Xiaomi wireless devices in the smart home ioBroker
Greetings to all home automation lovers. I decided to share the experience of using Xiaomi wireless devices with ZigBee interface. I, frankly, oppose the use of any wireless devices in any automation, from serious large-scale process control systems to small automation systems like fire alarm systems or smart homes, but ... Xiaomi solutions bribed with low cost, accessibility, excellent design and many positive reviews from users, I decided to try.
This post should be taken as step-by-step instructions for integrating ZigBee devices into the infrastructure of a smart home. Described here is by no means an axiom and you can find many other ways to connect ZigBee devices. If you still skip the detailed description, you can make an impression of the complexity or ease of combining devices from different manufacturers into one local platform using the example of ZigBee and ioBroker (more on this later). I will tell in this article how to connect devices to a smart home, display information from them on a tablet or simply in a browser and send messages via telegrams about changing the state of devices. If I am interested in you, then I ask for cat.
According to the manufacturer Xiaomi, users should use a native application with a cloud connection and a Wi-Fi gateway for ZigBee devices. However, it has long been known how to activate developer mode in an application for receiving a control token. Thus, within the local network, you can communicate with the gateway, which allows you to do the mihome driver that comes with ioBroker.
ioBroker is an open platform for IoT, including for building smart home systems. What is ioBroker can be read in the previous article .
')
Now my smart home is “spinning” on the Cubietruck ARM board with some “body kit” in the form of a 80GB hard drive, 5000 mAh rechargeable batteries, 1-wire USB network wizard, a USB-RS485 converter for polling devices using modbus protocol. Armbian OS is installed on the hard disk with the transfer of the root partition, only the boot loader remained on the microSD memory card.
I began my acquaintance with Xiaomi wireless devices by purchasing temperature and humidity sensors. At that time, the only way to integrate them was the mihome driver, which was mentioned above.
It is very easy to add a driver to the system; you need to click on the “+” button in the list of available drivers and observe the installation process.
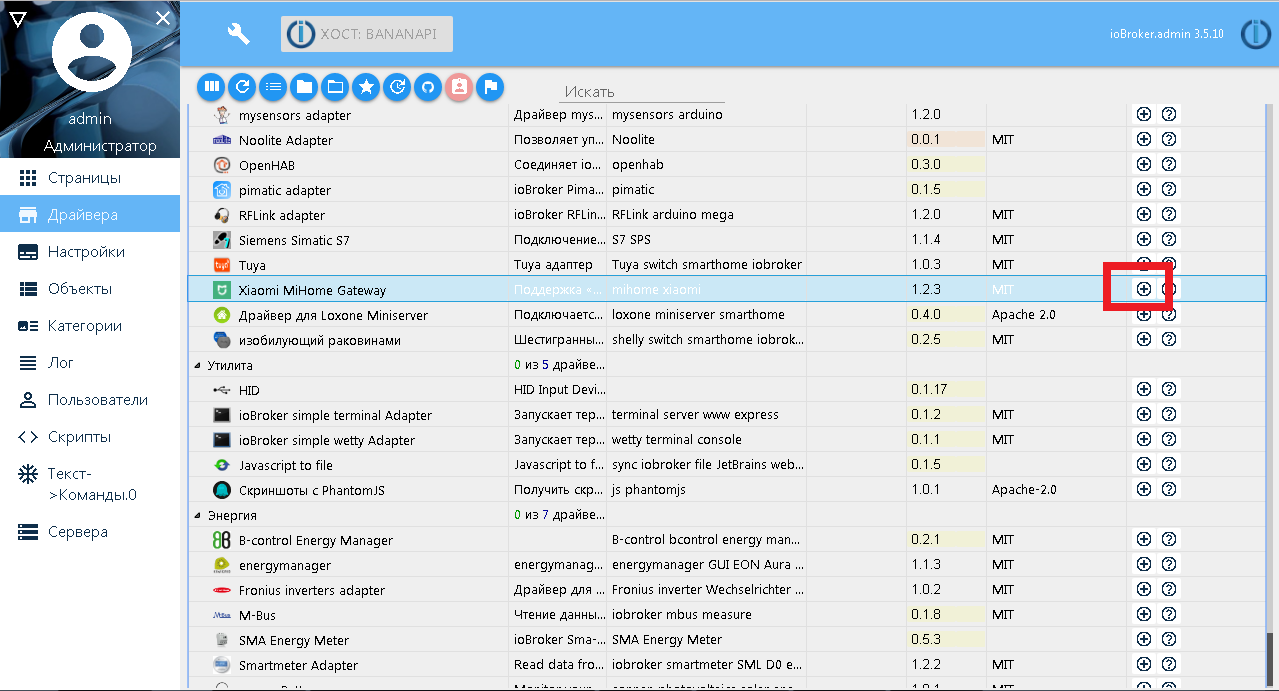
I will not describe the installation and initial setup of the native Android application Mi Home, you can see on the driver github page or on the Internet. So, the developer mode is activated, the token is received, we configure the adapter mihome, save and run, if it was not running.

The Xiaomi gateway and devices connected in the Mi Home application should appear in the object tree.
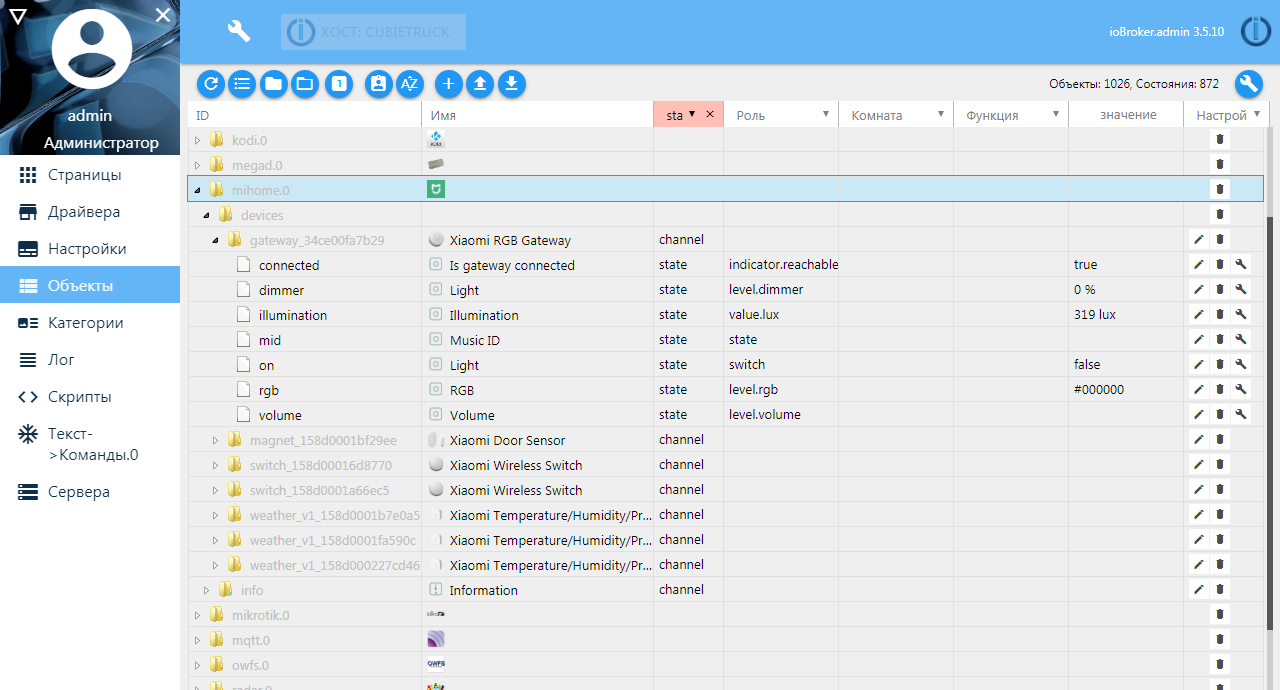
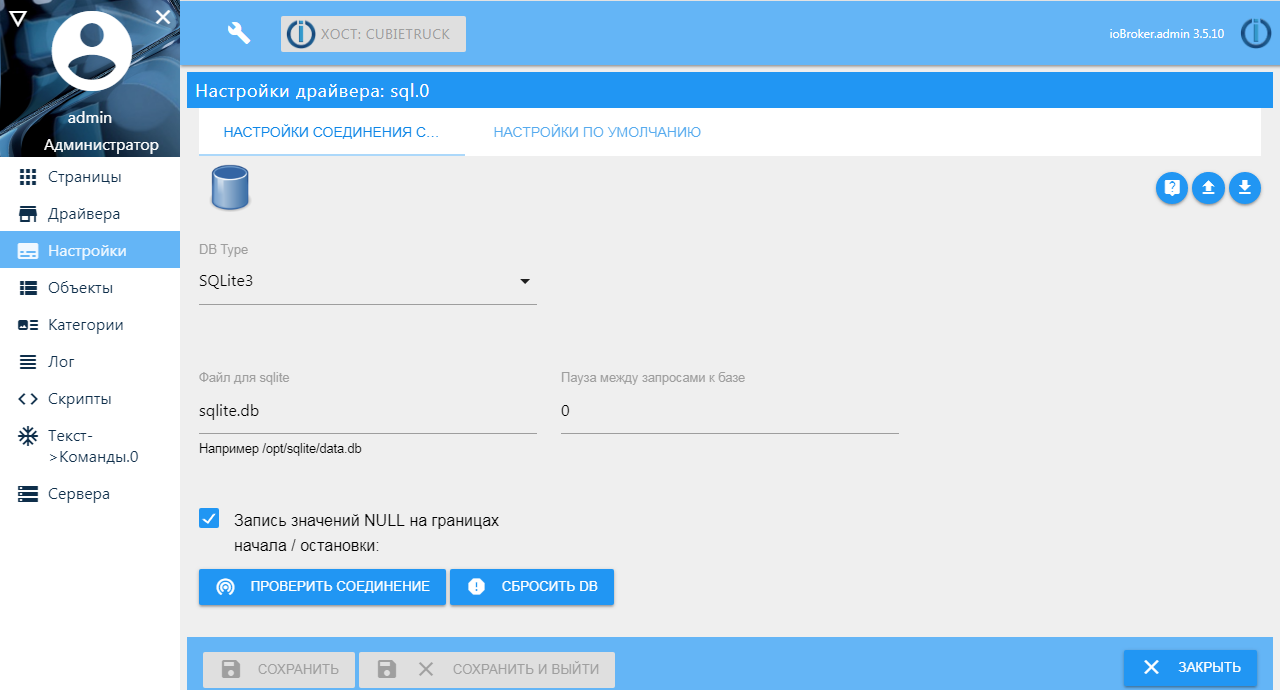
Then you can configure the newly created objects. For example, storing the history of temperature and humidity sensors. I use SQL driver for historical data with tuning to SQLite DB.
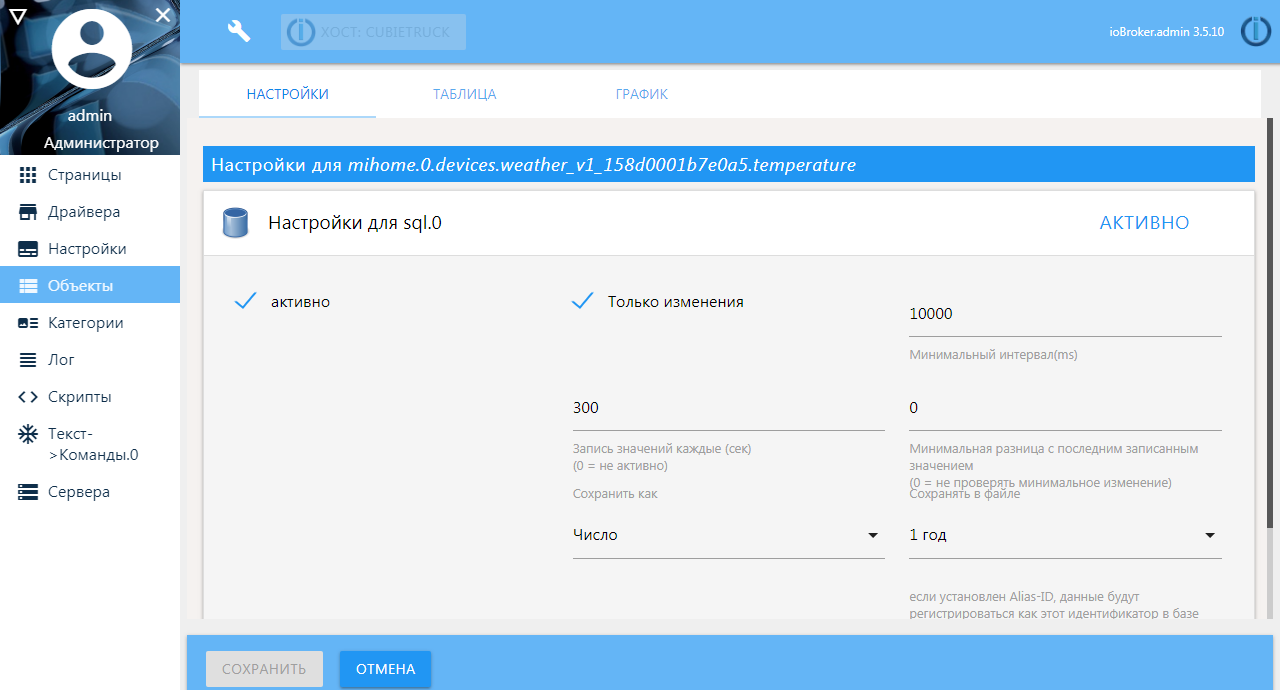
Setting the storage of the variable history is done in the system objects window: you need to get to the variable itself in the object hierarchy and click the button with a wrench on the right. On the “Settings” tab, the sensor history is activated on my sensors — only changes in the variable.
Other settings:
Adding new devices occurs through the native application. Those. You need to pair the new device with the gateway according to the attached instructions and after that it will automatically appear in the list of ioBroker objects.
It was inconvenient for me to use my native Xiaomi application, especially since I had to buy a gateway with a Chinese plug, which in my case, except for communicating with devices, was not useful for anything. Yes, it can be used as a night light, or you can use a light sensor in some scenarios. On the Internet, you can find instructions on how to feed the playlist to the gateway to play your own radio stations, but none of this stuck with me. Plus, the idea that my data was leaking somewhere, was being processed and stored, was haunted.
One of the active users of the ioBroker platform found on the Internet a zigbee-shepherd library on node.js, in which there was mention of connecting Xiaomi devices. A driver for ioBroker was written on its base, and the author of this driver was not limited to Xiaomi devices, the list of supported devices is constantly being updated and is available on the github project page.
As a network coordinator, it is supposed to use inexpensive ready-made devices based on TI's CC25xx chips. You can buy ready-made ZigBee modules with a USB connection and a built-in antenna, as well as more expensive and more serious models: with an external antenna, an amplifier, or a UART connection.
To work with the driver, you just need to change the firmware. Thus, it turns out that this driver does not need an expensive gateway, no Wi-Fi networks are needed. The “entry point” is the coordinator - a device based on the SS25xx chip with a special firmware. Through the coordinator, direct communication of the zigbee devices and the Smart Home system occurs, as well as the binding of new devices.
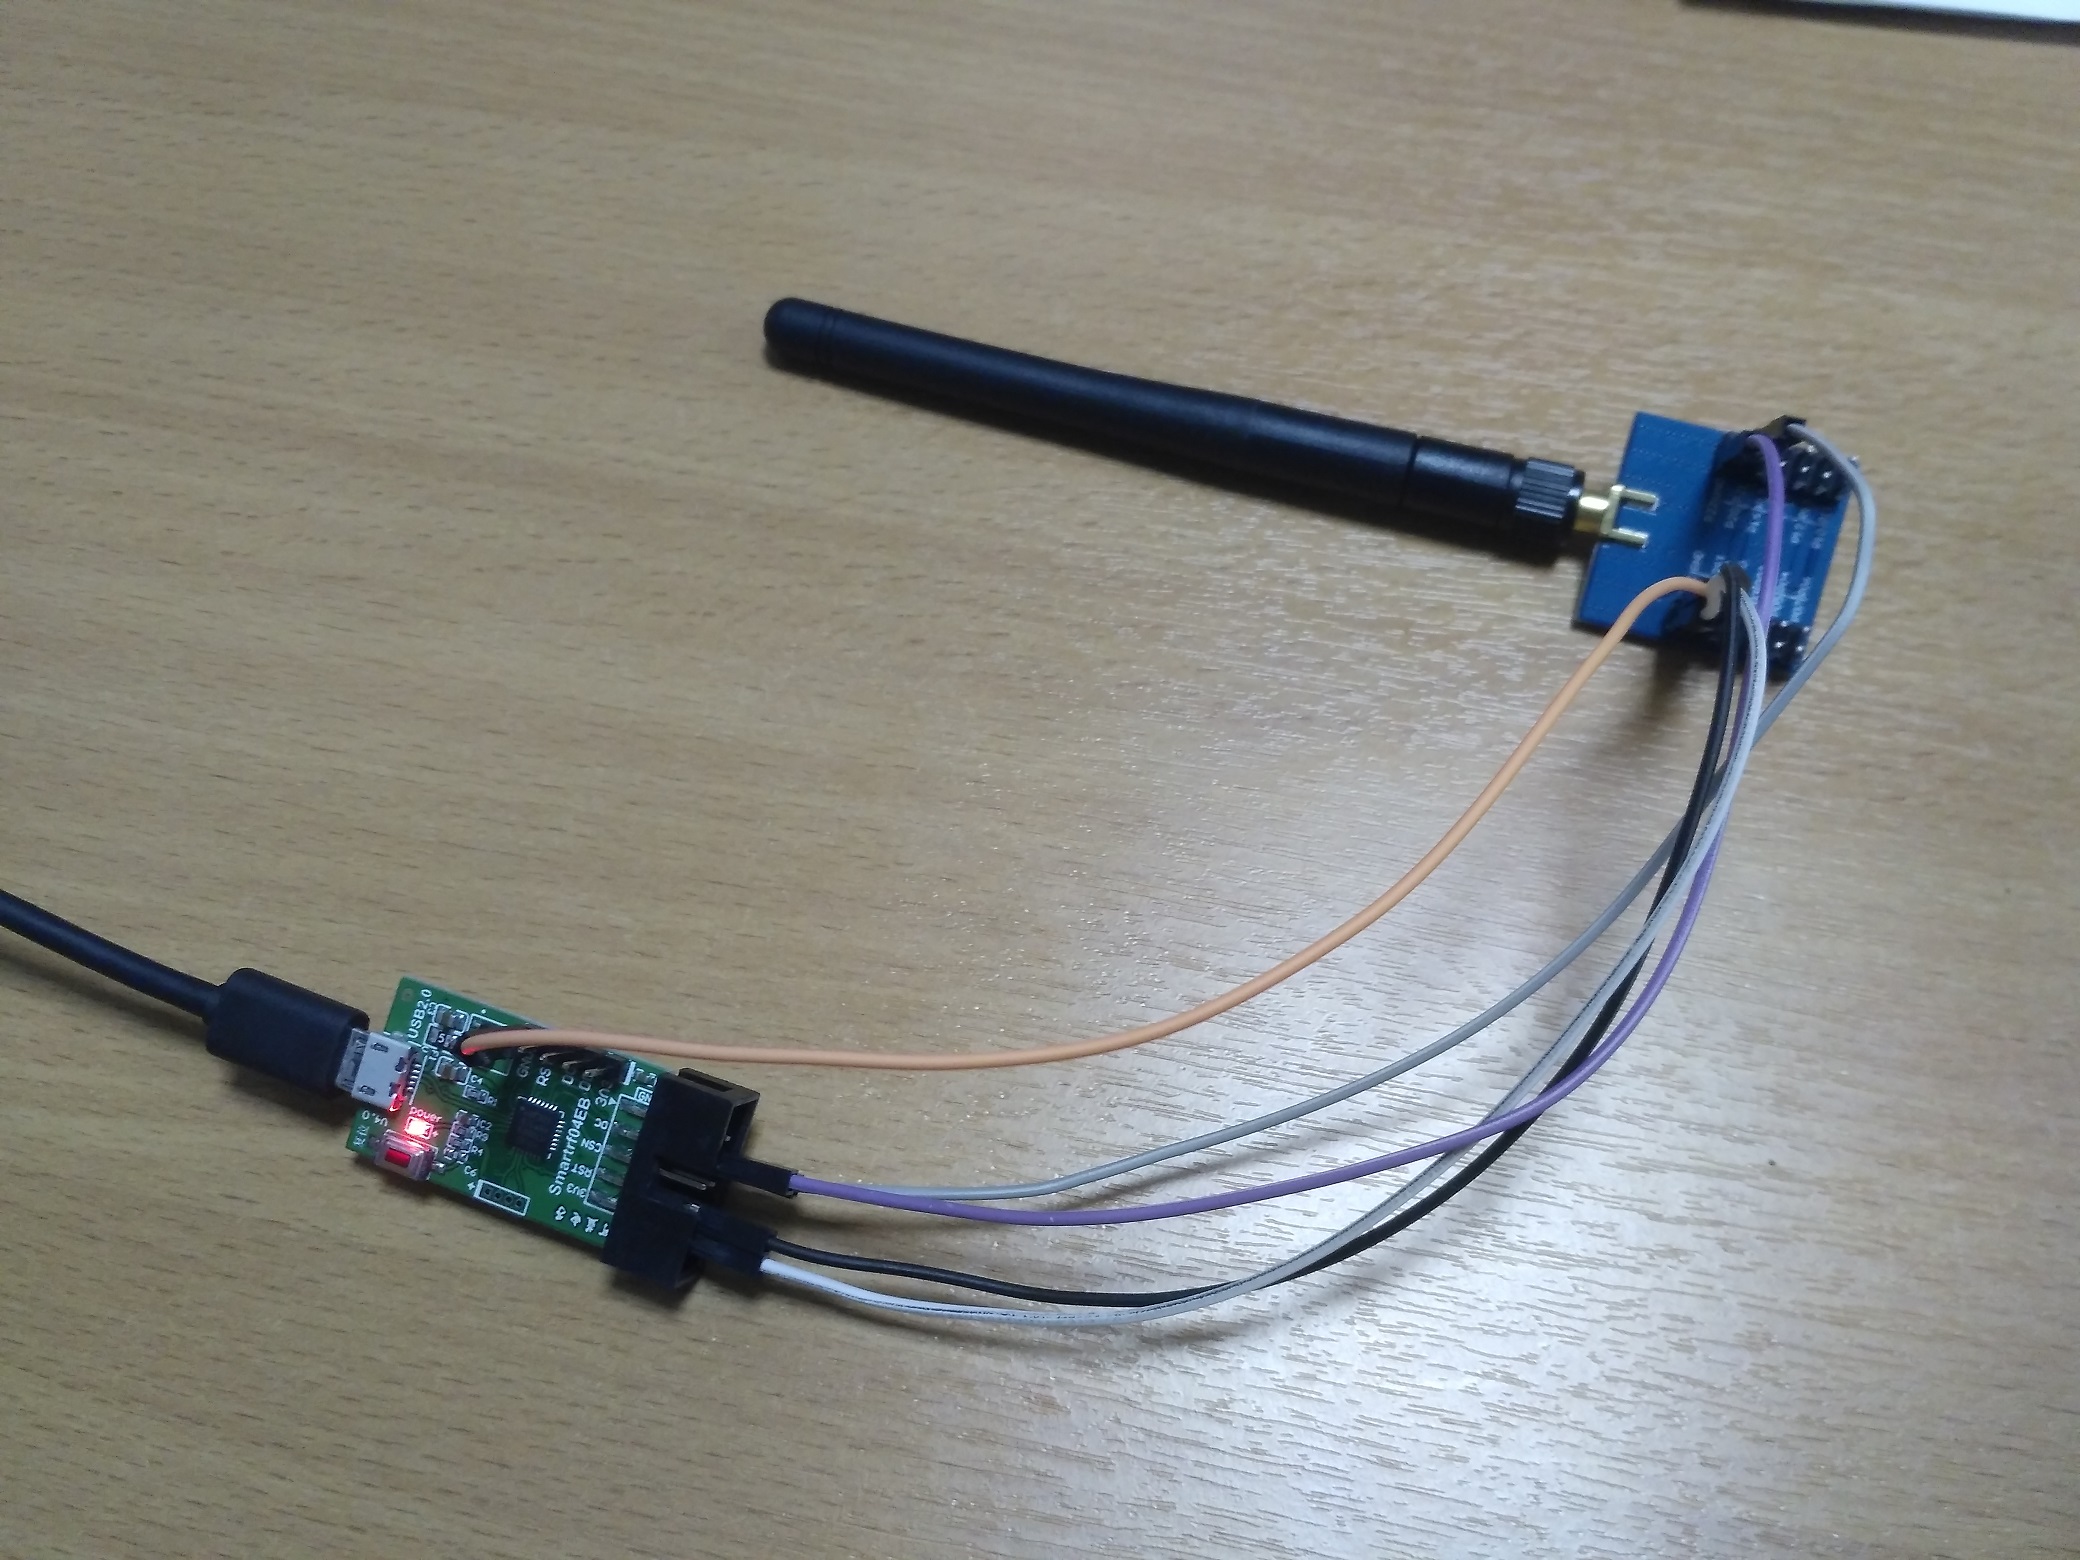
As a coordinator, I use a ready-made board based on the CC2530 chip with an external antenna, which I connected to the server through the UART.
A special debugger SmartRF04EB was bought for the firmware of the device; I connected the microUSB port to the computer and connected the ZigBee module using wiring for debugging according to the following scheme:
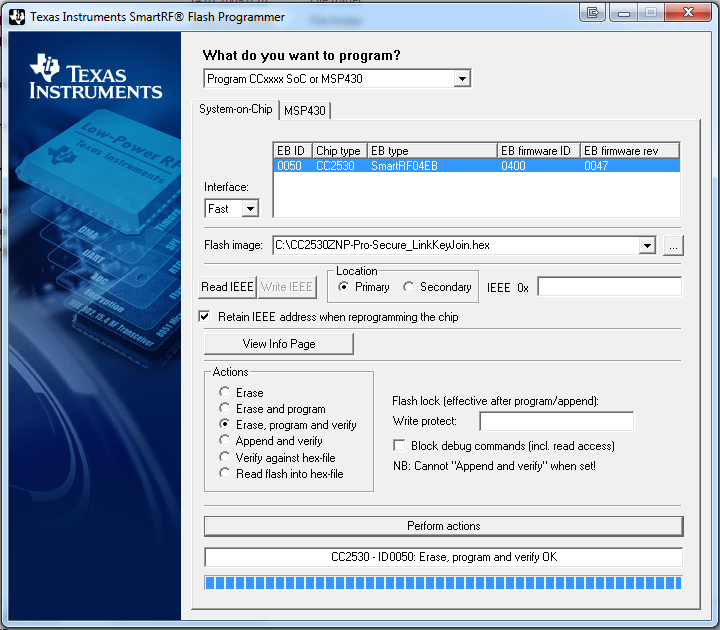
On the project's github page, download the firmware (the file for this device is called CC2530ZNP-Pro-Secure_LinkKeyJoin.hex) and the flash-programmer, after which the necessary drivers are added to the system.
When a debugger is connected to a USB port of a computer, the program will immediately display the connected device. You only need to specify the path to the firmware file and click the “Perform Actions” button
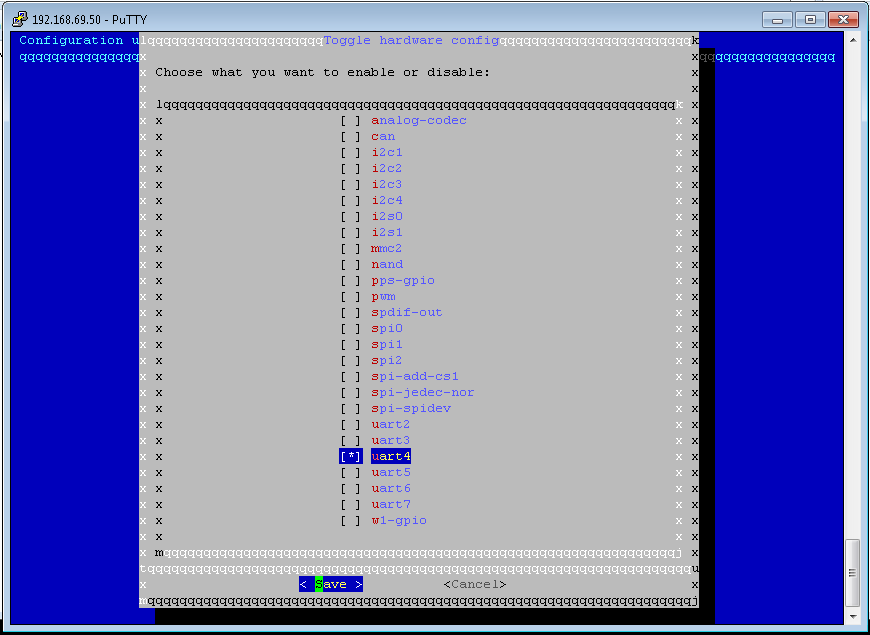
The ZigBee module with P03 (Rx) and P02 (Tx) ports is connected to UART4 (in OS as ttyS4) cubietruck boards, 3V3 power supply, GND picked up on neighboring pin. For stable operation, it is still necessary to pull the ports of the coordinator P20, P4, P5 to the ground. As I wrote above, I use Armbian OS, the UART port is activated very simply, using the armbian-config command in the System - Hardware section, you need to activate the required port and reboot the system.
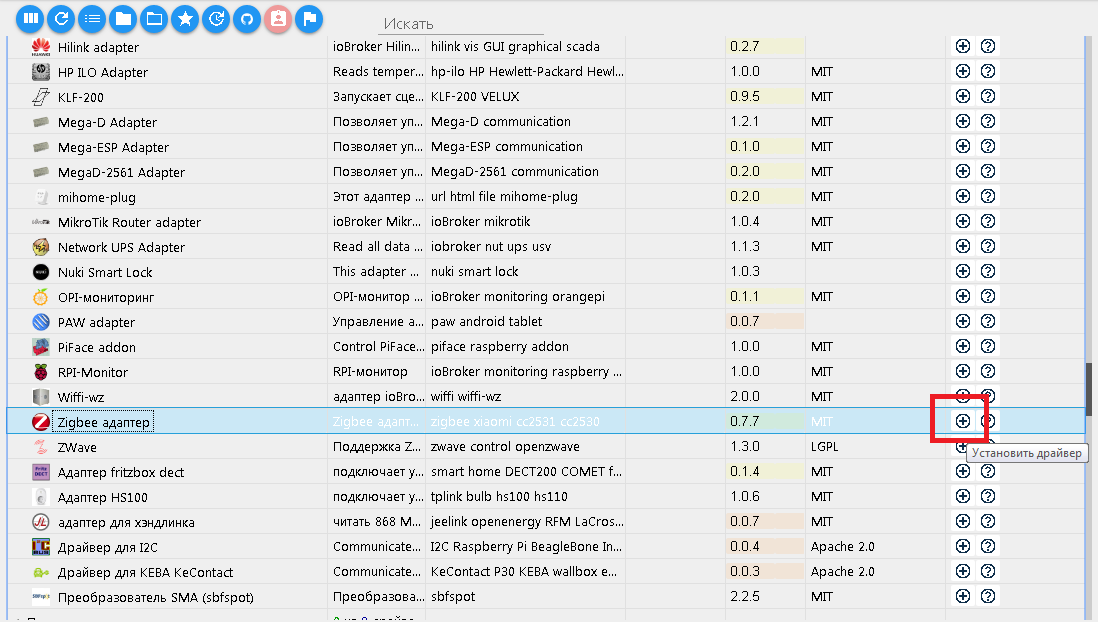
The zigbee driver is added from the admin with one click.
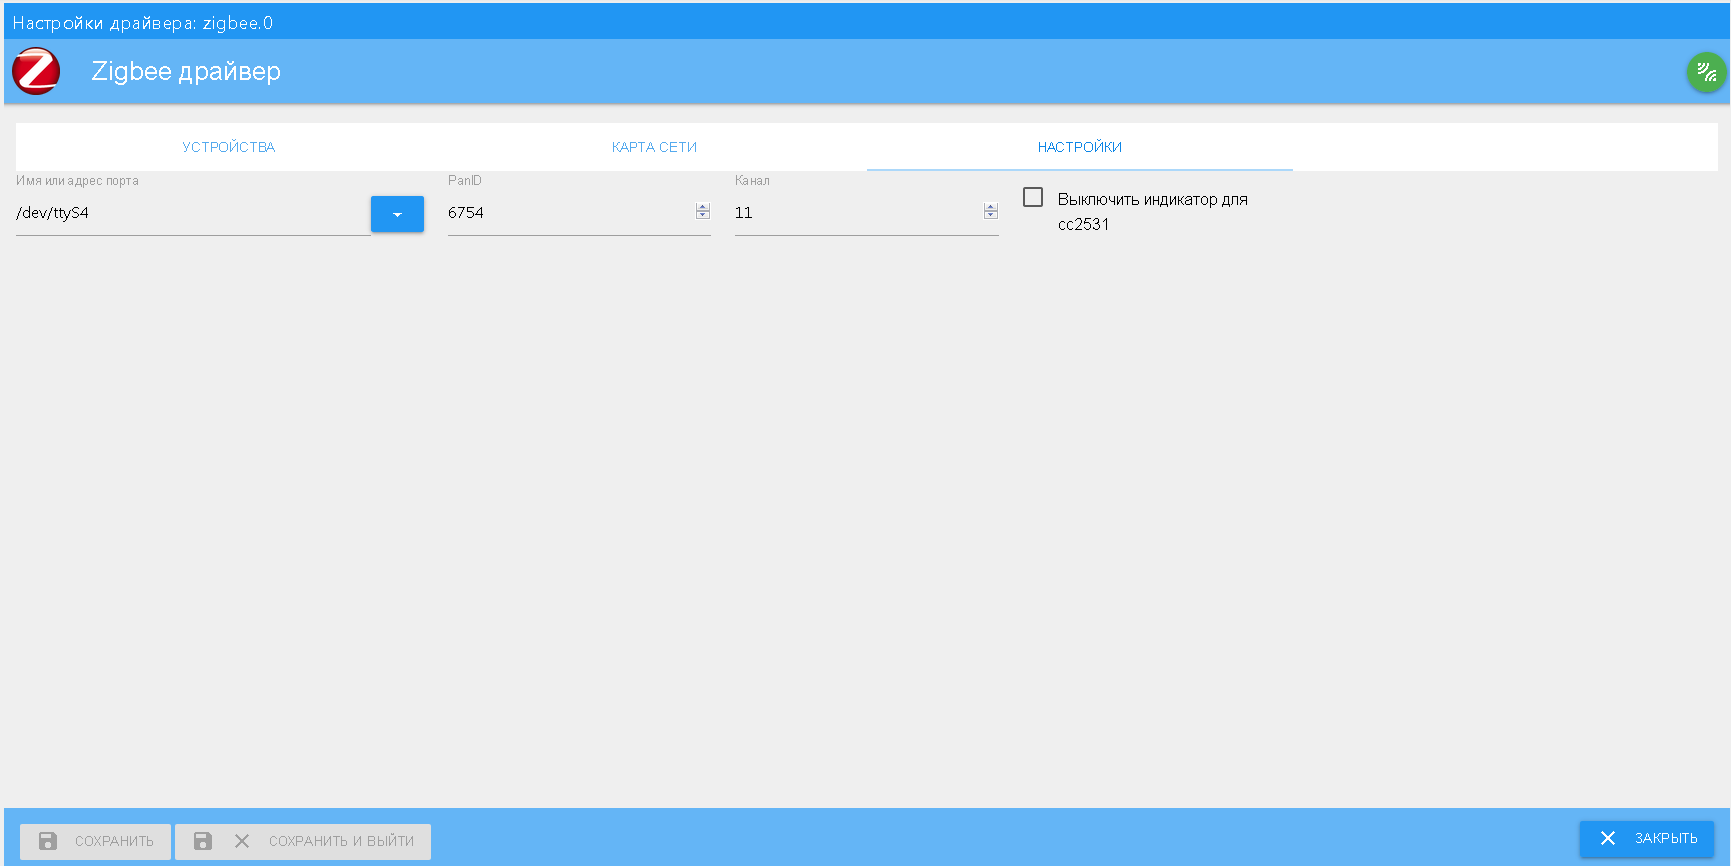
In my case, the coordinator is connected to the / dev / ttyS4 port (as I wrote above), we specify it in the settings.
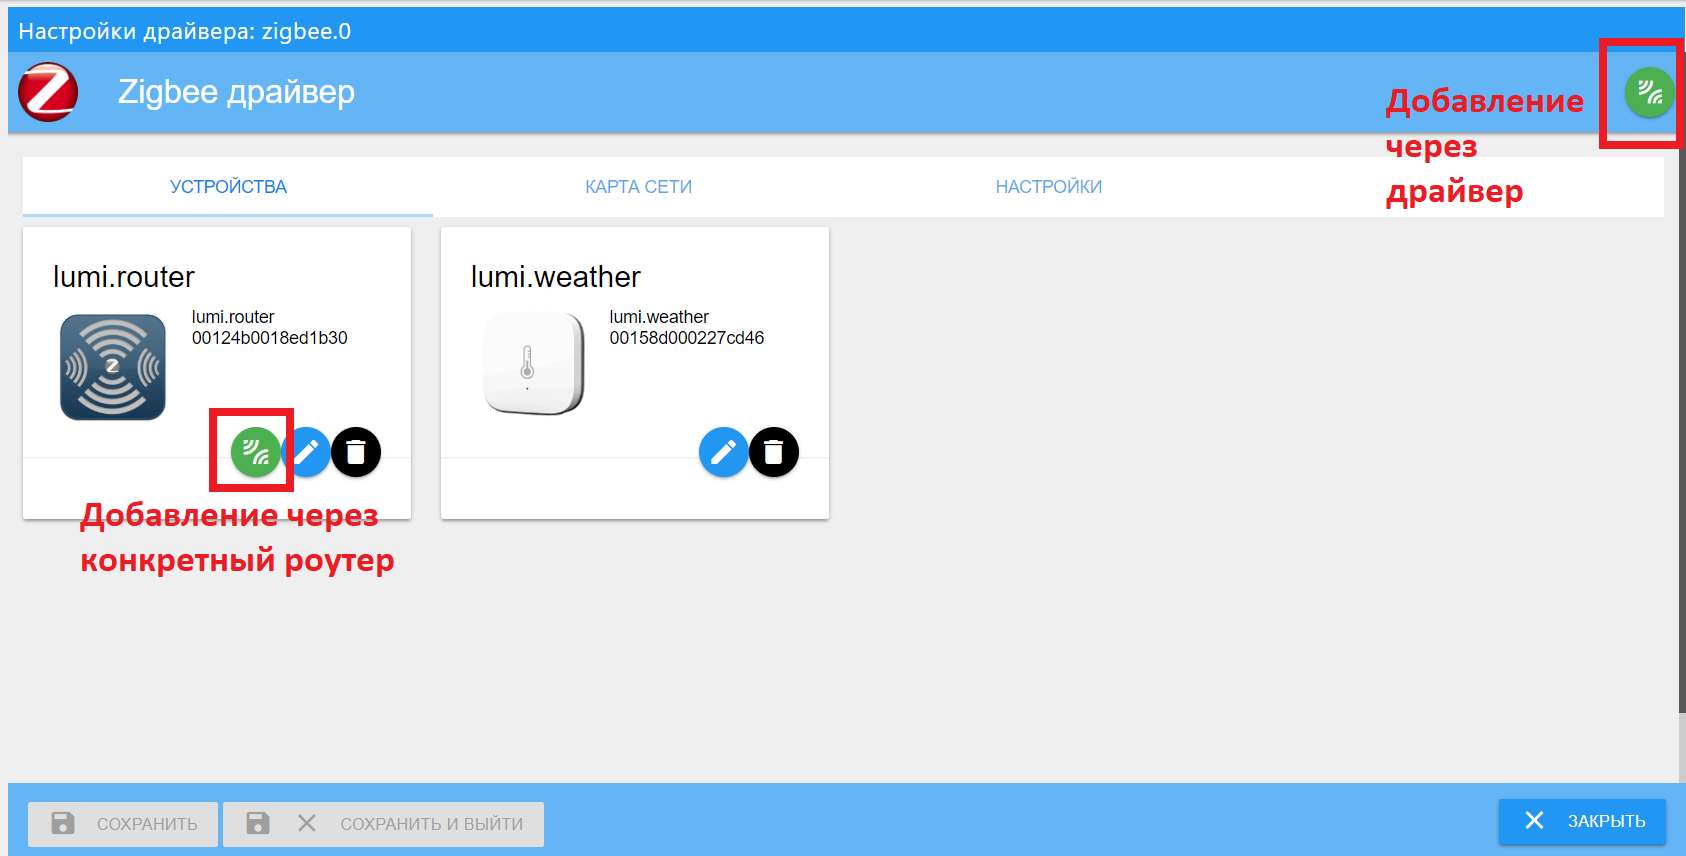
The remaining settings can be left as default. After the first launch of the driver, you need to pair (add) devices. The full github manual, pairing through this driver is a bit more complicated than through the native application, but I haven't had any problems.
So, for example, let's add the Xiaomi button (Mijia series), to do this, press the green button in the driver settings and, following the instructions, first hold down the pairing button on the back side with a clip until the LED starts blinking, then click this button for about 2 seconds, see mating progress.
My apartment is not big, communication with all devices is stable, even with the door opening sensor on the landing (RC wall 100 mm and distance 5 m in a straight line). The problems started when I decided to add a temperature and humidity sensor for outdoor air, which I installed on the outer wall of the house from the side of the insulated loggia. The signal of a weak sensor, which was also on the street, did not reach the automation cabinet. You can solve the problem simply - you need to add a router to the ZigBee network and place it closer to the sensor. Some wireless devices, for example, the Xiaomi socket may work as a router, but I did not have such devices. I didn’t want to buy an expensive outlet or a controlled light bulb only for “forwarding” data from a sensor on the street. As it turned out, for the same terminal devices based on the SS25xx chip there is a special firmware that allows them to be used as a router in the system. As a result, I added a router based on the CC2531 chip with a USB connection. I will not dwell on the firmware process in detail, the diagram and the firmware file itself can be found on the project's github page.
As a matter of fact, there is no communication with the module via the USB port, I temporarily plugged it into charging with the USB port and plugged it into a power outlet in the kitchen. In the near future I plan to locate permanently in a normal building on the loggia and with normal power from a home UPS.
The process of adding a router to the system is simple: we press the pairing button in the driver and on the switched on router we press the S2 button several times until the devices are connected.
For example, let's add a temperature / humidity sensor that I placed on the loggia outside and that should work through a router.
You can simply do the pairing through the driver and the sensor should connect through the router, if it is closer. But you can forcibly indicate that the pairing goes through a specific router. To do this, in the list of devices on the router's icon, press the green pairing button.
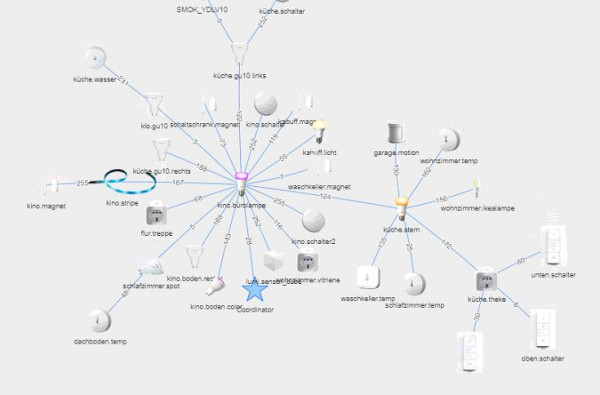
Make sure that the sensor is correctly connected - let's see the network map.
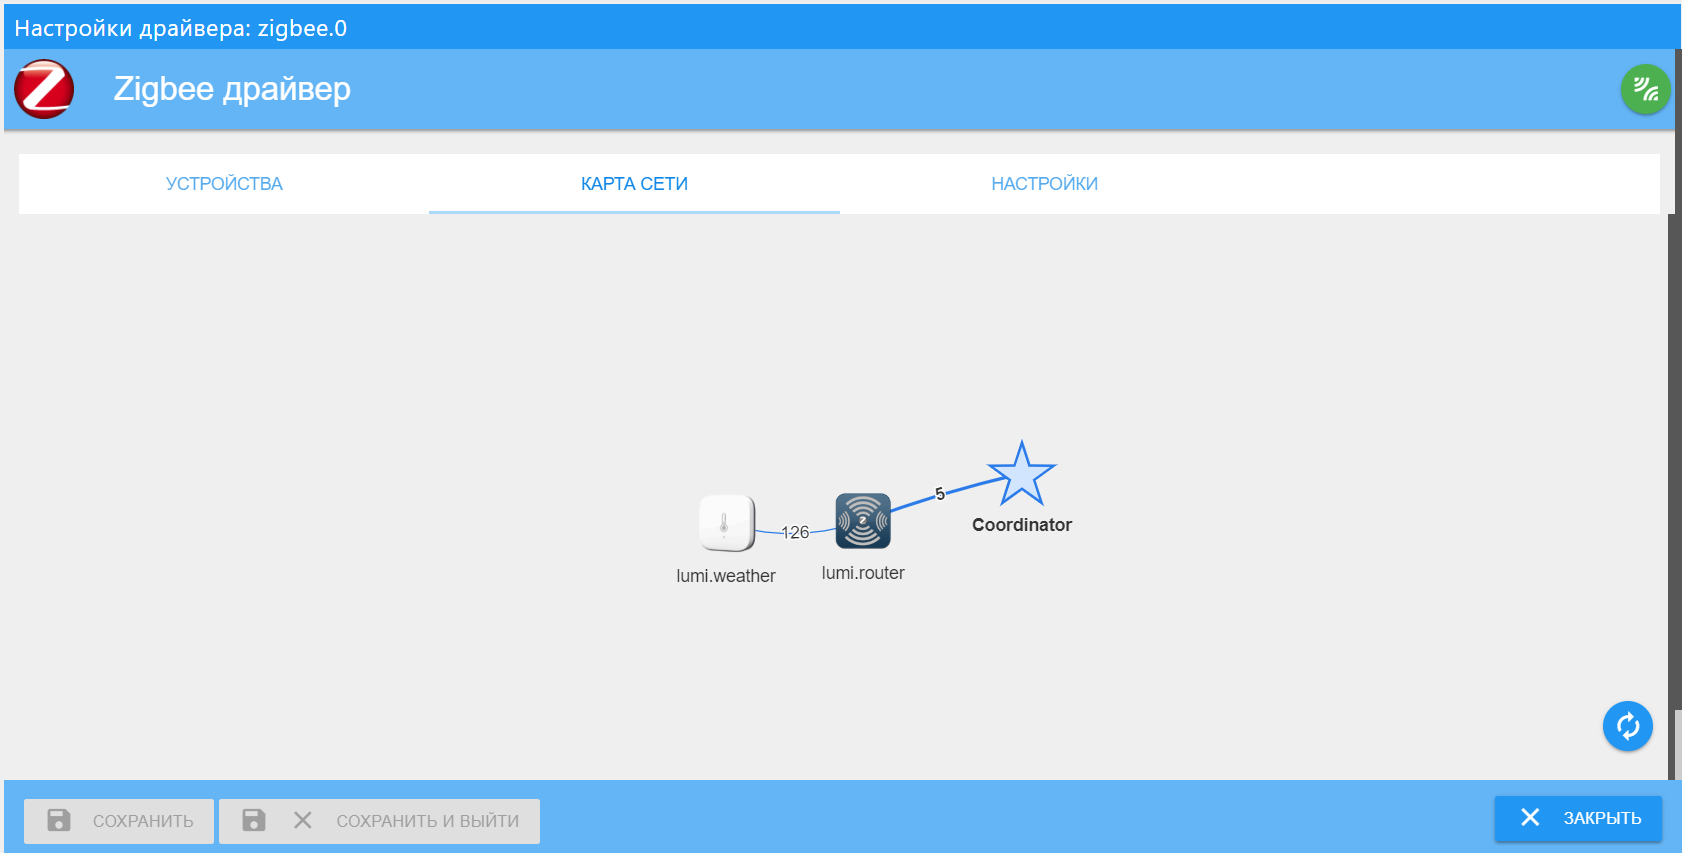
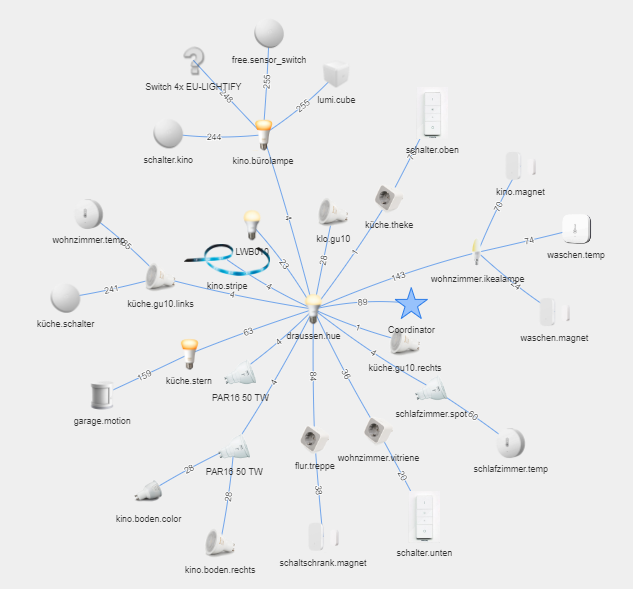
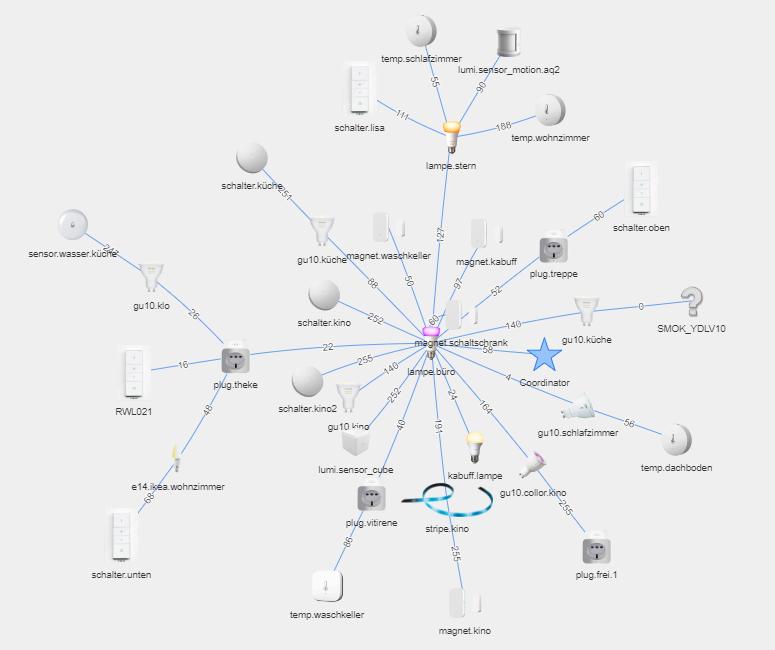
The map shows device pairing lines with an indication of the signal quality between network segments. As I wrote above, I have a small odnushka of 35 sq.m., therefore the map is rather modest. With the permission of other users, I will publish possible options with the map more.
The functionality of some Xiaomi devices through this adapter is even slightly larger than through the native application and the mihome driver. In the future I want to expand the network a little and try new devices, in particular, a smart drive for curtains and a sensor cube.
We received the data, the executive mechanisms were tied, what now to do with them? To begin, let's display in a beautiful interface. I have a big project in the VIS driver, which exists in several versions for different resolutions, but there is enough material for a separate article. Maybe she will be next.
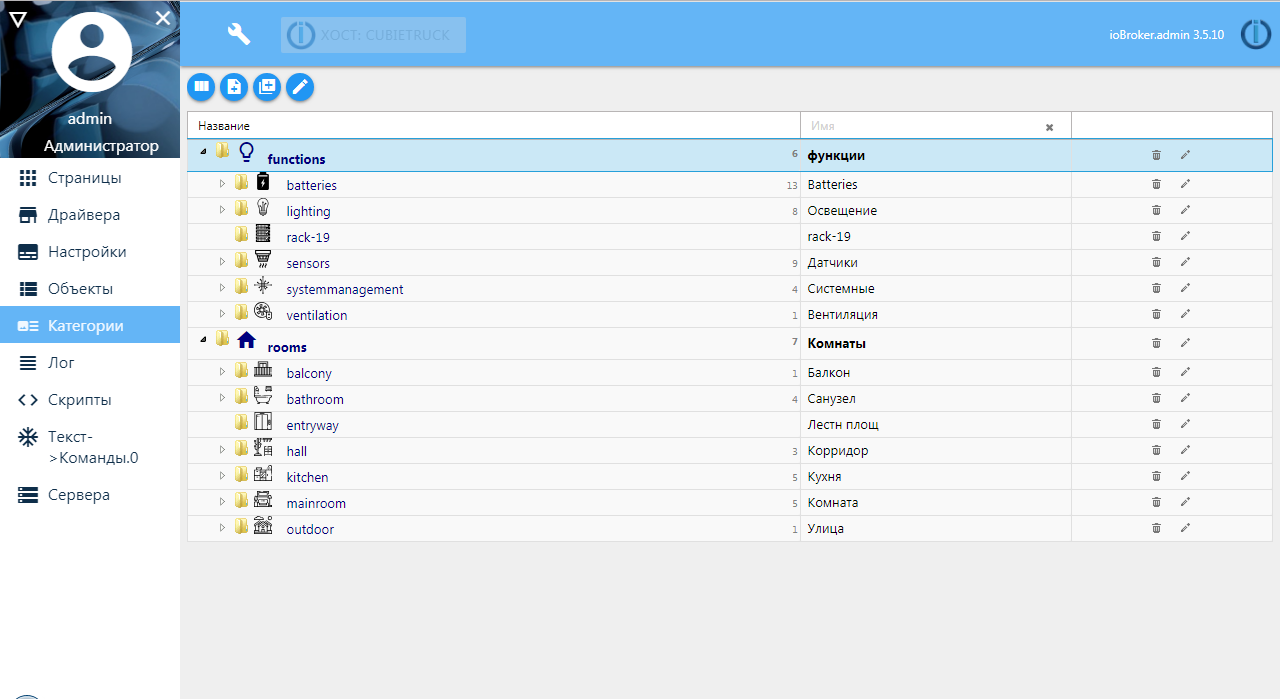
For simple and quick display of data and control of various devices, I use the driver material. Installation as usual in a couple of clicks. Interface tiles display data based on category settings, which are added to the interface admin window of the same name. The list of categories is limited only by fantasy, I use the “room-function” scheme, and grouping takes place according to them. Added all rooms (kitchen, corridor, room, balcony, etc.) and functions (lighting, sensors, system, etc.).
Now in the settings window of the system objects, it is necessary for the variables to be displayed on the screen, specify the room, the function and assign the role (for the correct display). An example is a Xiaomi room wall temperature and humidity sensor connected via Bluetooth.
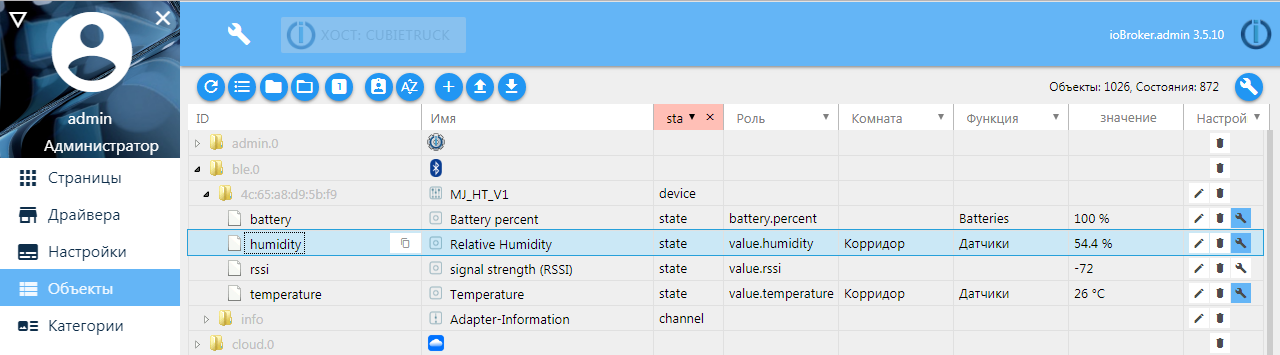
Based on these settings, the tile will display the data, the icon will be pulled, and controls of a certain type will be available.
Example 1. Displaying all information on one category - functions. Lighting throughout the apartment.
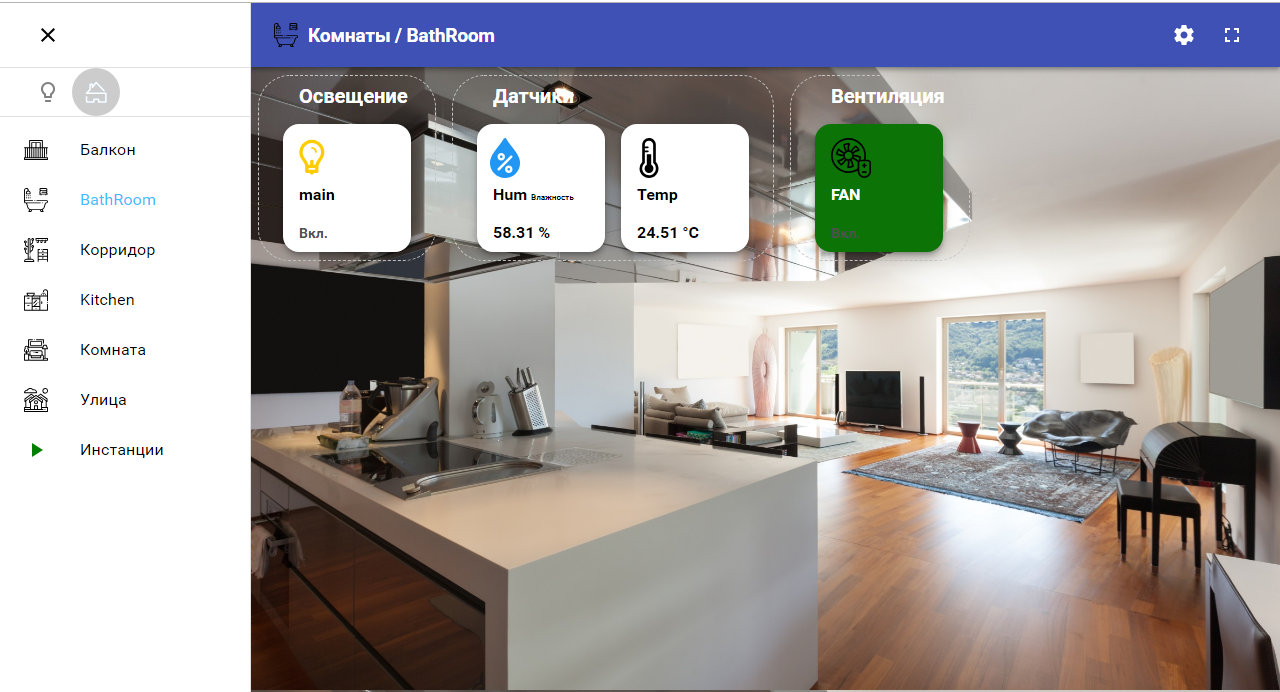
Example 2. Displaying all information about a room - Bathroom.
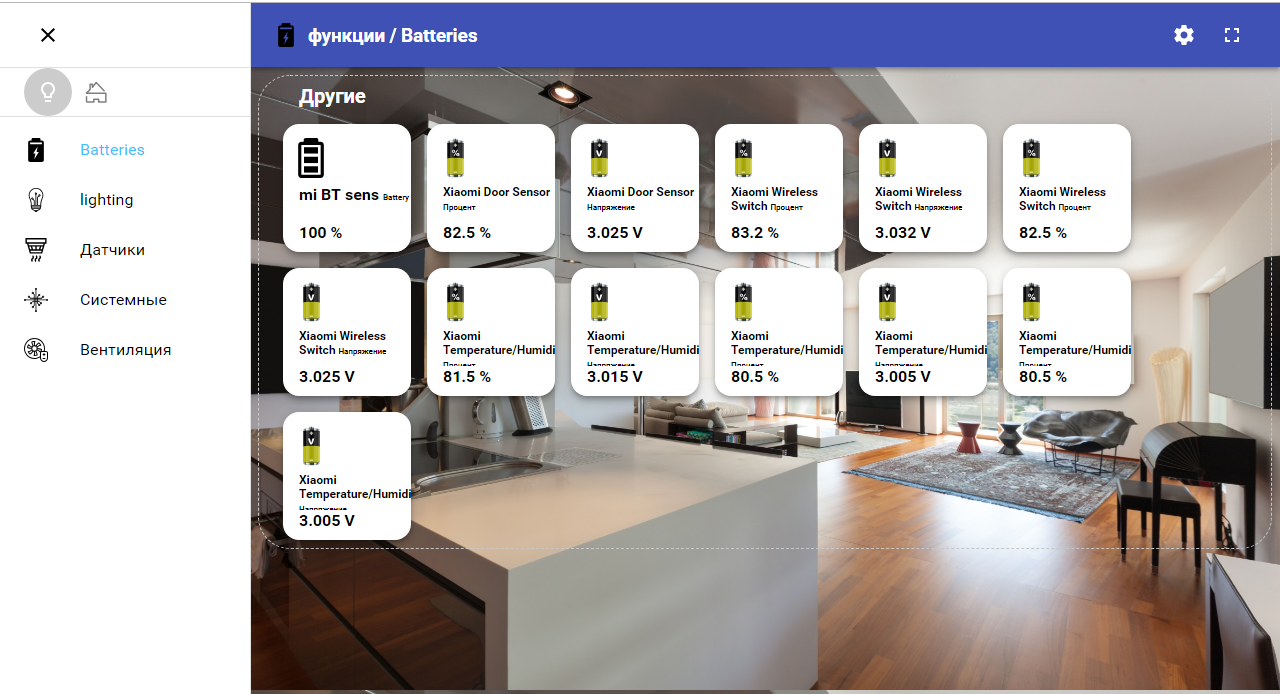
Example 3. Voltage and battery discharge level of all Xiaomi wireless devices.
This driver works for me for local management of the system from a mobile phone, a stationary tablet on the wall. Sometimes I connect via VPN. To control and view the states remotely, receive notifications, I use the telegram driver.
I will not describe the installation, just go over the settings. I use the mode of operation through periodic polling (by default 300ms) and connection through a proxy server. To get the token, you need a little "talk" with the bot creator - BotFather. The process is simple - find the search for this bot, give the command to create a new one, specify its unique name and your key, specify it in the driver settings and, for safety, be sure to specify the “welcome” password. His bot will ask you when communicating with a new user.
Now you need to configure communication cases through the bot. You can use the text2command driver or JavaScript for this. So historically, I use javascript in both text and Blockly blocks. Installing the JS driver should not cause difficulties, the setting in this case is not needed. After installation and launch, you need to enable the display of the menu to create and edit scripts.
Example 1. Alerts.
To begin, let's try to send a notification of the opening, for example, the front door. I have a sensor-reed wireless Xiaomi on the front door. Monitor as a wife walks with small while I'm at work. Create a new script in the common group.
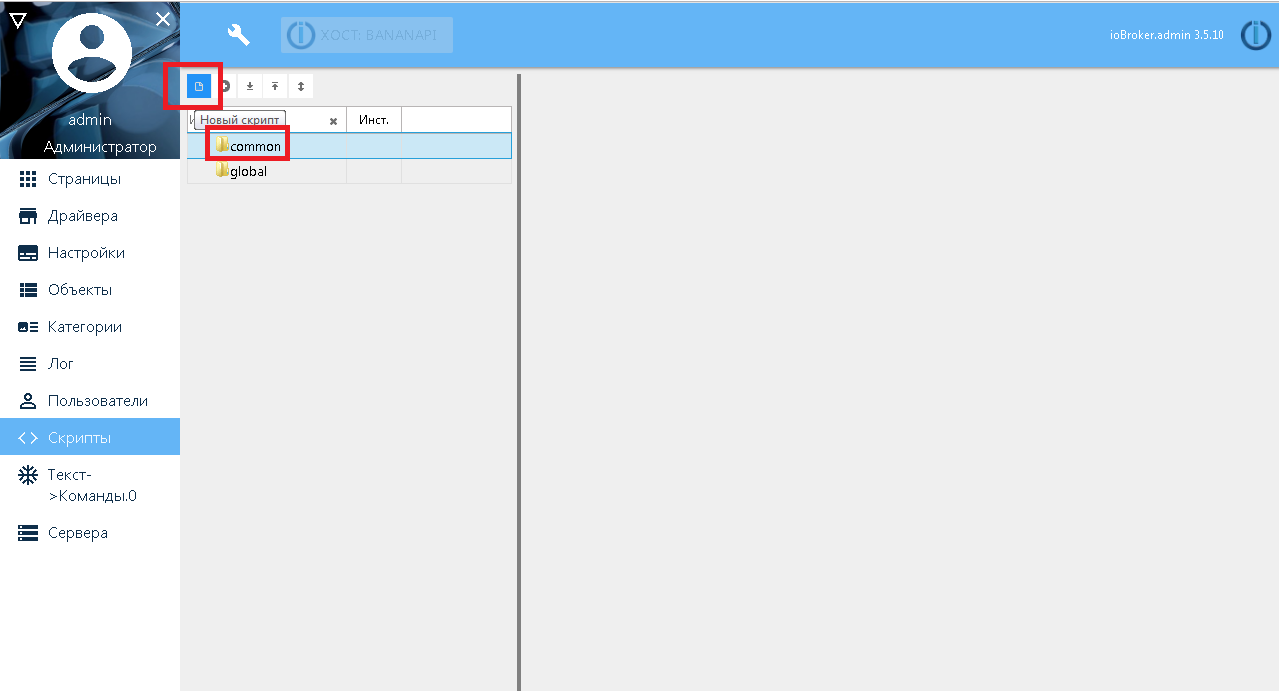
Specify what will “draw” in blockly and call it “telegram_bot”.
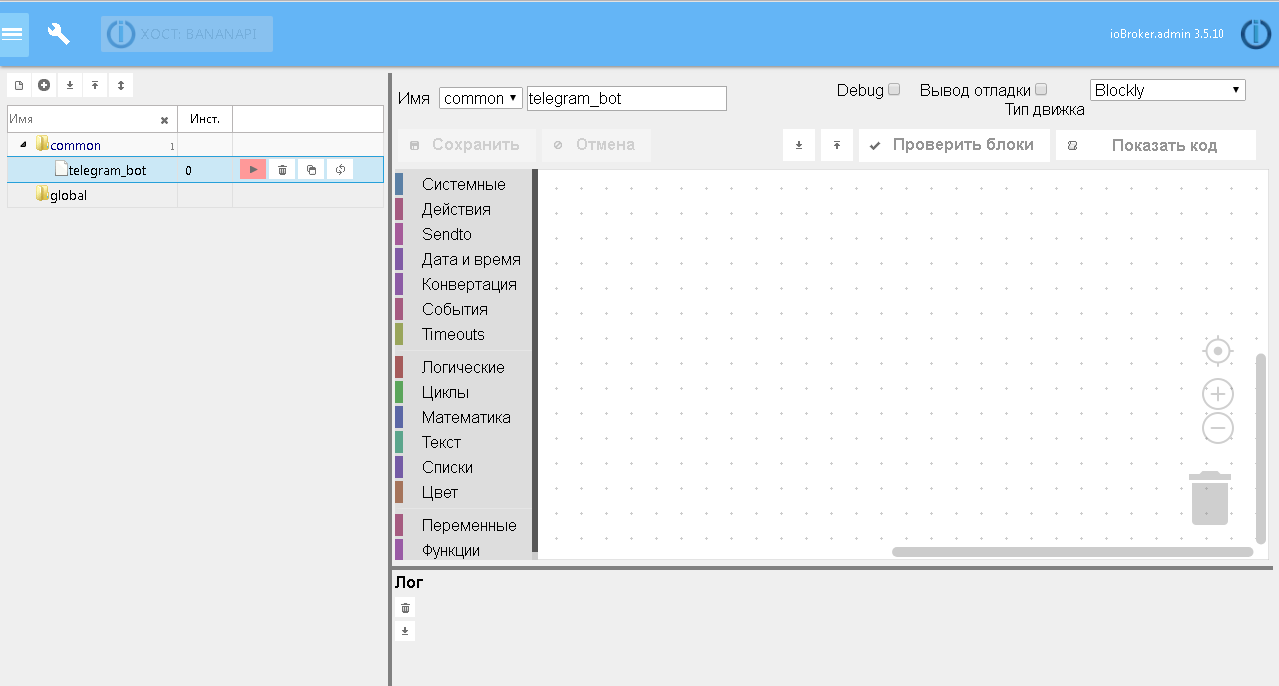
In the "Events" group, we take the block of reaction to changing a variable and drag it to the working field.
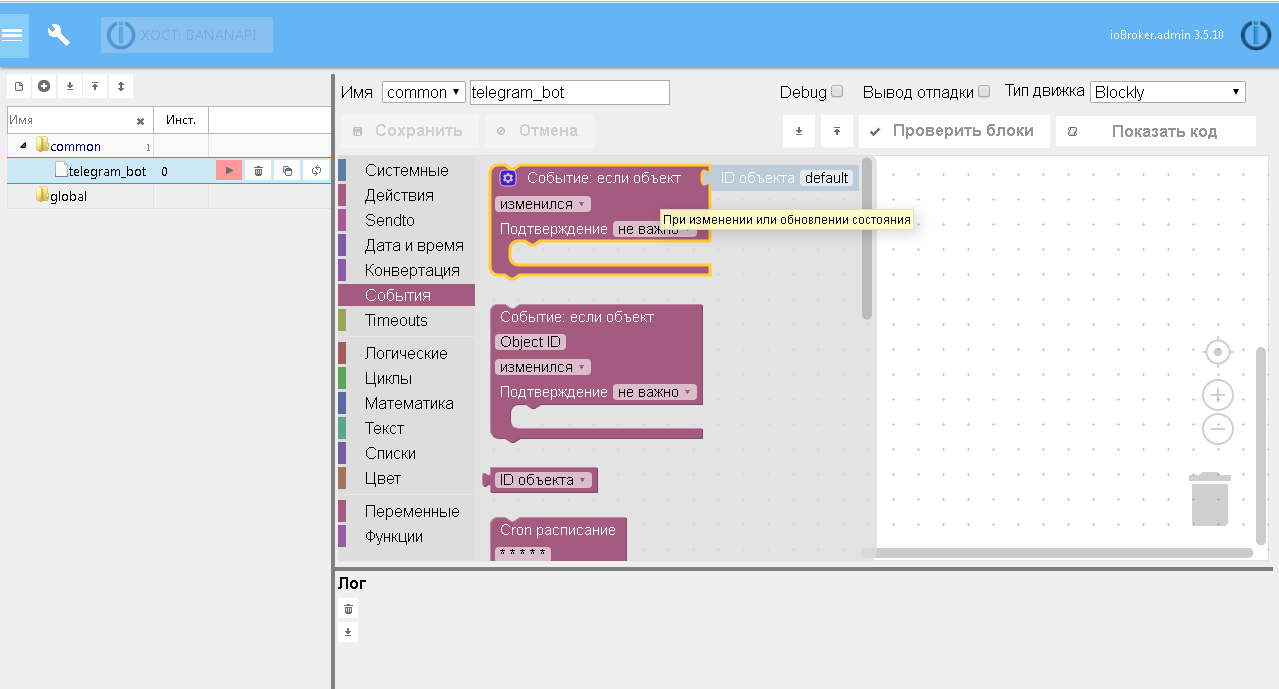
Next, we select the object ID for which we subscribe, we insert the object check through “if” - “otherwise if” to the value true / false. In the end, you should get something like the following.
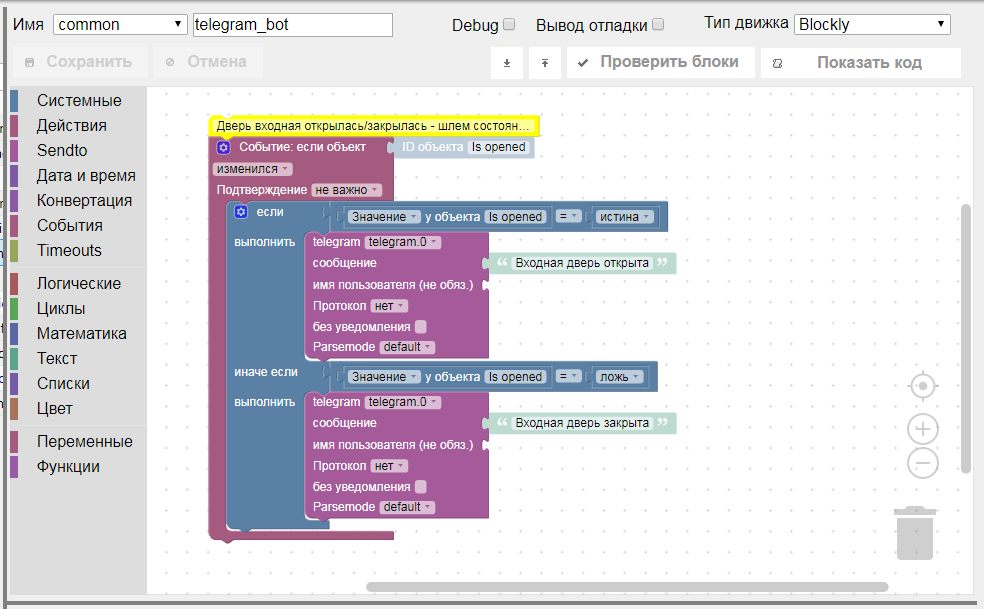
Great, now run, open the door - close the door and see the messages in the telegram.

Example 2. Lighting control through the menu.
An example is more complicated, let's make the lighting control using the menu buttons in the telegram. Here you will have to give a little bit of code, i.e. When creating a script, you need to select JS. The task is something like this: make the buttons in the form of a menu with the status of the lights immediately in the text of the buttons. Still try to make sure that when you press the button, the state of lighting is inverted and the status is immediately updated in the text of the button by the appearance / disappearance of the light bulb. Plus, if the menu has already been started and manually turned on / off the light, it is necessary that the menu is also updated with the status of the lights.
The code contains comments and is relatively not complicated:
The result should be something like this:

The article turned out to be a long one, but I hope it is useful, and it may make life easier for some users or encourage someone to create their own smart home.
At the moment, my ioBroker-based smart home system has been “spinning” for 4 years now and I’m quite happy with it. In addition to ZigBee, it also has several self-made MQTT and HTTP controllers for controlling lighting, ventilation and other systems, a network of temperature sensors on the 1-wire bus, a device for monitoring the electrical parameters of the RS485 bus and the modbus RTU protocol, and much more.
In my piggy bank of solutions for a smart home, many ideas have accumulated, although they probably should be perceived rather as a piggy bank of problems for a smart home (those in the subject will understand what I mean). Leave your wishes in the comments to help me decide on the topic of the next article.
This post should be taken as step-by-step instructions for integrating ZigBee devices into the infrastructure of a smart home. Described here is by no means an axiom and you can find many other ways to connect ZigBee devices. If you still skip the detailed description, you can make an impression of the complexity or ease of combining devices from different manufacturers into one local platform using the example of ZigBee and ioBroker (more on this later). I will tell in this article how to connect devices to a smart home, display information from them on a tablet or simply in a browser and send messages via telegrams about changing the state of devices. If I am interested in you, then I ask for cat.
According to the manufacturer Xiaomi, users should use a native application with a cloud connection and a Wi-Fi gateway for ZigBee devices. However, it has long been known how to activate developer mode in an application for receiving a control token. Thus, within the local network, you can communicate with the gateway, which allows you to do the mihome driver that comes with ioBroker.
ioBroker is an open platform for IoT, including for building smart home systems. What is ioBroker can be read in the previous article .
')
Now my smart home is “spinning” on the Cubietruck ARM board with some “body kit” in the form of a 80GB hard drive, 5000 mAh rechargeable batteries, 1-wire USB network wizard, a USB-RS485 converter for polling devices using modbus protocol. Armbian OS is installed on the hard disk with the transfer of the root partition, only the boot loader remained on the microSD memory card.
I began my acquaintance with Xiaomi wireless devices by purchasing temperature and humidity sensors. At that time, the only way to integrate them was the mihome driver, which was mentioned above.
Mihome driver
It is very easy to add a driver to the system; you need to click on the “+” button in the list of available drivers and observe the installation process.
I will not describe the installation and initial setup of the native Android application Mi Home, you can see on the driver github page or on the Internet. So, the developer mode is activated, the token is received, we configure the adapter mihome, save and run, if it was not running.
The Xiaomi gateway and devices connected in the Mi Home application should appear in the object tree.
Then you can configure the newly created objects. For example, storing the history of temperature and humidity sensors. I use SQL driver for historical data with tuning to SQLite DB.
Setting the storage of the variable history is done in the system objects window: you need to get to the variable itself in the object hierarchy and click the button with a wrench on the right. On the “Settings” tab, the sensor history is activated on my sensors — only changes in the variable.
Other settings:
- the minimum interval is 10 seconds - if the variable changes more often, the record in the database will be ignored
- recording values every 300 seconds (5 minutes) - if the variable does not change for more than 5 minutes, the current value will still be written to the database
- value type - number
- shelf life - 1 year
Adding new devices occurs through the native application. Those. You need to pair the new device with the gateway according to the attached instructions and after that it will automatically appear in the list of ioBroker objects.
Zigbee driver
It was inconvenient for me to use my native Xiaomi application, especially since I had to buy a gateway with a Chinese plug, which in my case, except for communicating with devices, was not useful for anything. Yes, it can be used as a night light, or you can use a light sensor in some scenarios. On the Internet, you can find instructions on how to feed the playlist to the gateway to play your own radio stations, but none of this stuck with me. Plus, the idea that my data was leaking somewhere, was being processed and stored, was haunted.
One of the active users of the ioBroker platform found on the Internet a zigbee-shepherd library on node.js, in which there was mention of connecting Xiaomi devices. A driver for ioBroker was written on its base, and the author of this driver was not limited to Xiaomi devices, the list of supported devices is constantly being updated and is available on the github project page.
As a network coordinator, it is supposed to use inexpensive ready-made devices based on TI's CC25xx chips. You can buy ready-made ZigBee modules with a USB connection and a built-in antenna, as well as more expensive and more serious models: with an external antenna, an amplifier, or a UART connection.
To work with the driver, you just need to change the firmware. Thus, it turns out that this driver does not need an expensive gateway, no Wi-Fi networks are needed. The “entry point” is the coordinator - a device based on the SS25xx chip with a special firmware. Through the coordinator, direct communication of the zigbee devices and the Smart Home system occurs, as well as the binding of new devices.
As a coordinator, I use a ready-made board based on the CC2530 chip with an external antenna, which I connected to the server through the UART.
A special debugger SmartRF04EB was bought for the firmware of the device; I connected the microUSB port to the computer and connected the ZigBee module using wiring for debugging according to the following scheme:
| SS2530 | SmartRF04EB board |
|---|---|
| P22 | DC |
| P21 | DD |
| Rst | RESET |
| GND | GND |
| VCC | 3.3V |
On the project's github page, download the firmware (the file for this device is called CC2530ZNP-Pro-Secure_LinkKeyJoin.hex) and the flash-programmer, after which the necessary drivers are added to the system.
When a debugger is connected to a USB port of a computer, the program will immediately display the connected device. You only need to specify the path to the firmware file and click the “Perform Actions” button
The ZigBee module with P03 (Rx) and P02 (Tx) ports is connected to UART4 (in OS as ttyS4) cubietruck boards, 3V3 power supply, GND picked up on neighboring pin. For stable operation, it is still necessary to pull the ports of the coordinator P20, P4, P5 to the ground. As I wrote above, I use Armbian OS, the UART port is activated very simply, using the armbian-config command in the System - Hardware section, you need to activate the required port and reboot the system.
The zigbee driver is added from the admin with one click.
In my case, the coordinator is connected to the / dev / ttyS4 port (as I wrote above), we specify it in the settings.
The remaining settings can be left as default. After the first launch of the driver, you need to pair (add) devices. The full github manual, pairing through this driver is a bit more complicated than through the native application, but I haven't had any problems.
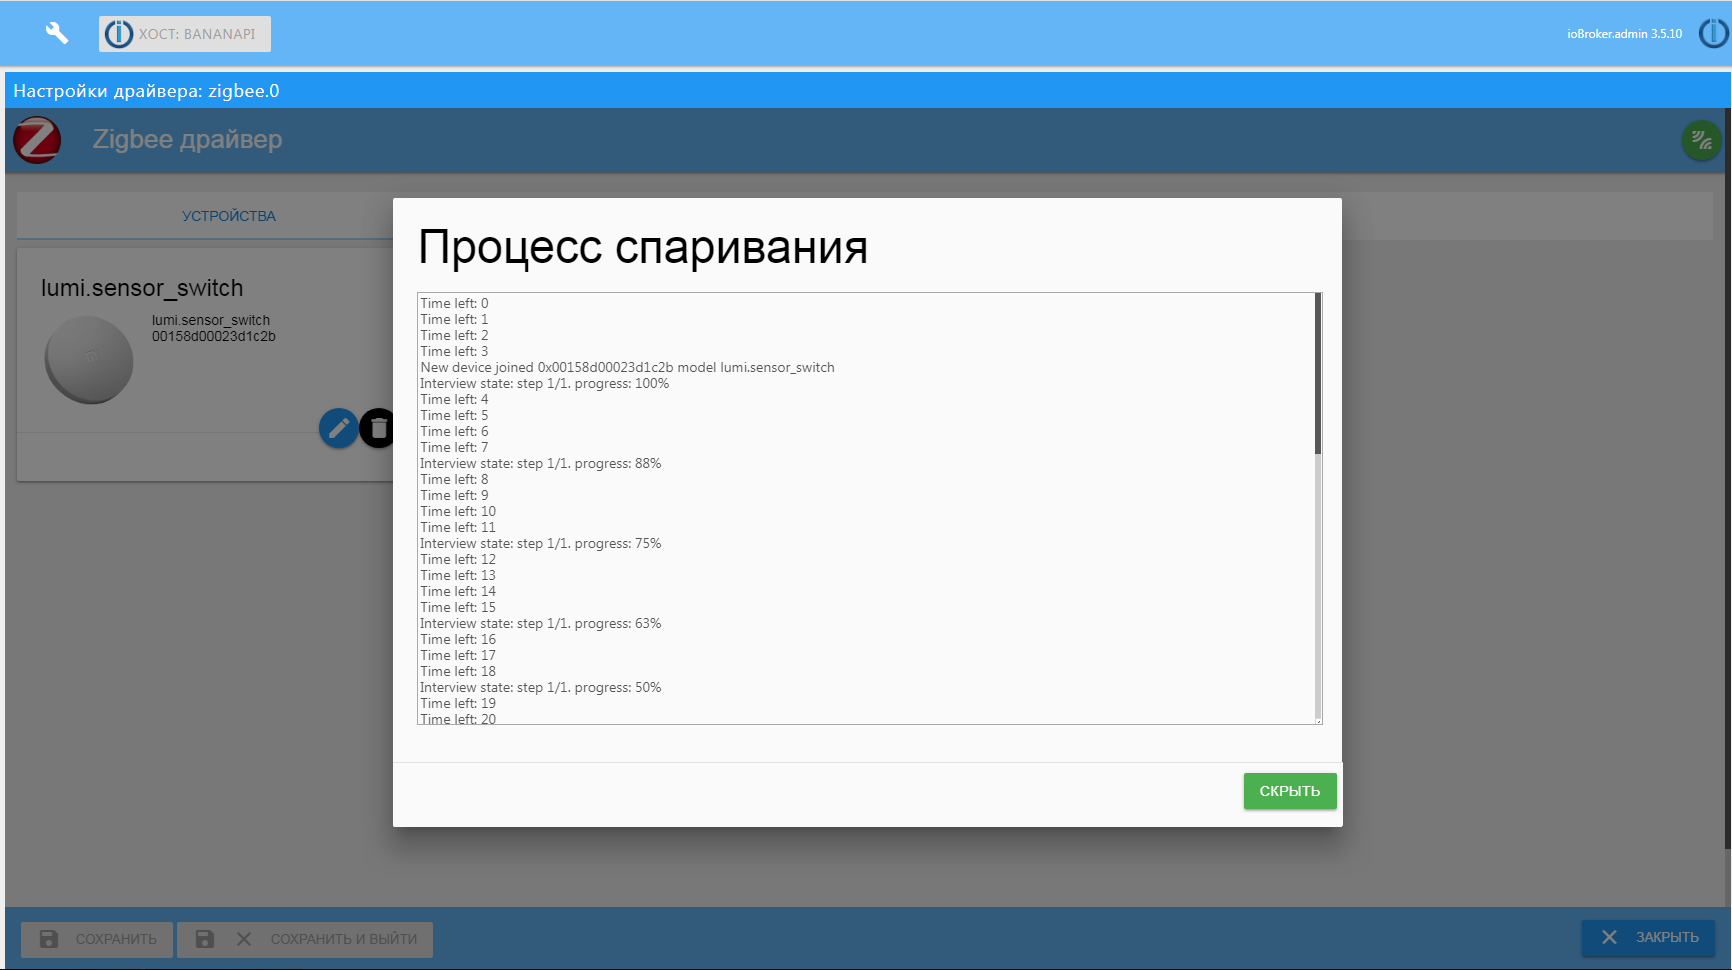
So, for example, let's add the Xiaomi button (Mijia series), to do this, press the green button in the driver settings and, following the instructions, first hold down the pairing button on the back side with a clip until the LED starts blinking, then click this button for about 2 seconds, see mating progress.
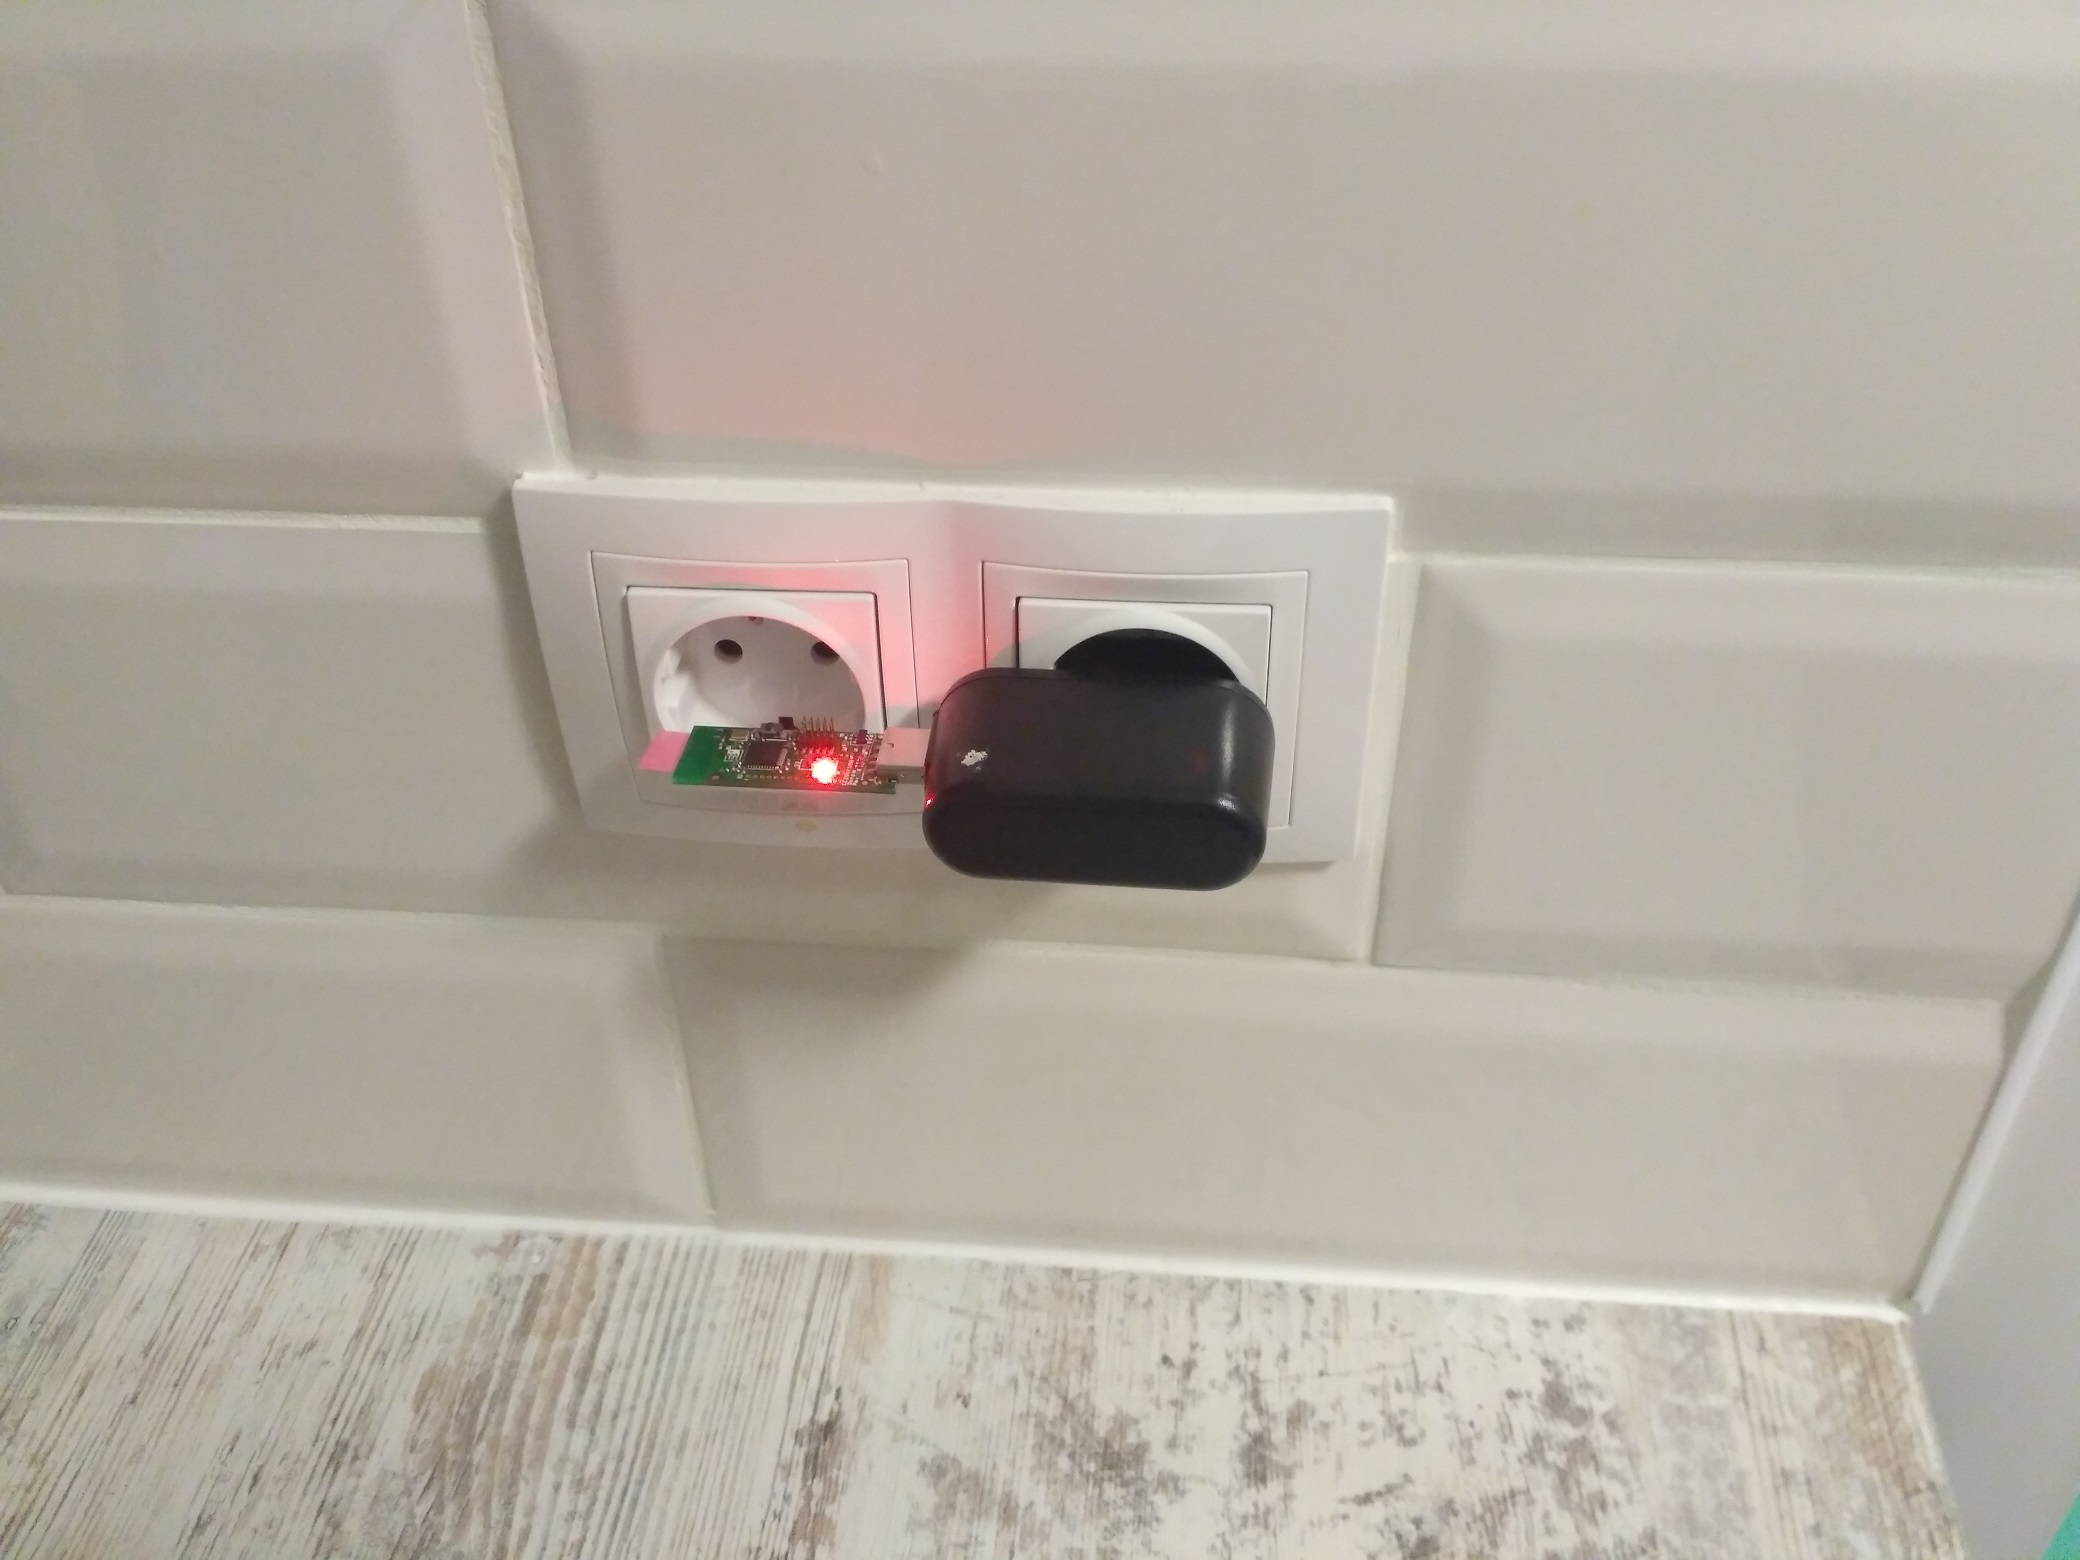
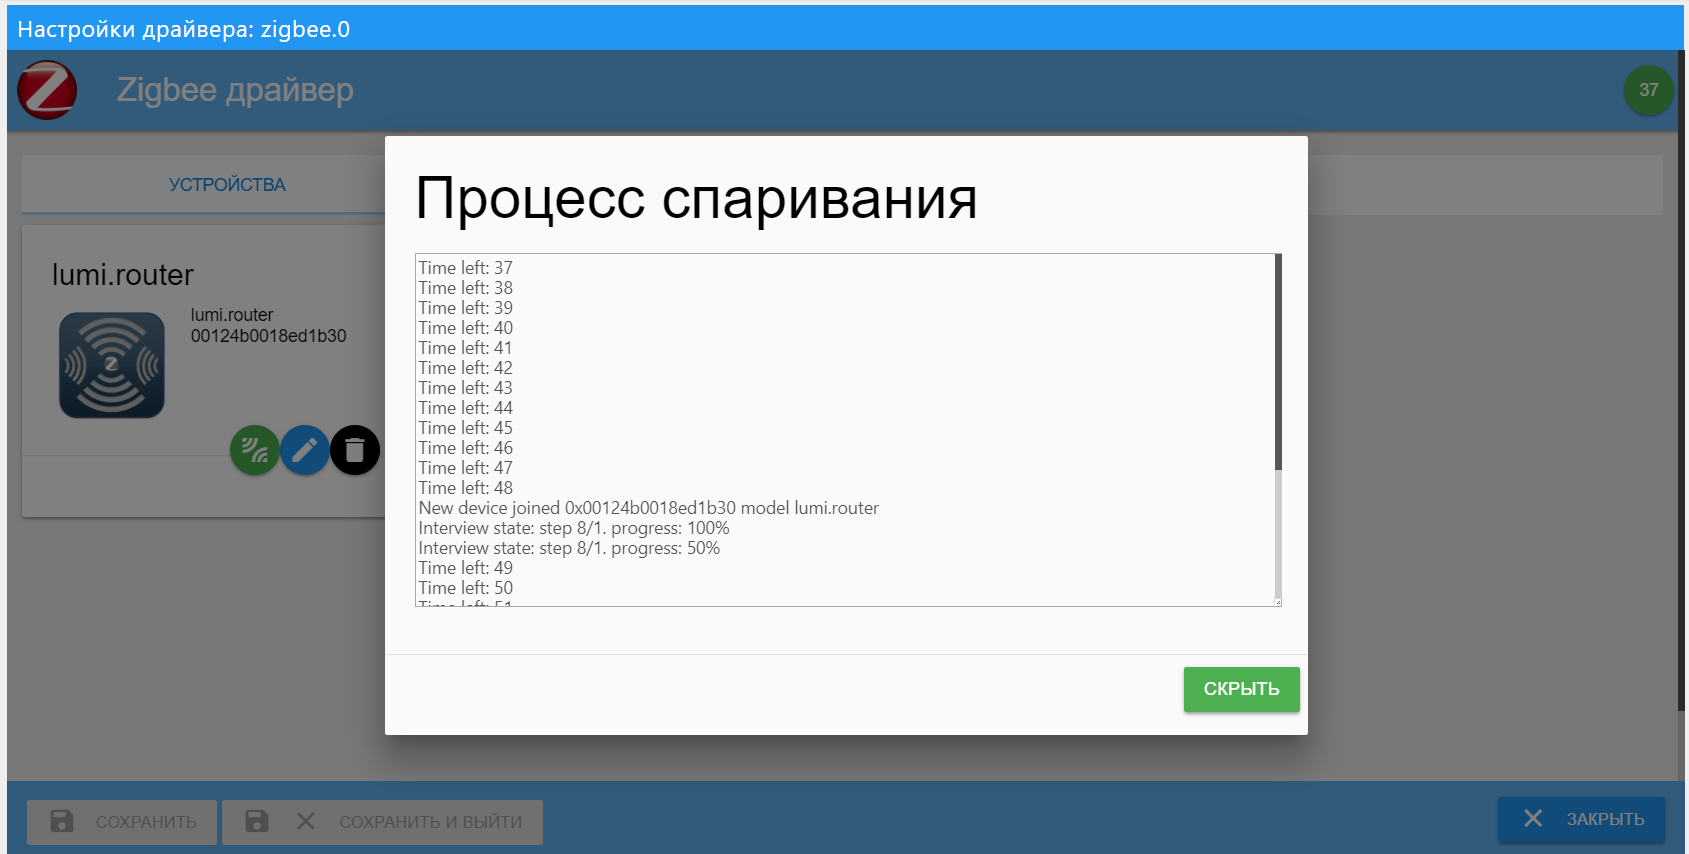
My apartment is not big, communication with all devices is stable, even with the door opening sensor on the landing (RC wall 100 mm and distance 5 m in a straight line). The problems started when I decided to add a temperature and humidity sensor for outdoor air, which I installed on the outer wall of the house from the side of the insulated loggia. The signal of a weak sensor, which was also on the street, did not reach the automation cabinet. You can solve the problem simply - you need to add a router to the ZigBee network and place it closer to the sensor. Some wireless devices, for example, the Xiaomi socket may work as a router, but I did not have such devices. I didn’t want to buy an expensive outlet or a controlled light bulb only for “forwarding” data from a sensor on the street. As it turned out, for the same terminal devices based on the SS25xx chip there is a special firmware that allows them to be used as a router in the system. As a result, I added a router based on the CC2531 chip with a USB connection. I will not dwell on the firmware process in detail, the diagram and the firmware file itself can be found on the project's github page.
As a matter of fact, there is no communication with the module via the USB port, I temporarily plugged it into charging with the USB port and plugged it into a power outlet in the kitchen. In the near future I plan to locate permanently in a normal building on the loggia and with normal power from a home UPS.
The process of adding a router to the system is simple: we press the pairing button in the driver and on the switched on router we press the S2 button several times until the devices are connected.
For example, let's add a temperature / humidity sensor that I placed on the loggia outside and that should work through a router.
You can simply do the pairing through the driver and the sensor should connect through the router, if it is closer. But you can forcibly indicate that the pairing goes through a specific router. To do this, in the list of devices on the router's icon, press the green pairing button.
Make sure that the sensor is correctly connected - let's see the network map.
The map shows device pairing lines with an indication of the signal quality between network segments. As I wrote above, I have a small odnushka of 35 sq.m., therefore the map is rather modest. With the permission of other users, I will publish possible options with the map more.
The functionality of some Xiaomi devices through this adapter is even slightly larger than through the native application and the mihome driver. In the future I want to expand the network a little and try new devices, in particular, a smart drive for curtains and a sensor cube.
Driver Material
We received the data, the executive mechanisms were tied, what now to do with them? To begin, let's display in a beautiful interface. I have a big project in the VIS driver, which exists in several versions for different resolutions, but there is enough material for a separate article. Maybe she will be next.
For simple and quick display of data and control of various devices, I use the driver material. Installation as usual in a couple of clicks. Interface tiles display data based on category settings, which are added to the interface admin window of the same name. The list of categories is limited only by fantasy, I use the “room-function” scheme, and grouping takes place according to them. Added all rooms (kitchen, corridor, room, balcony, etc.) and functions (lighting, sensors, system, etc.).
Now in the settings window of the system objects, it is necessary for the variables to be displayed on the screen, specify the room, the function and assign the role (for the correct display). An example is a Xiaomi room wall temperature and humidity sensor connected via Bluetooth.
Based on these settings, the tile will display the data, the icon will be pulled, and controls of a certain type will be available.
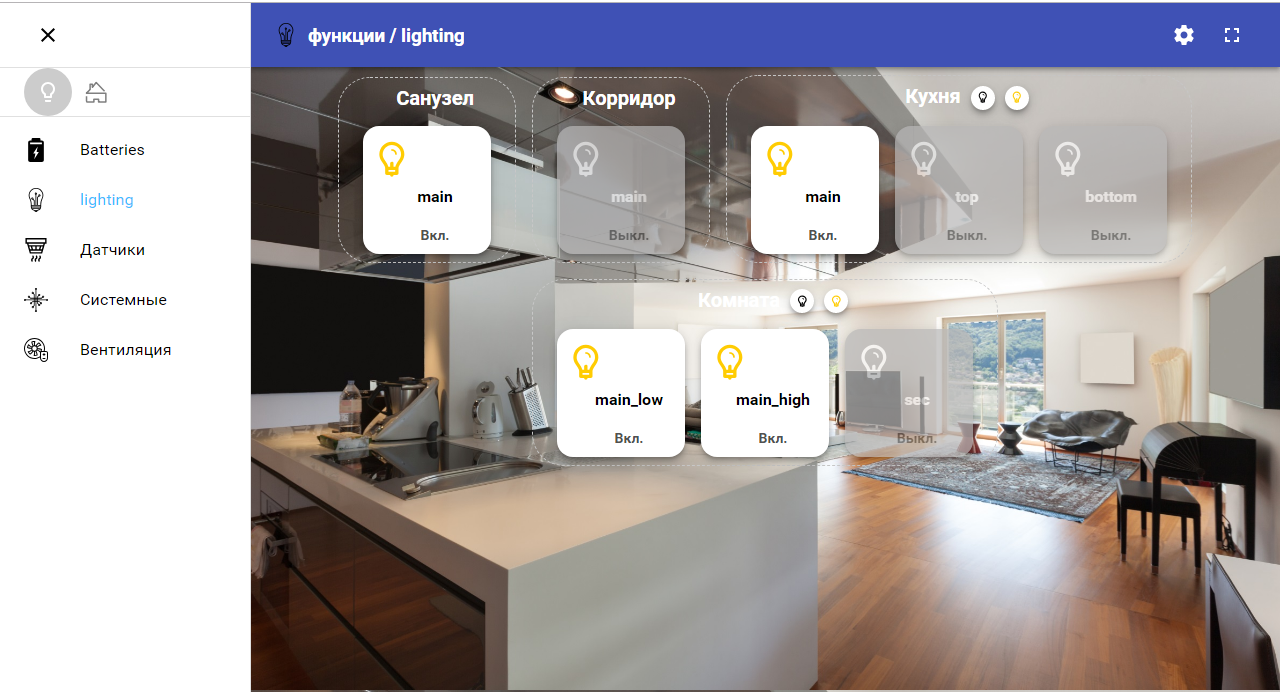
Example 1. Displaying all information on one category - functions. Lighting throughout the apartment.
Example 2. Displaying all information about a room - Bathroom.
Example 3. Voltage and battery discharge level of all Xiaomi wireless devices.
This driver works for me for local management of the system from a mobile phone, a stationary tablet on the wall. Sometimes I connect via VPN. To control and view the states remotely, receive notifications, I use the telegram driver.
Telegram driver
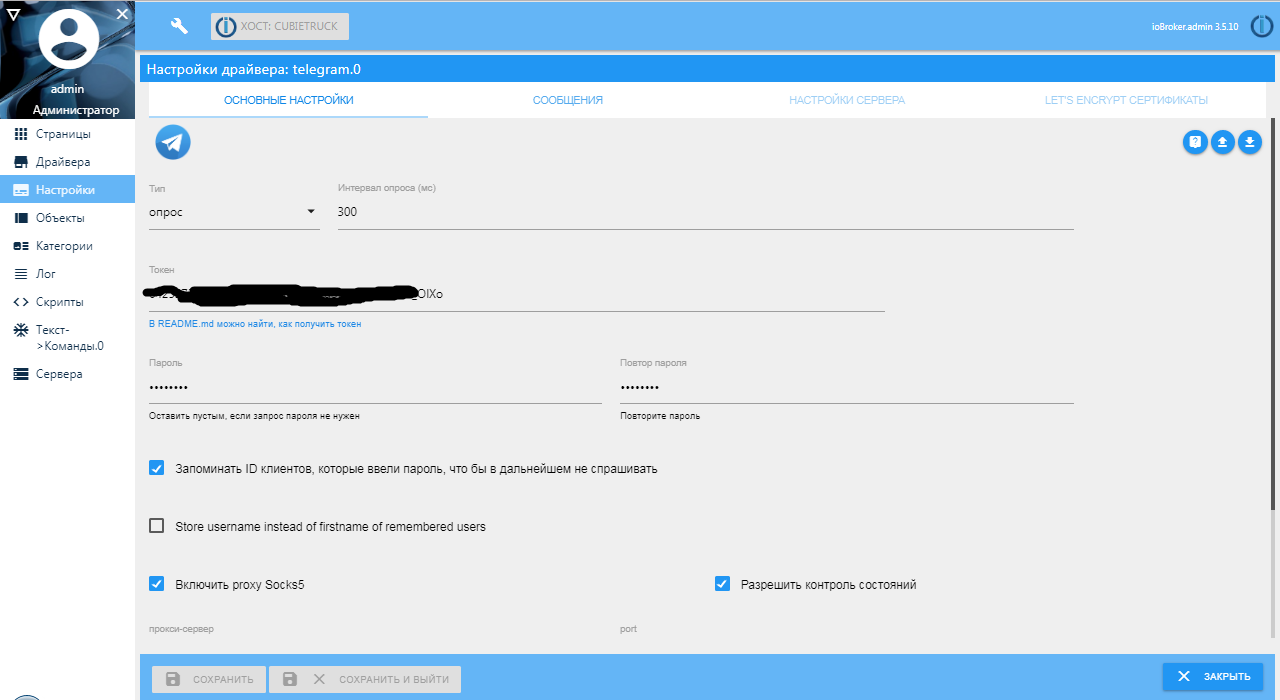
I will not describe the installation, just go over the settings. I use the mode of operation through periodic polling (by default 300ms) and connection through a proxy server. To get the token, you need a little "talk" with the bot creator - BotFather. The process is simple - find the search for this bot, give the command to create a new one, specify its unique name and your key, specify it in the driver settings and, for safety, be sure to specify the “welcome” password. His bot will ask you when communicating with a new user.
Now you need to configure communication cases through the bot. You can use the text2command driver or JavaScript for this. So historically, I use javascript in both text and Blockly blocks. Installing the JS driver should not cause difficulties, the setting in this case is not needed. After installation and launch, you need to enable the display of the menu to create and edit scripts.
Example 1. Alerts.
To begin, let's try to send a notification of the opening, for example, the front door. I have a sensor-reed wireless Xiaomi on the front door. Monitor as a wife walks with small while I'm at work. Create a new script in the common group.
Specify what will “draw” in blockly and call it “telegram_bot”.
In the "Events" group, we take the block of reaction to changing a variable and drag it to the working field.
Next, we select the object ID for which we subscribe, we insert the object check through “if” - “otherwise if” to the value true / false. In the end, you should get something like the following.
Great, now run, open the door - close the door and see the messages in the telegram.
Example 2. Lighting control through the menu.
An example is more complicated, let's make the lighting control using the menu buttons in the telegram. Here you will have to give a little bit of code, i.e. When creating a script, you need to select JS. The task is something like this: make the buttons in the form of a menu with the status of the lights immediately in the text of the buttons. Still try to make sure that when you press the button, the state of lighting is inverted and the status is immediately updated in the text of the button by the appearance / disappearance of the light bulb. Plus, if the menu has already been started and manually turned on / off the light, it is necessary that the menu is also updated with the status of the lights.
The code contains comments and is relatively not complicated:
The result should be something like this:
Conclusion
The article turned out to be a long one, but I hope it is useful, and it may make life easier for some users or encourage someone to create their own smart home.
At the moment, my ioBroker-based smart home system has been “spinning” for 4 years now and I’m quite happy with it. In addition to ZigBee, it also has several self-made MQTT and HTTP controllers for controlling lighting, ventilation and other systems, a network of temperature sensors on the 1-wire bus, a device for monitoring the electrical parameters of the RS485 bus and the modbus RTU protocol, and much more.
In my piggy bank of solutions for a smart home, many ideas have accumulated, although they probably should be perceived rather as a piggy bank of problems for a smart home (those in the subject will understand what I mean). Leave your wishes in the comments to help me decide on the topic of the next article.
Source: https://habr.com/ru/post/433340/
All Articles