Build a Dream Bundle with Webpack
JS applications, websites and other resources are becoming more complex and build tools are a reality of web development. Bandlers help package, compile, and organize libraries. One of the powerful and flexible open source tools that can be perfectly customized to build a client application is Webpack.
Maxim Sosnov ( crazymax11 ) - Frontend Lead in N1.RU implemented Webpack in several large projects that previously had its own custom build, and associated several projects with it. Maxim knows how to build a dream bundle with Webpack, do it quickly and configure it so that the config remains clean, supported and modular.
Decryption is different from the report - this is a highly enhanced version of the link. Throughout the decoding, Easter eggs are scattered on articles, plug-ins, minifiers, options, transporters and proof words of the speaker, links to which simply can not be put into a speech. If you collect everything, the bonus level in Webpack will open :-)
Usually, the order of implementation is as follows: a developer read an article about a Webpack somewhere, decides to connect it, starts to embed it, somehow it works out, everything starts up, and for a while the webpack-config works - for six months, a year, two. Locally everything is fine - the sun, rainbow and butterflies. And then come the real users:
')
- With mobile devices, your site does not load.
- Everything works with us. All is well locally!
Just in case, the developer goes all the profiling and sees that for mobile devices the bundle weighs 7 MB and loads for 30 seconds . This does not suit anyone and the developer begins to look for how to solve the problem - he can plug in a loader or find a magic plugin that solves all problems. Miraculously, this plugin is located. Our developer goes to the webpack-config, tries to install, but the line of code interferes:
The line translates as follows: "If the config is set up for production, then take the seventh rule, and put the
First, let's define what it is. First of all, the dream bundle has two main characteristics:
And in order to reduce the size of the bundle, you must first estimate its size.
The most popular solution is the WebpackBundleAnalyzer plugin. It collects application build statistics and renders an interactive page where you can see the location and weight of each module.
If this is not enough, you can build a dependency graph using another plugin .
Or a pie chart .
If this is not enough, and you want to sell Webpack to marketers, then you can build a whole universe , where each point is a module, like a star in the Universe.
There are a lot of tools that estimate the size of the bundle and monitor it. There is an option in the Webpack config that destroys the build if the bundle weighs too much, for example. There is a duplicate-package-checker-webpack-plugin plugin that won't let you build a bundle if you have 2 npm packages of different versions, for example, Lodash 4.15 and Lodash 4.14.
Now we understand how to throw out too much of the bundle.
Consider this in a popular example from moment.js :

It turns out that when you add a date to the date, hour or just want to put the link “in 15 minutes” with the help of moment.js, you connect as much as 230 KB code ! Why is this happening and how is it solved?
At the moment.js there is a function that sets the locale:
The code shows that the locale is loaded in a dynamic way, i.e. calculated in runtime. Webpack comes smart and tries to make sure that your bundle does not crash during the execution of the code: it finds all possible locales in the project, and bundles them. Therefore, the application weighs so much.
The solution is very simple - we take the standard plug-in from Webpack and tell it: “If you see that someone wants to load many locales, because they cannot determine which, take only Russian!”
Webpack will take only Russian, and WebpackBundleAnalyzer will show 54 Kb, which is already 200 Kb easier.
The next optimization that interests us is Dead code elimination . Consider the following code.
Most of the lines from this code are not needed in the final bundle - the block with the condition is not executed, the function after return is also not. All you need to leave is
We now turn to a more advanced method Dead code elimination - Tree shaking .
Suppose we have an application that uses Lodash . I strongly doubt that anyone is applying the whole Lodash. Most likely, several functions such as get , IsEmpty , unionBy or similar are being exploited .
When we do Tree shaking, we want Webpack to “shake” unnecessary modules and throw them out, and we only have the necessary ones left. This is Tree shaking.
Suppose you have this code:
The code is very simple: import a variable from some module and output it. But in this module there are two variables: a and b . We do not need the variable b , and we want to remove it.
When the Webpack comes, it converts the code with the import into this:
Our
The Webpack dependency converts to the following code:
Webpack left the export variable a , and removed the export variable b , but left the variable itself, marking it with a special comment. In the converted code, the variable b is not used, and UglifyJS can remove it.
Consider the cases more interesting - when the Tree shaking does not work.
Case number 1. You write code:
Run the code through the Webpack, and it remains the same. That's because the bandler organizes Tree shaking only if you are using ES6 modules. If you use CommonJS modules, the Tree shaking will not work.
Case number 2. You write code with ES6 modules and named exports.
If your code runs through Babel and you have not set the modules option to false , then Babel will lead your modules to CommonJS, and Webpack will not be able to perform Tree shaking again, because it only works with ES6 modules.
Accordingly, we need to be sure that no one in our assembly plan will transport the ES6 modules.
Case number 3. Suppose we have such a useless class that does nothing:
It seems everything should be fine, but if we look closely, we will see that inside this function there is a global variable
When you write classes and run them through Babel, they are never cut out. How is this fixed? There is a standardized hack - add a comment
Then UglifyJS will take the word that the following function is pure. Fortunately, Babel 7 is doing this right now, and Babel 6 is still not deleting anything.
Let's sum up:
We figured out how to reduce the weight of the bundle, and now let's teach it to load only the necessary functionality.
This part is divided into two. In the first part, only the code that the user requires is downloaded : if the user visits the main page of your site, he does not load the pages of the personal account. In the second, edits in the code lead to the lowest possible reload of resources .
Consider the structure of an imaginary application. He has:

The first problem we want to solve is making the common code . Denote by red square the common code for all pages, green circle for the main page and the search page. The remaining figures are not particularly important.
When the user comes to search from the main page, he will reload the square and circle a second time, although he already has them. Ideally, we would like to see about that.
It's good that Webpack 4 already has a built-in plugin that does it for us - SplitChunksPlugin . The plug-in takes out the application code or the node modules code, which is used by several chunks in a separate chunk, while ensuring that the common-code chunk will be more than 30 Kb, and for the page load no more than 5 chunks are required to load. The strategy is optimal: too small chunks are unprofitable to load, and downloading too many chunks is long and not as effective as downloading fewer chunks even on http2. To repeat this behavior on 2 or 3 versions of the Webpack, you had to write 20-30 lines with not documented features. Now it is solved in one line.
It would be great if we also rendered the CSS for each chunk to a separate file. For this there is a ready-made solution - Mini-Css-Extract-Plugin . The plugin appeared only in Webpack 4, but before it there were no adequate solutions for this task - only khaki, pain and shot through legs. The plugin takes CSS out of asynchronous chunks and was created specifically for this task , which it performs perfectly.
Let us figure out how to make sure that when we release, for example, a new promo block on the main page, the user would reload the minimum possible part of the code .
If we had versioning, everything would be fine. Here we have the main page of version N, and after the release of the promotional block - version N + 1. Webpack provides a similar mechanism right out of the box using hashing. After the Webpack collects all assets, - in this case, app.js, - then it counts its content hash, and adds it to the file name to make the app. [Hash] .js. This is the versioning that we need.
Let's now check how it works. Turn on the hashes, edit the main page, and see if the code of the main page really changed. We’ll see that two files have changed: main and app.js.

Why did this happen, because it is illogical? To understand why, let's break down app.js. It consists of three parts:
When we change the code in main, its content and hash change, which means that the link to it also changes in the app. The app itself will also change and you need to restart it. The solution to this problem is to divide app.js into two chunks: application code and webpack runtime and links to asynchronous chunks. Webpack 4 does everything for us with one runtimeChunk option, which weighs very little — less than 2 KB in gzip. Restarting it for the user is almost worthless. RuntimeChunk is enabled with just one option:
In Webpack 3 and 2, we would write 5-6 lines, instead of one. It is not much more, but still superfluous inconvenience.
Everything is great, we learned to make links and runtime! Let's write a new module in main, release, and - op! - now everything is rebooted.
Why is that? Let's see how the modules work in the webpack.
Suppose there is a code in which you add the modules a , b , d and e :
Webpack converts imports to require: a , b , d, and e replaced by require (0), require (1), require (2), and require (3).
Imagine a picture that happens very often: you write a new module c
When Webpack processes everything, it will convert the import of a new module to require (2):
Modules d and e , which were 2 and 3, will receive the digits 3 and 4 - the new id. A simple conclusion follows from this: using sequence numbers like id is a bit silly, but Webpack does.
To fix the problem, there is a built-in Webpack solution - HashedModuleIdsPlugin :
This plugin instead of numeric id uses 4 characters md4-hash from the absolute path to the file. With him, our require will turn into such:
Instead of numbers, letters appeared. Of course, there is a hidden problem - this is a hash collision . We stumbled upon it once and can advise you to use 8 characters, instead of 4. Having configured the hashes correctly, everything will work as we originally wanted.
We now know how to collect a dream bundle.
We've learned how to collect, and now let's work on speed.
In our N1.RU, the largest application consists of 10,000 modules and is going to be 28 minutes without optimizations. We were able to speed up the build up to two minutes! How did we do it? There are 3 ways to speed up any calculations, and all three are applicable to the Webpack.
The first thing we did was parallelize the build . For this we have:
Caching build results is the most efficient way to speed up a Webpack build.
The first solution we have is a cache-loader . This is a loader that gets into a chain of loaders and saves to the file system the result of assembling a specific file for a specific chain of loaders. On the next build of the bundle, if this file is on the file system and has already been processed with this chain, the cache-loader will take the results and will not call those loaders behind them, for example, Babel-loader or node-sass.
The graph shows the assembly time. Blue bar - 100% build time, no cache loader, and with it - 7% slower. This is because the cache-loader spends extra time saving caches to the file system. Already on the second assembly, we received a tangible profit - the assembly was 2 times faster.
The second solution is more sophisticated - HardSourcePlugin . The main difference: the cache-loader is just a loader, which can only operate in a chain of loaders with code or files, and HardSourcePlugin has almost complete access to the Webpack ecosystem, can operate with other plug-ins and loaders, and slightly expands the ecosystem for caching. The graph above shows that on the first run the build time increased by 37%, but by the second run with all the caches we accelerated 5 times.

The best part is that you can use both solutions together, which we are doing in N1.RU. Be careful, because there are problems with caches, which I will discuss later.
In the plugins / loaders you already use, there may be built-in caching mechanisms . For example, the babel-loader is a very efficient caching system, but for some reason it is turned off by default. The same functionality is in awesome-typeScript-loader . The UglifyJS plugin also has caching, which works great. He sped us for a few minutes.
And now the problems.
The last way to speed up a process is to not do any part of the process. Let's think about what can be saved in production? What can we not do? The answer is short - we can do nothing ! We have no right to refuse something in production, but we can save well in dev .
What to save:
We figured out how to build a dream bundle and how to assemble it quickly, and now let's figure out how to configure the Webpack, so as not to shoot yourself in the foot every time you change the config.
A typical webpack configuration path in a project begins with a simple config. First you just insert the webpack, babel-loader, sass-loader and all is well. Then, unexpectedly, some conditions appear on process.env , and you insert conditions. One, second, third, more and more, until a condition is added with a “magic” option. You understand that everything is already very bad, and it is better to just duplicate the configs for dev and production, and edit twice. Everything will be clearer. If your thought flashed: “Is something wrong here?”, Then the only working advice is to keep the config in order . I'll tell you how we do it.
We use webpack-merge package. This is an npm-package, which is created to merge several configs into one. If you are not satisfied with the default merge strategy, you can customize.
We have 4 main folders:
I'll tell you about each separately.
These are folders that contain files for each loader and plug-in, with detailed documentation and more human APIs than those provided by plugin and loader developers.
It looks like this:
There is a module, it exports a function that has options, and there is documentation. In words it looks good, but in reality our docks to the url-loader look like this:
We tell in a simple form what it does, how it works, describe which parameters accept functions, what the loader creates, and give a link to the docks. I hope that the one who comes here will understand exactly how the url-loader works. The function itself looks like this:
We take two parameters and return the description from the loader. Do not be afraid that the Loader folder will be cumbersome and each file will have a file.
This is a set of webpack options. They are responsible for one functionality, while operating with loaders and plug-ins, which we have already described, and the webpack settings that it has. The simplest example is a preset that tells you how to load scss files correctly:
He uses already prepared loaders.
The parts are what is already in the application itself. They configure the entry and exit points of your application, and can adjust or connect specific plugins, loaders and options. A typical example where we declare an entry and exit point:
In our practice we use:
Webpack-merge just gives us a ready config. With this approach, we always have documentation for the configuration, which is easy enough to understand. With webpack-merge we do not climb 3-7 configs to fix Babel-loader everywhere, because we have a consistent configuration of individual parts throughout the project. And it is also intuitively clear where to edit.
Let's sum up. Use ready-made tools , and do not build bicycles. Document the solutions , because webpack configs are rarely ruled by different people - so the documentation is very important there. Separate and reuse what you write.
Now you know how to build a dream bundle!
Maxim Sosnov ( crazymax11 ) - Frontend Lead in N1.RU implemented Webpack in several large projects that previously had its own custom build, and associated several projects with it. Maxim knows how to build a dream bundle with Webpack, do it quickly and configure it so that the config remains clean, supported and modular.
Decryption is different from the report - this is a highly enhanced version of the link. Throughout the decoding, Easter eggs are scattered on articles, plug-ins, minifiers, options, transporters and proof words of the speaker, links to which simply can not be put into a speech. If you collect everything, the bonus level in Webpack will open :-)
Integrating a Webpack into a typical project
Usually, the order of implementation is as follows: a developer read an article about a Webpack somewhere, decides to connect it, starts to embed it, somehow it works out, everything starts up, and for a while the webpack-config works - for six months, a year, two. Locally everything is fine - the sun, rainbow and butterflies. And then come the real users:
')
- With mobile devices, your site does not load.
- Everything works with us. All is well locally!
Just in case, the developer goes all the profiling and sees that for mobile devices the bundle weighs 7 MB and loads for 30 seconds . This does not suit anyone and the developer begins to look for how to solve the problem - he can plug in a loader or find a magic plugin that solves all problems. Miraculously, this plugin is located. Our developer goes to the webpack-config, tries to install, but the line of code interferes:
if (process.env.NODE_ENV === 'production') { config.module.rules[7].options.magic = true; } The line translates as follows: "If the config is set up for production, then take the seventh rule, and put the
magic = true option there." The developer does not know what to do with it and how to solve it. This is a situation when you need a dream bundle.How to build a dream bundle?
First, let's define what it is. First of all, the dream bundle has two main characteristics:
- It weighs a little . The less weight - the faster the user will get a working application. You do not want your site to open 15 seconds.
- The user downloads only what you need to download to display the current page of the site, and not a byte anymore!
And in order to reduce the size of the bundle, you must first estimate its size.
Estimate the size of the bundle
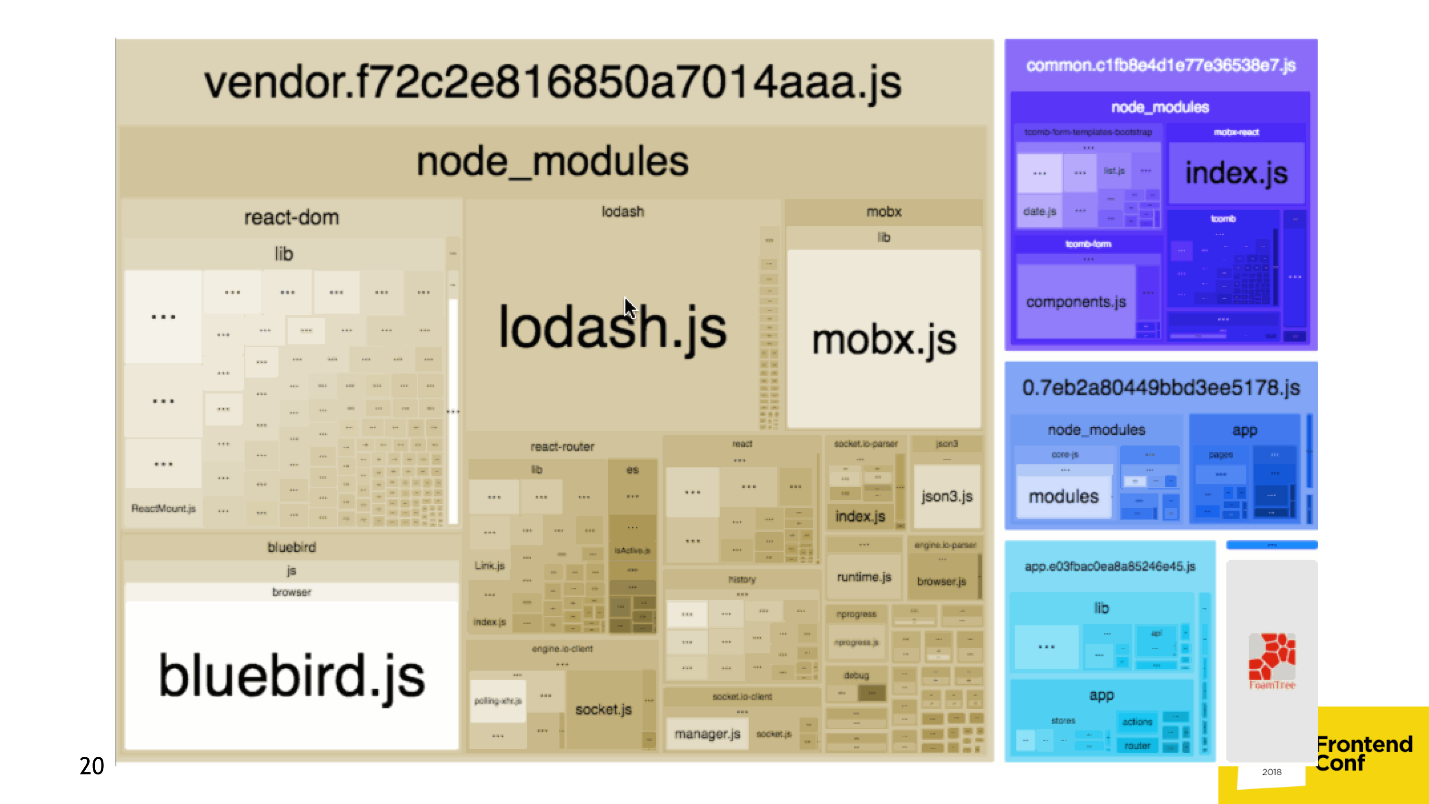
The most popular solution is the WebpackBundleAnalyzer plugin. It collects application build statistics and renders an interactive page where you can see the location and weight of each module.
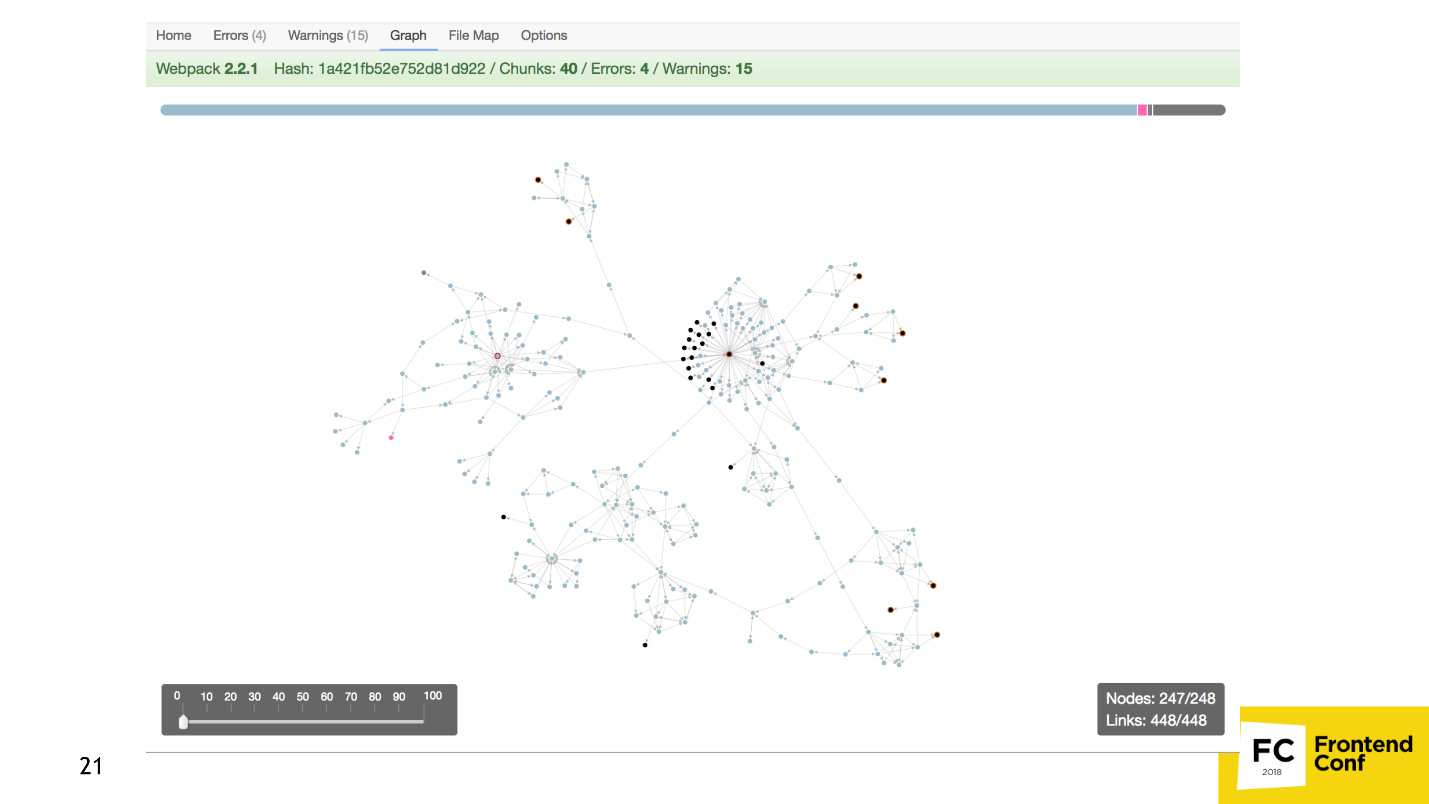
If this is not enough, you can build a dependency graph using another plugin .
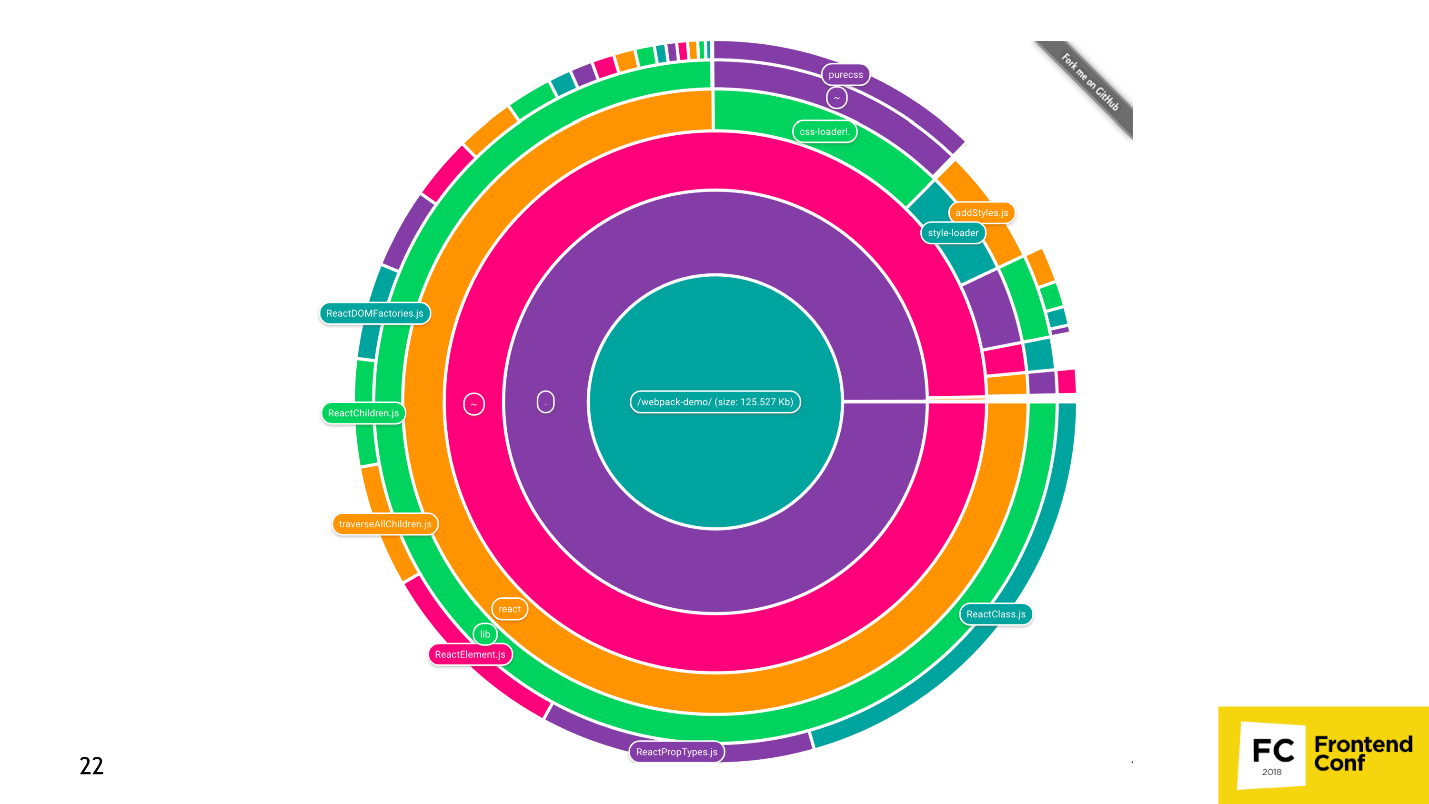
Or a pie chart .
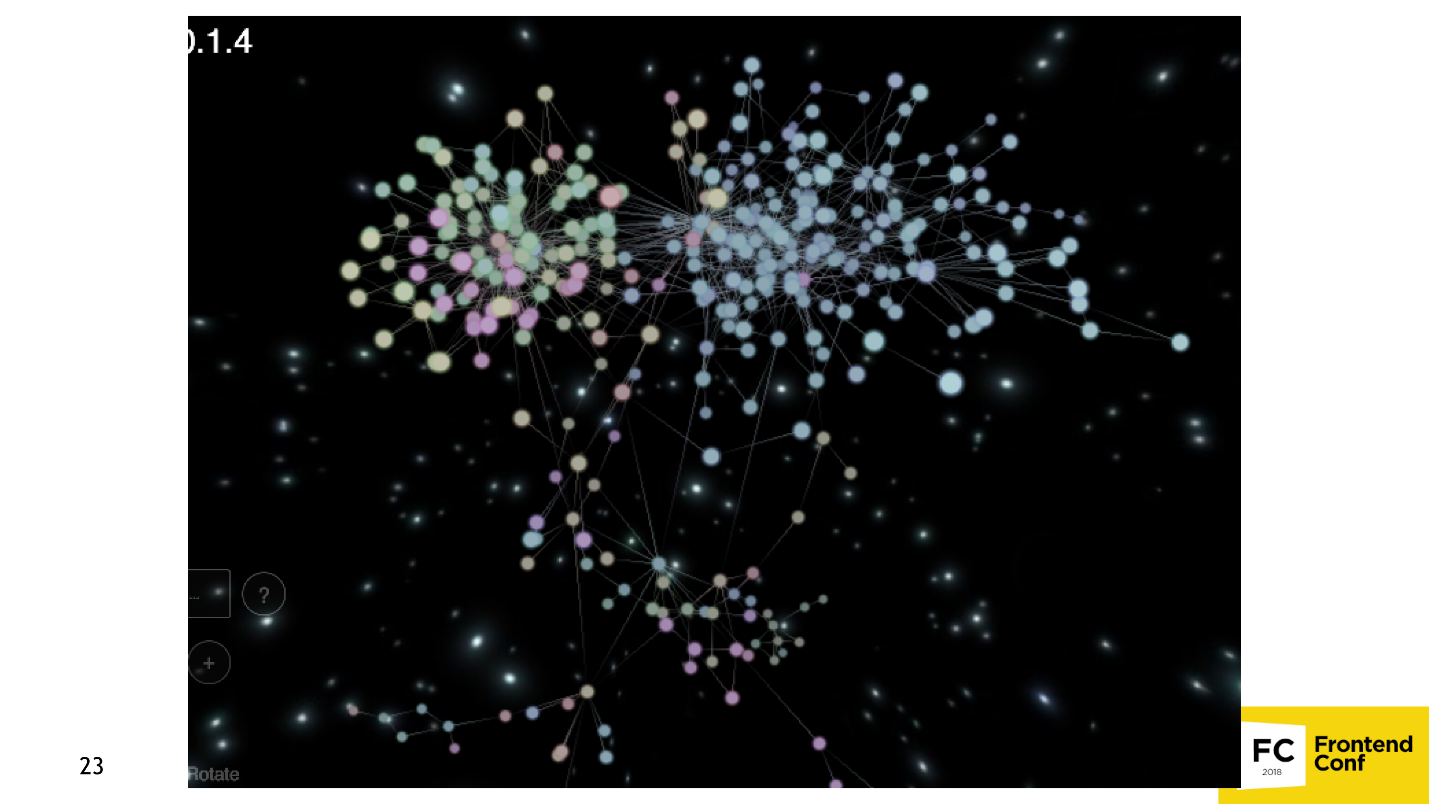
If this is not enough, and you want to sell Webpack to marketers, then you can build a whole universe , where each point is a module, like a star in the Universe.
There are a lot of tools that estimate the size of the bundle and monitor it. There is an option in the Webpack config that destroys the build if the bundle weighs too much, for example. There is a duplicate-package-checker-webpack-plugin plugin that won't let you build a bundle if you have 2 npm packages of different versions, for example, Lodash 4.15 and Lodash 4.14.
How to shrink a bundle
- The most obvious is to connect UglifyJS so that it mines JavaScript.
- Use special loaders and plugins that compress and optimize a certain resource. For example, css-nano for css, or SVGO , which optimizes SVG.
- Compress all files directly to Webpack via gzip / brotli plugins .
- Other tools.
Now we understand how to throw out too much of the bundle.
Throw out too much
Consider this in a popular example from moment.js :
import moment from 'moment' . If you take an empty application, import moment.js and ReactDOM into it, and then pass it through WebpackBundleAnalyzer , you will see the following picture.It turns out that when you add a date to the date, hour or just want to put the link “in 15 minutes” with the help of moment.js, you connect as much as 230 KB code ! Why is this happening and how is it solved?
Loading locale at the moment
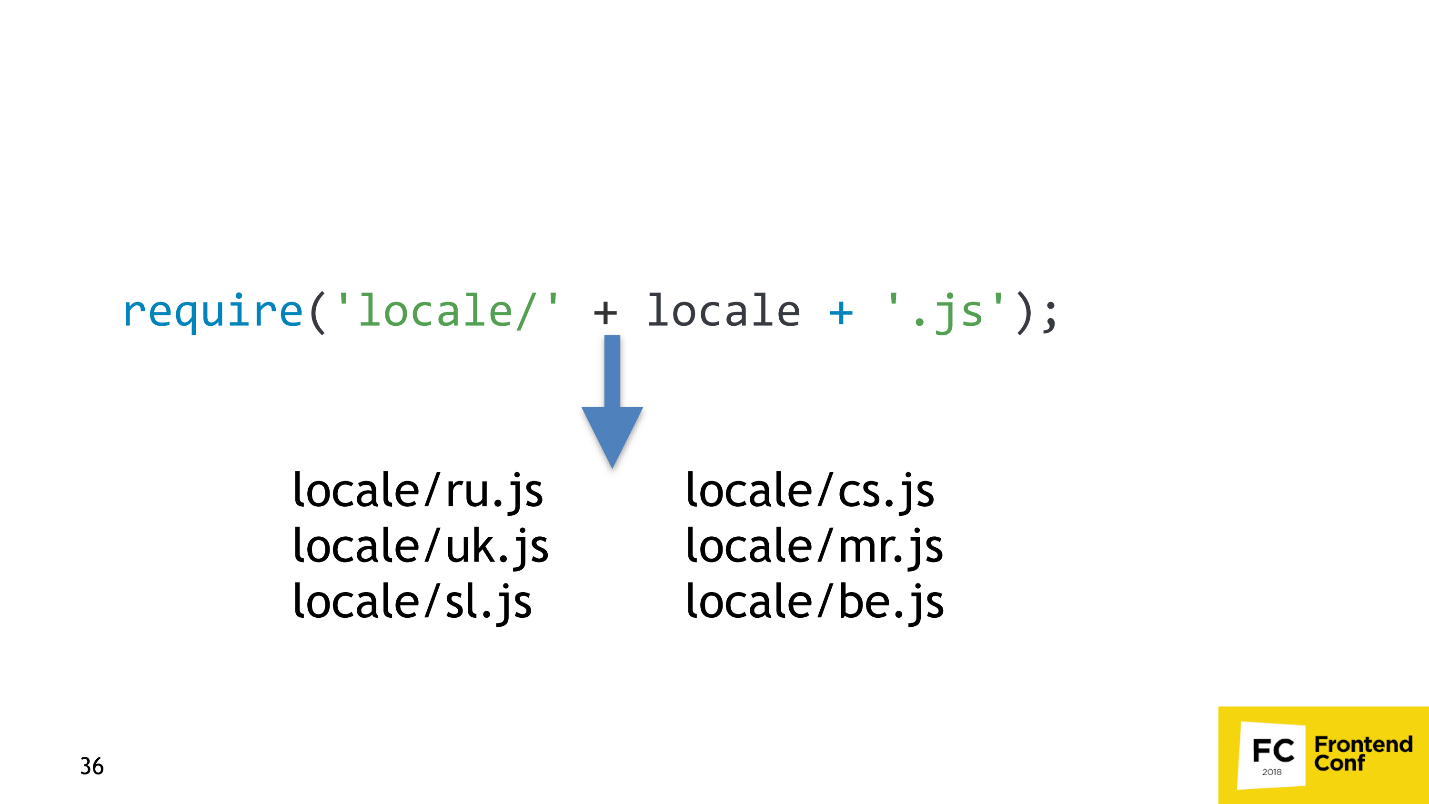
At the moment.js there is a function that sets the locale:
function setLocale(locale) { const localePath = 'locale/' + locale + '.js'; this._currentLocale = require(localePath); } The code shows that the locale is loaded in a dynamic way, i.e. calculated in runtime. Webpack comes smart and tries to make sure that your bundle does not crash during the execution of the code: it finds all possible locales in the project, and bundles them. Therefore, the application weighs so much.
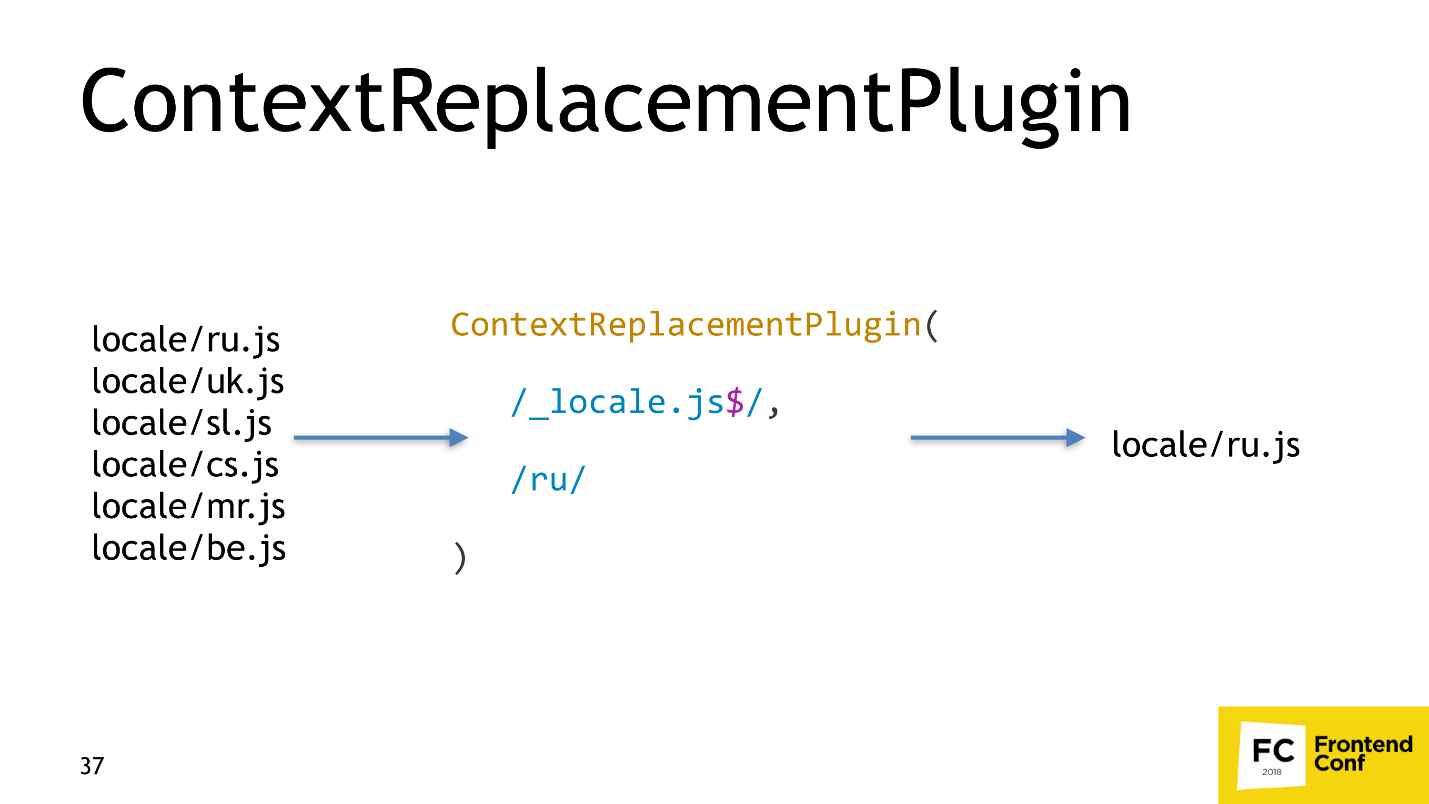
The solution is very simple - we take the standard plug-in from Webpack and tell it: “If you see that someone wants to load many locales, because they cannot determine which, take only Russian!”
Webpack will take only Russian, and WebpackBundleAnalyzer will show 54 Kb, which is already 200 Kb easier.
Dead code elimination
The next optimization that interests us is Dead code elimination . Consider the following code.
const cond = true; if (!cond) { return false; } return true; someFunction(42); Most of the lines from this code are not needed in the final bundle - the block with the condition is not executed, the function after return is also not. All you need to leave is
return true . This is precisely Dead code elimination: the build tool detects code that cannot be executed and cuts it. There is a nice feature that UglifyJS can do this.We now turn to a more advanced method Dead code elimination - Tree shaking .
Tree shaking
Suppose we have an application that uses Lodash . I strongly doubt that anyone is applying the whole Lodash. Most likely, several functions such as get , IsEmpty , unionBy or similar are being exploited .
When we do Tree shaking, we want Webpack to “shake” unnecessary modules and throw them out, and we only have the necessary ones left. This is Tree shaking.
How tree shaking works in webpack
Suppose you have this code:
import { a } from './a.js'; console.log(a); The code is very simple: import a variable from some module and output it. But in this module there are two variables: a and b . We do not need the variable b , and we want to remove it.
export const a = 3 export const b = 4 When the Webpack comes, it converts the code with the import into this:
var d = require(0); console.log(d["a"]); Our
import turned into require , and console.log not changed.The Webpack dependency converts to the following code:
var a = 3; module.exports["a«] = a; /* unused harmony export b */ var b = 4; Webpack left the export variable a , and removed the export variable b , but left the variable itself, marking it with a special comment. In the converted code, the variable b is not used, and UglifyJS can remove it.
Tree shaking in a Webpack only works if you have some kind of code minifiers, for example, UglifyJS or babel-minify .
Consider the cases more interesting - when the Tree shaking does not work.
When tree shaking is not working
Case number 1. You write code:
module.exports.a = 3; module.exports.b = 4; Run the code through the Webpack, and it remains the same. That's because the bandler organizes Tree shaking only if you are using ES6 modules. If you use CommonJS modules, the Tree shaking will not work.
Case number 2. You write code with ES6 modules and named exports.
export const a = 3 export const b = 4 If your code runs through Babel and you have not set the modules option to false , then Babel will lead your modules to CommonJS, and Webpack will not be able to perform Tree shaking again, because it only works with ES6 modules.
module.exports.a = 3; module.exports.b = 4; Accordingly, we need to be sure that no one in our assembly plan will transport the ES6 modules.
Case number 3. Suppose we have such a useless class that does nothing:
export class ShakeMe {} . Moreover, we still do not use it. When Webpack goes through imports and exports, Babel will turn the class into a function, and the bundler will note that the function is not used: /* unused harmony e[port b */ var ShakeMe = function () { function ShakeMe() { babelHelpers.classCallCheck(this, ShakeMe); } return ShakeMe; }(); It seems everything should be fine, but if we look closely, we will see that inside this function there is a global variable
babelHelpers , from which some function is called. This is the side effect : UglifyJS sees that some global function is called and will not cut out the code, because it is afraid that something will break.When you write classes and run them through Babel, they are never cut out. How is this fixed? There is a standardized hack - add a comment
/*#__PURE__*/ before the function: /* unused harmony export b */ var ShakeMe = /*#__PURE__*/ function () { function ShakeMe() { babelHelpers.classCallCheck(this, ShakeMe); } return ShakeMe; }(); Then UglifyJS will take the word that the following function is pure. Fortunately, Babel 7 is doing this right now, and Babel 6 is still not deleting anything.
The rule is: if you have a side effect somewhere, UglifyJS will not do anything.
Let's sum up:
- Tree shaking does not work for most libraries from npm , because they are all from CommonJS and are collected by old Babel.
- Most likely, Tree shaking will work adequately for those libraries that are already prepared for this , for example, Lodash-es, Date-fns, and your code or libraries.
- UglifyJS is involved in the build.
- ES6 modules are used.
- No side effects.
We figured out how to reduce the weight of the bundle, and now let's teach it to load only the necessary functionality.
We load only the necessary functionality.
This part is divided into two. In the first part, only the code that the user requires is downloaded : if the user visits the main page of your site, he does not load the pages of the personal account. In the second, edits in the code lead to the lowest possible reload of resources .
We load only the necessary code.
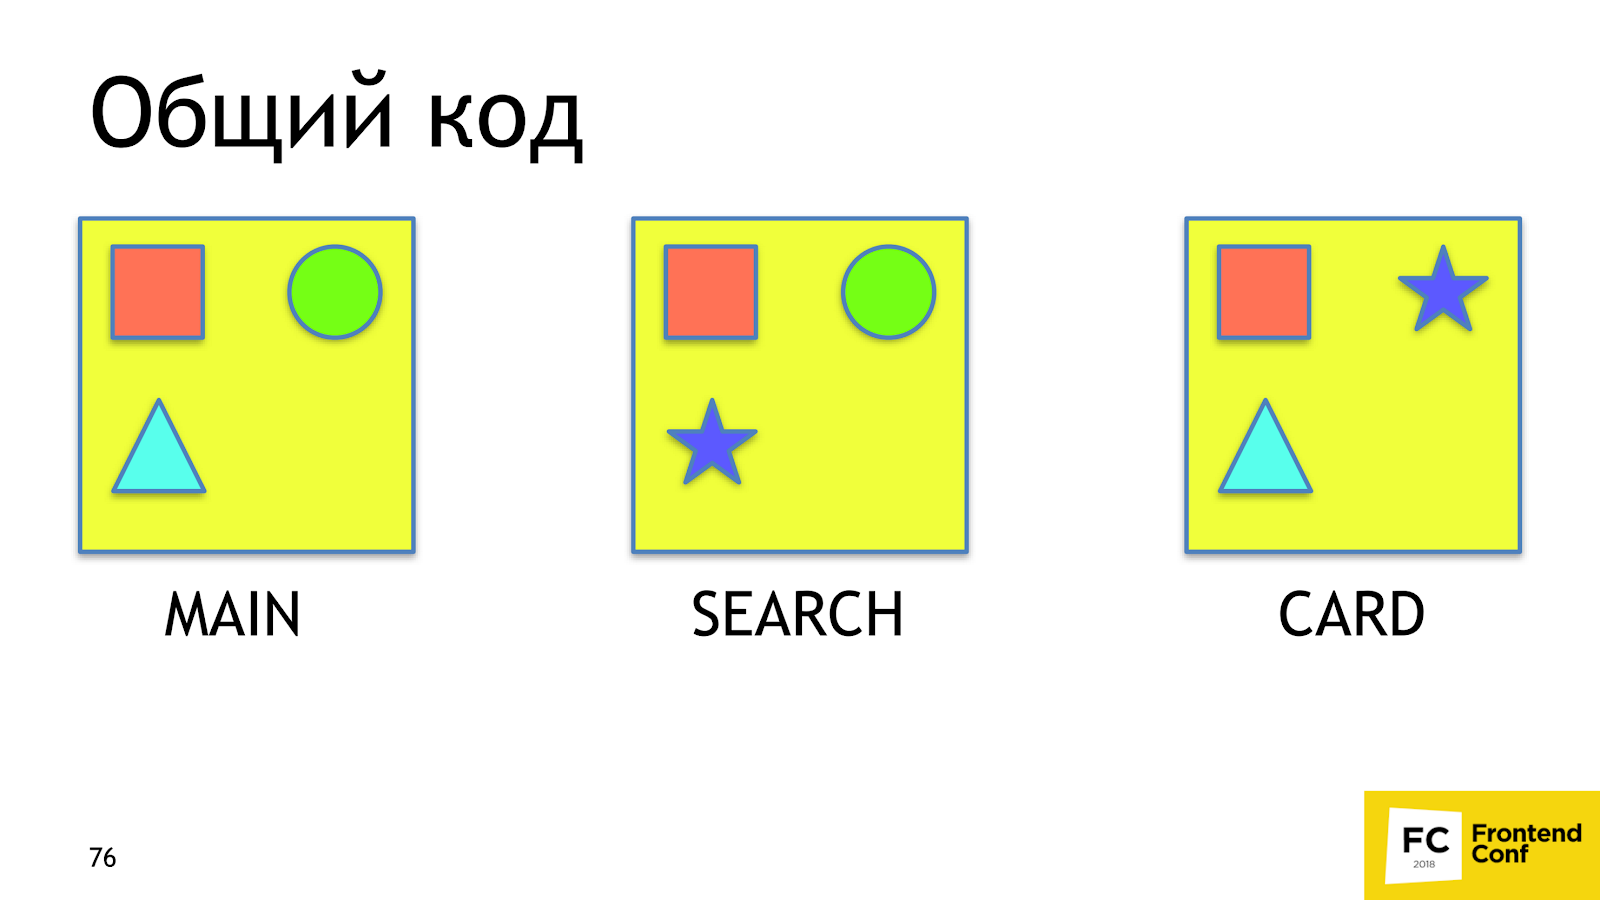
Consider the structure of an imaginary application. He has:
- Entry point - APP.
- Three pages: home, search and card.
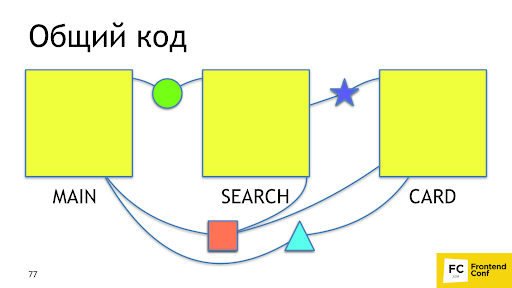
The first problem we want to solve is making the common code . Denote by red square the common code for all pages, green circle for the main page and the search page. The remaining figures are not particularly important.
When the user comes to search from the main page, he will reload the square and circle a second time, although he already has them. Ideally, we would like to see about that.
It's good that Webpack 4 already has a built-in plugin that does it for us - SplitChunksPlugin . The plug-in takes out the application code or the node modules code, which is used by several chunks in a separate chunk, while ensuring that the common-code chunk will be more than 30 Kb, and for the page load no more than 5 chunks are required to load. The strategy is optimal: too small chunks are unprofitable to load, and downloading too many chunks is long and not as effective as downloading fewer chunks even on http2. To repeat this behavior on 2 or 3 versions of the Webpack, you had to write 20-30 lines with not documented features. Now it is solved in one line.
Takeout CSS
It would be great if we also rendered the CSS for each chunk to a separate file. For this there is a ready-made solution - Mini-Css-Extract-Plugin . The plugin appeared only in Webpack 4, but before it there were no adequate solutions for this task - only khaki, pain and shot through legs. The plugin takes CSS out of asynchronous chunks and was created specifically for this task , which it performs perfectly.
Minimally possible reloading of resources
Let us figure out how to make sure that when we release, for example, a new promo block on the main page, the user would reload the minimum possible part of the code .
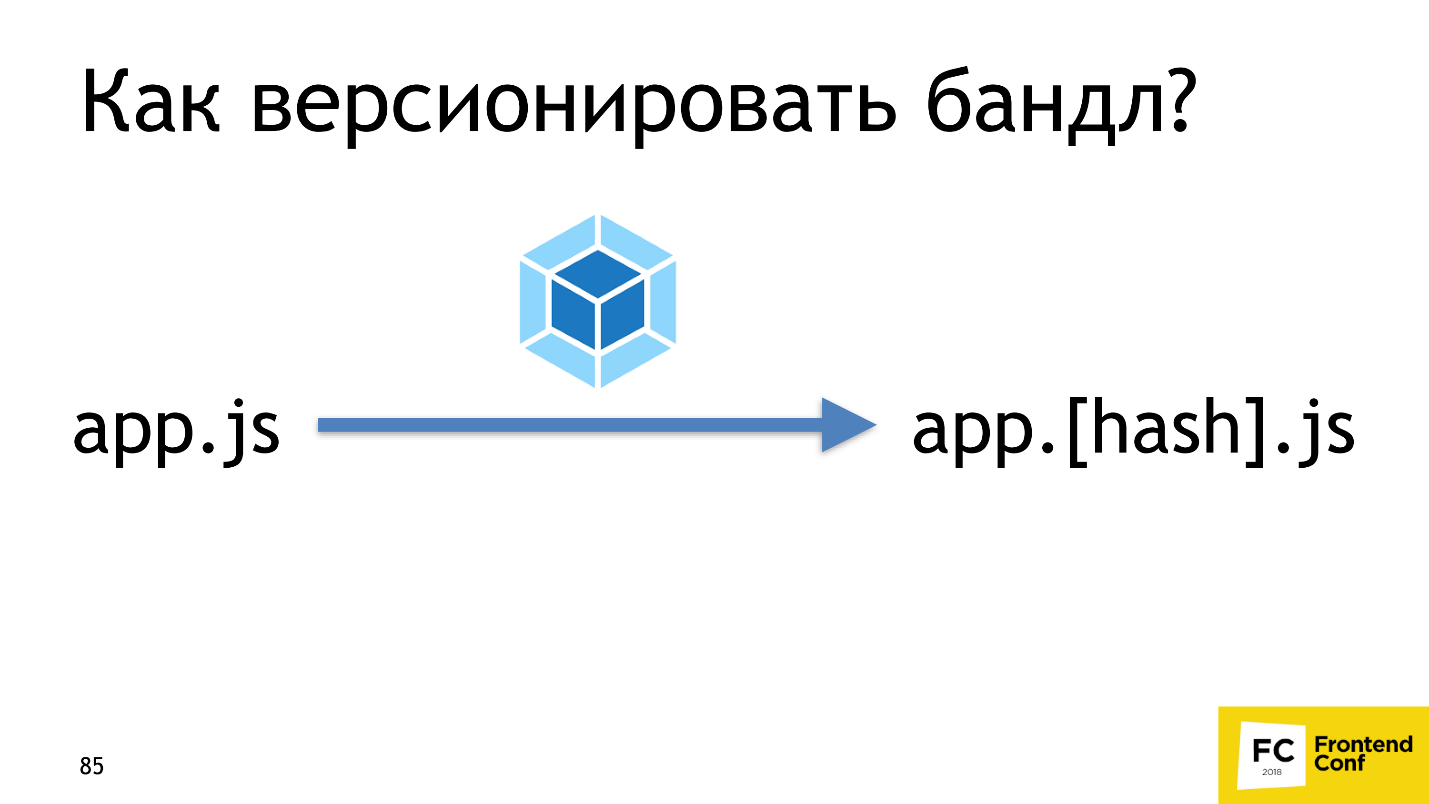
If we had versioning, everything would be fine. Here we have the main page of version N, and after the release of the promotional block - version N + 1. Webpack provides a similar mechanism right out of the box using hashing. After the Webpack collects all assets, - in this case, app.js, - then it counts its content hash, and adds it to the file name to make the app. [Hash] .js. This is the versioning that we need.
Let's now check how it works. Turn on the hashes, edit the main page, and see if the code of the main page really changed. We’ll see that two files have changed: main and app.js.
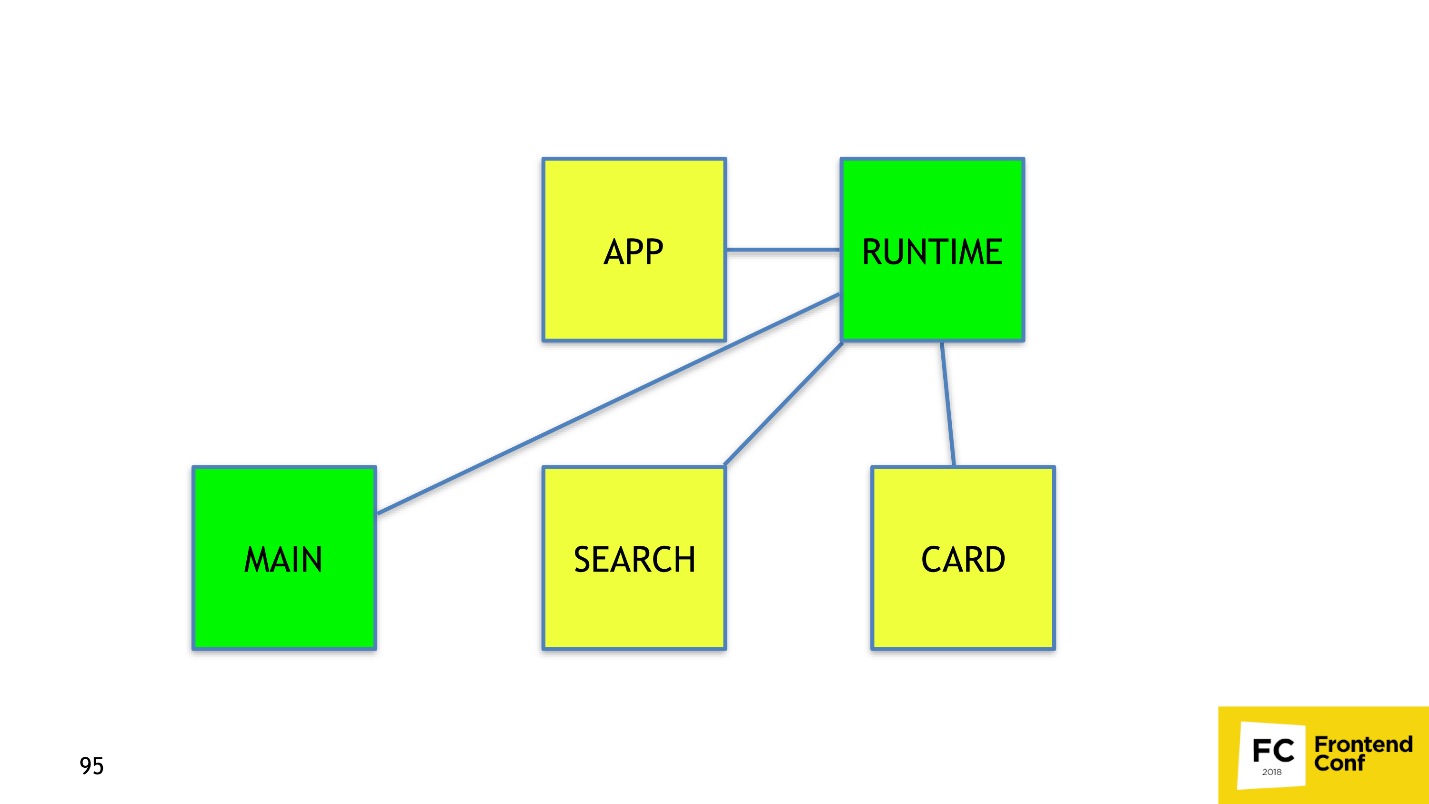
Why did this happen, because it is illogical? To understand why, let's break down app.js. It consists of three parts:
- application code;
- webpack runtime;
- links to asynchronous chunks.
When we change the code in main, its content and hash change, which means that the link to it also changes in the app. The app itself will also change and you need to restart it. The solution to this problem is to divide app.js into two chunks: application code and webpack runtime and links to asynchronous chunks. Webpack 4 does everything for us with one runtimeChunk option, which weighs very little — less than 2 KB in gzip. Restarting it for the user is almost worthless. RuntimeChunk is enabled with just one option:
optimization: { runtimeChunk: true } In Webpack 3 and 2, we would write 5-6 lines, instead of one. It is not much more, but still superfluous inconvenience.
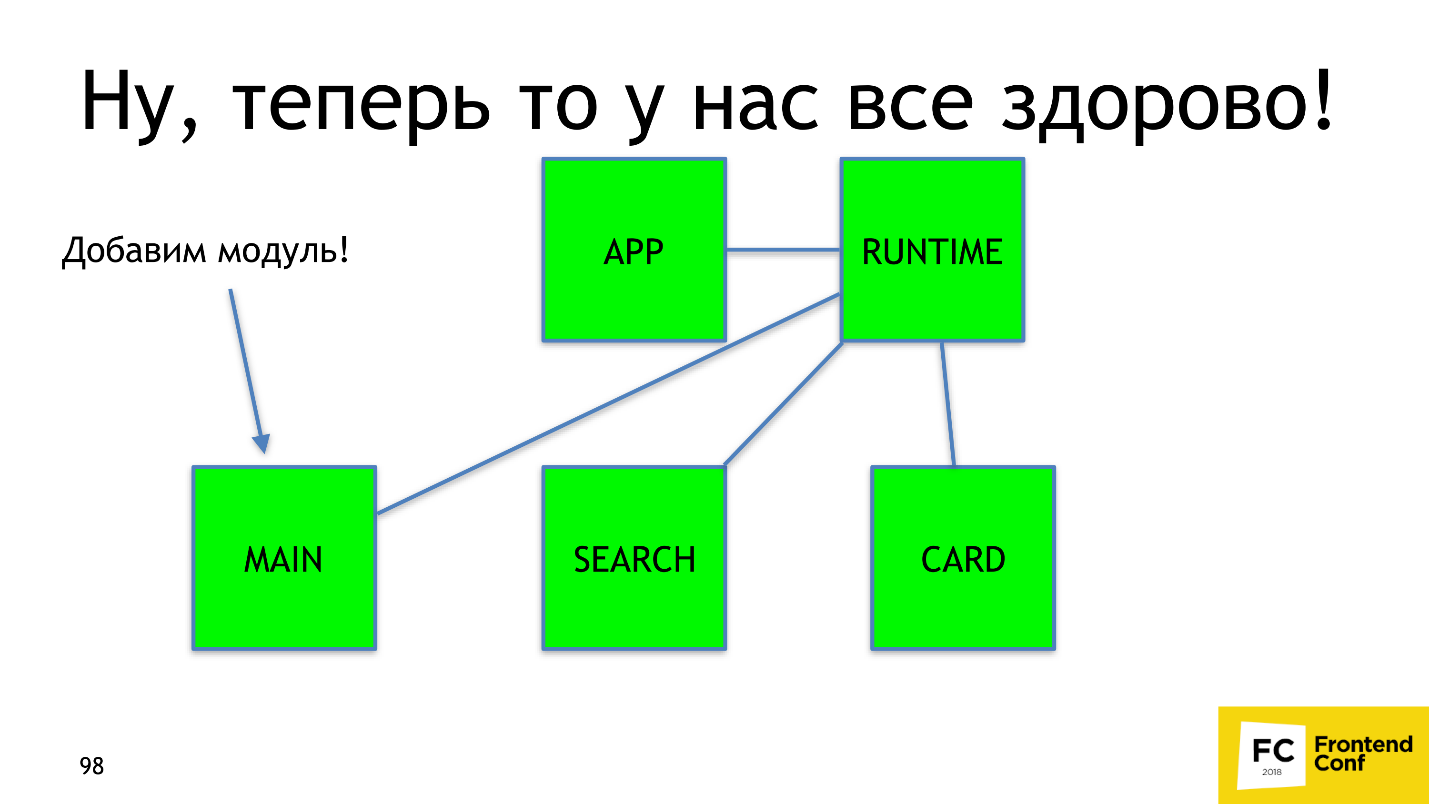
Everything is great, we learned to make links and runtime! Let's write a new module in main, release, and - op! - now everything is rebooted.
Why is that? Let's see how the modules work in the webpack.
Modules in webpack
Suppose there is a code in which you add the modules a , b , d and e :
import a from 'a'; import b from 'b'; import d from 'd'; import e from 'e'; Webpack converts imports to require: a , b , d, and e replaced by require (0), require (1), require (2), and require (3).
var a = require(0); var b = require(1); var d = require(2); var e = require(3); Imagine a picture that happens very often: you write a new module c
import c from 'c'; and insert it somewhere in the middle: import a from 'a'; import b from 'b'; import c from 'c'; import d from 'd'; import e from 'e'; When Webpack processes everything, it will convert the import of a new module to require (2):
var a = require(0); var b = require(1); var c = require(2); var d = require(3); var e = require(4); Modules d and e , which were 2 and 3, will receive the digits 3 and 4 - the new id. A simple conclusion follows from this: using sequence numbers like id is a bit silly, but Webpack does.
Do not use the sequence number as a unique id.
To fix the problem, there is a built-in Webpack solution - HashedModuleIdsPlugin :
new webpack.HashedModuleIdsPlugin({ hashFunction: 'md4′, hashDigest:'base64′, hashDigestLength: 4, }), This plugin instead of numeric id uses 4 characters md4-hash from the absolute path to the file. With him, our require will turn into such:
var a = require('YmRl'); var b = require('N2Fl'); var c = require('OWE4′); var d = require('NWQz'); var e = require('YWVj'); Instead of numbers, letters appeared. Of course, there is a hidden problem - this is a hash collision . We stumbled upon it once and can advise you to use 8 characters, instead of 4. Having configured the hashes correctly, everything will work as we originally wanted.
We now know how to collect a dream bundle.
- Minify .
- Use code-split .
- Configure hashes .
We've learned how to collect, and now let's work on speed.
How to build a dream bundle quickly ?
In our N1.RU, the largest application consists of 10,000 modules and is going to be 28 minutes without optimizations. We were able to speed up the build up to two minutes! How did we do it? There are 3 ways to speed up any calculations, and all three are applicable to the Webpack.
Assembly parallelization
The first thing we did was parallelize the build . For this we have:
- HappyPackPlugin , which wraps your loaders in other loaders, and puts all the calculations that are wrapped into separate processes. This allows, for example, to parallelize Babel and node-sass.
- thread-loader . Performs approximately the same as HappyPackPlugin, only uses not processes, but thread pool. Switching to a separate thread is a costly operation, use it carefully, and only if you want to wrap up resource-intensive and heavy operations, such as babel or node-sass. To load json, for example, parallelization is not needed, because it loads quickly.
- In the plugins and loaders you use, most likely, there are already built-in parallelization tools - just look. For example, this option is in UglifyJS .
Caching build results
Caching build results is the most efficient way to speed up a Webpack build.
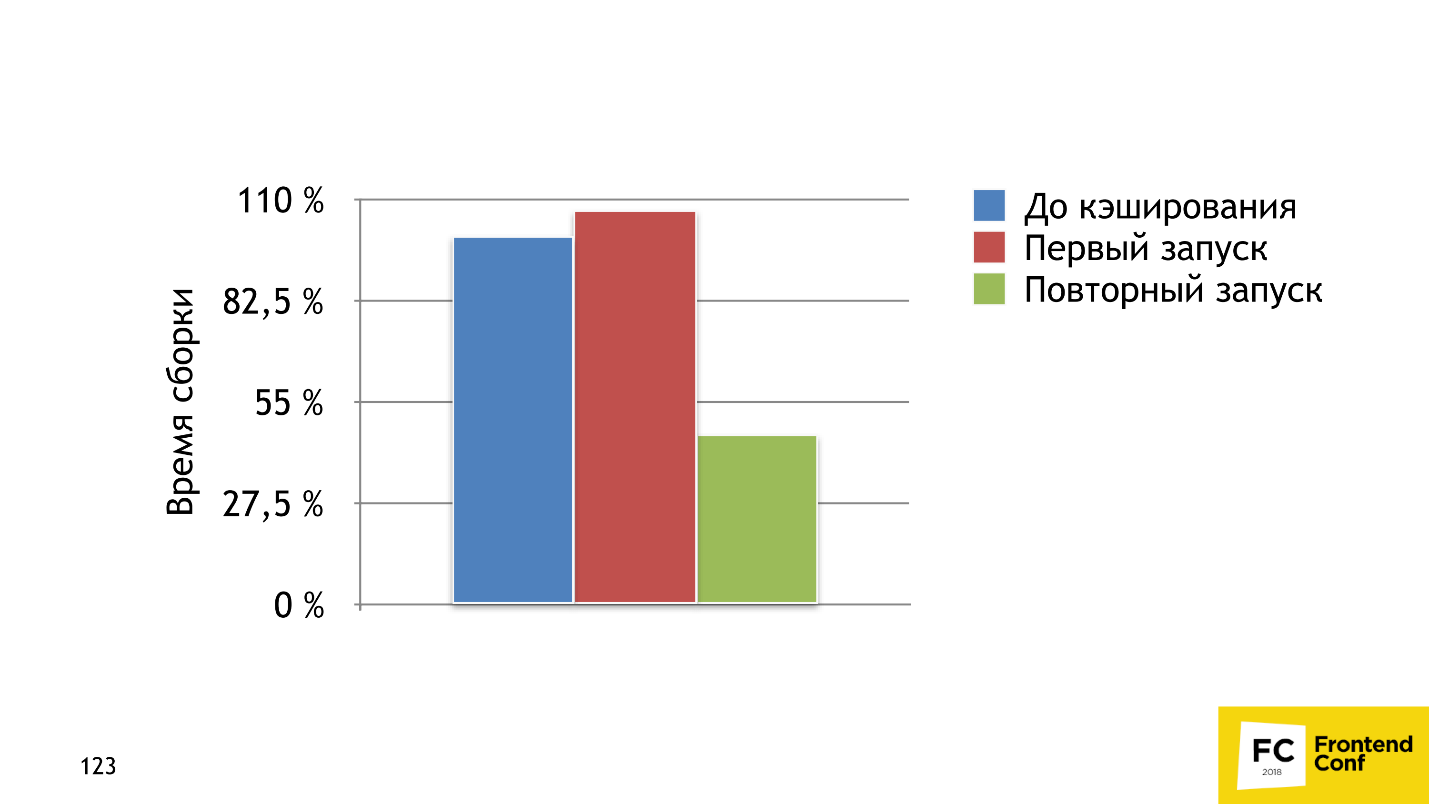
The first solution we have is a cache-loader . This is a loader that gets into a chain of loaders and saves to the file system the result of assembling a specific file for a specific chain of loaders. On the next build of the bundle, if this file is on the file system and has already been processed with this chain, the cache-loader will take the results and will not call those loaders behind them, for example, Babel-loader or node-sass.
The graph shows the assembly time. Blue bar - 100% build time, no cache loader, and with it - 7% slower. This is because the cache-loader spends extra time saving caches to the file system. Already on the second assembly, we received a tangible profit - the assembly was 2 times faster.
The second solution is more sophisticated - HardSourcePlugin . The main difference: the cache-loader is just a loader, which can only operate in a chain of loaders with code or files, and HardSourcePlugin has almost complete access to the Webpack ecosystem, can operate with other plug-ins and loaders, and slightly expands the ecosystem for caching. The graph above shows that on the first run the build time increased by 37%, but by the second run with all the caches we accelerated 5 times.
The best part is that you can use both solutions together, which we are doing in N1.RU. Be careful, because there are problems with caches, which I will discuss later.
In the plugins / loaders you already use, there may be built-in caching mechanisms . For example, the babel-loader is a very efficient caching system, but for some reason it is turned off by default. The same functionality is in awesome-typeScript-loader . The UglifyJS plugin also has caching, which works great. He sped us for a few minutes.
And now the problems.
Caching problems
- The cache may not be validated correctly .
- Applied solutions may not work with connected plug-ins, loaders, your code or with each other . In this regard, the cache-loader is a simple and problem-free solution. But with HardSourcePlugin you need to be more careful.
- It is difficult to debug if everything is broken . When caching works incorrectly and an incomprehensible error occurs, it will be very difficult to figure out what the problem is.
What to save in production?
The last way to speed up a process is to not do any part of the process. Let's think about what can be saved in production? What can we not do? The answer is short - we can do nothing ! We have no right to refuse something in production, but we can save well in dev .
What to save:
- Do not collect the source map until we need them.
- Use the style-loader instead of a cool scheme with the removal of css and processing through css-loaders. The style-loader itself is very fast, because it takes the css line and drives it into a function that inserts this line into the style tag.
- You can leave only the browser you specifically use in your browserlist - most likely it is the last chrome . This will greatly accelerate .
- Completely refuse any resource optimization : from UglifyJS, css-nano, gzip / brotli.
Accelerating an assembly is parallelization, caching, and rejecting calculations. By completing these three simple steps, you can accelerate very much.
How to configure a webpack?
We figured out how to build a dream bundle and how to assemble it quickly, and now let's figure out how to configure the Webpack, so as not to shoot yourself in the foot every time you change the config.
Evolution of the config in the project
A typical webpack configuration path in a project begins with a simple config. First you just insert the webpack, babel-loader, sass-loader and all is well. Then, unexpectedly, some conditions appear on process.env , and you insert conditions. One, second, third, more and more, until a condition is added with a “magic” option. You understand that everything is already very bad, and it is better to just duplicate the configs for dev and production, and edit twice. Everything will be clearer. If your thought flashed: “Is something wrong here?”, Then the only working advice is to keep the config in order . I'll tell you how we do it.
Keep config fine
We use webpack-merge package. This is an npm-package, which is created to merge several configs into one. If you are not satisfied with the default merge strategy, you can customize.
The structure of the project with the config
We have 4 main folders:
- Loaders.
- Plugins.
- Presets.
- Parts.
I'll tell you about each separately.
Plugin / Loader
These are folders that contain files for each loader and plug-in, with detailed documentation and more human APIs than those provided by plugin and loader developers.
It looks like this:
/** * JSdoc * @param {Object} options * @see */ module.exports = function createPlugin(options) { return new Plugin(options); }; There is a module, it exports a function that has options, and there is documentation. In words it looks good, but in reality our docks to the url-loader look like this:
/** * url-loader file-loader. * * @example * - some-image.png. url-loader, url-loader * 1. , url-loader base64 * 2. , url-loader outputPath + name , . * some-image.png, outputPath/images/some-image.12345678hash.png, url-loader * publicPath/images/some-image.12345678hash.png * * @param {string} prefix * @param {number} limit , * @return {Object} loader * @see https://www.npmjs.com/package/url-loader */ We tell in a simple form what it does, how it works, describe which parameters accept functions, what the loader creates, and give a link to the docks. I hope that the one who comes here will understand exactly how the url-loader works. The function itself looks like this:
function urlLoader(prefix = 'assets', limit = 100) { return { loader: 'url-loader', options: { limit, name: `${prefix}/[name].[hash].[ext]` } }; }; We take two parameters and return the description from the loader. Do not be afraid that the Loader folder will be cumbersome and each file will have a file.
Preset
This is a set of webpack options. They are responsible for one functionality, while operating with loaders and plug-ins, which we have already described, and the webpack settings that it has. The simplest example is a preset that tells you how to load scss files correctly:
{ test: /\.scss$/, use: [cssLoader, postCssLoader, scssLoader] } He uses already prepared loaders.
Part
The parts are what is already in the application itself. They configure the entry and exit points of your application, and can adjust or connect specific plugins, loaders and options. A typical example where we declare an entry and exit point:
entry: { app: './src/Frontend/app.js' }, output: { publicPath: '/static/cabinet/app/', path: path.resolve('www/static/app') }, In our practice we use:
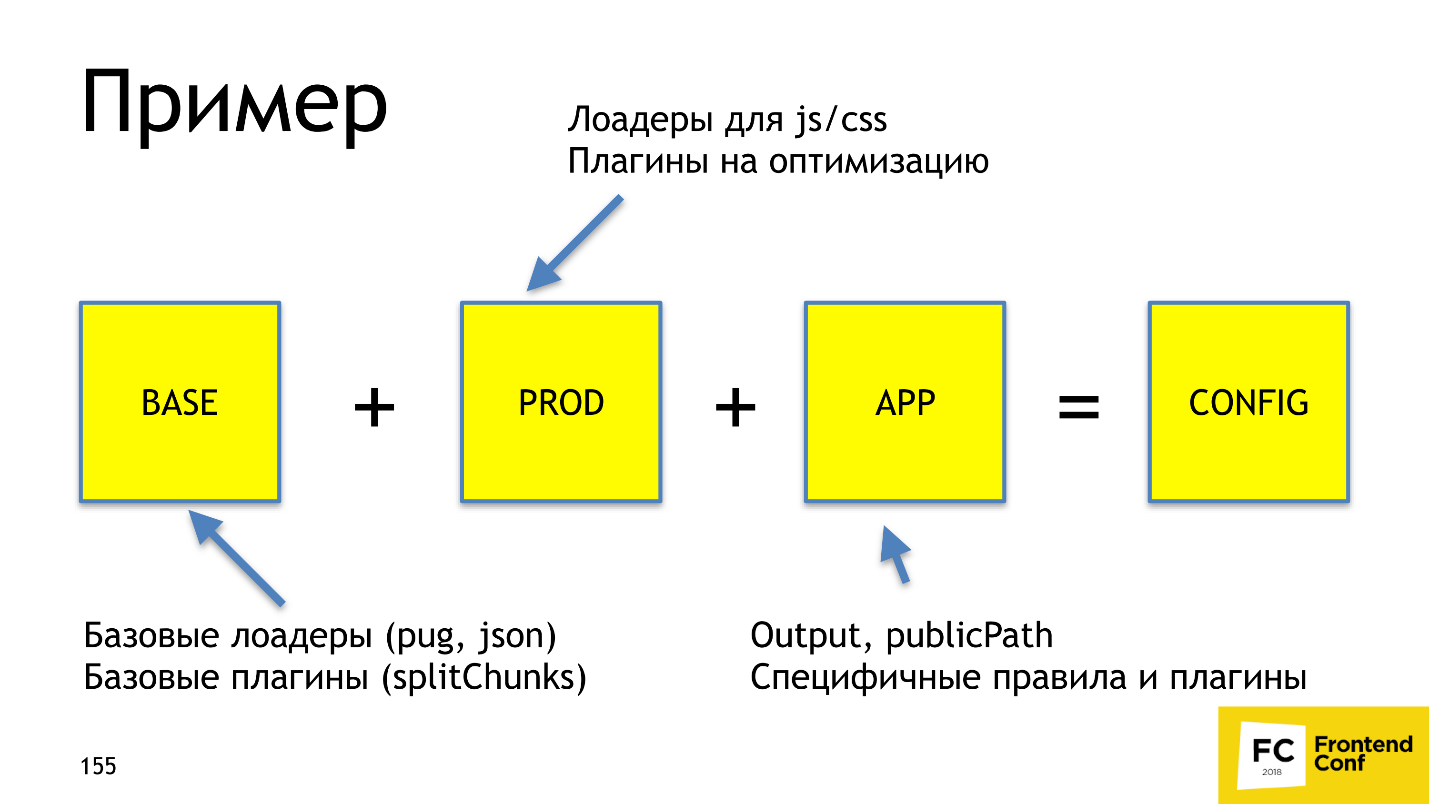
- The base preset , in which we describe how to load templates, json, which plugins should always be used, for example, splitChunks.
- Preset for dev , which describes how to properly load js / css and plugins for optimization
- Part , which describes the output, publicPath, entry-point, and some specific rules, for example, how the source map is rewritten separately.
Webpack-merge just gives us a ready config. With this approach, we always have documentation for the configuration, which is easy enough to understand. With webpack-merge we do not climb 3-7 configs to fix Babel-loader everywhere, because we have a consistent configuration of individual parts throughout the project. And it is also intuitively clear where to edit.
Config management
Let's sum up. Use ready-made tools , and do not build bicycles. Document the solutions , because webpack configs are rarely ruled by different people - so the documentation is very important there. Separate and reuse what you write.
Now you know how to build a dream bundle!
— Frontend Conf . , — , , Frontend Conf ++ .
- ? FrontenConf ++ , 27 28 . 27 , 15 . — !
Source: https://habr.com/ru/post/433324/
All Articles