Controller, easy! We take out the code in UIView
Do you have a big UIViewController? For many, yes. On the one hand, it works with data, on the other - with the interface.
The tasks of separating logic from an interface are described in hundreds of articles about the architecture: MVP, MVVM, VIPER. They solve the problem of data flow, but do not answer the question of how to work with the interface: in one place there is the creation of elements, layout, configuration, input processing and animation.
Let's separate the view from the controller and see what loadView () will help us with.
')

The iOS app interface is a
If you look at the methods of the
The
We can override the method and specify our class.
The controller will load
But while the compiler does not know about the class and believes that there is a normal
Now you can see the
Fonts, colors, constraints and hierarchies can be customized directly in the CustomView designer:
The best place for a manual layout is the
If there is time, then I make the
Encapsulation advantage: internal logic is hidden behind the interface. For example, the validity of an object may be indicated by the color of the area, not the square, but the controller does not know anything about it.
If you use Interface Builder, then often
The subclass for
You need to select the
If you select a control inside the
If you create an interface in code, then all objects are accessible after
For my taste, the controller should leave all user actions. From standard:
In this case, the
In Objective-C, you can fully replace the
In the GitHub example, you can look at the division of classes for a simple task: the color of the square depends on its position (in the green area it is green, outside it is red).
The more complex the screen, the better the effect: the controller decreases, the code is transferred to its places. The code is simply transferred to the
I used this code in different projects and with different people, each time the team welcomed the simplification and picked up the practice. I hope you enjoy it too. All lungs
The tasks of separating logic from an interface are described in hundreds of articles about the architecture: MVP, MVVM, VIPER. They solve the problem of data flow, but do not answer the question of how to work with the interface: in one place there is the creation of elements, layout, configuration, input processing and animation.
Let's separate the view from the controller and see what loadView () will help us with.
')
The iOS app interface is a
UIView hierarchy. The tasks of each view : to create elements, set up, decompose into places, animate. This is evident from the methods that are in the UIView: addSubview(), drawRect(), layoutSubviews(). class UIView: addSubview(), drawRect(), layoutSubviews().If you look at the methods of the
UIViewController class, you can see that he is in control of view: loads, reacts to screen loading and user actions, shows new screens. Often the code that needs to be in a UIView is written in subclasses of UIViewController , which makes it too large. Separate it.loadView ()
The
UIViewController life cycle begins with loadView() . A simplified implementation looks like this: // CustomViewController.swift func loadView() { self.view = UIView() } We can override the method and specify our class.
super.loadView() no need to call! // CustomViewController.swift override func loadView() { self.view = CustomView() } Implementing CustomView.swift
// CustomView.swift final class CustomView { let square: UIView = UIView() init() { super.init() square.backgroundColor = .red addSubview(square) } } The controller will load
CustomView, add it to the hierarchy, set the .frame . The .view property will be the class we need: // CustomViewController.swift print(view) // CustomView But while the compiler does not know about the class and believes that there is a normal
UIView . Let's fix this with a type conversion: // CustomViewController.swift func view() -> CustomView { return self.view as! CustomView } Now you can see the
CustomView variables: // CustomViewController.swift func viewDidLoad() { super.viewDidLoad() view().square // } Simplify using associatedtype
Ruslan Kavetsky proposed to remove code duplication using protocol extension:protocol ViewSpecificController { associatedtype RootView: UIView } extension ViewSpecificController where Self: UIViewController { func view() -> RootView { return self.view as! RootView } }
For each new controller, you only need to specify the protocol and subclass for itsUIViewthroughtypealias:// CustomViewController.swift final class CustomViewController: UIViewController, ViewSpecificController { typealias RootView = CustomView func viewDidLoad() { super.viewDidLoad() view().square // } }
Code in a subclass of UIView
Creating and configuring controls
Fonts, colors, constraints and hierarchies can be customized directly in the CustomView designer:
// CustomView.swift init() { super.init() backgroundColor = .lightGray addSubview(square) } layoutSubviews ()
The best place for a manual layout is the
layoutSubviews() method. It is called every time the view size changes, so you can rely on the bounds size for correct calculations: // CustomView.swift override func layoutSubviews() { super.layoutSubviews() square.frame = CGRect(x: 0, y: 0: width: 200, height: 200) square.center = CGPoint(x: bounds.width / 2, y: bounds.height / 2) } Private controls, public properties
If there is time, then I make the
property controls private, but I manage them through public variables or “in the knowledge” functions. Easier by example: // CustomView.swift private let square = UIView() var squarePositionIsValid: Bool { didSet { square.backgroundColor = squarePositionIsValid? .green : .red } } func moveSquare(to newCenter: CGPoint) { square.center = newCenter } Encapsulation advantage: internal logic is hidden behind the interface. For example, the validity of an object may be indicated by the color of the area, not the square, but the controller does not know anything about it.
What remains in viewDidLoad ()?
If you use Interface Builder, then often
viewDidLoad() empty. If you create a view in code, then you need to bind their actions through the target-action pattern, add a UIGestureRecognizer or associate delegates.Customizable via Interface Builder
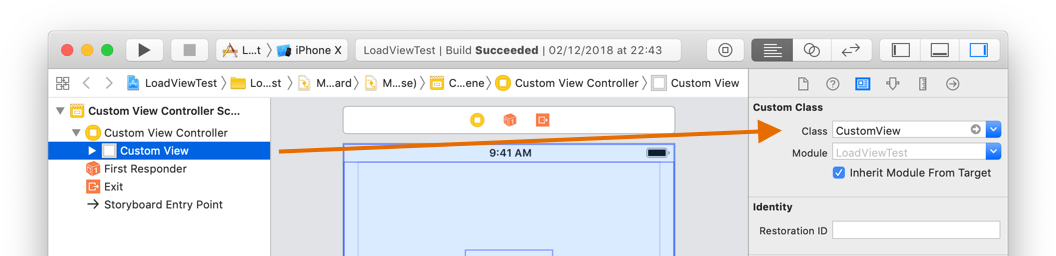
The subclass for
view can be configured through Interface Builder (hereinafter IB).You need to select the
view object (not the controller) and set its class. Write your own loadView() not necessary, the controller will do it himself. But UIView still have to UIView type.IBOutlet in UIView
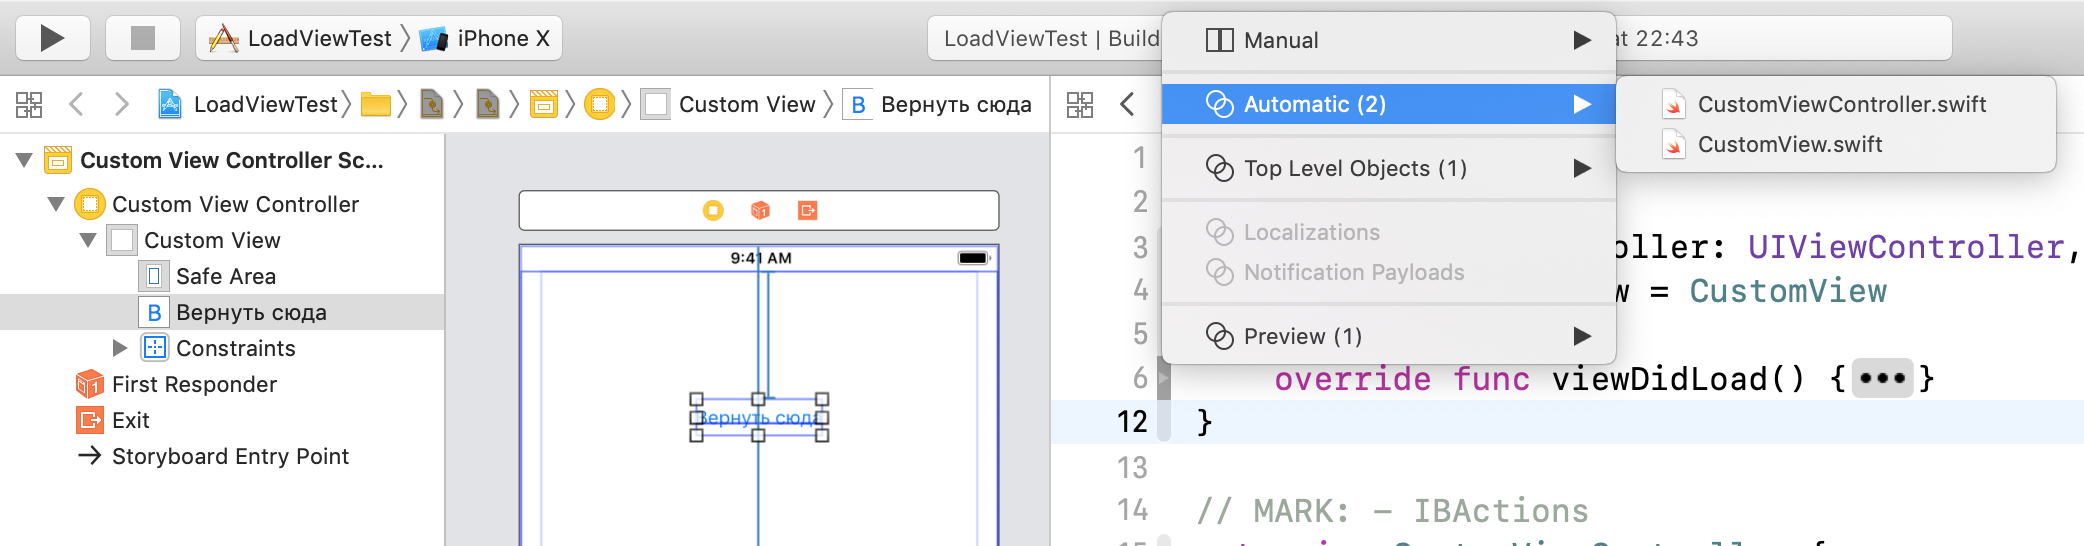
If you select a control inside the
view , the Assistant Editor will recognize the UIView class and offer it as the second file in Automatic mode. So you can transfer IBOutlet to view .If not working
Open the
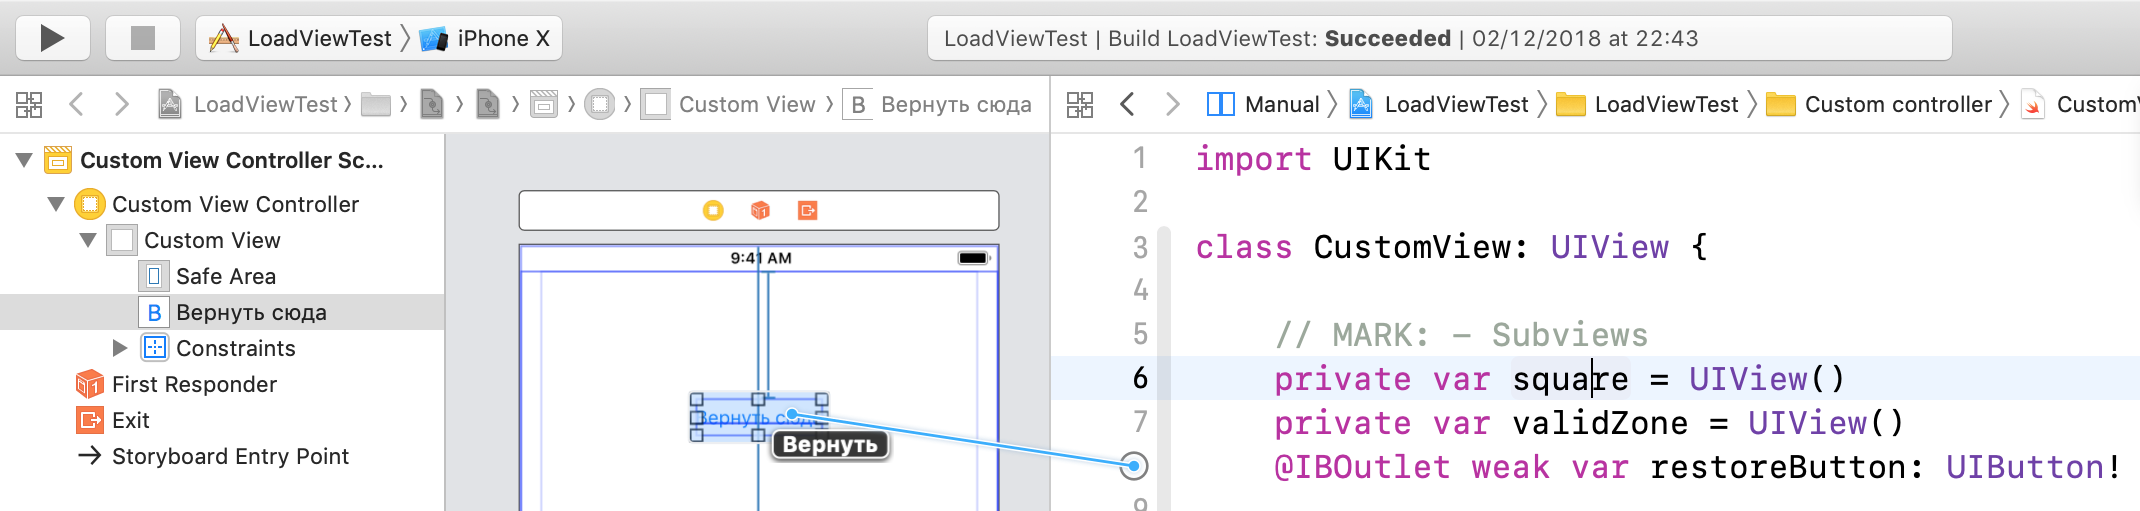
CustomView class manually, write IBOutlet . You can now drag the marker and hover over an item in IB.If you create an interface in code, then all objects are accessible after
init() , but when working with IB, access to IBOutlet appears only after loading the interface from the UIStoryboard in the awakeFromNib() method: // CustomView.swift func awakeFromNib() { super.awakeFromNib() square.layer.cornerRadius = 8 } IBAction in UIViewController
For my taste, the controller should leave all user actions. From standard:
- target-action from controls
- implementation of delegate in
UIViewController - block implementation
Notificationresponse
In this case, the
UIViewController controls only the interface. Everything related to business logic should be taken out of the controller, but this is a choice: MVP, VIPER, etc.Objective c
In Objective-C, you can fully replace the
UIView type. To do this, declare a property with the required class, override setter and getter , specifying the class: // CustomViewController.m @interface CustomViewController @property (nonatomic) CustomView *customView; @end @implementation - (void)setView:(CustomView *)view{ [super setView:view]; } - (CustomView *)view { return (CustomView *)super.view; } @end the end
In the GitHub example, you can look at the division of classes for a simple task: the color of the square depends on its position (in the green area it is green, outside it is red).
The more complex the screen, the better the effect: the controller decreases, the code is transferred to its places. The code is simply transferred to the
view , but encapsulation makes it easy to interact and read the code. Sometimes the view can be reused with another controller. For example, different controllers for the iPhone and iPad react differently to the appearance of the keyboard, but this does not change the view code in any way.I used this code in different projects and with different people, each time the team welcomed the simplification and picked up the practice. I hope you enjoy it too. All lungs
UIViewController !Source: https://habr.com/ru/post/432718/
All Articles