React Training Course, Part 1: Course Overview, React, ReactDOM, and JSX Reasons for Popularity
We present to your attention the first 5 lessons of the training course on React for beginners. The original course in English, consisting of 48 lessons, published on the platform Scrimba.com. The possibilities of this platform allow, listening to the presenter, sometimes to put the playback on pause and independently, in the same window in which the demonstration is conducted, experiment with the code. The course seemed interesting to us, we decided to translate it into Russian and convert it into the format of traditional publications.

→ Part 1: Course Overview, React, ReactDOM, and JSX Reasons
→ Part 2: Functional Components
→ Part 3: Component Files, Project Structure
→ Part 4: Parent and Child Components
→ Part 5: Getting Started on a TODO Application, Basics of Styling
→ Part 6: Some of the features of the course, JSX and JavaScript
→ Part 7: Inline Styles
→ Part 8: continued work on the TODO application, familiarity with the properties of components
→ Part 9: Component Properties
→ Part 10: Workshop on working with the properties of components and styling
→ Part 11: dynamic markup generation and the map array method
→ Part 12: workshop, the third stage of work on the TODO application
→ Part 13: Class Based Components
→ Part 14: Workshop on Class Based Components, Component State
→ Part 15: workshops on working with the state of components
→ Part 16: the fourth stage of the work on the TODO application, event handling
→ Part 17: the fifth stage of working on a TODO application, modifying the state of components
')
We believe that this course will be useful to everyone who, as they say, “does not know how to do in React”, but wants to learn. At the same time, it takes considerable time and effort to turn this course into regular publications, so we, before making a final decision on the launch of this project, invite everyone to evaluate the course and participate in a survey on the expediency of its translation.
→ Original
Welcome to the Basics of React course. My name is Bob Zearoll. I’ll tell you how to create front-end projects using one of the most popular web frameworks in the world. I have been working in the field of computer education for many years, in particular, now I am leading the organization of the educational process at V School .
Over the years of developing training courses aimed at helping everyone to quickly master complex things, I developed my own approach to learning, which I think it would be useful to tell.
First I want to note that the easiest and most effective way to learn anything is to spare no effort and time to practice. If you want to learn how to program - the sooner you start doing something yourself, and the more often you do it - the higher your chances of success.
Usually, when I introduce students to the V School, I give them the following example from my own life. Recently, I was drawn to work with a tree. I read books, watched countless videos on YouTube, they gave me tools. But I could not do anything worthy until I took the tools in my hands. Only many hours spent on work with a saw and sandpaper, on bonding and screwing parts, allowed me to get closer to the goal. As a matter of fact, the development of everything, anything, is arranged according to the same principle. Want to learn React? Write the code.
Most of the lessons in this course contain exercises. It is expected that you will try to do them yourself. If you, having familiarized yourself with the task for independent work, immediately proceed to the description of its solution, then you will, in fact, choose the most difficult way to study React. In addition, do not wait until you are offered to practice - take the initiative and try everything you learn. Try as much as possible to work independently with the code. In particular, when you have already mastered React a little - create something that you are interested in, experience everything that you are curious to experience. This will allow you to avoid such troubles as " tutorial hell ".
Another important point of my approach is interval training and the repetition of the material studied. These are the most important things that allow you to truly remember what you are learning. It is not recommended to rush to study the course. This is the way to that very “tutorial hell”. With this approach, there is a feeling as if you really learned something, but in reality you are just not able to remember what you “learned”.
Therefore, moving through the materials, take frequent breaks. We are not talking about periodic breaks of 5-10 minutes, but something more ambitious. Learn a couple of principles, practice using them, and then take a day's rest. When you return to the course, it will be very useful to repeat the materials already studied. Of course, with such an approach, it will take more time to master the course, but this will have an extremely beneficial effect on your learning.
Now let's briefly discuss what you learn by learning this course.
Here is a list of the main topics of the course:
In order to be productive in this course, you need to know HTML, CSS and JavaScript (ES6).
→ Original
During the course of this course, you will develop study projects. Take a look at some of them.
Our first development will be a standard TODO application.
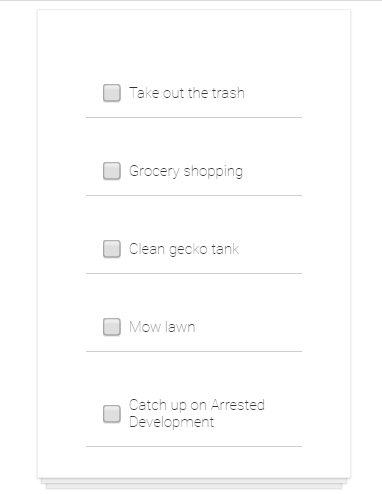
TODO application
It may look boring, but in the course of its development there will be a lot of opportunities that we will talk about. You can click on the items in the to-do list, marking them as completed, and see how their appearance changes.
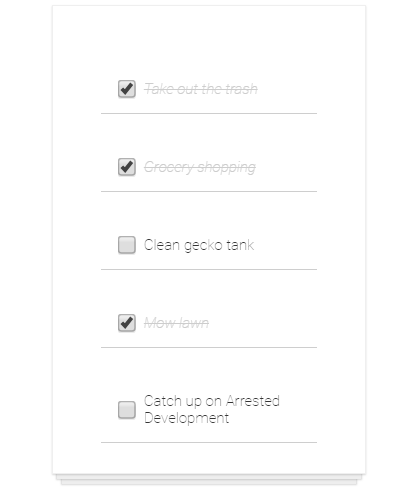
Reported cases in the TODO application
And here is our course project - meme generator.

Meme generator
When working with this application, in the

Ready meme
→ Original
Why use React if you can develop a web project in pure JavaScript? If you are interested in web development, you may have heard that React allows you to create very fast applications whose performance exceeds what is achievable using only JavaScript. This is achieved through the use of a technology called Virtual DOM in React. We will not go into details about Virtual DOM, if you want to get a closer look at this technology, you can watch this video.
Now it’s enough for us to know that Virtual DOM helps web applications to work much faster than if they were developed using regular JS. Another truly remarkable advantage that React gives us is the ability to create web components that are suitable for reuse. Consider an example.
We have the standard
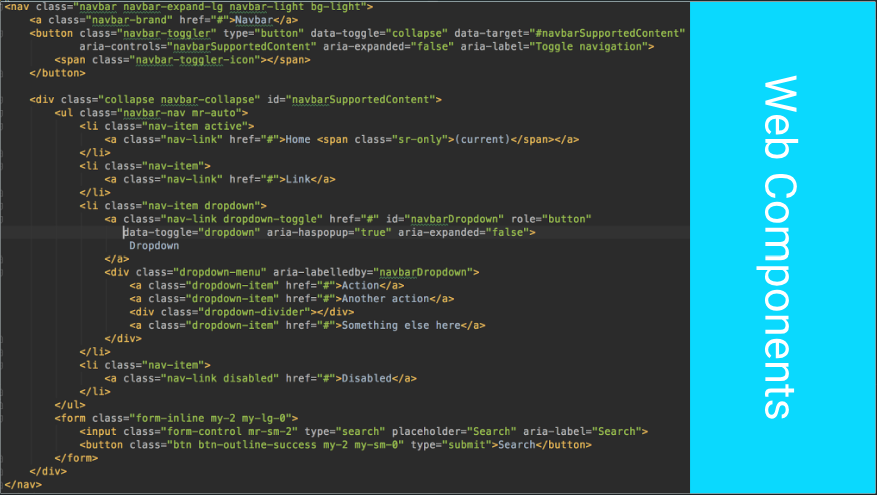
Navigation bar
If you have not used Bootstrap before, then know that this is just a CSS library that gives the web developer beautifully designed elements. There are about four dozen lines of code, it all looks rather cumbersome, to navigate in such code is not easy. If you include all this in the HTML page, on which there is a lot of everything, the code of such a page will be simply overloaded with various constructions.
React web components allow you to take HTML snippets, format them as stand-alone components, and, instead of adding these fragments to a page, include into the content of the pages something like special HTML tags pointing to them. In our case, instead of adding forty lines of HTML markup to a page, it is enough to include the component containing this markup. We call it
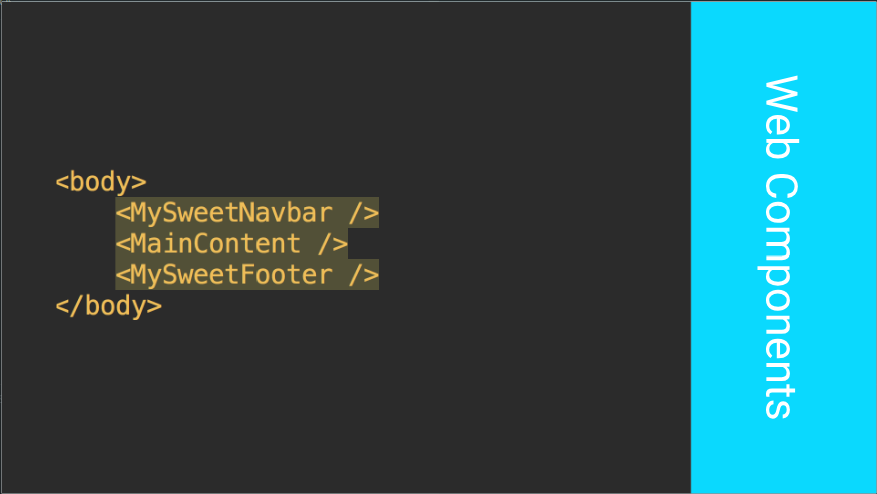
Component approach to the formation of web pages
You can name such a component as you like. As you can see, component-based page markup is much easier to read. The developer immediately sees the general structure of such a page. In this case, as you can see from the contents of the
In addition, components not only improve the code structure of HTML pages. They are also suitable for reuse. What if you need the same navigation bar on several pages? What if such panels on different pages are slightly different from each other? What to do if the same panel is used on multiple pages, and you need to make some change in it? Without the use of the component approach, it is difficult to give decent answers to these and many other questions.
Another reason for the popularity of React can be considered the fact that Facebook is developing and supporting this library. This, at least, means that React, on an ongoing basis, is handled by qualified programmers. The popularity of React, and the fact that this project is open-source, published on GitHub, also means that many third-party developers are contributing to the project. All this allows us to say that React, in the foreseeable future, will live and develop.
Speaking about React, and, in particular, about why this library should be studied, it is impossible not to recall the huge labor market associated with this library. These days, React specialists are in steady demand. If you study React in order to find a job in the field of front-end development, this means that you are on the right track.
→ Original
Here we will talk about how to create the simplest React application using ReactDOM and address some key points regarding JSX. But, before starting to work with the code, let's talk about where to run this code.
In order to experiment with React-code, perhaps, it would be best to deploy a full-fledged local development environment. In order to do this, you can refer to our recently published React.js material : a clear guide for beginners , in particular, to his section Practice of Developing React-applications. Namely, in order to start the experiments, you need to create a new application,
The content of the
Another option that is usually suitable for some very simple experiments is to use online platforms like codepen.io. For example, here’s a demonstration project for Dan Abramov’s React application. The essence of preparing a Codepen project for experiments with React is to connect the
It is possible that for experiments, it will be convenient to use the features of Scrimba. To do this, you can simply open the page of relevant classes. Links to these pages can be found below the headings with the numbers and titles of occupations.
It should be noted that in our examples we will use the capabilities of ES6 (ES2015), so it is highly desirable for you to navigate in them. In particular, in order to import the
And so you can import the
Now let's use the
If you decide to use the project created by means of
Enter the code in index.js
If you are running a development server and the
In fact, now is the time to deal with the code that we just wrote. Namely, here we imported into the React project, then - ReactDOM - so that the capabilities of this library could be used to display something on the screen.
The
What we want to display should somehow be tied to some HTML page. The code that we will write will be turned into HTML elements, which will go to the page.
Here is what this page might look like.
There are all the basic elements of the HTML page, including the
If you use
Notice the
If you now go back to the
With this approach, the
If you now refresh the browser page, then it will display, as a first-level heading, the specified text.

The result of the first program
Here you may have a question about why we put the description of the HTML element in the place where the argument of the JavaScript method is expected. After all, JavaScript, faced with something like
React developers have created not only a library, but also a special language called JSX. JSX is very similar to HTML. Then you will see that almost all JSX code almost completely coincides with the HTML markup generated with it. There are, of course, differences between JSX and HTML, and we will gradually discuss them.
We have introduced a rather simple and short instruction, but in the depths of React, when it is executed, a lot of interesting things happen. So, this instruction is converted to its version in JavaScript, HTML-code is being generated, although we don’t go into the details of this process. That is why we need to import not only
The fact is that even though in our example React is not directly used, the library is used to work with JSX.
Another thing about working with JSX, to which I want to draw your attention, is that you cannot render JSX elements that follow each other. Suppose that after the element
If you refresh the page after that, an error message will be displayed (in the
To make our example work, we wrap the
If you now refresh the page, then everything will look as expected.

Two HTML elements per page
JSX, , , HTML- JavaScript. ,
, . — , , JSX, .
→ Original
ReactDOM JSX, .
. , , , , , , . . , , .
, — , .
React-, (
, , JSX-, .
, , React, .
Thanks for attention!

→ Part 1: Course Overview, React, ReactDOM, and JSX Reasons
→ Part 2: Functional Components
→ Part 3: Component Files, Project Structure
→ Part 4: Parent and Child Components
→ Part 5: Getting Started on a TODO Application, Basics of Styling
→ Part 6: Some of the features of the course, JSX and JavaScript
→ Part 7: Inline Styles
→ Part 8: continued work on the TODO application, familiarity with the properties of components
→ Part 9: Component Properties
→ Part 10: Workshop on working with the properties of components and styling
→ Part 11: dynamic markup generation and the map array method
→ Part 12: workshop, the third stage of work on the TODO application
→ Part 13: Class Based Components
→ Part 14: Workshop on Class Based Components, Component State
→ Part 15: workshops on working with the state of components
→ Part 16: the fourth stage of the work on the TODO application, event handling
→ Part 17: the fifth stage of working on a TODO application, modifying the state of components
')
We believe that this course will be useful to everyone who, as they say, “does not know how to do in React”, but wants to learn. At the same time, it takes considerable time and effort to turn this course into regular publications, so we, before making a final decision on the launch of this project, invite everyone to evaluate the course and participate in a survey on the expediency of its translation.
Lesson 1: Course Overview and Recommendations
→ Original
Welcome to the Basics of React course. My name is Bob Zearoll. I’ll tell you how to create front-end projects using one of the most popular web frameworks in the world. I have been working in the field of computer education for many years, in particular, now I am leading the organization of the educational process at V School .
▍About the course development process
Over the years of developing training courses aimed at helping everyone to quickly master complex things, I developed my own approach to learning, which I think it would be useful to tell.
First I want to note that the easiest and most effective way to learn anything is to spare no effort and time to practice. If you want to learn how to program - the sooner you start doing something yourself, and the more often you do it - the higher your chances of success.
Usually, when I introduce students to the V School, I give them the following example from my own life. Recently, I was drawn to work with a tree. I read books, watched countless videos on YouTube, they gave me tools. But I could not do anything worthy until I took the tools in my hands. Only many hours spent on work with a saw and sandpaper, on bonding and screwing parts, allowed me to get closer to the goal. As a matter of fact, the development of everything, anything, is arranged according to the same principle. Want to learn React? Write the code.
Most of the lessons in this course contain exercises. It is expected that you will try to do them yourself. If you, having familiarized yourself with the task for independent work, immediately proceed to the description of its solution, then you will, in fact, choose the most difficult way to study React. In addition, do not wait until you are offered to practice - take the initiative and try everything you learn. Try as much as possible to work independently with the code. In particular, when you have already mastered React a little - create something that you are interested in, experience everything that you are curious to experience. This will allow you to avoid such troubles as " tutorial hell ".
Another important point of my approach is interval training and the repetition of the material studied. These are the most important things that allow you to truly remember what you are learning. It is not recommended to rush to study the course. This is the way to that very “tutorial hell”. With this approach, there is a feeling as if you really learned something, but in reality you are just not able to remember what you “learned”.
Therefore, moving through the materials, take frequent breaks. We are not talking about periodic breaks of 5-10 minutes, but something more ambitious. Learn a couple of principles, practice using them, and then take a day's rest. When you return to the course, it will be very useful to repeat the materials already studied. Of course, with such an approach, it will take more time to master the course, but this will have an extremely beneficial effect on your learning.
Now let's briefly discuss what you learn by learning this course.
▍Start and preliminary requirements
Here is a list of the main topics of the course:
- Components. Speaking of React, one cannot avoid discussing the concept of components. Components in React are the basic building block for creating HTML snippets suitable for reuse. And practically everything else that we will talk about is related to how to use these components to build web applications.
- Jsx This is a JavaScript syntax extension that allows you to create components using the capabilities of HTML and JavaScript.
- Styling components. Styling makes the components look attractive.
- Properties and data exchange in the application. Properties are used to transfer data between components.
- Condition. Component state mechanisms are used to store and manage data in an application.
- Event handling Events allow you to establish interactive relationships with application users.
- Methods of life cycle components. These methods allow the programmer to influence various events occurring with components.
- Download data from external APIs using the HTTP protocol.
- Work with forms.
In order to be productive in this course, you need to know HTML, CSS and JavaScript (ES6).
Lesson 2. Training Projects
→ Original
During the course of this course, you will develop study projects. Take a look at some of them.
Our first development will be a standard TODO application.
TODO application
It may look boring, but in the course of its development there will be a lot of opportunities that we will talk about. You can click on the items in the to-do list, marking them as completed, and see how their appearance changes.
Reported cases in the TODO application
And here is our course project - meme generator.
Meme generator
When working with this application, in the
Top Text and Bottom Text fields enter texts that, respectively, fall into the top and bottom of the image. By clicking on the Gen button, the program randomly selects a meme image from the corresponding API and adds text to it. Here is an example of the operation of this application:Ready meme
Session 3. Why do you need React and why is it worth studying?
→ Original
Why use React if you can develop a web project in pure JavaScript? If you are interested in web development, you may have heard that React allows you to create very fast applications whose performance exceeds what is achievable using only JavaScript. This is achieved through the use of a technology called Virtual DOM in React. We will not go into details about Virtual DOM, if you want to get a closer look at this technology, you can watch this video.
Now it’s enough for us to know that Virtual DOM helps web applications to work much faster than if they were developed using regular JS. Another truly remarkable advantage that React gives us is the ability to create web components that are suitable for reuse. Consider an example.
We have the standard
navbar element (navigation bar) from the Bootstrap library.Navigation bar
If you have not used Bootstrap before, then know that this is just a CSS library that gives the web developer beautifully designed elements. There are about four dozen lines of code, it all looks rather cumbersome, to navigate in such code is not easy. If you include all this in the HTML page, on which there is a lot of everything, the code of such a page will be simply overloaded with various constructions.
React web components allow you to take HTML snippets, format them as stand-alone components, and, instead of adding these fragments to a page, include into the content of the pages something like special HTML tags pointing to them. In our case, instead of adding forty lines of HTML markup to a page, it is enough to include the component containing this markup. We call it
MySweetNavbar .Component approach to the formation of web pages
You can name such a component as you like. As you can see, component-based page markup is much easier to read. The developer immediately sees the general structure of such a page. In this case, as you can see from the contents of the
<body> , there is a navigation bar ( MySweetNavbar ) at the top of the page, the main content ( MainContent ) is placed in the middle, and a footer ( MySweetFooter ) is at the bottom of the page.In addition, components not only improve the code structure of HTML pages. They are also suitable for reuse. What if you need the same navigation bar on several pages? What if such panels on different pages are slightly different from each other? What to do if the same panel is used on multiple pages, and you need to make some change in it? Without the use of the component approach, it is difficult to give decent answers to these and many other questions.
Another reason for the popularity of React can be considered the fact that Facebook is developing and supporting this library. This, at least, means that React, on an ongoing basis, is handled by qualified programmers. The popularity of React, and the fact that this project is open-source, published on GitHub, also means that many third-party developers are contributing to the project. All this allows us to say that React, in the foreseeable future, will live and develop.
Speaking about React, and, in particular, about why this library should be studied, it is impossible not to recall the huge labor market associated with this library. These days, React specialists are in steady demand. If you study React in order to find a job in the field of front-end development, this means that you are on the right track.
Lesson 4: Development Environment, ReactDOM and JSX
→ Original
Here we will talk about how to create the simplest React application using ReactDOM and address some key points regarding JSX. But, before starting to work with the code, let's talk about where to run this code.
▍ Environment development
In order to experiment with React-code, perhaps, it would be best to deploy a full-fledged local development environment. In order to do this, you can refer to our recently published React.js material : a clear guide for beginners , in particular, to his section Practice of Developing React-applications. Namely, in order to start the experiments, you need to create a new application,
create-react-app , then start the local development server and start editing the code. If we are talking about the simplest examples, then their code can be entered directly into the standard index.js file, removing the code from it or commenting it out.The content of the
index.html file in the project created by create-react-app corresponds to its content in the examples that will be provided in this course. In particular, we are talking about the presence on the page of a <div> element with the root identifier.Another option that is usually suitable for some very simple experiments is to use online platforms like codepen.io. For example, here’s a demonstration project for Dan Abramov’s React application. The essence of preparing a Codepen project for experiments with React is to connect the
react and react-dom libraries to it (this can be done by clicking the Settings button at the top of the page, going to the JavaScript section in the window that appears and connecting to the project, having previously found them with using the built-in search engine, the necessary libraries).It is possible that for experiments, it will be convenient to use the features of Scrimba. To do this, you can simply open the page of relevant classes. Links to these pages can be found below the headings with the numbers and titles of occupations.
▍First program
It should be noted that in our examples we will use the capabilities of ES6 (ES2015), so it is highly desirable for you to navigate in them. In particular, in order to import the
react library into a project, the following construction serves: import React from "react" And so you can import the
react-dom library: import ReactDOM from "react-dom" Now let's use the
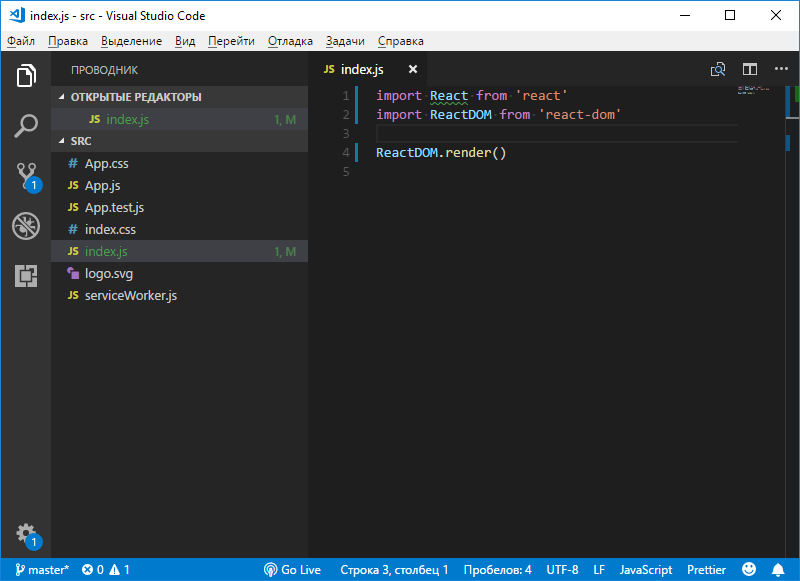
render() ReactDOM method to display something on the screen: ReactDOM.render() If you decide to use the project created by means of
create-react-app for experiments, then now its index.js file (opened in VSCode) will look like the one shown in the following figure.Enter the code in index.js
If you are running a development server and the
http://localhost:3000/ page is open in the browser, then you will save such index.js and you will see error messages there. This, at this stage of work, is perfectly normal, since we have not yet informed the system what and where we want to bring the render() command.In fact, now is the time to deal with the code that we just wrote. Namely, here we imported into the React project, then - ReactDOM - so that the capabilities of this library could be used to display something on the screen.
The
render() method takes two arguments. The first will be what we want to bring, and the second will be the place where we want to bring something. If this is written in the form of pseudo-code, then we get the following: ReactDOM.render( , ) What we want to display should somehow be tied to some HTML page. The code that we will write will be turned into HTML elements, which will go to the page.
Here is what this page might look like.
<html> <head> <link rel="stylesheet" href="style.css"> </head> <body> <div id="root"></div> <script src="index.js"></script> </body> </html> There are all the basic elements of the HTML page, including the
<link> tag and the <script> .If you use
create-react-app , then the index.html page will look a little different. In particular, there is no index.js import command in its code. The fact is that when building a project, the relationship index.html and index.js done automatically .Notice the
<div> element with the root id. Between the opening and closing tags of this element React will place everything we create. This element can be considered a container for our entire application.If you now go back to the
index.js file and to the index.js render() ReactDOM , its second argument, the place where the data should be output, will be an indication of a <div> element with the root identifier. Here we will use regular JavaScript, after which the second argument of the Render method will look like this: ReactDOM.render( , document.getElementById("root")) With this approach, the
render() method takes the first argument and prints what it describes to the specified location. Now let's take this first argument. Let's start with the element <h1> . And, as is usually the case when writing the first program, add the text Hello world! : ReactDOM.render(<h1>Hello world!</h1>, document.getElementById("root")) If you now refresh the browser page, then it will display, as a first-level heading, the specified text.
The result of the first program
Here you may have a question about why we put the description of the HTML element in the place where the argument of the JavaScript method is expected. After all, JavaScript, faced with something like
<h1>Hello world!</h1> , probably decides that the first character of this expression is the “less” operator, then, obviously, the variable name comes, then the comparison operator is “more ". JavaScript does not recognize the HTML element in this sequence of characters, nor should it.React developers have created not only a library, but also a special language called JSX. JSX is very similar to HTML. Then you will see that almost all JSX code almost completely coincides with the HTML markup generated with it. There are, of course, differences between JSX and HTML, and we will gradually discuss them.
We have introduced a rather simple and short instruction, but in the depths of React, when it is executed, a lot of interesting things happen. So, this instruction is converted to its version in JavaScript, HTML-code is being generated, although we don’t go into the details of this process. That is why we need to import not only
react-dom into the project, but also react , since the React library is exactly what allows us to use JSX and make JSX constructions work as expected. If we remove the import React from "react" line from our example, save the script file and refresh the page, an error message will be displayed. In particular, create-react-app will tell us that without access to React you cannot use JSX ( 'React' must be in scope when using JSX react/react-in-jsx-scope ).The fact is that even though in our example React is not directly used, the library is used to work with JSX.
Another thing about working with JSX, to which I want to draw your attention, is that you cannot render JSX elements that follow each other. Suppose that after the element
<h1> you need to display the element <p> . Let's try to use this design: ReactDOM.render(<h1>Hello world!</h1><p>This is a paragraph</p>, document.getElementById("root")) // If you refresh the page after that, an error message will be displayed (in the
create-react-app it looks like the Parsing error: Adjacent JSX elements must be wrapped in an enclosing tag ). The essence of this error is that such elements must be wrapped in some other element. What comes out in the end should look like one element with two elements nested into it.To make our example work, we wrap the
<h1>Hello world!</h1><p>This is a paragraph</p> code into a <div> element: ReactDOM.render(<div><h1>Hello world!</h1><p>This is a paragraph</p></div>, document.getElementById("root")) If you now refresh the page, then everything will look as expected.
Two HTML elements per page
JSX, , , HTML- JavaScript. ,
<p> , : var myNewP = document.createElement("p") myNewP.innerHTML = "This is a paragraph." , . — , , JSX, .
5. . ReactDOM JSX
→ Original
ReactDOM JSX, .
. , , , , , , . . , , .
, — , .
▍Job
React-, (
<ul> ). ( <li> ) .▍
, , JSX-, .
Decision
. —
— , — , —
:
, , ,
react , , - , react-dom . import React from "react" import ReactDOM from "react-dom" render() ReactDOM , , , . ReactDOM.render( <ul> <li>1</li> <li>2</li> <li>3</li> </ul>, document.getElementById("root") ) — , — , —
<div> root . HTML- , , .:
import React from "react" import ReactDOM from "react-dom" ReactDOM.render( <ul> <li>1</li> <li>2</li> <li>3</li> </ul>, document.getElementById("root") ) , , ,
render() HTML-.Results
, , React, .
Thanks for attention!
Source: https://habr.com/ru/post/432636/
All Articles