Before you - React Modern Web App
Before you begin to build from scratch Modern Web App you need to figure out what is - Modern Web Application?
Modern Web App (MWA) is an application that adheres to all modern web standards. Among them, the Progressive Web App is the ability to download a mobile browser version to a phone and use it as a full-fledged application. It is also an opportunity to browse the site offline both from a mobile device and from a computer; modern material design; perfect search engine optimization; and of course - high download speed.

Here is what will happen in our MWA (I advise you to use this article navigation):
- Universal web app
- Material-ui
- Code splitting
- Redux example
- mobile version
- Progressive web app
- Babel 7, Webpack and more
People on Habré are business, so immediately catch a link to the GitHub repository , an archive from each of the development stages and demos . This article is intended for developers who are familiar with node.js and react. All the necessary theory is presented in the required amount. Expand your horizons by clicking on the links.
Let's get started!
1. Universal
Standard actions: create a working directory and execute git init . Open package.json and add a couple of lines:
"dependencies": { "@babel/cli": "^7.1.5", "@babel/core": "^7.1.6", "@babel/preset-env": "^7.1.6", "@babel/preset-react": "^7.0.0", "@babel/register": "^7.0.0", "babel-loader": "^8.0.4", "babel-plugin-root-import": "^6.1.0", "express": "^4.16.4", "react": "^16.6.3", "react-dom": "^16.6.3", "react-helmet": "^5.2.0", "react-router": "^4.3.1", "react-router-dom": "^4.3.1", "webpack": "^4.26.1", "webpack-cli": "^3.1.2" } We execute npm install and, while installed, we understand.
Since we are at the turn of 2018 and 2019, our web application will be universal (or isomorphic) - both on the backup and on the front there will be ECMAScript versions not lower than ES2017. For this, index.js (application input file) connects babel / register, and all the ES code following it, babel on the fly turns into JavaScript, understandable to the browser, using babel / preset-env and babel / preset-react. For ease of development, I usually use the babel-plugin-root-import plugin, with which all imports from the root directory will look like '~ /', and from src / - '& /'. Alternatively, you can prescribe long paths or use alias from the webpack.
index.js
require("@babel/register")(); require("./app"); .babelrc
{ "presets": [ [ "@babel/preset-env", { "targets": { "node": "current" } } ], "@babel/preset-react" ], "plugins": [ ["babel-plugin-root-import", { "paths": [{ "rootPathPrefix": "~", "rootPathSuffix": "" }, { "rootPathPrefix": "&", "rootPathSuffix": "src/" }] }] ] } Time to set up a webpack . We create webpack.config.js and use the code (hereinafter pay attention to the comments in the code).
const path = require('path'); module.exports = { // , Universal web app entry: { client: './src/client.js' }, // , webpack' output: { path: path.resolve(__dirname, 'public'), publicPath: '/' }, module: { // babel-loader ECMAScript // JavaScript. /public rules: [ { test: /\.js$/, exclude: /node_modules/, loader: "babel-loader" } ] } } From this moment begins the most interesting. It's time to develop the server side of the application. Server-side Rendering (SSR) is a technology designed to speed up the load of a web application at times and solve the eternal debate about search engine optimization in Single Page Application (SEO in SPA). To do this, we take an HTML template, insert content into it and send it to the user. The server does this very quickly - the page is rendered in milliseconds. However, on the server there is no possibility to manipulate DOM, therefore the client part of the application refreshes the page, and it finally becomes interactive. Clear? We are developing!
app.js
import express from 'express' import path from 'path' import stateRoutes from './server/stateRoutes' // Express Node.js const app = express() // app.use(express.static('public')) app.use('/assets', express.static(path.resolve(__dirname, 'assets'))) // 3000 , const PORT = process.env.PORT || 3000 app.listen(PORT, '0.0.0.0', () => { console.log(`The app is running in PORT ${PORT}`) }) // - GET- state - // , . stateRoutes(app) server / stateRoutes.js
import ssr from './server' export default function (app) { // // ssr - , HTML app.get('*', (req, res) => { const response = ssr(req.url) res.send(response) }) } The server / server.js file collects the content generated by react and transfers it to an HTML template - /server/template.js . It should be clarified that the server uses a static router, because we do not want to change the url of the page during the download. A react-helmet is a library that greatly simplifies working with metadata (and in general with the head tag).
server / server.js
import React from 'react' import { renderToString } from 'react-dom/server' import { StaticRouter } from 'react-router-dom' import { Helmet } from 'react-helmet' import App from '&/app/App' import template from './template' export default function render(url) { // const reactRouterContext = {} // HTML let content = renderToString( <StaticRouter location={url} context={reactRouterContext}> <App/> </StaticRouter> ) // <head> HTML- const helmet = Helmet.renderStatic() // HTML- return template(helmet, content) } In server / template.js in the head we display data from the helmet, connect the favicon, styles from the static / assets directory. In the body there is content and webpack bundle client.js , located in the / public folder, but since it is static, we address to the address of the root directory - /client.js.
server / template.js
// HTML- export default function template(helmet, content = '') { const scripts = `<script src="/client.js"></script>` const page = `<!DOCTYPE html> <html lang="en"> <head> ${helmet.title.toString()} ${helmet.meta.toString()} ${helmet.link.toString()} <meta charset="utf-8"> <meta name="viewport" content="width=device-width, initial-scale=1"> <meta name="theme-color" content="#810051"> <link rel="shortcut icon" href="/assets/logos/favicon.ico" type="image/x-icon"> <link rel="icon" href="/assets/logos/favicon.ico" type="image/x-icon"> <link rel="stylesheet" href="/assets/global.css"> </head> <body> <div class="content"> <div id="app" class="wrap-inner"> <!--- magic happens here --> ${content} </div> </div> ${scripts} </body> ` return page } Go to the simple - the client part. The src / client.js file restores the HTML generated by the server without updating the DOM and makes it interactive. (Read more about it here ). This is the react-function hydrate . And now we have nothing to do with a static router. We use the usual - BrowserRouter.
src / client.js
import React from 'react' import { hydrate } from 'react-dom' import { BrowserRouter } from 'react-router-dom' import App from './app/App' hydrate( <BrowserRouter> <App/> </BrowserRouter>, document.querySelector('#app') ) Already in two files, the react-component App had time to light up. This is the main component of the desktop application that performs routing. Its code is very banal:
src / app / App.js
import React from 'react' import { Switch, Route } from 'react-router' import Home from './Home' export default function App() { return( <Switch> <Route exact path="/" component={Home}/> </Switch> ) } Well, src / app / Home.js. Notice how Helmet works — the usual head wrapper.
import React from 'react' import { Helmet } from 'react-helmet' export default function Home() { return( <div> <Helmet> <title>Universal Page</title> <meta name="description" content="Modern Web App - Home Page" /> </Helmet> <h1> Welcome to the page of Universal Web App </h1> </div> ) } Congratulations! We disassembled the first part of the development of MWA! There are only a couple of strokes left to test the whole thing. Ideally, you can fill in the / assets folder with global styles files and a favicon according to the template - server / template.js. We also have no application launch commands. Let's go back to package.json :
"scripts": { "start": "npm run pack && npm run startProd", "startProd": "NODE_ENV=production node index.js", "pack": "webpack --mode production --config webpack.config.js", "startDev": "npm run packDev && node index.js", "packDev": "webpack --mode development --config webpack.config.js" } You may notice two categories of commands - Prod and Dev. They differ webpack v4 configuration. About --mode worth reading here .
Be sure to try out the resulting universal application at localhost: 3000
2. Material-ui
This part of the tutorial will be devoted to connecting the material-ui library to an SSR web application. Why precisely she? Everything is simple - the library is actively developed, maintained, has a wide documentation. With it you can build a beautiful user interface just to spit.
The connection scheme itself, suitable for our application, is described here . Well, let's do it.
Install the necessary dependencies:
npm i @material-ui/core jss react-jss Next we have to make changes to existing files. In server / server.js, we wrap our application in JssProvider and MuiThemeProvider, which will provide the material-ui components and, very importantly, the sheetsRegistry object - css, which must be placed in the HTML template. On the client side, we use only MuiThemeProvider, supplying it with a subject object.
server / server.js
import React from 'react' import { renderToString } from 'react-dom/server' import { StaticRouter } from 'react-router-dom' import { Helmet } from 'react-helmet' // material-ui import { SheetsRegistry } from 'react-jss/lib/jss' import JssProvider from 'react-jss/lib/JssProvider' import { MuiThemeProvider, createMuiTheme, createGenerateClassName, } from '@material-ui/core/styles' import purple from '@material-ui/core/colors/purple' import App from '&/app/App' import template from './template' export default function render(url) { const reactRouterContext = {} // sheetsRegistry - const sheetsRegistry = new SheetsRegistry() const sheetsManager = new Map() // - const theme = createMuiTheme({ palette: { primary: purple, secondary: { main: '#f44336', }, }, // 3.*.*. v4 - typography: { useNextVariants: true, }, }) const generateClassName = createGenerateClassName() // let content = renderToString( <StaticRouter location={url} context={reactRouterContext}> <JssProvider registry={sheetsRegistry} generateClassName={generateClassName}> <MuiThemeProvider theme={theme} sheetsManager={sheetsManager}> <App/> </MuiThemeProvider> </JssProvider> </StaticRouter> ) const helmet = Helmet.renderStatic() // sheetsRegistry html return template(helmet, content, sheetsRegistry) } server / template.js
export default function template(helmet, content = '', sheetsRegistry) { const css = sheetsRegistry.toString() const scripts = `<script src="/client.js"></script>` const page = `<!DOCTYPE html> <html lang="en"> <head> ... </head> <body> <div class="content">...</div> <style id="jss-server-side">${css}</style> ${scripts} </body> ` return page } src / client.js
... import MuiThemeProvider from '@material-ui/core/styles/MuiThemeProvider' import createMuiTheme from '@material-ui/core/styles/createMuiTheme' import purple from '@material-ui/core/colors/purple' // , // const theme = createMuiTheme({ palette: { primary: purple, secondary: { main: '#f44336', }, }, typography: { useNextVariants: true, }, }) // hydrate( <MuiThemeProvider theme={theme}> <BrowserRouter> <App/> </BrowserRouter> </MuiThemeProvider>, document.querySelector('#app') ) Now I suggest adding some stylish design to the Home component. All components of the material-ui can look at their official website, here is enough Paper, Button, AppBar, Toolbar and Typography.
src / app / Home.js
import React from 'react' import { Helmet } from 'react-helmet' import Paper from '@material-ui/core/Paper' import Typography from '@material-ui/core/Typography' import Button from '@material-ui/core/Button' import Header from './Header' // Inline styles - css react const styles = { paper: { margin: "auto", marginTop: 200, width: "40%", padding: 15 }, btn: { marginRight: 20 } } export default function Home() { return( <div> <Helmet> <title>Universal Material Page</title> </Helmet> <Header/> <Paper elevation={4} style={styles.paper} align="center"> <Typography variant="h5">Universal Web App with Material-ui</Typography> <br/> <Button variant="contained" color="primary" style={styles.btn}>I like it!</Button> </Paper> </div> ) } src / app / Header.js
import React from 'react' import AppBar from '@material-ui/core/AppBar' import Toolbar from '@material-ui/core/Toolbar' import Typography from '@material-ui/core/Typography' export default function Header() { return ( <AppBar position="static"> <Toolbar> <Typography variant="h5" color="inherit"> Modern Web App </Typography> </Toolbar> </AppBar> ) } Now something similar should turn out:

3. Code Splitting
If you plan to write something more than a TODO sheet, then your application will increase in proportion to the client.js bundle. To avoid long loading of pages at the user, code splitting has long been invented. However, once Ryan Florence, one of the creators of React-router, scared off potential developers with his phrase:
Godspeed those who tried the server-rendered, code-split apps.
Good luck to all who decide to create ssr applications with code splitting
We are repulsed - we will do it! Install the necessary:
npm i @babel/plugin-syntax-dynamic-import babel-plugin-dynamic-import-node react-loadable The problem is only one function - import. This asynchronous dynamic import feature is supported by the webpack, but the babel compilation will be a huge problem. Fortunately, by 2018, libraries arrived to help with this. babel / plugin-syntax-dynamic-import and babel-plugin-dynamic-import-node will save us from the error "Unexpected token when using import()" . Why two libraries for one task? The dynamic-import-node is needed for server rendering, and will pick up imports on the server on the fly:
index.js
require("@babel/register")({ plugins: ["@babel/plugin-syntax-dynamic-import", "dynamic-import-node"] }); require("./app"); At the same time, we are modifying the global babel-configuration file .babelrc
"plugins": [ "@babel/plugin-syntax-dynamic-import", "react-loadable/babel", ... ] Here came react-loadable . This library with excellent documentation will collect all the modules broken by the webpack import on the server, and the client will pick them up just as easily. To do this, the server needs to load all modules:
app.js
import Loadable from 'react-loadable' ... Loadable.preloadAll().then(() => app.listen(PORT, '0.0.0.0', () => { console.log(`The app is running in PORT ${PORT}`) })) ... The modules themselves are very simple to connect. Take a look at the code:
src / app / App.js
import React from 'react' import { Switch, Route } from 'react-router' import Loadable from 'react-loadable' import Loading from '&/Loading' const AsyncHome = Loadable({ loader: () => import(/* webpackChunkName: "Home" */ './Home'), loading: Loading, delay: 300, }) export default function App() { return( <Switch> <Route exact path="/" component={AsyncHome}/> </Switch> ) } React-loadable asynchronously loads the Home component, making it clear to the webpack that it should be called Home (yes, this is a rare case when comments have some meaning). delay: 300 means that if after 300ms the component still does not load, you need to show that the download is still in progress. This deals with Loading:
src / Loading.js
import React from 'react' import CircularProgress from '@material-ui/core/CircularProgress' // . const styles = { div: { width: '20%', margin: 'auto', transition: 'margin 1s', backgroundColor: 'lightgreen', color: 'white', cursor: 'pointer', borderRadius: '3px' } } export default function Loading(props) { if (props.error) { // ( PWA ), // , return <div style={styles.div} onClick={ () => window.location.reload(true) } align="center"> <h3> Please, click here or reload the page. New content is ready. </h3> </div> } else if (props.pastDelay) { // 300, return <CircularProgress color="primary"/> } else { // Loading return null } } To make it clear to the server which modules we are importing, we would need to register:
Loadable({ loader: () => import('./Bar'), modules: ['./Bar'], webpack: () => [require.resolveWeak('./Bar')], }); But in order not to repeat the same code, there is a react-loadable / babel plugin, which we have already successfully connected to .babelrc . Now that the server knows what to import, you need to know what will be rendered. The scheme of work is a bit like Helmet:
server / server.js
import Loadable from 'react-loadable' import { getBundles } from 'react-loadable/webpack' import stats from '~/public/react-loadable.json' ... let modules = [] // modules let content = renderToString( <StaticRouter location={url} context={reactRouterContext}> <JssProvider registry={sheetsRegistry} generateClassName={generateClassName}> <MuiThemeProvider theme={theme} sheetsManager={sheetsManager}> <Loadable.Capture report={moduleName => modules.push(moduleName)}> <App/> </Loadable.Capture> </MuiThemeProvider> </JssProvider> </StaticRouter> ) ... // ( ) let bundles = getBundles(stats, modules) // HTML- return template(helmet, content, sheetsRegistry, bundles) To make sure that the client loads all the modules rendered on the server, we need to relate them to the bundles created by webpack. To do this, make changes to the configuration of the collector. The react-loadable / webpack plugin writes all modules to a separate file. We also need to tell the webpack that it correctly stores the modules after a dynamic import - in the output object.
webpack.config.js
const ReactLoadablePlugin = require('react-loadable/webpack').ReactLoadablePlugin; ... output: { path: path.resolve(__dirname, 'public'), publicPath: '/', chunkFilename: '[name].bundle.js', filename: "[name].js" }, plugins: [ new ReactLoadablePlugin({ filename: './public/react-loadable.json', }) ] Register modules in the template, loading them one by one:
server / template.js
export default function template(helmet, content = '', sheetsRegistry, bundles) { ... const page = `<!DOCTYPE html> <html lang="en"> <head>...</head> <body> <div class="content"> <div id="app" class="wrap-inner"> <!--- magic happens here --> ${content} </div> ${bundles.map(bundle => `<script src='/${bundle.file}'></script>`).join('\n')} </div> <style id="jss-server-side">${css}</style> ${scripts} </body> ` return page } It remains only to process the client part. The Loadable.preloadReady() method loads all modules that the server has previously given to the user.
src / client.js
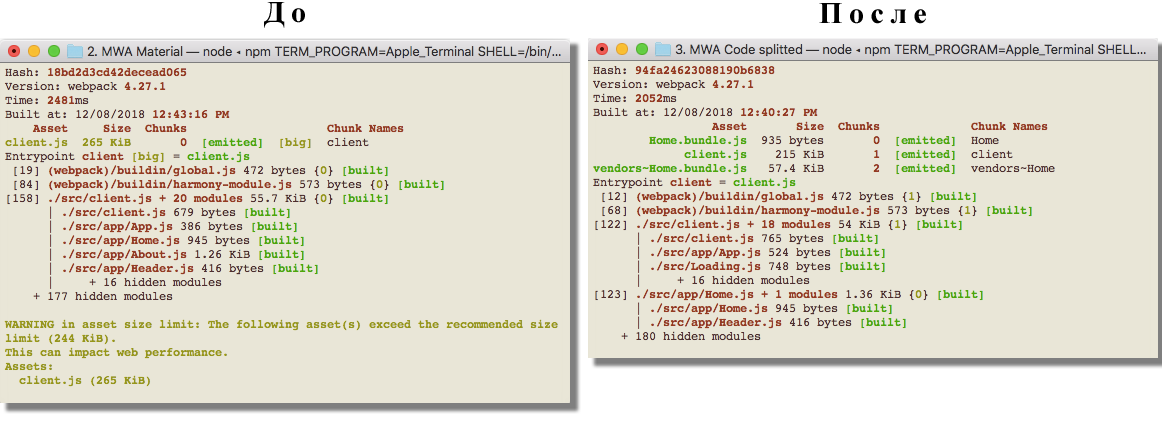
import Loadable from 'react-loadable' Loadable.preloadReady().then(() => { hydrate( <MuiThemeProvider theme={theme}> <BrowserRouter> <App/> </BrowserRouter> </MuiThemeProvider>, document.querySelector('#app') ) }) Done! We start and look at the result - in the last part there was only one file - client.js weighing 265kb, and now - 3 files, the largest of which weighs 215kb. Needless to say, the page loading speed will increase significantly when scaling a project?
4. Redux counter
Now we will begin to solve practical problems. How to solve the dilemma, when the server has data (say, from the database), you need to display it on the screen so that search robots can find content and then use this data on the client.
There is a solution. It is used in almost every article on SSR, but how it is implemented there is not always amenable to good scalability. In simple words, following most tutorials, you will not be able to make a real site with SSR on the principle of "One, two, and in production". Now I will try to dot the i.
We only need redux . The fact is that redux has a global store, which we can transfer from the server to the client at the click of a finger.
Now it’s important (!): We don’t have a server / stateRoutes file for nothing . It manages the initialState object that is generated there, creates a store from it, and then passes it to an HTML template. The client gets this object from window.__STATE__ , re- window.__STATE__ store and that's it. It seems easy.
Install:
npm i redux react-redux Perform the steps described above. There is mostly a repetition of the previously used code.
server / stateRoutes.js :
import ssr from './server' // - = 5 const initialState = { count: 5 } export default function (app) { app.get('*', (req, res) => { // initialState const response = ssr(req.url, initialState) res.send(response) }) } server / server.js :
import { Provider } from 'react-redux' import configureStore from '&/redux/configureStore' ... export default function render(url, initialState) { // const store = configureStore(initialState) ... // Redux Provider . let content = renderToString( <StaticRouter location={url} context={reactRouterContext}> <Provider store={store} > <JssProvider registry={sheetsRegistry} generateClassName={generateClassName}> <MuiThemeProvider theme={theme} sheetsManager={sheetsManager}> <Loadable.Capture report={moduleName => modules.push(moduleName)}> <App/> </Loadable.Capture> </MuiThemeProvider> </JssProvider> </Provider> </StaticRouter> ) ... // initialState HTML- return template(helmet, content, sheetsRegistry, bundles, initialState) } server / template.js
export default function template(helmet, content = '', sheetsRegistry, bundles, initialState = {}) { ... // initialState const scripts = `<script> window.__STATE__ = ${JSON.stringify(initialState)} </script> <script src="/client.js"></script>` const page = `<!DOCTYPE html> <html lang="en"> <head>...</head> <body> ... ${scripts} </body> ` return page } Get the store on the client. src / client.js
import Loadable from 'react-loadable' import { Provider } from 'react-redux' import configureStore from './redux/configureStore' ... // initialState "" const state = window.__STATE__ const store = configureStore(state) Loadable.preloadReady().then(() => { hydrate( <Provider store={store} > <MuiThemeProvider theme={theme}> <BrowserRouter> <App/> </BrowserRouter> </MuiThemeProvider> </Provider>, document.querySelector('#app') ) }) The redux logic in the SSR is over. Now the usual work with redux - creating a stack, actions, reducers, connect and so on. I hope that this will be clear without any special explanation. If not, read the documentation .
src / redux / configureStore.js
import { createStore } from 'redux' import rootReducer from './reducers' export default function configureStore(preloadedState) { return createStore( rootReducer, preloadedState ) } src / redux / actions.js
// actions export const INCREASE = 'INCREASE' export const DECREASE = 'DECREASE' // action creators export function increase() { return { type: INCREASE } } export function decrease() { return { type: DECREASE } } src / redux / reducers.js
import { INCREASE, DECREASE } from './actions' export default function count(state, action) { switch (action.type) { case INCREASE: // action = INCREASE - state.count 1 return Object.assign({}, state, { count: state.count + 1 }) case DECREASE: // DECREASE - 1. return Object.assign({}, state, { count: state.count - 1 }) default: // return state } } src / app / Home.js
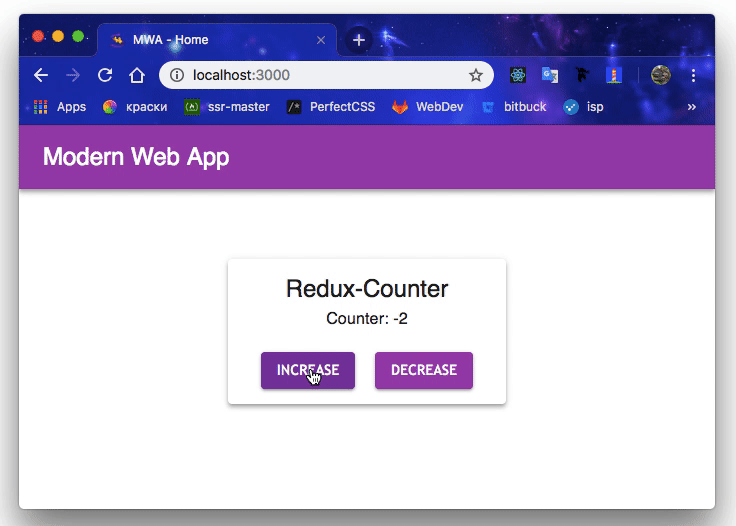
import React from 'react' import { Helmet } from 'react-helmet' import { bindActionCreators } from 'redux' import { connect } from 'react-redux' import * as Actions from '&/redux/actions' import Header from './Header' import Paper from '@material-ui/core/Paper' import Typography from '@material-ui/core/Typography' import Button from '@material-ui/core/Button' const styles = { paper: { margin: 'auto', marginTop: '10%', width: '40%', padding: 15 }, btn: { marginRight: 20 } } class Home extends React.Component{ constructor(){ super() this.increase = this.increase.bind(this) this.decrease = this.decrease.bind(this) } // dispatch increase decrease increase(){ this.props.actions.increase() } decrease(){ this.props.actions.decrease() } render(){ return ( <div> <Helmet> <title>MWA - Home</title> <meta name="description" content="Modern Web App - Home Page" /> </Helmet> <Header/> <Paper elevation={4} style={styles.paper} align="center"> <Typography variant="h5">Redux-Counter</Typography> <Typography variant="subtitle1">Counter: {this.props.count}</Typography> <br/> <Button variant="contained" color="primary" onClick={this.increase} style={styles.btn}>Increase</Button> <Button variant="contained" color="primary" onClick={this.decrease}>Decrease</Button> </Paper> </div> ) } } // props const mapStateToProps = (state) => ({ count: state.count }) // actions this.props const mapDispatchToProps = (dispatch) => ({ actions: bindActionCreators(Actions, dispatch) }) // react-redux connect export default connect( mapStateToProps, mapDispatchToProps )(Home) :
5.
 , — . . , , initialState , .
:
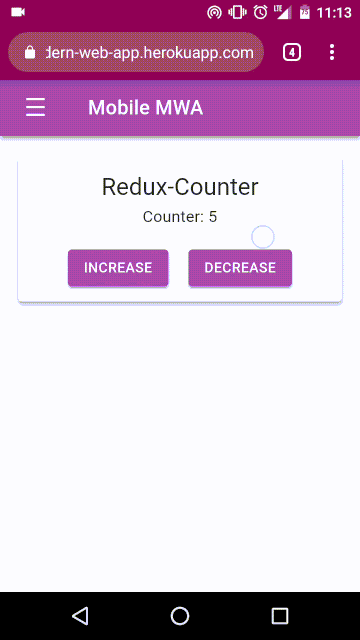
npm i mobile-detect mobile detect user-agent, null .
:
server/stateRoutes.js
import ssr from './server' import MobileDetect from 'mobile-detect' const initialState = { count: 5, mobile: null } export default function (app) { app.get('*', (req, res) => { // md == null, , const md = new MobileDetect(req.headers['user-agent']) const response = ssr(req.url, initialState, md.mobile()) res.send(response) }) } — :
server/server.js
... import App from '&/app/App' import MobileApp from '&/mobileApp/App' export default function render(url, initialState, mobile) { // - let content = renderToString( <StaticRouter location={url} context={reactRouterContext}> <Provider store={store} > <JssProvider registry={sheetsRegistry} generateClassName={generateClassName}> <MuiThemeProvider theme={theme} sheetsManager={sheetsManager}> <Loadable.Capture report={moduleName => modules.push(moduleName)}> {mobile === null ? <App/> : <MobileApp/> } </Loadable.Capture> </MuiThemeProvider> </JssProvider> </Provider> </StaticRouter> ) // initialState.mobile = mobile return template(helmet, content, sheetsRegistry, bundles, initialState) } src/client.js
... const state = window.__STATE__ const store = configureStore(state) // state Loadable.preloadReady().then(() => { hydrate( <Provider store={store} > <MuiThemeProvider theme={theme}> <BrowserRouter> {state.mobile === null ? <App/> : <MobileApp/> } </BrowserRouter> </MuiThemeProvider> </Provider>, document.querySelector('#app') ) }) 6.
Progressive Web App (PWA), Google — , , , .
 . : Chrome, Opera Samsung Internet , . iOS Safari, . , . PWA: Windows Chrome v70, Linux v70, ChromeOS v67. PWA macOS — 2019 Chrome v72.
: PWA . , , , .
2 — manifest.json service-worker.js — . — json , , , . Service-worker : push-, .
. , :
public/manifest.json :
{ "short_name": "MWA", "name": "Modern Web App", "description": "Modern app built with React SSR, PWA, material-ui, code splitting and much more", "icons": [ { "src": "/assets/logos/yellow 192.png", "sizes": "192x192", "type": "image/png" }, { "src": "/assets/logos/yellow 512.png", "sizes": "512x512", "type": "image/png" } ], "start_url": ".", "display": "standalone", "theme_color": "#810051", "background_color": "#FFFFFF" } public/service-worker.js
// - var CACHE = 'cache' // self.addEventListener('install', function(evt) { evt.waitUntil(precache()) }) // fetch , self.addEventListener('fetch', function(evt) { console.log('The service worker is serving the asset.') evt.respondWith(fromCache(evt.request)) evt.waitUntil(update(evt.request)) }) // , function precache() { return caches.open(CACHE).then(function (cache) { return cache.addAll([ './', '/assets/MWA.png', '/assets/global.css', '/assets/logos/favicon.ico', '/assets/logos/yellow 192.png', '/assets/logos/yellow 512.png', '/robots.txt' ]) }) } // , . , function fromCache(request) { return caches.open(CACHE).then(function (cache) { return cache.match(request).then(function (matching) { return matching || null }) }) } // , // function update(request) { return caches.open(CACHE).then(function (cache) { return fetch(request).then(function (response) { return cache.put(request, response) }) }) } PWA , - html-:
server/template.js
export default function template(helmet, content = '', sheetsRegistry, bundles, initialState = {}) { const scripts = `... <script> // service-worker - if ('serviceWorker' in navigator) { window.addEventListener('load', () => { navigator.serviceWorker.register('/service-worker.js') .then(registration => { console.log('Service Worker is registered! '); }) .catch(err => { console.log('Registration failed ', err); }); }); } </script>` const page = `<!DOCTYPE html> <html lang="en"> <head> ... <link rel="manifest" href="/manifest.json"> </head> <body> ... ${scripts} </body> ` return page } Done! https, , gif demo .
7.
MWA. , , . , SSR Code Splitting, PWA .
, MWA - web.dev :
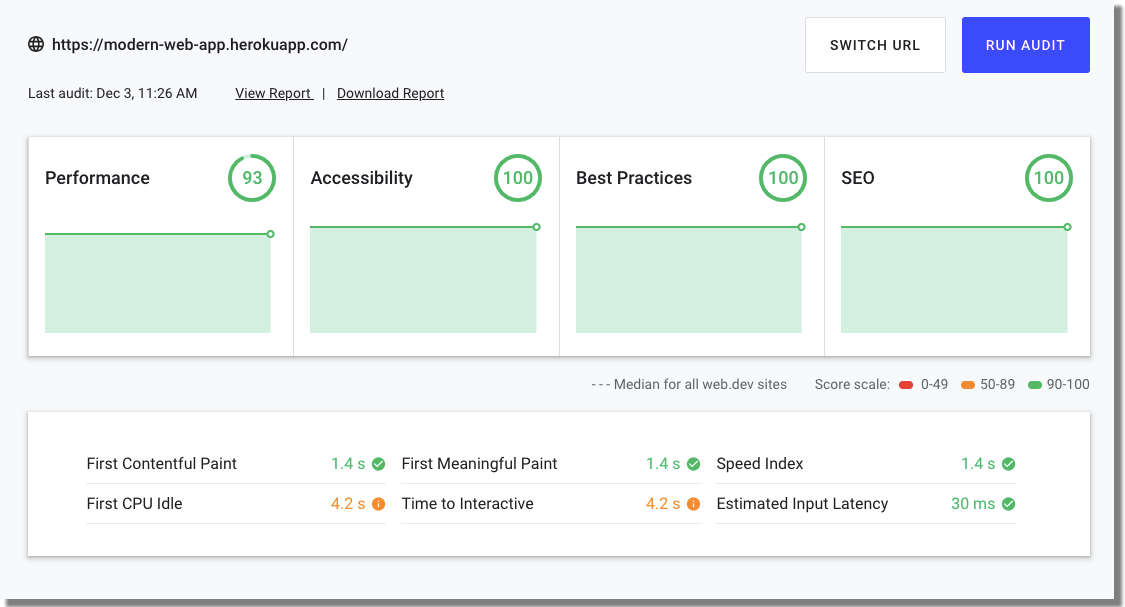
, — . , , — .
, MWA — opensource . , , !
Good luck!
')
Source: https://habr.com/ru/post/432368/
All Articles