Parsing by layout (sass, pug, gulp, bem)
For Juniors, for juniors ... or they will start here ... yes, we, yes it ...
Finished the project (site) pug + sass + es6 + gulp + BEM. During development faced many difficulties. This article is intended for beginners, for those who do not know about negative margins, have heard about the BEM naming methodology, but have not tried it, for those who do not have extensive experience in development. I hope you will be interested here. If you are reading this at work, sitting at 4 monitors and using one hand to write code for AI, and the second is flipping through the Habr, then I would like to hear from you constructive criticism of the methods that were used here.
I am writing this article because I'm interested in this, I'm interested in disassembling my projects. This gives me the opportunity to develop and close a gap in my knowledge of certain technologies. Thanks for reading, I hope you enjoyed it.
Finished the project (site) pug + sass + es6 + gulp + BEM. During development faced many difficulties. This article is intended for beginners, for those who do not know about negative margins, have heard about the BEM naming methodology, but have not tried it, for those who do not have extensive experience in development. I hope you will be interested here. If you are reading this at work, sitting at 4 monitors and using one hand to write code for AI, and the second is flipping through the Habr, then I would like to hear from you constructive criticism of the methods that were used here.
Negative margin and width 110%
I know about such a focus for a long time, but applied it to practice only for the first time. There was a restriction in the layout (wrapper = width: 1170px, red border). On the right, the content corresponded to the restriction and was adjacent to the border, while on the left, the picture got out abroad. At first it may be scary, but you should learn more about the work of margin-letf: -100px and you already know how to solve the problem. By the way, it is flex and yellow, I mark the boundaries of objects.
')
We are accustomed to using width, height as 100%, and this is understandable, all for adapting, with the help of width, you can achieve a similar result as with negative margins. Just give the size of the child more than its parent (for example, width: 130%)

')
We are accustomed to using width, height as 100%, and this is understandable, all for adapting, with the help of width, you can achieve a similar result as with negative margins. Just give the size of the child more than its parent (for example, width: 130%)
Css structure by BEM
This was probably the most difficult for me.

This picture well demonstrates my project, and indeed any project. When you write the first hundred lines, everything seems simple, and you do not notice the problems. So you finish the project, 900 lines long and unexpectedly for yourself, decided to scroll through the file, well, or add media queries.
You write styles for an element in media, look at the site and do not understand why styles do not work as required. In search of a problem, you have already spent 15 minutes, you checked the gulp task and flipped through the compiled css file.
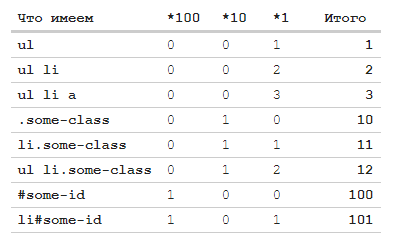
Accidentally, accidentally ... you find the problem in the cascading style sheet, but rather in the way that styles are superimposed on the elements. At the very beginning of my journey to the web, I certainly read that selectors have a different application priority. In short, for the usual (div, ul, a, p, etc.) selector -1 bal, for class-10, for identifier 100.
After checking carefully all the nesting, I still found a mistake. It turns out that you need to follow the nesting of elements, and give this is not the last value.
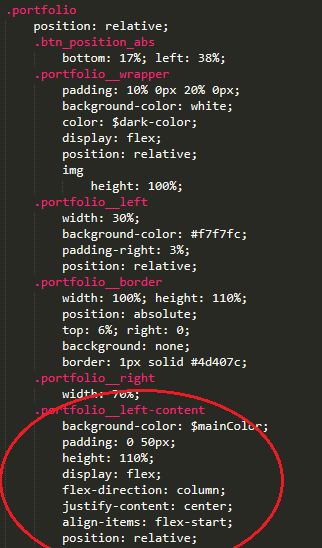
This includes the structure of the css (sass) file. There is a block “portfolio”, in it there are a lot of elements like “portfolio __ *”, but two classes in this nesting are superfluous, in my opinion.
This was the first project in which I tried to strictly adhere to BEM, but didn’t spend even a minute on designing at the very beginning, but came up with classes on the go, this made it difficult for support to be given.
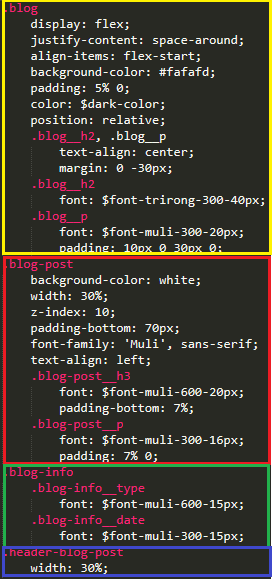
And this, in my opinion, is a good example of BEM
This picture well demonstrates my project, and indeed any project. When you write the first hundred lines, everything seems simple, and you do not notice the problems. So you finish the project, 900 lines long and unexpectedly for yourself, decided to scroll through the file, well, or add media queries.
You write styles for an element in media, look at the site and do not understand why styles do not work as required. In search of a problem, you have already spent 15 minutes, you checked the gulp task and flipped through the compiled css file.
Accidentally, accidentally ... you find the problem in the cascading style sheet, but rather in the way that styles are superimposed on the elements. At the very beginning of my journey to the web, I certainly read that selectors have a different application priority. In short, for the usual (div, ul, a, p, etc.) selector -1 bal, for class-10, for identifier 100.
After checking carefully all the nesting, I still found a mistake. It turns out that you need to follow the nesting of elements, and give this is not the last value.
This includes the structure of the css (sass) file. There is a block “portfolio”, in it there are a lot of elements like “portfolio __ *”, but two classes in this nesting are superfluous, in my opinion.
This was the first project in which I tried to strictly adhere to BEM, but didn’t spend even a minute on designing at the very beginning, but came up with classes on the go, this made it difficult for support to be given.
And this, in my opinion, is a good example of BEM
Long BEM Classes
I read about this problem in one of the articles on BEM, but for the first time I ran into it myself. Very reminiscent of the problems with bootstrap, it also had ... there are long classes. How can I do the minimum number of classes?
This is the default btn.

And these are already modified buttons ...


This is the default btn.
And these are already modified buttons ...
Difficult selectors
Taking into account what had to be written on BEM, some complications in the project flowed from here. I have already written about long classes, here is another case.
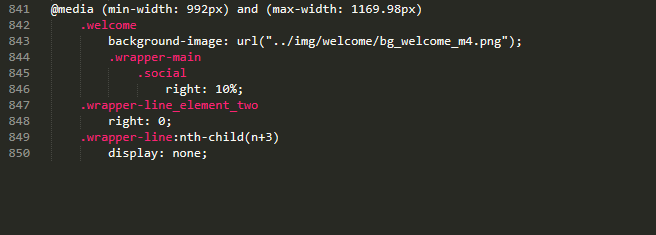
On the pages were 6 similar elements. When media queries, it was necessary to hide a certain number of elements. Do not create after all the new classes for each object. I had to use the pseudo class nth-child (). Previously, it was used only in a circumcised way (child (1), child (3), child (4), etc.), now there was a need to hide all the elements except the first two. After spending 5 minutes reading the documentation, I used nth-child (n + 3), thereby obtaining the result I needed.

Another example is how you can take the desired element through a group of selectors, rather than invent a special class for this element.

See the picture below. The next entry div.1> p will select only objects with class “2”, div.3> p, respectively, objects with class “4” will be received. The picture shows how it works. The nearest members are selected down the hierarchy.

On the pages were 6 similar elements. When media queries, it was necessary to hide a certain number of elements. Do not create after all the new classes for each object. I had to use the pseudo class nth-child (). Previously, it was used only in a circumcised way (child (1), child (3), child (4), etc.), now there was a need to hide all the elements except the first two. After spending 5 minutes reading the documentation, I used nth-child (n + 3), thereby obtaining the result I needed.
Another example is how you can take the desired element through a group of selectors, rather than invent a special class for this element.
See the picture below. The next entry div.1> p will select only objects with class “2”, div.3> p, respectively, objects with class “4” will be received. The picture shows how it works. The nearest members are selected down the hierarchy.
Conclusion
I am writing this article because I'm interested in this, I'm interested in disassembling my projects. This gives me the opportunity to develop and close a gap in my knowledge of certain technologies. Thanks for reading, I hope you enjoyed it.
Source: https://habr.com/ru/post/432248/
All Articles