Environment generation based on sound and music in Unity3D. Part 2. Creating 2D tracks from music
annotation
Hello. Relatively recently, I wrote an article Generating an environment based on sound and music in Unity3D , in which I gave several examples of games involving the mechanics of generating content based on music, and also told about the basic aspects of similar games. There was practically no code in the article and I promised that there would be a continuation. And here it is, in front of you. This time we will try to create a track for a 2D race, in the style of Hill Climb, from your music. Let's see what we can do ..

Introduction
I remind you that this series of articles is intended for novice developers and for those who have just recently started working with sound. If you are in your mind doing a quick Fourier transform, then you will probably be bored here.
Here is our Road Map for today:
- Consider what discretization is.
- Figure out what data we can get from Audio Clip Unity
- Understand how we can work with this data.
- Find out what we can generate from this data
- Learn how to make a game out of all this (well, or something like a game)
So let's go!
Analog Sample Discretization
As many know, to use a signal in digital systems, we need to convert it. One of the conversion steps is the discretization of the signal, in which the analog signal is divided into parts (temporary reports), after which each report is assigned the amplitude value that was at the selected moment.
The letter T is the sampling period. The smaller the period, the more accurate the signal conversion will be. But most often they talk about the inverse value: the sampling rate (it is logical that this is F = 1 / T). 8 000 Hz is enough for a telephone singhal, and, for example, one of the DVD-Audio format options requires a sampling frequency of 192 000 Hz. The standard in digital recording (in game editors, music editors) is 44 100 Hz - this is the frequency of CD Audio.
The numerical amplitude values are stored in the so-called samples, and it is with them that we will work. The value of the sample is float and it can be from -1 to 1. Simplified, it looks like this.

Sound wave rendering (static)
Basic information
Waveform (or audio form, and in common - "fish") - a visual representation of the audio signal in time. The waveform can show us at what point in the sound the active phase occurs, and where the attenuation occurs. Often the waveform is presented for each channel separately, for example, like this:

Imagine that we already have AudioSource and the script in which we work. Let's see what Unity can give us.
// AudioSource AudioSource myAudio = gameObject.GetComponent<AudioSource>(); // . 44100. int freq = myAudio.clip.frequency; Select number of reports
Before we go further, we need to talk a little about the depth of rendering our sound. With a sampling rate of 44100 Hz, every second, 44100 reports are available for processing. Suppose we need to draw a track with a length of 10 seconds. Each report we will draw a line in a pixel width. So, our oscillogram will be 441,000 pixels long. The result is a very long, elongated and poorly understood sound wave. But, in it you can see each specific report! And you will scare the system, no matter how you draw it.

If you do not do professional audio software, you do not need such accuracy. For a general audio picture, we can break all samples into larger periods and take, for example, the average of each 100 samples. Then our wave will have a completely distinct form:

Of course, this is not entirely accurate, since you can skip the volume peaks that you may need, so you can try not the average value, but the maximum of a given segment. This will give a slightly different picture, but your peaks will not be lost.
Preparing to receive audio data
Let's define the accuracy of our sample as quality, and the final quantity of reports as sampleCount.
int quality = 100; int sampleCount = 0; sampleCount = freq / quality; An example of calculating all the numbers will be lower.
Next we need to get the samples themselves. This can be done from the audio clip using the GetData method.
public bool GetData(float[] data, int offsetSamples); This method takes an array where it writes samples. offsetSamples is a parameter that is responsible for the starting point of reading an array of data. If you read the array from the beginning, then there should be zero.
To record samples, we need to prepare an array for them. For example, like this:
float[] samples; float[] waveFormArray; // samples = new float[myAudio.clip.samples * myAudio.clip.channels]; Why do we multiply the length by the number of channels? I'll tell you now ...
Unity audio channel information
Many people know that in the sound we usually use two channels: left and right. Someone knows that there are 2.1 systems, as well as 5.1, 7.1 in which sound sources surround from all sides. The topic of channels is well described on the wiki . How does this work in Unity?
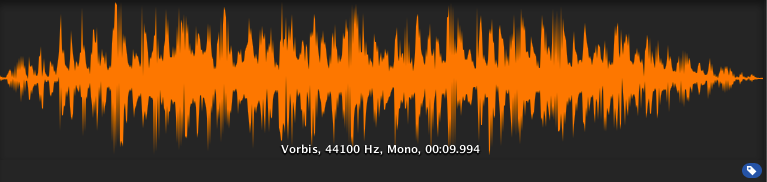
When downloading a file, when opening a clip, you can find the following image:

Here it is just shown that we have two channels, and one can even notice that they differ from each other. Unity records samples of these channels one after another. It turns out this picture:
That is why we need two times more space in the array than just for the number of samples.
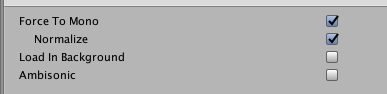
If you select the Force To Mono clip option, the channel will be one and all sound will be in the center. The preview of your wave will immediately change.
Receive audio data
This is what comes out:
private int quality = 100; private int sampleCount = 0; private float[] waveFormArray; private float[] samples; private AudioSource myAudio; void Start() { myAudio = gameObject.GetComponent<AudioSource>(); int freq = myAudio.clip.frequency; sampleCount = freq / quality; samples = new float[myAudio.clip.samples * myAudio.clip.channels]; myAudio.clip.GetData(samples,0); // , . waveFormArray = new float[(samples.Length / sampleCount)]; // for (int i = 0; i < waveFormArray.Length; i++) { waveFormArray[i] = 0; for (int j = 0; j < sampleCount; j++) { //Abs "" . . waveFormArray[i] += Mathf.Abs(samples[(i * sampleCount) + j]); } waveFormArray[i] /= sampleCount; } } Total, if the track is 10 seconds and it is two-channel, then we get the following:
- The number of samples in the clip (myAudio.clip.sample) = 44100 * 10 = 441000
- The length of the array of samples for two channels (samples.Length) = 441000 * 2 = 882000
- Number of reports (sampleCount) = 44100/100 = 441
- The length of the final array = samples.Length / sampleCount = 2000
As a result, we will work with 2000 points, which is quite enough for us to draw the wave. Now we need to include imagination and think about how we can use this data.
Audio rendering
Creating a simple audio track using Debug tools
As many know, Unity has convenient tools for displaying various kinds of Debug information. An intelligent developer based on these tools can make, for example, very powerful extensions for the editor. Our case shows a very atypical use of Debug-methods.
For drawing we need a line. We can make it using a vector that will be created from the values of our array. Consider, to make a beautiful mirror audio form, we need to glue the two halves of our visualization.
for (int i = 0; i < waveFormArray.Length - 1; i++) { // Vector3 upLine = new Vector3(i * .01f, waveFormArray[i] * 10, 0); // Vector3 downLine = new Vector3(i * .01f, -waveFormArray[i] * 10, 0); } Next, just use Debug.DrawLine to draw our vectors. You can choose any color. All these methods need to be called in Update, so we will update the information every frame.
Debug.DrawLine(upLine, downLine, Color.green); If you want, you can add a "slider", which will show the current position of the played track. This information can be obtained from the "AudioSource.timeSamples" field.
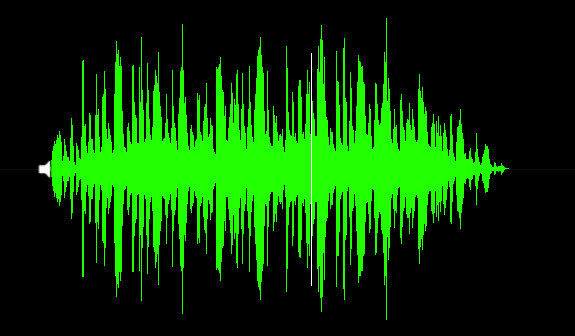
private float debugLineWidth = 5; // "" . int currentPosition = (myAudio.timeSamples / quality) * 2; Vector3 drawVector = new Vector3(currentPosition * 0.01f, 0, 0); Debug.DrawLine(drawVector - Vector3.up * debugLineWidth, drawVector + Vector3.up * debugLineWidth, Color.white); So here’s our script:
using UnityEngine; public class WaveFormDebug : MonoBehaviour { private readonly int quality = 100; private int sampleCount = 0; private int freq; private readonly float debugLineWidth = 5; private float[] waveFormArray; private float[] samples; private AudioSource myAudio; private void Start() { myAudio = gameObject.GetComponent<AudioSource>(); // freq = myAudio.clip.frequency; sampleCount = freq / quality; // samples = new float[myAudio.clip.samples * myAudio.clip.channels]; myAudio.clip.GetData(samples, 0); // waveFormArray = new float[(samples.Length / sampleCount)]; for (int i = 0; i < waveFormArray.Length; i++) { waveFormArray[i] = 0; for (int j = 0; j < sampleCount; j++) { waveFormArray[i] += Mathf.Abs(samples[(i * sampleCount) + j]); } waveFormArray[i] /= sampleCount; } } private void Update() { for (int i = 0; i < waveFormArray.Length - 1; i++) { // Vector3 upLine = new Vector3(i * 0.01f, waveFormArray[i] * 10, 0); // Vector3 downLine = new Vector3(i * 0.01f, -waveFormArray[i] * 10, 0); // Debug Debug.DrawLine(upLine, downLine, Color.green); } // "" . int currentPosition = (myAudio.timeSamples / quality) * 2; Vector3 drawVector = new Vector3(currentPosition * 0.01f, 0, 0); Debug.DrawLine(drawVector - Vector3.up * debugLineWidth, drawVector + Vector3.up * debugLineWidth, Color.white); } } And here is the result:
Create a smooth sound landscape with PolygonCollider2D
Before proceeding to this section, I want to note the following: riding along the track generated from the music is, of course, fun, but from the point of view of the gameplay it is almost useless. And that's why:
- In order for the track to be passable, you need to smooth our data. All the peaks disappear and you practically cease to "feel your music"
- Usually, music tracks are very compressed and represent a sound brick, which is badly suited for a 2D game.
- Unresolved question of the speed of our transport, which should fit the speed of the track. I want to consider this question in the next article.
Therefore, as an experiment, this type of generation is quite funny, but it is difficult to make a real gameplay feature based on it. In any case, we will continue.
So, we need to make PolygonCollider2D using our data. This is easy to do. PolygonCollider2D has a public field points, which accepts Vector2 []. First we need to transfer our points to the vector of the desired type. Let's make a function to translate an array of our samples into a vector array:
private Vector2[] CreatePath(float[] src) { Vector2[] result = new Vector2[src.Length]; for (int i = 0; i < size; i++) { result[i] = new Vector2(i * 0.01f, Mathf.Abs(src[i] * lineScale)); } return result; } After that, we simply transfer our resulting array of vectors to the collider:
path = CreatePath(waveFormArray); poly.points = path; See the result. Here is the beginning of our track ... hmm ... it looks not very passable (for now, don't think about visualization, comments will be later).

Our audio format is too sharp, so the track is strange. It is necessary to smooth it. Here we use the moving average algorithm. You can read more about it in Habré, in the article Moving Average Algorithm (Simple Moving Average) .
In Unity, the algorithm is implemented as follows:
private float[] MovingAverage(int frameSize, float[] data) { float sum = 0; float[] avgPoints = new float[data.Length - frameSize + 1]; for (int counter = 0; counter <= data.Length - frameSize; counter++) { int innerLoopCounter = 0; int index = counter; while (innerLoopCounter < frameSize) { sum = sum + data[index]; innerLoopCounter += 1; index += 1; } avgPoints[counter] = sum / frameSize; sum = 0; } return avgPoints; } Modifying our path creation:
float[] avgArray = MovingAverage(frameSize, waveFormArray); path = CreatePath(avgArray); poly.points = path; Checking ...

Now our track looks quite normal. I used a window width of 10. You can modify this parameter to choose the smoothing you need.
Here is the full script for this section:
using UnityEngine; public class WaveFormTest : MonoBehaviour { private const int frameSize = 10; public int size = 2048; public PolygonCollider2D poly; private readonly int lineScale = 5; private readonly int quality = 100; private int sampleCount = 0; private float[] waveFormArray; private float[] samples; private Vector2[] path; private AudioSource myAudio; private void Start() { myAudio = gameObject.GetComponent<AudioSource>(); int freq = myAudio.clip.frequency; sampleCount = freq / quality; samples = new float[myAudio.clip.samples * myAudio.clip.channels]; myAudio.clip.GetData(samples, 0); waveFormArray = new float[(samples.Length / sampleCount)]; for (int i = 0; i < waveFormArray.Length; i++) { waveFormArray[i] = 0; for (int j = 0; j < sampleCount; j++) { waveFormArray[i] += Mathf.Abs(samples[(i * sampleCount) + j]); } waveFormArray[i] /= sampleCount * 2; } // , frameSize float[] avgArray = MovingAverage(frameSize, waveFormArray); path = CreatePath(avgArray); poly.points = path; } private Vector2[] CreatePath(float[] src) { Vector2[] result = new Vector2[src.Length]; for (int i = 0; i < size; i++) { result[i] = new Vector2(i * 0.01f, Mathf.Abs(src[i] * lineScale)); } return result; } private float[] MovingAverage(int frameSize, float[] data) { float sum = 0; float[] avgPoints = new float[data.Length - frameSize + 1]; for (int counter = 0; counter <= data.Length - frameSize; counter++) { int innerLoopCounter = 0; int index = counter; while (innerLoopCounter < frameSize) { sum = sum + data[index]; innerLoopCounter += 1; index += 1; } avgPoints[counter] = sum / frameSize; sum = 0; } return avgPoints; } } As I said at the beginning of the section, with this smoothing, we no longer feel the track, moreover, the speed of the machine is not tied to the speed of music (BPM). We will examine this problem in the next part of this series of articles. In addition, there we will touch on the topic of specials. effects under the bit. By the way, I took the machine from this free asset .
Probably many of you, looking at the screenshots, wondered how I drew the track itself? After all, the colliders are not visible.
I used the wisdom of the Internet and found a way with which you can turn a polygon collider into a mesh, to which you can assign any material, and the line renderer will make a stylish outline. This method is described in detail here . Triangulator you can take on the Unity Community .
Completion
What we have learned in this article is a basic outline for music games. Yes, in this form it is, for the time being, a little indifferent, but you can already say with confidence, "Guys, I made the machine drive the audio track!". To make this a real game, you need to make a lot of effort. Here is a list of what we can do here:
- Snap the speed of the cars to the track BPM. The player can only control the inclination of the car, but not the speed. Then the music will be much stronger to be felt in the process of passing the track.
- Make a bit-detector and add specials. effects that will work under the bit. In addition, you can add animation to the body of the car, which will bounce on the beat of a bit. It all depends on your imagination.
- Instead of a moving average, you need to more competently process the track and get an array of data so that the peaks do not disappear, but at the same time the route was easy to build.
- Well, and, of course, you need to make the gameplay interesting. You can place a bit of a coin on each punch, add danger zones, etc.
All this and much more will be studied in the remaining parts of this series of articles. Thank you all for reading!
')
Source: https://habr.com/ru/post/432134/
All Articles