On-click fame, or how to excite the robot and ... the rest

A long time ago, overheard conversation took place
NB stopped asking, apparently fearing to annoy a clearly more experienced interlocutor.NB: - ?GURU : - «» . . . , ...NB: - , ?GURU : - google yandex , . . , .NB: - ?GURU : - ?… ...
GURU rolled his eyes, as if emphasizing the exhaustion of the topic about the proxy and was silent ...
Of course, GURU knew that a search query (for example by the word: proxy) would very soon lead NB to get the desired list “address: port”. But after the first experiments, NB , just as quickly, will understand:
- Not all addresses on his list are working;
- Not all proxies are equally good;
- "Click" site through a proxy manually - a task that requires considerable will;
- "Not correct" proxy will harm the situation, because site may be suspected scripts giants in cheat.
In this article I will talk about how the improvised (and most importantly universal) means
(without the use of specific proprietary software, such as ZennoPoster , etc ...)
build an automated tool for obtaining a list of "really suitable" proxies and using them to organize (automated) visits to the promoted
site using a Chrome browser .
')
Following the instructions, you will get a ready-made tool that will allow you to:
- "Click" -at (visit) the target site fully automatically, without fear of compromise;
- fully emulate user behavior;
- organize all visits on a schedule (scenario);
- do all of the above in the number of times needed to advance.
And although all my work (along with the research) took a week, you will not need two days to build such a tool, having basic knowledge of the command line , PHP and JavaScript .
However, before you scroll through the following diagram , I will say a few words about why and for whom this material was prepared.
The material will be useful if you want to understand how structures (? Or constructors?) Are arranged with which you can build an application relatively quickly, which is easily and inexpensively adaptable to changing loads. If you are interested in the possibility of building an application based on the service bus ( ESB ).
The text will be useful if you wanted to get acquainted with the use of Docker for instantly building systems. Or, if you are just interested in Selenium Server and the nuances of receiving content / display of HTTPx activity.
For "use immediately", it is not worth reading it thoughtfully. Code for sure.
Immediately proceed to setting up the finished tool. Setup takes less than 20 minutes.
The instruction assumes that you have 2 machines with Ubuntu 18.04 installed.
One for infrastructure ( docker ), the other for process control ( process ).
It is assumed that the following packages are already installed on docker :
It is assumed that the following packages are already installed on the process :
docker
process
Wait, watching what is happening through the web-panel (http: // ip-address-docker-machines: 8080).
The result will be available in the located queue.
One for infrastructure ( docker ), the other for process control ( process ).
It is assumed that the following packages are already installed on docker :
git, docker, docker-compose
It is assumed that the following packages are already installed on the process :
git, php-common, php-cli, php-curl, php-zip, php-memcached, composerIf you have any questions at this place, I suggest that you spend 15 minutes reading all the material in full.
docker
# root-. # , TCP-: # 11300, 11211, 4444, 5930, 8080, 8081, 8082, 8083 # # " root-" git clone \ https://oauth2:YRGzV8Ktx2ztoZg_oZZL@git.ituse.ru/deploy/esb-infrastructure.git cd esb-infrastructure docker-compose up --build -d # 3 # . # web-. process
# . # process- , # - php- git clone \ https://oauth2:YRGzV8Ktx2ztoZg_oZZL@git.ituse.ru/deploy/clicker-noserver.git cd clicker-noserver composer update # . "XXXXXXXX" mv app/settings.php.dist app/settings.php # . gnome-terminal \ --tab -e 'bash -c "php app/src/Process/noserver/singleProcess.php curl"' \ --tab -e 'bash -c "php app/src/Process/noserver/singleProcess.php timezone"' \ --tab -e 'bash -c "php app/src/Process/noserver/singleProcess.php whoer"' # . , , # : - log/list.proxy php app/src/Utils/givethejob.php ./log/list.proxy Wait, watching what is happening through the web-panel (http: // ip-address-docker-machines: 8080).
The result will be available in the located queue.
Crushing and planning
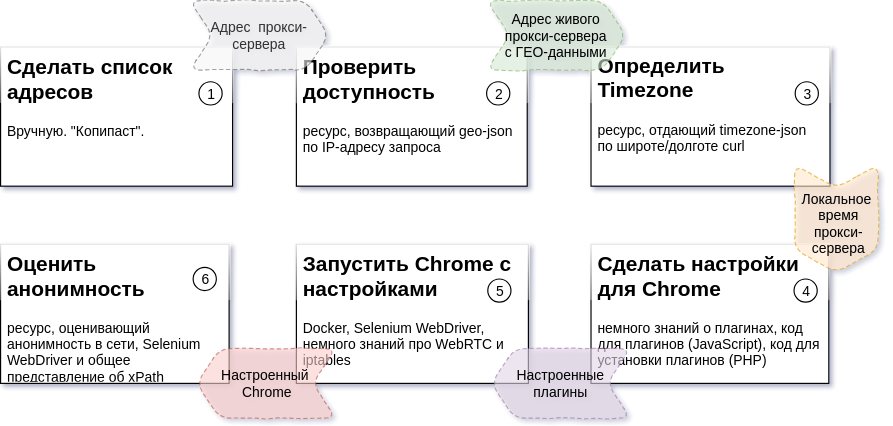
The diagram above describes the sequence of process steps, the expected result for each step, and the resources that will be required to create each of the parts (details: Task 2 , Task 3 , Task 4,5,6 ).
In my case, everything happens on two Ubuntu 18.04 machines. One of them controls the process. On the other, several Docker containers of infrastructure are running.
Excuses and failures
All package code consists of three parts.
One of them is not mine (I note that this is a neat and beautiful code). The source of this code is packagist.org .
I wrote another one myself, tried to make it understandable and devoted about a week to this part of the code.
The rest is “a difficult historical legacy.” This part of the code has been created for quite a long time. Including in that period when I still did not have a great knack for programming.
This is exactly the reason for the location of the repositories on my GitLab and the packages on my Satis . For publication on GitHub.com and packagist.org, this code will require processing and more thorough documentation.
All parts of the code are open for unlimited use. Repositories and packages will be available "forever."
However, when re-publishing the code, I will be grateful for you to post a link to me or to this article.
A bit about architecture
The approach that was used to create our tool is to write (or use a ready-made) utility to solve each specific task. Moreover, each utility, regardless of the problem being solved, has two properties common to all:
- the utility can be run independently of the rest from the command line with parameters containing the task;
- The utility can return the execution result to stdout (if configured in a certain way).
A solution made according to this principle allows changing the number of running task handlers (workers) for each of the process steps. A different number of workers for each step will result in “0” idle time of the next steps due to the processing time of the tasks of the previous steps.
The time spent on obtaining the unit of the result of the process (in our case, it is a verified proxy) depends on external factors (the number of invalid proxies, the response time of the external resource, etc.).
By changing the number of workers for each of the process steps, we transform this dependence into dependence on the number of launched workers (that is, dependence on the computing and channel capacities involved).
To synchronize the work of individual independent parts, it is convenient to use the messaging queue server as a single data bus. It will allow you to accumulate the results of completed steps in a queue and give them to the “next step” utility at the right time as input.
Messaging queue. MQ and ESB
We will use beanstalkd as the lower level ( MQ ). Small, light, not requiring configuration, available in the deb-package and in the Docker-container, imperceptible worker. The logical level ( ESB ) will implement the code in PHP .
Two classes will be used for implementation. esbTask and nextStepWorker .
esbTask
class esbTask // , { // immutable-; // "" ( ESB-), payload // // "" .... } An instance of this class serves to “address” paylod 'a through the steps of the process. The concept of ESB applied several principles / patterns. Two of them should pay attention separately:
- About the path (sequence of steps) of the process, at each time point of the process implementation,
no one knows other than the envelope being sent; - Each envelope has three possible directions of outcome:
- the next step of the process (normal continuation);
- stop pitch (stop target - selected by the next step, if there is no point in continuing the process / stop-situation);
- Error step (target of emergency termination - is selected by the next step, in case of a worker error).
In the queue, the object is represented in json, hidden here ...
// json- esbTask { // ( esbTask) "_type":"App\\\\rebean\\\\payloads\\\\ESBtaskQueue", // "task":"task:queue@XXX.XXX.XXX.XXX:11300", // () "replyto":[ "othertask1:nextqueue1@yyy.XXX.XXX.XXX:11300", "othertask2:nextqueue2", "othertask3:nextqueue3", ], // () "onerror":[ "error:errorsstep@zzz.XXX.XXX.XXX:11300", "error:errorsstep1", "error:errorsstep2", "error:errorsstep3" ], // () "onstop":[ "stop:stopstep@kkk.XXX.XXX.XXX:11300", "stop:stopstep1", "stop:stopstep2", "stop:stopstep3" ], // "payload":{ .... }, // ... () "till":[ .... ], // ... () // // - (LINUX-TimeStamp) "since":[ 1540073089.8833, ], // - "points":1, // . "groupid":"" } nextStepWorker
Each message in the queue is processed by the worker who is responsible for it. The following feature set is implemented for this:
class nextStepWorker extends workerConstructor { // // esbTask // () // MQ- (beanstalkd) // (Memcached) // (MySQL) // : - ( - ); - stop-; - (log, event, mq) .... } On the basis of this class, workers are implemented for each of the stages of the process. The whole routine of processing, addressing and sending to the next queue in the route, the class takes over.
The solution to each of the tasks is to ensure that:
- Get esbTask and run the worker;
- Implement the logic, saving the results in payload;
- Complete the execution of the worker (emergency or normal - it does not matter).
If the steps are completed, the result will go to the queue with the appropriate name and the next worker will begin processing.
Do it once. Check availability
In fact, creating a worker for solving any of the tasks is an implementation of a single method. An example (simplified) implementation of a worker who performs Task 2 is as follows:
// app/src/Process/worker/curlChecker.php .... class curlChecker extends nextStepWorker { const PROXY_INFO = 'https://api.ipfy.me?format=json&geo=true'; const PROXY_TIMEOUT = '40'; const COMMAND = "curl -m %s -Lx http://%s:%s '%s'"; public function logic() { // . .. payload extract($this->context()); // defaults payload $curltimeout = $curltimeout ?? self::PROXY_TIMEOUT; $curlchecker = $curlchecker ?? self::PROXY_INFO; // $line = sprintf( static::COMMAND, $curltimeout, $host, $port, $curlchecker ); exec($line, $info); // // ( , stop-) $info = arrays::valid_json(implode('', info)); if (empty($info)) throw new \Exception("Bad proxy: $host:$port!", static::STATUS_STOP); // payload $this->enrich(['info']) ->sets(compact('info')); } } A few lines of code and everything is done and “seconded” to the next stage.
Determine TimeZone. TimeZoneDB and what is it for ...
In-depth testing of incoming requests includes matching the time of the browser window with the time in which the IP address-source-request exists.
To avoid suspicion from the side of counters, we need to know the local proxy time.
To find out the time, take the latitude and longitude from the results of the previous step of the process and get data about the time zone in which our future instance of the browser window will work. These data will provide us with professionals in the field of time .
A simplified worker for solving this task ( Problem 3 ) will be completely similar to the previous one . The only difference is in the request URL. You can find the full version in the file:
// app / src / Process / worker / timeZone.php
Little about infrastructure
In addition to the described beanstalkd , our tool will need:
- Memcached - for caching tasks;
- Selenium Server - it is convenient to run Selenium Web Driver in a separate container and you can monitor the process via VNC ;
- Panels for monitoring beanstald , memcached and vnc .
Docker is very convenient for quick deployment of all this ( How to install on Ubuntu ).
And the "orchestrator" for him is docker-compose (commands for installation) ...
sudo apt-get -y update sudo apt-get -y install docker-compose These tools allow you to run already configured and configured (by someone earlier) server / processes in separate “containers” of the parent OS. For details, I recommend to refer to this or to this article.
So…
To start the infrastructure, you need several commands in the console:
# , docker- # ( ) # sudo -s git clone \ https://oauth2:YRGzV8Ktx2ztoZg_oZZL@git.ituse.ru/deploy/esb-infrastructure.git \ panels cd panels docker-compose up --build -d # . As a result of successful execution of the command on the machine with the address XXX.XXX.XXX.XXX,
You will receive the following set of services:
- XXX.XXX.XXX.XXX:11300 - beanstalkd
- XXX.XXX.XXX.XXX:11211 - Memcached
- XXX.XXX.XXX.XXX:4444 - Selenium Server
- XXX.XXX.XXX.XXX:5930 - VNC -server to control what is happening in Chrome
- XXX.XXX.XXX.XXX:8081 - Web panel for communication with Memcached (admin: pass)
- XXX.XXX.XXX.XXX:8082 - A web panel to communicate with beanstalkd
- XXX.XXX.XXX.XXX:8083 - Web panel for communication with VNC (password: secret)
- XXX.XXX.XXX.XXX:8080 - Shared web panel
"See if everything is in place", "get into the console to the container", "stop the infrastructure" can be commands in the spoiler.
# , docker-, # ..../panels/ # docker-compose ps # Name Command State Ports # ------------------------------------------------------------------------------------------------------------------------ # beanstalkd /usr/bin/beanstalkd Up 0.0.0.0:11300->11300/tcp # chrome start-cron Up 0.0.0.0:4444->4444/tcp, 0.0.0.0:5930->5900/tcp # memcached docker-entrypoint.sh memcached Up 0.0.0.0:11211->11211/tcp # nginx docker-php-entrypoint /sta ... Up 0.0.0.0:8443->443/tcp, 0.0.0.0:8080->80/tcp, # 0.0.0.0:8082->8082/tcp, 0.0.0.0:8083->8083/tcp, 9000/tcp # vnc /usr/bin/supervisord -c /e ... Up 0.0.0.0:8081->8081/tcp # chrome docker exec -ti chrome /bin/bash # docker-compose stop && docker rm $(docker ps -a -q) Tasks 4,5,6 - we unite in one utility
Looking in detail at the fragmentation of the tasks ( scheme above ), it is easy to verify that only one of the remaining tasks ( task 6 ) depends on an external resource. Performing tasks with “conditionally guaranteed” execution time (not dependent on uncontrollable factors), we will not receive additional advantages to the speed of the whole process. In this regard, these tasks ( 4,5,6 ) were merged into one worker. The worker file is called:
// app / src / Process / worker / whoerChecker.php
Make settings for Chrome. Plugins
Chrome is flexibly configured using plugins.
The plugin for Chrome is an archive that contains a file manifest.json . He describes the plugin. The archive also contains a set of JavaScript, html, css and other files required by the plugin ( details ).
In our case, one of the JavaScript files will be executed in the context of the Chrome working window and all the necessary settings will take effect.
We just need to take the plug-in template and substitute the necessary data in the right places (interaction protocol, address and port, or Timezone) for the proxy server under test.
The code snippet that makes the archive:
// app/src/Chrome/proxyHelper.php .... class proxyHelper extends sshDocker{ .... // $name - - // $files - [ ... ' -' => '', ...] protected function buildPlugin(string $name, array $files) { $this->last = "$this->cache/$name"; if (!file_exists("$this->last")) { $zip = new \ZipArchive(); $zip->open("$this->last", \ZipArchive::CREATE | \ZipArchive::OVERWRITE); foreach ($files as $n => $data) { $zip->addFromString(basename($n), $data); } $zip->close(); } $this->all[] = $this->last; $this->all = array_unique($this->all); return $this; } .... } The template for the plugin that configures the proxy was found in the piggy bank of the results of work of people who love their profession , changed in part of the protocol, and added to the repository.
Window time change
To change the global time of the running instance of Chrome, we need to replace window.Date with a class with the same functionality, but acting in the correct time zone.
I am very grateful for the work of Sampo Juustila . The script was made for automated testing of UI , but after a small refinement was applied.
There is a nuance to which I want to draw your attention. It is related to the execution context of the scripts described in manifest.json .
The whole secret is that the global context (the one in which the main script of the plug-in is launched and the settings, for example, connected with the network) is isolated from the context of the tab into which the page is loaded.
Empirically, it was found that the impact on the class prototype in a global context did not change it in the tab. However, by registering the script in the already loaded page and executing it before the rest, the task was solved.
The solution is represented by the following code snippet:
// app/chromePlugins/timeShift/content.js // var s = document.createElement('script'); // s.src = chrome.extension.getURL('timeshift.js'); // (document.head || document.documentElement).appendChild(s); Proxy settings
Setting up a proxy in Chrome is so simple that I will hide the js code in the spoiler
// app/chromePlugins/proxy/background.js var config = { mode: "fixed_servers", rules: { singleProxy: { scheme: "%scheme", host: "%proxy_host", port: parseInt(%proxy_port) }, bypassList: ["foobar.com"] } }; chrome.proxy.settings.set({value: config, scope: "regular"}, function () { }); function callbackFn(details) { return { authCredentials: { username: "%username", password: "%password" } }; } chrome.webRequest.onAuthRequired.addListener( callbackFn, {urls: [">all_urls<"]}, ['blocking'] ); Chrome Plugins Path
All plug-ins are named according to the scheme and stored in a temporary folder of the machine controlling the process.
// naming scheme for proxy plugin:
proxy- [address] - [port] - [protocol]>. zip
timeshift - ["-" | ""] - [shift_in_minute_ot_GMT] .zip
Next, we need to install these plugins into the docker container that runs on the machine responsible for the infrastructure.
We will do this with ssh.For this, I met phpseclib (even though I later regretted it). Fascinated by the unusual behavior of the library, I spent the day studying it.
The ssh console client here will work better and will work faster, but the work has already been done.
For the low level (working with SFTP and SSH) the base class is responsible (below). Replacing this class will allow phpseclib to be replaced with a console client.
// app/src/Chrome/sshDocker.php // (DOCKER_HOST, DOCKER_USER, DOCKER_PASS) // : app/settings.php // .... class sshDocker { .... // . docker // . // : app/techs.php const EXEC_DOCKER = DOCKER_BIN_PATH . "/docker exec -i %s %s"; .... // sudo ( ), DOCKER_USER - protected function sudo(string $command, string $expect = '.*'){...} // Docker-, // - self::EXEC_DOCKER protected function execDocker(string $command, string $expect){...} .... } Generated from the base sshDocker and already known to us proxyHelper class not only produces plugins, but also puts them into the temporary folder of the infrastructure container.
// app/src/Chrome/proxyHelper.php .... class proxyHelper extends sshDocker { .... public static function new(string $docker, $plugins) { return (new self($docker, $plugins)) ->setupPlugins(); } .... } Run Chome with settings
Launch a customized Chrome will help us Selenium Server .
Selenium Server is a frame-work created by the FaceBook team specifically for testing WEB-interfaces.
Framework allows a developer to programmatically emulate any user action in a browser window (using Chrome or Firefox ).
Selenium Server is adapted for use with many languages and is the de facto standard tool for writing test scripts.
The best way to get a fresh release for use in a project:
composer require facebook/webdriver The traditional configuration of the main instance of a Selenium Server object (RemoteWebDriver) seemed to me verbose.
// URL- $url = "https://example.com/books/196/empire-v-povest-o-nastoyashem-sverhcheloveke"; // URL, (Selenium Server) $server = 'http://' . DOCKER_HOST . '/wd/hub'; // , $options = new ChromeOptions(); $options->addArguments(array( '--disable-notifications' )); // - $capabilities = DesiredCapabilities::chrome(); $capabilities->setCapability(ChromeOptions::CAPABILITY, $options); // 5000 URL $driver = RemoteWebDriver::create($server, $capabilities, 5000); $page = $driver->get($url); And therefore, I have a little reduced all this, having optimized configuration for my needs:
// app/src/Process/worker/whoerChecker.php .... class whoerChecker extends nextStepWorker { // : app/settings.php // URL Selenium Server const SELENIUM_SERVER = CHVM; // - const DOCKER_NAME = DOCKER_NAME; .... public function config() .... // : // $driver = RemoteWebDriver::create($server, $capabilities, 5000); $chrome = Chrome::driver( static::SELENIUM_SERVER, Chrome::capabilities(static::DOCKER_NAME, $plugins), 5000 ); .... } .... The eye immediately clings to $ plugins. $ plugins is a data structure that is responsible for configuring plugins. For each directory and for replacing placeholders in the JavaScript files of the plugin.
The structure is described in the app / plugs.php file and is part of the global app / settings.php options.
// app/plugs.php const PLUGS = [ 'timeshift' => [ 'path' => PROJECTPATH . '/app/chromePlugins/timeShift', 'files' => ['manifest.json', 'timeshift.js', 'content.js'], 'fields' => ['%addsminutes' => 'timeshift'] ], 'proxy' => [ 'path' => PROJECTPATH . '/app/chromePlugins/proxy', 'files' => ['manifest.json', 'background.js'], 'fields' => [ '%proxy_host' => 'host', '%proxy_port' => 'port', '%scheme' => 'scheme', '%username' => 'user', '%password' => 'pass' ] ] ]; Parsing a page with Selenium WebDriver is very simple.
.... $url = 'https://__/_-_'; $page = $chrome->get($url); .... // xPath- $xpath = '/html[1]/body[1]/div[1]/div[1]/div[1]/div[2]/div[1]/div[1]/div[1]/div[1]/strong[1]'; $element = page->findElement(WebDriverBy::xpath($xpath)); .... // $text = $element->getText(); // HTML- $html = $element->>getAttribute('innerHTML'); .... As I already wrote, all these actions are implemented by the third-step utility ( Task 4,5,6 ):
// app / src / Process / worker / whoerChecker.phpFinishing the description of working with Selenium Server , I want to draw your attention to the fact that when using this technology on an industrial scale (1000 - 3000 page openings), there are often situations when a session with Selenium Server ends incorrectly. The window is abandoned. And such windows can accumulate a lot.
There are several ways to combat the “brooches”. Work "ate" 2 days. The most effective was cron . Its proper installation and configuration in the Docker container has become a separate task, carefully and very thoroughly described by renskiy , in an article devoted ONLY TO THIS TOPIC (which I was surprised by).
Automatic reassembly of the original Docker-image and the installation of several scripts for closing brooches and clearing unused plug-ins is described in the docker-compose.yml, infrastructure repository . The frequency of cleaning is set in the killcron file of the same repository.
Webrtc
Despite the fact that we have already set the correct time, and the traffic of our browser goes through a proxy, we can still be detected.
In addition to the time difference (browser and IP address), there are two more sources of deanonymization of "sitting at the proxy". These are flash and WebRTC technologies embedded in the browser. Flash is disabled in our browser , WebRTC is not.
The reason for the two possibilities of failure is the same - the ubiquitous and nimble UDP packets. For WebRTC, these are two ports: 3478 and 19302 .
To stop the exodus of the “scouts” from the “chrome” container, the iptables rule is applied on the host machine with the infrastructure containers:
iptables -t raw -I PREROUTING -p udp -m multiport --dports 3478,19302 -j DROP This task is implemented by the same proxyHelper.
The remaining workers
To successfully achieve the goal - the implementation of a "click" on the target site via an anonymous proxy, we need another worker.
It will be a truncated version of whoerChecker . I think to do it yourself, using all that is written, is not difficult.
The result of the work of the whole process, which falls into the queue located , contains data on the “degree” of anonymity of each proxy server that passes the address verification.
When “playing” against counters, the main thing is to remember about anonymity and not to get carried away with robotic visits. Observance of the principle “do not get carried away with clicks” is ensured by the possibility of organizing actions on a schedule, which is embodied in esbTask ( since the field of our ESB envelope).
If you try and do everything neatly, then the yandex-metric of the target site will be similar to the figure below.

How to put everything together
So, given:
- utilities that are able to accept "as input" (as a command line argument) esbTask json-string view and execute some logic, and send the results to beanstalkd ;
- message queue ( MQ ), based on beanstalkd ;
- Linux machine (Process machine);
With this "given", usually, I use libevent and React PHP . All this, complemented by several tools, allows you to manage the number (within specified limits) of instances of handlers for each stage of the process automatically.
However, given the size of the article and the specifics of the topic, I will be happy to describe all this in a separate article. This article is a " noserver " technology . Future material is " server ".
In " noserver ", one instance will process one queue (one stage of the process). This approach
Depending on the required processing speed, you can start as many copies as you want “manually”.
It may look like this:
// app/src/Process/noserver/singleProcess.php // , // include __DIR__ . '/../../../settings.php'; use App\ESB\pipeNcacheService; use App\arrayNstring\queueDSN; use App\arrayNstring\timeSpent; use App\arrayNstring\progressString; // $path = __DIR__ . '/../worker'; // $queues = array_keys(WORKERS); $queue = $argv[1] ?? end($queues); $queue = strtolower($queue); if (!in_array($queue, $queues)) die("php $argv[0] <queue_name>" . PHP_EOL); // - $progress = new progressString("Listenning... Idle: ", 40, 20); // , $stopwatch = timeSpent::start(); // beanstalkd- list($worker, $task) = WORKERS[$queue]; $procid = ['procid' => posix_getpid()]; // beanstalkd Memcached, // ( ) $dsn = new queueDSN($task, $queue, ...QUEUE_SERVER); // ESB- $pnc = new pipeNcacheService($dsn); $pipe = $pnc->getPipe(); echo "Start listener for queue: $queue." . PHP_EOL; echo "Press Ctrl-C to stop listener." . PHP_EOL; // // while (true) { try { $job = $pipe->watch($queue) ->reserve(1); $now = new DateTime(); $opts = json_encode($pipe->getPayload($job) + $procid); $pipe->delete($job); echo PHP_EOL . "Task recived at: " . $now->format('H:i:s') . " Starting worker: $worker. "; $stopwatch = timeSpent::start(); exec("php $path/$worker $opts", $out); echo "Finished. Time spent: $stopwatch" . PHP_EOL; $stopwatch = timeSpent::start(); } catch (Throwable $exception) { echo $progress($stopwatch('%I:%S', null, $now)); } } The strange start of the worker is striking ... Despite the fact that each of the workers is a PHP object, I used exec (...) .
This is done in order to save time, not to create separate workers for " noserver " or not to change the worker for launch purposes in the " server " mode .
A few words about configuration and deployment
Configuration Constants
The configuration of your instance is the file app / settings.php . It should be created by you immediately after the repository is cloned. To do this, rename the file app / settings.php.dist . All constants are described inside.
app / settings.php , among other things, connects files with other constants.
- app / queues.php contains the names of queues and tasks
- app / plugs.php contains a description of Chrome plugin
- app / techs.php contains calculated constants
Utilities
For the convenience of processing the results of the process and the placement of tasks there are several utilities. Utilities run from the command line. Equipped with argument descriptions. Located: app / src / Utils .
 backup.php - saves queues to a file
    clear.php - cleans the queues
    exporter.php - exports from a file with a saved queue
                     pairs address: port
    givethejob.php - places tasks for the process
                     (source - file with the address: port).
                     may exclude some addresses from the list
    restore.php - restores the saved queue
Fine-tuning workers
When using written workers, it may be convenient to use the following configuration options:
// app/src/Process/worker/curlChecker.php .... $worker = new curlChecker( [ // curlChecker::WORKER => 'curlchecker', // beanstalkd curlChecker::PIPE_HOSTPORT => implode(':', QUEUE_SERVER), // Memcached curlChecker::CACHE_HOSTPORT => implode(':', MEMCACHED), // , . // - curlChecker::DB_SCRIPT => __DIR__ . '/../../../confdb.php', // , // ( -) curlChecker::INFO_START => CURL_START, // , // ( -) curlChecker::INFO_END => CURL_END, // , // // curlChecker::INFO_ADDS_END => ['host', 'port'] ], ['setupworker', 'config', 'logic'] ); .... Deployment
The instruction assumes that you have 2 machines with Ubuntu 18.04 installed .
One for infrastructure ( docker ), the other for process control ( process ).
docker
# root-. # , TCP-: # 11300, 11211, 4444, 5930, 8080, 8081, 8082, 8083 # . sudo -s apt -y update apt -y install git snap snap install docker apt -y install docker-compose # C # " root-" cd ~ git clone \ https://oauth2:YRGzV8Ktx2ztoZg_oZZL@git.ituse.ru/deploy/esb-infrastructure.git cd esb-infrastructure docker-compose up --build -d # 3 # . # web-. process
# . # . sudo apt -y update sudo apt -y install git php-common php-cli php-curl php-zip php-memcached composer # C process- , # - php- cd /var/www git clone \ https://oauth2:YRGzV8Ktx2ztoZg_oZZL@git.ituse.ru/deploy/clicker-noserver.git cd clicker-noserver composer update # . "XXXXXXXX" mv app/settings.php.dist app/settings.php # . gnome-terminal \ --tab -e 'bash -c "php app/src/Process/noserver/singleProcess.php curl"' \ --tab -e 'bash -c "php app/src/Process/noserver/singleProcess.php timezone"' \ --tab -e 'bash -c "php app/src/Process/noserver/singleProcess.php whoer"' # . , , # : - log/list.proxy php app/src/Utils/givethejob.php ./log/list.proxy Wait, watching what is happening through the web-panel (http: // ip-address-docker-machines: 8080).
The result will be available in the located queue .
And in conclusion
Surprisingly, writing and editing this article took longer than writing the code itself.
In my opinion, everything could be the other way around (and the difference in time could be several times greater) if it were not for the two ideologies: Message Queue and Enterprise Service Bus .
I will be very happy if you will find the presented approach to writing applications useful, the load on different parts of which is not clear at the design stage.
Thank.
Source: https://habr.com/ru/post/432038/
All Articles