Dash Quick Start Guide - Python web framework for creating dashboards. Installation + Dash Layout

Hello!
Today I propose to plunge into one of the most convenient web frameworks in conjunction with Python called Dash . It appeared not so long ago, a couple of years ago, thanks to plotly developers of the framework. Dash itself is a bunch of Flask, React.Js, HTML and CSS.
Chris Parmer speaking at PLOTCON 2016
')
Let's install the framework right away. Please check updated versions here .
pip install dash==0.31.1 # The core dash backend pip install dash-html-components==0.13.2 # HTML components pip install dash-core-components==0.38.1 # Supercharged components pip install dash-table==3.1.7 # Interactive DataTable component (new!) Friends, if you really want to understand this framework, read the publications to the end, as examples often follow first, and after a detailed review of the code. If you still do not understand - I advise you to read the original Dash documentation in English. Also in RuNet there are several articles that explain the concepts that I decided to skip in this tutorial.
Let's start.
Dash applications consist of two parts. The first part - “layout” describes what our application looks like. The second part describes the interactivity of the application, we will talk about it in the next article.
Dash provides Python classes for all visual components of an application. Developers provide a set of components in the so-called
dash_core_components and dash_html_components . But also you can build your component using javascript and React.js.Important
dash_core_components contains various dynamic forms, such as drop-down lists, charts, and check-boxes.The
dash_html_components contains html constructs that can wrap our forms. For example Div blocks or tags of the headers H1, H2, and so on. Developers provide us with a kind of abstraction from html using Python dictionaries.To get started, let's create an
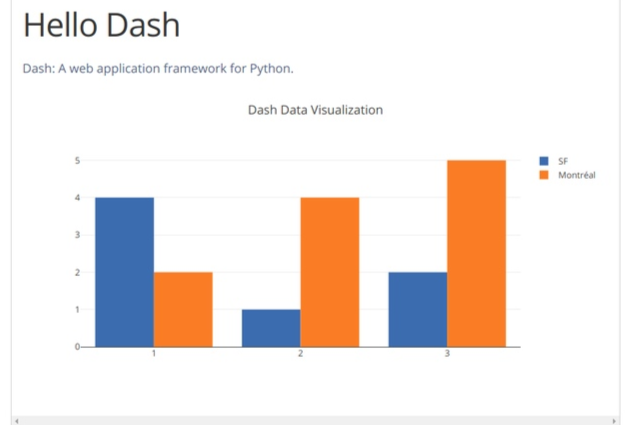
app.py file, which will contain the following: # -*- coding: utf-8 -*- # import dash import dash_core_components as dcc import dash_html_components as html # , external_stylesheets = ['https://codepen.io/chriddyp/pen/bWLwgP.css'] app = dash.Dash(__name__, external_stylesheets=external_stylesheets) app.layout = html.Div(children=[ html.H1(children='Hello Dash'), html.Div(children=''' Dash: A web application framework for Python. '''), dcc.Graph( id='example-graph', figure={ 'data': [ {'x': [1, 2, 3], 'y': [4, 1, 2], 'type': 'bar', 'name': 'SF'}, {'x': [1, 2, 3], 'y': [2, 4, 5], 'type': 'bar', 'name': u'Montréal'}, ], 'layout': { 'title': 'Dash Data Visualization' } } ) ]) if __name__ == '__main__': app.run_server(debug=True) And run it from the current directory with the command:
$ python app.py...Running on http://127.0.0.1:8050/ (Press CTRL+C to quit)We see that the server has started and is ready to accept requests on port 8050 (you may have another port).
Go to the address
http://127.0.0.1:8050/and see:
Note
- The
layoutcomponent consists of a tree of "components" that are contained in thedash_html_components. For example blocks div. dash_html_componentshas a component for each html tag.html.H1(children='Hello Dash')component generates an HTML element<h1>Hello Dash</h1>- Not all framework components are HTML components.
dash_core_componentsgenerates higher-level elements and interactive elements using a bunch of JS, HTML, CSS and React.Js. - Each component is described completely through the attributes of keywords. Dash is declarative: first you will describe your application through these attributes.
- The
childrenattribute is a bit special. By convention, it always goes first, which means that you can replacehtml.H1(children='Hello Dash')withhtml.H1('Hello Dash').
On a note
Dash contains the usual web developer feature:
hot-reloading . It is activated at the moment when the app.run_server(debug=True) function is app.run_server(debug=True) . This feature updates your browser whenever you make edits to the code and save the result. Thus, there is no need to restart the server every time.As we remember, Dash contains a component for each HTML tag. But it can also take all keyword arguments, as well as HTML elements.
Let's change our code a bit:
# -*- coding: utf-8 -*- import dash import dash_core_components as dcc import dash_html_components as html external_stylesheets = ['https://codepen.io/chriddyp/pen/bWLwgP.css'] app = dash.Dash(__name__, external_stylesheets=external_stylesheets) colors = { 'background': '#111111', 'text': '#7FDBFF' } app.layout = html.Div(style={'backgroundColor': colors['background']}, children=[ html.H1( children='Hello Dash', style={ 'textAlign': 'center', 'color': colors['text'] } ), html.Div(children='Dash: A web application framework for Python.', style={ 'textAlign': 'center', 'color': colors['text'] }), dcc.Graph( id='example-graph-2', figure={ 'data': [ {'x': [1, 2, 3], 'y': [4, 1, 2], 'type': 'bar', 'name': 'SF'}, {'x': [1, 2, 3], 'y': [2, 4, 5], 'type': 'bar', 'name': u'Montréal'}, ], 'layout': { 'plot_bgcolor': colors['background'], 'paper_bgcolor': colors['background'], 'font': { 'color': colors['text'] } } } ) ]) if __name__ == '__main__': app.run_server(debug=True) We update the page and see:

In this example, we changed the
html.Div and html.H1 styles using the style property.html.H1('Hello Dash', style={'textAlign': 'center', 'color': '#7FDBFF'}) rendered in the Dash application as: <h1 style="text-align: center; color: #7FDBFF">Hello Dash</h1> But there are several important notes:
- HTML
styleproperties are semicolon-delimited strings. In Dash, you can simply transfer the dictionary. - The keys in the
styledictionary differ slightly in spelling relative to HTML. Instead oftext-alignwe writetextAlign. - Child classes of each tag element in Dash (class) are passed in an array through the argument
children.
Reusable components
Continuing, let's imagine that we need some elements that will change, for example, depending on the input data of the user of our application. For this, so-called
reusable components provided in Dash. Consider them on the example of a table, the data for which will be loaded from the Pandas dataframe. import dash import dash_core_components as dcc import dash_html_components as html import pandas as pd df = pd.read_csv( 'https://gist.githubusercontent.com/chriddyp/' 'c78bf172206ce24f77d6363a2d754b59/raw/' 'c353e8ef842413cae56ae3920b8fd78468aa4cb2/' 'usa-agricultural-exports-2011.csv') def generate_table(dataframe, max_rows=10): return html.Table( # Header [html.Tr([html.Th(col) for col in dataframe.columns])] + # Body [html.Tr([ html.Td(dataframe.iloc[i][col]) for col in dataframe.columns ]) for i in range(min(len(dataframe), max_rows))] ) external_stylesheets = ['https://codepen.io/chriddyp/pen/bWLwgP.css'] app = dash.Dash(__name__, external_stylesheets=external_stylesheets) app.layout = html.Div(children=[ html.H4(children='US Agriculture Exports (2011)'), generate_table(df) ]) if __name__ == '__main__': app.run_server(debug=True) Little about the tables
Let's remember what the table in HTML is.
HTML table is defined by the table tag.
Each row of the table is defined by a tr tag. Header table is defined by the tag th . A table cells are filled with the td tag.
It turns out this structure:
<table style="width:100%"> <tr> <th>Firstname</th> <th>Lastname</th> <th>Age</th> </tr> <tr> <td>Jill</td> <td>Smith</td> <td>50</td> </tr> <tr> <td>Eve</td> <td>Jackson</td> <td>94</td> </tr> <tr> <td>John</td> <td>Doe</td> <td>80</td> </tr> </table> And it looks like this:
| Firstname | Lastname | Age |
|---|---|---|
| Jill | Smith | 50 |
| Eve | Jackson | 94 |
| John | Doe | 80 |
Kernel Components (Core Components)
As we said earlier,
dash_core_components includes high-level elements. Such as: drop-down menus, graphics, and more.You can get acquainted with the visual side of these elements, each of which is accompanied by a code (very convenient, universal respect to the developers of Plot.ly) here .
In order for the developer, namely you, in the code to distinguish all the elements, it is customary to write a label for each component of the kernel. This is something like the name of our item. This is not necessary, but will just make debugging easier. And the user will be given the opportunity to quickly understand your interface. Then you will understand what I mean.
Let's look at the following code:
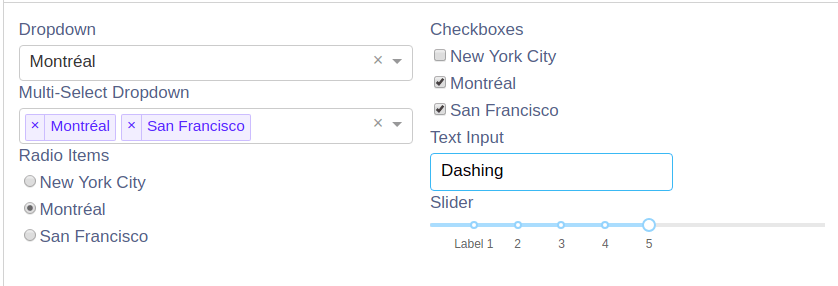
import dash import dash_core_components as dcc import dash_html_components as html external_stylesheets = ['https://codepen.io/chriddyp/pen/bWLwgP.css'] app = dash.Dash(__name__, external_stylesheets=external_stylesheets) app.layout = html.Div([ html.Label('Dropdown'), dcc.Dropdown( options=[ {'label': 'New York City', 'value': 'NYC'}, {'label': u'Montréal', 'value': 'MTL'}, {'label': 'San Francisco', 'value': 'SF'} ], value='MTL' ), html.Label('Multi-Select Dropdown'), dcc.Dropdown( options=[ {'label': 'New York City', 'value': 'NYC'}, {'label': u'Montréal', 'value': 'MTL'}, {'label': 'San Francisco', 'value': 'SF'} ], value=['MTL', 'SF'], multi=True ), html.Label('Radio Items'), dcc.RadioItems( options=[ {'label': 'New York City', 'value': 'NYC'}, {'label': u'Montréal', 'value': 'MTL'}, {'label': 'San Francisco', 'value': 'SF'} ], value='MTL' ), html.Label('Checkboxes'), dcc.Checklist( options=[ {'label': 'New York City', 'value': 'NYC'}, {'label': u'Montréal', 'value': 'MTL'}, {'label': 'San Francisco', 'value': 'SF'} ], values=['MTL', 'SF'] ), html.Label('Text Input'), dcc.Input(value='MTL', type='text'), html.Label('Slider'), dcc.Slider( min=0, max=9, marks={i: 'Label {}'.format(i) if i == 1 else str(i) for i in range(1, 6)}, value=5, ), ], style={'columnCount': 2}) if __name__ == '__main__': app.run_server(debug=True) Here we see that we have created, as usual, one common div block, which contains our various core components. It looks something like this:
Any questions?
The developers have prepared very detailed documentation, you can read it with a typical Python team for each class:
>>> help(dcc.Dropdown) Summary
Previously, we studied the
layout describes what our application looks like. In fact, it contains a tree-like hierarchy of HTML tags and high-level elements of the Dash core, which are contained in dash_core_components .In the next part we will learn how to make our page interactive. If you like this tutorial, put a plus sign and subscribe to me.
* There will soon be a link to the next part *
Source: https://habr.com/ru/post/431754/
All Articles