RecyclerView tree list (without third-party libraries and child arrays)
Good day, dear readers.
In my article, I want to share the implementation of the tree view using RecyclerView. Without using any additional libraries and without using a child array.
Who cares, I ask under the cat. I will try to describe as much as possible what yes how.
The principle of forming a list of elements is that the child elements will be shown or hidden.
')
Although I said that the implementation will be without additional libraries, but the standard libraries still need to connect.
The markup will be the most minimal - only the RecyclerView list.
Additionally, you need a separate class with which we will store the values of the list.
The comments should be clear, but I will explain. For each element of the list, we will store its certain valueId , the name of the valueText , the parentId of the parent element, a label indicating that the element is the parent itemParent and the visibility value for the childVisibility elements.
The next preparatory step is to create markup for the list item itself.
AppCompatImageView is needed to display the status of the parent element. TextView - to display the value of the item. View - just for sharing.
The final preparatory step is to create a class for handling the list adapter.
The main processing takes place in the onBindViewHolder procedure. For each element of the list, its identifier, value and parameters of the parent value are obtained. Child elements are shown or hidden, as well as the status icon for the parent element. Well, hangs the processing of clicks on the list. Here everyone decides how he needs to handle the list. The example simply displays a message with the id and value of the element.
In the procedure for showing or hiding a setVisibility child element, additional text is indented for a child element of 80 pixels.
It remains only to fill the list in the right place.
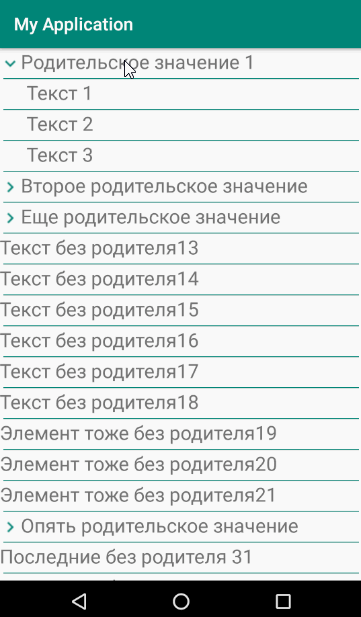
The result is such a simple list with support for children. This implementation allows you to fill in several nested elements. But you need quite a bit to modify the indents for the children, if the nesting level is more than 1.
Thank you all for your attention and successful projects.
In my article, I want to share the implementation of the tree view using RecyclerView. Without using any additional libraries and without using a child array.
Who cares, I ask under the cat. I will try to describe as much as possible what yes how.
The principle of forming a list of elements is that the child elements will be shown or hidden.
')
Although I said that the implementation will be without additional libraries, but the standard libraries still need to connect.
Connected Libraries
dependencies { implementation 'com.android.support:appcompat-v7:26.1.0' implementation 'com.android.support:design:26.1.0' implementation 'com.android.support:recyclerview-v7:26.1.0' } The markup will be the most minimal - only the RecyclerView list.
Markup
<RelativeLayout xmlns:android="http://schemas.android.com/apk/res/android" android:layout_width="match_parent" android:layout_height="match_parent"> <android.support.v7.widget.RecyclerView android:layout_width="match_parent" android:layout_height="match_parent" android:id="@+id/recycler_list"> </android.support.v7.widget.RecyclerView> </RelativeLayout> Additionally, you need a separate class with which we will store the values of the list.
Class for data Data.java
public final class Data { private String valueText = ""; // private int valueId = 0; // private boolean itemParent = false; // private int parentId = -1; //id , private boolean childVisibility = false; // // public boolean isItemParent() { return itemParent; } // public void setItemParent(boolean newItemParent) { itemParent = newItemParent; } // public boolean isChildVisibility() { return childVisibility; } // public void setChildVisibility(boolean newChildVisibility) { childVisibility = newChildVisibility; } // public int getParentId() { return parentId; } // public void setParentId(int newParentId) { parentId = newParentId; } // public String getValueText() { return valueText; } // public void setValueText(String newValueText) { valueText = newValueText; } // public int getValueId() { return valueId; } // public void setValueId(int newValueId) { valueId = newValueId; } } The comments should be clear, but I will explain. For each element of the list, we will store its certain valueId , the name of the valueText , the parentId of the parent element, a label indicating that the element is the parent itemParent and the visibility value for the childVisibility elements.
The next preparatory step is to create markup for the list item itself.
Markup for item.xml
<LinearLayout xmlns:android="http://schemas.android.com/apk/res/android" xmlns:app="http://schemas.android.com/apk/res-auto" android:id="@+id/item" android:layout_width="match_parent" android:layout_height="wrap_content"> <RelativeLayout android:layout_width="match_parent" android:layout_height="match_parent"> <!-- --> <android.support.v7.widget.AppCompatImageView android:id="@+id/icon_tree" android:layout_width="wrap_content" android:layout_height="wrap_content" android:background="@drawable/icon_hide" android:visibility="gone" app:backgroundTint="@color/colorPrimary" android:layout_centerVertical="true"/> <LinearLayout android:id="@+id/block_text" android:layout_width="match_parent" android:layout_height="wrap_content" android:layout_toRightOf="@+id/icon_tree"> <!-- --> <TextView android:id="@+id/value_name" android:layout_width="match_parent" android:layout_height="wrap_content" android:foreground="?android:attr/selectableItemBackground" android:text="sdfdsf"/> </LinearLayout> <!-- --> <View android:layout_width="match_parent" android:layout_height="1dp" android:background="@color/colorPrimary" android:layout_below="@+id/block_text" android:layout_marginTop="4dp" android:layout_marginLeft="4dp" android:layout_marginRight="4dp"/> </RelativeLayout> </LinearLayout> AppCompatImageView is needed to display the status of the parent element. TextView - to display the value of the item. View - just for sharing.
The final preparatory step is to create a class for handling the list adapter.
Adapter for RecyclerViewAdapter.java list
public class RecyclerViewAdapter extends RecyclerView.Adapter<RecyclerViewAdapter.ViewHolder> { private View vv; private List<Data> allRecords; // public RecyclerViewAdapter(List<Data> records) { allRecords = records; } @Override public RecyclerViewAdapter.ViewHolder onCreateViewHolder(ViewGroup viewGroup, int i) { View v = LayoutInflater.from(viewGroup.getContext()).inflate(R.layout.item, viewGroup, false); return new RecyclerViewAdapter.ViewHolder(v); } @Override public void onBindViewHolder(final RecyclerViewAdapter.ViewHolder viewHolder, int i) { Data record = allRecords.get(i); String value = record.getValueText(); int id = record.getValueId(); int parentId = record.getParentId(); final int position = i; final String text = "#" + id + ": " + value + " (id : " + parentId + ")"; // , if (parentId >= 0) { // setVisibility(viewHolder.item, allRecords.get(parentId).isChildVisibility(), parentId); } else { // , setVisibility(viewHolder.item, true, parentId); } // if (record.isItemParent()) { viewHolder.iconTree.setVisibility(View.VISIBLE); // if (record.isChildVisibility()) // viewHolder.iconTree.setBackgroundResource(R.drawable.icon_show); else // viewHolder.iconTree.setBackgroundResource(R.drawable.icon_hide); } else // viewHolder.iconTree.setVisibility(View.GONE); // if (!TextUtils.isEmpty(value)) { viewHolder.valueText.setText(value); } // viewHolder.valueText.setOnClickListener(new View.OnClickListener() { @Override public void onClick(View view) { Data dataItem = allRecords.get(position); if (dataItem.isItemParent()) { // , dataItem.setChildVisibility(!dataItem.isChildVisibility()); notifyDataSetChanged(); } else { // , Snackbar snackbar = Snackbar.make(vv, text, Snackbar.LENGTH_LONG); snackbar.show(); } } }); } // private void setVisibility(View curV, boolean visible, int parentId) { // , LinearLayout vPadding = curV.findViewById(R.id.block_text); LinearLayout.LayoutParams params; if (visible) { params = new LinearLayout.LayoutParams(ViewGroup.LayoutParams.MATCH_PARENT, ViewGroup.LayoutParams.WRAP_CONTENT); if (vPadding != null) { if (parentId >= 0) { // , vPadding.setPadding(80, 0, 0, 0); } else { vPadding.setPadding(0, 0, 0, 0); } } } else params = new LinearLayout.LayoutParams(ViewGroup.LayoutParams.MATCH_PARENT, 0); curV.setLayoutParams(params); } @Override public int getItemCount() { return allRecords.size(); } class ViewHolder extends RecyclerView.ViewHolder { private LinearLayout item; private TextView valueText; private AppCompatImageView iconTree; public ViewHolder(View itemView) { super(itemView); vv = itemView; item = vv.findViewById(R.id.id_item); valueText = vv.findViewById(R.id.value_name); iconTree = vv.findViewById(R.id.icon_tree); } } } The main processing takes place in the onBindViewHolder procedure. For each element of the list, its identifier, value and parameters of the parent value are obtained. Child elements are shown or hidden, as well as the status icon for the parent element. Well, hangs the processing of clicks on the list. Here everyone decides how he needs to handle the list. The example simply displays a message with the id and value of the element.
In the procedure for showing or hiding a setVisibility child element, additional text is indented for a child element of 80 pixels.
It remains only to fill the list in the right place.
List formation
List<Data> records = new ArrayList<Data>(); // Data record; RecyclerViewAdapter adapter; int parentId; RecyclerView recyclerView = findViewById(R.id.recycler_list); record = new Data(); record.setValueId(1); record.setValueText(" 1"); record.setItemParent(true); // records.add(record); parentId = records.size() -1; for (int ind = 1; ind <= 3; ind ++) { record = new Data(); record.setValueId(ind); record.setValueText(" " + ind); record.setParentId(parentId); records.add(record); } record = new Data(); record.setValueId(1); record.setValueText(" "); record.setItemParent(true); // records.add(record); parentId = records.size() -1; for (int ind = 4; ind <= 7; ind ++) { record = new Data(); record.setValueId(ind); record.setValueText(" " + ind); record.setParentId(parentId); records.add(record); } record = new Data(); record.setValueId(1); record.setValueText(" "); record.setItemParent(true); // records.add(record); parentId = records.size() -1; for (int ind = 8; ind <= 12; ind ++) { record = new Data(); record.setValueId(ind); record.setValueText(" " + ind); record.setParentId(parentId); records.add(record); } for (int ind = 13; ind <= 18; ind ++) { record = new Data(); record.setValueId(ind); record.setValueText(" " + ind); records.add(record); } for (int ind = 19; ind <= 21; ind ++) { record = new Data(); record.setValueId(ind); record.setValueText(" " + ind); records.add(record); } record = new Data(); record.setValueId(1); record.setValueText(" "); record.setItemParent(true); // records.add(record); parentId = records.size() -1; for (int ind = 22; ind <= 30; ind ++) { record = new Data(); record.setValueId(ind); record.setValueText(": " + ind); record.setParentId(parentId); records.add(record); } for (int ind = 31; ind <= 45; ind ++) { record = new Data(); record.setValueId(ind); record.setValueText(" " + ind); records.add(record); } adapter = new RecyclerViewAdapter(records); RecyclerView.ItemAnimator itemAnimator = new DefaultItemAnimator(); LinearLayoutManager layoutManager = new LinearLayoutManager(this); recyclerView.setAdapter(adapter); recyclerView.setLayoutManager(layoutManager); recyclerView.setItemAnimator(itemAnimator); The result is such a simple list with support for children. This implementation allows you to fill in several nested elements. But you need quite a bit to modify the indents for the children, if the nesting level is more than 1.
Thank you all for your attention and successful projects.
Source: https://habr.com/ru/post/431718/
All Articles