Introduction to Custom CSS Properties
Stas Melnikov, the author of the course on the “HTML-layout” Netology , told us what custom CSS properties are and why they are worth studying.
Standard CSS Custom Properties changed CSS. There were insane opportunities, which previously we could only dream of. We tell you exactly what and why beginners should learn them as quickly as possible.
A custom property is a CSS property that the developer himself created. The browser does not know anything about this property until it has been announced.
The declaration of a custom property begins with a double hyphen, after which the name is indicated, a colon is inserted, and a value is added.

For example, let's declare a custom property -
')
Now the browser knows about our property, but what is its use?
The first feature is the
In order for the browser to do this, the developer needs to declare a built-in property, for example,
For example, add a custom property for the built-in
In a browser, the button will look like this:

Why study custom properties if there are variables in Sass and they are completely satisfied?
Variables in preprocessors, such as LESS and Sass, help organize code so that we can more easily maintain it. For example, in the following code, I use the
After converting the code in the browser, we will see the following code:
Based on the example, it is clear that after converting the code from Sass to CSS in place of variables, the compiler inserted their values, so we can say that there are no Sass variables in the browser.
The second feature of user properties is that they live in the browser, so we can change them directly in it. For example, change the value of the custom property -

Now, if the button has a
As another example, I’ll change the value of a custom property in a

The ability to dynamically change user properties can be combined with Sass variables or LESS variables.
Another possibility of custom properties is that their values can be switched using media queries.
For example, create two custom properties:


In CSS, there is a
If we add the value 5 for the custom property
For a change I will change 5 to 7 and the elements will be rearranged.

Another option for custom properties is to use them to set values for SVG properties such as
In the first method, we will use the attributes
And add in CSS the values for custom properties:

On the left there is an icon without styling, and on the right with our settings. So simply we can customize the graphics.
The second way is to remove their attributes and replace them with CSS properties.
I specifically added other values for the properties
According to caniuse.com , user properties work in most modern browsers, except IE11.
If your project has many users with IE11, do not use custom properties. I could tell you how to make fallbacks, but based on my experience, I think it is better to just not use them.
If you do not need to support IE11, feel free to use all the features of custom properties.
I hope I managed to interest you in custom properties. In this article, I touched only on the possibilities and lowered the technical and practical part, but I will catch it up and write a few more articles about the principles of work and cases.
Courses "Netology" on the topic:
Standard CSS Custom Properties changed CSS. There were insane opportunities, which previously we could only dream of. We tell you exactly what and why beginners should learn them as quickly as possible.
What is a custom property
A custom property is a CSS property that the developer himself created. The browser does not know anything about this property until it has been announced.
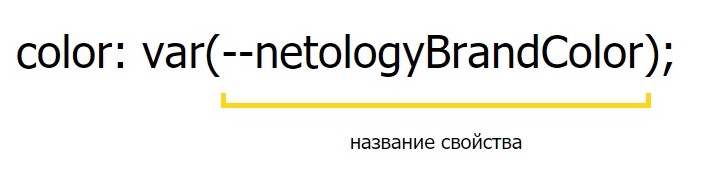
The declaration of a custom property begins with a double hyphen, after which the name is indicated, a colon is inserted, and a value is added.
For example, let's declare a custom property -
--netologyBrandColor with the value purple for the button element:')
button { --netologyBrandColor: purple; } Now the browser knows about our property, but what is its use?
Custom Property Features
The first feature is the
var function. With this function, we can tell the browser to take a value from the declared custom property and add it to the inline property.In order for the browser to do this, the developer needs to declare a built-in property, for example,
color , and add a var function as its value, in the argument of which pass the name of the custom property.For example, add a custom property for the built-in
border and color properties: button { --netologyBrandColor: purple; border: 2px solid var(--netologyBrandColor); color: var(--netologyBrandColor); } In a browser, the button will look like this:
Why study custom properties if there are variables in Sass and they are completely satisfied?
Variables in preprocessors, such as LESS and Sass, help organize code so that we can more easily maintain it. For example, in the following code, I use the
$netologyBrandColor variable, which stores the main color of the brand: $netologyBrandColor: purple; button { border: 2px solid $netologyBrandColor; color: $netologyBrandColor; } After converting the code in the browser, we will see the following code:
button { border: 2px solid purple; color: purple; } Based on the example, it is clear that after converting the code from Sass to CSS in place of variables, the compiler inserted their values, so we can say that there are no Sass variables in the browser.
The second feature of user properties is that they live in the browser, so we can change them directly in it. For example, change the value of the custom property -
--netologyBrandColor when you hover the mouse over a button. button { --netologyBrandColor: purple; border: 2px solid var(--netologyBrandColor); color: var(--netologyBrandColor); } button:hover { --netologyBrandColor: #27ae60; } Now, if the button has a
hover state, the values of the border and color properties change. It is because of this feature that user properties are called “live”: they can change directly in the browser, and accordingly change the values of the built-in properties to which they apply.As another example, I’ll change the value of a custom property in a
focus state. button { --netologyBrandColor: #000000; border: 2px solid var(--netologyBrandColor); color: var(--netologyBrandColor); } button:hover { --netologyBrandColor: #27ae60; } button:focus { --netologyBrandColor: #c0392b; outline: 3px solid var(--netologyBrandColor); } The ability to dynamically change user properties can be combined with Sass variables or LESS variables.
Custom properties and media expressions
Another possibility of custom properties is that their values can be switched using media queries.
For example, create two custom properties:
—mq and —textColor . Using the first one, we will display the name of the media function on the page, and the second is needed to switch colors. On screens with a width of up to 768px, the text will be purple, and from 769px - red. body::before { content: var(--mq); color: var(--textColor); } @media (max-width: 768px) { body::before { --mq: "max-width: 768px"; --textColor: purple; } } @media (min-width: 769px) { body::before { --mq: "min-width: 769px"; --textColor: red; } } Custom properties and calc function
In CSS, there is a
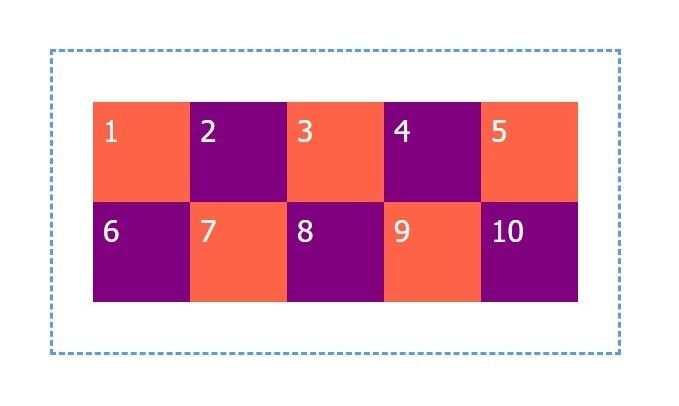
calc function, with which you can perform arithmetic operations. It can also work with custom properties. For example, we can control the number of children in a row: .child { width: calc(100% / var(--childCount)); } If we add the value 5 for the custom property
--childCount in the browser, we see the following picture:For a change I will change 5 to 7 and the elements will be rearranged.
Custom Properties and SVG
Another option for custom properties is to use them to set values for SVG properties such as
fill , stroke , stroke-width and others. This can be done in two ways.In the first method, we will use the attributes
fill , stroke and stroke-width , to which we will define custom properties as values. <svg class="svg-with-attr" viewBox="0 0 26 28"> <path stroke="var(--iconStroke)" stroke-width="var(--iconStrokeWidth)" fill="var(--iconFill)" d="..."> </svg> And add in CSS the values for custom properties:
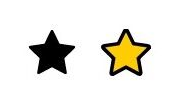
.svg-with-attr{ --iconFill: #eeeeee; --iconStroke: #000000; --iconStrokeWidth: 1px; } On the left there is an icon without styling, and on the right with our settings. So simply we can customize the graphics.
The second way is to remove their attributes and replace them with CSS properties.
<svg class="svg-with-props" viewBox="0 0 26 28"> <path d="..."> </svg> .svg-with-props { --iconFill: #ffcc00; --iconStroke: #000000; --iconStrokeWidth: 2px; stroke: var(--iconStroke); stroke-width: var(--iconStrokeWidth); fill: var(--iconFill); } I specifically added other values for the properties
fill , stroke and stroke-width , so that the difference between the examples was visually noticeable.Browser Support
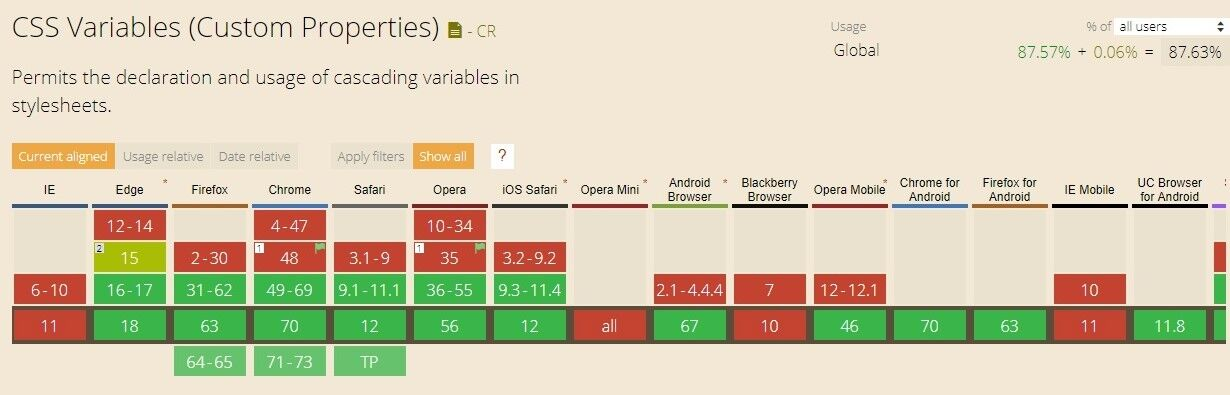
According to caniuse.com , user properties work in most modern browsers, except IE11.
If your project has many users with IE11, do not use custom properties. I could tell you how to make fallbacks, but based on my experience, I think it is better to just not use them.
If you do not need to support IE11, feel free to use all the features of custom properties.
Conclusion
I hope I managed to interest you in custom properties. In this article, I touched only on the possibilities and lowered the technical and practical part, but I will catch it up and write a few more articles about the principles of work and cases.
From the Editor
Courses "Netology" on the topic:
- online profession " Data Analyst "
- online profession " Data Scientist "
- online course " Frontend Developer "
Source: https://habr.com/ru/post/431616/
All Articles