We start the container with unit tests in Azure DevOps (VSTS)
With the advent of .Net Core, we have a great opportunity not only to run our code on different operating systems, but also to test it on different operating systems. And what can be better than Docker when working with different operating systems?
Testing is more valuable when you have no difference between the test environment and the target media. Imagine that you support your application on multiple operating systems or versions of the operating system. With Docker, you can test your application in each of them.
In this article, we will look at how to create a separate image in which the unit tests of your application will run and configure for all this a CI / CD pipeline in VSTS which is Azure DevOps for some time now.
If you are working with Docker, you are probably using multi-stage builds to build your containers. In this case, you combine the creation of binaries (using the build image) and the creation of the final image (using the runtime image) within the same Docker file.
')
If your system consists of a single container, in this case, the most common approach would be to run the tests as part of the process of building the final image. That is, the launch of tests in the Dockerfile.
To do this in a multi-step process, when you run

For now, let's not worry about what the web application does. On the other hand, we have a single test that tests the behavior of
Now, create a Dockerfile that will create a WebApplication image and run the tests at the same time:
This Dockerfile should be placed in the directory with the solution file (CiCd.sln). To create an image, use the command:
Our test fails (an error in
Now let's see how to run this process in Azure DevOps.
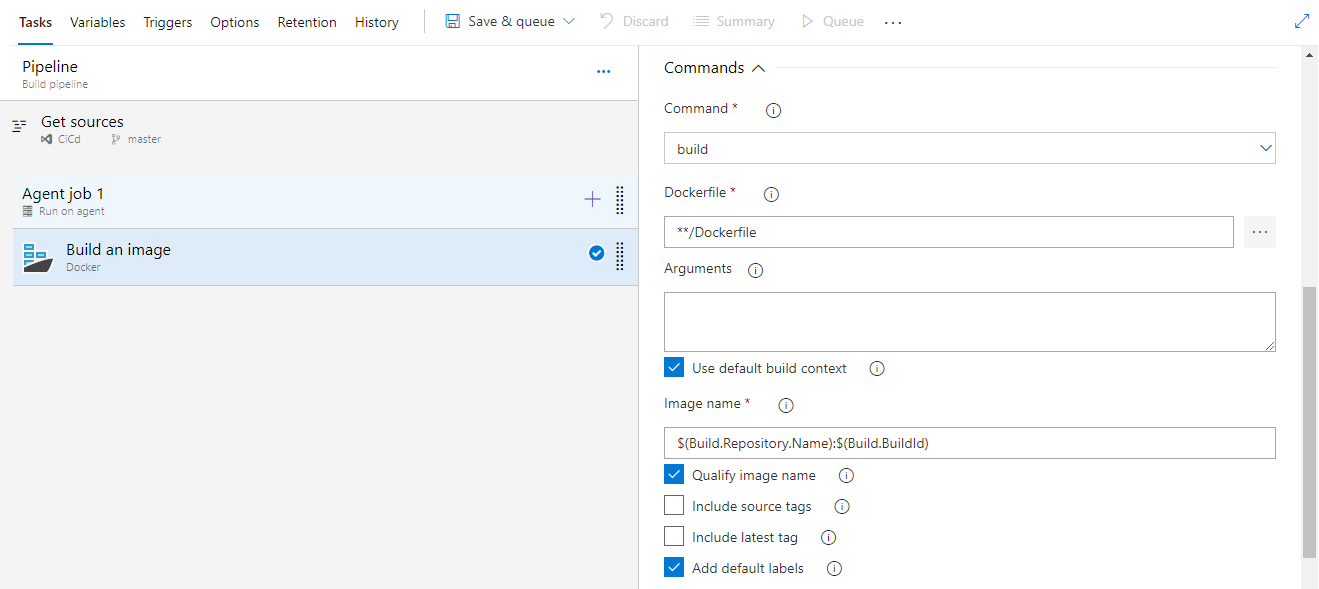
Our build definition currently represents a single “Docker” task:
As a result of the launch, the build fails because our test drops. In addition, we do not have test results (the Test tab is empty), since testing is not performed in the understanding of VSTS:

Running tests as part of an image build is not that bad, but it will prevent VSTS from learning about the result. This is due to the “limitation” of Docker, which does not allow volumes to be created during
We will take a different approach and use the excellent
The
Here we run the image created in the previous step, and through the volume we match the container's " tests " directory with the host's directory (in my case D: \ CiCD \ tests). As a result, test results appeared in my D: \ CiCD \ tests.
In order to build the final image run:
The advantage is that, thanks to the Docker layer model, there is no need to re-execute all other steps (that is, there is no need to recompile the application).
Well, let's apply all this to the Azure DevOps pipelines now. To simplify the build and avoid a large number of parameters, we will use docker-compose. Our docker-compose.yml has the following content:
Here we define two images (webapplication and webapplication-tests). To make it all over the canon, let's add the docker-compose.override.yml file:
Great, now we just need to run the tests:
This command runs the tests and creates the output trx file in the directory specified by the
Now you can edit our CI process in Azure DevOps. To do this, we define the following steps:
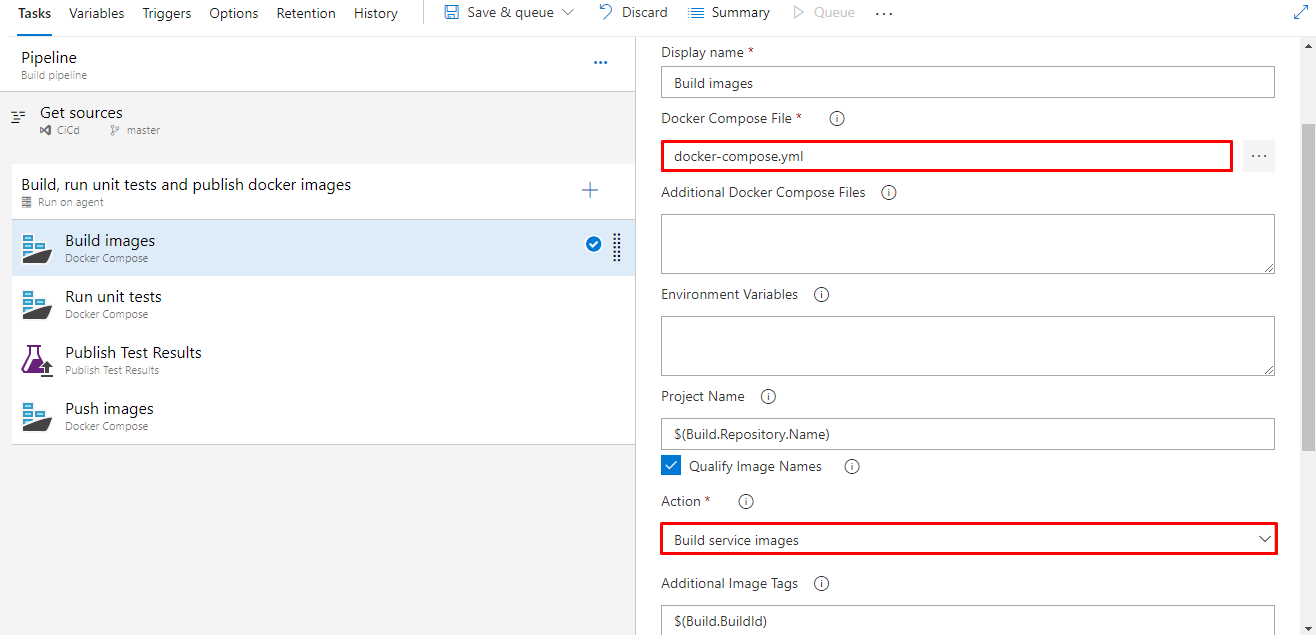
Let's start with the first step, which is the Docker Compose task in Azure:
Put the
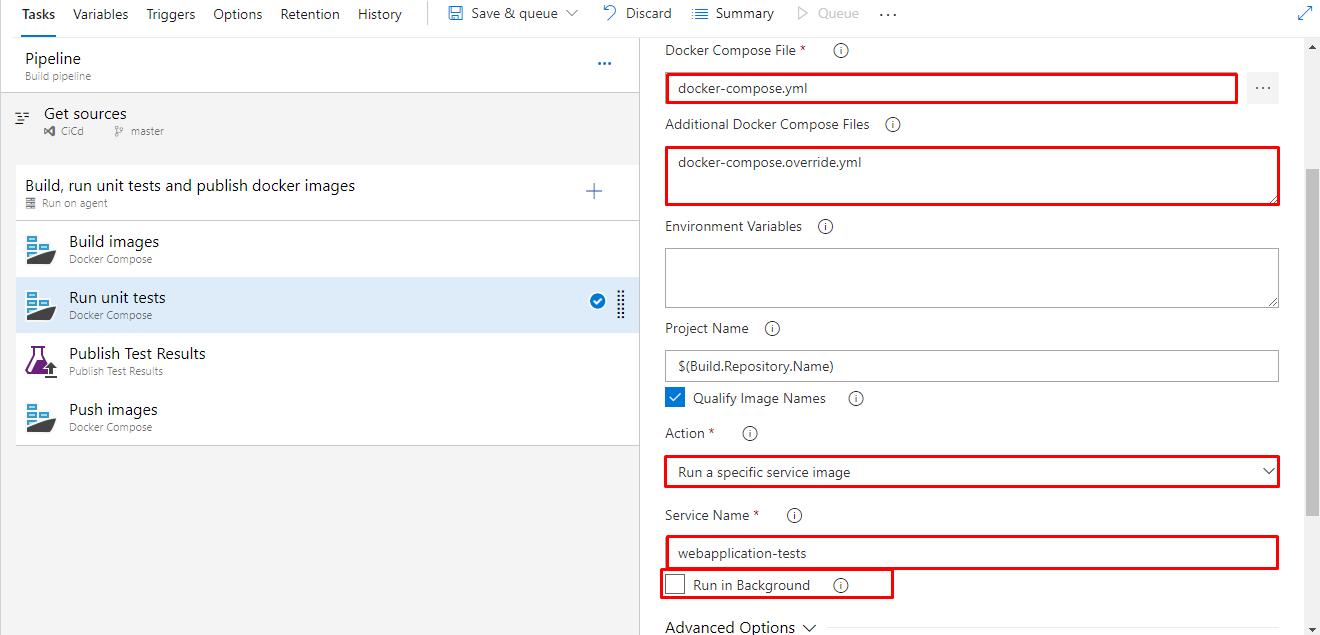
Next run the container with unit tests:
Here you need to select
The third step is “Publish test results”:
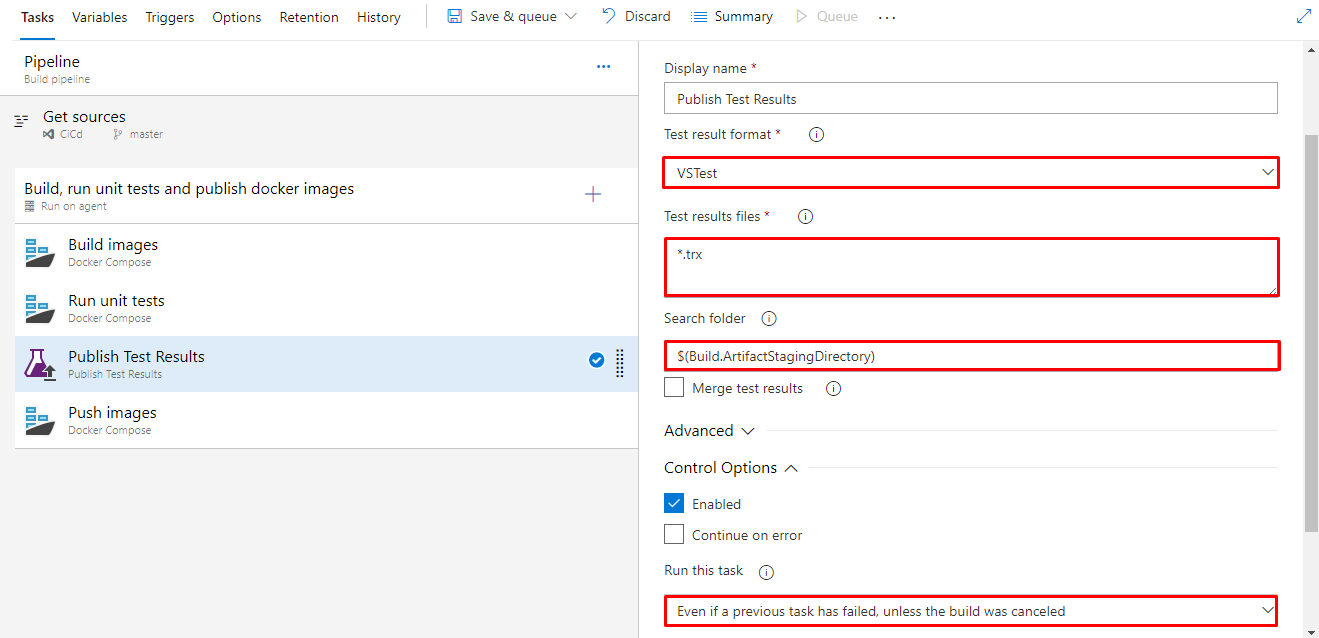
It is important to specify
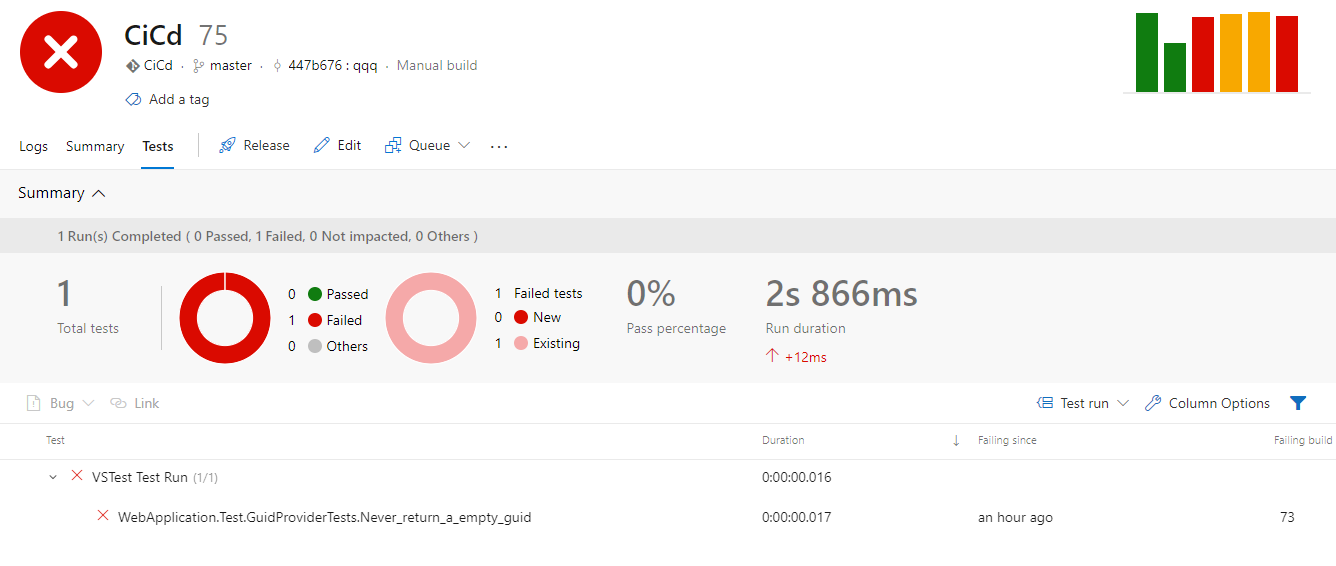
The last step will push the images into the repository. To do this, specify the Azure subscription, as well as the Azure Container Registry. Everything is ready to create a new build. We save. We start. If the tests fail, the build will fail, but now we see the results in VSTS:
I hope this material was useful. You can find my yml configuration file here .
Thanks for attention!
Testing is more valuable when you have no difference between the test environment and the target media. Imagine that you support your application on multiple operating systems or versions of the operating system. With Docker, you can test your application in each of them.
In this article, we will look at how to create a separate image in which the unit tests of your application will run and configure for all this a CI / CD pipeline in VSTS which is Azure DevOps for some time now.
If you are working with Docker, you are probably using multi-stage builds to build your containers. In this case, you combine the creation of binaries (using the build image) and the creation of the final image (using the runtime image) within the same Docker file.
')
If your system consists of a single container, in this case, the most common approach would be to run the tests as part of the process of building the final image. That is, the launch of tests in the Dockerfile.
To do this in a multi-step process, when you run
docker build you run the tests as one more step in building the final image. Let's look at a simple example. Suppose we have two projects: web applications and unit tests:For now, let's not worry about what the web application does. On the other hand, we have a single test that tests the behavior of
GuidProvider and looks like this: [Fact] public void Never_return_a_empty_guid() { // Arrange & Act var provider = new GuidProvider(); var id = provider.Id; // Assert Assert.NotEqual(Guid.Empty, id); } Now, create a Dockerfile that will create a WebApplication image and run the tests at the same time:
FROM microsoft/dotnet:2.1-aspnetcore-runtime AS base WORKDIR /app EXPOSE 80 FROM microsoft/dotnet:2.1-sdk AS build WORKDIR /src COPY CiCd.sln . COPY WebApplication/WebApplication.csproj WebApplication/ COPY WebApplication.Test/WebApplication.Test.csproj WebApplication.Test/ RUN dotnet restore COPY . . WORKDIR /src/WebApplication RUN dotnet build --no-restore -c Release -o /app FROM build as test WORKDIR /src/WebApplication.Test RUN dotnet test FROM build AS publish WORKDIR /src/WebApplication RUN dotnet publish --no-build -c Release -o /app FROM base AS final WORKDIR /app COPY --from=publish /app . ENTRYPOINT ["dotnet", "WebApplication.dll"] This Dockerfile should be placed in the directory with the solution file (CiCd.sln). To create an image, use the command:
docker build -t webapplication . Our test fails (an error in
GuidProvider which always returns Guid.Empty ), so the image build fails:output
Step 15/22 : RUN dotnet test ---> Running in 423c27696356 Build started, please wait... Build completed. Test run for /src/WebApplication.Test/bin/Debug/netcoreapp2.1/WebApplication.Test.dll(.NETCoreApp,Version=v2.1) Microsoft (R) Test Execution Command Line Tool Version 15.9.0 Copyright (c) Microsoft Corporation. All rights reserved. Starting test execution, please wait... [xUnit.net 00:00:00.96] WebApplication.Test.GuidProviderTests.Never_return_a_empty_guid [FAIL] Failed WebApplication.Test.GuidProviderTests.Never_return_a_empty_guid Error Message: Assert.NotEqual() Failure Expected: Not 00000000-0000-0000-0000-000000000000 Actual: 00000000-0000-0000-0000-000000000000 Stack Trace: at WebApplication.Test.GuidProviderTests.Never_return_a_empty_guid() in /src/WebApplication.Test/GuidProviderTests.cs:line 17 Test Run Failed. Total tests: 1. Passed: 0. Failed: 1. Skipped: 0. Test execution time: 2.8166 Seconds The command '/bin/sh -c dotnet test' returned a non-zero code: 1 Now let's see how to run this process in Azure DevOps.
Our build definition currently represents a single “Docker” task:
As a result of the launch, the build fails because our test drops. In addition, we do not have test results (the Test tab is empty), since testing is not performed in the understanding of VSTS:
Running tests as part of an image build is not that bad, but it will prevent VSTS from learning about the result. This is due to the “limitation” of Docker, which does not allow volumes to be created during
docker build , so we cannot provide a file with test results (which can be generated using the dotnet test ), this file remains in an intermediate container, and we cannot easily get him from there. We will take a different approach and use the excellent
docker run alternative. At first we will lift the separate container and we will start tests in it. For both containers we will be able to use the same Dockerfile. First of all, you need to remove the line that starts the dotnet test from the Dockerfile, since now we will run them separately. Ok, now let's use the docker run , which allows you to run Dockerfile before a certain stage. In our case, this is the testing phase: docker build -t webapplication-tests . --target test The
-target parameter indicates which stage to build. Please note that the generated image will be named " webapplication-tests ". Now you can run our tests and at the same time save the file " test-results.trx " with the results of their execution in the container's " tests " directory: docker run -v/c/tests:/tests webapplication-tests --entrypoint "dotnet test --logger trx;LogFileName=/tests/test-results.trx" Here we run the image created in the previous step, and through the volume we match the container's " tests " directory with the host's directory (in my case D: \ CiCD \ tests). As a result, test results appeared in my D: \ CiCD \ tests.
In order to build the final image run:
docker build -t webapplication . The advantage is that, thanks to the Docker layer model, there is no need to re-execute all other steps (that is, there is no need to recompile the application).
Well, let's apply all this to the Azure DevOps pipelines now. To simplify the build and avoid a large number of parameters, we will use docker-compose. Our docker-compose.yml has the following content:
version: '3.5' services: webapplication: image: webapplication build: context: . dockerfile: Dockerfile webapplication-tests: image: webapplication-tests build: context: . dockerfile: Dockerfile target: test Here we define two images (webapplication and webapplication-tests). To make it all over the canon, let's add the docker-compose.override.yml file:
version: '3.5' services: webapplication: environment: - ASPNETCORE_ENVIRONMENT=Development ports: - "8080:80" webapplication-tests: entrypoint: - dotnet - test - --logger - trx;LogFileName=/tests/test-results.trx volumes: - ${BUILD_ARTIFACTSTAGINGDIRECTORY:-./tests/}:/tests Great, now we just need to run the tests:
docker-compose run webapplication-tests This command runs the tests and creates the output trx file in the directory specified by the
BUILD_ARTIFACTSTAGINGDIRECTORY environment BUILD_ARTIFACTSTAGINGDIRECTORY or the default value is ./tests . The final image is done like this: docker-compose build webapplication Now you can edit our CI process in Azure DevOps. To do this, we define the following steps:
- Collect all images [build]
- Run unit tests [run]
- Publish test result [publish]
- Push images into storage (Registry) [push]
Let's start with the first step, which is the Docker Compose task in Azure:
Put the
Action: Build service images and specify the path to docker-compose.yml.Next run the container with unit tests:
Here you need to select
Action: Run a specific service image and specify the name of the container Service Name: webapplication-tests . Also, do not forget about the path to docker-compose.yml and docker-compose.override.yml. The value for Run in Background should not be set, otherwise the container will be launched in “Detached mode” and the task will not wait for the results of the tests to be executed but will proceed to the next step. The “Publish Test Results” task will attempt to publish results that may not yet exist, since the launch of tests takes some time. The third step is “Publish test results”:
It is important to specify
Run this task: Even if a previous task has failed, unless the build was canceled . This parameter is important because otherwise the results will never be published unless the tests pass. Search folder: $(Build.ArtifactStagingDirectory)The last step will push the images into the repository. To do this, specify the Azure subscription, as well as the Azure Container Registry. Everything is ready to create a new build. We save. We start. If the tests fail, the build will fail, but now we see the results in VSTS:
I hope this material was useful. You can find my yml configuration file here .
Thanks for attention!
Source: https://habr.com/ru/post/430958/
All Articles