Update SPPermission and Hayter Library
- “ Some kind of library, someone updated ... Hayter with it?” Why do I, an excellent developer, need to spend time on this article? "
might think you, my dear friend. No need to waste time. This is just an evening fiction with a share of unfunny humorous ones. The text will be about the library RequestPermission and about its mysterious author.
Let's start with the main thing - rebranding! Library renamed to SPPermission . I don’t know if this is the case or not, but after changing the name, it’s already been hanging in the top of GitHub for the second week. Yes, there is such a top, it is conditional, but still interesting projects can be found there. The author (mysterious person), updated banners on the project page , description, a huge section donated inserted. What greedy!
But let's move on to the project itself:
')

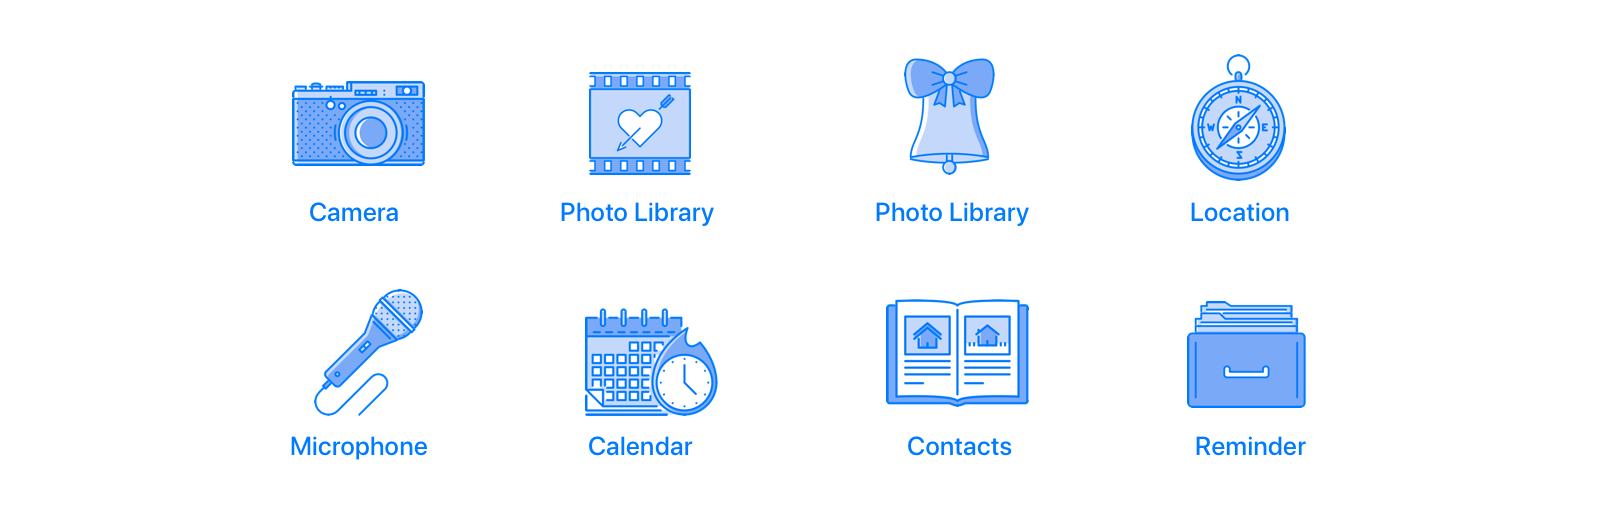
As you can see from the huge size of the gifs (non-Orthodox 4 megabytes) , the project requests a list of permissions, there are icons, text. You can even say that it looks good.
You can simply drag the source to your project, this is a folder of structured files. And you cannot suffer nonsense to build a library using CocoaPods . Pros and cons will not tell, not about this article. Add a line to the pod file:
and update dependencies. Most likely, this is the most difficult step of all the upcoming)
If you simply dragged files into the project, the SPPermission module is already available. If youdid not suffer from nonsense, use CocoaPods , then you should import the library into the controller:
Now in the viewDidAppear function we will call the following construction:
We transfer the list of permissions and the controller on which we will present the dialog box. It remains to run the project.
If you, dear friend, worked with tables or collections, the words Delegate and DataSource will not scare. And if a little obsessed with patterns, then even cry out:
- “ Wow! Protocol-oriented approach! "
You see! See? And I said it would not be funny. But once read to this line, then go ahead.
Let's start with the SPPermissionDialogDataSource protocol, it will be responsible for customizing the dialog box and will allow the library to be more loyally integrated into the project. Let's look at the parameters:
To be honest, I don’t see any reason to dwell on everyone, as their names speak. Let's analyze a couple of ambiguous: bottomComment and showCloseButton .
The first parameter is responsible for the comment under the dialog box; there you can put, for example, the hint " Swipe to close ":
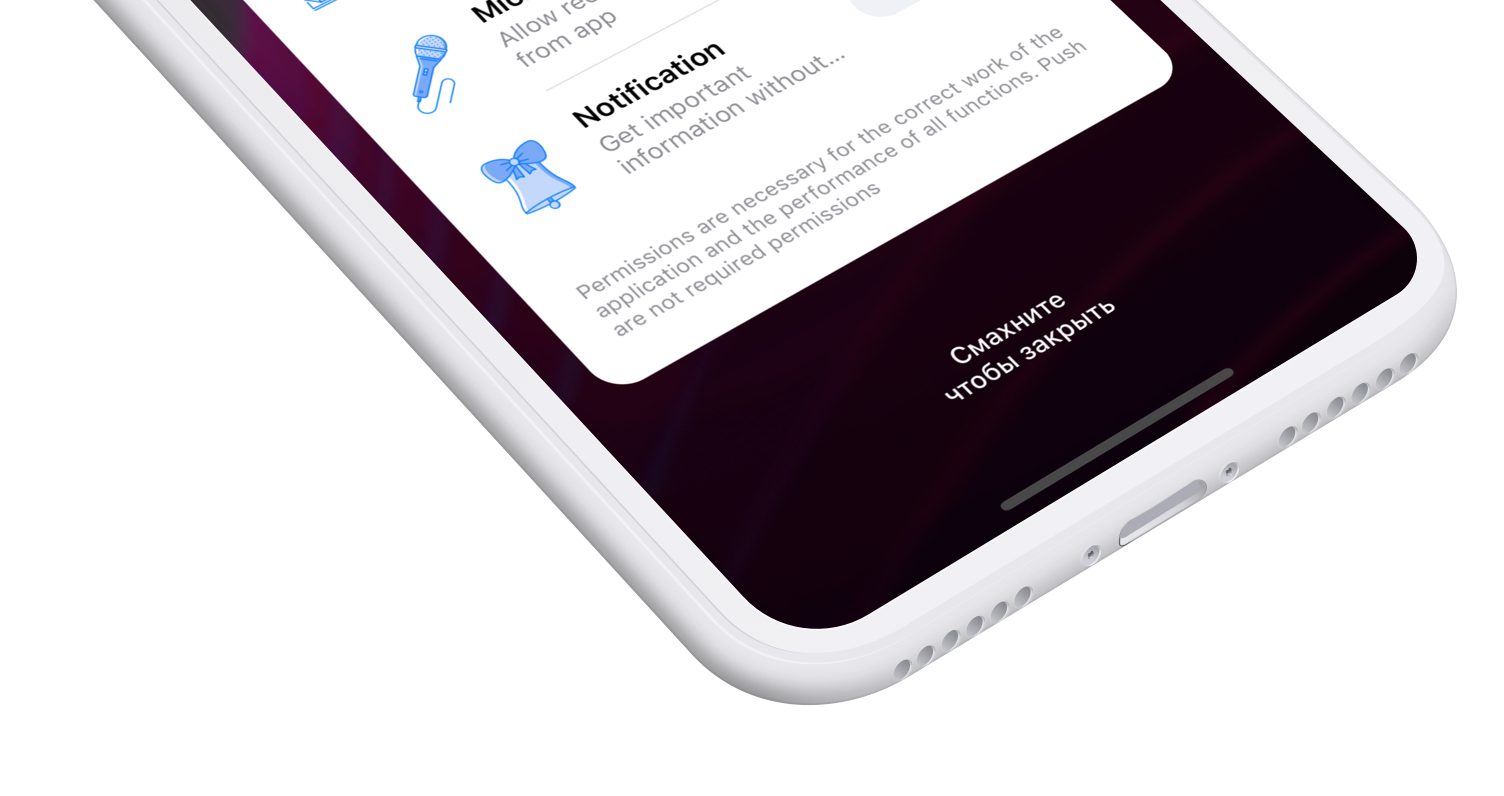
The second parameter, showCloseButton , is responsible for the close button in the upper right corner of the screen. I also have a picture with an example:

Some functions allow nil to be returned, this is necessary if you do not need to customize all titles / icons or text. It is enough to return nil to leave the default value:
It remains to transfer the DataSource object to the main structure:
It allows you to track some events. Let's look at the protocol:
Hmm, not a lot ... But although, what else do you need?) I don’t need to explain at what events the functions will be called. The names speak. I draw your attention - the delegate must not forget to specify:
The list will be updated if there are any suggestions or criticisms for the library, it is worth creating a new issue here.
It is worth paying attention to the useful function:
It will let you know if the user has given permission. In order to increase loyalty, it is recommended to request permissions not before a bundle, but before use. And no more than 3 ex! Although it is difficult for me to think of a situation where I need more) Use this:
The old version looked like this, and maybe a year ago it was nothing:
Actually, I did not update it for a year (oh well, don’t pretend that I didn’t understand that I was the author of the library), and more recently, I received a letter ... although let's talk about this story a little later. We are doing serious business here!
About a year ago I wrote an article in which I was directly trashed against lovers of unjustified use of architecture. But only I thought so, and the main message was not heard. My desire to simplify this year has not stopped. When I thought of a redesign, I realized that I would have to rewrite the project entirely. This is some kind of drilling rig with the ability to listen to the radio, cut vegetables and a heater on the floor rate. I saw it a year later! Now it seems to me it was stupid to write this article , having such a complicated example. Probably, in one more year, I will make everything even easier. We'll see)
Tutorial sobsna ended and we turn to the chatter. A few weeks ago I received a letter asking me to explain how the library works. It was a strange question, and since I abandoned the library, I simply answered the template one:
- “ Dear friend, I do not support the library now, I do not have free time. Have a nice day ”
That's right, and wrote only in Zabugorsk. And forgot. Having entered poppy, I saw about a dozen !!! messages in the spam folder. All right, obviously some kind of portal was sold, now how can I unsubscribe from their mailing! And nnnet ... I wrote the same guy, only this time in anger. In the letters, I learned that I was not the author of the library (and therefore I could not tell), I learned that people like me are the most terrible people (and we need to ban registration on GitHub), I learned that I want a lot of money for my worthless work. Of money? On the old page there was not even a Donat form. But I understood the point, the man was just angry.
I decided to help, but not because of kindness - I was incredibly interested in what such incredible things needed to be customized, which provoked a huge wave of anger. It turned out he was looking for a method that is called when the dialog box is closed. My laughter through tears had no limits! The delegate was described in the first version.
The story is sad, but further is even sadder! Yes Yes! I described in detail to him personally how to use delegates, so to speak, a general course. I did not miss the opportunity to go crazy and said that all this was on the main page of the project from the very beginning. I received the answer ... but I wanted to cry even more:
“ I recently started programming and don't want to understand the documentation. Goodbye ”
I laughed for a long time.
A brief educational program was introduced, for attentive I will leave links to the timelapse with the design (I unscrupulously lick off the indents and colors from the e-mail applications) and the tutorial that will show everything I described here, but clearly.
All successful migrations to the new Swift!
might think you, my dear friend. No need to waste time. This is just an evening fiction with a share of unfunny humorous ones. The text will be about the library RequestPermission and about its mysterious author.
Let's start with the main thing - rebranding! Library renamed to SPPermission . I don’t know if this is the case or not, but after changing the name, it’s already been hanging in the top of GitHub for the second week. Yes, there is such a top, it is conditional, but still interesting projects can be found there. The author (mysterious person), updated banners on the project page , description, a huge section donated inserted. What greedy!
But let's move on to the project itself:
')
As you can see from the huge size of the gifs (non-Orthodox 4 megabytes) , the project requests a list of permissions, there are icons, text. You can even say that it looks good.
Install
You can simply drag the source to your project, this is a folder of structured files. And you can
pod 'SPPermission' and update dependencies. Most likely, this is the most difficult step of all the upcoming)
We use
If you simply dragged files into the project, the SPPermission module is already available. If you
import SPPermission Now in the viewDidAppear function we will call the following construction:
override func viewDidAppear(_ animated: Bool) { super.viewDidAppear(animated) SPPermission.Dialog.request( with: [.camera, .calendar, .notification], on: self ) } We transfer the list of permissions and the controller on which we will present the dialog box. It remains to run the project.
Customization
If you, dear friend, worked with tables or collections, the words Delegate and DataSource will not scare. And if a little obsessed with patterns, then even cry out:
- “ Wow! Protocol-oriented approach! "
You see! See? And I said it would not be funny. But once read to this line, then go ahead.
Let's start with the SPPermissionDialogDataSource protocol, it will be responsible for customizing the dialog box and will allow the library to be more loyally integrated into the project. Let's look at the parameters:
@objc public protocol SPPermissionDialogDataSource: class { @objc optional var dialogTitle: String { get } @objc optional var dialogSubtitle: String { get } @objc optional var dialogComment: String { get } @objc optional var allowTitle: String { get } @objc optional var allowedTitle: String { get } @objc optional var bottomComment: String { get } @objc optional var showCloseButton: Bool { get } @objc optional func name(for permission: SPPermissionType) -> String? @objc optional func description(for permission: SPPermissionType) -> String? @objc optional func image(for permission: SPPermissionType) -> UIImage? } To be honest, I don’t see any reason to dwell on everyone, as their names speak. Let's analyze a couple of ambiguous: bottomComment and showCloseButton .
The first parameter is responsible for the comment under the dialog box; there you can put, for example, the hint " Swipe to close ":
The second parameter, showCloseButton , is responsible for the close button in the upper right corner of the screen. I also have a picture with an example:
Some functions allow nil to be returned, this is necessary if you do not need to customize all titles / icons or text. It is enough to return nil to leave the default value:
func description(for permission: SPPermissionType) -> String? { if permission == .calendar { return "" } lse { return nil } } It remains to transfer the DataSource object to the main structure:
SPPermission.Dialog.request( with: [.camera, .calendar, .microphone, .notification], on: self, dataSource: self ) Delegate
It allows you to track some events. Let's look at the protocol:
@objc public protocol SPPermissionDialogDelegate: class { @objc optional func didHide() @objc optional func didAllow(permission: SPPermissionType) } Hmm, not a lot ... But although, what else do you need?) I don’t need to explain at what events the functions will be called. The names speak. I draw your attention - the delegate must not forget to specify:
SPPermission.Dialog.request( with: [.camera, .calendar, .microphone, .notification], on: self, delegate: self dataSource: self ) Permissions
The list will be updated if there are any suggestions or criticisms for the library, it is worth creating a new issue here.
Buns
It is worth paying attention to the useful function:
func isAllow(_ permission: SPPermissionType) -> Bool It will let you know if the user has given permission. In order to increase loyalty, it is recommended to request permissions not before a bundle, but before use. And no more than 3 ex! Although it is difficult for me to think of a situation where I need more) Use this:
let isAvailableCamera = SPPermission.isAllow(.amera) Why was it updated
The old version looked like this, and maybe a year ago it was nothing:
Actually, I did not update it for a year (oh well, don’t pretend that I didn’t understand that I was the author of the library), and more recently, I received a letter ... although let's talk about this story a little later. We are doing serious business here!
Architecture
About a year ago I wrote an article in which I was directly trashed against lovers of unjustified use of architecture. But only I thought so, and the main message was not heard. My desire to simplify this year has not stopped. When I thought of a redesign, I realized that I would have to rewrite the project entirely. This is some kind of drilling rig with the ability to listen to the radio, cut vegetables and a heater on the floor rate. I saw it a year later! Now it seems to me it was stupid to write this article , having such a complicated example. Probably, in one more year, I will make everything even easier. We'll see)
So what's the story?
Tutorial sobsna ended and we turn to the chatter. A few weeks ago I received a letter asking me to explain how the library works. It was a strange question, and since I abandoned the library, I simply answered the template one:
- “ Dear friend, I do not support the library now, I do not have free time. Have a nice day ”
That's right, and wrote only in Zabugorsk. And forgot. Having entered poppy, I saw about a dozen !!! messages in the spam folder. All right, obviously some kind of portal was sold, now how can I unsubscribe from their mailing! And nnnet ... I wrote the same guy, only this time in anger. In the letters, I learned that I was not the author of the library (and therefore I could not tell), I learned that people like me are the most terrible people (and we need to ban registration on GitHub), I learned that I want a lot of money for my worthless work. Of money? On the old page there was not even a Donat form. But I understood the point, the man was just angry.
I decided to help, but not because of kindness - I was incredibly interested in what such incredible things needed to be customized, which provoked a huge wave of anger. It turned out he was looking for a method that is called when the dialog box is closed. My laughter through tears had no limits! The delegate was described in the first version.
The story is sad, but further is even sadder! Yes Yes! I described in detail to him personally how to use delegates, so to speak, a general course. I did not miss the opportunity to go crazy and said that all this was on the main page of the project from the very beginning. I received the answer ... but I wanted to cry even more:
“ I recently started programming and don't want to understand the documentation. Goodbye ”
I laughed for a long time.
We finish
A brief educational program was introduced, for attentive I will leave links to the timelapse with the design (I unscrupulously lick off the indents and colors from the e-mail applications) and the tutorial that will show everything I described here, but clearly.
All successful migrations to the new Swift!
Source: https://habr.com/ru/post/430886/
All Articles