Creating a game "Like Coins" on Godot Engine. Part 2
I hope you have been waiting for the second part of the article covering the aspects of game development with the help of "Godot Engine", on the example of the game "Like Coins"? On the agenda cooked a lot of "tasty" and "healthy." Immediately, I’ll make a reservation that in this article we’ll end the game we started earlier, the beginning of which you can read here - Creating a Game Like Coins on Godot Engine. Part 1 , but the series of articles will continue, because There was so much material that made me put some of it aside, but we will definitely return to it later. Let gamedev begin!
Scene "Main"
In the previous part of the article we stopped at the main stage ( Main ), from it, perhaps, we will continue. Delete everything that was added earlier (if you of course added something to check how everything works), if nothing was loaded into the scene, then you should add a Node , which will be the parent for the nodes listed below, which in turn should also be added to the scene:
ColorRect ("Background") - fill the background color;Player - the Player object (I hope you are not confused, because of what I call the scene Player ? Object?);Node ("Container") - "container" for temporary storage of coins;Position2D ("PlayerStart") - at the start of the game sets the initial position of the object "Player";Timer ("GameTimer") - time limit counter;
Select ColorRect and select from the toolbar: Layout -> Full Rect to stretch it to the entire screen area (in the future we will often use this function, so I advise you to study other operations listed in the Layout yourself), in the property "Color" specify the desired fill color. You can do the same with TextureRect , but instead of filling, you will need to load an image through the "Texture" property. For Position2D , in the property "position", we specify the values "x" and "y" - this will serve as the initial position for the Player . Of course, with the help of the script, you can set the positioning values directly in the Player itself, but we not only learn how to develop games, but also study "Godot", therefore, consideration of different options for solving one task will not be superfluous.
Script for "Main"
Add a script for Node and print the following:
extends Node #PackedScene export (PackedScene) var Coin export (int) var playtime var level # var score # var left_time # var window_size # var playing = false # The properties "Coin" and "playtime" will be displayed in the Inspector . Drag the "Coin.tscn" scene to the "Coin" property, and set "playtime" to "40" (the duration of the game in seconds).
When starting the game, initialization should occur every time - preparation for work, determination of the required parameters for high-quality and error-free operation of the application. This is a necessary step, so care should be taken first.
func _ready(): randomize() # window_size = get_viewport().get_visible_rect().size # $Player.window_size = window_size # "" $Player.hide() # Note that when specifying the name of the Player object, the "$" symbol is used - this is "syntactic sugar" that allows you to directly refer to the node in the current scene, a good alternative to the get_node("Node1") method (although using the latter is not forbidden). If "Node1" has a descendant of "Node2", you can also use this method - $Node1/Node2 . Note that in "Godot" autofilling works great, so do not neglect to use it. Using spaces in node names is undesirable, but still acceptable, in this case use quotes - $"My best Node1" .
New game
To start a new game, we define for this an appropriate function, which we can then call, for example, by pressing a button.
func new_game(): playing = true # level = 1 score = 0 time_left = playtime $Player.start($PlayerStart.position) $Player.show() $GameTimer.start() # spawn_coins() # The "start ()" function, whose argument is $PlayerStart.position , will move the player to the initial location, and the "spawn_coins ()" function answers, as it is not difficult to guess, for spawning coins on the playing field.
func spawn_coins(): for i in range(4 + level): var c = Coin.instance() $CoinContainer.add_child(c) c.window_size = window_size c.position = Vector2(rand_range(0, window_size.x), rand_range(0, window_size.y)) The range(4 + level) function returns an array with the specified range, the value of which is equal to the sum of the number of coins and the value of the current level. A range can contain one argument, as in our case, either two arguments or three arguments (the third argument will be an array step). In this function, we create several instances of the "Coin" object and add CoinContainer nodes as CoinContainer (I hope you did not forget that we already have access to the object, thanks to PackedScene ). Remember that whenever creating an instance of a new node (the instance() method), it must be added to the tree with add_child() . Next, we set the area for the possible spawn of coins, so that they do not accidentally appear behind the screen, and then randomly assign a position. The last line does not look a bit aesthetically pleasing, so I propose to simplify it by resorting to the help of Singletons.
Singletons
The second name of "Singltonov" - "Startup". Already leads to some thoughts, right? I tell, singlton works as follows: a script in which we can record anything (starting from the declaration of variables and ending with the "switches" of scenes, including their loading and unloading) is loaded first, with the launch of the application, and all its contents are accessible from any project points. In its own way, it is some kind of user global storage of "anything and everything" available at any given time.
Note that the project has its own global repository, the contents of which we can also use, and you can access it usingProjectSettings.get_setting(name), wherenameis the name of the required parameter.
Now, to use something from the storage "_G", it is enough to call it by name, and then specify the called method or whatever we will have. So, we will create an empty script and write the function listed below in it:
extends Node func rand(): var rrand = Vector2(rand_range(40, 760), rand_range(40, 540)) return rrand # 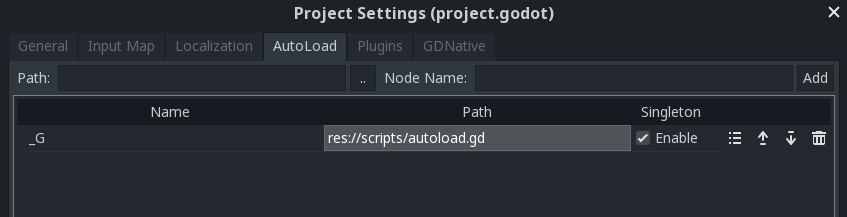
Next, save it and go to the project settings: Project -> Project Settings -> AutoLoad . Select our newly created script, set a name for it, for example, "_G", and go back to the "spawn_coins ()" function to slightly correct the last date, replacing it with the following code:
... c.position = _G.rand() Now it’s worth checking what happened by putting "spawn_coins ()" in the "_ready ()" block and running the application on F5. And do not forget to choose Main.tscn as the main scene, if for some reason you made a wrong choice, you can change the main scene manually, for this you need to go to the project settings: General -> Run -> MainScene . Works? Then we go further.
How many coins are left?
Let's continue. Next, you need to check how many coins are left to transfer the player to the next level, give him a small "bonus" in the form of an increase in time by 5 seconds, and then zaspavnit coins again.
func _process(delta): # ? ? if playing and $CoinContainer.get_child_count() == 0: # level += 1 # "" time_left += 5 # spawn_coins() User interface
Our entire interface will consist of the following elements: score, current level, time, name of the game and a button, by pressing which the game will start. Create a scene ( HUD.tscn ) with the parent CanvasLayer (allows you to draw the user interface over the playing field). Looking ahead, I’ll say that it’s not very convenient to manage user interface elements, at least for me, but a fairly wide list of elements and active development instills a positive attitude in the bright future of the development of this aspect of the engine.
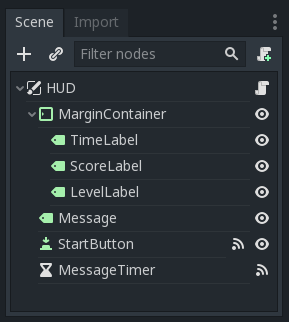
In "Godot" there are so-called "control nodes" that allow you to automatically format the child elements relative to the specified parameters of the parent. Each type of "control node" has special properties that control how they will manage the location of their descendants. A bright representative of this type of MarginContainer , which must be added to the scene. Using Layout -> Top Wide stretch it in the upper part of the window, and in the properties of this object, in the Margin section, we will specify indents from the edges: left, top and right. MarginContainer should have three child Label with the following names: ScoreLabel , LevelLabel and TimeLabel . Add them to the scene. Using the Align property, make them positioned on the left, center, and right. It remains to add another Label ( Messagelabel ), placing it in the center, all with the help of Layout , and just below place the button ( StartButton ).

Now we will make the interface responsive, we need to update the time, the number of collected coins and the current level will be highlighted. Add a script for the HUD node.
extends CanvasLayer signal start_game func update_score(value): $MarginContainer/ScoreLabel.text = str(value) func update_level(value): if len(str(value)) == 1: $MarginContainer/TimeLabel.text = "0: 0" + str(value) else: $MarginContainer/TimeLabel.text = "0: " + str(value) func update_timer(value): $MarginContainer/TimeLabel.txt = str(value) For MessageLabel we need a timer to change the message text for a short period. Add a Timer node and replace its name with a MessageTimer . In the inspector you should set a waiting time of 2 seconds and check the box in the One Shot field. This ensures that when you start the timer will work only once.
func show_message(text): $MessageLabel.text = text $MessageLabel.show() $MessageTimer.start() Connect the timeout() signal with "MessageTimer" and add the following:
func _on_MessageTimer_timeout(): $MessageLabel.hide() On the "Node" tab for the StartButton , connect the signal pressed() . When you click on the StartButton button StartButton it should disappear along with MessageLabel , then send a signal to the main scene, where we will successfully intercept it at the same time by slipping the function into execution - "new_game ()". We do this with the code below. Do not forget for the button, in the Text property to set any text calling to start the game.
func _on_StartButton_pressed(): $StartButton.hide() $MessageLabel.hide() emit_signal("start_game") To finally finish with the interface, we will write the last, final function - the function of displaying a message about the end of the game. In this function, we need to show “Game Over” for no more than two seconds and then disappear, which is possible due to the “show_message ()” function. However, it is necessary to again show the launch button of the new game, as soon as the message indicating that the game is over will disappear. yield() suspend the function until a signal is received from MessageTimer , and receiving a signal from MessageTimer about its execution, the function will continue execution, returning us to its original state so that we can start a new game again.
func show_game_over(): show_message("Game Over") yield($MessageTimer, "timeout") $StartButton.show() $MessageLabel.text = "LIKE COINS!" $MessageLabel.show() Ending?
Let's set up the feedback between HUD and Main . Add a HUD scene to the main scene and on the main scene connect the GameTimer signal via timeout() adding the following:
func _on_GameTimer_timeout(): time_left -= 1 # $HUD.update_timer(time_left) # if time_left <= 0: game_over() # Then we connect the player's pickup() and die() signals.
func _on_Player_pickup(): score += 1 $HUD.update_score(score) func _on_Player_die(): game_over() At the end of the game should happen a few things that can not be overlooked. Write down the following code, and I will explain.
func game_over(): playing = false $GameTimer.stop() for coin in $CoinContainer.get_children(): coin.queue_free() $HUD.show_game_over() $Player.die() This function will stop the game, and then the remaining coins will be recalculated and the remaining coins will be show_game_over() , then the show_game_over() call will occur for the HUD . The next step is to start the animation and stop the Player node execution process.
Finally, you should activate the StartButton , which should be connected to the new_game() function. Click on the HUD node and in the connection dialog you need to click on Make Function to Off (this will prevent the creation of a new function) and in the Method In Node field specify the name of the plug-in function - new_game . This will connect the signal to an existing function, rather than create a new one.
new_game() touches - remove new_game() from the _ready() function and add the following two lines to the new_game() function:
... $HUD.update_score(score) $HUD.update_timer(time_left) Now we can say with confidence that the game is ready, now it is quite playable, but without effects. We will consider the latter in the next article paying great attention to various kinds of "embellishments" in order to diversify the gameplay and further explore the possibilities of "Godot". So do not forget to follow the release of articles. Successes!
')
Source: https://habr.com/ru/post/430800/
All Articles