Build a system of reactive components using Kotlin
Hello! My name is Anatoly Varivonchik, I'm an Android developer for Badoo. Today I will share with you the translation of the second part of the article by my colleague Zsolt Kocsi on the implementation of MVI, which we use daily in the development process. The first part is here .
What we want and how we will do it
In the first part of the article, we became acquainted with Features , the central elements of MVICore that can be reused. They can have the simplest structure and include just one Reducer , and can become a full-featured tool for managing asynchronous tasks, events, and many others.
')
Each Feature is traceable - it is possible to subscribe to changes in its state and receive notifications about it. In this feature, you can subscribe to the input source. And this makes sense, because with the inclusion of Rx in the code base, we already have many observable objects and subscriptions at various levels.
It is precisely in connection with the increase in the number of reactive components that the time has come to reflect on what we have and whether it is possible to make the system even better.
We have to answer three questions:
- What elements should be used when adding new reactive components?
- What is the easiest way to manage subscriptions?
- Is it possible to abstract from lifecycle management / the need to clear subscriptions to avoid memory leaks? In other words, can we separate the binding of components from subscription management?
In this part of the article we will look at the basics and advantages of building a system with the help of reactive components and see how Kotlin helps in this.
Main elements
By the time we came to work on the design and standardization of our Features , we had already tried many different approaches and decided that the Features would be in the form of reactive components. At first we focused on the main interfaces. First of all, we had to decide on the types of input and output data.
We reasoned as follows:
- Let's not reinvent the wheel - let's see which interfaces already exist.
- Since we are already using the RxJava library, it makes sense to refer to its basic interfaces.
- The number of interfaces should be kept to a minimum.
As a result, we decided to use ObservableSource <T> for output and Consumer <T> for input. Why not Observable / Observer , you ask. Observable is an abstract class from which you need to inherit, and ObservableSource is an interface you are implementing that fully satisfies the need for implementing a reactive protocol.
package io.reactivex; import io.reactivex.annotations.*; /** * Represents a basic, non-backpressured {@link Observable} source base interface, * consumable via an {@link Observer}. * * @param <T> the element type * @since 2.0 */ public interface ObservableSource<T> { /** * Subscribes the given Observer to this ObservableSource instance. * @param observer the Observer, not null * @throws NullPointerException if {@code observer} is null */ void subscribe(@NonNull Observer<? super T> observer); } Observer , the first interface that comes to mind, implements four methods: onSubscribe, onNext, onError, and onComplete. In an effort to simplify the protocol as much as possible, we chose Consumer <T> , which accepts new elements using a single method. If we chose Observer , the remaining methods would most often be redundant or would work differently (for example, we would like to present errors as part of the state ( State ), and not as exceptions, and certainly not interrupt the flow).
/** * A functional interface (callback) that accepts a single value. * @param <T> the value type */ public interface Consumer<T> { /** * Consume the given value. * @param t the value * @throws Exception on error */ void accept(T t) throws Exception; } So, we have two interfaces, each of which contains one method. Now we can link them by signing the Consumer <T> on the ObservableSource <T> . The latter accepts only Observer <T> instances, but we can wrap it in Observable <T> , which is subscribed to Consumer <T> :
val output: ObservableSource<String> = Observable.just("item1", "item2", "item3") val input: Consumer<String> = Consumer { System.out.println(it) } val disposable = Observable.wrap(output).subscribe(input) (Fortunately, the .wrap (output) function does not create a new object if output is already an Observable <T> ).
You may remember that the Feature component from the first part of the article used input data of the type Wish (corresponds to the Intent from Model-View-Intent) and output data of the State type, and therefore it can be on both sides of the bundle:
// Wishes -> Feature val wishes: ObservableSource<Wish> = Observable.just(Wish.SomeWish) val feature: Consumer<Wish> = SomeFeature() val disposable = Observable.wrap(wishes).subscribe(feature) // Feature -> State consumer val feature: ObservableSource<State> = SomeFeature() val logger: Consumer<State> = Consumer { System.out.println(it) } val disposable = Observable.wrap(feature).subscribe(logger) Such a linking between Consumer and Producer already looks simple enough, but there is an even easier way in which you do not need to create subscriptions manually or cancel them.
Introducing Binder .
Steroid Binding
MVICore contains a class called Binder , which provides a simple API for managing Rx subscriptions and has a number of cool features.
Why is it needed?
- Creating a binding by subscribing input data for the weekend.
- Ability to unsubscribe at the end of the life cycle (when it is an abstract concept and has no relation to Android).
- Bonus: Binder allows you to add intermediate objects, for example, for logging or time-travel-debugging.
Instead of manually subscribing, you can rewrite the examples above as follows:
val binder = Binder() binder.bind(wishes to feature) binder.bind(feature to logger) Thanks to Kotlin, everything looks very simple.
These examples work if the input and output data types are the same. But what if it is not? By implementing the expansion function, we can make the transformation automatic:
val output: ObservableSource<A> = TODO() val input: Consumer<B> = TODO() val transformer: (A) -> B = TODO() binder.bind(output to input using transformer) Pay attention to the syntax: it reads almost like a regular sentence (and this is another reason why I love Kotlin). But binder is not only used as syntactic sugar - it is also useful to us for solving problems with the life cycle.
Create Binder
Creating an instance looks easier than ever:
val binder = Binder() But in this case, you need to unsubscribe manually, and you will have to call
binder.dispose() whenever you need to remove subscriptions. There is another way: to introduce a life cycle instance into the constructor. Like this: val binder = Binder(lifecycle) Now you do not need to worry about subscriptions - they will be deleted at the end of the life cycle. At the same time, the life cycle can be repeated many times (like, for example, the start and stop cycle in the Android UI) - and Binder will create and delete subscriptions for you every time.
What is the life cycle?
Most Android developers, seeing the phrase "life cycle", represent the cycle Activity and Fragment. Yes, Binder can work with them, unsubscribing at the end of the cycle.
But this is only the beginning, because you will not use the Android interface LifecycleOwner - the Binder has its own, more universal. It is essentially a BEGIN / END signal flow:
interface Lifecycle : ObservableSource<Lifecycle.Event> { enum class Event { BEGIN, END } // Remainder omitted } You can either implement this stream using Observable (by mapping), or simply use the ManualLifecycle class from the library for non-Rx environments (as you see below).
How does the binder work ? Receiving a BEGIN signal, it creates subscriptions for components previously configured by you ( input / output ), and receiving an END signal, deletes them. The most interesting thing is that you can start all over again:
val output: PublishSubject<String> = PublishSubject.create() val input: Consumer<String> = Consumer { System.out.println(it) } val lifecycle = ManualLifecycle() val binder = Binder(lifecycle) binder.bind(output to input) output.onNext("1") lifecycle.begin() output.onNext("2") output.onNext("3") lifecycle.end() output.onNext("4") lifecycle.begin() output.onNext("5") output.onNext("6") lifecycle.end() output.onNext("7") // will print: // 2 // 3 // 5 // 6 This flexibility in reassigning subscriptions is especially useful when working with Android, when there can be several Start-Stop and Resume-Pause cycles at once, besides the usual Create-Destroy.
Android Binder Life Cycles
The library has three classes:
- CreateDestroyBinderLifecycle ( androidLifecycle )
- StartStopBinderLifecycle ( androidLifecycle )
- ResumePauseBinderLifecycl e ( androidLifecycle )
androidLifecycle is the value returned by the getLifecycle() method, that is, AppCompatActivity , AppCompatDialogFragment , etc. Everything is very simple: fun createBinderForActivity(activity: AppCompatActivity) = Binder( CreateDestroyBinderLifecycle(activity.lifecycle) ) Individual life cycles
Let's not dwell on this, because we are in no way attached to Android. What is a life cycle binder ? Literally anything: for example, the playing time of a dialog or the execution time of an asynchronous task. You can, say, bind it to the scope of the DI - and then any subscription will be deleted along with it. Full freedom of action.
- Want to keep your subscriptions before the Observable sends an item? Convert this object to Lifecycle and transfer it to Binder . Implement the following code in the extension- function and use it further:
fun Observable<T>.toBinderLifecycle() = Lifecycle.wrap(this .first() .map { END } .startWith(BEGIN) ) - Want your bindings to persist until Completable is finished? No problems - this is done by analogy with the previous paragraph:
fun Completable.toBinderLifecycle() = Lifecycle.wrap( Observable.concat( Observable.just(BEGIN), this.andThen(Observable.just(END)) ) ) - Want some other non-Rx code to decide when to delete subscriptions? Use ManualLifecycle as described above.
In any case, you can either lay the jet stream to the Lifecycle.Event element stream, or use the ManualLifecycle if you are working with non-Rx code.
System overview
Binder hides the details of creating and managing Rx subscriptions. All that remains is a concise, generalized review: “Component A interacts with component B in scope C”.
Suppose we have the following reactive components for the current screen:
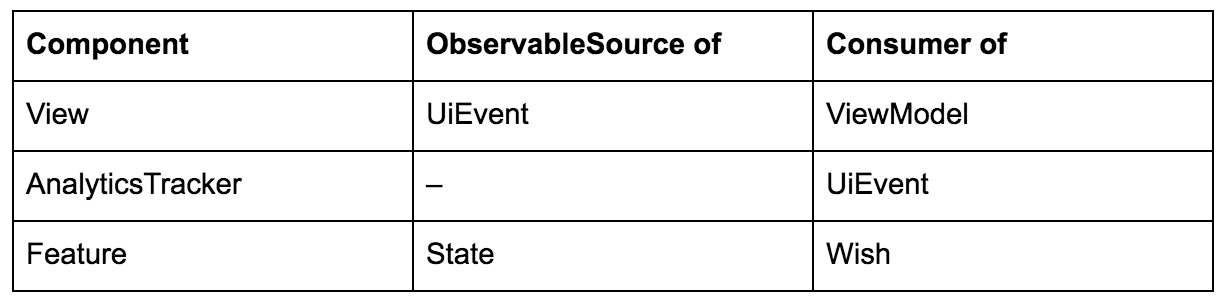
We would like the components to be linked within the current screen, and know that:
- UIEvent can be “fed” directly to AnalyticsTracker ;
- UIEvent can be transformed into Wish for Feature ;
- State can be transformed into a ViewModel for View .
This can be expressed in a couple of lines:
with(binder) { bind(feature to view using stateToViewModelTransformer) bind(view to feature using uiEventToWishTransformer) bind(view to analyticsTracker) } We make such husks to demonstrate the interconnection of components. And since we, the developers, spend more time reading the code than writing it, such a brief overview is extremely useful, especially as the number of components increases.
Conclusion
We saw how Binder helps in managing Rx subscriptions and how it helps to get an overview of the system built from reactive components.
In the following articles, we will describe how we separate reactive UI components from business logic and how to add intermediate objects using Binder (for logging and time travel debugging). Do not switch!
In the meantime, get acquainted with the library on GitHub .
Source: https://habr.com/ru/post/430550/
All Articles