Make your ideas come app. Serverless application - step by step instructions

In 2018, serverless is the fastest way to make backend applications, even if you have never done them. Yes, I know about countless application constructors, MBaaS or BaaS, but I want to show that serverless is suitable not only for elementary applications, but also for scalable compound backends that cannot be done on the designer.
The other day we launched the first serverless cloud in Russia - Rusonyx Serverless based on the Swifty platform. The first three months of using the platform are free, so that everyone can try a serverless approach to business.
In the article I will tell you how to create a simple todo application with authentication, user profile, image storage and, in fact, task management using the serverless approach. We will naturally do this on Swifty, but the approach here is about the same for all serverless solutions. An example of the finished application can be found here . The frontend is written in vue.js, which we will run on the built-in Object Storage (S3), we will do backend on functions on Go and Python.
')
You do not need knowledge of JavaScript, Goshechka and Python to pass this guide. Source code of the application can be found here .
User Authentication
At the first stage, we will create the functions themselves for the backend of the application. First of all, you need an account in Swifty, which you can create here . After logging into the dashboard you should open such a screen.

Now that you have an account, you can start creating the functions themselves. Swifty includes an authentication service — Authentication, which provides basic signup, signin, and logout operations, as well as the ability to create, modify, retrieve, and delete a user profile. It also has Facebook integration and the ability to associate an already created profile with a Facebook profile. But we will not need them yet. Maybe later.
Create an authentication service :
- Open Swifty -> Authentication Services.
- Click Create Auth Database and call the base todoapp. I will use this name in the future, but you can name your base as desired.
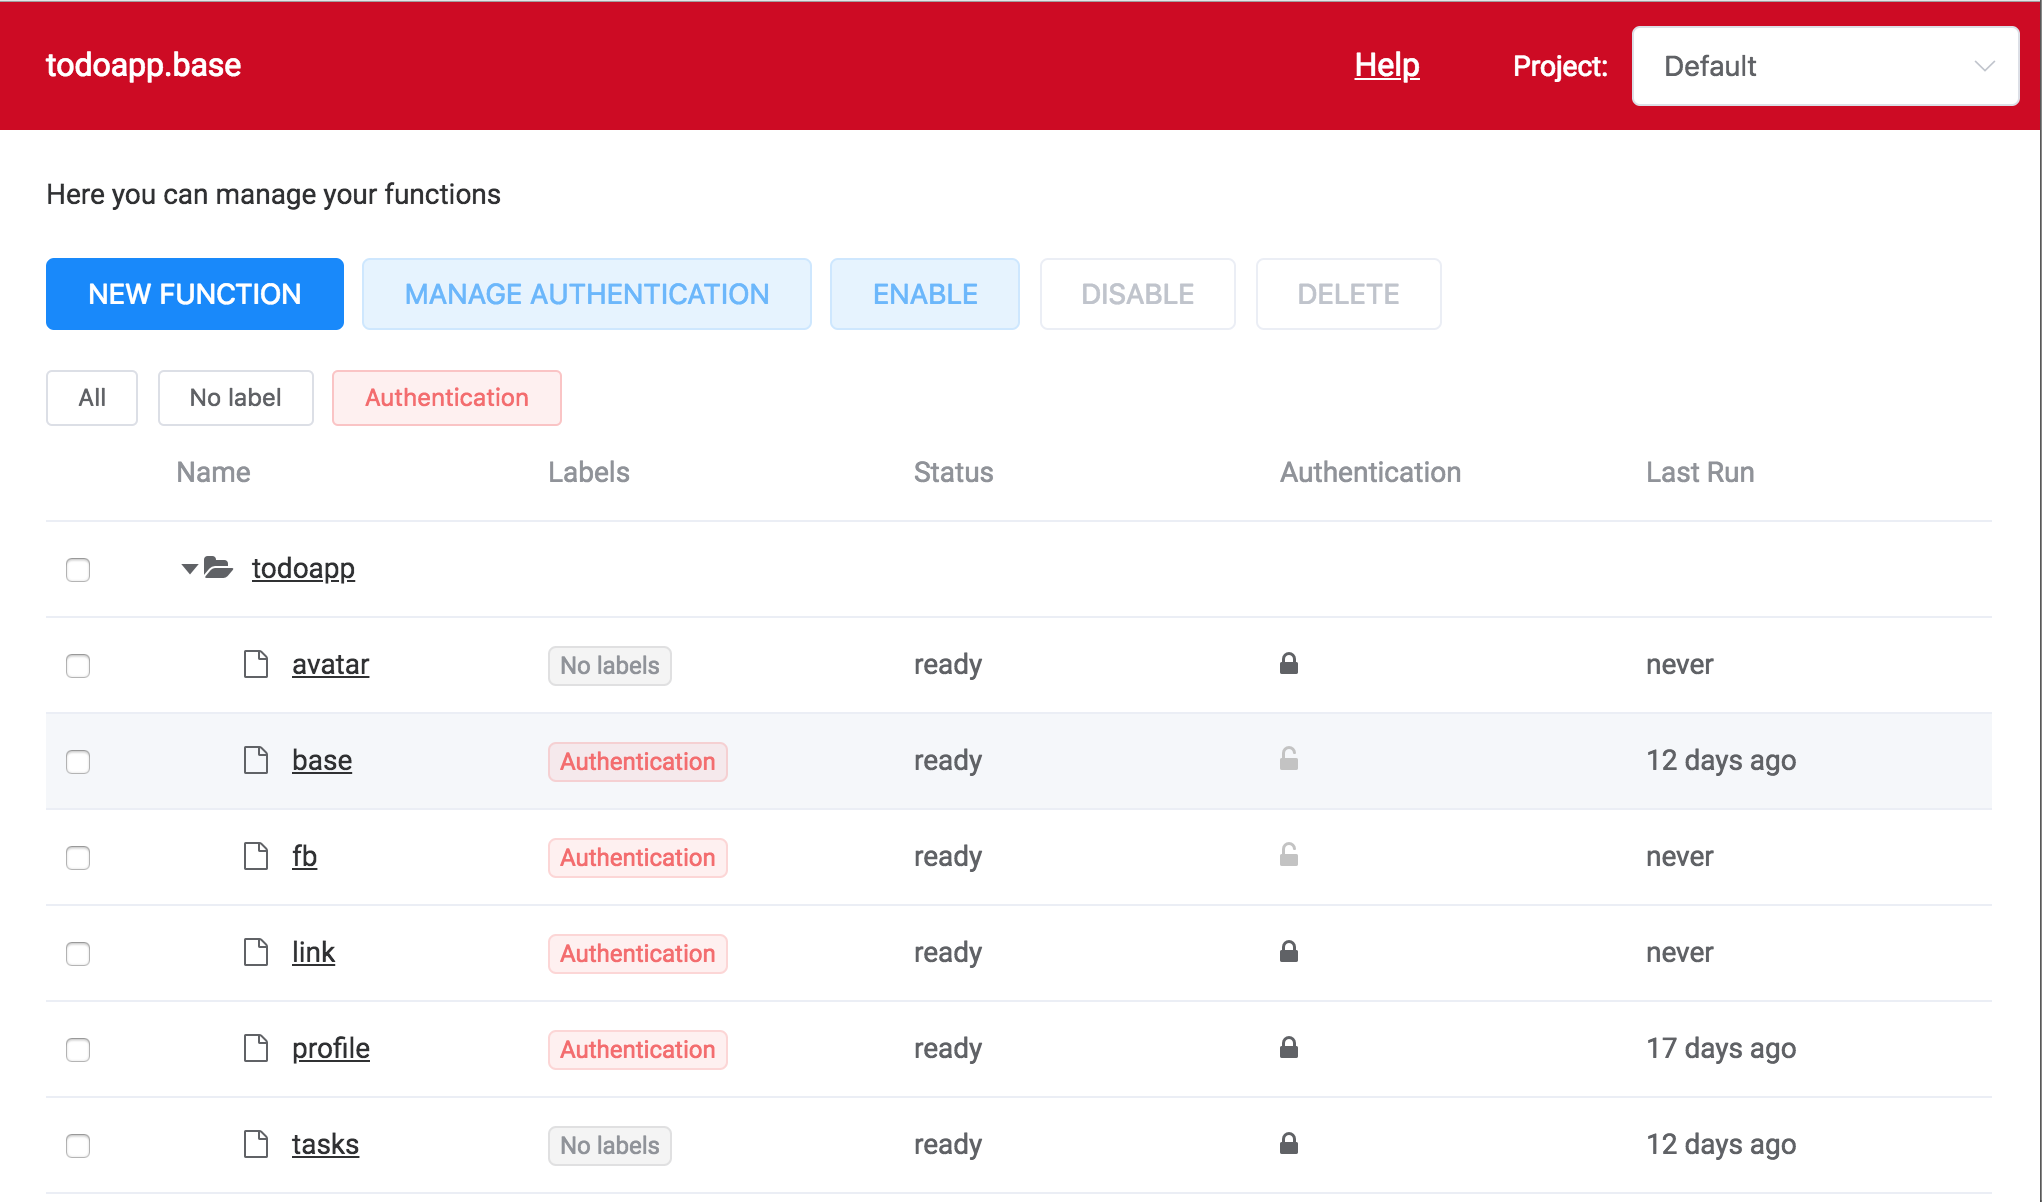
As a result, a lot of things will be created :
- Function todoapp.base - makes signup, signin and logout users, implements the OAuth 2.0 protocol.
- The todoapp.fb function allows you to authenticate users via fb.
- Function todoapp.link - links accounts already created users with their accounts on fb.
- The function todoapp.profiles - creates, updates, deletes user profiles in MongoDB.
- DB todoapp_mgo - Mongo for storing user accounts.
- DB todoapp_profiles - Mongo for storing user profiles.
- Authentication Middleware (AuthMW) is a proxy that, when accessing the function API, verifies the user's authentication by checking its JWT token, which the todoapp.base function issued to it. There is no token or it is not true - the request to the API will be dropped.
We use “.” In the name of the functions to separate them into folders. Therefore, if you create a new function with the name todoapp.newfunction, then it will automatically go to the todoapp folder and appear there with the name newfunction. Your list of functions should now contain the following set (see picture).

You can skip, but better to read
This paragraph, in principle, can be skipped. Or not, if you want to understand how our authentication service works and a little more to understand about the principles of Swifty. The todoapp.base function, written in Go, provides basic authentication capabilities, but nothing prevents you from expanding its capabilities according to the needs of your application. No matter how you change it, without touching signin and signout, it will still do its job. The function has a variable SWIFTY_AUTH_NAME that stores the name AuthMW. Functions also need access to MongoDB and AuthMW itself, which are listed on the Access tab in the function properties. It also has a REST API trigger that has a link that you need to call to access the function.
The todoapp.base function expects you to pass a userid and password to it as request arguments. The password is encrypted.
Here are examples of such requests:
* Sign up: https://api.swifty.cloud:8686/call/012.../signup&userid=user@yourmail.com&password=xxxxxxxx * Sign in: https://api.swifty.cloud:8686/call/012.../signin&userid=user@yourmail.com&password=xxxxxxxx * Log out: https://api.swifty.cloud:8686/call/012.../leave&userid=user@yourmail.com If, for example, signin was successful (the function successfully checked the transmitted password), then you will receive a JSON with a JWT token, which you will need to use every time you access functions with authentication enabled. The JWT token is created based on the Bearer Authentication scheme. You can read more about OAuth 2.0 and Bearer here .
If the authentication is not successful, then the called function does not start and the request returns code 401.
User Profile Management
So, each function has a REST API url, a link that needs to be called to start the function. To get this link for the authentication function, open the todoapp.base function, go to the Triggers tab, copy the REST API url and save it as AUTH_URL somewhere. A little further we will need to insert this link into the frontend configuration file of our application.
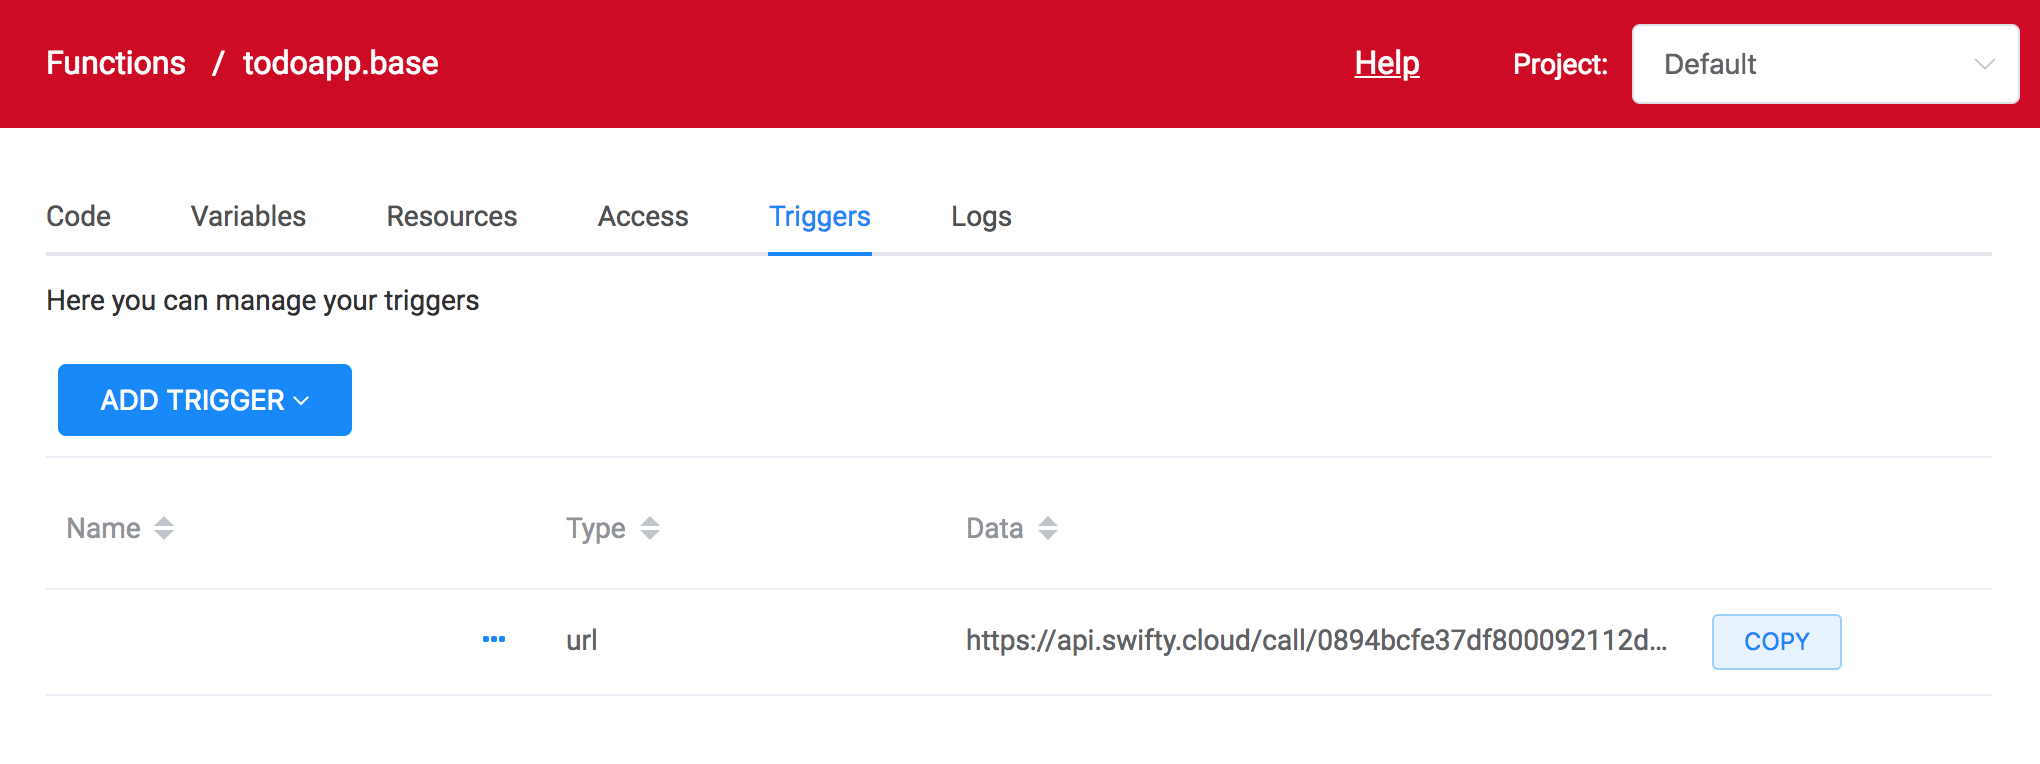
We also need a URL API for todoapp.profiles so that our application can manage user profiles. Open this function, go to the Triggers tab, copy the REST API url and save it as PROFILE_URL.
Manage user avatar
Our application also allows you to load a user's avatar and demonstrate how you can store files in the built-in Object Storage. The user's picture is loaded using a special function and stored on the built-in Object Storage. Access to the picture can be obtained through a function or using a standard S3 API, access keys to which can be obtained on the Object Storage tab of the UI.
To create an image management function:
- Go to the Functions tab -> New Function -> From repo (Templates). We store all the function templates in the public git repository swifty.demo. This repository should be selected by default.
- Select the Avatar management (python) function, click Next and enter the name of the new function todoapp.avatar. Click Create.
- Next, go to the Triggers tab, click Add Trigger, select REST API (URL). Copy the link that appears and save it as PICTURE_URL.
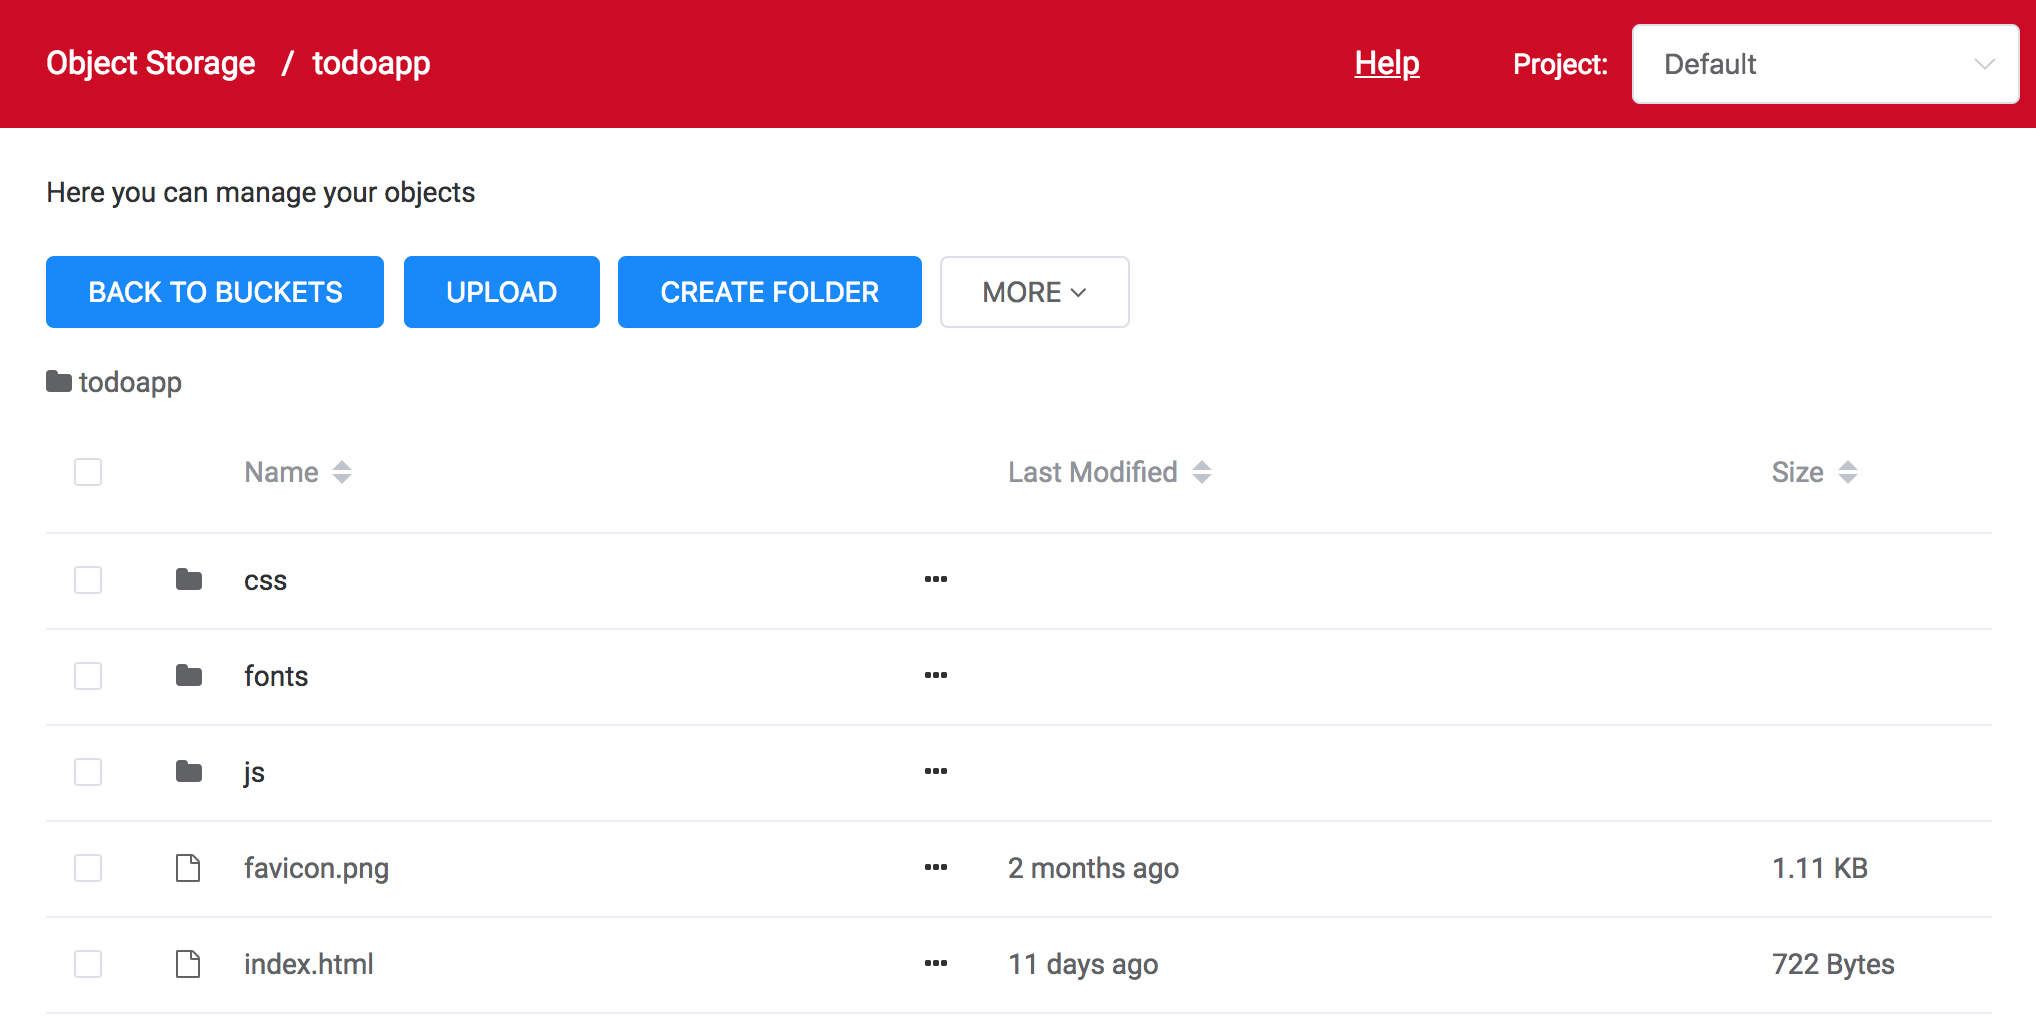
Next you need to create a bake in Object Storage to store user pictures:
- Go to the tab Object Storage -> Create Bucket. Name the new bucket todoappimages.
- Go to the Functions tab -> todoapp.avatar -> Access -> click Add, select Object Storage, the newly created todoappimgaes batch and click Add.
Now our function has access to the specified batch. So simple and we do not need to register any accesses to the bucket inside the function. The only thing we need to specify the functions in which the bucket to store pictures using the environment variable:
- Go to the Functions tab -> todoapp.avatar -> Variables and click Create Variable.
- Enter the variable name - BUCKET_NAME, and its value - todoappimages.
Task Management
Actually, we are making a task management application and it's time to finally make the appropriate function. We have a template for it that allows you to create a task, mark it as completed and delete the task.
Create a function:
- Go to the Functions tab -> New Function -> From repo (Templates).
- Select the TODO application (python) function, click Next and enter the name of the new function todoapp.tasks. Click Create.
- Next, go to the Triggers tab, click Add Trigger, select REST API (URL). Copy the link that appears and save it as TASKS_URL.
Next we need a database to store our tasks. The easiest option is MongoDB.
- Go to the Mongo Database -> Create Database tab and create a database named todoapp_tasks.
- Go to the Functions tab -> todoapp.tasks -> Access -> Add and add a new database.
Now our function has access to the todoapp_tasks database and we can access it from a function using the swifty library, for example:
db = swifty.MongoDatabase(os.getenv('TASKS_DB_NAME'))It only remains for us to register an environment variable with the name of the database:
- Go to the Functions tab -> todoapp.tasks -> Variables and click Create Variable.
- Enter the variable name - TASKS_DB_NAME, and its value - todoapp_tasks.
Enable authentication for functions.
When we have a backend for authenticating users and the functions themselves that make up the backend of our application, we can enable authentication for them so that only authorized users can access the profile management functions, avatar and tasks.
How to enable verification of tokens for certain functions:
- Go to the Functions tab and select the functions todoapp.tasks and todoapp.avatar.
- Click Manage Authentication and select the todoapp service, click Enable.
Now, the functions todoapp.tasks and todoapp.avatar will only be executed for users with the correct JWT token generated by todoapp.base.
After all the above actions, our list of functions should look something like this.
Application Publishing
Let's take the front end of our application. The frontend is written in vue.js and we just need to add links to our functions in its configuration file and rebuild the application with this updated configuration. Everything is simple here and no knowledge of vue.js and JavaScript is needed.
In order to rebuild the application you need an installed node.js. If you do not have it, then please use the official guide to put it. If you have a mac, then there is a good guide here . You will also need git to pull the repository onto your computer. Please do:
# git clone https://github.com/swiftycloud/swifty.todoapp After that, go to the
/swifty.todoapp/src folder and open the config.js file in your favorite editor. You need to change the variables contained there to those you saved earlier:export const AUTH_URL = "https://api.swifty.cloud/call/991..."
export const PROFILE_URL = "https://api.swifty.cloud/call/281..."
export const PICTURE_URL = "https://api.swifty.cloud/call/e6a..."
export const TASKS_URL = "https://api.swifty.cloud/call/4b1..."The variables associated with the FB we do not need.
Then you need to rebuild the application:
# npm run build ...
DONE Build complete. The dist directory is ready to be deployed.
Before building the application you can also test it locally:
# npm run serve and enter it through the browser at http: // localhost: 8080
We use Object Storage to store static files of our application. Go to the Object Storage tab, create a todoapp baket and upload files from the
/swifty.todoapp/dist/ folder to /swifty.todoapp/dist/ observing the naming of the folders (you will have to create them manually).The last step is to publish the application. Click More -> HTTP Server Settings and enable HTTP Server for your baket. Copy the link that appears and click on it - this is your application!
Now you can create an account in it and try it in action. If you now go to the functions screen, you will see that the functions have just been launched - for authentication, profile loading, and so on.
What's next?
We showed a simple example of how to use serverless to create applications. We still have a lot of templates of popular features, and you, I am sure, still have many ideas for new applications. Try templates, write your own functions and make your ideas come app.
And of course, contact us if you have any questions about serverless in general and Swifty in particular.
Enjoy!
Source: https://habr.com/ru/post/430296/
All Articles