Moving to a cluster running "1C-Bitrix: Web Environment"
Actually, if we turn to the vendor’s site , we’ll see that:
“1C-Bitrix”: Web Environment ”- Linux is used to quickly and easily install all the software required for the operation of 1C-Bitrix products and solutions on CentOS 6 (i386, x86_64) and CentOS 7 (x86_64) Linux platforms. It is necessary to install on a “clean” CentOS, without a web server already installed.
The structure of "1C-Bitrix: Web Environment" - Linux includes: mysql-server, httpd, php, nginx, nodejs push-server, memcached, stunnel, catdoc, xpdf, munin, nagios, sphinx.
In fact, this software package contains a configured LAMP, a console control panel of the server, plus additional packages necessary for the operation of some 1C-Bitrix modules. All software is configured with the features of 1C-Bitrix, namely:
')
- the necessary extensions are installed (gd, zip, socket, mbstring)
- support for short tags is included
- The required values for the parameters memory_limit, max_input_vars, safe mode, opcache.validate_timestamps, opcache.revalidate_freq, mbstring.func_overload, default_charset, display_errors, etc. are set.
- the same time zone is set for the database, php and on the server itself
- and etc.
This allows, in most cases, not to configure the server and its tuning.
So, we had 2 app servers (let's call them app01 and app01), 2 db servers (db01, db02), 1 server for caching (cache01, you understand), or rather the idea was to implement the cluster structure in a similar way. Under this plan, 5 servers were obtained, with the latest versions of centos7 installed on them (unfortunately, debian, ubuntu, fedora, rhel, and others are not suitable), except for os, nothing was installed on the servers.
Since we collect a cluster, it is necessary to determine which of the servers will be the main one. Due to the peculiarities of balancing requests to the application, one of the servers where httpd will work will also contain nginx. All incoming requests will also receive it, and then redirect the request to one of the available web nodes. We chose the main app01 server.
Further work went according to the following plan:
1. Install bitrixenv
Installation does not imply supernatural knowledge of linux or administration. We go to each server via ssh and execute the following commands:
cd ~ wget http://repos.1c-bitrix.ru/yum/bitrix-env.sh chmod +x bitrix-env.sh ./bitrix-env.sh Bitrixenv must be installed on all servers that you plan to use in a cluster. Even if the server will only work as a memcached instance, bitrixenv is needed because allows you to manage the entire cluster from the main server.
2. Configure bitrixenv
Since we will use this whole zoo as a cluster, then we can configure the servers through the environment menu on app01. To do this, go to the server via ssh, and run the file /root/menu.sh. When you first start, you must set a password for the bitrix user (a similar operation must be performed on all servers where the site is planned to be launched):
Actually, this is the user under which the application will work. After this we see a screen offering to create a pool of servers:
Here we need to select the first menu item. During the creation process, the environment will request the name of the current server, then we specify app01:
After the pool is created, we are returned to the first screen of the environment, but this time there are more items available: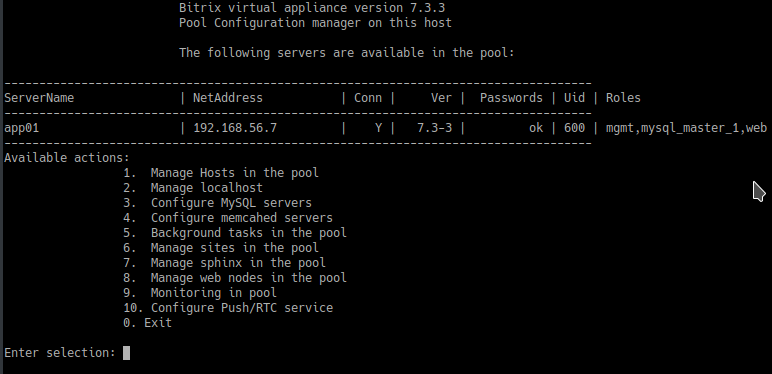
In general, the environment is ready and you can use it. If we do not need a cluster, then we could end it, but we will go further.
Now we need to add all available servers to the created pool. To do this, use the first menu item and see the following options: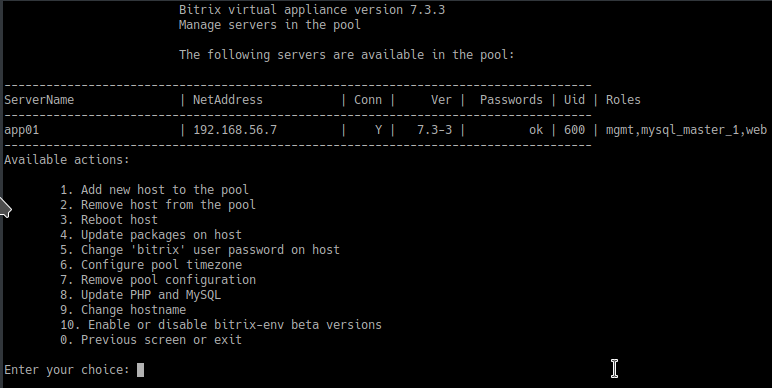
Again, select the first menu item, and specify the ip of the new server, its name in the cluster (the same app02, db01, db02, cache01) and the root password from the connected server. Thus, we add each existing server in turn. After all the servers are registered in the cluster, we should get something like this on the main screen of the environment:
Setting server roles until the next step.
3. Transfer of the project
Since our application initially runs on the same server, the cluster scaling and management module is disabled, the database is not replicated. The transfer itself is nothing supernatural - packed bitrix and upload folders, removed the database dump.
After the archives and dumps are ready, go to app01, and pull the project code into the default folder of the site in bitrixenv - / home / bitrix / www via git, download the archives and dump of the database, unpack the archives and fill in dump to db on app01, transfer cron entries.
If your application uses additional software, then it's time to install and configure it. In our case, supervisord and RabbitMQ were installed and configured, since The application worked using queues.
There is a small, but important, nuance. When transferring a site to a cluster, it is necessary that the scale and cluster modules are disabled on the site, and in the environment of the cluster to which the transfer is planned, the pool servers are not involved. Cluster servers need to be put into operation only after the site is moved and deployed on the main server. Otherwise, the site will not be able to correctly identify the cluster servers.
4. Enabling cluster mode
After the application was transferred to app01, and we checked the correctness of its work, it’s time to do the most interesting thing - scaling. First you need to install the scale and cluster modules in the 1C-Bitrix admin panel. During installation, nothing special needs to be done, all the work goes on.
Once the modules are installed, go to the ssh connection to the main server, and this is app01, and open the bitrixenv menu (here lies / root / menu.sh). Before proceeding with further configuration, it is necessary to find out one important point - bitrixenv operates with the concept of “server role”. It does not matter what the name of the server in the pool is, because Each server contains all the software that is included in the bitrixenv package, we can always assign one or more roles to it, and we can remove them from it or change them for others. The main roles are mgmt (balancer, i.e. nginx), web (i.e. httpd / apache), mysql_master and mysql_slave (database instance, the slave appears already when we start replication), memcached (server with memcached). The overall picture is now clear, and we decided to start with a memcached server. To do this, go to the point
4. Configure memcahed servers > 1. Configure memcached service and see the request for the name of the server that will serve as the memcached server. We already have a cache01 server prepared for this, so we are looking at the list of available servers. If cache01 is in the list, then there are no problems with the installation, and we can give the server the selected role.

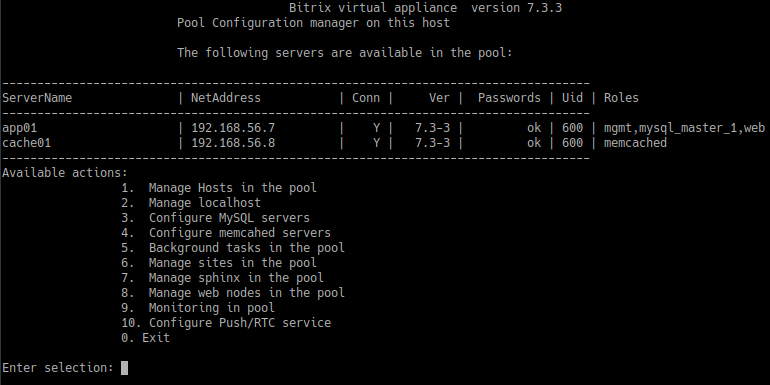
Enter the name of cache01, we see that the task of installing the role is queued. We wait for the end of the background work and see the server ready for work with the role we need.
It's time to add a second app server. To do this, go on the way
8. Manage web nodes in the pool > 1. Create web role on server, 
where we need to specify the server name and the method of synchronization between the main and new web nodes. Based on the bitrixenv documentation and preliminary tests, it was enough for our project to select the first option (in one step, the project is copied and the node configuration is set up). After the background work is over, we should see in the main menu something like this:

Note that the Roles column opposite the app02 server indicates the web role.
It remains to deal with the database, its configuration takes the most time. To begin with, I will briefly explain how the roles of mysql are distributed in the context of bitrixenv. By default, the master server is the master version of the database. In our case, it was necessary to move the database to a separate server and add another server with a slave version of the database. In bitrixenv you can’t just take and transfer master from one server to another)

The sequence is as follows:
- We give the role of mysql_slave to the server to which we plan to transfer the database
- On the target server, we change the role of mysql_slave to the role of mysql_master (the old mysql_master automatically switches to mysql_slave mode)
- Removing the mysql_slave role on the source server that was master
- ...
- PROFIT !!!
We followed this logic in this way:
Switched to
3. Configure MySQL servers > 4. Create MySQL slave 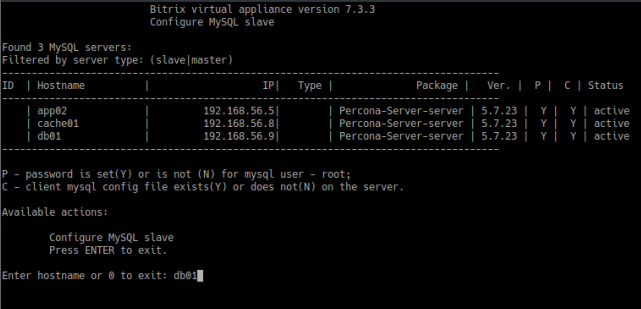
Specified the server to which we want to give the role of mysql_slave - db01. We are waiting for the end of the background work and see the following result:

Great, now go to
3. Configure MySQL servers > 5. Change MySQL master 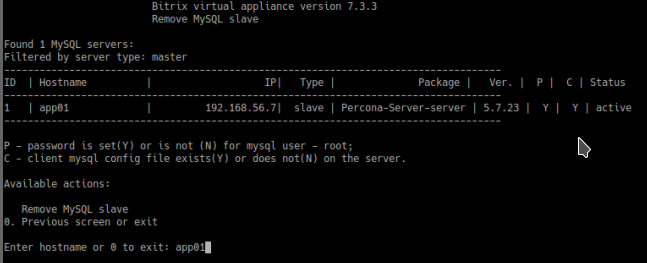
Specify app01 and wait. As a result, you should see something like this:

Slowly and inevitably, we approached the installation of the last role - mysql_slave. To do this, you need to repeat the actions by which we have established such a role for db01, but specify already db02.
Finally, all servers are connected and configured.
5. Tuning performance
After the cluster is ready, there are some features in the application setup that allow for additional optimization:
- We are pumping work with sessions. Described in detail here . In short - we switch storage of sessions in memcached.
- Delete the files /bitrix/php_interface/after_connect_d7.php and /bitrix/php_interface/after_connect.php, because commands from them terminate the cluster pipeline (if bitrixenv is not used, it is better to leave them).
- We increase the amount of memory allocated by memcached and set the percentage of utilization of servers with the memcached role to 100%.
- Disable php modules: apcu, ldap
- Disable modules Compression, and “Web analytics” (if possible).
- Consider using a local cache. Details are described here . In our case, there was no increase, but the idea is interesting. The solution has a couple of features:
- The number of memcached instances should be equal to the number of web nodes.
- To return the composite cache, nginx will have to dig the nginx config from the box directly from the local memcached, it does not work out of the box.
- Transfer the execution of all agents to cron.
findings
In this article, we have reviewed the sequence of actions required to configure a cluster of servers based on bitrixenv, as well as some possible pitfalls. According to the results of work with bitrixenv, and the cluster on it, we can highlight the pros and cons of this approach:
Pros bitrixenv
- Installation time
Installation and basic setup takes less than 30 minutes. There is no need to configure LAMP elements (both the integration of these services with each other, and for the correct operation of projects on 1C-Bitrix). - Services to speed up the site
Installed and configured services that allow organizing faster caching through memcached, rather than files, search using the sphinx engine and functional video calls and chats on the building portal (nginx push & pull module). In addition, nginx in the environment is configured in such a way that when you enable the corresponding options on the website and in the bitrixenv menu, the cache is given using nginx immediately from memcached (bypassing httpd and php) - Clustering
Ability to enable database replication, without picking MySQL settings. Connect an arbitrary number of web-nodes, which will be automatically synchronized with each other, and memcached-nodes. Manage the distribution of the load on the web- and memcached-nodes both from the bitrixenv menu and through the admin panel of the project on 1C-Bitrix. Plus, adding new servers and roles to them does not cause a simple project (except for the role of database servers)
Cons bitrixenv
- The balancer is always together with the main web-node
Since we already had our own balancer, we were faced with the fact that it is impossible to abandon the balancer built into bitrixenv. It is impossible including place it separately from the main web node. - A lot of extra software for some roles
Since each server in the pool contains the full version of the environment, it turns out that the db-nodes are httpd, memcached, sphinx, even if they are not used. Similarly, you can find MySQL on the server, which deals only with caching, but in this case, MySQL can be stopped in the environment menu or the admin panel of the site. - Php works in apache2handler mode
There is no way to safely enable php to work in fcgi mode, not to mention the nginx + php-fpm mode. It is also impossible to change the version of php, without dancing with a tambourine.
Sources:
www.1c-bitrix.ru/products/env
dev.1c-bitrix.ru/community/blogs/rns/hidden-features-of-work-with-sessions.php
dev.1c-bitrix.ru/community/blogs/rns/the-use-of-local-caches-in-the-cluster.php
dev.1c-bitrix.ru/learning/course/index.php?COURSE_ID=32&INDEX=Y
dev.1c-bitrix.ru/learning/course/index.php?COURSE_ID=37&INDEX=Y
Source: https://habr.com/ru/post/430080/
All Articles