jQuery ColorPicker - choose a color.
I was surprised to find that I still did not touch on the theme of choosing a color. I hasten to correct this misunderstanding and talk about another plugin for jQuery library - ColorPicker . I just want to warn you, the plugin uses png-files, and in our beloved IE6 this is awakened by minor problems.
As usual, first demonstrate the examples, and then we will figure out how to use it.
Example: x3k.name/habrahabr/jquery.colorpicker.html
We need the jQuery library, the colorpicker.js plugin itself, quite a few pictures of the colorPicker 'a working panel (pictures are included in the archive).
')
Descriptions of the colorPicker styles are directly in the sample file and generally it’s best not to touch them, except to put them in a separate file.
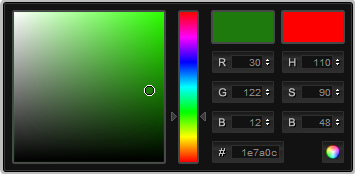
And we will analyze the first example with perhaps the simplest use case - the colorPicker as an element of the page.
HTML is not easy:
<div id = "colorpickerHolder"> </ div>
Just a div element that acts as a container for our colorPicker. And below is the javascript code that the colorPicker will call.
We pass the flat option to the plugin with a value of true — that is what determines the display option colorPicker 'a.
The next use case in Example 2 is that we add a colorPicker to the input element. The HTML code could be omitted:
<input id = "colorpickerField" type = "text" value = "00ff00" />
And more "saturated" than in the first example javascript code:
Here we call the colorPicker and pass two options to it - onSubmit and onBeforeShow, the values of which are callback functions. OnSubmit defines a function that will be called at the moment when the desired color is selected and the selection confirmation icon is pressed in the lower right corner, and onBeforeShow the function that is called before the colorPicker is selected is defined.
It sounds a bit confusing, and besides, the call chain is supplemented by associating the keyup event with another function. Let's take a look at it from the practical side and try to describe all this in Russian. Let's start from the end ...
So, with the input element that has the id colorpickerField we associate the keyup event. The function that will be executed upon the occurrence of this event will set the color on which the colorPicker will be opened - and in fact it can be seen even from its name.
Now about the two parameters that we pass to the plugin. Before the colorPicker is shown ( onBeforeShow ), the same function is called as on the keyup event, and it does the same. Well, after the color is selected ( onSubmit ) - its value in hexadecimal form is written to the input element.
Now the third example - the colorPicker is “hidden” behind a picture inserted into the div element. First HTML code:
<div id = "colorSelector"> <div> </ div> </ div>
Here, using the style, we set the background, which by default will “shine through” the image in the png format (look in the source code for the corresponding styles).
And the javascript code for this example:
In the color option, we specify the color on which the colorPicker opens, in the onShow and onHide options (the names speak for themselves, right?) We use the jQUery library methods to set some animation, slightly reviving the appearance and hiding of the colorPicker.
A little bit about onChange - when the current color changes, we immediately read it and change the css-property backgroundColor for the div element, thus causing the background that “shines through” through the png-image to change.
In general, through examples, we got acquainted with almost all the available options. I’ll also mention eventName, the event for which the colorPicker will be called. The default is click. And still LivePreview allows you to disable the change of digital values in the color selection process, if you set this option to false. The default is true.
Well, download the archive: x3k.name/habrahabr/jquery.colorpicker.rar
Tyuta
As usual, first demonstrate the examples, and then we will figure out how to use it.
Example: x3k.name/habrahabr/jquery.colorpicker.html
We need the jQuery library, the colorpicker.js plugin itself, quite a few pictures of the colorPicker 'a working panel (pictures are included in the archive).
')
Descriptions of the colorPicker styles are directly in the sample file and generally it’s best not to touch them, except to put them in a separate file.
And we will analyze the first example with perhaps the simplest use case - the colorPicker as an element of the page.
HTML is not easy:
<div id = "colorpickerHolder"> </ div>
Just a div element that acts as a container for our colorPicker. And below is the javascript code that the colorPicker will call.
$( document ).ready( function (){ // №1 $( '#colorpickerHolder' ).ColorPicker({flat: true }); }); * This source code was highlighted with Source Code Highlighter .
$( document ).ready( function (){ // №1 $( '#colorpickerHolder' ).ColorPicker({flat: true }); }); * This source code was highlighted with Source Code Highlighter .$( document ).ready( function (){ // №1 $( '#colorpickerHolder' ).ColorPicker({flat: true }); }); * This source code was highlighted with Source Code Highlighter .$( document ).ready( function (){ // №1 $( '#colorpickerHolder' ).ColorPicker({flat: true }); }); * This source code was highlighted with Source Code Highlighter .$( document ).ready( function (){ // №1 $( '#colorpickerHolder' ).ColorPicker({flat: true }); }); * This source code was highlighted with Source Code Highlighter .$( document ).ready( function (){ // №1 $( '#colorpickerHolder' ).ColorPicker({flat: true }); }); * This source code was highlighted with Source Code Highlighter .
We pass the flat option to the plugin with a value of true — that is what determines the display option colorPicker 'a.
The next use case in Example 2 is that we add a colorPicker to the input element. The HTML code could be omitted:
<input id = "colorpickerField" type = "text" value = "00ff00" />
And more "saturated" than in the first example javascript code:
* This source code was highlighted with Source Code Highlighter .
- $ ( document ) .ready ( function () {
- // example №2
- $ ( '#colorpickerField' ) .ColorPicker ({
- onSubmit: function (hsb, hex, rgb) {
- $ ( '#colorpickerField' ) .val (hex);
- },
- onBeforeShow: function () {
- $ ( this ) .ColorPickerSetColor ( this .value);
- }
- })
- .bind ( 'keyup' , function () {
- $ ( this ) .ColorPickerSetColor ( this .value);
- });
- });
Here we call the colorPicker and pass two options to it - onSubmit and onBeforeShow, the values of which are callback functions. OnSubmit defines a function that will be called at the moment when the desired color is selected and the selection confirmation icon is pressed in the lower right corner, and onBeforeShow the function that is called before the colorPicker is selected is defined.
It sounds a bit confusing, and besides, the call chain is supplemented by associating the keyup event with another function. Let's take a look at it from the practical side and try to describe all this in Russian. Let's start from the end ...
So, with the input element that has the id colorpickerField we associate the keyup event. The function that will be executed upon the occurrence of this event will set the color on which the colorPicker will be opened - and in fact it can be seen even from its name.
Now about the two parameters that we pass to the plugin. Before the colorPicker is shown ( onBeforeShow ), the same function is called as on the keyup event, and it does the same. Well, after the color is selected ( onSubmit ) - its value in hexadecimal form is written to the input element.
Now the third example - the colorPicker is “hidden” behind a picture inserted into the div element. First HTML code:
<div id = "colorSelector"> <div> </ div> </ div>
Here, using the style, we set the background, which by default will “shine through” the image in the png format (look in the source code for the corresponding styles).
And the javascript code for this example:
* This source code was highlighted with Source Code Highlighter .
- // about 3
- $ ( '#colorSelector' ) .ColorPicker ({
- color: '# 0000ff' ,
- onShow: function (cp) {
- $ (cp) .fadeIn (500);
- return false ;
- },
- onHide: function (cp) {
- $ (cp) .fadeOut (500);
- return false ;
- },
- onChange: function (hsb, hex, rgb) {
- $ ( '#colorSelector div' )
- .css ( 'backgroundColor' , '#' + hex);
- }
- });
In the color option, we specify the color on which the colorPicker opens, in the onShow and onHide options (the names speak for themselves, right?) We use the jQUery library methods to set some animation, slightly reviving the appearance and hiding of the colorPicker.
A little bit about onChange - when the current color changes, we immediately read it and change the css-property backgroundColor for the div element, thus causing the background that “shines through” through the png-image to change.
In general, through examples, we got acquainted with almost all the available options. I’ll also mention eventName, the event for which the colorPicker will be called. The default is click. And still LivePreview allows you to disable the change of digital values in the color selection process, if you set this option to false. The default is true.
Well, download the archive: x3k.name/habrahabr/jquery.colorpicker.rar
Tyuta
Source: https://habr.com/ru/post/42996/
All Articles