Introduction to React Hooks

If you are reading Twitter, you most likely know that Hooks is a new feature of React, but you can ask how we can use them in practice ? In this article, we will show you some examples of using Hooks.
One of the key ideas for understanding is that Hooks allow you to use state and other features of React without writing classes .
The motivation behind the hooks
Although the component-oriented architecture allows us to reuse the view in our application, one of the biggest problems faced by the developer is how to reuse state-based logic between components . When we have components that have similar state logic, there are no good solutions for reusing components, and this can sometimes lead to duplication of logic in the constructor and the life cycle methods.
To solve this problem, usually use:
- higher order components (High Order Components)
- render props
But both of these patterns have flaws that can contribute to the complexity of the code base.
')
Hooks are aimed at solving all these problems, allowing you to write functional components that have access to state, context, life cycle methods, ref, etc., without writing classes.
Hooks in Alpha
Before we dive in, it is important to mention that the development of the Hooks API is not yet complete.
In addition, the official documentation is very good, and we recommend reading it also because it extensively describes the motivation behind the introduction of Hooks.
UPD The original article, the translation of which you are reading was written while the API was in alpha testing, at the moment React Hooks is officially ready to use. Irreversible changes made to the release (compared to alpha) can be found at the bottom of the article or in the release notes .
How Hooks relate to classes
If you are familiar with React, one of the best ways to understand Hooks is to see how we can reproduce the behavior we used to work with classes using Hooks.
Recall that when writing component classes we often need to:
- Manage state
- Use lifecycle methods such as componentDidMount () and componentDidUpdate ()
- Context access (static contextType)
With React Hooks, we can reproduce the same behavior in functional components:
- To access the state of a component, use useState () hook.
- Instead of using lifecycle methods such as componentDidMount () and componentDidUpdate (), use the useEffect () hook.
- Instead of static contextType properties use useContext () hook.
The latest version of React is required to use Hooks.
You can get started with Hooks right now by changing the value of react and react-dom in your package.json to “next”.

Sample useState () Hook
State is an integral part of React. It allows us to declare variables that contain data, which, in turn, will be used in our application. Using the state classes is usually defined as follows:

Before Hooks, state was usually used only in the component class, but as mentioned above, Hooks allows us to add state to the functional component .
Let's see an example below. Here we will build a backlit switch that will change color depending on the state value. For this we will use useState () hook.
Here is the complete code (and executable example) - we will look at what happens below. By clicking on the image, you can look at this example on the CodeSandBox.
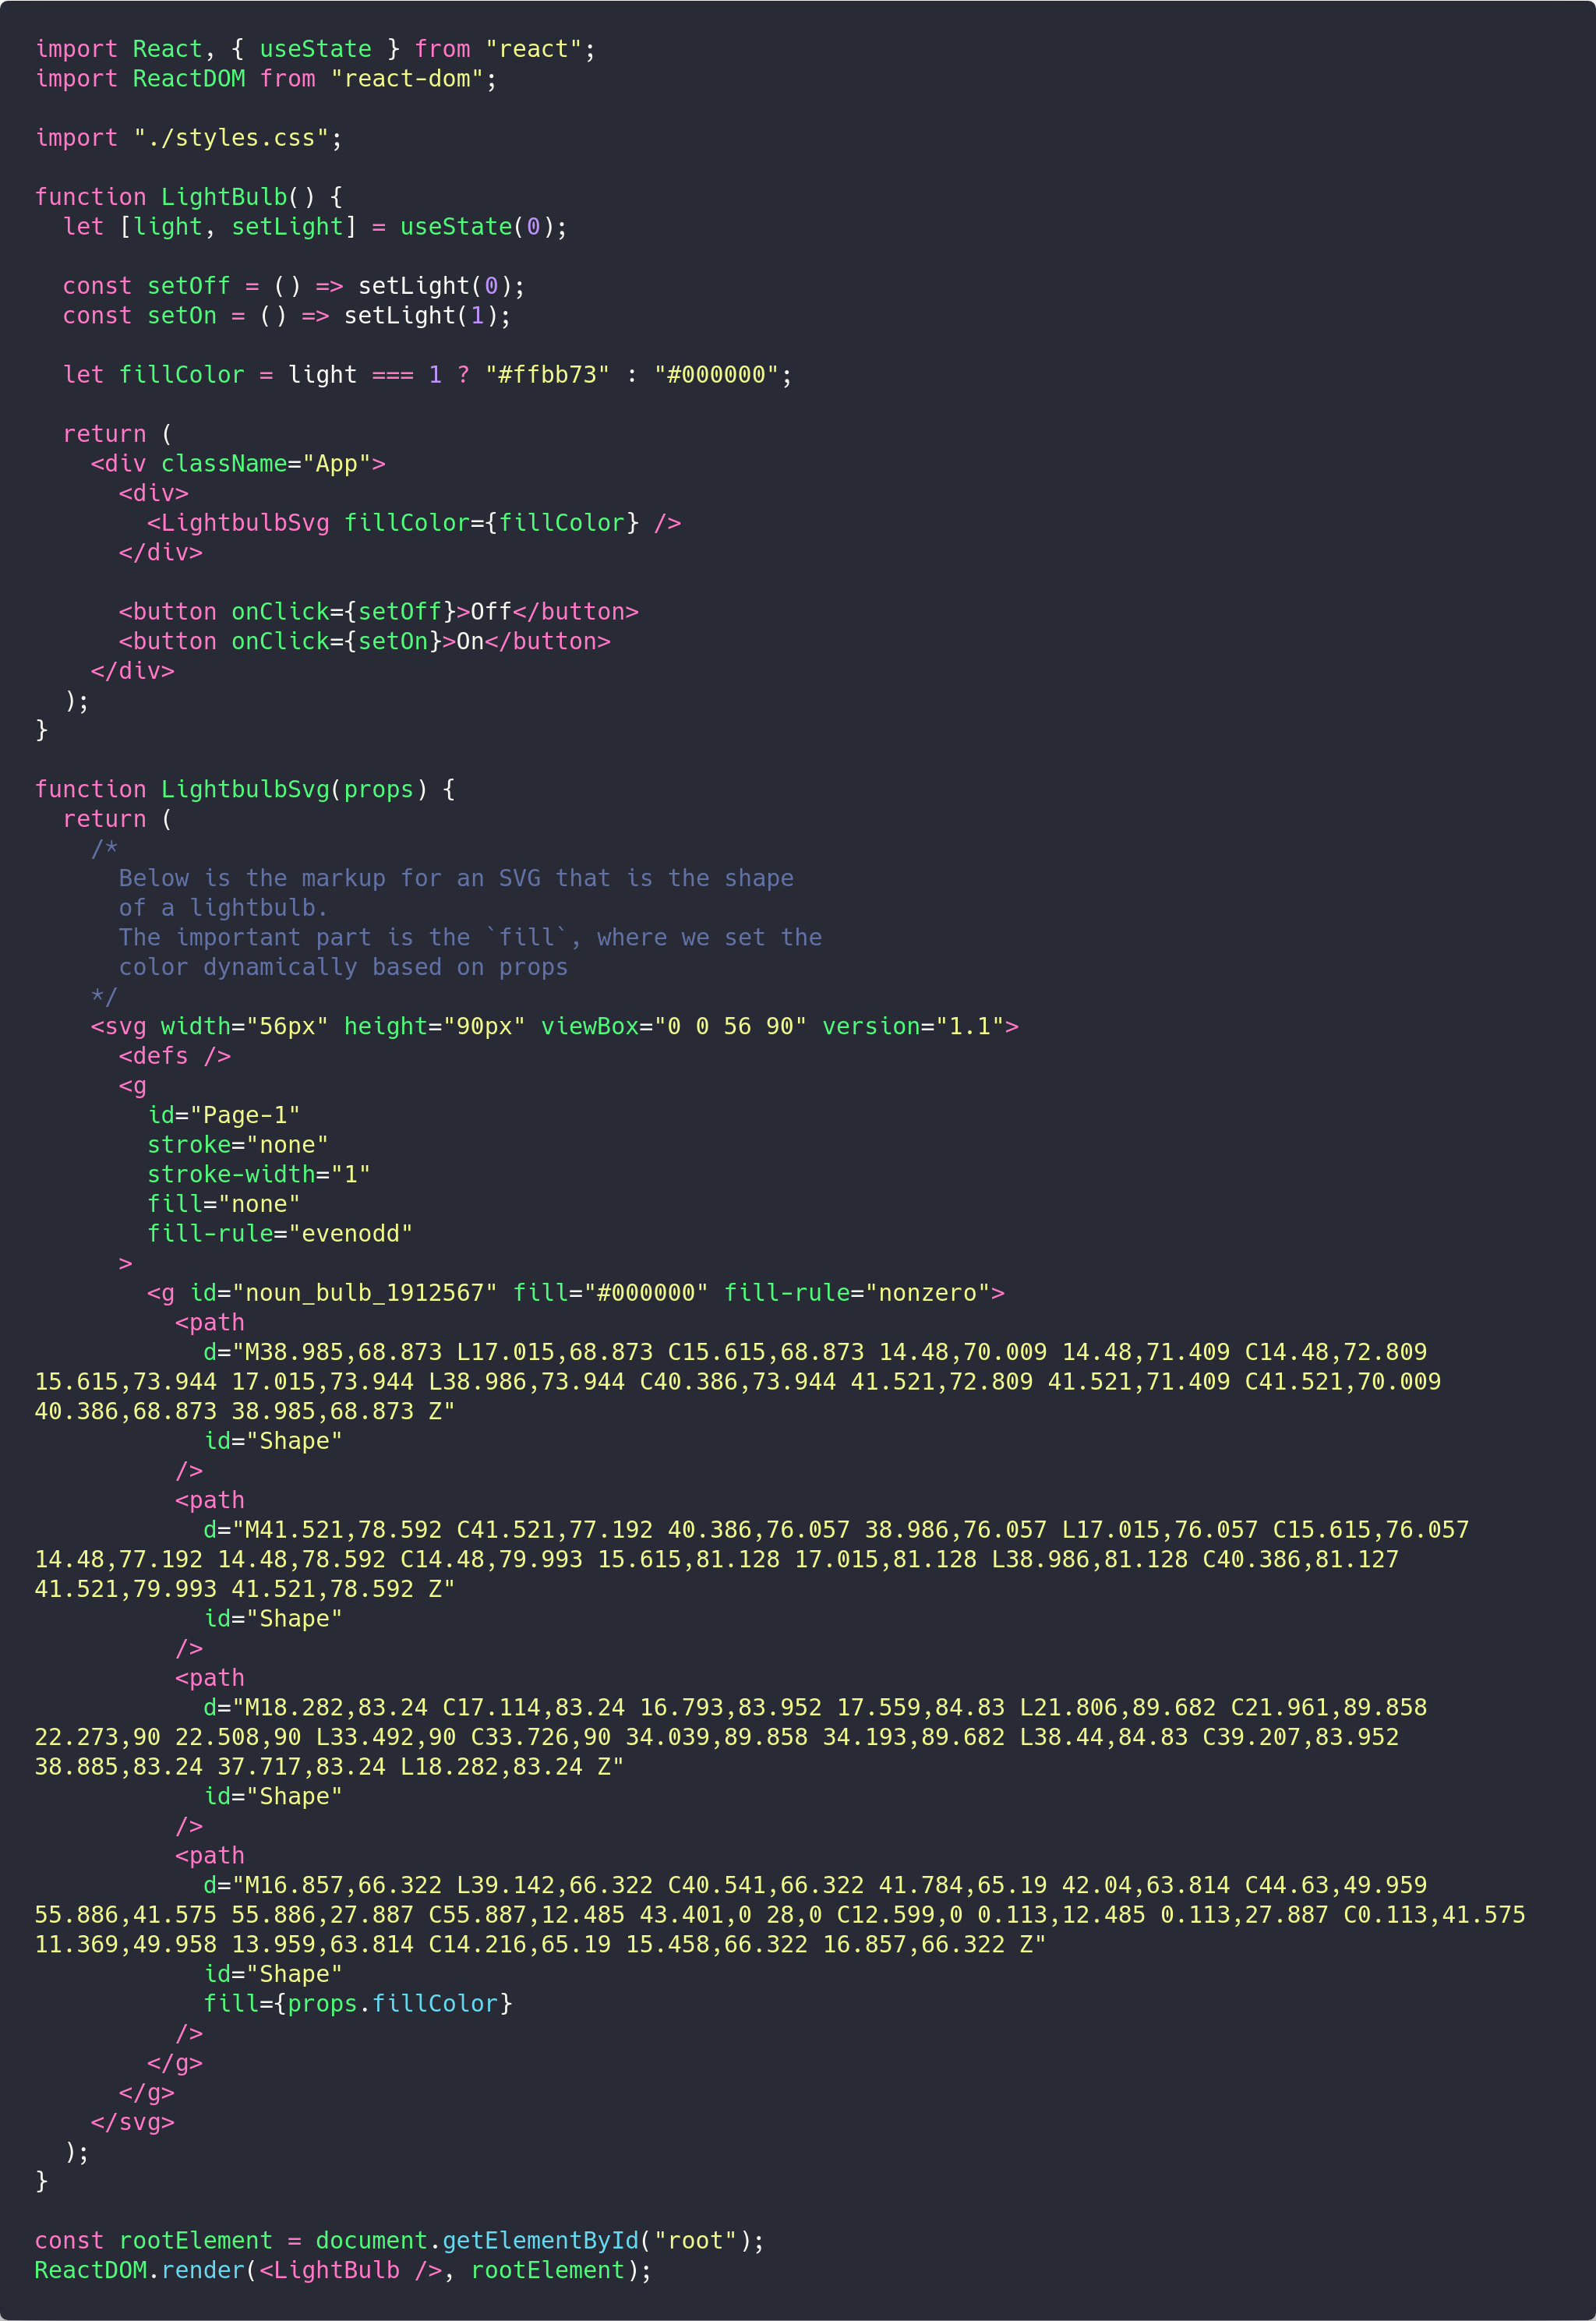
Our component is a function.
In the above code block, we start by importing useState from React. UseState is a new way to use the features that this.state previously offered.
Then notice that this component is a function, not a class . Interesting!
Reading and writing state
Inside this function, we call useState to create a variable in state:

useState is used to declare a state variable and can be initialized with any type of value (as opposed to state in classes, which must be an object).
As you can see above, we use destructiveization by the return value of useState.
- The first value, light in this case, is the current state (like this.state)
- The second value is the function used to update the state value (first value) (like this.setState).
Then we create two functions, each of which sets the state to different values, 0 or 1.

Then we use them as event handlers on the buttons in the view:

React tracks state
When the “On” button is pressed, the setOn function is called, which calls setLight (1). Calling setLight (1) updates the light value for the next render . This may seem a bit magical, but React tracks the value of this variable and will transmit a new value when this component is re-rendered.
Then we use the current state ( light ) to determine whether the lamp should be on or not. That is, we set the fill color of the SVG depending on the value of light . If light is 0 (off), then fillColor is set to # 000000 (and if 1 (on), fillColor is set to # ffbb73).
Multiple States
Although we do not do this in the example above, you can create several states by calling useState more than once. For example:

NOTE.
There are some restrictions on using hooks that you should be aware of. Most importantly, you should call hooks only at the top level of your function. See the “ hooks rules ” for more information.
Example useEffect () Hook
UseEffect Hook allows you to perform side effects in functional components . Side effects can be appeals to the API, updating the DOM, subscribing to event handlers — all you want, as long as an “imperative” action occurs.
Using useEffect () Hook, React knows that you want to perform a specific action after rendering.
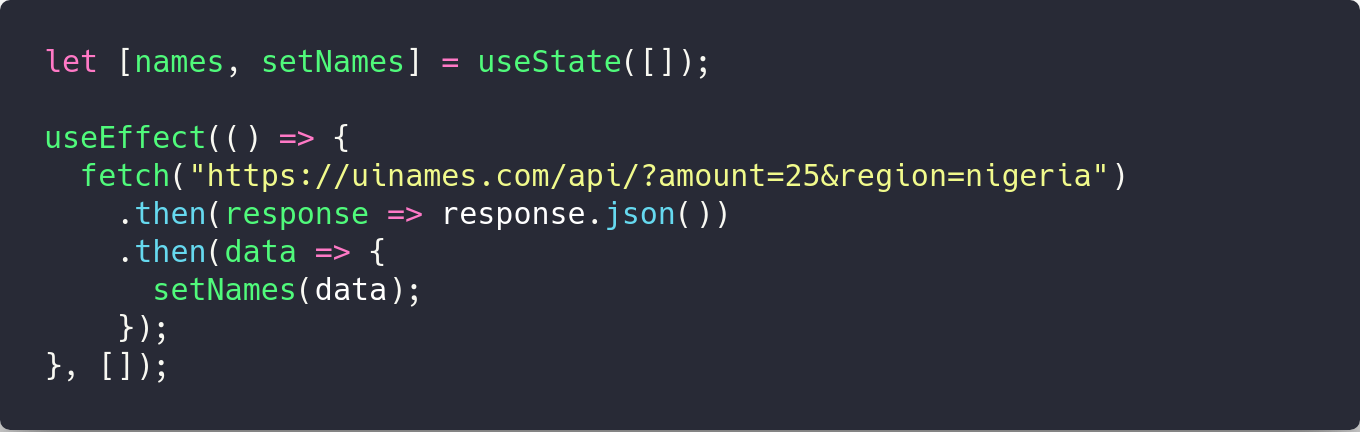
Let's look at the example below. We will use useEffect () to call the API and get a response.

This code example uses both useState and useEffect , and this is because we want to write the result of the API call to state.

Getting data and updating state
To “use an effect”, we need to put our action in the useEffect function, that is, we pass the “action” effect as an anonymous function, as the first useEffect argument.
In the example above, we are accessing an API that returns a list of names. When response is returned, we convert it to JSON, and then use setNames (data) to set state.
Performance Problems with Effects
However, it is worth mentioning something else about using useEffect .
The first thing you need to think about is that by default our useEffect will be invoked on every render! The good news is that we don’t need to worry about obsolete data, but the bad news is that we probably don’t want to make an HTTP request for each rendering (as in this case).
You can skip effects using the second argument useEffect , as in this case. The second argument to useEffect is the list of variables that we want to “observe,” and then we will rerun the effect only when one of these values changes.
In the code example above, note that we are passing an empty array as the second argument. This is what we say React, that we only want to name this effect when mounting the component.
To learn more about the performance effect, read this section in official documents.
In addition, like the useState function, useEffect allows multiple instances to be used, which means you can have several useEffect functions.
Example useContext () Hook
Context point
The context in React is the way for the child component to access the value in the parent component.
To understand the need for context: when creating a React application, you often need to pass values from the top of your React tree down. By not using context, you pass props through components that you don’t need to know about.
The transfer of props down the tree of "unbound" components is affectionately called props drilling.
React Context solves the problem of props drilling, allowing you to share values through the component tree, with any component that requests these values.
useContext () simplifies use of context
With the useContext Hook, using context is easier than ever.
The useContext () function takes a ontext object, which is initially returned from React.createContext () , and then returns the current context value. Let's look at the example below.
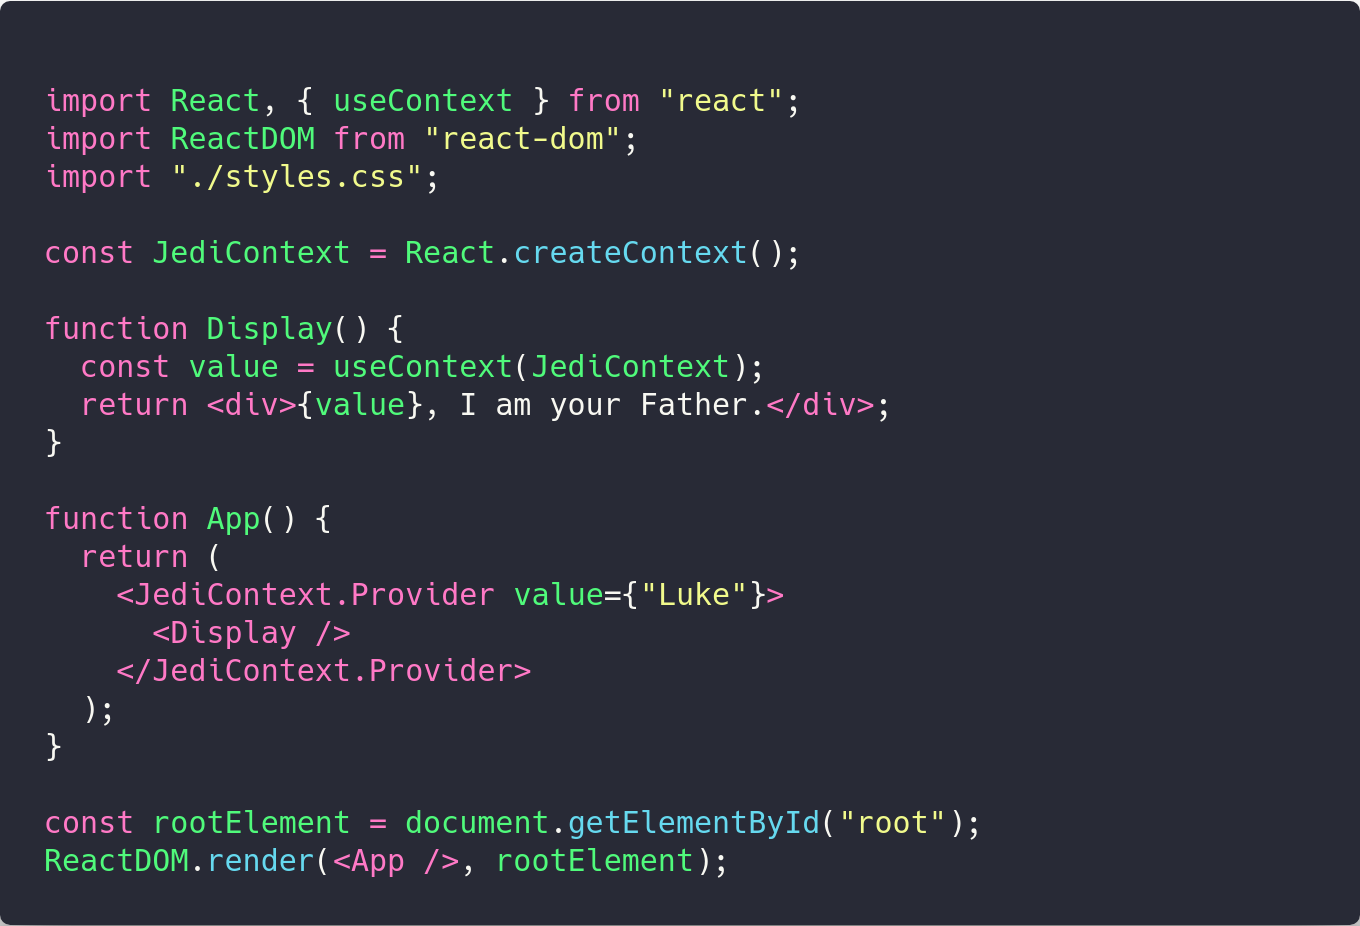
In the above, the context code JediContext is created using React.createContext ().
We use JediContext.Provider in our App component and set the value “Luke” there. This means that any component that needs to access the context can now read this value.
To read this value in the Display () function, we call useContext, passing the argument JediContext.
Then we pass the context object we received from React.createContext, and it automatically prints the value. When the provider value is updated, this Hook will automatically work with the last context value.
Getting context reference in a larger application.
Above, we created the JediContext under both components, but in a larger application, Display and App will be in different files. Therefore, if you have a similar situation, you might be wondering: “How do we get the link to the JediContext between the files?”
The answer is that you need to create a new file that exports JediContext .
For example, you might have a context.js file that contains something like this:

and then in App.js (and Display.js) you should write:

Thank you, Dave )
Example useRef () Hook
Refs provides a way to access React elements created in the render () method.
If you are new to React refs, you can read this introduction to React refs .
The useRef () function returns a ref object.

useRef () and forms with input
Let's see an example of using useRef () hook.

In the example above, we use useRef () in combination with useState () to render the value of input to the p tag.
Ref is created in the nameRef variable. Then the variable nameRef can be used in input by specifying ref. Essentially, this means that the contents of the input field will now be available via ref.
The submit button in the code has an onClick event handler called submitButton. The submitButton function calls setName (created via useState).
As we did with hookState, setName will be used to set state name. To extract the name from the input tag, we read the value of nameRef.current.value.
Another note about useRef is that it can be used more than the ref attribute.
Using Custom Hooks
One of the coolest features of Hooks is that you can easily share logic between several components, creating your own Hook.
In the example below, we will create a custom setCounter () Hook, which allows us to track the state and provide custom state update functions!
See Also, this react-use useCounter Hook from Kent and useCounter from Kent
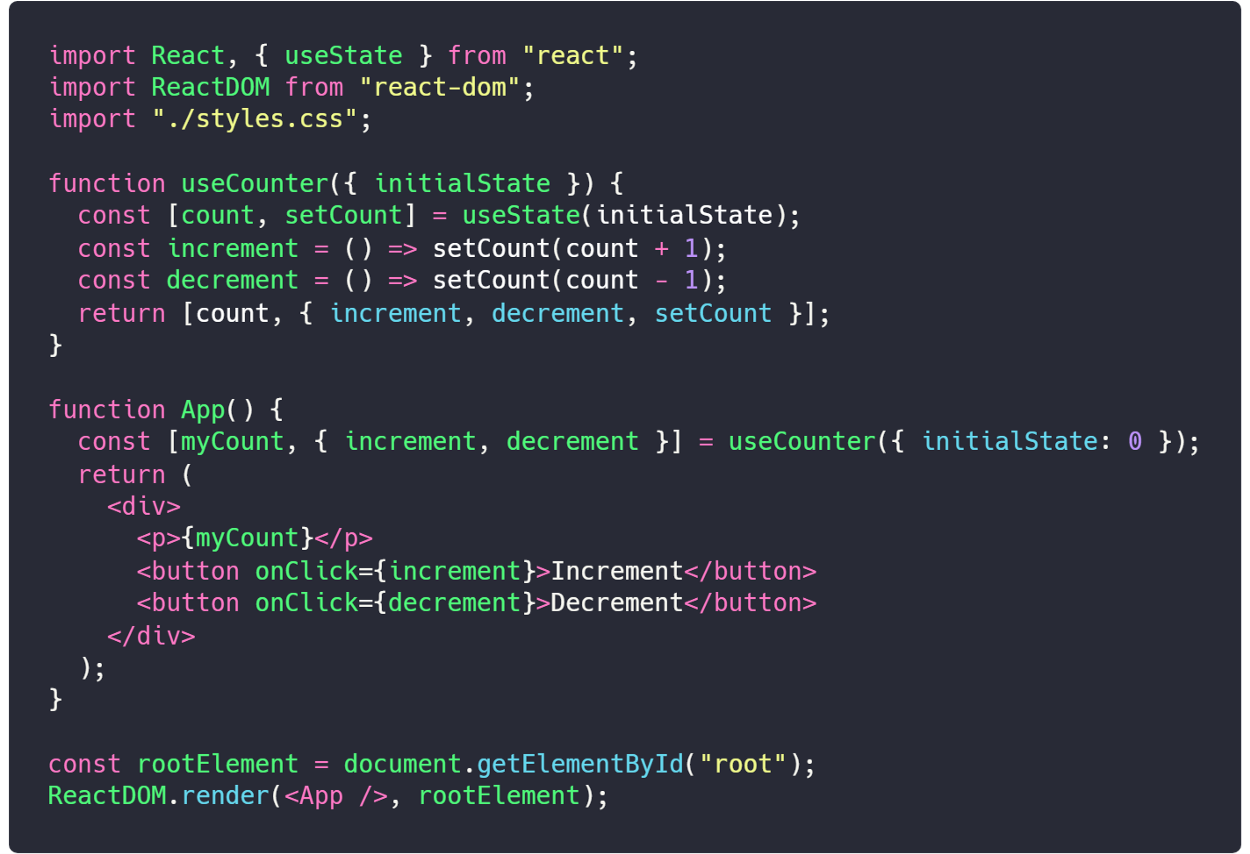
In the code block above, we create the useCounter function, which stores the logic of our hook.
Please note that useCounter may use other Hooks! Start by creating a new Hook state via useState.
Then we define two helper functions: increment and decrement , which call setCount and adjust the current count accordingly.
Finally, we return the links needed to interact with our Hook.
Q: What happens when an array is returned with an object?
A: Well, like most things in Hooks, API agreements are not yet complete. But what we do here returns an array, where:
- The first item is the current value of the hook.
- The second element is an object containing the functions used to interact with the Hook.
This convention allows you to easily "rename" the current value of the Hook - as we do above using myCount .
However, you can return whatever you want from your custom Hook.
In the example above, we use increment and decrement as onClick handlers, in our view. When the user clicks the buttons, the counter is updated and re-displayed (like myCount ) in the view.
Writing tests for React Hooks
To write tests for hooks, we will use the react-testing-library testing library .
react-testing-library is a very lightweight solution for testing React components. It is the extension of the react-dom and react-dom / test-utils . Using the react-testing-library library ensures that your tests work directly with DOM nodes.
Testing hooks is not all that clear. Currently you cannot test the hook in isolation. Instead, you need to attach your hook to the component and test this component.
So, below we will write tests for our Hooks, interacting with our components, and not with Hooks directly. The good news is that our tests will look like normal React tests.
Testing useState () Hook
Let's see an example of writing tests for useState Hook. In the lesson above, we test more variations of the useState example used above. We will write tests to make sure that pressing the "Off" button sets the state to 0 and pressing the "On" button sets the state to 1.
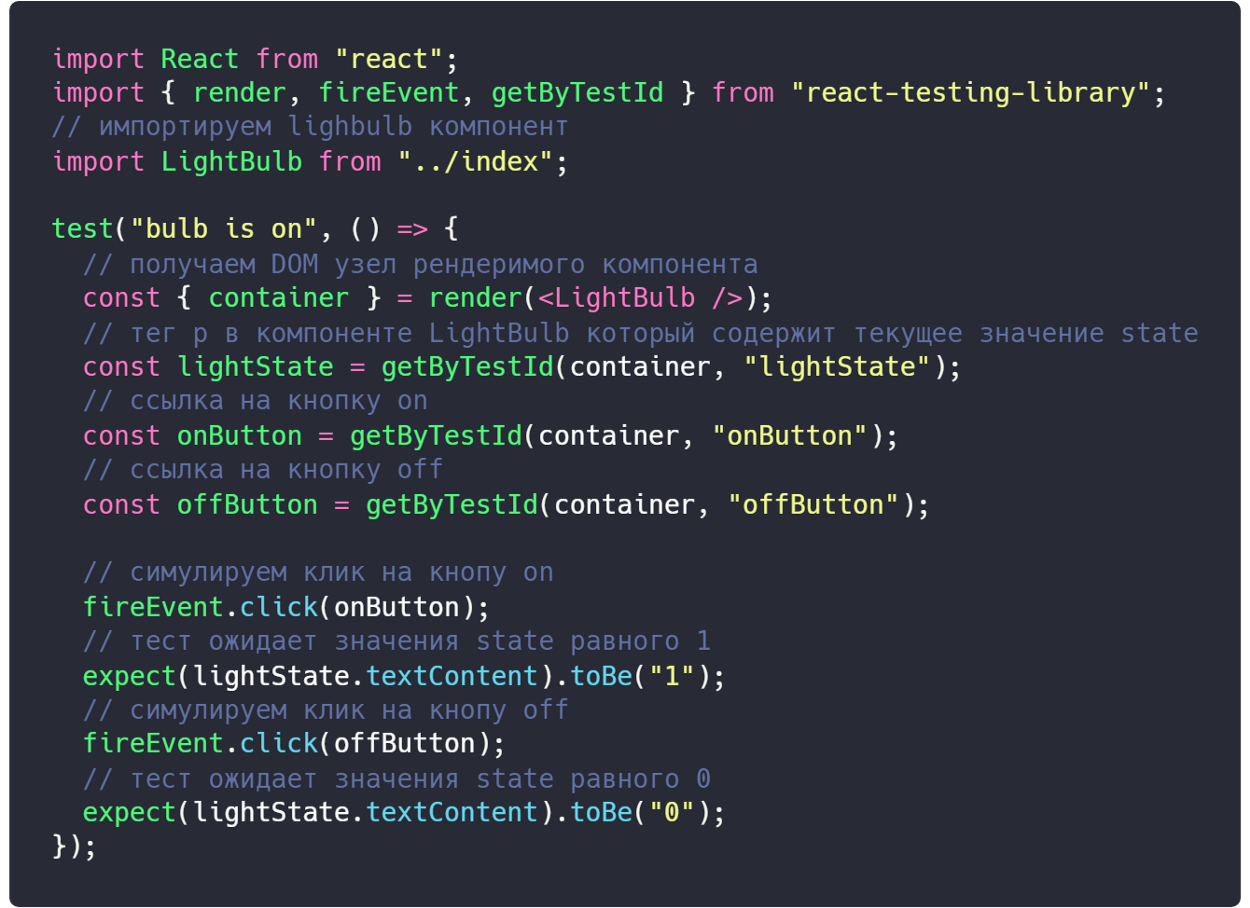
In the above code block, we start by importing some helpers from the react-testing-library and the component under test.
- render , it will help to display our component. It is rendered in a container that is added to document.body
- getByTestId gets a DOM element by data-testid
- fireEvent , this is used to trigger DOM events. It attaches an event handler to the document and handles some DOM events through event delegation, for example. pressing the button.
Further, in the test approval function, we set the variable values for the elements with data-testid and their values that we would like to use in the test. With references to elements in the DOM, we can then use the fireEvent method to simulate a click on a button.
The test verifies that if onButton is pressed, the state value is set to 1, and when you click on offButton, the state is 1.
Testing useEffect () Hook
In this example, we will write tests to add the item to the cart using the useEffect Hook. The number of items is also stored in localStorage. The index.js file in CodeSandbox below contains the actual logic used to add items to the basket.
We will write tests to make sure that the update of the number of cart items is also reflected in localStorage, and even if the page has reloaded, the number of cart items is still the same.
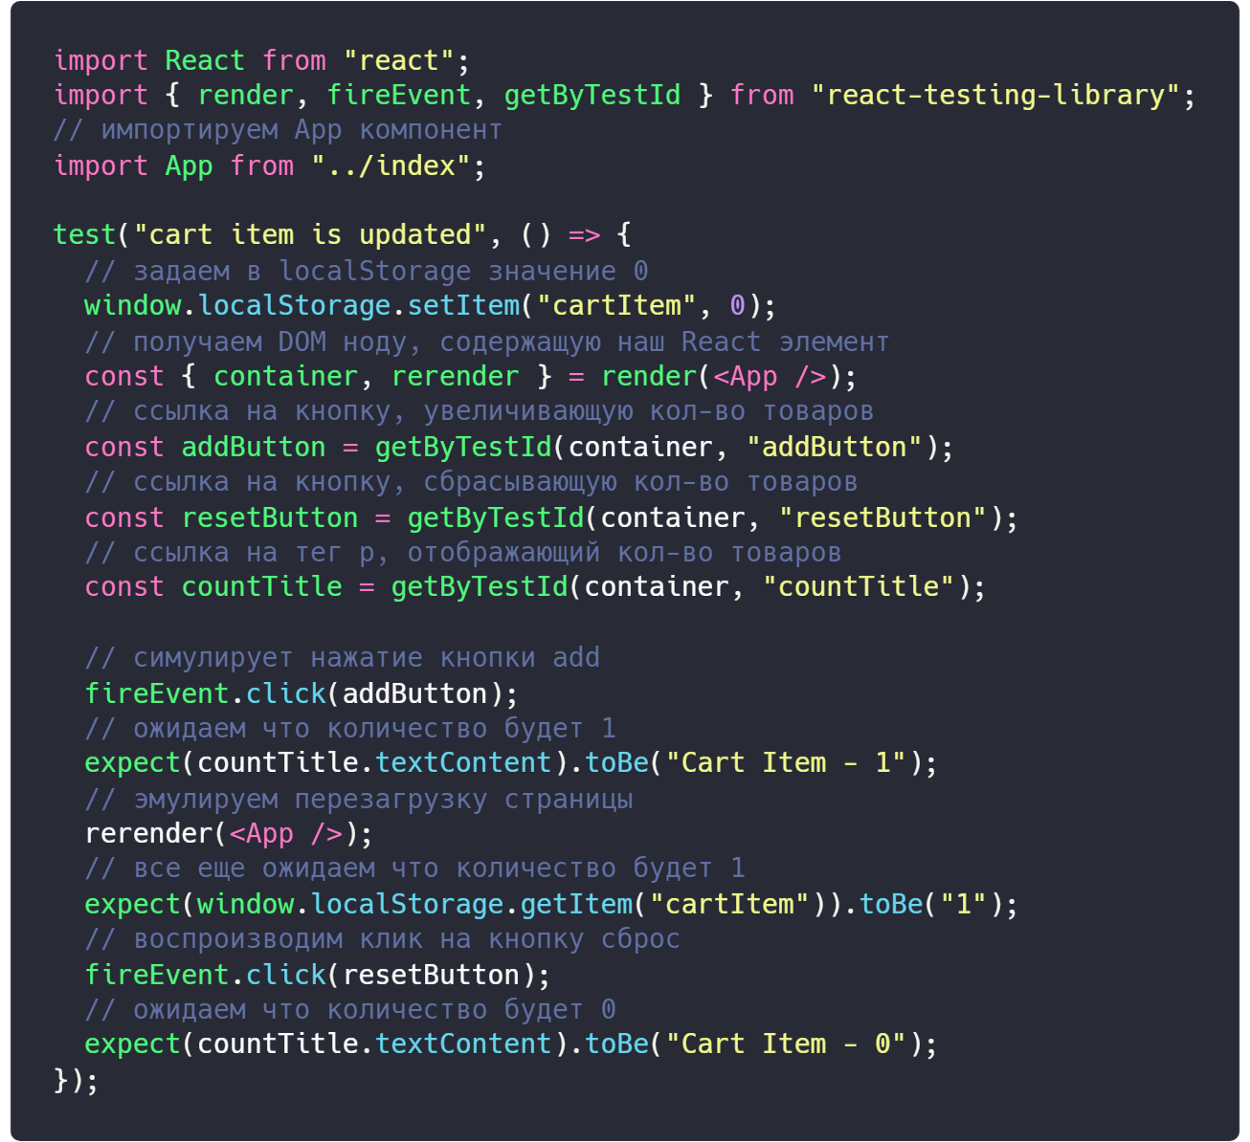
In the function confirming the passing of the test, we first set the cartItem to localStorage equal to 0, which means that the number of cart items is 0. Then we get both the container and the rerender from the App component through restructuring . Rerender allows us to simulate a page reload.
Then we get links to the buttons and the p tag, which displays the current value of the basket and sets them to variables.
Once this is done, the test then simulates a click on addButton and checks if the current cart count is 1 and reloads the page, after which if it checks whether localStorage , cartItem is set to 1. It then simulates a click on resetButton and checks whether the current number of cart items is set to 0.
Testing useRef () Hook
In this example, we will test the useRef Hook, and we will use the original useRef example given above as the basis for the test. UseRef is used to get the value from the input field, and then sets the value to state. The index.js file in CodeSandbox below contains the logic for entering a value and sending it.
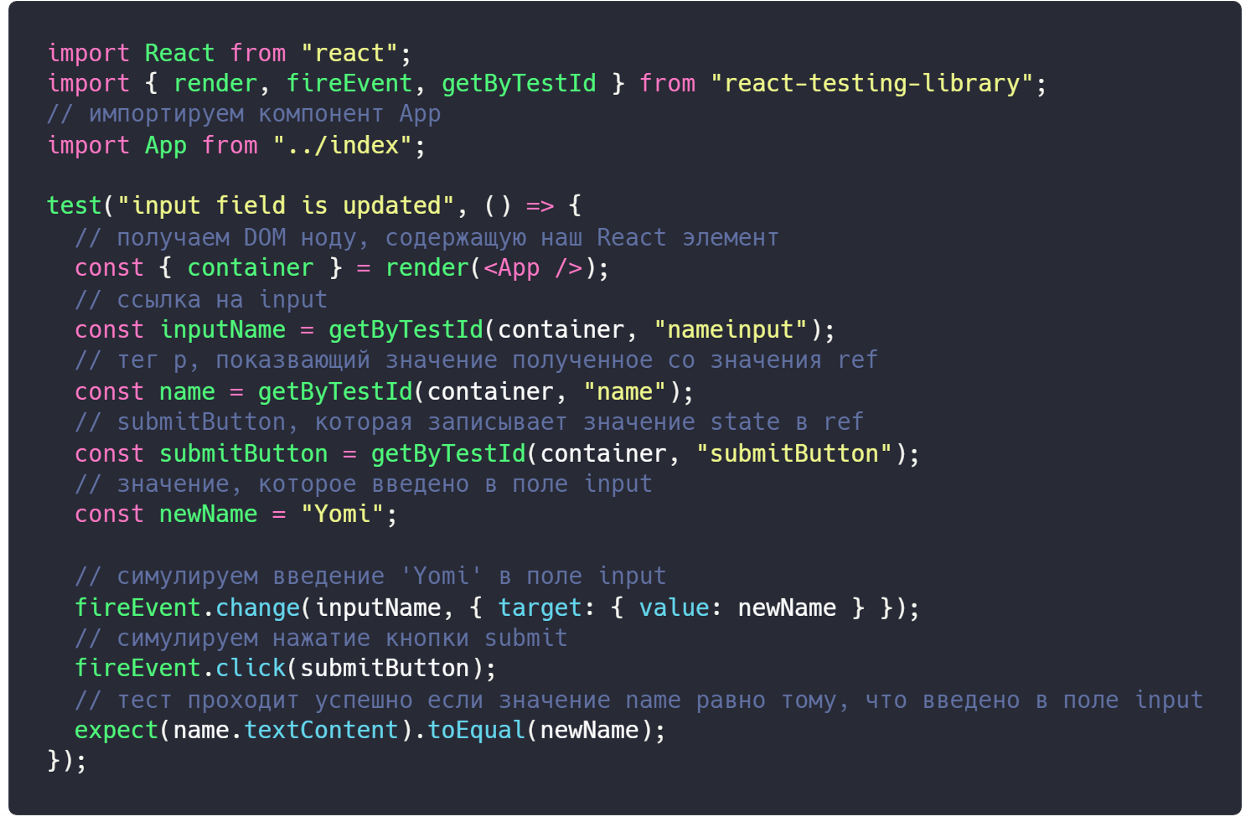
In the function approving the passing of the test, we set the variables in the input field, the p tag, which displays the current ref value, and the send button. We also set the value we would like to enter in the input field for the variable newName. This will be used for testing in the test.

The fireEvent.change method is used to enter a value in the input field, in which case the name stored in the constant newName is used, after which the submit button is pressed.
The test then checks to see if the value of ref after pressing the button matches the value of newName .
Finally, you should see the “No test crashes, congratulations!” Message in the console.
Hooks community response
Since the React Hooks were introduced, the community has been delighted with this feature, and we have seen many examples and examples of using React Hooks. Here are some of the main ones:
- This site contains a collection of React Hooks.
- react-use , a library that comes with a bunch of React Hooks.
- This codeSandbox example shows how to use the useEffect Hook to create animations using react-spring.
- An example of using useMutableReducer, which allows you to simply mutate a state in order to update it in the reducer.
- This example is on CodeSandbox, which shows the complex, complex use of parent-child communication and the use of radiers.
- Switching component built with React Hooks
- Another React Hooks collection that has hooks for input values, device orientation, and document visibility.
Different types of hooks
There are various types of hooks that you can start using in your React application. They are listed below:
- useState - allows us to write pure functions with access to state in them.
- useEffect - allows us to perform side effects. Side effects can be API calls, DOM updates, subscription to event handlers.
- useContext - allows you to write pure functions with context in them.
- useReducer - gives us a link to a redux-like reducer
- useRef - allows you to write pure functions that return a variable ref object.
- useMemo - used to return a saved value.
- useCallback - Hook is used to return a callback callback.
- useImperativeMethods - customizes the value of the instance that is passed to the parent components when using ref.
- useMutationEffects is similar to useEffect Hook in the sense that it allows you to perform DOM mutations.
- useLayoutEffect - used to read the layout from DOM and synchronous re-rendering.
- Custom hooks - allow you to write component logic in a reusable function.
Future hooks
The great thing about Hooks is that they work side by side with existing code, so you can slowly make changes that embed Hooks. All you need to do is upgrade your React to a version that supports hooks.
However, Hooks are still an experimental feature, and the React team has repeatedly warned that the API could be changed. Consider yourself warned.
What does Hooks mean for classes? As the React team reports, the classes still remain, they are a huge part of the React codebase and, most likely, there will be some more time.
We have no plans to condemn classes. In Facebook, we have tens of thousands of components written by classes, and, as you understand, we are not going to rewrite them. But if the React community approves Hooks, there is no point in having two different recommended ways to write components - Dan Abramov
Although the concrete API of the Hooks is experimental today, the community endorses the idea of Hooks, so I think they will stay with us for a long time.
Additional resources
- The React team did a wonderful job of documenting React Hooks, read more here.
- API from official documentation here .
- There is also a standing RFC, so you can go there to ask questions or leave comments.
UPD
Prevodchika Note:
Today, as you know, the released version of React 16.8 officially supports the Hooks API. The changelog shows the following incompatible changes with the alpha version:
- removed useMutationEffect.
- renamed useImperativeMethods to useImperativeHandle.
- it was possible to avoid re-renderers when passing mandatory values in useState and useReducer Hooks.
- no need to compare the first argument passed to useEffect / useMemo / useCallback Hooks.
- use the Object.is algorithm to compare the useState and useReducer values.
- components are rendered twice in Strict Mode (DEV-only).
- improved lazy initialization API for useReducer Hook.
You can read more here .
Source: https://habr.com/ru/post/429712/
All Articles