96-core supercomputer on NanoPi Fire3 single board
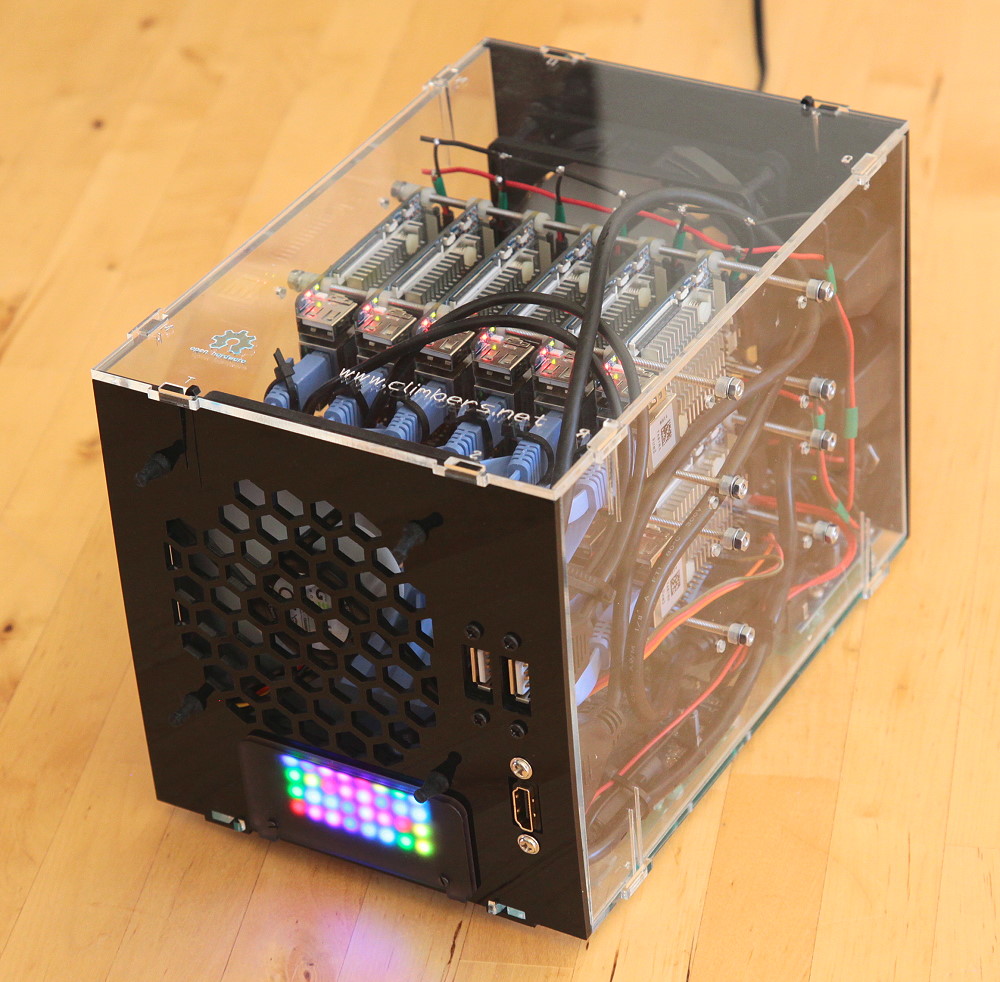
Creating a high-performance cluster with 12 NanoPi-Fire3 nodes for less than £ 100 (£ 550, including twelve Fire3)
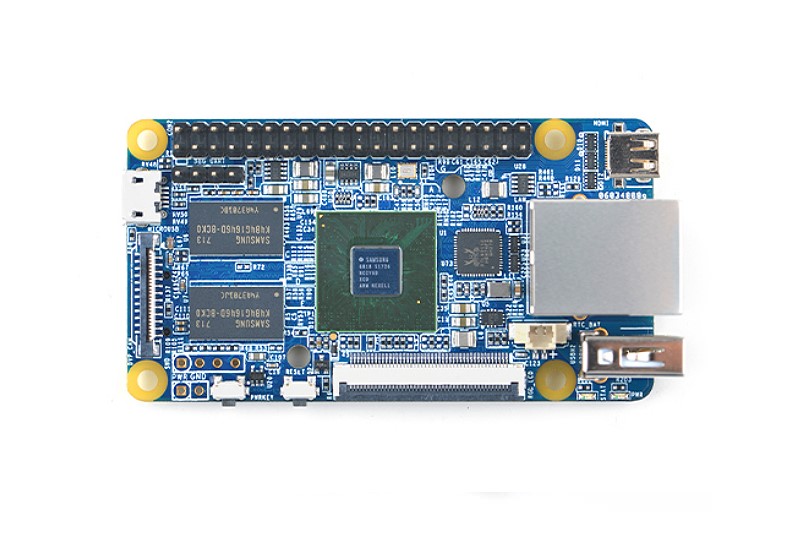
My last cluster on the Raspberry Pi 3 last year interested the public a lot, so I’ll try to do similar projects on other great single-board computers that are on the market. FriendlyARM from China very generously sent me 12 of its last 64-bit ARM NanoPi-Fire3 boards , each of which has eight nuclear ARM A53 SoC operating at 1.4 GHz with Gigabit Ethernet.

')
The cluster size is 146.4 (w) × 151 (h) × 216 mm (d), and weight is 1.67 kg.
or ... What is it for ??
Clusters are often used for resource-intensive tasks (medical research, weather modeling, AI / deep learning, mining cryptocurrency) and / or high availability services (redundant nodes are involved in case of hardware failures). This cluster is, of course, slow from the point of view of modern supercomputers, but a small portable system is ideal for learning or developing distributed software, which can then be transferred to much more powerful systems.
I plan to write several articles to evaluate this cluster for mining and deep learning.
Docker Swarm or Kubernetes seem like excellent options for managing a cluster, although I haven't tried them yet.
The NanoPi-Fire3 board is much more advanced compared to the Raspberry Pi 3, both in terms of performance and in terms of functions, in a smaller form factor, while at about the same price:

Most modern computers have multi-core processors capable of performing two or more tasks at the same time. These can be different applications (for example, a web server that processes three web pages and a database), or one task divided into several streams for maximum speed (for example, a ray tracer, file compression, etc.). This test from the
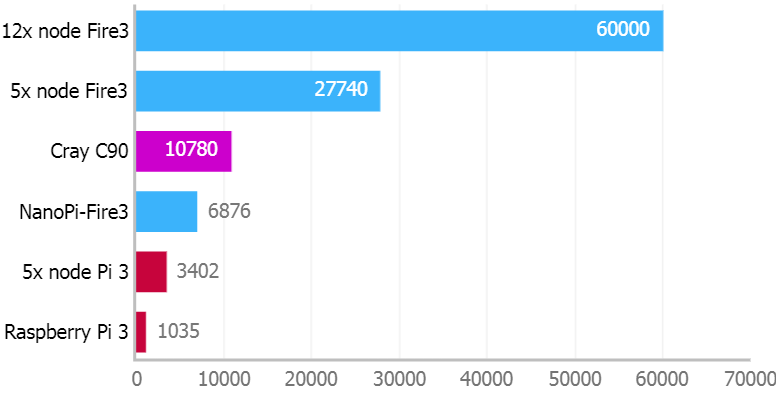
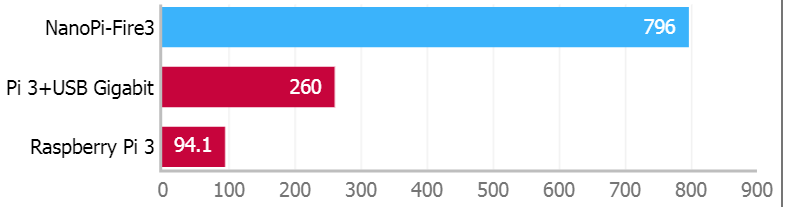
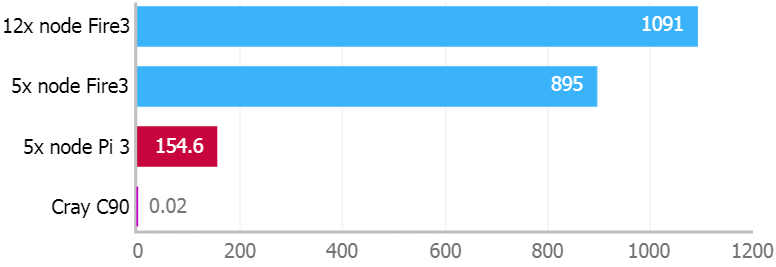
Linpack TPP v1.4.1 (linear equation solver). Number of MFLOPS (millions of floating point operations per second)
On the Fire3 board, there are twice as many cores, a higher clock frequency and faster memory: as a result, the result is 6.6 times higher than on Pi 3.
60,000 MFLOPS - not too much by current performance standards, but as early as 2000 this cluster of 12 Fire3 would have entered the top 250 fastest supercomputers in the world (!). A cluster of five Fire3 runs 8.2 times faster than a Pi 3 cluster of the same size, which is explained by additional CPU cores, faster memory and a much faster network for exchanging data between nodes.
The 16-core supercomputer Cray C90, released in 1992, produced 10,780 MFLOPS, but cost $ 30.5 million, weighed 10.9 tons and needed 495 kW of power!
Setting up a cluster for maximum results is a whole art: optimizing the compiler, setting up math libraries, etc. But we took the estimates from the standard
Both in Fire3 and Pi 3, quad-core GPUs are used for parallel processing of large amounts of data in computer graphics. Recently, they are also used for specialized computing, such as mining cryptocurrency.
glmark2-es2 2014.03 (OpenGL ES 2.0). Score the more the better
The Fire3 board in this test was 7.5 times faster than Pi 3. The results of the clusters are simply scaled by the number of nodes.
As in the case of the CPU, there are many options for customizing graphics by compiling with different drivers, etc. In this test, we simply launched the standard glmark2-es2 binary on Ubuntu 16.04.4, using the default configuration. It is started with the following command:
The outdated OpenGL render for Pi 3 is rather weak, but if you switch to the experimental Mesa
Most ARM monoplatniks have relatively old GPUs that show very modest performance compared to the latest flagship smartphones, not to mention desktop PCs with expensive high-end graphics cards and huge power supplies. The Mali-400 MP4 GPU in Fire3 dates back to 2008, and Broadcom VideoCore-IV in Pi 3 is 2010. There are several more recent single-board devices , such as RockPro64 from PINE64, with more powerful and new graphics processors (Mali-T860 MP4), while the latest generation Mali-G72 MP18 is installed on the Samsung Galaxy S9.
In these tests, the actual data transfer rate in iPerf between two cards connected to an Ethernet switch 100 / 1000Mpbs is checked.
iPerf v2.0.5 (TCP, 1000Mbps Ethernet, between boards), Mbps
With the default settings, the 1000 Mbps interface on Fire3 shows a huge speed difference of 8.5 times compared to the 100 Mbps interface on Pi 3.
If you want to increase network performance on the Raspberry Pi (older than the Pi 3 model B +), you can install a gigabit USB-Ethernet adapter instead of the standard integrated interface. It will increase speed by 2.8 times , but due to limitations USB2 will still be much slower than the current 1000 Mbps interface. This network interface is integrated in the newest model Pi 3 B +.
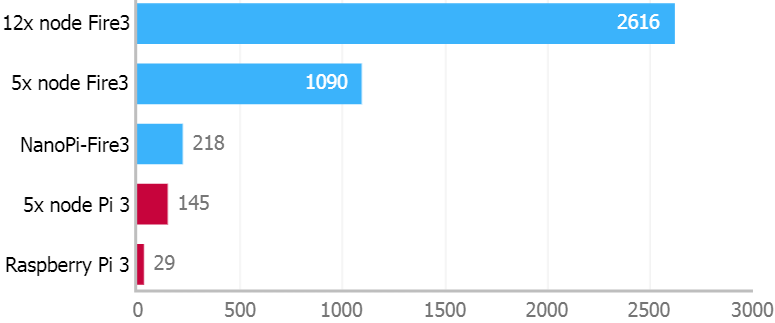
To evaluate performance per watt, I took the Linpack test results higher in MFLOPS and divided it into power consumption. This indicator is usually used for ranking computer systems .
MFLOPS per watt
The five-node Fire3 cluster is 5.8 times more energy efficient than the Pi 3 cluster of the same size, although it consumes more power at 100% load.
Watts were measured at 100% load for the entire cluster , including network switches, fans, and power supplies. WiFi, Bluetooth, HDMI, etc. left in the default settings.
The Cray C90 supercomputer mentioned above delivered only 0.02 MFLOPS per watt in 1992.
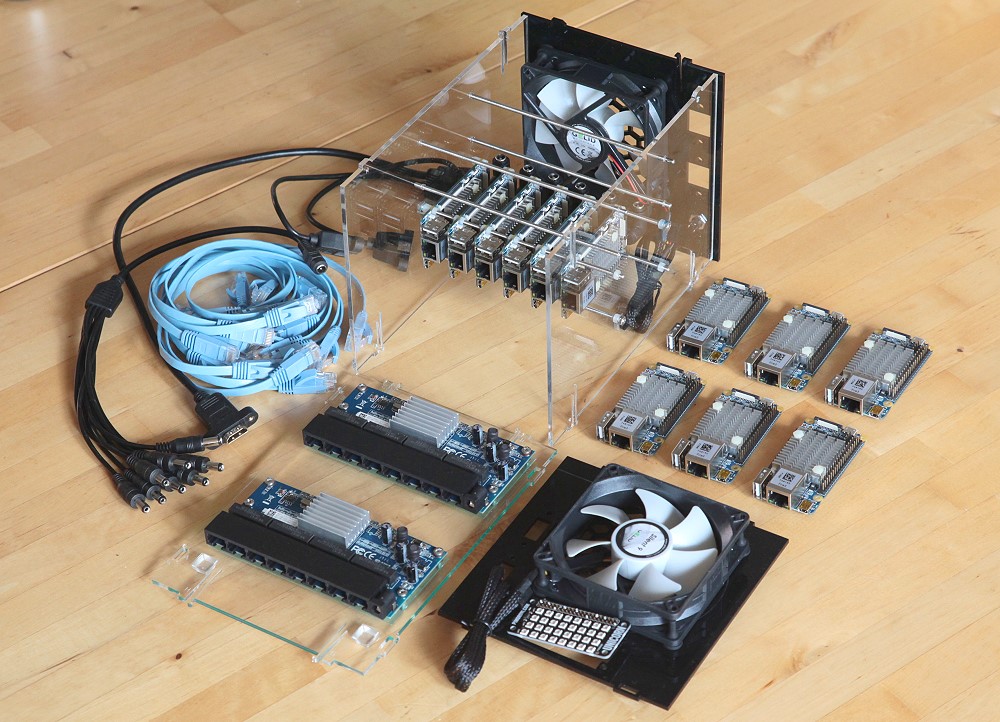
I changed the original design of the Raspberry Pi cluster in the free version of SketchUp , sketching out rough 3D NanoPi-Fire3 templates, network switches, connectors, etc. I decided not to include ventilation slots / grilles in the model. The case is exactly the same size as the clusters of five nodes: the task was to accommodate 12 cards, twice as many fans and Ethernet switches, as well as all the cables!


Download the SKP file for SketchUp 2013
I use the free Inkscape program: it prepares 2D models for loading into a laser cutter. Different colors correspond to different levels of laser power / speed. First, contours are cut along green lines with openings for ports, bolts and ventilation. Pink indicates additional cuts to make it easier to remove fragile parts. Then orange text and lines are etched, and at the very end of the panel are cut out along blue contours.

You can download files for cutting on one sheet of 600 × 400 × 3 mm, although I myself took either transparent or black sheets for different panels:
An optional little detail is a diffuser for a (very bright!) LED panel that can be cut from matte acrylic or simply buy the official Pimoroni diffuser for three pounds.
See my first article for more information on laser cutting and screwless hull assembly systems.
Although the case remained exactly the same size but I made a lot of changes and improvements:
You can read more about some design solutions in the original Pi cluster.
I chose the excellent Unicorn pHAT 32x RGB LEDs panel from Pimoroni to create a colorful “state display” of the cluster. It shows the processor load, temperature, disk and network activity for each node. These inexpensive boards usually connect directly to the Raspberry Pi pins, but you have to tinker a bit to connect them to another board. Jeremy Garff’s rpi_ws281x library uses a very smart low-level PWM / DMA code specific to Raspberry Pi, so I changed the library to use a single SPI pin to control the LEDs, which should work on almost any hardware.

Unicorn pHAT is connected to the board with just three wires: + 5V, GND and SPI0 MOSI (pin 19). In the next article I will describe in detail how this all works. The LEDs are very bright, so they look much better behind the diffuser, which is attached to the outside of the case with two to four M2.5 screws. You can cut your own diffuser from matte acrylic or buy a Pimoroni model with screws for £ 3.
The cluster status on the controller node is controlled by the lightweight broker (server) Mosquitto MQTT (Message Queue Telemetry Transport). Every node every second tells the broker the current processor speed, temperature, network activity, etc.
Without a load, the entire system of twelve Fire3s, two network switches and two 7V fans consumes only 24 watts, and at full load 55 watts.
Do you need radiators? With double the number of cores, Fire3 SoC generates much more heat than Pi3, so the presence of a radiator is very important. Fortunately, FriendlyARM supplies a large heatsink with thermal grease that fits securely onto the Fire3 board. It is much more than radiators for other monoplatniks that I have seen on the market, and perfectly lowers the temperature of the stone, but the fans will still not interfere.
The power adapter produces a maximum of 75 watts (1.1 A on Fire3), so external USB devices (for example, hard drives) will most likely need a separate power supply. Measure the temperature:
We see that the processor without load heats up to 39 ° C with cooling from both 12V fans.
On a load of 100% with fans, the temperature reaches a stable 58 ° C:
Without fans, the temperature will quickly reach 80 ° C with an automatic lowering of the clock frequency to avoid further overheating. Processors can work for a long time at this temperature without any problems, but you do not get maximum performance.
Exactly the same design of the case should be suitable for the NanoPi Fire2s and Fire2As models, which are not as hot as the Fire3, so that one fan will suffice. For cooling one Fire3, a much smaller fan will fit, perhaps 40-60 mm.
Unusual for single-board devices, Fire3 is able to go to sleep with ultra-low energy consumption (about 5 μA), which makes it thought to put to sleep and remove individual nodes from sleep as needed. Unfortunately, there is no Wake-on-LAN Ethernet support, only the inflexible "wake after X minutes" setting. However, there is a
To cool the cluster, I installed two 92 mm fans in the case. I searched for the quietest coolers, rated by Quietpc.com , and the choice fell on Gelid Silent 9 for £ 5.40.
To hear even the slightest fan noise at 5V, you need to bring the ear to it at a distance of 5-7 cm, and the rubber gaskets from the kit perfectly isolate the case from any vibrations. However, at 12V, the fans are quite audible (20dBA) in a quiet room. Therefore, I was looking for a voltage that would provide sufficient cooling, but retained silence. Using an upconverter, I changed the speed of the fans by trying voltage options between 5V and 12V.
(here are the average temperatures for different nodes, that is, at an average of 71 ° C, in reality, two boards are close to an emergency frequency reduction).
I was surprised that the second fan does not particularly affect the result, and in the end it remains to choose between one fan at 9V or two at 7V, while the second option is a little cooler and quieter. I assume that the second fan is more important on a larger case and / or a more complex air flow path inside the case?
The hardest thing was finding a good solution for powering 12 nodes, two Ethernet switches and two fans. I tried to avoid a lot of soldering and self-manufacturing of cables ...
Both Ethernet switches are also powered by 5V, and round DC connectors are soldered.
The build process is similar to the 40-core ARM cluster on the NanoPC-T3 , with only more nodes, an additional network switch and a fan. Fire3 boards are placed at a distance of 20 mm along the rails with an M3 thread, each fastened with eight nuts. For beauty, I pasted the 5V-to-12V up-converter board to the back of the case and added pins to easily turn the fans on and off. Some cables are laid and secured using small cable ties. The Pimoroni LED display is connected to the controller board through three GPIO pins ... more .


Most parts are from different sellers on AliExpress or eBay, which greatly increases postage. If there is sufficient demand for clusters, it is cheaper to purchase parts in bulk.
1 NanoPi-Fire3 can be imported duty free into the UK, and shipping 12 boards from China costs only $ 29, but with a British VAT of 20%, you get £ 383.38.
By now I also built:
My last cluster on the Raspberry Pi 3 last year interested the public a lot, so I’ll try to do similar projects on other great single-board computers that are on the market. FriendlyARM from China very generously sent me 12 of its last 64-bit ARM NanoPi-Fire3 boards , each of which has eight nuclear ARM A53 SoC operating at 1.4 GHz with Gigabit Ethernet.
')
The cluster size is 146.4 (w) × 151 (h) × 216 mm (d), and weight is 1.67 kg.
Software to run in a cluster?
or ... What is it for ??
Clusters are often used for resource-intensive tasks (medical research, weather modeling, AI / deep learning, mining cryptocurrency) and / or high availability services (redundant nodes are involved in case of hardware failures). This cluster is, of course, slow from the point of view of modern supercomputers, but a small portable system is ideal for learning or developing distributed software, which can then be transferred to much more powerful systems.
I plan to write several articles to evaluate this cluster for mining and deep learning.
Docker Swarm or Kubernetes seem like excellent options for managing a cluster, although I haven't tried them yet.
NanoPi-Fire3 versus Raspberry Pi 3
The NanoPi-Fire3 board is much more advanced compared to the Raspberry Pi 3, both in terms of performance and in terms of functions, in a smaller form factor, while at about the same price:
| NanoPi-Fire3 | Raspberry Pi 3 model B | |
|---|---|---|
| SoC | 8-core ARM A53 S5P6818 @ 1.4 GHz | 4-core ARM A53 BCM2837 @ 1.2 GHz |
| Memory | 1 GB DDR3 | 1 GB DDR2 |
| GPU | Mali-400 MP4 500 MHz? | Broadcom VideoCore IV 400 MHz? |
| Network | 1000 Mbps | 100 Mbps |
| WiFi | not | 802.11bgn |
| Bluetooth | not | 4.1 + BLE |
| Storage | MicroSD card | MicroSD card |
| USB | 1 connector 1 microUSB | 4 connectors |
| Video | Micro HDMI 1.4a, RGB-LCD | HDMI, DSI |
| Camera interface | DVP | CSI |
| Audio | not | 3.5 mm |
| The size | 75 × 40 mm | 85 × 56 mm |
| Nutrition | 1.2 → 3.6 W 2A max. MicroUSB | 1.2 → 2.1 W 2.5A max. MicroUSB |
| Release | Q4 2017 | Q1 2016 |
| Price (UK) | £ 34.30 1 | £ 33.59 |
| 1 $ 35 for Fire3 + $ 5 shipping + 20% VAT + 0% import duty = £ 34.30 | ||
Benchmarks
CPU
Most modern computers have multi-core processors capable of performing two or more tasks at the same time. These can be different applications (for example, a web server that processes three web pages and a database), or one task divided into several streams for maximum speed (for example, a ray tracer, file compression, etc.). This test from the
hpcc package uses all the CPU cores, effectively testing the overall performance of the processor in floating point operations.Linpack TPP v1.4.1 (linear equation solver). Number of MFLOPS (millions of floating point operations per second)
On the Fire3 board, there are twice as many cores, a higher clock frequency and faster memory: as a result, the result is 6.6 times higher than on Pi 3.
60,000 MFLOPS - not too much by current performance standards, but as early as 2000 this cluster of 12 Fire3 would have entered the top 250 fastest supercomputers in the world (!). A cluster of five Fire3 runs 8.2 times faster than a Pi 3 cluster of the same size, which is explained by additional CPU cores, faster memory and a much faster network for exchanging data between nodes.
The 16-core supercomputer Cray C90, released in 1992, produced 10,780 MFLOPS, but cost $ 30.5 million, weighed 10.9 tons and needed 495 kW of power!
Setting up a cluster for maximum results is a whole art: optimizing the compiler, setting up math libraries, etc. But we took the estimates from the standard
hpcc package in Ubuntu 16.04.4 using the default configuration.Shell commands for benchmark
# Setup on each node apt install hpcc swapoff -a adduser mpiuser # Controller node setup su - mpiuser cp /usr/share/doc/hpcc/examples/_hpccinf.txt hpccinf.txt # Edit default hpccinf.txt so that NB=80, N=18560, P=8 and Q=12 (P x Q = 96 cores) sed -i "8s/.*/80\tNBs/; 6s/.*/18560\tNs/; 11s/.*/8\tPs/; 12s/.*/12\tQs/" hpccinf.txt # Generate & copy SSH keys across cluster, so controller can run benchmark on all nodes # (use the hostnames or IP addresses for your nodes) ssh-keygen -t rsa nodes=('controller' 'b1' 'b2' 'b3' 'b4' 'b5' 't1' 't2' 't3' 't4' 't5' 't6') for i in ${nodes[@]} do ssh-copy-id "fire3-$i" echo "fire3-$i slots=8" >> mycluster done mpirun -hostfile mycluster --mca plm_rsh_no_tree_spawn 1 hpcc grep -F -e HPL_Tflops -e PTRANS_GBs -e MPIRandomAccess_GUPs -e MPIFFT_Gflops -e StarSTREAM_Triad -e StarDGEMM_Gflops -e CommWorldProcs -e RandomlyOrderedRingBandwidth_GBytes -e RandomlyOrderedRingLatency_usec hpccoutf.txt Graphics
Both in Fire3 and Pi 3, quad-core GPUs are used for parallel processing of large amounts of data in computer graphics. Recently, they are also used for specialized computing, such as mining cryptocurrency.
glmark2-es2 2014.03 (OpenGL ES 2.0). Score the more the better
The Fire3 board in this test was 7.5 times faster than Pi 3. The results of the clusters are simply scaled by the number of nodes.
As in the case of the CPU, there are many options for customizing graphics by compiling with different drivers, etc. In this test, we simply launched the standard glmark2-es2 binary on Ubuntu 16.04.4, using the default configuration. It is started with the following command:
sudo apt install glmark2-es2 glmark2-es2 --off-screen The outdated OpenGL render for Pi 3 is rather weak, but if you switch to the experimental Mesa
rpi-config render via rpi-config , you will get a performance like Fire3.Most ARM monoplatniks have relatively old GPUs that show very modest performance compared to the latest flagship smartphones, not to mention desktop PCs with expensive high-end graphics cards and huge power supplies. The Mali-400 MP4 GPU in Fire3 dates back to 2008, and Broadcom VideoCore-IV in Pi 3 is 2010. There are several more recent single-board devices , such as RockPro64 from PINE64, with more powerful and new graphics processors (Mali-T860 MP4), while the latest generation Mali-G72 MP18 is installed on the Samsung Galaxy S9.
Network
In these tests, the actual data transfer rate in iPerf between two cards connected to an Ethernet switch 100 / 1000Mpbs is checked.
iPerf v2.0.5 (TCP, 1000Mbps Ethernet, between boards), Mbps
With the default settings, the 1000 Mbps interface on Fire3 shows a huge speed difference of 8.5 times compared to the 100 Mbps interface on Pi 3.
Shell commands for benchmark
sudo apt install iperf # On node1 iperf -s -V # On node2 iperf -c node1 -i 1 -t 20 -V If you want to increase network performance on the Raspberry Pi (older than the Pi 3 model B +), you can install a gigabit USB-Ethernet adapter instead of the standard integrated interface. It will increase speed by 2.8 times , but due to limitations USB2 will still be much slower than the current 1000 Mbps interface. This network interface is integrated in the newest model Pi 3 B +.
Cluster performance per watt
To evaluate performance per watt, I took the Linpack test results higher in MFLOPS and divided it into power consumption. This indicator is usually used for ranking computer systems .
MFLOPS per watt
The five-node Fire3 cluster is 5.8 times more energy efficient than the Pi 3 cluster of the same size, although it consumes more power at 100% load.
Watts were measured at 100% load for the entire cluster , including network switches, fans, and power supplies. WiFi, Bluetooth, HDMI, etc. left in the default settings.
The Cray C90 supercomputer mentioned above delivered only 0.02 MFLOPS per watt in 1992.
3D case design
I changed the original design of the Raspberry Pi cluster in the free version of SketchUp , sketching out rough 3D NanoPi-Fire3 templates, network switches, connectors, etc. I decided not to include ventilation slots / grilles in the model. The case is exactly the same size as the clusters of five nodes: the task was to accommodate 12 cards, twice as many fans and Ethernet switches, as well as all the cables!
Download the SKP file for SketchUp 2013
Laser cutting
I use the free Inkscape program: it prepares 2D models for loading into a laser cutter. Different colors correspond to different levels of laser power / speed. First, contours are cut along green lines with openings for ports, bolts and ventilation. Pink indicates additional cuts to make it easier to remove fragile parts. Then orange text and lines are etched, and at the very end of the panel are cut out along blue contours.
You can download files for cutting on one sheet of 600 × 400 × 3 mm, although I myself took either transparent or black sheets for different panels:
An optional little detail is a diffuser for a (very bright!) LED panel that can be cut from matte acrylic or simply buy the official Pimoroni diffuser for three pounds.
See my first article for more information on laser cutting and screwless hull assembly systems.
Changes in design compared to the Pi 3 cluster
Although the case remained exactly the same size but I made a lot of changes and improvements:
- The design of the horizontal mounting rail has been preserved, but the holes in the Fire3 are M3, for which it is easier to find parts than for M2.5 in Pi. And the holes are closer to each other, because the overall size of the board is slightly smaller than the Pi. Is it a little tiring to screw plastic nuts on horizontal rails, and I would like to print some plastic clips on a 3D printer to hold the boards along each rail, or to make thick elastic washers?
- External power supply instead of internal USB hub : I replaced the internal USB power supply with a fanless AC power supply outside the case. This frees up space inside (for more Fire3 boards and two fans) and should help with heat dissipation. Each Fire3 can pull a maximum of 2A, but in reality the cluster will pull much less, without taking into account additional peripherals that hang on USB and GPIO.
- Two microUSB chains instead of 12 separate cables : there were no suitable ones for sale, so I made my own cables in a “chain” (daisy-chain) using shorter and thicker wires (rating 11A) and soldering 12 microUSB connectors: as a result, the cables occupied very little space inside the case ... more
- Two fans instead of one : I was sure that the more powerful Fire3 boards would need much more active cooling, so I made room on the case for two ultra-quiet 92 mm fans: the rear fan sucks in cold air into the case, and the front fan blows hot air out.
- Fan Gelid Solutions Silent 9 instead of Nanoxia Deep Silence : I am very pleased with the performance of the fan Nanoxia (and their excellent technical support), but I wanted to try a cheaper option. Gelid rubber gaskets are thicker than those of Nanoxia, so I increased the diameter of the mounting holes in the case by 0.5 mm.
- 5V direct power supply for fans instead of 5V from GPIO : in previous clusters, the fans were powered from one of the boards with GPIO output. But taking into account the installation of two 12V fans, I connected a step-up converter with a straight line from the main power supply of the case.
- Several vents instead of a large number : instead of cutting dozens of vents all over the body (which takes time), I cut out the holes only on the front and rear panels opposite the fans. Maybe it optimizes the air flow through the case?
- USB connectors on the case : these two combined USB connectors worked fine in my original cluster, but I never liked them because of the long cables that don't normally bend. So now I took two separate USB ports with short cables and connectors at an angle, which leaves more space inside the case.
- No shelf for attaching a USB hub : transferring the power supply to the outside simplified the design of the case, which can now be cut from a single sheet of acrylic 600 × 400 mm. Removing the shelf reduces the rigidity of the case, but if you screw the horizontal mounting rail to the side panels, then the rigidity is normal.
- Flat LAN cables instead of round ones : I liked the multicolored network cables from the RPi3 project, but it's very difficult to put them inside the case. Flat cables bend much more easily, which is even more important with such a dense package of boards. At first I tried the 25 cm cables, but they were too long, but the 15 cm cables left more space inside the case.
- Blue network cables instead of dull gray : blue really colors the gray design ... plus the FriendlyARM logo blue with green.
- A gigabit switch instead of a 10-gigabit switch: Fire3 has 1000 Mbps network ports (ten times faster than Pi), so it’s obvious that the switch should be at least 1000 Mbps. The ten-gigabit switch will completely eliminate the bottleneck in this location: so ten or more Fire3s will be able to communicate at full speed with the external network. However, these switches are still expensive (from £ 200) and too cumbersome. The NETGEAR GS110MX switch looks promising.
- Board holders 4 mm instead of 6 mm : lowering the switch board, we got a little more space for cable laying and air exchange.
- Micro HDMI instead of HDMI : on the Fire3 boards, Micro HDMI connectors, so I used the shortest Micro HDMI → HDMI cable I could find (50 cm). Another option was a shorter cable with a separate HDMI → Micro HDMI adapter, but it is cumbersome and can block one of the LAN ports.
- Black plexiglass panels instead of transparent ones : to “hide” two fans, but leave all the electronics in sight from the side and from above. The black front panel also attracts the gaze to the Unicorn LED panel.
- LED panel Unicorn pHAT instead of simple LEDs on the boards : there are so many nodes in the cluster that it makes sense to put on the front panel of the case a visual monitoring of the status that shows CPU speed, temperature, disk and network activity for each node ... more
You can read more about some design solutions in the original Pi cluster.
Server Status Indicators with MQTT
I chose the excellent Unicorn pHAT 32x RGB LEDs panel from Pimoroni to create a colorful “state display” of the cluster. It shows the processor load, temperature, disk and network activity for each node. These inexpensive boards usually connect directly to the Raspberry Pi pins, but you have to tinker a bit to connect them to another board. Jeremy Garff’s rpi_ws281x library uses a very smart low-level PWM / DMA code specific to Raspberry Pi, so I changed the library to use a single SPI pin to control the LEDs, which should work on almost any hardware.
Unicorn pHAT is connected to the board with just three wires: + 5V, GND and SPI0 MOSI (pin 19). In the next article I will describe in detail how this all works. The LEDs are very bright, so they look much better behind the diffuser, which is attached to the outside of the case with two to four M2.5 screws. You can cut your own diffuser from matte acrylic or buy a Pimoroni model with screws for £ 3.
The cluster status on the controller node is controlled by the lightweight broker (server) Mosquitto MQTT (Message Queue Telemetry Transport). Every node every second tells the broker the current processor speed, temperature, network activity, etc.
Power, temperature and cooling
Without a load, the entire system of twelve Fire3s, two network switches and two 7V fans consumes only 24 watts, and at full load 55 watts.
Do you need radiators? With double the number of cores, Fire3 SoC generates much more heat than Pi3, so the presence of a radiator is very important. Fortunately, FriendlyARM supplies a large heatsink with thermal grease that fits securely onto the Fire3 board. It is much more than radiators for other monoplatniks that I have seen on the market, and perfectly lowers the temperature of the stone, but the fans will still not interfere.
The power adapter produces a maximum of 75 watts (1.1 A on Fire3), so external USB devices (for example, hard drives) will most likely need a separate power supply. Measure the temperature:
cat /sys/devices/virtual/thermal/thermal_zone0/temp We see that the processor without load heats up to 39 ° C with cooling from both 12V fans.
On a load of 100% with fans, the temperature reaches a stable 58 ° C:
sysbench --test=cpu --cpu-max-prime=20000000 --num-threads=8 run & Without fans, the temperature will quickly reach 80 ° C with an automatic lowering of the clock frequency to avoid further overheating. Processors can work for a long time at this temperature without any problems, but you do not get maximum performance.
Exactly the same design of the case should be suitable for the NanoPi Fire2s and Fire2As models, which are not as hot as the Fire3, so that one fan will suffice. For cooling one Fire3, a much smaller fan will fit, perhaps 40-60 mm.
Unusual for single-board devices, Fire3 is able to go to sleep with ultra-low energy consumption (about 5 μA), which makes it thought to put to sleep and remove individual nodes from sleep as needed. Unfortunately, there is no Wake-on-LAN Ethernet support, only the inflexible "wake after X minutes" setting. However, there is a
PWR header on the boards. Perhaps, it can be connected for remote wake-up from the pin GPIO on the controller?Silent cooling
To cool the cluster, I installed two 92 mm fans in the case. I searched for the quietest coolers, rated by Quietpc.com , and the choice fell on Gelid Silent 9 for £ 5.40.
To hear even the slightest fan noise at 5V, you need to bring the ear to it at a distance of 5-7 cm, and the rubber gaskets from the kit perfectly isolate the case from any vibrations. However, at 12V, the fans are quite audible (20dBA) in a quiet room. Therefore, I was looking for a voltage that would provide sufficient cooling, but retained silence. Using an upconverter, I changed the speed of the fans by trying voltage options between 5V and 12V.
| Fans | Radiators? | Without load | 100% load | Performance |
|---|---|---|---|---|
| Rear 12V, 1500 rpm | Yes | 42 ° C | 66 ° C | Ok |
| Rear 9V ,? rpm | Yes | 44 ° C | 71 ° C | Ok |
| Rear 7V ,? rpm | Yes | 46 ° C | 75 ° C | frequency reduction |
| Both 12V, 1500 rpm | Yes | 39 ° C | 58 ° C | Ok |
| Both are 7V ,? rpm | Yes | 40 ° C | 65 ° C | Ok |
| Both 5V ,? rpm | Yes | 46 ° C | 77 ° C | frequency reduction |
I was surprised that the second fan does not particularly affect the result, and in the end it remains to choose between one fan at 9V or two at 7V, while the second option is a little cooler and quieter. I assume that the second fan is more important on a larger case and / or a more complex air flow path inside the case?
Power cables: saga in five parts
The hardest thing was finding a good solution for powering 12 nodes, two Ethernet switches and two fans. I tried to avoid a lot of soldering and self-manufacturing of cables ...
- Fire3s are powered via microUSB, like Pi, but I didn’t find a 12-port USB hub at 15A. I considered a 6-port hub with six two-way microUSB splitters or even two separate 6-port USB hubs. But the first option did not provide enough power for 12 nodes, and the second took too much space inside the case.
- With an external “brick” as an AC source, I tried some standard 8x and 6x splitters. The cables are designed for CCTV cameras with microUSB → DC corner connectors, but they take up a lot of space (bad for the air flow) and are not rated for current, which leads to a voltage drop on each Fire3 board.
- And if you use steel chassis rails as a conductor for 5V + GND ?! This is not as insane as it seems: each rail has a low resistance of only 0.5 ohms and must be electrically isolated from the boards. But I could not figure out how to make a reliable connection from each board to the rail in order to easily disconnect them in case of replacement of the node, etc.
- New Hope? Is there any way to power the boards other than soldering 12 homemade microUSB cables? Fire3 boards have unused points of 5V + GND, such as the UART header. It would be easier and cheaper to solder a two-pin header to each node and provide power using ready-made two-pin DuPont connectors instead of microUSB. However, this bold plan had to be abandoned when I realized that after assembling the cluster between the boards there was not enough space to connect or disconnect the two-pin connectors ... and ideally I would not want to solder each board.
- In the end, I made a homemade chain of power cables (daisy-chain), taking a 0.5 mm thick twin cable (11A, 6 knots in length) and soldering to it the microUSB corner connectors. It came out very neatly, and the cable took up very little space inside the case, ensuring excellent air flow. Two power chains come out of the case through separate ones through separate sockets in order to limit the maximum current through one DC connector. It also means that you can only include the upper or lower half of the cluster if you want.
Both Ethernet switches are also powered by 5V, and round DC connectors are soldered.
Fire3 cluster build
The build process is similar to the 40-core ARM cluster on the NanoPC-T3 , with only more nodes, an additional network switch and a fan. Fire3 boards are placed at a distance of 20 mm along the rails with an M3 thread, each fastened with eight nuts. For beauty, I pasted the 5V-to-12V up-converter board to the back of the case and added pins to easily turn the fans on and off. Some cables are laid and secured using small cable ties. The Pimoroni LED display is connected to the controller board through three GPIO pins ... more .
List of materials
Most parts are from different sellers on AliExpress or eBay, which greatly increases postage. If there is sufficient demand for clusters, it is cheaper to purchase parts in bulk.
| Edimax ES-5800G V3 Gigabit Ethernet (2 .) | £19,96 |
| 15 Cat6 LAN (12 .) | £6,79 |
| M3 12 (8 10 ) | £1,45 |
| M3 4 (8 50 .) | £0,99 |
| 5,5/2,1 DC (2 5 .) | £1,49 |
| 1 + | n / a |
| 1 2- 0,5 (11A) DC | £0,99 |
| microUSB (12 20 .) | £1,63 |
| 5,5/2,1mm DC (2 10 .) | £0,65 |
| 10A (4 12) | £1,29 |
| 100 (5 @ 20 ) , 5,5/2,1 + UK | £13,51 |
| RJ45 «-» (2 .) | £1,74 |
| M3 8 (4 5) | £1,25 |
| M3 150 (8 .) | £9,20 |
| M3 (120 150) | £1,73 |
| Micro HDMI «» HDMI «» 50 | £2,19 |
| USB "mother" to the corner "male" panel mount 25 cm (2 pcs.) | £ 2.38 |
| 3 mm transparent plexiglas 600 × 400 mm | £ 5.32 |
| 5V-to-12V boost converter | £ 2.04 |
| Charge for laser cutter | n / a |
| 92 mm fan Gelid Silent 9 (2 pcs.) | £ 11.65 |
| Polyurethane rubber feet (4 of 10) | £ 1.75 |
| Unicorn pHAT 32x RGB LED panel | £ 10.00 |
| Black screws M2.5 10 mm (2−4 out of 20) | £ 1.02 |
| Small cable ties (10 pcs.) | n / a |
| Total materials | £ 97.73 |
|---|---|
| NanoPi-Fire3 for $ 35 (12 pcs.) 1 | £ 383.38 |
| SanDisk Industrial class 10 8 GB microSDHC card (12 pcs.) | £ 62.16 |
| Total | £ 543.27 |
Clusters from other single board computers
By now I also built:
Source: https://habr.com/ru/post/429488/
All Articles