How to grow a forest on Actionscript3 / Flash in a few * lines of code
Here in this comment I boasted that at one time I wrote a program that creates a render of a “decent looking” forest in two hundred lines of code. Unfortunately, the reality turned out to be a bit larger in size - the excavated source code contains about 2100 lines of code, of which about 700 are comments, thoughts out loud, old discarded code and attempts to document methods. The size of the SWF executable, however, turned out to be 13112 bytes.
It all started with the fact that on the Kongregate.com forum, where I was actively tusil at the time, one of the participants offered to compete in the procedural generation of something, the first topic was Forest .
Naturally, each had their own idea of what the forest they would grow should be. At that time, I read out books about all kinds of magic, as a result, I wanted to grow just the forest. A forest consists of trees - we write class Tree {...}. A tree consists of branches and leaves - we write class Branch {...} and think, and do we really need to take into account each leaf on the tree? As a result, the “branch” acquired the parameter “with leaves”, and the tree - a pair of textures, one for the branches and the trunk, one for the leaves. The texture “under the tree” was relatively easy to make - there is perlin noise, it can be stretched, wrapped, painted, considered ready, and I had to tinker with the leaves.
')
However, I was not satisfied with just the pearl noise on the texture under the tree, instead I thought up to do bumpmapping - i.e. He created a height map, corrected it under the semicircle of the branch visible from the side, then filled the main texture with brown and superimposed a height map with lighting adjusted to the side with a creeper. The final code is:
“Basis” is a helper class for vectors a la Vector3D, but since the code was written then under Flash 10.1, there were no such vectors there yet, or I preferred to make my own bike. The texture under the branch with leaves was drawn as follows: first, one sheet was made, then it was determined whether the branches would have a central sheet, this determined the length of a piece of the branch to which the leaves were attached, then by the calculated width of the sheet they were attached (drawn on the texture) at an angle to the branch . The leaf shape was set as a distorted circle with several anchor points offset from the circle with a radius of half a sheet, and the length of the cutting was set separately, all this was drawn on the leaf texture in black and white and remained for future. (More precisely, the texture “branch with leaves” was two, one for the ends, i.e., branches that do not grow from the “end”, but they are with leaves, a sheet was painted on it at the end of the branch, the second for “middle "Without end sheet.)
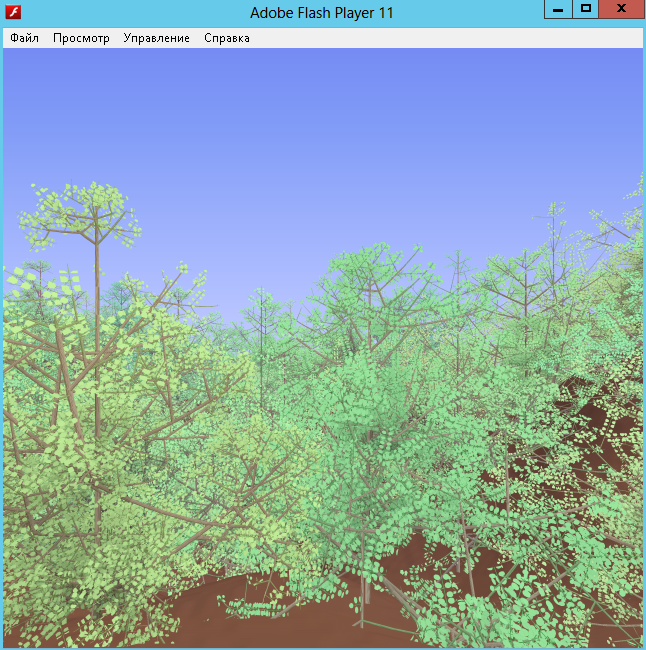
Further the most difficult - how the tree will look? Here I thought for a long time and experimented. I decided to make the tree really grow - the branches stretch out in length (they actually grow from the end), sometimes they spawn branches to the side, the branches stretch towards the sun (upwards) and a couple of conditions. It turned out a terrible mess, the best option, which was able to share, looked like this:
(Oddly enough, diary.ru is a great photo hosting site, so far nothing is rotten!)
I came to the conclusion that you need to somehow reduce the density of the branches. At first, the idea was to limit them gravitationally - i.e. too "heavy" branches just break off and fall. He began to count the moment of force on the bend, comparing it with the strength of the tree (from somewhere he dragged the values, scored as constants and began to test) - it turned out badly, sometimes the trunk broke, even despite the fact that it should not, and the tree safely bent , sometimes at first one large branch broke, the result led to imbalance of the trunk and it broke again, this time due to the loss of vertical balance, and sometimes the branch, quite normal in structure, grew in thickness, first progressed under its weight, then broke down if nothing in it is no longer grew. Scored, because the challenge was deadline.
The second attempt was to limit both the growth of new branches and the survival of old / previous ones with the help of lighting. From the third attempt of implementation (the first two remained in the form of commented functions) it turned out like this: I built a three-dimensional voxel grid with a side of 0.5 meters (yep, all values were in meters and kilograms - I really wanted real physics for a real forest), which was filled initially with zeros, then when walking around a tree, each branch contributed to filling the grid in the form of its volume divided by one or two voxels. The fact is that all the branches (in any case, almost all) as separate pieces of the calculated framework were shorter than 0.5m, which made it possible to use a rough approximation. In addition to filling, each branch “cast a shadow” on the underlying voxels in the form of additional filling of voxels under and slightly around the voxel with a branch (the final form is a square pyramid, but it didn’t bother with the circle but it was no longer illumination). This grid was used as a limiter, if one of the branches starts to grow in the middle of the tree - it will have less light there, it will be shorter and may not grow at all or die from a lack of lighting. Dead branches then fell off.
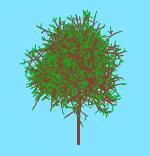
Such an option allowed to get relatively transparent when viewed and relatively compact in terms of the scope of the trees, the first working version looked like this:

In this version, I also debugged the growth mechanism of the tree itself, and the tree could be viewed from all sides. The tree was drawn one branch at a time, the array of branches was first sorted by distance from the observer, as in the old good VMK course on three-dimensional graphics from 1996, I chose the colors for drawing from the HSB range for each call “draw me a tree” for each call so that the forest was not monotonous, the skeleton of the tree was also randomly turned for drawing. The total tree models for drawing were from six to eight, each grew under its own RNG-influence, the landscape of the earth set another pearl noise, and the place where the tree was grown was chosen randomly using a set of ranges of allowed points for growth on the side moving distance observer. If the tree was planted at point A, and the radius of the tree R selected for “growing”, then the values (AR, A + R) became forbidden for growth at the current distance, during the transition to the next (-0.05) this interval decreased by 0.1, and was removed when reduced to zero.
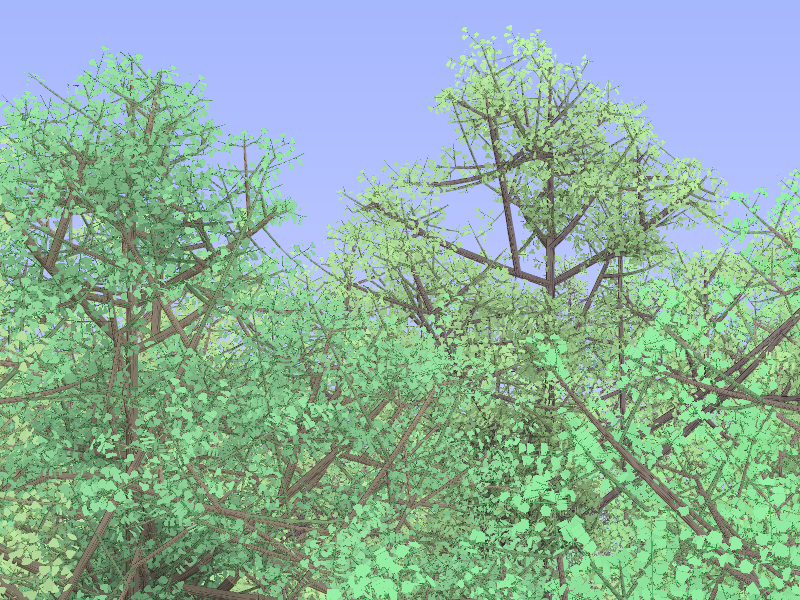
The last (and in fact the first and immediately accounted for) nuance of this whole algorithm is VERY LONG. To get around an “adult” tree, it takes a few seconds to draw, a few more to draw the textures of one tree, goes from half a second to two, and Adobe Flash is not designed for such long intervals of calculations without refreshing the screen (more precisely, without returning control to the engine) . Consequently, we needed an algorithm that is able to maintain state between calls, continue working from the place where it was interrupted and monitor its execution time, and at the same time not panic itself and prevent panic from flashing. The state saving was implemented as a pair of properties of the Main class, splitting into stages by selecting the functions “grow a tree once”, “draw a finished tree” and “draw a piece of earth” and measure the time spent, respectively, as soon as another “once” for a tree it took more than a few seconds, the tree was considered “ready” and set aside. It turned out three large phases: the creation of textures, the "cultivation" of trees, the placement of finished trees on the screen.
The result looks like this:
You can play here . Optimized (more precisely, written) under Flash 10.1, taking into account heaps of flash updates in terms of security, can be terribly slow - in this case I advise you to download the debug version of Adobe Flash Player 11.5 and open it offline. The whole drawing takes 5-6 minutes, after the first two on the screen some movement begins to occur, which may be interesting to watch. After the drawing is completed, you can press Ctrl + click to save the result as a quad-size PNG file compared to the size window.
It all started with the fact that on the Kongregate.com forum, where I was actively tusil at the time, one of the participants offered to compete in the procedural generation of something, the first topic was Forest .
Naturally, each had their own idea of what the forest they would grow should be. At that time, I read out books about all kinds of magic, as a result, I wanted to grow just the forest. A forest consists of trees - we write class Tree {...}. A tree consists of branches and leaves - we write class Branch {...} and think, and do we really need to take into account each leaf on the tree? As a result, the “branch” acquired the parameter “with leaves”, and the tree - a pair of textures, one for the branches and the trunk, one for the leaves. The texture “under the tree” was relatively easy to make - there is perlin noise, it can be stretched, wrapped, painted, considered ready, and I had to tinker with the leaves.
')
However, I was not satisfied with just the pearl noise on the texture under the tree, instead I thought up to do bumpmapping - i.e. He created a height map, corrected it under the semicircle of the branch visible from the side, then filled the main texture with brown and superimposed a height map with lighting adjusted to the side with a creeper. The final code is:
private function generateBranch():void { branchBitmap = new BitmapData(512, 512, true, 0xff8080ff); //branchBitmap.perlinNoise(32, 256, 2, 100 + Math.round(Math.random() * 900), true, true, 7, true); var hm:BitmapData = new BitmapData(512, 512, false, 0); var seed:int = 1000 + Math.random() * 2000; hm.perlinNoise(24,192, 2, seed, true, true, BitmapDataChannel.BLUE, false); // blue only. Is a heightmap var i:int; var j:int; for (i = 0; i < 512; i++) { if (Math.abs(i - 256) > 100) r = 0; else r = 200 * Math.sqrt(1 - (i - 256) * (i - 256) / 10000);// square curve //r = 200 * Math.sin(Math.PI * (i - 128) / 256); // sine curve for (j = 0; j < 512; j++) hm.setPixel(i, j, Math.round(r*(500.0 + (hm.getPixel(i, j)-128))*0.002)); // now, r means position on the "log", and initial perlin noise is log's texture. // perlinNoise median 128, highest offset taking as 100, the result offset needs to be ~0.2 in multiplier } var v:Vector.<int> = new Vector.<int>(); var vv:Vector.<Number> = new Vector.<Number>(3); for (i = 1; i < 511; i++) { v.length = 0; v.push(hm.getPixel(0, i-1), hm.getPixel(1, i-1), hm.getPixel(2, i-1), hm.getPixel(0, i), hm.getPixel(1, i), hm.getPixel(2, i), hm.getPixel(0, i+i), hm.getPixel(1, i+1), hm.getPixel(2, i+1)); for (j = 1; j < 510; j++) { var g:int = -1 * v[0] - 2 * v[1] - 1 * v[2] + 1 * v[8] + 2 * v[7] + 1 * v[6]; // gradient by Y var r:int = -1 * v[0] - 2 * v[3] - 1 * v[6] + 1 * v[2] + 2 * v[5] + 1 * v[8]; // gradient by X //if ((i > 50) && (i < 55) && (j > 50) && (j < 55)) trace(g, r); var b:int = v[5]; r += 128; g += 128; var p:uint = r *0x10000 + g*0x100 + b; branchBitmap.setPixel(j, i, p); v.shift(); v.push(hm.getPixel(j + 2, i + 1)); v[2] = hm.getPixel(j + 2, i - 1); v[5] = hm.getPixel(j + 2, i); } } var bf:BlurFilter = new BlurFilter(2,8); // ___ // bevelFilter is not what I need, it bevels a rectangle and just that [___] // dropShadowFilter requires empty alpha I believe // convolution filter works best on self, while it can do what I need branchBitmap.applyFilter(branchBitmap, branchBitmap.rect, P0, bf); hm.copyPixels(branchBitmap, branchBitmap.rect, P0); //branchBitmap.perlinNoise(32, 256, 0, seed, true, true, 7, true); // naked grayscale // 0 octaves means 50% gray filling branchBitmap.fillRect(branchBitmap.rect, 0xff808080); // it looks like I'll have enough details just by perlin-noising the heightmap var inc:Number = Math.PI / 3; var azi:Number = -Math.PI * 1 / 4; var cx:Number = Math.cos(inc) * Math.cos(azi); var cy:Number = Math.cos(inc) * Math.sin(azi); var cz:Number = Math.sin(inc); azi = 1 - 2 * cz; inc = 1 / cz; // cos(lighting) to be normalized into (0..1) via cz for (i = 0; i < 512; i++) for (j = 0; j < 512; j++) { p = branchBitmap.getPixel(j, i); var h:uint = hm.getPixel(j, i); // give a vector here somewhere vv[0]= (h >> 16)-128; vv[1] = ((h >> 8) & 255)-128; vv[2] = 26; // balance constant, a normal is always pointing upwards, Basis.Normalize(vv); var m:Number = inc*(cx * vv[0] + cy * vv[1] + cz * vv[2]); // cos(lightangle) r = (p >> 16) & 255; g = (p >> 8) & 255; b = p & 255; r = Math.max(0,Math.min(255, r * m)); g = Math.max(0,Math.min(255, g * m)); b = Math.max(0,Math.min(255, b * m)); branchBitmap.setPixel(j, i, 0x10000 * r + 0x100 * g + b); } branchBitmap.applyFilter(branchBitmap, branchBitmap.rect, P0,bf); // should be here, without blurring it's liney hm = new BitmapData(192, 512, false); hm.copyPixels(branchBitmap, new Rectangle(160, 0, 192, 512), P0); branchBitmap = hm; } “Basis” is a helper class for vectors a la Vector3D, but since the code was written then under Flash 10.1, there were no such vectors there yet, or I preferred to make my own bike. The texture under the branch with leaves was drawn as follows: first, one sheet was made, then it was determined whether the branches would have a central sheet, this determined the length of a piece of the branch to which the leaves were attached, then by the calculated width of the sheet they were attached (drawn on the texture) at an angle to the branch . The leaf shape was set as a distorted circle with several anchor points offset from the circle with a radius of half a sheet, and the length of the cutting was set separately, all this was drawn on the leaf texture in black and white and remained for future. (More precisely, the texture “branch with leaves” was two, one for the ends, i.e., branches that do not grow from the “end”, but they are with leaves, a sheet was painted on it at the end of the branch, the second for “middle "Without end sheet.)
Further the most difficult - how the tree will look? Here I thought for a long time and experimented. I decided to make the tree really grow - the branches stretch out in length (they actually grow from the end), sometimes they spawn branches to the side, the branches stretch towards the sun (upwards) and a couple of conditions. It turned out a terrible mess, the best option, which was able to share, looked like this:
(Oddly enough, diary.ru is a great photo hosting site, so far nothing is rotten!)
I came to the conclusion that you need to somehow reduce the density of the branches. At first, the idea was to limit them gravitationally - i.e. too "heavy" branches just break off and fall. He began to count the moment of force on the bend, comparing it with the strength of the tree (from somewhere he dragged the values, scored as constants and began to test) - it turned out badly, sometimes the trunk broke, even despite the fact that it should not, and the tree safely bent , sometimes at first one large branch broke, the result led to imbalance of the trunk and it broke again, this time due to the loss of vertical balance, and sometimes the branch, quite normal in structure, grew in thickness, first progressed under its weight, then broke down if nothing in it is no longer grew. Scored, because the challenge was deadline.
The second attempt was to limit both the growth of new branches and the survival of old / previous ones with the help of lighting. From the third attempt of implementation (the first two remained in the form of commented functions) it turned out like this: I built a three-dimensional voxel grid with a side of 0.5 meters (yep, all values were in meters and kilograms - I really wanted real physics for a real forest), which was filled initially with zeros, then when walking around a tree, each branch contributed to filling the grid in the form of its volume divided by one or two voxels. The fact is that all the branches (in any case, almost all) as separate pieces of the calculated framework were shorter than 0.5m, which made it possible to use a rough approximation. In addition to filling, each branch “cast a shadow” on the underlying voxels in the form of additional filling of voxels under and slightly around the voxel with a branch (the final form is a square pyramid, but it didn’t bother with the circle but it was no longer illumination). This grid was used as a limiter, if one of the branches starts to grow in the middle of the tree - it will have less light there, it will be shorter and may not grow at all or die from a lack of lighting. Dead branches then fell off.
Such an option allowed to get relatively transparent when viewed and relatively compact in terms of the scope of the trees, the first working version looked like this:
In this version, I also debugged the growth mechanism of the tree itself, and the tree could be viewed from all sides. The tree was drawn one branch at a time, the array of branches was first sorted by distance from the observer, as in the old good VMK course on three-dimensional graphics from 1996, I chose the colors for drawing from the HSB range for each call “draw me a tree” for each call so that the forest was not monotonous, the skeleton of the tree was also randomly turned for drawing. The total tree models for drawing were from six to eight, each grew under its own RNG-influence, the landscape of the earth set another pearl noise, and the place where the tree was grown was chosen randomly using a set of ranges of allowed points for growth on the side moving distance observer. If the tree was planted at point A, and the radius of the tree R selected for “growing”, then the values (AR, A + R) became forbidden for growth at the current distance, during the transition to the next (-0.05) this interval decreased by 0.1, and was removed when reduced to zero.
The last (and in fact the first and immediately accounted for) nuance of this whole algorithm is VERY LONG. To get around an “adult” tree, it takes a few seconds to draw, a few more to draw the textures of one tree, goes from half a second to two, and Adobe Flash is not designed for such long intervals of calculations without refreshing the screen (more precisely, without returning control to the engine) . Consequently, we needed an algorithm that is able to maintain state between calls, continue working from the place where it was interrupted and monitor its execution time, and at the same time not panic itself and prevent panic from flashing. The state saving was implemented as a pair of properties of the Main class, splitting into stages by selecting the functions “grow a tree once”, “draw a finished tree” and “draw a piece of earth” and measure the time spent, respectively, as soon as another “once” for a tree it took more than a few seconds, the tree was considered “ready” and set aside. It turned out three large phases: the creation of textures, the "cultivation" of trees, the placement of finished trees on the screen.
The result looks like this:
You can play here . Optimized (more precisely, written) under Flash 10.1, taking into account heaps of flash updates in terms of security, can be terribly slow - in this case I advise you to download the debug version of Adobe Flash Player 11.5 and open it offline. The whole drawing takes 5-6 minutes, after the first two on the screen some movement begins to occur, which may be interesting to watch. After the drawing is completed, you can press Ctrl + click to save the result as a quad-size PNG file compared to the size window.
Source: https://habr.com/ru/post/429256/
All Articles