Creating a game "Like coins" on Godot Engine. Part 1
"Godot Engine" is developing very fast and winning the hearts of game developers from around the world. Perhaps this is the most friendly and easy-to-learn tool for creating games, and to make sure of this, we will try to make a small 2D game. For a good understanding of the game development process, you should start with 2D games - this will reduce the threshold for entering a more serious game development. Although the transition to 3D itself is not as difficult as it may seem, because most of the functions in Godot Engine can be successfully used in both 2D and 3D.
Introduction
The simplest thing you can think of is a game in which our main character will collect coins. To complicate it a bit, let's add an obstacle and time as a limiting factor. The game will have 3 scenes: Player , Coin and HUD (not covered in this article), which will be combined into one Main scene.

Project Settings
Before you dive into writing scripts (scripts), which is about 80-90% of the total time spent on creating the game, the first thing to do is to set up our future project. In large projects, it is useful to create separate folders for storing scenarios, scenes, images and sounds, and we should definitely take note of this, because who knows what end result we will come to.
I want to make a reservation right away that this article implies that you are a little familiar with the "Godot Engine" and that you have some knowledge and skills to use this tool, although I will be guided by the fact that you are encountering "Godot Engine" for the first time, I am still I advise you to start to get acquainted with the basic component of the engine, study the syntax of GDScript and come to an understanding of the terminology used (nodes, scenes, signals, etc.), and then return here and continue acquaintance.
In the program menu go to Project -> Project Settings .
Another small digression. I will always give examples based on the fact that the end user uses the English interface of the engine, despite the fact that in "Godot Engine" there is support for the Russian language. This is done in order to get rid of possible misunderstandings or embarrassments associated with the incorrect / inaccurate translation of certain elements of the program interface.
We find the section Display/Window and set the width - 800 , and the height - 600 . Also in this section you should set Stretch/Mode to 2D , and Aspect to Keep . This will prevent stretching and deformation of the contents of the window when it is resized, but in order to prohibit resizing the window, simply uncheck the Resizable box. I advise you to play with these options.
Now go to the Rendering/Quality section and turn on Use Pixel Snap in the right pane. What is it for? The coordinates of the vectors in Godot Engine are floating point numbers. Since objects cannot be drawn only half a pixel, this discrepancy can cause visual defects for games where pixelart used. And it is worth noting that in 3D this parameter is useless. Keep this in mind.
Scene "Player"
Let's start creating the first scene - Player .
The advantage of any scene is that initially they are independent of other parts of the game, and this makes it possible to freely test them and get the result that was originally incorporated into them. In general, dividing game objects into scenes is a useful tool in creating complex games - it is easier to catch mistakes, make changes to the scene itself, without affecting other parts of the game, they can also serve as templates for other games and they will definitely work exactly , as worked before the transfer.
Creating a scene is a trivially simple action - on the Scene tab, click + (Add / Create) and select the Area2D node and immediately change its name not to be confused. This is our parent node, and in order to extend the functionality, you need to add child nodes. In our case, these are AnimatedSprite and CollisionShape2D , but let's not hurry, but start in order. Then you should immediately "lock" the root node:

If the shape of the body collision (CollisionShape2D) or the sprite (AnimatedSprite) is displaced, stretched relative to the parent node, this will definitely lead to unexpected errors and subsequently it will be difficult to correct them. With this option enabled, the "parent" and all his "children" will always move together. It sounds ridiculous, but using this feature is extremely useful.
AnimatedSprite
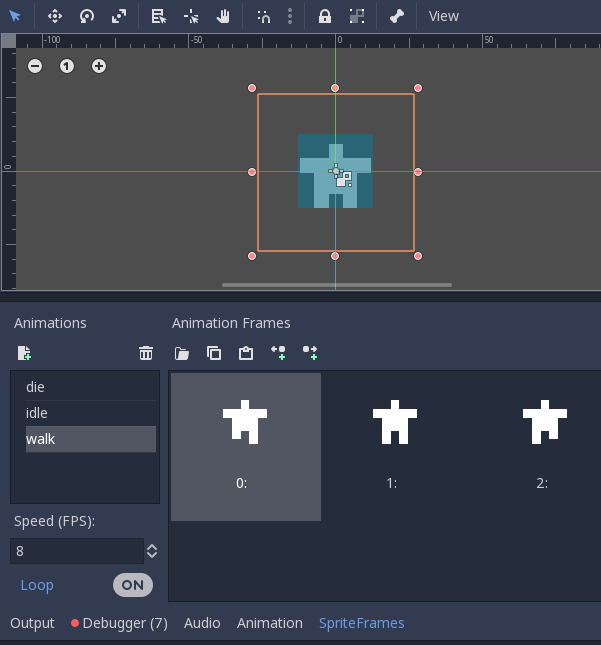
Area2D very useful node if you need to know about the overlap event with other objects or about their collision, but by itself it is invisible to the eye and to make the Player object visible, add an AnimatedSprite . The name of the node suggests that we will deal with animation and sprites. In the Inspector window, go to the Frames parameter and create a new SpriteFrames . Working with the SpriteFrames panel is to create the necessary animations and download the corresponding sprites to them. We will not analyze in detail all the stages of creating animations, leaving it to independent study, I will just say that we should have three animations: walk ( walk animation), idle (rest) and die (death or failure animation). Do not forget the value of SPEED (FPS) should be equal to 8 (although you can choose another value - the appropriate one).
CollisionShape2D
In order for Area2D to detect collisions, it is necessary to provide it with an object shape. Shapes are defined by the Shape2D parameter and include rectangles, circles, polygons and other more complex shape types, and the dimensions are already edited in the editor itself, but you can always use the Inspector for more precise settings.
Scenarios
Now, in order to “revive” our game object, you need to set a script for it, according to which the actions specified in this scenario will be carried out. In the Scene tab, create a script, leave the default settings, erase all comments (lines starting with the '#' sign) and proceed to declaring variables:
export (int) var speed var velocity = Vector2() var window_size = Vector2(800, 600) Using the export keyword allows you to set the speed variable in the Inspector panel window. This is a very useful method if we want to get custom values that are convenient to edit in the Inspector window. Set the Speed to 350 . The velocity value will determine the direction of movement, and window_size will define the area that limits the player’s movement.
The further order of our actions is as follows: use the get_input() function to check whether keyboard input is made. Then we move the object according to the keys pressed and then play the animation. The player will move in four directions. By default, in Godot Engine there are events assigned to the arrow keys ( Project -> Project Settings -> Input Map ), so we can apply them to our project. To find out if a key is pressed, use Input.is_action_pressed() by slipping to it the name of the event that we want to track.
func get_input(): velocity = Vector2() if Input.is_action_pressed("ui_left"): velocity.x -= 1 if Input.is_action_pressed("ui_right"): velocity.x += 1 if Input.is_action_pressed("ui_up"): velocity.y -= 1 if Input.is_action_pressed("ui_down"): velocity.y += 1 if velocity.length() > 0: velocity = velocity.normalized() * speed At first glance, everything looks good, but there is one small nuance. The combination of several keystrokes (for example, down and left) will cause the addition of vectors and in this case the player will move faster than if he just moved down. To avoid this, we will use the method normalized() - it will return the length of the vector to 1 .
So, the keystroke events were tracked, now we need to move the Player object. The _process() function will help us in this, which is called every time a frame is changed, so it is advisable to use it for those objects that will change frequently.
func _process(delta): get_input() position += velocity * delta position.x = clamp(position.x, 0, window_size.x) position.y = clamp(position.y, 0, window_size.y) I hope you notice the delta parameter, which in turn is multiplied by the speed. It is necessary to give an explanation of what it is. The game engine is initially configured to work at a speed of 60 frames per second. However, there may be situations when the computer, or the "Godot Engine" itself, slows down. If the frame rate is not coordinated (the time for which the frames are replaced), this will affect the “smoothness” of movement of game objects (as a result, the movement is “jerky”). "Godot Engine" solves this problem (like most similar engines) by entering the variable delta - it gives the value for which the frames were replaced. Thanks to these values, you can "align" the movement. Pay attention to another noteworthy function - clamp (returns a value within two specified parameters), thanks to it we have the ability to limit the area in which the Player can move, simply by setting the minimum and maximum value of the area.
Do not forget to animate our object. Please note that when an object moves to the right, you need to flip the AnimatedSprite (using flip_h ) and our hero will look in that direction to where he is moving. Make sure that the Playing parameter is enabled in AnimatedSprite so that the animation starts playing.
if velocity.length() > 0: $AnimatedSprite.animation = "walk" $AnimatedSprite.flip_h = velocity.x < 0 else: $AnimatedSprite.animation = "idle" Birth and death
When starting the game, the main scene needs to inform the key scenes about the readiness to start a new game, in our case, inform the Player object about the start of the game and set initial parameters for it: appearance position, default animation, run set_process .
func start(pos): set_process(true) # Vector2(x, y) position = pos $AnimatedSprite.animation = "idle" We will also provide for the player’s death event when the time runs out or the player stumbles upon an obstacle, and setting set_process (false) will cause the _process () function to no longer be executed for this scene.
func die(): $AnimatedSprite.animation = "die" set_process(false) Adding collisions
It was the turn to make the player detect collisions with coins and obstacles. The easiest way to do this is with the help of signals. Signals are a great way to send a message so that other nodes can detect and respond to them. Most nodes already have built-in signals, but it is possible to define "custom" signals for your own purposes. Signals are added if you declare them, at the beginning of the script:
signal pickup signal die Review the list of signals in the Inspector window ( Node tab), and pay attention to our signals, and signals that already exist. Now we are interested in area_entered () , it assumes that the objects with which the collision will occur also have the type Area2D . We connect the area_entered () signal using the Connect button, and in the Connect Signal window, select the highlighted node (Player), and leave everything else as default.
func _on_Player_area_entered( area ): if area.is_in_group("coins"): # emit_signal("pickup") area.pickup() In order for objects to be easily detected and interact with them, they need to be defined in appropriate groups. The creation of the groups themselves is now omitted, but we will definitely return to them later. The pickup() function determines the behavior of a coin (for example, it can play an animation or sound, delete an object, etc.).
Scene "Coin"
When creating a scene with one coin, you need to do everything that we have done with the "Player" scene, except that in AnimatedSprite will be only one animation (highlight). Speed (FPS) can be increased to 14 . Another change the scale AnimatedSprite - 0,5, 0,5 . And the dimensions of CollisionShape2D should correspond to the image of the coin, the main thing is not to scale it, namely, change the size using the appropriate markers on the form in the 2D editor, which
adjusts the radius of the circle.

Groups are a kind of labeling node that allows you to identify similar nodes. In order for the Player object to react to touch with coins, the coins must belong to the group, let's call it coins . Select the Area2D node (with the name "Coin") and in the Node -> Groups tab Node -> Groups assign a tag to it, creating the corresponding group.

For Coin nodes we create a script. The pickup() function will be called by the Player object's script and will tell the coin what to do when it worked. The queue_free() method will safely remove a node from the tree with all its child nodes and clear the memory, but the deletion will not work immediately, it will first be moved to the queue to be deleted at the end of the current frame. It is much safer than deleting the node immediately, because other "participants" (nodes or scenes) in the game may still need the existence of this node.
func pickup (): queue_free () Conclusion
Now we can create the Main scene, drag and drop both scenes into the 2D editor: Player and Coin , and check how the player’s movement and contact with the coin work by running the scene (F5). Well, I hurry to say that the first part of the creation of the game "Like Coins" is over, let me take my leave and thank everyone for their attention. If you have something to say, add material or you see errors in the article - be sure to report this by writing a comment below. Do not be afraid to be tough and critical. Your "reverse response" will tell you whether I am moving in the right direction and what can be corrected so that the material is even more interesting and useful.
')
Source: https://habr.com/ru/post/429234/
All Articles