Block system encryption of Windows Linux installed systems. Encrypted multiboot. Defense and attack on GRUB2

Cowboy strategy:
[A] block system encryption of Windows 7 installed system;
[B] GNU / Linux (Debian) block system encryption of the installed system (including / boot) ;
[C] GRUB2 setting, bootloader protection with digital signature, authentication protection;
[D] sweep - destroy unencrypted data;
[E] Universal backup of encrypted OS;
[F] attack <on item [C]> on the GRUB2 bootloader;
[G] useful documentation.
───Schema # rooms 40 # <BIOS / MBR / 1HDD without lvm>:
╼──╼ encryption is not hidden;
╼──╼ Windows 7 installed - full system encryption;
╼──╼ GNU / Linux installed (Debian and derived distributions) - full system encryption (/, including / boot; swap) ;
╼──╼ Independent loaders: VeraCrypt is installed in the MBR, GRUB2 is installed in the extended partition;
╼──╼ OS installation / reinstallation is not required;
──╼ used cryptographic software: VeraCrypt, Cryptsetup, GnuPG, Seahorse, GRUB2 - free / free.
')
The above scheme partially solves the problem of “remote boot to a flash drive”, allows you to enjoy encrypted Windows / Linux and exchange data via an “encrypted channel” from one OS to another.
PC boot order:
- turning on the machine;
- boot loader VeraCrypt (correct password will continue loading Windows 7) ;
- pressing the “Esc” key will load the GRUB2 bootloader;
- GRUB2 boot loader (choice of distribution / GNU / Linux / CLI) , requires authentication of the GRUB2-superuser <login / password>;
- after successful authentication and distribution selection, you will need to enter a password phrase to unlock "/boot/initrd.img";
- after entering error-free passwords in GRUB2, you will need to enter a password (third password, BIOS password or GNU / Linux user account password to unlock ) and unlock the GNU / Linux OS, or automatically substitute the secret key (two passwords + key) ;
- external invasion of the GRUB2 configuration will freeze the GNU / Linux boot process.
When partitioning a hard disk (MBR table), a PC can have no more than 4 main partitions, or 3 main and one extended partitions, as well as an unlabeled area. An extended partition, unlike the main one, can contain subsections (logical drives = extended partition) . In other words, the “extended partition” on the HDD replaces LVM for the current task: full system encryption. If your disk is mapped to 4 main partitions, you need to use lvm, either transform (with formatting) the section from main to extended, or competently use all four sections and leave everything as it is, getting the desired result. Even if you have one partition on the disk, Gparted will help to split the HDD (into additional sections) without losing data, but still with a small price to pay for such actions.
The layout of the hard disk, for which the verbalization of the entire article will go, is presented in the table below.
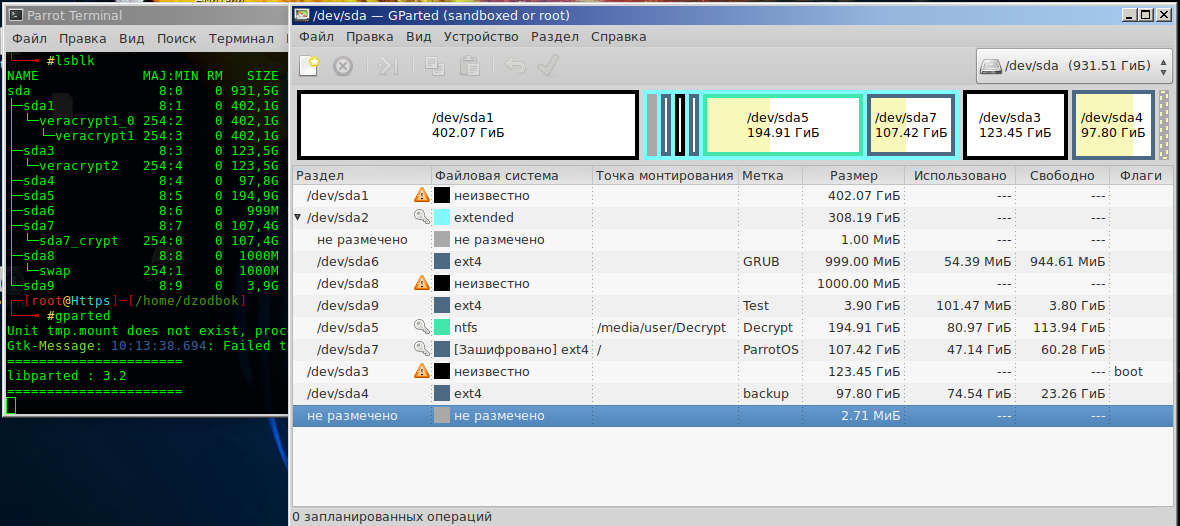
Table (№ 1) sections 1Tb.
Something similar should be with you.
Sda1 - the main section number 1 NTFS (encrypted) ;
sda2 - extended marker section;
sda6 - logical drive (GRUB2 boot loader is installed on it);
sda8 - swap (encrypted paging file);
sda9 - test logical drive;
sda5 - logical disk for the curious;
sda7 - GNU / Linux OS (transferred OS to an encrypted logical drive);
sda3 - the main section number 2 with Windows 7 (encrypted) ;
sda4 - the main section number 3 (it was located unencrypted GNU / Linux, used for backup) .
[A] Block system encryption Windows 7
A1. Veracrypt
Downloading from the official site , or from the sourceforge mirror, the installation version of the VeraCrypt cryptographic software (at the time of publishing the article v1.23, the portable version of VeraCrypt is not suitable for system encryption) . Check the checksum of the loaded software.
and compare the result with the laid out COP on the VeraCrypt developer site.
If the HashTab software is installed, it is even simpler: PCM (VeraCrypt Setup 1.23.exe) -properties hash of the sum of files.
To verify the program signature, gnuPG software must be installed in the system; gpg4win
Downloading from the official site , or from the sourceforge mirror, the installation version of the VeraCrypt cryptographic software (at the time of publishing the article v1.23, the portable version of VeraCrypt is not suitable for system encryption) . Check the checksum of the loaded software.
$ Certutil -hashfile "C:\VeraCrypt Setup 1.23.exe" SHA256and compare the result with the laid out COP on the VeraCrypt developer site.
If the HashTab software is installed, it is even simpler: PCM (VeraCrypt Setup 1.23.exe) -properties hash of the sum of files.
To verify the program signature, gnuPG software must be installed in the system; gpg4win
A2. Installing / launching VeraCrypt software with administrator rights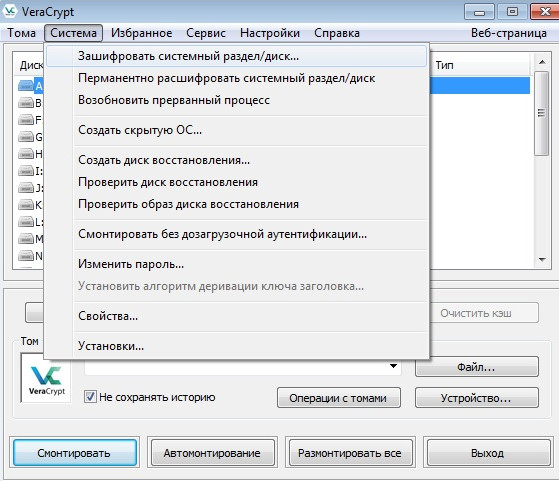
A3. Selection of parameters for system encryption of the active partition
VeraCrypt - System - Encrypt system partition / disk - Normal - Encrypt Windows system partition - Multiboot - (warning: "For inexperienced users not recommended to use this method" and this is true, agree "Yes") - Boot disk ("yes", even if not so, all the same "yes") - The number of system disks "2 or more" - Multiple systems on one disk "Yes" - Not Windows bootloader "No" (in fact "Yes", but VeraCrypt / GRUB2 loaders will not divide the MBR between more specifically, only the smallest part of the bootloader code is stored in the MBR / boot path, naya part is located within the file system) - Multiboot - Configure encryption options ...
If you deviate from the above steps ( block system encryption scheme) , then VeraCrypt will roll out a warning and will not allow you to encrypt the partition.
In the next step, to targeted data protection, conduct a “Test” and choose an encryption algorithm. If you have an out of date CPU, then the Twofish encryption algorithm is likely to be the fastest. If the CPU is powerful, note the difference: AES - encryption on the test results will be several times faster than its crypto competitors. AES is a popular encryption algorithm, the hardware of modern CPUs is specially optimized for the “secret”and for “hacking ”.
VeraCrypt supports the ability to encrypt disks in a cascade of AES (Twofish) / and other combinations. On a 2-core Intel 2.20GHz CPU a decade ago (without hardware support for AES, A / T cascade encryption), performance degradation is almost imperceptible. (AMD CPU of the same era / ~ parameters — performance is slightly reduced) . The OS works in dynamics and the consumption of resources for transparent encryption is imperceptible. Unlike, for example, a noticeable decrease in performance due to the installed test unstable desktop environment Mate v1.20.1 (or v1.20.2 I do not remember exactly) in GNU / Linux, or because of the work of the telemetry subroutine in Windows7. Usually sophisticated users perform hardware performance tests before encryption. For example, in Aida64 / Sysbench / systemd-analyze and compared with the results of the same tests after the system is encrypted, thereby refuting the myth for itself, "system encryption is harmful." The slowdown of the machine and the inconvenience are noticeable when backing up / restoring encrypted data, because the “system backup data” operation itself is not measured in ms, and those <decrypt / encrypt on the fly> are added. In the end, each user chooses an encryption algorithm regarding the satisfaction of the tasks set and the degree of his paranoia.
It is better to leave the PIM parameter by default so that when booting the OS each time you do not enter exact iteration values. VeraCrypt uses a huge number of iterations to create a truly “slow hash”. An attack on such a “cryptulite” by the Brute force method / rainbow tables makes sense only with ashort “simple” passphrase and a personal charset-list of the victim. Paying for password strength is a delay in correctly entering a password when booting the OS (mounting VeraCrypt volumes in GNU / Linux is much faster).
Free software for implementing brute force attacks (extracting a passphrase from the header of a VeraCrypt / LUKS drive) Hashcat and John the Ripper, the latter does not know how to work with Twofish for example.
Due to the cryptographic strength of the encryption algorithms, unstoppable crypto-punkers are developing software with a different attack vector. For example, extracting metadata / keys from RAM (cold boot attack / DMA), there is specialized free and non-free software for this purpose.
Upon completion of setting / generating “unique metadata” of the encrypted active partition, VeraCrypt will offer to restart the PC and test the performance of its bootloader. After reboot a / start Windows, VeraCrypt will load in standby mode, it remains only to confirm the encryption process - Y.
At the final step of system encryption, VeraCrypt will offer to create a backup copy of the header of the active encrypted partition in the form of “veracrypt rescue disk.iso” - it is necessary to make - in this software such an operation is a requirement (in LUKS, the requirement is unfortunately omitted but underlined in the documentation) . Rescue disk is useful to all, and to someone, and not once. The loss (header / MBR rewrite) of the header backup will permanently deny access to the decrypted partition from the Windows OS.
If you deviate from the above steps ( block system encryption scheme) , then VeraCrypt will roll out a warning and will not allow you to encrypt the partition.
In the next step, to targeted data protection, conduct a “Test” and choose an encryption algorithm. If you have an out of date CPU, then the Twofish encryption algorithm is likely to be the fastest. If the CPU is powerful, note the difference: AES - encryption on the test results will be several times faster than its crypto competitors. AES is a popular encryption algorithm, the hardware of modern CPUs is specially optimized for the “secret”
VeraCrypt supports the ability to encrypt disks in a cascade of AES (Twofish) / and other combinations. On a 2-core Intel 2.20GHz CPU a decade ago (without hardware support for AES, A / T cascade encryption), performance degradation is almost imperceptible. (AMD CPU of the same era / ~ parameters — performance is slightly reduced) . The OS works in dynamics and the consumption of resources for transparent encryption is imperceptible. Unlike, for example, a noticeable decrease in performance due to the installed test unstable desktop environment Mate v1.20.1 (or v1.20.2 I do not remember exactly) in GNU / Linux, or because of the work of the telemetry subroutine in Windows7. Usually sophisticated users perform hardware performance tests before encryption. For example, in Aida64 / Sysbench / systemd-analyze and compared with the results of the same tests after the system is encrypted, thereby refuting the myth for itself, "system encryption is harmful." The slowdown of the machine and the inconvenience are noticeable when backing up / restoring encrypted data, because the “system backup data” operation itself is not measured in ms, and those <decrypt / encrypt on the fly> are added. In the end, each user chooses an encryption algorithm regarding the satisfaction of the tasks set and the degree of his paranoia.
It is better to leave the PIM parameter by default so that when booting the OS each time you do not enter exact iteration values. VeraCrypt uses a huge number of iterations to create a truly “slow hash”. An attack on such a “cryptulite” by the Brute force method / rainbow tables makes sense only with a
Free software for implementing brute force attacks (extracting a passphrase from the header of a VeraCrypt / LUKS drive) Hashcat and John the Ripper, the latter does not know how to work with Twofish for example.
Due to the cryptographic strength of the encryption algorithms, unstoppable crypto-punkers are developing software with a different attack vector. For example, extracting metadata / keys from RAM (cold boot attack / DMA), there is specialized free and non-free software for this purpose.
Upon completion of setting / generating “unique metadata” of the encrypted active partition, VeraCrypt will offer to restart the PC and test the performance of its bootloader. After reboot a / start Windows, VeraCrypt will load in standby mode, it remains only to confirm the encryption process - Y.
At the final step of system encryption, VeraCrypt will offer to create a backup copy of the header of the active encrypted partition in the form of “veracrypt rescue disk.iso” - it is necessary to make - in this software such an operation is a requirement (in LUKS, the requirement is unfortunately omitted but underlined in the documentation) . Rescue disk is useful to all, and to someone, and not once. The loss (header / MBR rewrite) of the header backup will permanently deny access to the decrypted partition from the Windows OS.
A4. Creating a rescue disk VeraCrypt
By default, VeraCrypt offers to burn “metadata ~ 2-3MB” on a CD, but not all people have disks or DWD-ROM drives, and creating a bootable “VeraCrypt Rescue disk” flash drive for someone will be a technical surprise: Rufus / GUIdd-ROSA ImageWriter and other similar software will not be able to cope with the task, because in addition to copying the displaced metadata to the bootable flash drive, you need to copy / paste from the image outside the file system of the USB drive, in short, correctly copy the MBR / road to trinket. Under the GNU / Linux OS, you can create a bootable flash drive using the dd utility, looking at this table.
Creating a rescue disk in the Windows environment - otherwise. The developer VeraCrypt did not include the solution to this problem in the official documentation on the "rescue disk", but suggested a solution in another way: he put additional software to create the "usb rescue disk" in free access on his forum VeraCrypt. The archivist of this software for Windows is “ creating a usb veracrypt rescue disk ”. After saving the rescue disk.iso, the block system encryption process of the active partition will begin. During encryption, the OS does not stop, no restart of the PC is required. Upon completion of the encryption operation, the active partition becomes fully encrypted, you can use it. If the VeraCrypt loader does not appear when the PC starts up, and the header recovery operation does not help, then check the “boot” flag, it should be installed on the partition where Windows is present (regardless of encryption and other OS, see table 1).
This completes the description of block system encryption with Windows OS.
[B] LUKS. Encryption GNU / Linux (~ Debian) installed OS. Algorithm and Steps
In order to encrypt the installed Debian / derived distribution, you need to map the prepared partition to the virtual block device, transfer it to the mapped GNU / Linux disk, and install / configure GRUB2. If you do not have a bare server, and you value your time, then you need to use the GUI, and most of the terminal commands described below are meant to be driven in “Chuck-Norris mode”.
B1. Booting a PC from GNU / Linux live usb "
"To hold a cryptotest on the performance of iron"
lscpu && ryptsetup benchmark 
If you are a happy owner of a powerful AES-enabled car, then the numbers will look like the right side of the terminal, if you are happy, but with antique iron, the left side.
B2. Partitioning disk. mount / format fs logical disk HDD in Ext4 (Gparted)
B2.1. Creating an encrypted sda7 section header
Describe the names of the sections, hereinafter, I will agree with respect to its partition table, laid out above. According to your disk layout, you must substitute your partition names.
Comparison of disk drive encryption (/ dev / sda7> / dev / mapper / sda7_crypt).
# Simple creation of "LUKS-AES-XTS partition"
Options:
* luksFormat - initialize the LUKS header;
* -y - password phrase (not key / file);
* -v-verbalization (output information in the terminal);
* / dev / sda7 - your logical disk from the extended partition (where GNU / Linux transfer / encryption is planned) .
The default encryption algorithm is <L UKS1: aes-xts-plain64, Key: 256 bits, LUKS header hashing: sha256, RNG: / dev / urandom > (depends on the version of cryptsetup).
In the absence of AES hardware support on the CPU, the best choice would be to create an extended “LUKS-Twofish-XTS partition”.
Comparison of disk drive encryption (/ dev / sda7> / dev / mapper / sda7_crypt).
# Simple creation of "LUKS-AES-XTS partition"
cryptsetup -v -y luksFormat /dev/sda7 Options:
* luksFormat - initialize the LUKS header;
* -y - password phrase (not key / file);
* -v-verbalization (output information in the terminal);
* / dev / sda7 - your logical disk from the extended partition (where GNU / Linux transfer / encryption is planned) .
The default encryption algorithm is <L UKS1: aes-xts-plain64, Key: 256 bits, LUKS header hashing: sha256, RNG: / dev / urandom > (depends on the version of cryptsetup).
# default- cryptsetup --help # . In the absence of AES hardware support on the CPU, the best choice would be to create an extended “LUKS-Twofish-XTS partition”.
B2.2. Advanced creation of the “LUKS-Twofish-XTS-partition”
Options:
* luksFormat - initialize the LUKS header;
* / dev / sda7 your future encrypted logical drive;
* -v verbalization;
* -y password phrase;
* -c select data encryption algorithm;
* -s encryption key size;
* -h hash / crypto function, used by the RNG (--use-urandom) to generate a unique encryption / decryption key for the logical disk header, the secondary header key (XTS); a unique master key stored in an encrypted disk header, a secondary XTS key, all this metadata and an encryption routine that encrypts / decrypts any data on the partition (except for the section header) using the master key and the secondary XTS key disk.
* -i iterations in milliseconds, instead of “quantity” (the time delay in processing a passphrase affects the OS load and the cryptographic strength of the keys). To maintain a balance of cryptographic strength with a simple password of the “russian” type, it is required to increase the value - (i), with a complex password of the type “? 8dƱob / øfh” the value can be reduced.
* --use-urandom random number generator, generate keys and salt.
After mapping the sda7> sda7_crypt partition (the operation is fast, since an encrypted header with ~ 3 MB of metadata is created and that's it) , you need to format and mount the sda7_crypt file system.
cryptsetup luksFormat /dev/sda7 -v -y -c twofish-xts-plain64 -s 512 -h sha512 -i 1500 --use-urandom Options:
* luksFormat - initialize the LUKS header;
* / dev / sda7 your future encrypted logical drive;
* -v verbalization;
* -y password phrase;
* -c select data encryption algorithm;
* -s encryption key size;
* -h hash / crypto function, used by the RNG (--use-urandom) to generate a unique encryption / decryption key for the logical disk header, the secondary header key (XTS); a unique master key stored in an encrypted disk header, a secondary XTS key, all this metadata and an encryption routine that encrypts / decrypts any data on the partition (except for the section header) using the master key and the secondary XTS key disk.
* -i iterations in milliseconds, instead of “quantity” (the time delay in processing a passphrase affects the OS load and the cryptographic strength of the keys). To maintain a balance of cryptographic strength with a simple password of the “russian” type, it is required to increase the value - (i), with a complex password of the type “? 8dƱob / øfh” the value can be reduced.
* --use-urandom random number generator, generate keys and salt.
After mapping the sda7> sda7_crypt partition (the operation is fast, since an encrypted header with ~ 3 MB of metadata is created and that's it) , you need to format and mount the sda7_crypt file system.
B2.3. Matching
options:
* open -make the section "with the name";
* / dev / sda7 is a logical disk;
* sda7_crypt — mapping a name that is used to mount an encrypted partition or initialize it when the OS boots.
cryptsetup open /dev/sda7 sda7_crypt # . options:
* open -make the section "with the name";
* / dev / sda7 is a logical disk;
* sda7_crypt — mapping a name that is used to mount an encrypted partition or initialize it when the OS boots.
B2.4. Formatting the sda7_crypt file system in ext4. Mounting the drive in the OS
(Note: working with an encrypted partition will not work in Gparted)
options:
* -v-verbalization;
* -L-disk label (which is displayed in the Explorer among other disks).
Next, you should mount the virtual-encrypted block device / dev / sda7_crypt into the system
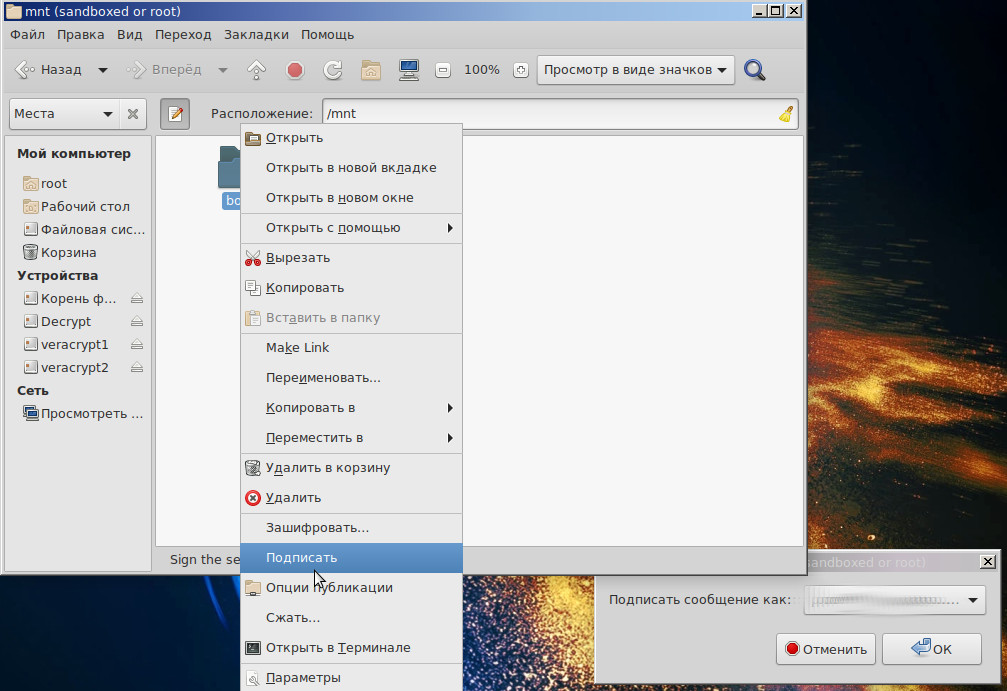
Working with files in the / mnt folder will automatically encrypt / decrypt data in sda7.
It is more convenient to map and mount a partition in the explorer (nautilus / caja GUI) , the partition will already be in the disk selection list, you only need to enter a passphrase for opening / decrypting the disk. The matching name will be selected automatically and not “sda7_crypt”, but something like / dev / mapper / Luks-xx-xx ...
# mkfs.ext4 -v -L DebSHIFR /dev/mapper/sda7_crypt options:
* -v-verbalization;
* -L-disk label (which is displayed in the Explorer among other disks).
Next, you should mount the virtual-encrypted block device / dev / sda7_crypt into the system
mount /dev/mapper/sda7_crypt /mnt Working with files in the / mnt folder will automatically encrypt / decrypt data in sda7.
It is more convenient to map and mount a partition in the explorer (nautilus / caja GUI) , the partition will already be in the disk selection list, you only need to enter a passphrase for opening / decrypting the disk. The matching name will be selected automatically and not “sda7_crypt”, but something like / dev / mapper / Luks-xx-xx ...
B2.5. Backup disc header (metadata ~ 3MB)
One of the most important operations that needs to be done without delay is a backup copy of the “sda7_crypt” header. If you overwrite / damage the header (for example, by installing GRUB2 in sda7 partition, etc.) , the encrypted data will be lost completely without any possibility to restore them, because it will not be possible to regenerate the same keys, the unique keys will be created.
options:
* luksHeaderBackup --header-backup-file-backup command;
* luksHeaderRestore --header-backup-file - restore command;
* ~ / Backup_DebSHIFR - backup file;
* / dev / sda7-partition whose backup copy of the encrypted disk header needs to be saved.
In this step, <create and edit an encrypted partition> is completed.
# cryptsetup luksHeaderBackup --header-backup-file ~/_DebSHIFR /dev/sda7 # cryptsetup luksHeaderRestore --header-backup-file <file> <device> options:
* luksHeaderBackup --header-backup-file-backup command;
* luksHeaderRestore --header-backup-file - restore command;
* ~ / Backup_DebSHIFR - backup file;
* / dev / sda7-partition whose backup copy of the encrypted disk header needs to be saved.
In this step, <create and edit an encrypted partition> is completed.
B3. Transferring the GNU / Linux OS (sda4) to an encrypted partition (sda7)
Create a folder / mnt2 (Note - we are still working with live usb, sda7_crypt is mounted at / mnt) , and we mount our GNU / Linux into / mnt2, which needs to be encrypted.
mkdir /mnt2 mount /dev/sda4 /mnt2 We carry out the correct transfer of the OS using the Rsync software
rsync -avH --progress /mnt2/ /mnt Rsync options are described in E1.
Next, you need to defragment the partition of the logical disk
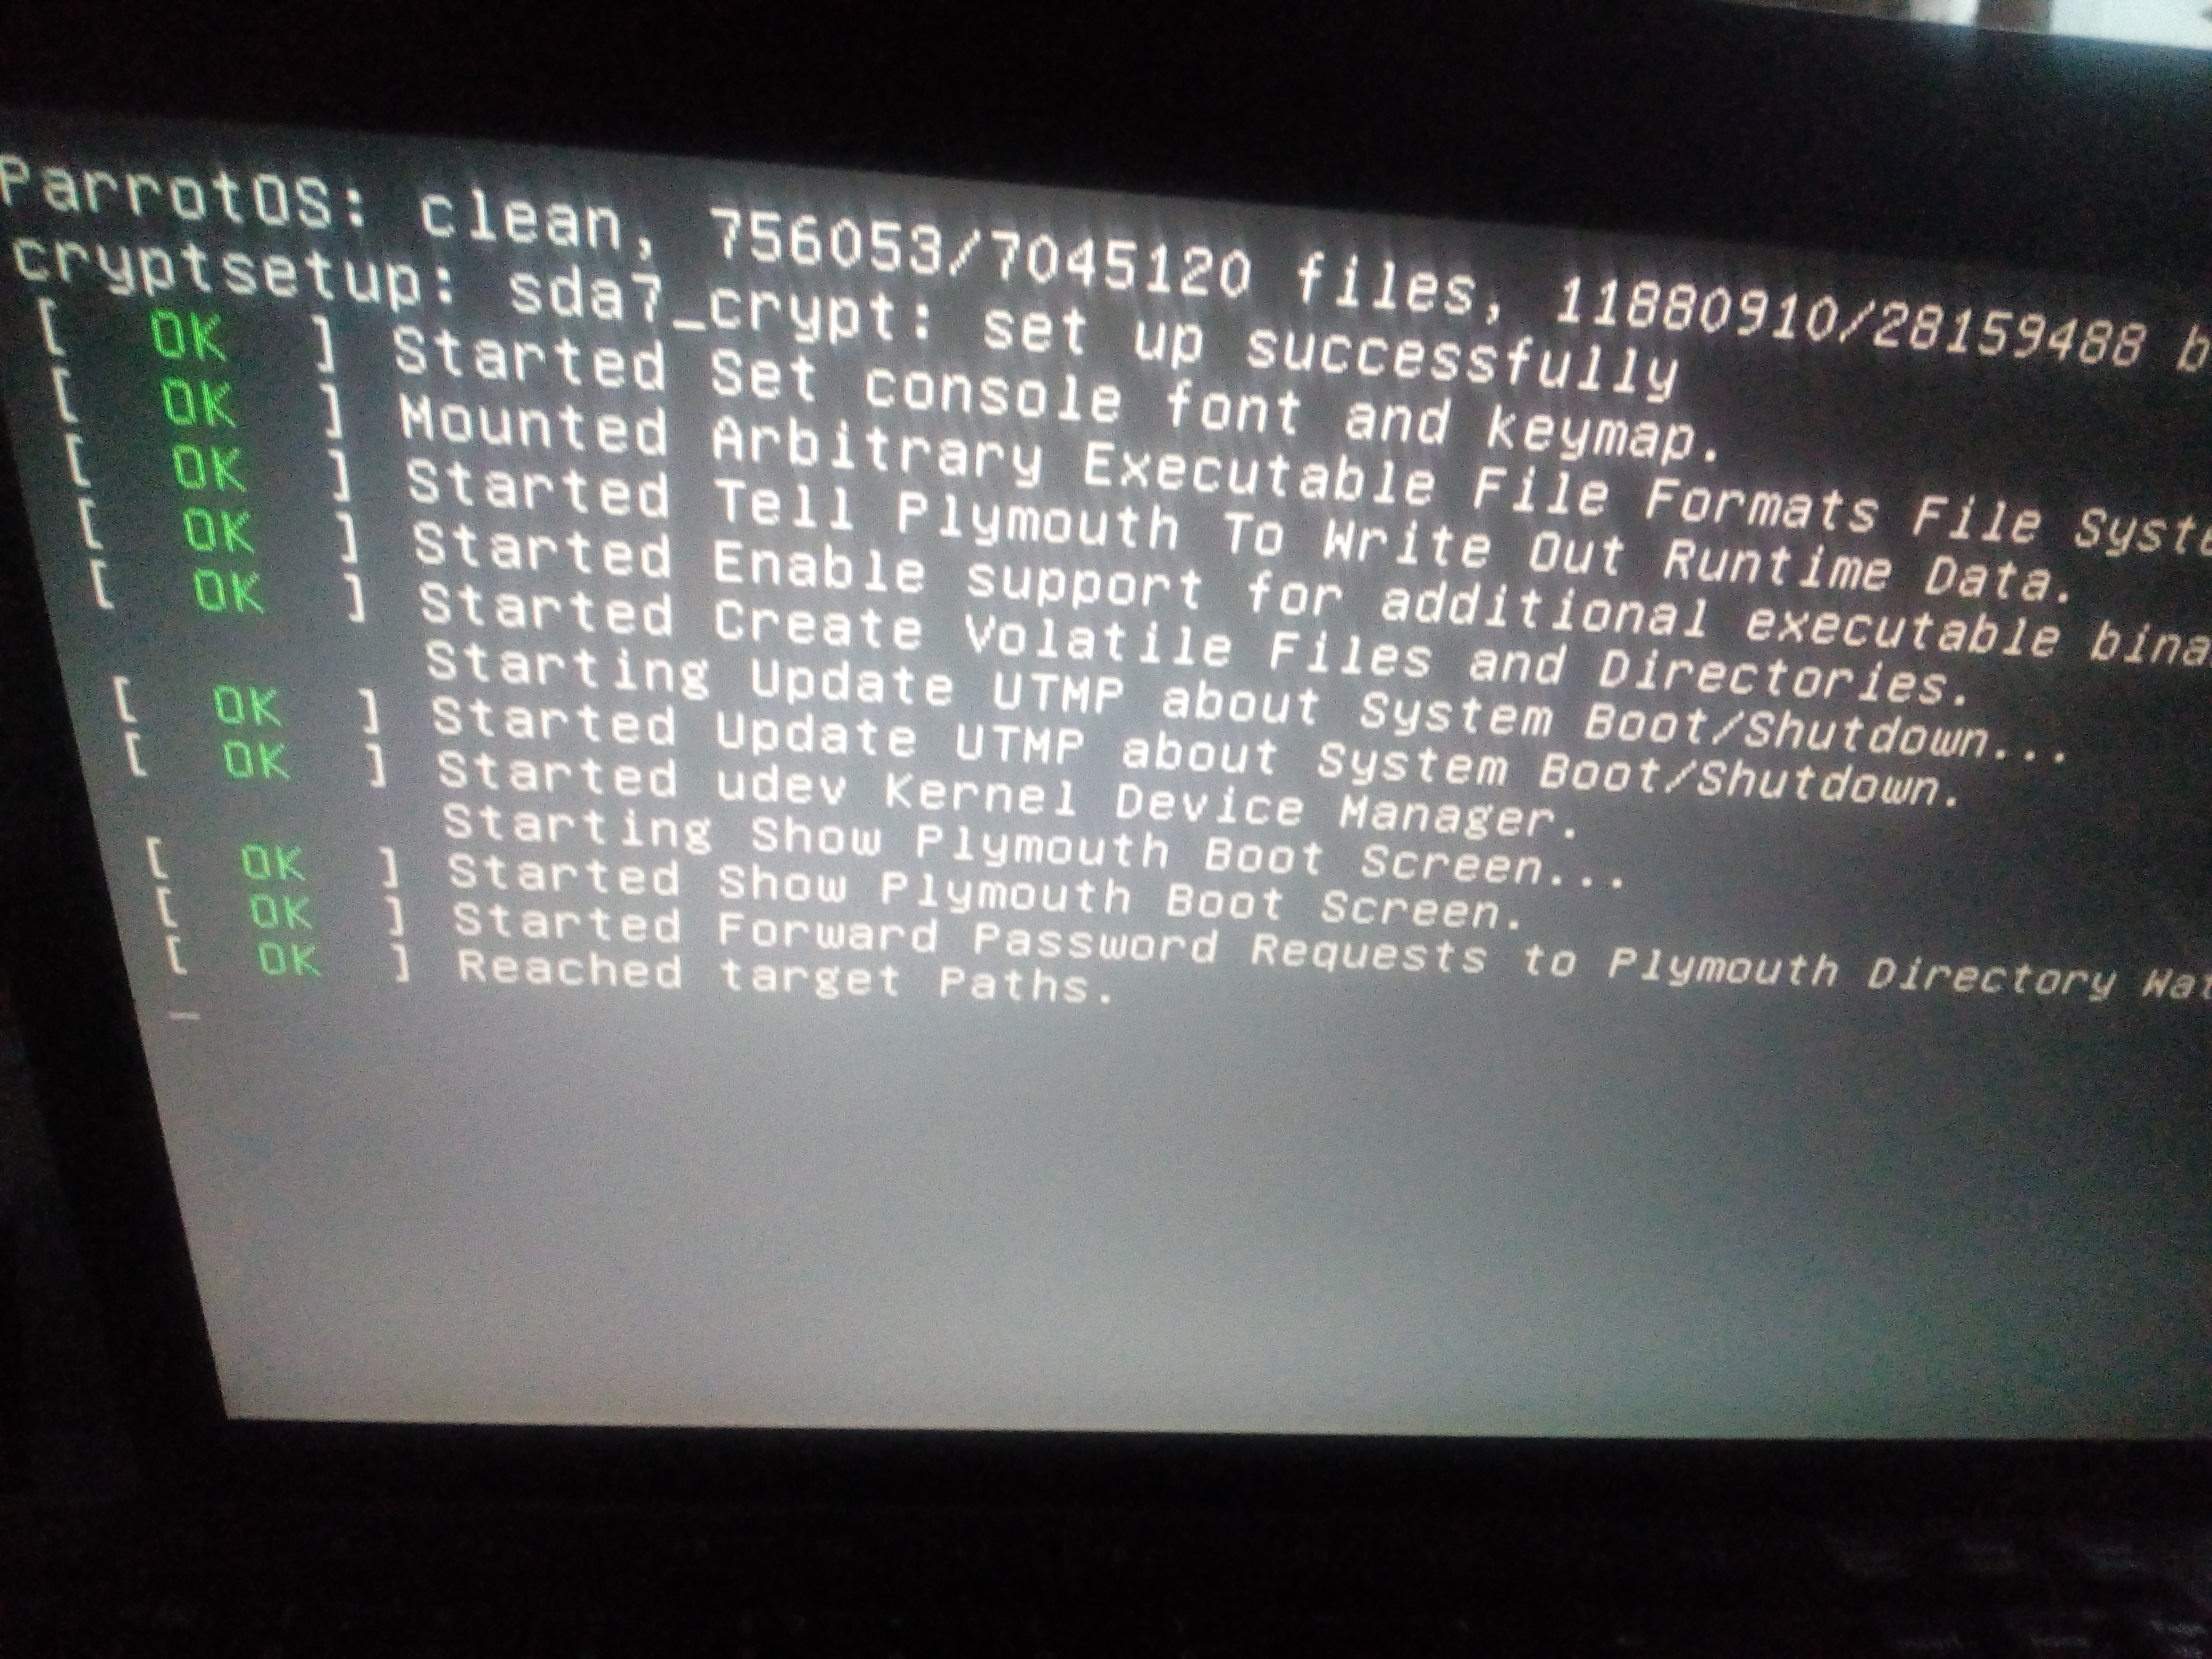
e4defrag -c /mnt/ # , e4defrag , ~"0", , ! e4defrag /mnt/ # GNU/Linux Migrating and synchronizing [GNU / Linux> GNU / Linux-encrypted] is completed in this step.
AT 4. Configuring GNU / Linux on an encrypted sda7 partition
After the successful transfer of the OS / dev / sda4> / dev / sda7, you need to enter GNU / Linux on the encrypted partition, and perform further configuration (without rebooting the PC) of the encrypted system. That is, to be in live usb, but to execute commands “relative to the root of the encrypted OS”. Simulate a similar situation will be "chroot". In order to promptly receive information from which OS you are currently working (encrypted or not, since the data in sda4 and sda7 are synchronized) , unsynchronize OSs. Create in the root directories (sda4 / sda7_crypt) empty marker files, for example, / mnt / encryptedOS and / mnt2 / decryptedOS. Quick check what OS you are in (including the future):
ls /<Tab-Tab> B4.1. "Simulation of the entrance to the encrypted OS"
mount --bind /dev /mnt/dev mount --bind /proc /mnt/proc mount --bind /sys /mnt/sys chroot /mnt B4.2. Verify that the operation is performed on an encrypted system.
ls /mnt<Tab-Tab> # "/" history # su . B4.3. Create / configure an encrypted swap (swap partition), edit crypttab / fstab
Since the paging file is formatted every time the OS starts, it does not make sense to create and match the swap with the logical disk now, and type the commands as in p. B2.2. For Swap, each time it starts, its temporary encryption keys will be automatically generated. Swap-a key life cycle: unmounting / disabling the swap partition (+ clearing the RAM) ; or restart the OS. Configuring swap, open the file responsible for the configuration of block encrypted devices (similar to the fstab file, but responsible for crypto).
rule
Options
* swap - the mapped name when encrypting / dev / mapper / swap.
* / dev / sda8 - use your logical partition under swap.
* / dev / urandom is the generator of random encryption keys for swap ( with each new OS load, new keys are created). The / dev / urandom generator is less random than / dev / random, after all / dev / random is used when working in dangerous paranoid circumstances. When booting the OS / dev / random, it slows down the boot for a few ± minutes (see systemd-analyze) .
* swap, cipher = twofish-xts-plain64, size = 512, hash = sha512: -partition knows that it is swap and is formatted "accordingly"; encryption algorithm.
rule
/ dev / mapper / swap is the name specified in crypttab.
The swap partition configuration is complete.
nano /etc/crypttab rule
# "Target name" "source device" "key file" "options"
swap / dev / sda8 / dev / urandom swap, cipher = twofish-xts-plain64, size = 512, hash = sha512
Options
* swap - the mapped name when encrypting / dev / mapper / swap.
* / dev / sda8 - use your logical partition under swap.
* / dev / urandom is the generator of random encryption keys for swap ( with each new OS load, new keys are created). The / dev / urandom generator is less random than / dev / random, after all / dev / random is used when working in dangerous paranoid circumstances. When booting the OS / dev / random, it slows down the boot for a few ± minutes (see systemd-analyze) .
* swap, cipher = twofish-xts-plain64, size = 512, hash = sha512: -partition knows that it is swap and is formatted "accordingly"; encryption algorithm.
# fstab nano /etc/fstab rule
# swap was on / dev / sda8 during installation
/ dev / mapper / swap none swap sw 0 0
/ dev / mapper / swap is the name specified in crypttab.
The swap partition configuration is complete.
B4.4. Configuring Encrypted GNU / Linux (editing crypttab / fstab files)
The / etc / crypttab file, as written above, describes encrypted block devices that are configured during system boot.
if the section sda7> sda7_crypt was mapped as in p. B2.1
if they mapped the sda7 section> sda7_crypt as in p. B2.2
if you mapped the sda7> sda7_crypt section as in p.2.1 or B2.2, but do not want to re-enter the password to unlock and boot the OS, then you can substitute the secret key / random file instead of the password
Description
* none - reports that when booting the OS, entering a secret passphrase is required to unlock the root.
* UUID is the partition ID. To find out your ID dial in the terminal (a reminder that all this time and further, you are working in the terminal in the chroot environment, and not in another live usb terminal).
This line can be seen when requesting blkid from the live usb terminal when sda7_crypt is mounted).
You take the UUID from your sdaX (not sdaX_crypt!, UUID sdaX_crypt - it will automatically go away when generating the grub.cfg config).
* cipher = twofish-xts-plain64, size = 512, hash = sha512 -luks encryption in advanced mode.
* / etc / skey is a secret key file that is automatically inserted to unlock the OS boot (instead of entering the 3rd password). You can specify any file up to 8MB, but data will be read <1MB.
It will look something like this:
/ etc / fstab contains descriptive information about various file systems.
option
* / dev / mapper / sda7_crypt - sda7 mapping name> sda7_crypt, which is specified in the / etc / crypttab file.
The crypttab / fstab configuration is complete.
# /etc/crypttab nano /etc/crypttab if the section sda7> sda7_crypt was mapped as in p. B2.1
# "Target name" "source device" "key file" "options"
sda7_crypt UUID = 81048598-5bb9-4a53-af92-f3f9e709e2f2 none luks
if they mapped the sda7 section> sda7_crypt as in p. B2.2
# "Target name" "source device" "key file" "options"
sda7_crypt UUID = 81048598-5bb9-4a53-af92-f3f9e709e2f2 none cipher = twofish-xts-plain64, size = 512, hash = sha512
if you mapped the sda7> sda7_crypt section as in p.2.1 or B2.2, but do not want to re-enter the password to unlock and boot the OS, then you can substitute the secret key / random file instead of the password
# "Target name" "source device" "key file" "options"
sda7_crypt UUID = 81048598-5bb9-4a53-af92-f3f9e709e2f2 / etc / skey luks
Description
* none - reports that when booting the OS, entering a secret passphrase is required to unlock the root.
* UUID is the partition ID. To find out your ID dial in the terminal (a reminder that all this time and further, you are working in the terminal in the chroot environment, and not in another live usb terminal).
fdisk -l # blkid # - / dev / sda7: UUID = "81048598-5bb9-4a53-af92-f3f9e709e2f2" TYPE = "crypto_LUKS" PARTUUID = "0332d73c-07"
/ dev / mapper / sda7_crypt: LABEL = "DebSHIFR" UUID = "382111a2-f993-403c-aa2e-292b5eac4780" TYPE = "ext4"
This line can be seen when requesting blkid from the live usb terminal when sda7_crypt is mounted).
You take the UUID from your sdaX (not sdaX_crypt!, UUID sdaX_crypt - it will automatically go away when generating the grub.cfg config).
* cipher = twofish-xts-plain64, size = 512, hash = sha512 -luks encryption in advanced mode.
* / etc / skey is a secret key file that is automatically inserted to unlock the OS boot (instead of entering the 3rd password). You can specify any file up to 8MB, but data will be read <1MB.
# "" < > 691. head -c 691 /dev/urandom > /etc/skey # (691) 7- luks cryptsetup luksAddKey --key-slot 7 /dev/sda7 /etc/skey # "/ luks-" cryptsetup luksDump /dev/sda7 It will look something like this:
(do it yourself and see for yourself).
/ etc / fstab contains descriptive information about various file systems.
# /etc/fstab nano /etc/fstab # "File system" "mount poin" "type" "options" "dump" "pass"
# / was on / dev / sda7 during installation
/ dev / mapper / sda7_crypt / ext4 errors = remount-ro 0 1
option
* / dev / mapper / sda7_crypt - sda7 mapping name> sda7_crypt, which is specified in the / etc / crypttab file.
The crypttab / fstab configuration is complete.
B4.5. Editing configuration files. Key moment
B4.5.1. Editing the /etc/initramfs-tools/conf.d/resume config
and comment out (if there is) the "#" line "resume". The file must be completely empty.
B4.5.2. Editing the /etc/initramfs-tools/conf.d/cryptsetup config
should match
B4.5.3. Editing the / etc / default / grub config (this config is responsible for the ability to generate grub.cfg when working with encrypted / boot)
add the line "GRUB_ENABLE_CRYPTODISK = y"
the 'y' value, grub-mkconfig, and grub-install will check for the presence of encrypted disks and generate additional commands required for their access at boot time (ins <cryptomount / set root>) .
should be like
B4.5.4. Editing the / etc / cryptsetup-initramfs / conf-hook config
, <CRYPTSETUP=y> <#>.
( , , initrd.img).
B4.5.5. /etc/cryptsetup-initramfs/conf-hook
«skey» initrd.img, ( , «skey»).
# swap , . nano /etc/initramfs-tools/conf.d/resume and comment out (if there is) the "#" line "resume". The file must be completely empty.
B4.5.2. Editing the /etc/initramfs-tools/conf.d/cryptsetup config
nano /etc/initramfs-tools/conf.d/cryptsetup should match
# /etc/initramfs-tools/conf.d/cryptsetup
CRYPTSETUP = yes
export CRYPTSETUP
B4.5.3. Editing the / etc / default / grub config (this config is responsible for the ability to generate grub.cfg when working with encrypted / boot)
nano /etc/default/grub add the line "GRUB_ENABLE_CRYPTODISK = y"
the 'y' value, grub-mkconfig, and grub-install will check for the presence of encrypted disks and generate additional commands required for their access at boot time (ins <cryptomount / set root>) .
should be like
GRUB_DEFAULT = 0
GRUB_TIMEOUT = 10
GRUB_DISTRIBUTOR = `lsb_release -i -s 2> / dev / null || echo Debian`
GRUB_CMDLINE_LINUX_DEFAULT = "acpi_backlight = vendor"
GRUB_CMDLINE_LINUX = "quiet splash noautomount"
GRUB_ENABLE_CRYPTODISK = y
B4.5.4. Editing the / etc / cryptsetup-initramfs / conf-hook config
nano /etc/cryptsetup-initramfs/conf-hook , <CRYPTSETUP=y> <#>.
( , , initrd.img).
B4.5.5. /etc/cryptsetup-initramfs/conf-hook
nano /etc/cryptsetup-initramfs/conf-hook KEYFILE_PATTERN="/etc/skey"
UMASK=0077
«skey» initrd.img, ( , «skey»).
B4.6. /boot/initrd.img [version]
initrd.img cryptsetup,
initrd.img ( «, ») , cryptsetup, , , Nvidia — . , , . ( chroot ./boot/initrd.img). Attention! [update-initramfs -u] , cryptsetup open /dev/sda7 sda7_crypt — , /etc/crypttab, reboot-a busybox)
.
update-initramfs -u initrd.img ( «, ») , cryptsetup, , , Nvidia — . , , . ( chroot ./boot/initrd.img). Attention! [update-initramfs -u] , cryptsetup open /dev/sda7 sda7_crypt — , /etc/crypttab, reboot-a busybox)
.
[] GRUB2
C1. ( 20)
mkfs.ext4 -v -L GRUB2 /dev/sda6 C2. /dev/sda6 /mnt
chroot, /mnt2, /mnt — .
GRUB2
GRUB2, /mnt/boot/grub/i-386-pc ( , , «i386-pc») (, , .mod: cryptodisk; luks; gcry_twofish; gcry_sha512; signature_test.mod), GRUB2 .
Important! GRUB2 , « » – ( — GRUB2 — «MBR» live usb) . / VeraCrypt. GRUB2, , , «MBR». GRUB2, – ( GRUB 2.02 ~BetaX).
GRUB2
mount /dev/sda6 /mnt GRUB2, /mnt/boot/grub/i-386-pc ( , , «i386-pc») (, , .mod: cryptodisk; luks; gcry_twofish; gcry_sha512; signature_test.mod), GRUB2 .
apt-get update apt-get install grub2 Important! GRUB2 , « » – ( — GRUB2 — «MBR» live usb) . / VeraCrypt. GRUB2, , , «MBR». GRUB2, – ( GRUB 2.02 ~BetaX).
C3. GRUB2 [sda6]
[.C.2]
* --force - , , ( ).
* --root-directory - <boot/grub> sda6.
* /dev/sda6 - sda ( <> /mnt /dev/sda6).
grub-install --force --root-directory=/mnt /dev/sda6 * --force - , , ( ).
* --root-directory - <boot/grub> sda6.
* /dev/sda6 - sda ( <> /mnt /dev/sda6).
C4. [grub.cfg]
«update-grub2»,
/ grub.cfg, () («grub-mkconfig» live usb, Windows 10 — ). «», «grub.cfg» , , GRUB ( ), GRUB2 .
« » GRUB2 .
grub-mkconfig -o /mnt/boot/grub/grub.cfg / grub.cfg, () («grub-mkconfig» live usb, Windows 10 — ). «», «grub.cfg» , , GRUB ( ), GRUB2 .
« » GRUB2 .
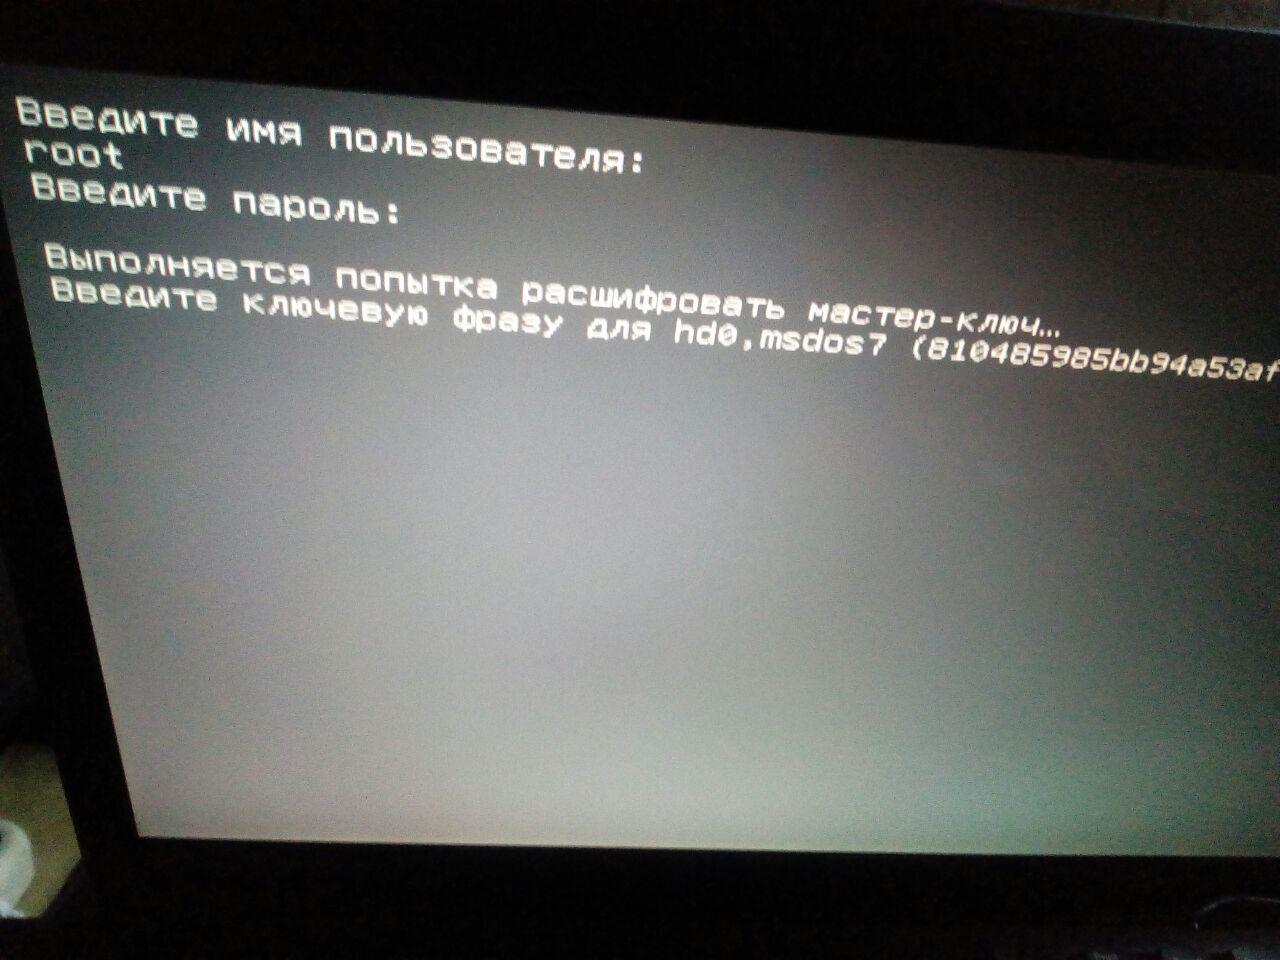
C5. Proof-test GNU/Linux
. GNU/Linux ( chroot).
VeraCrypt.
* — Windows.
* «Esc» GRUB2, GNU/Linux – (sda7_crypt) /boot/initrd.img.
* , (. .B4.4/4.5) /boot/initrd.img, / , «skey», .
( « »).
* GNU/Linux .
* , /boot/initrd.img ( 4.6).
GRUB2 ( - live usb)
GNU/Linux:
« GRUB2» .
umount -a # GNU/Linux Ctrl+d # chroot umount /mnt/dev umount /mnt/proc umount /mnt/sys umount -a # live usb reboot VeraCrypt.
* — Windows.
* «Esc» GRUB2, GNU/Linux – (sda7_crypt) /boot/initrd.img.
* , (. .B4.4/4.5) /boot/initrd.img, / , «skey», .
( « »).
* GNU/Linux .
* , /boot/initrd.img ( 4.6).
update-initramfs –u GRUB2 ( - live usb)
mount /dev/sda6 /mnt grub-mkconfig -o /mnt/boot/grub/grub.cfg GNU/Linux:
- GNU/Linuxinux , /boot/kernel and initrd;
- initrd.img;
- ( initrd; / ; Linux) .
« GRUB2» .
6. GRUB2. +
GNU/Linux , – BIOS. GRUB2 , / , – [. . F].
«» GRUB2 «/».
«» GRUB2 «/».
- « » , – .
- - , CLI, -GRUB2.
6.1.
,
GRUB2
. -
GRUB
, «grub.cfg» - (" --unrestricted" "--user",
( ### END /etc/grub.d/41_custom ###)
«set superusers=»root"
password_pbkdf2 root ".
«grub-mkconfig -o /mnt/boot/grub/grub.cfg» grub.cfg, (/) GRUB-
«grub-mkconfig -o /mnt/boot/grub/grub.cfg», , , grub.cfg.
GRUB2 .
ls /<Tab-Tab> # - GRUB2
grub-mkpasswd-pbkdf2 #/ . . -
grub.pbkdf2.sha512.10000.DE10E42B01BB6FEEE46250FC5F9C3756894A8476A7F7661A9FFE9D6CC4D0A168898B98C34EBA210F46FC10985CE28277D0563F74E108FCE3ACBD52B26F8BA04D.27625A4D30E4F1044962D3DD1C2E493EF511C01366909767C3AF9A005E81F4BFC33372B9C041BE9BA904D7C6BB141DE48722ED17D2DF9C560170821F033BCFD8
GRUB
mount /dev/sda6 /mnt nano -$ /mnt/boot/grub/grub.cfg , «grub.cfg» - (" --unrestricted" "--user",
( ### END /etc/grub.d/41_custom ###)
«set superusers=»root"
password_pbkdf2 root ".
# This file provides an easy way to add custom menu entries. Simply type the
# menu entries you want to add after this comment. Be careful not to change
# the 'exec tail' line above.
### END /etc/grub.d/40_custom ###
### BEGIN /etc/grub.d/41_custom ###
if [ -f ${config_directory}/custom.cfg ]; then
source ${config_directory}/custom.cfg
elif [ -z "${config_directory}" -a -f $prefix/custom.cfg ]; then
source $prefix/custom.cfg;
fi
set superusers=«root»
password_pbkdf2 root grub.pbkdf2.sha512.10000.DE10E42B01BB6FEEE46250FC5F9C3756894A8476A7F7661A9FFE9D6CC4D0A168898B98C34EBA210F46FC10985CE28277D0563F74E108FCE3ACBD52B26F8BA04D.27625A4D30E4F1044962D3DD1C2E493EF511C01366909767C3AF9A005E81F4BFC33372B9C041BE9BA904D7C6BB141DE48722ED17D2DF9C560170821F033BCFD8
### END /etc/grub.d/41_custom ###
#
«grub-mkconfig -o /mnt/boot/grub/grub.cfg» grub.cfg, (/) GRUB-
nano /etc/grub.d/41_custom cat << EOF
set superusers=«root»
password_pbkdf2 root grub.pbkdf2.sha512.10000.DE10E42B01BB6FEEE46250FC5F9C3756894A8476A7F7661A9FFE9D6CC4D0A168898B98C34EBA210F46FC10985CE28277D0563F74E108FCE3ACBD52B26F8BA04D.27625A4D30E4F1044962D3DD1C2E493EF511C01366909767C3AF9A005E81F4BFC33372B9C041BE9BA904D7C6BB141DE48722ED17D2DF9C560170821F033BCFD8
EOF
«grub-mkconfig -o /mnt/boot/grub/grub.cfg», , , grub.cfg.
GRUB2 .
6.2.
, pgp- ( ). : gnuPG; kleopatra/GPA; Seahorse. - . Seahorse — 3.14.0 ( , , V3.20 – ).
PGP- // su!
GRUB2
GRUB2 sda6, GRUB «core.img»
* --force - , , ( ).
* --modules=«gcry_sha256 gcry_sha512 signature_test gcry_dsa gcry_rsa» - GRUB2 .
* -k ~/perskey - «PGP-» ( , ).
* --root-directory - boot sda6
/dev/sda6 - sda .
/ grub.cfg
«grub.cfg» «trust /boot/grub/perskey» ( pgp-.) GRUB2 , «signature_test.mod», «set check_signatures=enforce».
( grub.cfg)
"/boot/grub/perskey" , hd0,6, «» , GRUB2 (. set rot=..).
GRUB2 ( /GRUB) «perskey».
, ( nautilus/caja): «seahorse» . su.
sudo "/mnt/boot" – – .
"/mnt/boot/grub/perskey" ( grub) . , / [*.sig].
"/boot" ( kernel, initrd). - , bash- « ».
( - )
, , GRUB2.
< > GRUB2 .
PGP- // su!
gpg - -gen-key gpg --export -o ~/perskey mount /dev/sda6 /mnt #sda6 – GRUB2 GRUB2
rm -rf /mnt/ GRUB2 sda6, GRUB «core.img»
grub-install --force --modules="gcry_sha256 gcry_sha512 signature_test gcry_dsa gcry_rsa" -k ~/perskey --root-directory=/mnt /dev/sda6 * --force - , , ( ).
* --modules=«gcry_sha256 gcry_sha512 signature_test gcry_dsa gcry_rsa» - GRUB2 .
* -k ~/perskey - «PGP-» ( , ).
* --root-directory - boot sda6
/dev/sda6 - sda .
/ grub.cfg
grub-mkconfig -o /mnt/boot/grub/grub.cfg «grub.cfg» «trust /boot/grub/perskey» ( pgp-.) GRUB2 , «signature_test.mod», «set check_signatures=enforce».
( grub.cfg)
### BEGIN /etc/grub.d/41_custom ###
if [ -f ${config_directory}/custom.cfg ]; then
source ${config_directory}/custom.cfg
elif [ -z "${config_directory}" -a -f $prefix/custom.cfg ]; then
source $prefix/custom.cfg;
fi
trust /boot/grub/perskey
set superusers=«root»
password_pbkdf2 root grub.pbkdf2.sha512.10000.DE10E42B01BB6FEEE46250FC5F9C3756894A8476A7F7661A9FFE9D6CC4D0A168898B98C34EBA210F46FC10985CE28277D0563F74E108FCE3ACBD52B26F8BA04D.27625A4D30E4F1044962D3DD1C2E493EF511C01366909767C3AF9A005E81F4BFC33372B9C041BE9BA904D7C6BB141DE48722ED17D2DF9C560170821F033BCFD8
### END /etc/grub.d/41_custom ###
#
"/boot/grub/perskey" , hd0,6, «» , GRUB2 (. set rot=..).
GRUB2 ( /GRUB) «perskey».
, ( nautilus/caja): «seahorse» . su.
sudo "/mnt/boot" – – .
"/mnt/boot/grub/perskey" ( grub) . , / [*.sig].
"/boot" ( kernel, initrd). - , bash- « ».
( - )
rm -f $(find /mnt/boot/grub -type f -name '*.sig') , , GRUB2.
apt-mark hold grub-common grub-pc grub-pc-bin grub2 grub2-common < > GRUB2 .
C6.3. Proof-test GRUB2,
GRUB2. - GNU/Linux CLI ( ) . / initrd
, GRUB2-.
- GRUB2/ grub.cfg, /, .mod, . GRUB2 .

, GRUB2 « ».
«» « », «0». ( « » «0» — ).
?
: / GRUB2 , , luks.mod.sig .
: CLI
«perskey», «0», , .C6.2.
« GRUB2 » .
, GRUB2-.
- GRUB2/ grub.cfg, /, .mod, . GRUB2 .
, GRUB2 « ».
«» « », «0». ( « » «0» — ).
?
: / GRUB2 , , luks.mod.sig .
: CLI
trust_list «perskey», «0», , .C6.2.
« GRUB2 » .
[D] —
, « », .
As usual, there are various “myths and legends ” about data recovery after they are deleted from the hard disk. If you believe in cyberspace, or are members of the Dr web community and have never tried to recover data after deleting / rewriting it (for example, restoring using R-studio) , then the proposed method is unlikely to suit you, use what is closer to you.
After the successful transfer of GNU / Linux to an encrypted partition, the old copy must be deleted without the possibility of data recovery. Universal cleaning method: software for Windows / Linux free GUI software BleachBit .
Quickly format the partition whose data you want to destroy (using Gparted),Run BleachBit, select "Clean up free space" - select a partition (your sdaX with the previous copy of GNU / Linux) , the cleaning process will start. BleachBit - wipes the disc in one pass - this is what we need, BUT! this only works in theory if you formatted the disk and cleaned it in BB v2.0 software.
Attention ! BB wipes the disk, leaving the metadata, the file names are saved when the data is erased (Ccleaner does not leave metadata).
And the myth of data recovery is not exactly a myth.
Bleachbit V2.0-2 unstable OS Debian ( : sfill; wipe-Nautilus - ) : « » HDD/ (ntfs/ext4) . , . () / / «» . , , , « » 3+ .
GNU/Linux Bleachbit 2.0-2 , . : Windows CCleaner « ntfs» , .
, , Bleachbit , , « / ».
« » Windows CCleaner/BB «». GNU/Linux ( ) ( + ( , )) , .
GNU/Linux Bleachbit 2.0-2 , . : Windows CCleaner « ntfs» , .
, , Bleachbit , , « / ».
« » Windows CCleaner/BB «». GNU/Linux ( ) ( + ( , )) , .
In this step, “disc cleaning” is completed.
[E] Universal backup of encrypted OS
Each user has his own method of data backup, but the encrypted data of the “System OS” requires a slightly different approach to the task. Unified software such as Clonezilla and similar software cannot work directly with encrypted data.
Setting the task of backing up encrypted block devices:
- universality - the same algorithm / backup software for Windows / Linux;
- the ability to work in the console from any GNU / Linux live usb without the need for additional software download (but still recommend the GUI) ;
- backup security - stored “images” must be encrypted / password protected;
- the size of the encrypted data must match the size of the actual data copied;
- convenient extraction of the necessary files from the backup (there is no requirement to decrypt the entire section first).
For example, backup / restore through the utility "dd"
dd if=/dev/sda7 of=//sda7.img bs=7M conv=sync,noerror dd if=//sda7.img of=/dev/sda7 bs=7M conv=sync,noerror Corresponds to almost all items of the task, but according to claim 4 does not hold water, as it copies the entire section of the disk as a whole, including free space. Not interested.
For example, a backup copy of GNU / Linux via the tar archiver | gpg is convenient, but for Windows backup you need to look for another solution. Not interested.
E1. Backup Windows / Linux. A bunch of Grsync + VeraCrypt volume
:
VeraCrypt :
( Windows, GNU/Linux) ;
, « » ( ) – .
Windows, GNU/Linux > VeraCrypt , .
Twofish 70 ( , ) HDD ~ ( , ). VeraCrypt Windows/Linux , « », .
VeraCrypt ( ) , .
// VeraCrypt GUI> GNU/Linux live usb ( /media/veracrypt2, Windows /media/veracrypt1). Windows GUI rsync (grsync) , .
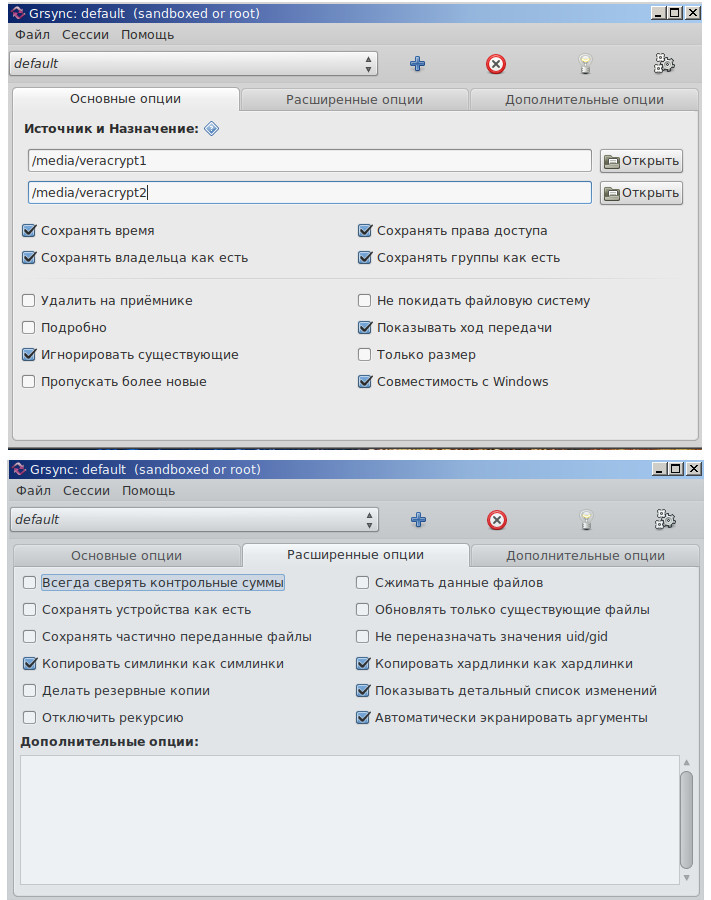
. , .
GNU/Linux, GUI rsync « Windows».
. rsync:
* -g - ;
* -P --progress — ;
* -H - , ;
* - - ( rlptgoD) ;
* -v -.
« Windows VeraCrypt» cryptsetup, alias (su)
«veramountpictures » , - , Windows.
/ VeraCrypt cryptsetup
/ / VeraCrypt cryptsetup
Windows/Linux.
.
- (/) VeraCrypt ;
- / Rsync VeraCrypt;
- VeraCrypt www.
VeraCrypt :
( Windows, GNU/Linux) ;
, « » ( ) – .
Windows, GNU/Linux > VeraCrypt , .
Twofish 70 ( , ) HDD ~ ( , ). VeraCrypt Windows/Linux , « », .
VeraCrypt ( ) , .
// VeraCrypt GUI> GNU/Linux live usb ( /media/veracrypt2, Windows /media/veracrypt1). Windows GUI rsync (grsync) , .
. , .
GNU/Linux, GUI rsync « Windows».
. rsync:
* -g - ;
* -P --progress — ;
* -H - , ;
* - - ( rlptgoD) ;
* -v -.
« Windows VeraCrypt» cryptsetup, alias (su)
echo "alias veramount='cryptsetup open --veracrypt --tcrypt-system --type tcrypt /dev/sdaX Windows_crypt && mount /dev/mapper/ Windows_crypt /media/veracrypt1'" >> .bashrc && bash «veramount
/ VeraCrypt cryptsetup
cryptsetup open --veracrypt --tcrypt-system --type tcrypt /dev/sdaX Windows_crypt mount /dev/Windows_crypt /mnt / / VeraCrypt cryptsetup
cryptsetup open --veracrypt --type tcrypt /dev/sdaY test_crypt mount /dev/test_crypt /mnt Windows/Linux.
.
[F] Attack on GRUB2 bootloader
If you have protected your bootloader with a digital signature and / or authentication (see p. C6.) , Then it will not protect you from physical access. Encrypted data will remain inaccessible, but protection bypass (reset of digital signature protection) GRUB2 allows a cyber villain to inject its code into the bootloader without arousing suspicion (unless the user manually monitors the status of the bootloader, or creates a strong, arbitrary script for grub.cfg).
Algorithm attack. Intruder
* Boot a PC from live usb. Any change (by the intruder) of the files will result in notifying the real PC owner about the invasion of the bootloader. But simple GRUB2 reinstallation with grub.cfg saving(and the subsequent possibility of editing it) will allow the attacker to edit any files (in this situation, when GRUB2 is loaded, the alert will not be sent to the real user. The status is the same <0>)
* Mounts the unencrypted partition, keeps "/ mnt / boot / grub / grub.cfg ".
* Reinstalls the bootloader (ejecting “perskey” from the core.img image)
grub-install --force --root-directory=/mnt /dev/sda6 * Returns "grub.cfg"> "/mnt/boot/grub/grub.cfg", if necessary, it edits, for example, adding your module "keylogger.mod" to the folder with the loader modules in the "grub.cfg"> line "Insmod keylogger". Or, for example, if the enemy is cunning, then after reinstalling GRUB2 (all signatures remain in place), it collects the main image of GRUB2 using “grub-mkimage with the (-c) option.” The “-c” option will allow you to load your config before loading the main "Grub.cfg". A config can consist of just one line: redirection to any “modern.cfg”, mixed, for example, with ~ 400 files (modules + signatures)in the folder "/ boot / grub / i386-pc". At the same time, the intruder can enter arbitrary code and load modules without affecting "/boot/grub/grub.cfg", even if the user has applied "hashsum" to the file and temporarily displayed it on the screen.
The attacker will not need to crack the login / password of the GRUB2 superuser, you just need to copy the lines (responsible for authentication) "/boot/grub/grub.cfg" into your "modern.cfg"
superusers = set «root»
password_pbkdf2 root grub.pbkdf2.sha512.10000.DE10E42B01BB6FEEE46250FC5F9C3756894A8476A7F7661A9FFE9D6CC4D0A168898B98C34EBA210F46FC10985CE28277D0563F74E108FCE3ACBD52B26F8BA04D.27625A4D30E4F1044962D3DD1C2E493EF511C01366909767C3AF9A005E81F4BFC33372B9C041BE9BA904D7C6BB141DE48722ED17D2DF9C560170821F033BCFD8
And for the PC host, the GRUB2 authentication of the root user will still be valid.
Chain loading (the loader loads another loader) , as I wrote above, does not make sense (it is intended for another purpose) . Because of the BIOS, you cannot load an encrypted bootloader (chain loading restarts GRUB2> encrypted GRUB2, an error!) . However, if you still use the idea of chain loading, then you can be sure that it is the encrypted (not upgraded) “grub.cfg” that is loaded from the encrypted partition. And this is also a false sense of security, because everything that is stated in the encrypted "grub.cfg"(module loading) is added to modules that are loaded from unencrypted GRUB2.
If you want to check this, then select / encrypt another sdaY partition, copy GRUB2 onto it (grub-install operation on the encrypted partition is impossible) and in the “grub.cfg” (unencrypted config) change lines like this
menuentry 'GRUBx2' --class parrot --class gnu-linux --class gnu --class os $ menuentry_id_option 'gnulinux-simple-382111a2-f993-403c-aa2e-292b5eac4780' {
load_video
insmod gzio
if [x $ grubp ma ]; then insmod xzio; insmod lzopio; fi
insmod part_msdos
insmod cryptodisk
insmod luks
insmod gcry_twofish
insmod gcry_twofish
insmod gcry_sha512
insmod ext2
cryptomount -u 15c47d1c4bd34e5289df77bcf60ee838
set root='cryptouuid/15c47d1c4bd34e5289df77bcf60ee838'
normal /boot/grub/grub.cfg
}
strings
* insmod - loading the necessary modules to work with an encrypted disk;
* GRUBx2 -the name of the output line in the boot menu GRUB2;
* cryptomount -u 15c47d1c4bd34e5289df77bcf60ee838 - see fdisk -l (sda9);
* set root-install root;
* normal /boot/grub/grub.cfg - executable configuration file on the encrypted partition.
The confidence that it is the encrypted “grub.cfg” that is being loaded is a positive response to entering the password / unlocking the “sdaY” when selecting the “GRUBx2” line in the GRUB menu.
When working in the CLI, in order not to get confused (and to check if the “set root” variable environment worked),create empty marker files, for example, in the encrypted "/ shifr_grub" section, in the unencrypted "/ noshifr_grub" section. CLI Check
cat /Tab-Tab As noted above, this will not help from downloading malicious modules if such modules are on your PC. For example, a keylogger who can save keystrokes to a file and mix with other files in "~ / i386" until an attacker downloads it with physical access to a PC.
The easiest way to verify that digital signature protection is actively working (not reset) , and no one has invaded the bootloader, in the CLI we type the command
list_trusted in response, we receive a cast of our perskey, or do not get anything if we are attacked (you also need to check “set check_signatures = enforce”) .
Essential minus of such step, to fill teams manually. If you add this command to “grub.cfg” and protect it with a digital signature, then the preliminary output of the key snapshot on the screen is too short in timing, and you may not have time to see the output, having received the GRUB2 download.
There is no one to complain to: the developer in his documentation Clause 18.2 officially states
«Note that even with GRUB password protection, GRUB itself cannot prevent someone with physical access to the machine from altering that machine's firmware (eg, Coreboot or BIOS) configuration to cause the machine to boot from a different (attacker-controlled) device. GRUB is at best only one link in a secure boot chain».
GRUB2 is too overloaded with functions that can give a sense of false security, and its development has already been ahead of MS-DOS OS, but this is just a bootloader. It's funny that GRUB2 - “tomorrow” can become an OS, and GNU / Linux loaded virtual machines for it.
A small video about how I dropped the GRUB2 digital signature protection and announced my intrusion to a real user (scared, but instead of what is shown on the video - you can write a non-harmless arbitrary code / .mod) .
Findings:
1) Block system encryption for Windows is easier to implement, and protection with one password is more convenient than protection with multiple passwords with GNU / Linux block system encryption.
2) The article was written as a relevant, detailed and simple guide to full Windows / GNU / Linux system encryption, which you are not meeting on the network. Therefore, it did not consider some interesting chapters: about cryptographers who disappear / remain in the shadows; that in different GNU / Linux books they do not write about encryption; on Article 55 of the Constitution of the Russian Federation; about what you need to encrypt the root / boot. The article turned out to be already considerable, but detailed (describing even simple steps), in turn, this will save you a lot of time when you take up full system encryption.
3) System encryption performed on Windows 7 64; GNU / Linux Parrot 4x; GNU / Debian 9.0 / 9.5.
4) Implemented a successful attack on the GRUB2 bootloader.
5) Tutorial was created to help all the paranoid CIS, but was not duplicated in the blog Habr social network vk (for reasons unknown to me).
[G] Useful Documentation
- TrueCrypt User Guide (February 7, 2012 RU)
- VeraCrypt Documentation
- / usr / share / doc / cryptsetup (-run) [local resource] (the official detailed documentation for setting up GNU / Linux encryption using cryptsetup)
- The official cryptsetup FAQ (a brief documentation on configuring GNU / Linux encryption using cryptsetup)
- LUKS device encryption (archlinux documentation)
- Detailed cryptsetup syntax (arch manual page)
- Crypttab Detailed Description (arch manual page)
- Official documentation GRUB2 .
Tags: full disk encryption, partition encryption, full Linux encryption, full system encryption.
Source: https://habr.com/ru/post/429208/
All Articles