Android navigation component. Simple things you have to do yourself.
Hello! I want to talk about the features of the Navigation Architecture Component , because of which I had an ambiguous impression about the library.
This article is not a step-by-step instruction; implementation details are omitted to focus on key points. There are manyidentical examples of use on the Internet (there are also translations) - they will help to get acquainted with the library. Also before reading I suggest to study the documentation .

I will say straight away that I definitely consider the library useful and do not exclude the possibility of misuse, but perhaps I tried everything before writing this article.
')
So, here are the scenarios, with the implementation of which the functional expectations did not coincide with the reality in the implementation:
This is one of those features that influenced the decision to use the Navigation Component.
You just need to make the same id menu items
and screens id (destination in the graph of navigation)
then you need to associate the menu with the navigation controller:
Navigation in the menu has earned - isn’t it a miracle ?!
Pay attention to the "hamburger" (menu icon), when switching between menu items, it changes its state to the "back" button. This behavior seemed unusual (the usual - as in the play market application) and, for a while, I tried to figure out what I did wrong?
It's like that! After re-reading the documentation on the principles of navigation (namely, points two and three ), I realized that the “hamburger” is shown only for startDestination , or rather, the “back” button is shown for everyone except startDestination . The situation can be changed by applying various tricks in the subscription ( addOnNavigatedListener () ) to change the destination , but you should not even describe them. It works like this, you need to accept it.
An activity can act as a navigation host and, at the same time, in the graph of navigation can act as one of the destination . Opening an Activity without a nested navigation graph works as expected , that is, a call:
make the transition (as in the case of fragments) and open the requested Activity.
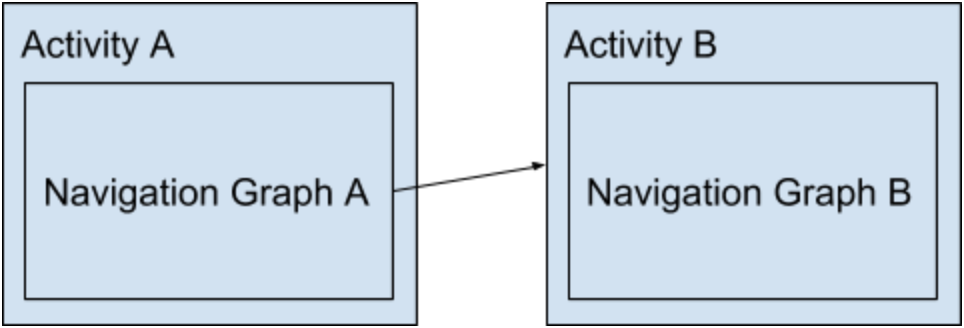
It is much more interesting to consider the case when the target Activity itself acts as a navigation host , that is, option 2 from the documentation :
As an example, let's consider an Activity to add a note. It will contain the main fragment with EditFragment input fields , it will be startDestination in the navigation graph. Let's say that when editing, we need to attach a photo, for this we will go to PhotoFragment to get a picture from the camera. The navigation graph will look like this:
EditActivity is a little different from MainActivity . The main difference is that there is no menu on EditActivity :
Activity opens, navigation inside it works:

Again, pay attention to the navigation button in the toolbar - there is no “Back to parent Activity” button on the start EditFragment (but I would like to). From the point of view of the documentation, everything is legal: a new graph of the navigation, a new value of startDestination , the button “Back”, the end is not shown at startDestination .
For those who want to return the usual behavior of c parent activity , while maintaining the functionality of switching between fragments, I can offer thiscrutch approach:
Subscription is necessary so that for NavigationUI.ActionBarOnNavigatedListener all the destination is not startDestination . Thus, NavigationUI.ActionBarOnNavigatedListener will not hide the navigation button (for details, refer to the sources). Add to this the onSupportNavigateUp () processing in a regular manner on startDestination and get what we wanted.
It is worth saying that the solution is far from ideal, if only because this is an unobvious interference in the library's behavior. I suppose there may be problems when using deep links (not yet verified).
In the Navigation Component there is a mechanism for passing parameters from one destination to another. There is even a tool to ensure type safety due to code generation (not bad).
Now we will examine the case, because of which I could not put a solid top five to this functionality.
Let's return to EditActivity , a rather familiar scenario, when one Activity is used to create and edit objects. When you open an object for editing in the Activity, you need to transfer, for example, the object id - let's do it in a regular way:
You probably noticed the features of getting parameters in the EditFragment . It works this way because the edit action (from point 1) passes the arguments to the EditActivity , and for some reason , it in turn, isgreedy and does not pass it to the graph (for example, by calling navController.graph.setDefaultArguments () ). This feature can be circumvented by manually preparing the navigation controller . One way is described on StackOwerflow .
Perhaps the greatest difficulty will arise when used simultaneously as a startDestination and the usual destination . That is, when moving and passing parameters to startDestination from any other destination of this graph, the fragment will have to independently determine whether to retrieve the parameters: from arguments or from intent.extras. This must be borne in mind when designing transitions with the transfer of parameters.
Summarizing, I want to note that I myself have not stopped using the library and, despite the listedshortcomings of features, I consider it sufficiently useful to recommend for use. I really hope that in the next releases the situation will change at least with the transfer of parameters to startDestination .
Thank you for attention. Work your code!
Sources for the article are available on GitHub .
This article is not a step-by-step instruction; implementation details are omitted to focus on key points. There are many
I will say straight away that I definitely consider the library useful and do not exclude the possibility of misuse, but perhaps I tried everything before writing this article.
')
So, here are the scenarios, with the implementation of which the functional expectations did not coincide with the reality in the implementation:
- switch between menu items in navigation drawer
- opening a new Activity with its graph of navigation
- passing parameters to startDestination
Switch between menu items
This is one of those features that influenced the decision to use the Navigation Component.
You just need to make the same id menu items
activity_main_drawer.xml
<?xml version="1.0" encoding="utf-8"?> <menu xmlns:android="http://schemas.android.com/apk/res/android" xmlns:tools="http://schemas.android.com/tools" tools:showIn="navigation_view"> <group android:checkableBehavior="single"> <item android:id="@+id/importFragment" android:icon="@drawable/ic_menu_camera" android:title="Import"/> <item android:id="@+id/galleryFragment" android:icon="@drawable/ic_menu_gallery" android:title="Gallery"/> <item android:id="@+id/slideshowFragment" android:icon="@drawable/ic_menu_slideshow" android:title="Slideshow"/> <!-- --> and screens id (destination in the graph of navigation)
mobile_navigation.xml
<?xml version="1.0" encoding="utf-8"?> <navigation xmlns:android="http://schemas.android.com/apk/res/android" xmlns:app="http://schemas.android.com/apk/res-auto" xmlns:tools="http://schemas.android.com/tools" android:id="@+id/mobile_navigation" app:startDestination="@id/importFragment"> <fragment android:id="@+id/importFragment" android:name="com.xiii.navigationapplication.ImportFragment" android:label="fragment_import" tools:layout="@layout/fragment_import"/> <fragment android:id="@+id/galleryFragment" android:name="com.xiii.navigationapplication.GalleryFragment" android:label="fragment_gallery" tools:layout="@layout/fragment_gallery"/> <fragment android:id="@+id/slideshowFragment" android:name="com.xiii.navigationapplication.SlideshowFragment" android:label="fragment_slideshow" tools:layout="@layout/fragment_slideshow"/> </navigation> then you need to associate the menu with the navigation controller:
MainActivity.kt
class MainActivity : AppCompatActivity() { private val navController by lazy(LazyThreadSafetyMode.NONE) { Navigation.findNavController(this, R.id.nav_host_fragment) } override fun onCreate(savedInstanceState: Bundle?) { super.onCreate(savedInstanceState) setContentView(R.layout.activity_main) setSupportActionBar(toolbar) // "" toolbar NavigationUI.setupWithNavController(toolbar, navController, drawer_layout) // nav_view.setupWithNavController(navController) } // override fun onSupportNavigateUp() = navController.navigateUp() } Navigation in the menu has earned - isn’t it a miracle ?!
Pay attention to the "hamburger" (menu icon), when switching between menu items, it changes its state to the "back" button. This behavior seemed unusual (the usual - as in the play market application) and, for a while, I tried to figure out what I did wrong?
It's like that! After re-reading the documentation on the principles of navigation (namely, points two and three ), I realized that the “hamburger” is shown only for startDestination , or rather, the “back” button is shown for everyone except startDestination . The situation can be changed by applying various tricks in the subscription ( addOnNavigatedListener () ) to change the destination , but you should not even describe them. It works like this, you need to accept it.
Opening a new Activity
An activity can act as a navigation host and, at the same time, in the graph of navigation can act as one of the destination . Opening an Activity without a nested navigation graph works as expected , that is, a call:
navController.navigate(R.id.editActivity) make the transition (as in the case of fragments) and open the requested Activity.
It is much more interesting to consider the case when the target Activity itself acts as a navigation host , that is, option 2 from the documentation :
As an example, let's consider an Activity to add a note. It will contain the main fragment with EditFragment input fields , it will be startDestination in the navigation graph. Let's say that when editing, we need to attach a photo, for this we will go to PhotoFragment to get a picture from the camera. The navigation graph will look like this:
edit_navigation.xml
<?xml version="1.0" encoding="utf-8"?> <navigation xmlns:android="http://schemas.android.com/apk/res/android" xmlns:app="http://schemas.android.com/apk/res-auto" xmlns:tools="http://schemas.android.com/tools" android:id="@+id/edit_navigation" app:startDestination="@id/editFragment"> <fragment android:id="@+id/editFragment" android:name="com.xiii.navigationapplication.ui.edit.EditFragment" android:label="fragment_edit" tools:layout="@layout/fragment_edit"> <action android:id="@+id/action_editFragment_to_photoFragment" app:destination="@id/photoFragment"/> </fragment> <fragment android:id="@+id/photoFragment" android:name="com.xiii.navigationapplication.ui.edit.PhotoFragment" android:label="fragment_photo" tools:layout="@layout/fragment_photo"/> </navigation> EditActivity is a little different from MainActivity . The main difference is that there is no menu on EditActivity :
EditActivity.kt
class EditActivity : AppCompatActivity() { private val navController by lazy(LazyThreadSafetyMode.NONE) { Navigation.findNavController(this, R.id.nav_host_fragment) } override fun onCreate(savedInstanceState: Bundle?) { super.onCreate(savedInstanceState) setContentView(R.layout.activity_edit) setSupportActionBar(toolbar) // "" toolbar NavigationUI.setupWithNavController(toolbar, navController) } override fun onSupportNavigateUp() = navController.navigateUp() fun takePhoto(view: View) { navController.navigate(R.id.action_editFragment_to_photoFragment) } } Activity opens, navigation inside it works:
Again, pay attention to the navigation button in the toolbar - there is no “Back to parent Activity” button on the start EditFragment (but I would like to). From the point of view of the documentation, everything is legal: a new graph of the navigation, a new value of startDestination , the button “Back”, the end is not shown at startDestination .
For those who want to return the usual behavior of c parent activity , while maintaining the functionality of switching between fragments, I can offer this
1. Specify the parent Activity in the manifest.
<activity android:name=".EditActivity" android:parentActivityName=".MainActivity" android:theme="@style/AppTheme.NoActionBar"> <!-- Parent activity meta-data to support 4.0 and lower --> <meta-data android:name="android.support.PARENT_ACTIVITY" android:value=".MainActivity" /> </activity> 2. Add a subscription in which we will replace id startDestination
class EditActivity : AppCompatActivity() { private val navController by lazy(LazyThreadSafetyMode.NONE) { Navigation.findNavController(this, R.id.nav_host_fragment) } private var isStartDestination = true override fun onCreate(savedInstanceState: Bundle?) { super.onCreate(savedInstanceState) setContentView(R.layout.activity_edit) setSupportActionBar(toolbar) val startDestinationId = navController.graph.startDestination // id, NavigationUI.ActionBarOnNavigatedListener // destination startDestination navController.addOnNavigatedListener { controller, destination -> isStartDestination = destination.id == startDestinationId // R.id.fake_start_destination id controller.graph.startDestination = if (isStartDestination) R.id.fake_start_destination else startDestinationId } // "" toolbar NavigationUI.setupActionBarWithNavController(this, navController) } override fun onSupportNavigateUp(): Boolean { // startDestination Navigation Component return if (isStartDestination) super.onSupportNavigateUp() else navController.navigateUp() } fun takePhoto(view: View) { navController.navigate(R.id.action_editFragment_to_photoFragment) } } Subscription is necessary so that for NavigationUI.ActionBarOnNavigatedListener all the destination is not startDestination . Thus, NavigationUI.ActionBarOnNavigatedListener will not hide the navigation button (for details, refer to the sources). Add to this the onSupportNavigateUp () processing in a regular manner on startDestination and get what we wanted.
It is worth saying that the solution is far from ideal, if only because this is an unobvious interference in the library's behavior. I suppose there may be problems when using deep links (not yet verified).
Passing parameters to startDestination
In the Navigation Component there is a mechanism for passing parameters from one destination to another. There is even a tool to ensure type safety due to code generation (not bad).
Now we will examine the case, because of which I could not put a solid top five to this functionality.
Let's return to EditActivity , a rather familiar scenario, when one Activity is used to create and edit objects. When you open an object for editing in the Activity, you need to transfer, for example, the object id - let's do it in a regular way:
1. Add a parameter to the graph for EditActivity
I added the parameter directly to the root element of the graph (navigation), but I can add to the target fragment. From this, only the method of getting the parameter will change.
<?xml version="1.0" encoding="utf-8"?> <navigation xmlns:android="http://schemas.android.com/apk/res/android" xmlns:app="http://schemas.android.com/apk/res-auto" xmlns:tools="http://schemas.android.com/tools" android:id="@+id/edit_navigation" app:startDestination="@id/editFragment"> <argument android:name="id" app:argType="integer"/> <fragment android:id="@+id/editFragment" android:name="com.xiii.navigationapplication.ui.edit.EditFragment" android:label="fragment_edit" tools:layout="@layout/fragment_edit"> <action android:id="@+id/action_editFragment_to_photoFragment" app:destination="@id/photoFragment"/> </fragment> <fragment android:id="@+id/photoFragment" android:name="com.xiii.navigationapplication.ui.edit.PhotoFragment" android:label="fragment_photo" tools:layout="@layout/fragment_photo"/> </navigation> 2. Add action's to the main graph
I added add and edit action's to one of the fragments, so they will be accessible only from it.
<?xml version="1.0" encoding="utf-8"?> <navigation xmlns:android="http://schemas.android.com/apk/res/android" xmlns:app="http://schemas.android.com/apk/res-auto" xmlns:tools="http://schemas.android.com/tools" android:id="@+id/mobile_navigation" app:startDestination="@id/importFragment"> <fragment android:id="@+id/importFragment" android:name="com.xiii.navigationapplication.ImportFragment" android:label="fragment_import" tools:layout="@layout/fragment_import"> <action android:id="@+id/add" app:destination="@id/editActivity"> <argument android:name="id" app:argType="integer" android:defaultValue="0"/> </action> <action android:id="@+id/edit" app:destination="@id/editActivity"> <argument android:name="id" app:argType="integer"/> </action> </fragment> <fragment android:id="@+id/galleryFragment" android:name="com.xiii.navigationapplication.GalleryFragment" android:label="fragment_gallery" tools:layout="@layout/fragment_gallery"/> <fragment android:id="@+id/slideshowFragment" android:name="com.xiii.navigationapplication.SlideshowFragment" android:label="fragment_slideshow" tools:layout="@layout/fragment_slideshow"/> <activity android:id="@+id/editActivity" android:name="com.xiii.navigationapplication.EditActivity" android:label="activity_edit" tools:layout="@layout/activity_edit"/> </navigation> 3. Prepare the parameters and request a transition.
In this example, the ImportFragmentDirections is an automatically generated safe-args class.
val direction = ImportFragmentDirections.edit(123 /* id */) navController.navigate(direction) 3. Get id in fragment
class EditFragment : Fragment() { override fun onCreateView(inflater: LayoutInflater, container: ViewGroup?, savedInstanceState: Bundle?): View { // , fragment startDestination // val id = EditFragmentArgs.fromBundle(arguments) val id = EditFragmentArgs.fromBundle(requireActivity().intent.extras) return inflater.inflate(R.layout.fragment_edit, container, false) } } You probably noticed the features of getting parameters in the EditFragment . It works this way because the edit action (from point 1) passes the arguments to the EditActivity , and for some reason , it in turn, is
Perhaps the greatest difficulty will arise when used simultaneously as a startDestination and the usual destination . That is, when moving and passing parameters to startDestination from any other destination of this graph, the fragment will have to independently determine whether to retrieve the parameters: from arguments or from intent.extras. This must be borne in mind when designing transitions with the transfer of parameters.
Summarizing, I want to note that I myself have not stopped using the library and, despite the listed
Thank you for attention. Work your code!
Sources for the article are available on GitHub .
Source: https://habr.com/ru/post/429152/
All Articles