Manage your CMS modules using composer
Hello, friends! The emergence of a popular dependency manager in PHP is one of the most important events in the life of the PHP community. Composer divided the time into "before" - when our self-contained libraries were stored in zip archives or simply scattered in folders and copied with "pens", only in isolated cases did git or PEAR be used, and "after" when we started using composer. But what to do if you work with a certain CMS, and she doesn’t "know" what is a composer?
Foreword
I work as a team leader in a medium-sized web-studio and about a year ago I had to reconsider the approach to the use of developments in my team. For the development of projects, more than 70% of the functionality of which can be called standard (website, online store), we use 1C-Bitrix. Like all popular CMS 1C-Bitrix has a modular structure and supports the installation of third-party modules. It sounds good, but in reality everything is a little different. You can develop your modules and store them in the archive by copying the source code into the necessary folders and installing the modules one by one in the control panel, or you can publish the modules on the “1C-Bitrix: Marketplace” site provided for this. To publish the modules, you only need to enter into a partnership agreement and sign an agreement that describes your responsibility. And there is no talk of any dependencies of modules and installation of a chain of dependencies.
This problem is to some extent inherent in all CMS developed “before”. It demotivates to develop small modules (it seems to us that we should not wrap “this simple functionality” into a module), and it requires separate documentation.
In this article I will explain how to organize the storage and use of developments in a team / company. It will be interesting to those who are faced with a similar problem, to those who develop websites using CMS, to those who develop their CMS and to those who are simply developing PHP projects. Go!
Part one. Public placement of modules
The first task to solve is where to store the modules. Source codes of modules can be stored in any git, mercurial or svn repository. For public modules, I recommend GitHub. On GitHub, you will have the ability to easily view source codes and maintain documentation in Markdown format. To use composer, you need to create and populate the composer.json file. This can be done in the editor, in your IDE or by calling the composer init command. Hereinafter I will not delve into the basic features and composer commands, if you are new to composer, read this article .
After you have created your module (for an example so far empty) and posted its code on GitHub, you need to register the module on the website packagist.org . Packagist will ask you to configure the GitHub hooks so that when changes occur in the repository, the module information is updated on packagist.org.
Part two. Installation The most interesting thing here
You, for sure, are very familiar with the CMS you work with, which means you know all the subtleties of installing modules in it. In 1C-Bitrix, the installation of modules takes place in 2 stages:
- placing the source code of the module in a specific directory
<project_dir>/local/modules/<company_name>.<mod_mame> - Call the RegisterModule function (<company_name>. <Mod_mame>). As a rule, all module installation actions are described in the DoInstall method of the class responsible for installing and removing the module.
<project_dir>/local/modules/<company_name>.<mod_mame>/install/index.php
Part two one. Hide packages in a safe place.
By default, composer installs all packages in the <project_dir>/vendor directory if the composer is located in the project root, and does not execute any hooks in your packages. But it is easy to change.
We need to place the composer.json file in the project root:
{ "name": "sites/<sitename>", "description": "<SiteName>", "authors": [ { "name": "<developerName>", "email": "<developerEmail>" } ], "minimum-stability": "dev", "require": {}, "config": { "vendor-dir": "local/vendor" } } In 1C-Bitrix, code written by developers is usually placed in the <project_dir>/local directory. Therefore, we moved the vendor folder there in the config section. Now all third-party packages will be placed there. But our modules need to be placed in the <project_dir>/local/modules/<company_name>.<mod_mame> , what should we do?
Part two two. Plugin module installation
The composer has several types of packages, one of which is the composer-plugin extensions for the composer itself. In order for our modules to be installed as required by CMS, we need to write our own plugin. To do this, create a separate project and place composer.json in its root:
{ "name": "<my_name>/installer", "description": "Plugin for custom installing", "type": "composer-plugin", "license": "MIT", "homepage": "<link to homepage github>", "version": "0.0.1", "authors": [ { "name": "<name>", "email": "<email>" } ], "require": { "composer-plugin-api": "^1.0" }, "require-dev": { "composer/composer": "^1.0" }, "autoload": { "psr-4": { "<my_name>\\installer\\": "" } }, "extra": { "class": "<my_name>\\installer\\Plugin" } } There are 3 key points in this file:
- "type": "composer-plugin" - tells composer that it is a plugin
- autoload - describes the class autoload rules
- extra - indicates which class is a plugin
The plugin will consist of two classes:
- directly the plugin itself. It will add its own installer to the composer.
- the installer that will install the modules
The plugin simply adds the installer (file: Plugin.php )
namespace company_name\installer; use Composer\Composer; use Composer\EventDispatcher\EventSubscriberInterface; use Composer\IO\IOInterface; use Composer\Plugin\PluginInterface; class Plugin implements PluginInterface { public function activate(Composer $composer, IOInterface $io) { $composer->getInstallationManager()->addInstaller(new Bitrix($io, $composer)); } } Next, the installer itself ( company_name\installer\Bitrix ). The class must inherit from Composer\Installer\LibraryInstaller and contain the following methods:
- supports - returns true if the installer supports this type of package.
- getInstallPath - returns the path where the source code of the package should be placed
- install / uninstall / update - install / uninstall / update hooks
All our modules will be of the bitrix-module type and the installer should work with them.
public function supports($packageType) { return $packageType === 'bitrix-module'; } I decided to preserve the integrity of the module name (it consists of the company_name and mod_name separated by a dot) and the name package <my_name>/<company_name>.<mod_mame> or <company_name>/<company_name>.<mod_mame> . If we take the package name and split it on the slash, the second part will be the module name
public function getInstallPath(PackageInterface $package) { $name = explode("/", $package->getName()); return "local/modules/{$name[1]}/"; } The initBitrix and getModule methods implement the work with the Bitrix 1C API to install the module. The update method is implemented based on what kind of CMS you have and how you release the module updates and how you plan to perform them (file: Bitrix.php ).
namespace company_name\installer; use Composer\Installer\LibraryInstaller; use Composer\Package\PackageInterface; use Composer\Repository\InstalledRepositoryInterface; class Bitrix extends LibraryInstaller { public function supports($packageType) { return $packageType === 'bitrix-module'; } public function install(InstalledRepositoryInterface $repo, PackageInterface $package) { parent::install($repo, $package); $name = explode("/", $package->getName()); $this->initBitrix(); $module = $this->getModule($name[1]); $module->DoInstall(); } public function uninstall(InstalledRepositoryInterface $repo, PackageInterface $package) { $name = explode("/", $package->getName()); $this->initBitrix(); $module = $this->getModule($name[1]); $module->DoUninstall(); parent::uninstall($repo, $package); } public function getInstallPath(PackageInterface $package) { $name = explode("/", $package->getName()); return "local/modules/{$name[1]}/"; } protected function initBitrix() { $_SERVER['DOCUMENT_ROOT'] = __DIR__ . "/../../../../"; define('STOP_STATISTICS', true); define("NO_KEEP_STATISTIC", "Y"); define("NO_AGENT_STATISTIC","Y"); define("NOT_CHECK_PERMISSIONS", true); require_once($_SERVER['DOCUMENT_ROOT'] . '/bitrix/modules/main/include/prolog_before.php'); $GLOBALS['APPLICATION']->RestartBuffer(); } protected function getModule($module) { include_once $_SERVER['DOCUMENT_ROOT'] . "/local/modules/" . $module . "/install/index.php"; $class = str_replace(".", "_", $module); $module = new $class(); return $module; } } After you have checked the plug-in's work, the code can be uploaded to GitHub and registered with Packagist.
Part two three. Module
Let's return to the module itself, which we mentioned in the first part. or rather to his composer.json .
{ "name": "<my_name>/<company_name>.<mod_mame>", "type": "bitrix-module", "description": " ", "version": "1.0.0", "time": "11.09.2018", "minimum-stability": "dev", "license": "MIT", "homepage": "<link to homepage github>", "authors": [ { "name": "<name>", "email": "<email>" } ], "require": { "<my_name>/installer": "*" } } The module name must comply with the CMS requirements, the type must be the one with which the installer works (in our case, bitrix-module ) and the module must have a plug-in in the dependencies ( require section). After creating the module itself and checking its operation, we upload its code on GitHub and register it with Packagist.
Part two is four. using
Let me remind you that the project itself (website) has something like the following composer.json
{ "name": "sites/<sitename>", "description": "<SiteName>", "authors": [ { "name": "<developerName>", "email": "<developerEmail>" } ], "minimum-stability": "dev", "require": {}, "config": { "vendor-dir": "local/vendor" } } Now we can list all the modules we need in the require section or call the command
composer require "<my_name>/<company_name>.<mod_mame>" "*" You can fully feel the usefulness of the work done, if you have to, for example, add an authorization module to the project with sending a password via SMS
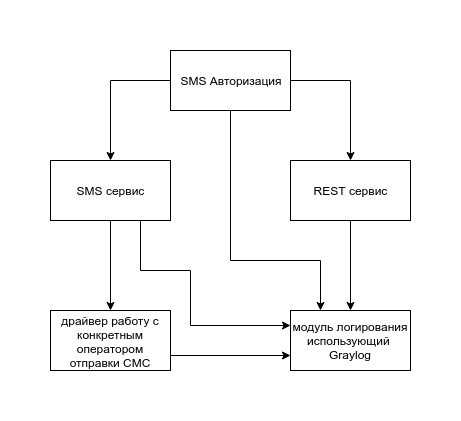
The module itself contains a code that is responsible for the authorization logic. You should not include the SMS sending code in it, because other modules perform the sending of SMS, for example, the notification module, which means that the SMS should be made a separate module so that the code does not duplicate. Also REST service. It can also be used by other modules. And with all this difficult scheme, when your module pulls four more, its installation remains just as simple. Just execute one command:
composer require "<my_name>/<company_name>.<mod_mame>" "*" So what and in what order to download and install allow to solve the composer.
Part Three Private modules
Friends, if in all of the above, you do not like that your modules will be in the public domain, then we will quickly fix it now. To organize the welcoming storage of modules, you will need two tools:
- GitLab is an analogue of GitHub which you can download and install on your servers.
- Satis is a repository generator that the compositor can work with.
To get started, install GitLab and transfer the source codes of your modules to it. after installing Satis and describe all your modules in satis.json
{ "name": "ropoName", "homepage": "https://composer.<company_name>.ru/", "repositories": [ { "type": "vcs", "url": "https://gitlab.<company_name>.ru/<my_name>/installer" }, { "type": "vcs", "url": "https://gitlab.<company_name>.ru/<my_name>/<company_name>.<mod_name>" } ], "config": { "gitlab-domains": [ "gitlab.<company_name>.ru" ], "gitlab-token": { "gitlab.<company_name>.ru": "GitLab Token" } }, "require-all": true } In GitLab, you need to create a token that will have api available and specify it in satis.json . After all these manipulations run the command:
php bin/satis build satis.json ./web And in the web folder get a static repository, which can be published at https: // composer . <Company_name> .ru /.
The composer.json site will be different only in that it will contain the repositories section.
{ "name": "sites/<sitename>", "description": "<SiteName>", "authors": [ { "name": "<developerName>", "email": "<developerEmail>" } ], "minimum-stability": "dev", "require": {}, "config": { "vendor-dir": "local/vendor" }, "repositories": [ { "type": "composer", "url": "https://composer.<company_name>.ru/" } ] } Afterword
Friends, I really hope this article has been helpful to you. And, no matter which CMS you use, you can intelligently organize the storage of your code, document it strictly, divide the “thick” modules into many “thin” dependencies, and stop experiencing difficulties installing or updating the modules. Good luck.
')
Source: https://habr.com/ru/post/429150/
All Articles