Creating GIF Animations with OpenCV
This tutorial will show you how to create animated GIF files using OpenCV, Python, and ImageMagick. Then combine these methods to create a meme generator with OpenCV!
We all need to laugh from time to time. And perhaps the best way to find lulz is memes. Some of my favorites:
')
- Kermit the Frog: "But This Is Not My Business"
- Grumpy cat
- epic fail
- Good guy Greg
But for me personally, none of these memes compare with the meme ”Deal With It" ("Get over it" or "Understand it yourself"), an example of which is given at the beginning of the article.
It is usually used in the following cases:
- As a response or objection to someone who does not approve of something you have done / said (“Get over it”)
- Putting on glasses as if you were leaving and leaving a person alone with a problem (“Understand yourself”)
A few years ago I was reading a funny article in an author's blog, which I can no longer remember how to generate such memes using computer vision. Last week I could not find this guide anywhere, so as a blogger, computer vision expert and meme expert, I decided to write a tutorial myself! (By the way, if you accidentally know the original source, please let me know so that I can express my gratitude to the author. UPD: Just found the original article from Kirk Kaiser’s blog, MakeArtWithPython ).
The development of the mec generator at OpenCV will teach us a number of valuable practical skills, including:
- Face Detection with Deep Learning Techniques
- Use of the dlib library to locate face landmarks and extract eye areas
- How to calculate the angle of rotation between the eyes based on the information received
- And finally, how to generate animated GIFs using OpenCV (with a little using ImageMagick)
This guide should be fun and entertaining - and at the same time teach you the valuable computer vision programming skills that come in handy in the real world.
Creating gifs with OpenCV
In the first part of the guide, we will discuss the necessary conditions and dependencies for this project, including the correct setting of the development environment.
Then we will look at the project / directory structure for our gif generator on OpenCV.
As soon as we understand the structure of the project, we will consider: 1) our configuration file; 2) Python script responsible for creating GIF with OpenCV.
Finally, we will evaluate the results of the work of the program on the popular meme “Deal With It”.
Prerequisites and dependencies
Fig. 1. To create gifs we will use OpenCV, dlib and ImageMagick
Opencv and dlib
OpenCV is needed to identify faces in the frame and basic image processing. Follow one of my OpenCV installation guides if OpenCV is not installed on the system.
Dlib is used to detect facial landmarks, which will allow us to find two eyes on the face and put on sunglasses over the top. You can install dlib using this instruction .
Imagemagick
If you are not familiar with ImageMagick , then in vain. This is a cross platform command line tool with many image processing functions.
Do you want to convert PNG / JPG to PDF with one command? No problem.
There are several images from which you need to make a multi-page PDF? Easily.
Need to draw polygons, lines and other shapes? And it is possible.
What about batch color adjustments or resizing of all pictures with one team? To do this, you do not need to write a few lines in Python for OpenCV.
ImageMagick also generates gifs from any images.
To install ImageMagick on Ubuntu (or Raspbian), just use apt:
Creating gifs with OpenCVShell
$ sudo apt-get install imagemagick On macOS, you can use HomeBrew:
$ brew install imagemagick imutils
In most articles, courses, and books, I use my handy package of image processing functions imutils . It is installed in a system or virtual environment using pip:
$ pip install imutils Project structure

Fig. 2. The project structure includes two directories, a configuration file and a Python script.
There are two directories in our project:
images/: examples of input images for which we want to make an animated GIF. I found some images with me, but feel free to add my own.assets/: this folder contains our face detector, face face detector and all images + associated masks. With these assets, we will overlay points and text on the original images from the first folder.
Due to the large number of customizable parameters, I decided to create a JSON configuration file, which: 1) makes editing parameters easier; 2) will require less command line arguments. All configuration parameters required for this project are contained in
config.json .Consider the contents of
config.json and create_gif.py .Note Lane: Project code and 17-page manual on computer vision, machine learning and OpenCV are issued after registration (mirror: source code , manual ).
GIF Generation with OpenCV
So, let's continue and start creating our OpenCV GIF generator!
The contents of the JSON configuration file
Let's start with the JSON configuration file, and then go to the Python script.
Open a new
config.json file and insert the following key / value pairs:Creating gifs with OpenCVPython
{ "face_detector_prototxt": "assets/deploy.prototxt", "face_detector_weights": "assets/res10_300x300_ssd_iter_140000.caffemodel", "landmark_predictor": "assets/shape_predictor_68_face_landmarks.dat", These are the OpenCV face detector model files for deep learning .
The last line is the path to the predictor dlib.
And now we have some paths to the image files:
"sunglasses": "assets/sunglasses.png", "sunglasses_mask": "assets/sunglasses_mask.png", "deal_with_it": "assets/deal_with_it.png", "deal_with_it_mask": "assets/deal_with_it_mask.png", These are the paths to our sunglasses, the text and the corresponding masks for them, which are shown below.
First, fancy sunglasses and a mask:

Fig. 3. You do not like glasses with pixels? Just get over it

Fig. 4. You do not understand why you need a mask for sunglasses? Just put up with it - or read the rest of the article to find out the answer.
And now our text is “DEAL WITH IT” and the mask:

Fig. 5. Do you hate Helvetica Neue Condensed? Deal with it

Fig. 6: This mask allows you to make a border around the text. Oh, and maybe you do not need do not want a border? Well, get over it
Masks are needed in order to superimpose the corresponding image on the photo: we'll deal with this later.
Now let's set some parameters for the memes generator:
"min_confidence": 0.5, "steps": 20, "delay": 5, "final_delay": 250, "loop": 0, "temp_dir": "temp" } Here are the definitions for each of the parameters:
min_confidence: minimum required face detection probability.steps: the number of frames in the final animation. Each "step" moves the sunglasses from the top border down to the goal (i.e., to the eyes).delay: delay between frames in hundredths of a second.final_delay: the last frame delay in hundredths of a second (useful in this context, since we want the text to appear longer than the other frames).loop: a null value indicates that GIF repeats forever, otherwise specify a positive integer for the number of repetitions of the animation.temp_dir: the temporary directory in which each frame is stored will be before creating the final GIF.
Memes, GIF and OpenCV
We have created a JSON configuration file, now let's move to the real code.
Open a new file, name it
create_gif.py and paste the following code: # from imutils import face_utils from imutils import paths import numpy as np import argparse import imutils import shutil import json import dlib import cv2 import sys import os Here we import the necessary packages. In particular, we will use imutils, dlib and OpenCV. To install these dependencies, see the “Required Components and Dependencies” section above.
Now the script has the necessary packages, so we define the
overlay_image function: def overlay_image(bg, fg, fgMask, coords): # (, ) # (sH, sW) = fg.shape[:2] (x, y) = coords # # , , ** # , overlay = np.zeros(bg.shape, dtype="uint8") overlay[y:y + sH, x:x + sW] = fg # - , ** ** # , , # , alpha = np.zeros(bg.shape[:2], dtype="uint8") alpha[y:y + sH, x:x + sW] = fgMask alpha = np.dstack([alpha] * 3) # - , # - output = alpha_blend(overlay, bg, alpha) # return output The
overlay_image function superimposes the foreground ( fg ) on the upper part of the background image ( bg ) on the coordinates coords (coordinates (x, y) ), implementing alpha transparency on the foreground mask fgMask .To familiarize yourself with the basics of OpenCV, such as working with masks, do not forget to read this manual .
To complete the blending process, perform alpha blending:
def alpha_blend(fg, bg, alpha): # , - # [0, 1] fg = fg.astype("float") bg = bg.astype("float") alpha = alpha.astype("float") / 255 # - fg = cv2.multiply(alpha, fg) bg = cv2.multiply(1 - alpha, bg) # , output = cv2.add(fg, bg) # return output.astype("uint8") This implementation of alpha blending is also provided on the LearnOpenCV blog .
In essence, we convert the foreground, background, and alpha channel into floating point numbers in the range [0, 1] . Then we perform alpha blending, add foreground and background to get the result, which we return to the calling function.
We will also create a helper function that allows generating GIFs from a set of image paths using ImageMagick and the
convert command: def create_gif(inputPath, outputPath, delay, finalDelay, loop): # imagePaths = sorted(list(paths.list_images(inputPath))) # lastPath = imagePaths[-1] imagePaths = imagePaths[:-1] # imagemagick 'convert' # GIF # ( ) cmd = "convert -delay {} {} -delay {} {} -loop {} {}".format( delay, " ".join(imagePaths), finalDelay, lastPath, loop, outputPath) os.system(cmd) The
create_gif function takes a set of images and assembles them into a GIF animation with a specified delay between frames and loops. All this handles ImageMagick — we simply wrap the convert command in a function that dynamically processes various parameters.See the documentation for available
convert arguments. There you will see how many features this command has!Specifically, in this function, we:
- We take
imagePaths. - Select the path of the last image, which will be a separate delay.
- Reassign
imagePathsto eliminate the last path. - We put together a command with command line arguments, and then instruct the operating system to
convertto create a GIF animation.
Assign the script own command line arguments:
# ap = argparse.ArgumentParser() ap.add_argument("-c", "--config", required=True, help="path to configuration file") ap.add_argument("-i", "--image", required=True, help="path to input image") ap.add_argument("-o", "--output", required=True, help="path to output GIF") args = vars(ap.parse_args()) We have three command line arguments that are processed at runtime:
--config: path to the JSON configuration file. We covered the configuration file in the previous section.--image: path to the input image, against which the animation is created (ie, face detection, adding sunglasses, and then text).--output: the path to the final GIF.
Each of these arguments is required when running the script on the command line / terminal.
Load the configuration file, as well as the glasses and the corresponding mask:
# JSON, # config = json.loads(open(args["config"]).read()) sg = cv2.imread(config["sunglasses"]) sgMask = cv2.imread(config["sunglasses_mask"]) # ( ), # , , # GIF- shutil.rmtree(config["temp_dir"], ignore_errors=True) os.makedirs(config["temp_dir"]) Here we load the configuration file (which in the future may be available as a Python dictionary). Then we load sunglasses and a mask.
If something remains from the previous script, delete the temporary directory, and then re-create an empty temporary directory. The temporary folder will contain each individual frame from the GIF animation.
Now we’ll load the OpenCV deep learning face detector into memory:
# load our OpenCV face detector and dlib facial landmark predictor print("[INFO] loading models...") detector = cv2.dnn.readNetFromCaffe(config["face_detector_prototxt"], config["face_detector_weights"]) predictor = dlib.shape_predictor(config["landmark_predictor"]) To do this, call
cv2.dnn.readNetFromCaffe . The dnn module is available only in OpenCV 3.3 or later. The face detector will detect the presence of faces in the image:
Fig. 7. Face Detector Operation Using OpenCV DNN
Then load the dlib face predictor . It will allow you to localize individual structures: eyes, eyebrows, nose, mouth and chin line:
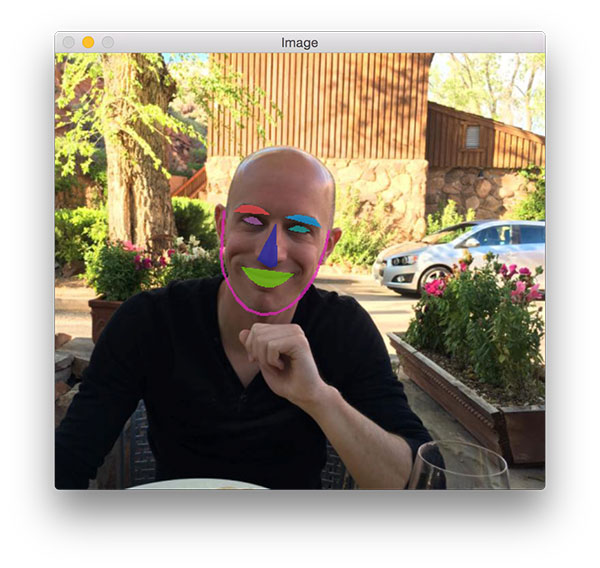
Fig. 8. On my face there are landmarks found by dlib
Later in this script we extract only the eye area.
Moving on, let's find the face:
# image = cv2.imread(args["image"]) (H, W) = image.shape[:2] blob = cv2.dnn.blobFromImage(cv2.resize(image, (300, 300)), 1.0, (300, 300), (104.0, 177.0, 123.0)) # print("[INFO] computing object detections...") detector.setInput(blob) detections = detector.forward() # , # , i = np.argmax(detections[0, 0, :, 2]) confidence = detections[0, 0, i, 2] # if confidence < config["min_confidence"]: print("[INFO] no reliable faces found") sys.exit(0) In this block we do the following:
- Load the original
image. - We construct a
blobfor sending to the neural network face detector. This article describes howblobFromImagefrom OpenCV works. - Perform face detection procedure.
- We find the person with the highest probability value and compare it with the minimum acceptable threshold. If the criteria are not met, simply exit the script. Otherwise, continue.
Now we will extract the face and calculate the reference points:
# (x, y) # box = detections[0, 0, i, 3:7] * np.array([W, H, W, H]) (startX, startY, endX, endY) = box.astype("int") # dlib # rect = dlib.rectangle(int(startX), int(startY), int(endX), int(endY)) shape = predictor(image, rect) shape = face_utils.shape_to_np(shape) # , # (lStart, lEnd) = face_utils.FACIAL_LANDMARKS_IDXS["left_eye"] (rStart, rEnd) = face_utils.FACIAL_LANDMARKS_IDXS["right_eye"] leftEyePts = shape[lStart:lEnd] rightEyePts = shape[rStart:rEnd] To extract the face and find the facial references, we do the following:
- Retrieve the coordinates of the bounding box around the face.
- We create a
rectangleobject in dlib and apply face localization. - Extract the (x, y) coordinates of the
leftEyePtsandrightEyePts, respectively.
Given the coordinates of the eyes, you can calculate where and how to place sunglasses:
# leftEyeCenter = leftEyePts.mean(axis=0).astype("int") rightEyeCenter = rightEyePts.mean(axis=0).astype("int") # dY = rightEyeCenter[1] - leftEyeCenter[1] dX = rightEyeCenter[0] - leftEyeCenter[0] angle = np.degrees(np.arctan2(dY, dX)) - 180 # , # sg = imutils.rotate_bound(sg, angle) # ** , # — # 90% sgW = int((endX - startX) * 0.9) sg = imutils.resize(sg, width=sgW) # ( , # ), # - — # , # sgMask = cv2.cvtColor(sgMask, cv2.COLOR_BGR2GRAY) sgMask = cv2.threshold(sgMask, 0, 255, cv2.THRESH_BINARY)[1] sgMask = imutils.rotate_bound(sgMask, angle) sgMask = imutils.resize(sgMask, width=sgW, inter=cv2.INTER_NEAREST) First, we calculate the center of each eye, then the angle between the centroids. The same operation is performed with horizontal alignment of the face in the frame .
Now you can rotate and resize points. Please note that we use the rotate_bound function , and not just
rotate , so that OpenCV will not cut off parts that are not visible after affine transformation.The same operations that were applied to the glasses, apply to the mask. But first you need to convert it to shades of gray and binarize, because the masks are always binary. Then we rotate and resize the mask in the same way as we did with the glasses.
Note: Please note that when changing the size of the mask, we use interpolation on the nearest neighboring points, because the mask must have only two values (0 and 255). Other interpolation methods are more aesthetic, but not suitable for masks. Here you can get additional information about interpolation by the nearest neighboring points.
The remaining three blocks of code create frames for GIF animation:
# , # N # steps = np.linspace(0, rightEyeCenter[1], config["steps"], dtype="int") # start looping over the steps for (i, y) in enumerate(steps): # # , ** # , # shiftX = int(sg.shape[1] * 0.25) shiftY = int(sg.shape[0] * 0.35) y = max(0, y - shiftY) # add the sunglasses to the image output = overlay_image(image, sg, sgMask, (rightEyeCenter[0] - shiftX, y)) Points fall from the top of the image. On each frame, they are displayed closer to the face until they cover their eyes. Using the
"steps" variable in the JSON configuration file, we generate y-coordinates for each frame. To do this, effortlessly use the function linspace from NumPy.The lines with a slight shift to the left and up may seem a bit strange, but they are needed to ensure that the glasses cover the eyes entirely, rather than just moving to the point where the center of the eye is located. I empirically determined the percentage values to calculate the shift on each axis. The next line provides no negative values.
Using the
overlay_image function, overlay_image generate the final output frame.Now apply the text “DEAL WITH IT” using another mask:
# , # "DEAL WITH IT" if i == len(steps) - 1: # "DEAL WITH IT" , # dwi = cv2.imread(config["deal_with_it"]) dwiMask = cv2.imread(config["deal_with_it_mask"]) dwiMask = cv2.cvtColor(dwiMask, cv2.COLOR_BGR2GRAY) dwiMask = cv2.threshold(dwiMask, 0, 255, cv2.THRESH_BINARY)[1] # 80% # oW = int(W * 0.8) dwi = imutils.resize(dwi, width=oW) dwiMask = imutils.resize(dwiMask, width=oW, inter=cv2.INTER_NEAREST) # , , # oX = int(W * 0.1) oY = int(H * 0.8) output = overlay_image(output, dwi, dwiMask, (oX, oY)) At the last step we superimpose the text, which in reality is another image.
I decided to use an image because the rendering capabilities of OpenCV fonts are rather limited. In addition, I wanted to add a shadow and border around the text, which, again, OpenCV does not know how.
In the rest of this code, we load both the image and the mask, and then perform alpha blending to generate the final result.
It remains only to save each frame to disk and then create a GIF animation:
# p = os.path.sep.join([config["temp_dir"], "{}.jpg".format( str(i).zfill(8))]) cv2.imwrite(p, output) # , # GIF- print("[INFO] creating GIF...") create_gif(config["temp_dir"], args["output"], config["delay"], config["final_delay"], config["loop"]) # -- print("[INFO] cleaning up...") shutil.rmtree(config["temp_dir"], ignore_errors=True) Write the result to disk. After generating all frames, call the function
create_gif to create a GIF-animation file. Remember, this is a shell that passes parameters to the ImageMagick convert command line tool.Finally, delete the temporary output directory and the individual image files.
results
Now the most interesting: let's see what our meme generator has created!
Be sure to download the source code, sample images, and deep learning models. Then open a terminal and execute the following command:
$ python create_gif.py --config config.json --image images/adrian.jpg \ --output adrian_out.gif [INFO] loading models... [INFO] computing object detections... [INFO] creating GIF... [INFO] cleaning up... 
Figure 9. GIF animation generated with OpenCV and ImageMagick with this Python script
Here you can see a GIF created using OpenCV and ImageMagick. The following actions are performed on it:
- The correct detection of my face.
- Localization of the eyes and the calculation of their centers.
- Points correctly fall on the face.
Readers of my blog know that I am a big nerd in the "Jurassic Park" and often mention it in my books, courses and textbooks.
Do not like the "Jurassic Park" ?
Well, here is my answer:
$ python create_gif.py --config config.json --image images/adrian_jp.jpg \ --output adrian_jp_out.gif [INFO] loading models... [INFO] computing object detections... [INFO] creating GIF... [INFO] cleaning up... 
Fig. 10. GIF-animation of OpenCV based on a photo from a recent screening of the film “Jurassic World 2”
Here I am at the show “The World of the Jurassic Period: 2” in a thematic T-shirt, with a glass of light and collection book.
A funny story:
Five or six years ago, my wife and I visited the Epcot Center theme park in Walt Disney World, Florida.
We decided to go on a journey to get away from the harsh winter in Connecticut, and desperately needed sunlight.
Unfortunately, it rained all the time in Florida, and the temperature barely exceeded 10 ° C.
Near the Canadian Gardens, Trisha took a picture of me: she says that I look like a vampire with pale skin, dark clothes and a hood, against the background of lush gardens behind:
$ python create_gif.py --config config.json --image images/vampire.jpg \ --output vampire_out.gif [INFO] loading models... [INFO] computing object detections... [INFO] creating GIF... [INFO] cleaning up... 
Fig. 11. With OpenCV and Python, you can make this meme or other animated GIF
That evening, Trisha published a photo in social networks - I had to put up with it.
Those of you who attended PyImageConf 2018 ( read the review ) know that I am always open for jokes. For example:
Question: Why does the rooster cross the road?
$ python create_gif.py --config config.json --image images/rooster.jpg \ --output rooster_out.gif [INFO] loading models... [INFO] computing object detections... [INFO] creating GIF... [INFO] cleaning up... 
Fig. 12. The face is recognized even with low contrast, and OpenCV correctly processes the photo and lowers the sunglasses.
Answer: I will not say the answer - put up with it.
Finally, we conclude today's guide with a good meme.
About six years ago, my father and I adopted a little beagle, Gemma.
Here you can see Gemma on my shoulder:
$ python create_gif.py --config config.json --image images/pupper.jpg \ --output pupper_out.gif [INFO] loading models... [INFO] computing object detections... [INFO] creating GIF... [INFO] cleaning up... 
Fig. 13. Gemma is amazing. Do not you think so? Then “put up with it”!
Do not agree that she is cute? Get over it.
An AttributeError error occurred?
Do not worry!
If you see this error:
$ python create_gif.py --config config.json --image images/adrian.jpg \ --output adrian_out.gif ... Traceback (most recent call last): File "create_gif.py", line 142, in <module> (lStart, lEnd) = face_utils.FACIAL_LANDMARKS_IDXS["left_eye"] AttributeError: module 'imutils.face_utils' has no attribute 'FACIAL_LANDMARKS_IDXS' ... then you just need to update the imutils package:
$ pip install --upgrade imutils Collecting imutils ... Successfully installed imutils-0.5.1 Why?
By default, it
imutils.face_utilsuses the 68-point detector of landmarks, built-in to dlib (as in this article). There is a faster 5-point detector , which now also works with imutils. I recently updated imutils to support both detectors (so you may see an error).Summary
In today's tutorial, you learned how to create a GIF using OpenCV.
To make the lesson fun, we used OpenCV to generate GIF-animation “Deal With It”, a popular meme (and my favorite), which in one form or another is found on almost every social networking site.
In the process, we used computer vision and deep learning to solve several practical problems:
- Definition of persons
- Prediction of landmarks
- Determining areas of the face (in this case, the eye)
- Calculating the angle between the eyes to align the face
- Creating transparent overlays using alpha blending
Finally, we took a set of generated images and created an animated GIF using OpenCV and ImageMagick.
I hope you enjoyed today's lesson!
If you like it, please leave a comment and let me know.
Well, if you do not like it, it does not matter, just accept this. ;)
Source: https://habr.com/ru/post/429024/
All Articles