Creating Puzzle Games on Puzzle Script
Puzzle Script is a minimalistic game engine for creating puzzles for HTML5, has open source. Examples of ready-made games can be found here .
Puzzle Script is a free online program that is used to create puzzle games. She is best known for creating push puzzles like my The Nodus . In this part we will create a game by examining the basic functions of the Puzzle Script, and in the next we proceed to programming.

Go to the engine website . Click Make a Game to open the Puzzle Script editor .
First, let's look at a few examples. At the top of the screen, open the “Load Example” list and select the first example called “Basic”. Now click on “Run”.
')


The game screen will appear. Click inside its window and press Enter on the keyboard.
Try to play the game. Your goal is to push orange boxes to black squares. When on each goal will be on the box, the level will be passed. You can press on the keyboard Z to cancel the move or R to restart the level.
Now we will create several levels. I will create one with you, while others advise you to come up with it yourself. Click on “Level Editor” in the top menu.
If you do not see the level editor screen, then click “Run” and start the game. Once on the level, again click on the “Level Editor” button. This will allow you to edit the level at which you just were.
At the top are game objects. When left clicked, the selected object is drawn. Right-click renders the “background” object. Left click on the edge of the map increases its size, right click reduces it.

To complete a level, you need to put a box on each of the goals, so each level must have a minimum:
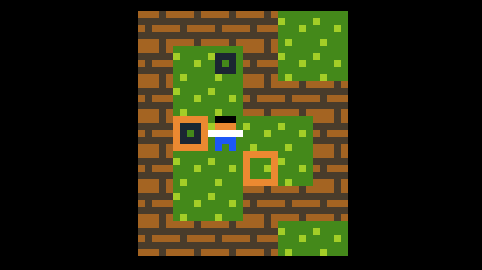
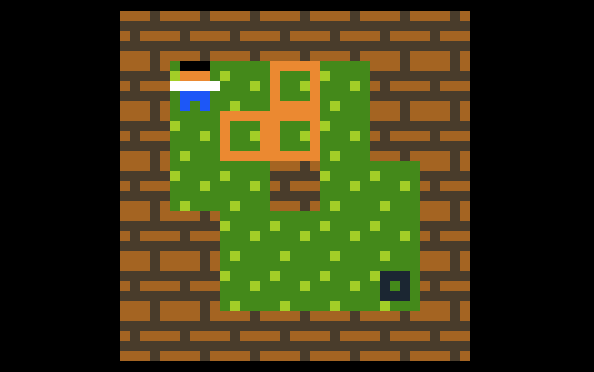
For now, right click will turn everything into grass. Then left-click on the edge of the level to make it bigger, and finally draw a level that looks like the one shown below.
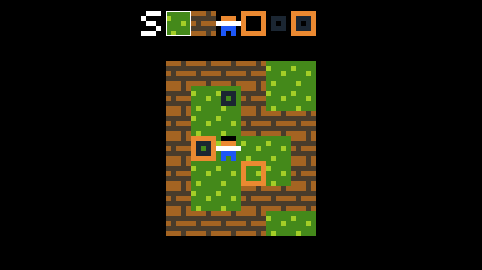
Having finished creating the level, we will add it to the list of levels. In the level editor, click on the white letter S next to the list of game objects to save the created level.

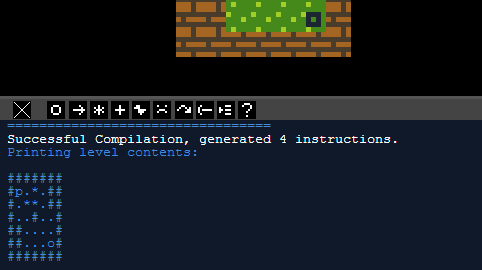
A message about successful compilation and a grid of funny characters should appear under the level editor, as shown below.
These funny symbols represent the level we have just created. Each character represents a separate object. On the left side of the screen, go down and find LEGEND. The legend provides an explanation for each of the symbols:
All that is on the left side of the screen is the game code, divided into different parts, such as OBJECTS or LEGEND. Drop down to LEVELS. Here we see the levels that are used in the example.

To add a new level, create a new blank line at the bottom of the level section. Then copy the symbols generated for our level and paste them there. Everything, level is added.

Test it. After creating a new level, you need to press the “Run” button at the top of the screen again to restart the game with a new level. Sometimes it does not work, and then you need to click the "Rebuild" button, and then click "Run" again.
Try to create some more new levels. When you are ready to save the game, go up to the top of the code and enter your own name, author name and homepage, and then click on the “Save” button.


A limited number of saves is stored in the "Load" menu on the computer you are using. However, there is a “Share” button at the top of the screen. Clicking on it generates a message with two web links.

One of the links is the source code of your project. The second is a link to a playable version of the game that can be shared with friends. I recommend periodically creating a new link to the source code and saving it in some text document so that you have a permanently stored version of the project.
You can also export the game as an html5 file, which you can then upload to game portals, for example, itch.io , Kongregate or Newgrounds . Just click "Export" and upload the downloaded html file to the game portal.
Our sample project can be found here .
In this part we will learn how to start programming in Puzzle Script .
Open the sample project . The program code is on the left side of the screen, it is divided into parts: Objects, Legend, Sounds, etc. The Rules section defines the rules for the interaction of objects. Go into it. There should be only one line of code:
This line means that if a player is near the box and moves in his direction, the game moves the player and pushes the box. To explain how this works, you need to understand that the Puzzle Script code follows this structure:
This means the following:
Puzzle Script checks if the conditions to the left of the arrow are true, for example, whether the player’s object is near the box object. If the condition is true, then we do something, for example, push the box.
Here is an example of the condition:
This event checks if object1 is near object2. You can check whether two objects are next to each other by placing a
The above code checks if two boxes are next to each other.
This condition checks if there are three boxes nearby.
This condition checks whether the box is on top of the target, because the
The rules must be balanced. Both the condition check and the event following it should be described in the same way. I will show what it means.
This line of code destroys the box if there is a player next to it. Cannot write:
because the condition on the left checks for the presence of neighboring objects in two separate grid spaces, but the event describes only one grid space that the player takes. Puzzle Script needs to know what to do with the spaces it checks. The correct code for destroying the mailbox should be as follows:
That is, even empty spaces in the code matter. However, the following entry is valid:
Since in the condition we speak only about one grid space, the event describes the same grid space.
Let's go back to the source code line.
In other words:
Arrow> underlines movement.
Sometimes we need to write comments to remember what the code does. Puzzle Script ignores comments - they are intended only for the user. To write a comment, you need to put the text in brackets. Let us write over our rule a comment describing what it does:
Now, under the push code of the box, we will write the following:
An upside down arrow means that if a player moves away from the box, he pulls the box. Click “Run” to test this action. You should be able to push and pull boxes. In programming, even with a typo in one letter, the computer may not understand the code, so get rid of all errors. When making changes to the code, click “Run” again to download the changes. If the game does not behave as it should, try clicking on “Rebuild” to clear the program’s memory, and then click “Run.”
Sometimes you need to deactivate a line of code. Just turn it into a comment to save for the future. Let's comment out the pushing code of the boxes so that the player can only drag the boxes:
If it worked, comment out the box pull code and try the following:
If the player moves away from the box, the player and the box will move in opposite directions. The arrows determine in which direction the object either moves or will move. Now comment out this and try the following:
The box moves, but the player remains in place. Experiment with c ^ and v (letter v) to see how objects will move.
Let's intentionally write the wrong rule and see what happens. Enter the following line:
Try running the program. You should see this message:
Usually Puzzle Script describes the error very well. However, sometimes Puzzle Script is wrong. In such cases, you need to go through the code yourself and figure out where the error is.
Try experimenting and writing rules yourself. Here are some examples.
In the example shown above, the player will push the box if they are anywhere on the same level row, and the player moves to the box.
This code changes the player and the box in some places.
In this code, if the player is near the box and moves toward it, the player will stop moving, but the box will turn into a goal. The best thing about Puzzle Script is the simplicity of creating a new one and the possibility of experiments.
All graphic fragments in games on Puzzle Script designate objects. To create games on Puzzle Script you need to create your own objects. In this part, I’ll tell you how to create them and add them to your code.
Open the sample project . The process of creating an object consists of the following steps:
Having done all these steps, you can start using the object.
Several objects already exist. Each game must have a background object. All objects are created from a 5 x 5 pixel grid and have at least one color. The background object is shown below.
Numbers denote image pixels. Each number corresponds to its color. The first color has the number 0, the second - 1, and so on up to 9. There can be up to ten colors. In our case, each 1 colors a pixel in light green (Light Green), and 0 - in green (Green). The result looks like this:

Objects are always created as follows:
The name is always on the top line. The colors are always in the second line, and the image takes up the next 5 lines, 5 characters per line, which forms a grid of 5 x 5. Or you can do the following:
This code will create an object called “Background”, which will be a 5 x 5 pixel grid in light green. If you do not describe the image grid, then we get a block of solid color, which can sometimes be useful.
Objects can be called as you like, but the name cannot begin with a symbol and it must be in one word without spaces. Give objects clear names, but don't overdo it. PlayerStill is a good name, PlayerThatIsStandingStill is too long and verbose.
You must declare the colors you want to use for the object, and separate them with a space. Puzzle Script has predefined colors:
You can also set colors in hexadecimal, which gives us a much larger range of colors. You can use websites like this to select hexadecimal colors. Select the desired color and then rewrite the color code shown above the image. Hexadecimal color codes are written to Puzzle Script as follows:
The color code is always preceded by a #.
Creating an object, you need to add it to the legend. The legend looks like this:
Each character represents an object in a level. That is, when we see such a grid of characters:
it actually describes our level:
Each object to be created must be assigned a letter, symbol or number denoting this object at the level. Like this:
We can also create groups of objects in the legend. For example, if we have several multi-colored boxes, we can do this:
That will allow us to use the boxes in the editor level. But to create code, you can group them together in Legend, like this:
And all together it will look like this:
Why do this? Because then instead of creating such rules:
you can simply write:
And this code will work for the entire group of objects.
In addition, in the Collision Layers section, it will be possible to refer to the layer in which the group is located, and not to enter each individual object.
By default, the collision layer section looks like this:
Each line selects objects in its own layer. The order of the object layers determines which objects will be on top of others. The objects in the top line will be on the bottom layer, the next line will be in the layer above it, and so on. The background should always be on the top line in order to be on the bottom layer. Objects in the same layer cannot be on top of each other. That is, this can not be:
You can make objects in different layers interact with each other. For example, you can write:
Create some new objects. Create a box type that can only be pushed. Create another box that can only be dragged. Create a box that disappears when you touch it. Continuing the experiments, you will better remember how everything is done.
Everyone loves to win. We, as players, want to win. In this part we will learn how to program the conditions of victory in the game.
Download the sample project and go to the Win Conditions code section. You should see the following:
The game is won if there is a box on each goal. If you have 3 boxes and 2 goals, you will win by setting only 2 boxes on goals. If you swap:
then each box must be on target.
Conditions may be one or more. In the case of multiple conditions, they must all be met. For example, we may have the following:
If there are target and target2 at the level, then crate and crate2 are on them, respectively. If at the level there is none of the objects necessary to fulfill a certain victory condition, for example, target2 is not present, then this condition is fulfilled automatically.
There are several different types of victory conditions.
In this case, victory comes when there are no such objects at the level.
You win when there is at least one object of the specified type on the level.
It is necessary that at least one of Object1 be on Object2.
This condition is opposite to
Let's experiment with different victory conditions. Try to create a game in which the gain comes, if all the boxes are not on targets. Or make a game in which you need to destroy all the boxes of a certain type, but other pushed boxes are on your way.
My complete example of the project can be found here .
In PuzzleScript there is a very useful command called “late”. The order of origin of events in the game is important, and sometimes to get the results you need, you need a code that runs later. In this part I will talk about using the late command.
Open the sample project , then paste the following code into the game and run it:
It can be expected that as soon as the player gets close to the target, the target will be destroyed, but this does not happen. Instead, the target disappears in the course after the player has stood next to it. Therefore, let's try another code:
As soon as you stand next to the target, it will disappear. It happened because everything, denoted as late , occurs after the execution of the rest of the code. Sometimes it is necessary.
Here is how the code is executed in Puzzle Script with each move.
The computer starts with the top line of code and reads down, line by line. checking every condition. So when you try to move, Puzzle Script reads all the rules and checks if the conditions are true, and if so, it does something. For example, the first line could be:
If the player does not stand next to the stake trap, the code continues execution. This means that the order of writing lines of code is important. You can use the late command in some cases, which you will learn with time in practice.
In my experience, it is best to use the late command when you check whether objects are on top of each other or next to each other, but there are other cases. If you check if one object is on another, the event will not register until the next turn, unless you use the late command:
In the above case, the player will not be killed by a trap with stakes until the next turn after moving into the trap. To make the player die instantly, just add the late command,
To restart the entire level when a character dies, you can do the following:
And the level will restart when the player falls into the trap with stakes.
A complete example of the project can be found here .
We made a great game on Puzzle Script , but now we need to add sounds to it. How to do it? Now I will tell you!
Open the sample project . Add sounds to it. Under the screen of the game you can see black squares with white characters. They are used to generate sound. Each symbol generates a unique sound type, and a cross deletes the sounds created. Try to click on the squares and listen to the sounds.

Yellow numbers are unique codes that need to be copied and pasted into those parts of the code where sounds are necessary.
Having found a suitable sound, you must paste it into the Sounds section of the game code.

Sounds can be used in several ways. The simplest is to create a new sound effect (sfx). They should be numbered. We create a new sfx by assigning it a number from 0 to 10 when inserting a numeric sound ID. In the Sounds list, create a new sfx called sfx0 and assign it the generated sound:
To use sound, you need to insert it into the rules after the event. Let's attach the newly created sfx0 to the box destruction event (the event is already present in the sample project):
You can also announce sounds for playback with certain events, for example:
In this case, the sound will play when you move Crate. Generate a new sound effect to drag and drop CratePull objects and make it play when CratePull is moved:
Event sounds need only be announced in the Sounds section: they are not required to be mentioned in the rules.
Below is a list of the various event sounds that you can use, taken from the Puzzle Script documentation .
Object Action 541566 - reproduced when an object is exposed during an action.
Object Create 641667 - reproduced when creating a specific object.
EndGame 5416789 - is played at the end of the game.
EndLevel 6417822 - is played after the completion of the level.
Object CantMove 781673 - reproduced when the object tried unsuccessfully to move in any direction.
Player CantMove Down Left 464674 - played when the object tried unsuccessfully to move down or to the left.
CloseMessage 344456 - played when the player closes the window with the message.
Object Destroy 187975 - played when an object is destroyed.
Object Move 264567 - reproduced when the object successfully moves in any direction.
Object Move Down Left 765432 - plays when the object successfully moves down or to the left.
Object Move Horizontal 345367 - reproduced when the object successfully moved horizontally. You can also use Vertical.
Restart 7865435 - is played when the player presses the restart button R.
SFX0 765743 - can be anything from SFX0 to SFX10. These are special sound events that can be performed from the rules.
ShowMessage 478483 - is played when the message is displayed.
StartGame 234626 - played at the beginning of a new game.
Startlevel 765436 - plays at the beginning of each level.
TitleScreen 876543 - plays after the screen saver loads.
Undo 436234 - played when a player presses the cancel key (Z).
For move and cantmove, you can specify directions so that when moving in different directions, different sounds are played.
The finished sample project is here .
We learned how to create games on Puzzle Script, but wouldn't it be great to add music to them? It is possible, and now I will tell how it is done.
Open the project stub . Music works in Puzzle Script as follows: you can insert a link to a single video from Youtube. PuzzleScript will automatically play all the sounds of this video. Open Youtube and select any video, or use the following:
youtube.com/watch?v= CKAc3nYEatw
To play music from a video, we need to get a unique video ID. The green part in the line above is a unique ID.

Under the label of the author’s home page at the beginning of the project, add the youtube label, and after it the unique video ID, for example:
youtube CKAc3nYEatw
To make sure that it works correctly, click on “Share” and click on the link of the game (not on the link of the source code). During testing inside the editor, the Puzzle Script music cannot be played. If you want the game to have music, then you need to upload it as a video on Youtube and insert a unique ID into your project. In each project there can be only one Youtube video.
An example of the Puzzle Script project can be found here .
We already know how to move, push and drag blocks, but what if we need to do something by pressing a certain key, such as a space ?
The input options in PuzzleScript are quite limited, mostly the arrow keys, Z to cancel, R to restart, and we cannot change them. But the engine gives us an additional key for action - pressing the space or the X key.
Working with the Action command follows the format described above. We used the basic PuzzleScript code format:
If the condition is true, then we execute the event. The action command is used in the same way, but it has its own rules. She looks like this:
Here is an example of using the Action command:
First, Action is always the first word of a condition.
Secondly, if we want to influence a certain object in the game, then we need to mention this object both in the condition and in the event (if we mention another object, the program will delete the original one and replace it with a new object, and if the object is not specified, then it will just go away).
Finally, the word Action should be used only in the condition , but sometimes it is worth using it both in the condition and in the event. I will tell about it below.
Check the code shown above in the game project. You can start with this example . You will see that when you press the space or X the player becomes a box.
The condition states [ If we press the Action key and there is a Player object at the level ] -> then [ replace the player object with the box]
Now, try the following code in the example project:
Make sure that you are surrounded by boxes on all sides, as in the image above. You will notice that the action only affects one box at a time. I don’t know exactly what the reason is, but if you want to influence several objects with the Action command , you need to specify it in the condition and in the event.
Replace the code with the updated version:

Now we can push all the boxes at the same time. If you need to apply an action to several objects, then place an Action in both the condition and the event.
Let's learn to check several conditions, for example, the presence of a bomb AND a destructible block.

Open the sample project . Now add the following code to it:
The code corresponds to this format:
If condition 1 is true and condition 2 is true, then action 1 and action 2 are performed. In our case, condition 1 checks if the Player is on the Switch. If so, is condition 2 checked, that is, the presence at the level of a closed door? If the condition is true, then the DoorClosed object turns into a DoorOpen object, opening the door.
Suppose we need the door to close when the hero leaves the switch, because we want the player to push the box to the switch to open the door. You can write something like this:
If the player is standing next to the switch and somewhere on the level there is an open door, then we close the door. Finally, we need the door to remain open if we push the box to the switch:
Now the door will remain open while there is a drawer on the switch.
A complete example of the project can be found here .
Perhaps you have a good idea to play Puzzle Script, but you need control points (checkpoints) for the player to recover in case of death. How to do it? Pretty simple, and now I will explain how.

Open the sample project . Now we need to program the control point. All you need is a single line of code:
FlagRed is a control point. When a player is on top of a flag, this code creates a control point (CHECKPOINT). If you do not use late, the checkpoint function will not work.
Test the game. Go over the control point, and then a little further and press R. You will need to start from the control point.
If there are several control points, the game uses the last one activated by the player.
To avoid re-activation of the already used control point, you need to change it to another object. To do this, create in the OBJECTS section of the code under the red flag its white copy.
Now rewrite this line in the legend:
We can create a group of objects. In this case, Flag will be either FlagRed, or FlagWhite. As long as at least one of the grouped objects is assigned a symbol (we assigned the symbol F to the FlagRed), we will not need to assign symbols to other objects of the group, and you can only access them in the code, but not in the level editor. You can then assign collision layers to the group, which we did. Appeal to a group of objects, for example, Flag, refers to the entire group. Therefore:
This code will affect both the red and the white flag.
Here's how to change FlagRed to FlagWhite:
If at the end of the turn the player is on a red flag, then we turn it into white. However, you need to make the flag graphics change after creating a control point, because the code is read from top to bottom. Test the program.
There are two flags in the project. Let's make it so that when the second flag is activated, the old white flag turns black, so that it cannot be used again. We write the following:
The code says: if a player is on a red flag and somewhere in the game there are white flags, then you need to make the white flags black. Since the code is read from top to bottom, we need to do this in the following order:
If you don’t understand why the code should be in this order, then try changing the order of the lines and test the program. To solve your own problems, you need to learn how to step back and think about what the code does. But I will give you a hint - when you play, where are the red flags in the last line of code in the following wrong example?
View the finished sample project here . In addition, I just showed you the simplest way to animate. In the next part I will talk about creating more complex animations, such as explosions.
There are two ways to create animations in PuzzleScript. In one of them, real time is used, but in this part I will not talk about it. The other is used for quick, one-time animations, such as an explosion or a character walking down a vertical staircase.
Open the sample project . We will create a bomb and a series of explosion frames, and then animate them.
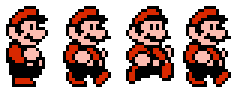
For 2D animations, you need several drawings of an object moving from one state to another, for example, a running Mario sprite. It contains 4 frames of animation.
To simulate the transition of one animation frame to another, we will create several objects in PuzzleScript that will be animation frames, and then use the code to switch between them.
Create such an object bomb.
Do not forget to add it to the layers and the legend.
To animate the explosion, we need to create each frame of the animation as a separate object, and then switch between them in code. Let's create explosion objects.
It will be correct to number the objects in order to know which frame of the animation we need. After adding them to the layers and the legend, we can add a few lines of code.
Try adding this code, then place a bomb on the level and start the game. You will notice that each time you move, the bomb animation changes by one frame. Switching between objects, we create an animation.
The order of switching between animations is crucial. The last frame should be above and the first one below. Do not forget that the code is read from top to bottom. If the animation frames are in a different order, we will never see the changes. We will only see the last frame, and in our case the bomb will just disappear. It will change to the first frame, then to the second, and so on, in one frame, before you see the graphics. Placing the last frame in the beginning, we will see the following change in each turn.
To animate everything together, we need the command again . Again means that after reading all the code, PuzzleScript will pause, and then count the code again, executing all the commands again . It can be used for gravity, sliding on ice, and in our case for animations. All that is needed is to rewrite the code as follows:
Test the game. You will see that the entire bomb animation is played immediately. If you think it is too slow or fast, then the speed can be changed. At the very beginning of the program text, under the homepage write the following code:
This is part of what is called prelude in PuzzleScript . This is the place where, before the rest of the code, you can set additional rules that determine the behavior of the game. Now the animation should play faster. Try changing the number after again_interval and check what has changed.
A complete example of the project can be found here .
Usually PuzzleScript is used to create games with top view (top down), but in fact you can simulate some elements of side scrollers, albeit with limited rules of PuzzleScript, that is, they will still be step by step. In this part I will tell you how to implement gravity.
Open the sample project . I created a simple level, it has a player, a box on the ledge and a door below. We want to make sure that when a player pushes a box from a ledge, it will fall to the ground. We also want the player to fall off the edge, also fall to the ground.
Here is the first part of the code we will use:
Try to push the box off the edge. You will notice that after moving the box freezes in the air, but after another move it falls to the ground. Several things happen here.
First, let's talk about the down keyword . Adding down , we limit the rule to the fact that it applies only in the "down" direction. That is why the drawer moves down. If you replace down with right , you will see that the box is stuck in the right wall, as in a game with anti-gravity. Try this.
Next, do something unusual. Instead of checking whether a player is near a certain object (for example, a box), we check if he is near a generic object.. If you look at the legend in the example code, then you will see that we have defined object as a group of objects, that is, with each use of the word object, we mean a group of objects. That is, we check if there are any of these objects under the player. If not, we order the player to occupy this empty space and leave the previous space, because of the word down, following in the downward direction.
But it can also be noted that after pushing the ledge off the box does not fall until the next turn, and that it instantly reaches the ground. To eliminate this pending drop, you can use the late keyword:
But how to make it fall gradually, frame by frame?
Now we use the keyword random . Rewrite the code as follows:
Run the code. It works very much like the previous code, but one important difference. The box hangs in the air, but each time a player moves, he falls down one cell. This is due to the word random . Strictly speaking, random is intended for creating games with random elements, but it was useful to us here. It forces the corresponding line of code to be executed once per turn. PuzzleScript performs each rule as many times as possible in one move, and only then the player sees the graphic changes. That is why it seems that the box falls to the ground instantly. But when using the word random, we allow it to fall only one cell at a time.
Now we add the keyword again :
Run the game. Everything is almost perfect. The box freezes for a while in the air, but if you move again, it gradually falls to the ground. We are already familiar with the again keyword , in essence, it means that at the end of the course, PuzzleScript reads the code again and tries to execute all the commands again as a separate move, then pauses, then repeats them again as many times as possible. The important thing here is that he pauses between turns again , which allows us to see the fall of the box.
And the final touch. To make the box fall to the ground right after pushing it off the edge, we need to add one more line of code above the one we just wrote:
The moving keyword used in square brackets [] in front of the player means that we check if the player is moving. This means that if a player moves, then we order him to keep moving and to run the command again . Then everything that the keyword again uses will work immediately ; in our case, this is a drop box animation.
A complete example of the project can be found here .
Sometimes it happens that you need to check something only in one direction. For example, you need to make blocks that can be pushed only horizontally, or create a duck that can only walk to the left.
Be that as it may, we can indicate that events take place only in certain directions.
Open PuzzleScript, create a game based on the Basic example, and replace it with Rules with the following code:
Start the game and see what happens.
If you try to go left, the player will turn into a box. This is a good example of how directions are working.
We are already accustomed to the format in which I explained PuzzleScript code:
If the event is true, then the event occurs.
But now, when we need to check directions, it will follow the new rules:
That is our previous code:
checks whether the player is moving left ( Left ). If yes, then we replace the player with the box object.
You can choose from the following types of directions:
For some reason, the game may require custom movement. Ducks can only walk to the left, boxes can be pushed only horizontally, and so on. Make it very easy. Let's take another look at the basic format of the PuzzleScript code:
If the condition is true, then an event occurs. To create a custom move, do the following:
Here is how the example will look like:
Download PuzzleScript , open the Basic example , paste in this code and see what happens. Approach the box, around which there are no walls.
You will see that when a player is near the box, the box is pushed to the left. However, since the Late keyword does not exist, this happens during the course after you have taken the first step towards it.
If you specify in addition to the object in the Event , the direction of movement , for example, Left , PuzzleScript will try to move the object in the specified direction. That is why the box, and not the player moves to the left - Left is located next to the Crate .
Remember this code from the previous part?
If you specify the direction of motion in the condition next to the object, then it checks whether this object is moving in a given direction. This is an important difference. You can rewrite it like this:
Customizable movements can be created with any of these words:
You cannot use Horizontal or Vertical , because PuzzleScript will not understand in which direction you want to move the object, or it will take a lot of workarounds to do this. Need to specify a specific direction.
Sometimes it is necessary to check what is near the object. Make it pretty simple. Let's look again at the format of the code of PuzzleScript:
i.e
To check the sides of the object, we need to add one element. The format looks like this:
Before the condition, we check which side of the object we want to perform the check.
Inside the condition, we assume that you need at least two cells. A cell is, in fact, any objects that are in the same space and not next to each other.
The first cell is an object, the sides of which we check. The second cell is an object that we check for. Try the following examples:
The code shown above removes the boxes if they are in the box to the left of the player.
This code checks if the box is to the left of another box. If yes, then the box whose side is being checked will become a new player object.
In the above code there is the same check, but the player’s object becomes the box on the left.
This code also uses a similar pattern. The box immediately to the left of the test player becomes a player if the 3 boxes are next to each other horizontally.
If the 3 boxes are next to each other horizontally, then the leftmost one becomes a player.
If you test each of these examples, you will begin to understand the pattern. The first cell is an object that we check to see what is nearby. The following cells, from the nearest to the far, are the objects whose presence we check.


Part 1. Create the first game on Puzzle Script.
Puzzle Script is a free online program that is used to create puzzle games. She is best known for creating push puzzles like my The Nodus . In this part we will create a game by examining the basic functions of the Puzzle Script, and in the next we proceed to programming.
Go to the engine website . Click Make a Game to open the Puzzle Script editor .
Loading examples
First, let's look at a few examples. At the top of the screen, open the “Load Example” list and select the first example called “Basic”. Now click on “Run”.
')
The game screen will appear. Click inside its window and press Enter on the keyboard.
Try to play the game. Your goal is to push orange boxes to black squares. When on each goal will be on the box, the level will be passed. You can press on the keyboard Z to cancel the move or R to restart the level.
Making the first game
Now we will create several levels. I will create one with you, while others advise you to come up with it yourself. Click on “Level Editor” in the top menu.
If you do not see the level editor screen, then click “Run” and start the game. Once on the level, again click on the “Level Editor” button. This will allow you to edit the level at which you just were.
Create a new level
At the top are game objects. When left clicked, the selected object is drawn. Right-click renders the “background” object. Left click on the edge of the map increases its size, right click reduces it.
To complete a level, you need to put a box on each of the goals, so each level must have a minimum:
- 1 box
- 1 goal
- 1 player
For now, right click will turn everything into grass. Then left-click on the edge of the level to make it bigger, and finally draw a level that looks like the one shown below.
Add it to the list of levels
Having finished creating the level, we will add it to the list of levels. In the level editor, click on the white letter S next to the list of game objects to save the created level.
A message about successful compilation and a grid of funny characters should appear under the level editor, as shown below.
These funny symbols represent the level we have just created. Each character represents a separate object. On the left side of the screen, go down and find LEGEND. The legend provides an explanation for each of the symbols:
. = Background
# = Wall
P = Player
* = Crate
@ = Crate and Target
O = Target
All that is on the left side of the screen is the game code, divided into different parts, such as OBJECTS or LEGEND. Drop down to LEVELS. Here we see the levels that are used in the example.
To add a new level, create a new blank line at the bottom of the level section. Then copy the symbols generated for our level and paste them there. Everything, level is added.
Test it. After creating a new level, you need to press the “Run” button at the top of the screen again to restart the game with a new level. Sometimes it does not work, and then you need to click the "Rebuild" button, and then click "Run" again.
Save and load the game
Try to create some more new levels. When you are ready to save the game, go up to the top of the code and enter your own name, author name and homepage, and then click on the “Save” button.
A limited number of saves is stored in the "Load" menu on the computer you are using. However, there is a “Share” button at the top of the screen. Clicking on it generates a message with two web links.
One of the links is the source code of your project. The second is a link to a playable version of the game that can be shared with friends. I recommend periodically creating a new link to the source code and saving it in some text document so that you have a permanently stored version of the project.
Export of games
You can also export the game as an html5 file, which you can then upload to game portals, for example, itch.io , Kongregate or Newgrounds . Just click "Export" and upload the downloaded html file to the game portal.
Our sample project can be found here .
Part 2. Starting to program in Puzzle Script
In this part we will learn how to start programming in Puzzle Script .
Code
Open the sample project . The program code is on the left side of the screen, it is divided into parts: Objects, Legend, Sounds, etc. The Rules section defines the rules for the interaction of objects. Go into it. There should be only one line of code:
[ > Player | Crate ] -> [ > Player | > Crate ]This line means that if a player is near the box and moves in his direction, the game moves the player and pushes the box. To explain how this works, you need to understand that the Puzzle Script code follows this structure:
[ ] -> [ ]This means the following:
[ ] -> [ ]Puzzle Script checks if the conditions to the left of the arrow are true, for example, whether the player’s object is near the box object. If the condition is true, then we do something, for example, push the box.
Condition examples
Here is an example of the condition:
[ object1 | object2 ]This event checks if object1 is near object2. You can check whether two objects are next to each other by placing a
| between them | | entered by pressing shift + \. Conditions are always enclosed in [ ] .[ crate | crate ]The above code checks if two boxes are next to each other.
[ crate | crate | crate ]This condition checks if there are three boxes nearby.
[ crate target ]This condition checks whether the box is on top of the target, because the
| | between the two objects. Objects can be on top of each other if they are located in different layers of collisions, which we will look at in the following parts of the tutorial.Maintain equality
The rules must be balanced. Both the condition check and the event following it should be described in the same way. I will show what it means.
[ player | crate ] -> [ player | ]This line of code destroys the box if there is a player next to it. Cannot write:
[ player | crate ] -> [ player ]because the condition on the left checks for the presence of neighboring objects in two separate grid spaces, but the event describes only one grid space that the player takes. Puzzle Script needs to know what to do with the spaces it checks. The correct code for destroying the mailbox should be as follows:
[ | ] -> [ | ][ player | crate ] -> [ player | ]That is, even empty spaces in the code matter. However, the following entry is valid:
[ player target ] -> [ player ]Since in the condition we speak only about one grid space, the event describes the same grid space.
How to move boxes
Let's go back to the source code line.
[ > Player | Crate ] -> [ > Player | > Crate ]In other words:
[ | ] -> [ | ]Arrow> underlines movement.
Sometimes we need to write comments to remember what the code does. Puzzle Script ignores comments - they are intended only for the user. To write a comment, you need to put the text in brackets. Let us write over our rule a comment describing what it does:
( )
[ > Player | Crate ] -> [ > Player | > Crate ]
Now, under the push code of the box, we will write the following:
( )
[ < Player | Crate ] -> [ < Player | < Crate ]
An upside down arrow means that if a player moves away from the box, he pulls the box. Click “Run” to test this action. You should be able to push and pull boxes. In programming, even with a typo in one letter, the computer may not understand the code, so get rid of all errors. When making changes to the code, click “Run” again to download the changes. If the game does not behave as it should, try clicking on “Rebuild” to clear the program’s memory, and then click “Run.”
Sometimes you need to deactivate a line of code. Just turn it into a comment to save for the future. Let's comment out the pushing code of the boxes so that the player can only drag the boxes:
( )
([ > Player | Crate ] -> [ > Player | > Crate ])
( )
[ < Player | Crate ] -> [ < Player | < Crate ]
If it worked, comment out the box pull code and try the following:
[ < Player | Crate ] -> [ < Player | > Crate ]If the player moves away from the box, the player and the box will move in opposite directions. The arrows determine in which direction the object either moves or will move. Now comment out this and try the following:
[ > Player | Crate ] -> [ Player | > Crate ]The box moves, but the player remains in place. Experiment with c ^ and v (letter v) to see how objects will move.
Errors
Let's intentionally write the wrong rule and see what happens. Enter the following line:
[ < Player | Crate ] -> [ < Player ]Try running the program. You should see this message:
The line 81 is the corresponding length (number of cells).
Usually Puzzle Script describes the error very well. However, sometimes Puzzle Script is wrong. In such cases, you need to go through the code yourself and figure out where the error is.
More experiments
Try experimenting and writing rules yourself. Here are some examples.
[ > Player | … | Crate ] -> [ > Player | … | > Crate ]In the example shown above, the player will push the box if they are anywhere on the same level row, and the player moves to the box.
[ > Player | Crate ] -> [ Crate | Player ]This code changes the player and the box in some places.
[ > Player | Crate ] -> [ Player | Target ]In this code, if the player is near the box and moves toward it, the player will stop moving, but the box will turn into a goal. The best thing about Puzzle Script is the simplicity of creating a new one and the possibility of experiments.
Part 3. Creating objects
All graphic fragments in games on Puzzle Script designate objects. To create games on Puzzle Script you need to create your own objects. In this part, I’ll tell you how to create them and add them to your code.
General information
Open the sample project . The process of creating an object consists of the following steps:
- Creating it in the list of objects
- Adding an object to the legend
- Adding a collision layer
Having done all these steps, you can start using the object.
Object creation
Several objects already exist. Each game must have a background object. All objects are created from a 5 x 5 pixel grid and have at least one color. The background object is shown below.
Background
LIGHTGREEN GREEN
11111
01111
11101
11111
10111
Numbers denote image pixels. Each number corresponds to its color. The first color has the number 0, the second - 1, and so on up to 9. There can be up to ten colors. In our case, each 1 colors a pixel in light green (Light Green), and 0 - in green (Green). The result looks like this:
Objects are always created as follows:
- Title
- Colors
- Picture
The name is always on the top line. The colors are always in the second line, and the image takes up the next 5 lines, 5 characters per line, which forms a grid of 5 x 5. Or you can do the following:
Background
LIGHTGREEN
This code will create an object called “Background”, which will be a 5 x 5 pixel grid in light green. If you do not describe the image grid, then we get a block of solid color, which can sometimes be useful.
Give names to objects
Objects can be called as you like, but the name cannot begin with a symbol and it must be in one word without spaces. Give objects clear names, but don't overdo it. PlayerStill is a good name, PlayerThatIsStandingStill is too long and verbose.
Colors
You must declare the colors you want to use for the object, and separate them with a space. Puzzle Script has predefined colors:
- black
- white
- gray
- darkgrey
- lightgrey
- gray
- darkgray
- lightgray
- red
- darkred
- lightred
- brown
- darkbrown
- lightbrown
- orange
- yellow
- green
- darkgreen
- lightgreen
- blue
- lightblue
- darkblue
- purple
- pink
- transparent
You can also set colors in hexadecimal, which gives us a much larger range of colors. You can use websites like this to select hexadecimal colors. Select the desired color and then rewrite the color code shown above the image. Hexadecimal color codes are written to Puzzle Script as follows:
#51A2BD #ff0000 #ffffffThe color code is always preceded by a #.
Adding an object to the legend
Creating an object, you need to add it to the legend. The legend looks like this:
. = Background
# = Wall
P = Player
* = Crate
@ = Crate and Target
O = Target
Each character represents an object in a level. That is, when we see such a grid of characters:
#p.*.##
#.**.##
#..#..#
##....#
##...o#
#######
it actually describes our level:
Each object to be created must be assigned a letter, symbol or number denoting this object at the level. Like this:
P = playerGroup objects in the legend
We can also create groups of objects in the legend. For example, if we have several multi-colored boxes, we can do this:
O = OrangeCrate
B = BlueCrate
G = GreenCrate
That will allow us to use the boxes in the editor level. But to create code, you can group them together in Legend, like this:
Crates = OrangeCrate or GreenCrate or BlueCrateAnd all together it will look like this:
=======
LEGEND
=======
O = OrangeCrate
B = BlueCrate
G = GreenCrate

Crates = OrangeCrate or GreenCrate or BlueCrate
Why do this? Because then instead of creating such rules:
[ > Player | OrangeCrate ] -> [ > Player | > OrangeCrate ]
[ > Player | BlueCrate] -> [ > Player | > BlueCrate ]
[ > Player | GreenCrate] -> [ > Player | > GreenCrate]
you can simply write:
[ > Player | Crates ] -> [ > Player | > Crates ]And this code will work for the entire group of objects.
In addition, in the Collision Layers section, it will be possible to refer to the layer in which the group is located, and not to enter each individual object.
Collision layers
By default, the collision layer section looks like this:
Background
Target
Player, Wall, Crate
Each line selects objects in its own layer. The order of the object layers determines which objects will be on top of others. The objects in the top line will be on the bottom layer, the next line will be in the layer above it, and so on. The background should always be on the top line in order to be on the bottom layer. Objects in the same layer cannot be on top of each other. That is, this can not be:
[ player wall ] -> [ player wall ]You can make objects in different layers interact with each other. For example, you can write:
[ > Player | Target ] -> [ > Player | > Target ]Experiment
Create some new objects. Create a box type that can only be pushed. Create another box that can only be dragged. Create a box that disappears when you touch it. Continuing the experiments, you will better remember how everything is done.
Part 4. Victory conditions
Everyone loves to win. We, as players, want to win. In this part we will learn how to program the conditions of victory in the game.
Victory conditions
Download the sample project and go to the Win Conditions code section. You should see the following:
All Target on CrateThe game is won if there is a box on each goal. If you have 3 boxes and 2 goals, you will win by setting only 2 boxes on goals. If you swap:
All crate on targetthen each box must be on target.
Conditions may be one or more. In the case of multiple conditions, they must all be met. For example, we may have the following:
All Target on Crate
All Target2 on Crate2
If there are target and target2 at the level, then crate and crate2 are on them, respectively. If at the level there is none of the objects necessary to fulfill a certain victory condition, for example, target2 is not present, then this condition is fulfilled automatically.
Different types of win conditions
There are several different types of victory conditions.
No ObjectIn this case, victory comes when there are no such objects at the level.
Some ObjectYou win when there is at least one object of the specified type on the level.
Some Object1 on Object2It is necessary that at least one of Object1 be on Object2.
No Object1 On Object2This condition is opposite to
All Target on Crate . In this case, we need all the specified objects to be located separately from each other, and not on top of each other. You can also combine with each other the various conditions of victory.Experiment
Let's experiment with different victory conditions. Try to create a game in which the gain comes, if all the boxes are not on targets. Or make a game in which you need to destroy all the boxes of a certain type, but other pushed boxes are on your way.
My complete example of the project can be found here .
Part 5. Team late
In PuzzleScript there is a very useful command called “late”. The order of origin of events in the game is important, and sometimes to get the results you need, you need a code that runs later. In this part I will talk about using the late command.
Why do we need it
Open the sample project , then paste the following code into the game and run it:
[ player | target ] -> [ player | ]It can be expected that as soon as the player gets close to the target, the target will be destroyed, but this does not happen. Instead, the target disappears in the course after the player has stood next to it. Therefore, let's try another code:
late [ player | target ] -> [ player | ]As soon as you stand next to the target, it will disappear. It happened because everything, denoted as late , occurs after the execution of the rest of the code. Sometimes it is necessary.
Order of events
Here is how the code is executed in Puzzle Script with each move.
- Puzzle Script detects player wants to move
- Where possible, rules are read and executed from top to bottom.
- Player moves if possible
- Apply Late Rules
The computer starts with the top line of code and reads down, line by line. checking every condition. So when you try to move, Puzzle Script reads all the rules and checks if the conditions are true, and if so, it does something. For example, the first line could be:
[ player | spikeTrap ] -> [ | spikeTrap ]If the player does not stand next to the stake trap, the code continues execution. This means that the order of writing lines of code is important. You can use the late command in some cases, which you will learn with time in practice.
Ways to use Late in practice
In my experience, it is best to use the late command when you check whether objects are on top of each other or next to each other, but there are other cases. If you check if one object is on another, the event will not register until the next turn, unless you use the late command:
[ player spikeTrap ] -> [ spikeTrap ]In the above case, the player will not be killed by a trap with stakes until the next turn after moving into the trap. To make the player die instantly, just add the late command,
late [ player spikeTrap ] -> [ spikeTrap ]To restart the entire level when a character dies, you can do the following:
late [ player spikeTrap ] -> restartAnd the level will restart when the player falls into the trap with stakes.
A complete example of the project can be found here .
Part 6. Working with sound effects.
We made a great game on Puzzle Script , but now we need to add sounds to it. How to do it? Now I will tell you!
Sound generation
Open the sample project . Add sounds to it. Under the screen of the game you can see black squares with white characters. They are used to generate sound. Each symbol generates a unique sound type, and a cross deletes the sounds created. Try to click on the squares and listen to the sounds.
Yellow numbers are unique codes that need to be copied and pasted into those parts of the code where sounds are necessary.
How to use sounds
Having found a suitable sound, you must paste it into the Sounds section of the game code.
Sounds can be used in several ways. The simplest is to create a new sound effect (sfx). They should be numbered. We create a new sfx by assigning it a number from 0 to 10 when inserting a numeric sound ID. In the Sounds list, create a new sfx called sfx0 and assign it the generated sound:
sfx0 36301705To use sound, you need to insert it into the rules after the event. Let's attach the newly created sfx0 to the box destruction event (the event is already present in the sample project):
(The player destroys a crate)
[ > Player | CrateVanish ] -> [ Player | ] sfx0
You can also announce sounds for playback with certain events, for example:
Crate MOVE 36772507In this case, the sound will play when you move Crate. Generate a new sound effect to drag and drop CratePull objects and make it play when CratePull is moved:
CratePull MOVE 12735307Event sounds need only be announced in the Sounds section: they are not required to be mentioned in the rules.
List of ways to play sounds
Below is a list of the various event sounds that you can use, taken from the Puzzle Script documentation .
Object Action 541566 - reproduced when an object is exposed during an action.
Object Create 641667 - reproduced when creating a specific object.
EndGame 5416789 - is played at the end of the game.
EndLevel 6417822 - is played after the completion of the level.
Object CantMove 781673 - reproduced when the object tried unsuccessfully to move in any direction.
Player CantMove Down Left 464674 - played when the object tried unsuccessfully to move down or to the left.
CloseMessage 344456 - played when the player closes the window with the message.
Object Destroy 187975 - played when an object is destroyed.
Object Move 264567 - reproduced when the object successfully moves in any direction.
Object Move Down Left 765432 - plays when the object successfully moves down or to the left.
Object Move Horizontal 345367 - reproduced when the object successfully moved horizontally. You can also use Vertical.
Restart 7865435 - is played when the player presses the restart button R.
SFX0 765743 - can be anything from SFX0 to SFX10. These are special sound events that can be performed from the rules.
ShowMessage 478483 - is played when the message is displayed.
StartGame 234626 - played at the beginning of a new game.
Startlevel 765436 - plays at the beginning of each level.
TitleScreen 876543 - plays after the screen saver loads.
Undo 436234 - played when a player presses the cancel key (Z).
For move and cantmove, you can specify directions so that when moving in different directions, different sounds are played.
The finished sample project is here .
Part 7. Playing music
We learned how to create games on Puzzle Script, but wouldn't it be great to add music to them? It is possible, and now I will tell how it is done.
Note: it seems that at the moment this function in Puzzle Script is broken, so go to the next part.
What do we have to do
Open the project stub . Music works in Puzzle Script as follows: you can insert a link to a single video from Youtube. PuzzleScript will automatically play all the sounds of this video. Open Youtube and select any video, or use the following:
youtube.com/watch?v= CKAc3nYEatw
To play music from a video, we need to get a unique video ID. The green part in the line above is a unique ID.
Under the label of the author’s home page at the beginning of the project, add the youtube label, and after it the unique video ID, for example:
youtube CKAc3nYEatw
To make sure that it works correctly, click on “Share” and click on the link of the game (not on the link of the source code). During testing inside the editor, the Puzzle Script music cannot be played. If you want the game to have music, then you need to upload it as a video on Youtube and insert a unique ID into your project. In each project there can be only one Youtube video.
Sample project
An example of the Puzzle Script project can be found here .
Part 8. How to use the Action command
We already know how to move, push and drag blocks, but what if we need to do something by pressing a certain key, such as a space ?
The input options in PuzzleScript are quite limited, mostly the arrow keys, Z to cancel, R to restart, and we cannot change them. But the engine gives us an additional key for action - pressing the space or the X key.
Working with the Action command follows the format described above. We used the basic PuzzleScript code format:
[ ] -> [ ]If the condition is true, then we execute the event. The action command is used in the same way, but it has its own rules. She looks like this:
[ Action ] -> [ ]Here is an example of using the Action command:
[ Action Player ] -> [ Crate ]First, Action is always the first word of a condition.
Secondly, if we want to influence a certain object in the game, then we need to mention this object both in the condition and in the event (if we mention another object, the program will delete the original one and replace it with a new object, and if the object is not specified, then it will just go away).
Finally, the word Action should be used only in the condition , but sometimes it is worth using it both in the condition and in the event. I will tell about it below.
Check the code shown above in the game project. You can start with this example . You will see that when you press the space or X the player becomes a box.
The condition states [ If we press the Action key and there is a Player object at the level ] -> then [ replace the player object with the box]
Now, try the following code in the example project:
[ Action Player | Crate ] -> [ Player | > Crate ]Make sure that you are surrounded by boxes on all sides, as in the image above. You will notice that the action only affects one box at a time. I don’t know exactly what the reason is, but if you want to influence several objects with the Action command , you need to specify it in the condition and in the event.
Replace the code with the updated version:
[ Action Player | Crate ] -> [ Action Player | > Crate ]Now we can push all the boxes at the same time. If you need to apply an action to several objects, then place an Action in both the condition and the event.
Part 9. Verifying Multiple Conditions
Let's learn to check several conditions, for example, the presence of a bomb AND a destructible block.
Open the sample project . Now add the following code to it:
late [Player Switch][DoorClosed] -> [Player Switch][DoorOpen]The code corresponds to this format:
[ 1 ] [ 2 ] -> [ 1 ] [ 2 ]If condition 1 is true and condition 2 is true, then action 1 and action 2 are performed. In our case, condition 1 checks if the Player is on the Switch. If so, is condition 2 checked, that is, the presence at the level of a closed door? If the condition is true, then the DoorClosed object turns into a DoorOpen object, opening the door.
Suppose we need the door to close when the hero leaves the switch, because we want the player to push the box to the switch to open the door. You can write something like this:
late [Player | Switch][DoorOpen] -> [Player | Switch][DoorClosed]If the player is standing next to the switch and somewhere on the level there is an open door, then we close the door. Finally, we need the door to remain open if we push the box to the switch:
late [Crate Switch][DoorClosed] -> [Crate Switch][DoorOpen]Now the door will remain open while there is a drawer on the switch.
A complete example of the project can be found here .
Part 10. Creating control points
Perhaps you have a good idea to play Puzzle Script, but you need control points (checkpoints) for the player to recover in case of death. How to do it? Pretty simple, and now I will explain how.
Creating control points
Open the sample project . Now we need to program the control point. All you need is a single line of code:
late [ Player FlagRed ] -> CHECKPOINTFlagRed is a control point. When a player is on top of a flag, this code creates a control point (CHECKPOINT). If you do not use late, the checkpoint function will not work.
Test the game. Go over the control point, and then a little further and press R. You will need to start from the control point.
Several checkpoints
If there are several control points, the game uses the last one activated by the player.
To avoid re-activation of the already used control point, you need to change it to another object. To do this, create in the OBJECTS section of the code under the red flag its white copy.
FlagWhite
White Orange
.1…
.00..
.000.
.1…
.1…
Now rewrite this line in the legend:
Flag = FlagRed or FlagWhiteWe can create a group of objects. In this case, Flag will be either FlagRed, or FlagWhite. As long as at least one of the grouped objects is assigned a symbol (we assigned the symbol F to the FlagRed), we will not need to assign symbols to other objects of the group, and you can only access them in the code, but not in the level editor. You can then assign collision layers to the group, which we did. Appeal to a group of objects, for example, Flag, refers to the entire group. Therefore:
[ > Player | Flag ] -> [ > Player | ]This code will affect both the red and the white flag.
Changing the flag object
Here's how to change FlagRed to FlagWhite:
late [ Player FlagRed ] -> [ Player FlagWhite ]If at the end of the turn the player is on a red flag, then we turn it into white. However, you need to make the flag graphics change after creating a control point, because the code is read from top to bottom. Test the program.
Change the second flag
There are two flags in the project. Let's make it so that when the second flag is activated, the old white flag turns black, so that it cannot be used again. We write the following:
late [ Player FlagRed ][ FlagWhite] -> [ Player FlagRed ][FlagBlack]The code says: if a player is on a red flag and somewhere in the game there are white flags, then you need to make the white flags black. Since the code is read from top to bottom, we need to do this in the following order:
late [ Player FlagRed ] -> CHECKPOINT
late [ Player FlagRed ][ FlagWhite] -> [ Player FlagRed ][FlagBlack]
late [ Player FlagRed ] -> [ Player FlagWhite ]
If you don’t understand why the code should be in this order, then try changing the order of the lines and test the program. To solve your own problems, you need to learn how to step back and think about what the code does. But I will give you a hint - when you play, where are the red flags in the last line of code in the following wrong example?
[ > Player | Crate ] -> [ > Player | > Crate ]
[ > Crate | Flag ] -> [ Crate | Flag ]
late [ Player FlagRed ] -> CHECKPOINT
late [ Player FlagRed ] -> [ Player FlagWhite ]
late [ Player FlagRed ][ FlagWhite] -> [ Player FlagRed ][FlagBlack]
View the finished sample project here . In addition, I just showed you the simplest way to animate. In the next part I will talk about creating more complex animations, such as explosions.
Part 11. Animations
There are two ways to create animations in PuzzleScript. In one of them, real time is used, but in this part I will not talk about it. The other is used for quick, one-time animations, such as an explosion or a character walking down a vertical staircase.
Open the sample project . We will create a bomb and a series of explosion frames, and then animate them.
Object Animation
For 2D animations, you need several drawings of an object moving from one state to another, for example, a running Mario sprite. It contains 4 frames of animation.
To simulate the transition of one animation frame to another, we will create several objects in PuzzleScript that will be animation frames, and then use the code to switch between them.
Bomb
Create such an object bomb.
Bomb
black yellow grey
..1..
..1..
.000.
00020
.000.
Do not forget to add it to the layers and the legend.
To animate the explosion, we need to create each frame of the animation as a separate object, and then switch between them in code. Let's create explosion objects.
Explosion1
black yellow grey red
..1..
..1..
.000.
00320
.000.

Explosion2
black yellow grey red
..1..
..1..
.333.
03330
.333.

Explosion3
black yellow grey red
..1..
.333.
33333
33333
.333.

Explosion4
black yellow grey red
.333.
33333
33333
33333
.333.

Explosion5
black yellow grey red
.333.
33333
33.33
33333
.333.

Explosion6
black yellow grey red
.333.
3...3
3...3
3...3
.333.

Explosion7
black yellow grey red
.....
.....
.....
.....
.....
It will be correct to number the objects in order to know which frame of the animation we need. After adding them to the layers and the legend, we can add a few lines of code.
[Explosion7] -> []
[Explosion6] -> [Explosion7]
[Explosion5] -> [Explosion6]
[Explosion4] -> [Explosion5]
[Explosion3] -> [Explosion4]
[Explosion2] -> [Explosion3]
[Explosion1] -> [Explosion2]
[Bomb] -> [Explosion1]
Try adding this code, then place a bomb on the level and start the game. You will notice that each time you move, the bomb animation changes by one frame. Switching between objects, we create an animation.
The order of switching between animations is crucial. The last frame should be above and the first one below. Do not forget that the code is read from top to bottom. If the animation frames are in a different order, we will never see the changes. We will only see the last frame, and in our case the bomb will just disappear. It will change to the first frame, then to the second, and so on, in one frame, before you see the graphics. Placing the last frame in the beginning, we will see the following change in each turn.
Using the Again Team
To animate everything together, we need the command again . Again means that after reading all the code, PuzzleScript will pause, and then count the code again, executing all the commands again . It can be used for gravity, sliding on ice, and in our case for animations. All that is needed is to rewrite the code as follows:
[Explosion7] -> []
[Explosion6] -> [Explosion7] again
[Explosion5] -> [Explosion6] again
[Explosion4] -> [Explosion5] again
[Explosion3] -> [Explosion4] again
[Explosion2] -> [Explosion3] again
[Explosion1] -> [Explosion2] again
[Bomb] -> [Explosion1] again
Test the game. You will see that the entire bomb animation is played immediately. If you think it is too slow or fast, then the speed can be changed. At the very beginning of the program text, under the homepage write the following code:
again_interval 0.1This is part of what is called prelude in PuzzleScript . This is the place where, before the rest of the code, you can set additional rules that determine the behavior of the game. Now the animation should play faster. Try changing the number after again_interval and check what has changed.
A complete example of the project can be found here .
Part 12. Gravity
Usually PuzzleScript is used to create games with top view (top down), but in fact you can simulate some elements of side scrollers, albeit with limited rules of PuzzleScript, that is, they will still be step by step. In this part I will tell you how to implement gravity.
Sample project
Open the sample project . I created a simple level, it has a player, a box on the ledge and a door below. We want to make sure that when a player pushes a box from a ledge, it will fall to the ground. We also want the player to fall off the edge, also fall to the ground.
Fall, Stage 1
Here is the first part of the code we will use:
down [ Player | no Object ] -> [ | Player ]
down [ Crate | no Object no Player ] -> [ | Crate ]
Try to push the box off the edge. You will notice that after moving the box freezes in the air, but after another move it falls to the ground. Several things happen here.
First, let's talk about the down keyword . Adding down , we limit the rule to the fact that it applies only in the "down" direction. That is why the drawer moves down. If you replace down with right , you will see that the box is stuck in the right wall, as in a game with anti-gravity. Try this.
Next, do something unusual. Instead of checking whether a player is near a certain object (for example, a box), we check if he is near a generic object.. If you look at the legend in the example code, then you will see that we have defined object as a group of objects, that is, with each use of the word object, we mean a group of objects. That is, we check if there are any of these objects under the player. If not, we order the player to occupy this empty space and leave the previous space, because of the word down, following in the downward direction.
But it can also be noted that after pushing the ledge off the box does not fall until the next turn, and that it instantly reaches the ground. To eliminate this pending drop, you can use the late keyword:
late down [ Player | no Object ] -> [ | Player ]
late down [ Crate | no Object no Player ] -> [ | Crate ]
But how to make it fall gradually, frame by frame?
Fall, Stage 2
Now we use the keyword random . Rewrite the code as follows:
random down [ Player | no Object ] -> [ | Player ]
random down [ Crate | no Object no Player ] -> [ | Crate ]
Run the code. It works very much like the previous code, but one important difference. The box hangs in the air, but each time a player moves, he falls down one cell. This is due to the word random . Strictly speaking, random is intended for creating games with random elements, but it was useful to us here. It forces the corresponding line of code to be executed once per turn. PuzzleScript performs each rule as many times as possible in one move, and only then the player sees the graphic changes. That is why it seems that the box falls to the ground instantly. But when using the word random, we allow it to fall only one cell at a time.
Fall, stage 3
Now we add the keyword again :
random down [ Player | no Object ] -> [ | Player ] again
random down [ Crate | no Object no Player ] -> [ | Crate ] again
Run the game. Everything is almost perfect. The box freezes for a while in the air, but if you move again, it gradually falls to the ground. We are already familiar with the again keyword , in essence, it means that at the end of the course, PuzzleScript reads the code again and tries to execute all the commands again as a separate move, then pauses, then repeats them again as many times as possible. The important thing here is that he pauses between turns again , which allows us to see the fall of the box.
Final stage
And the final touch. To make the box fall to the ground right after pushing it off the edge, we need to add one more line of code above the one we just wrote:
[moving Player] -> [moving Player] again
random down [ Player | no Object ] -> [ | Player ] again
random down [ Crate | no Object no Player ] -> [ | Crate ] again
The moving keyword used in square brackets [] in front of the player means that we check if the player is moving. This means that if a player moves, then we order him to keep moving and to run the command again . Then everything that the keyword again uses will work immediately ; in our case, this is a drop box animation.
A complete example of the project can be found here .
Part 13. Checking the direction of movement
Direction indication
Sometimes it happens that you need to check something only in one direction. For example, you need to make blocks that can be pushed only horizontally, or create a duck that can only walk to the left.
Be that as it may, we can indicate that events take place only in certain directions.
Open PuzzleScript, create a game based on the Basic example, and replace it with Rules with the following code:
[ Left Player ] -> [ Crate ]Start the game and see what happens.
If you try to go left, the player will turn into a box. This is a good example of how directions are working.
We are already accustomed to the format in which I explained PuzzleScript code:
[ ] -> [ ]If the event is true, then the event occurs.
But now, when we need to check directions, it will follow the new rules:
[ Movement Direction Object Affected ] -> [ New State of Object ]That is our previous code:
[ Left Player ] -> [ Crate ]checks whether the player is moving left ( Left ). If yes, then we replace the player with the box object.
Types of directions
You can choose from the following types of directions:
- Up
- Down
- Left
- Right
- Horizontal (checks if there is horizontal movement)
- Vertical (checks if there is vertical movement)
Part 14: Creating Custom Movements
For some reason, the game may require custom movement. Ducks can only walk to the left, boxes can be pushed only horizontally, and so on. Make it very easy. Let's take another look at the basic format of the PuzzleScript code:
[ ] -> [ ]If the condition is true, then an event occurs. To create a custom move, do the following:
[ Condition ] -> [ Movement Direction Object To Move ]Here is how the example will look like:
[ Player | Crate ] -> [ Player | Left Crate ]Download PuzzleScript , open the Basic example , paste in this code and see what happens. Approach the box, around which there are no walls.
You will see that when a player is near the box, the box is pushed to the left. However, since the Late keyword does not exist, this happens during the course after you have taken the first step towards it.
If you specify in addition to the object in the Event , the direction of movement , for example, Left , PuzzleScript will try to move the object in the specified direction. That is why the box, and not the player moves to the left - Left is located next to the Crate .
Remember this code from the previous part?
[ ] -> [ ]If you specify the direction of motion in the condition next to the object, then it checks whether this object is moving in a given direction. This is an important difference. You can rewrite it like this:
[ ] -> [ ]Valid custom moves
Customizable movements can be created with any of these words:
- Up
- Down
- Left
- Right
You cannot use Horizontal or Vertical , because PuzzleScript will not understand in which direction you want to move the object, or it will take a lot of workarounds to do this. Need to specify a specific direction.
Part 15. Checking cells near objects
Sometimes it is necessary to check what is near the object. Make it pretty simple. Let's look again at the format of the code of PuzzleScript:
[ ] -> [ ]i.e
[ ] -> [ ]To check the sides of the object, we need to add one element. The format looks like this:
[ object1 | object2 ] -> [ object1 | object2 ]Before the condition, we check which side of the object we want to perform the check.
Inside the condition, we assume that you need at least two cells. A cell is, in fact, any objects that are in the same space and not next to each other.
[ ]

[ | | ]
The first cell is an object, the sides of which we check. The second cell is an object that we check for. Try the following examples:
Left [ Player | Crate ] -> [ Player | ]The code shown above removes the boxes if they are in the box to the left of the player.
Left [ Crate | Crate ] -> [ Player | Crate ]This code checks if the box is to the left of another box. If yes, then the box whose side is being checked will become a new player object.
Left [ Crate | Crate ] -> [ Crate | Player ]In the above code there is the same check, but the player’s object becomes the box on the left.
Left [ Crate | Crate | Crate ] -> [ Crate | Player | Crate ]This code also uses a similar pattern. The box immediately to the left of the test player becomes a player if the 3 boxes are next to each other horizontally.
Left [ Crate | Crate | Crate ] -> [ Crate | Crate | Player ]If the 3 boxes are next to each other horizontally, then the leftmost one becomes a player.
If you test each of these examples, you will begin to understand the pattern. The first cell is an object that we check to see what is nearby. The following cells, from the nearest to the far, are the objects whose presence we check.
Keywords
- Up - checks on the object
- Down - checks under the object
- Left - checks to the left of the object.
- Right - checks to the right of the object.
- Horizontal - checks left and right of the object
- Vertical - checks above and below the object
Source: https://habr.com/ru/post/428906/
All Articles