React Native Web Application Development Guide
You woke up. The sun is shining, birds are chirping. In the world, no one is fighting with anyone, no one is hungry, and the same code can be used in web projects and in native applications. How good it would be! Unfortunately, only a universal code can be seen on the horizon, but the path to it, even today, is still full of surprises.

The material, which we are publishing today, is a small but fairly detailed guide to developing universal applications using React Native.
The abbreviation “PWA” ( Progressive Web Apps , progressive web applications) is widely known today; this three-letter acronym seems like a whale in a sea of technical terms. But this popular technology is still not without flaws . There are many technological difficulties associated with such applications, there are situations in which the developer is forced to simultaneously create native and web applications. Here is a good article comparing PWA and native applications.
')
Maybe business should focus only on native applications? No, not worth it. This is a big mistake. As a result, the development of a single universal application becomes a logical step. This reduces the time spent on development, reduces the cost of creating and supporting projects. It was these characteristics of universal applications that prompted me to one small experiment.
This is a universal example application from the field of e-commerce for ordering food. After the experiment, I created a template for future projects and for further research.
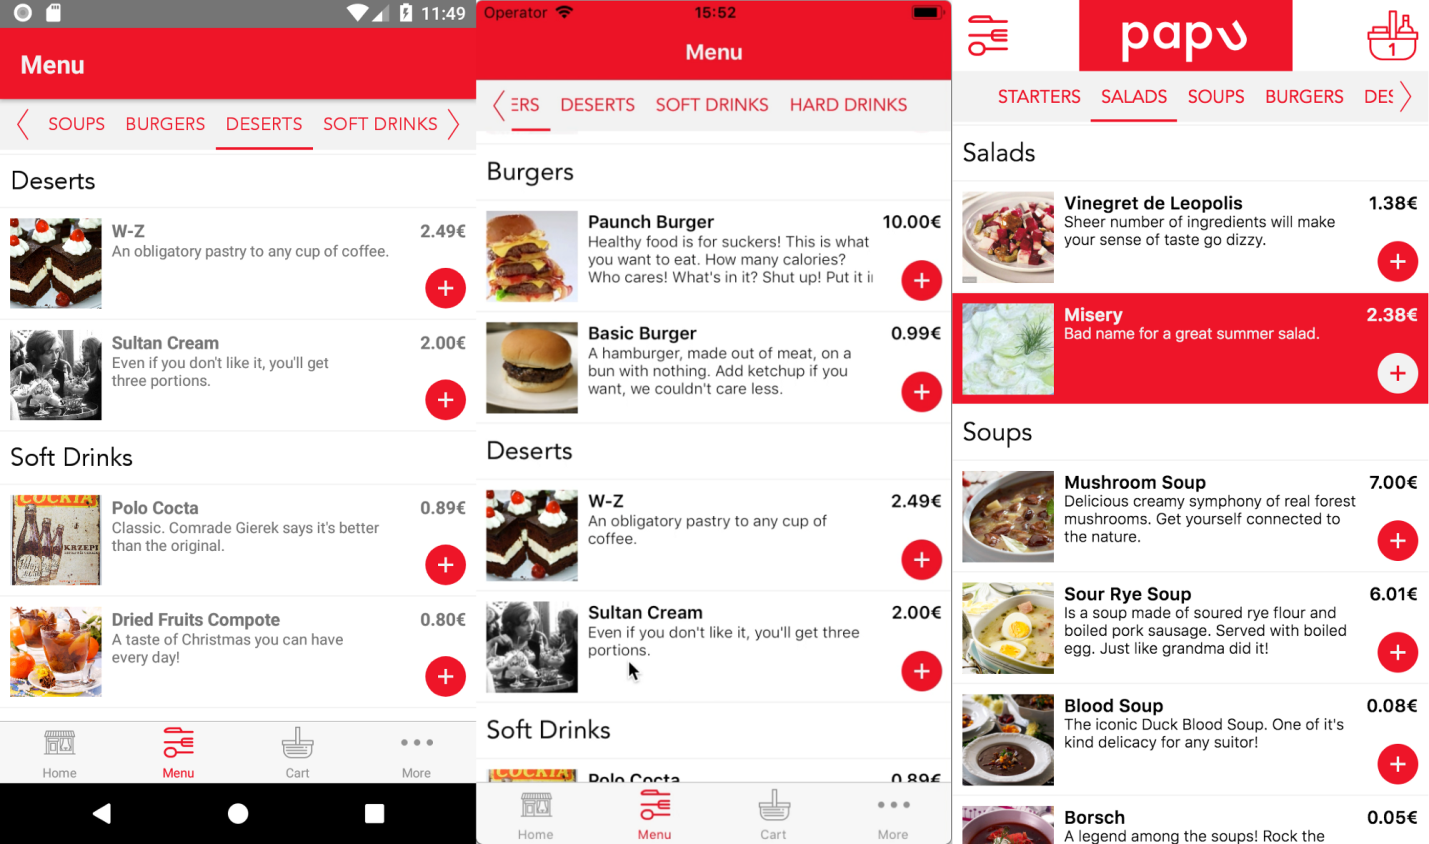
Papu is a food ordering application for Android, iOS and the web.
Here we use React, so we need to separate the application logic from the user interface. Here it is best to use some system to manage the state of an application like Redux or Mobx. Such a move immediately makes the logic of the application functioning universal. It, without changes, can be used on different platforms.
The visual part of the application is another conversation. In order to construct an application interface, you need to have a universal set of primitives, basic building blocks. They should work in the web and in the native environment. Unfortunately, the language of the web and the language of native platforms are different things.
For example, a standard web container will contact you like this:
And native is like this:
Some clever people have found a way out of this situation. The output became specialized libraries of elements. One of my favorites is the wonderful React Native Web library. It not only takes care of the basic primitives of the application, allowing you to use React Native components on the web (not all components!), But also gives you access to various React Native APIs. Among them -
We figured out the primitives. But we still need to link the environment for web development and for native development. In my project, create-react-app (for the web application) and the initialization script React Native (for the native application, without Expo) are used. First, I created one project with the following command:
Please note that this version of the file has no navigation options. Next, you need to copy all the source code files from the folders of the web application and the native application to the folder of the new unified project.
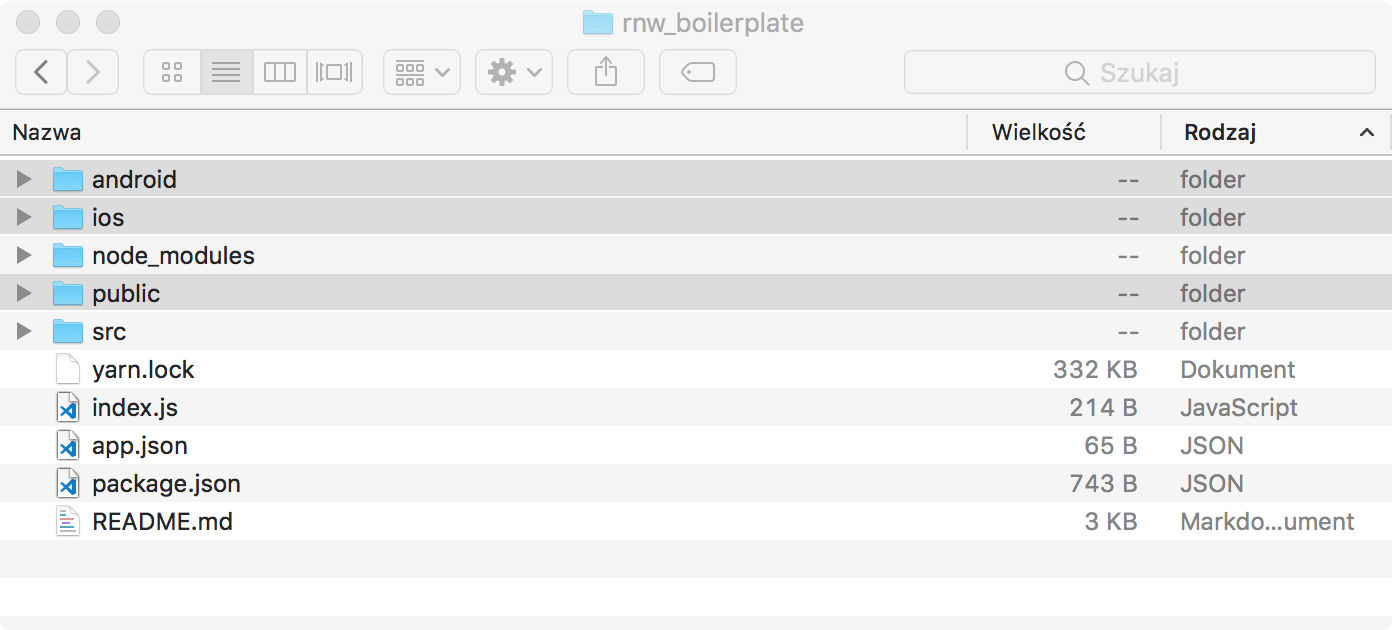
Folders that need to be copied to a new project
Now, in the folder
Here is the
Here is the
This is how I created a simple application template and prepared a platform for further work. You can try this template, looking at this repository.
Now we complicate this template a bit, add a routing / navigation system.
The application, unless it consists of one screen, needs some kind of navigation system. Now (we are talking about September 2018) there is only one such universal working system suitable for the web and for native applications. This is React Router . For the web, this solution fits well, but in the case of React Native projects, things are not so straightforward.
In React Router Native there are no transitions between screens, no support for the Back button (for the Android platform), no modal screens, navigation bars and other features. Other navigation tools, like React Navigation , have these capabilities.
I used this particular library, but you can pick up something else. Therefore, in my project, React Router is responsible for navigation in the web application, and React Navigation is responsible for navigation in the native application. This, however, creates a new problem. The fact is that the approaches to navigation and to the transfer of parameters in these systems are very different.
In order to preserve the spirit of React Native Web, using everywhere an approach close to that used in native applications, I approached the solution of this problem by creating web routes and wrapping them in HOC. This gave me the opportunity to create an API resembling React Navigation.
This approach allowed me to move between the screens of the web application, eliminating the need to create separate components for two types of applications.
The first step in implementing this mechanism is to create an object with a description of the routes for the web application:
In essence, here is a copy of the function for creating the React Navigation navigator with additions of features specific to the React Router.
Next, using my auxiliary function, I create
React Navigation, thanks to
In addition, you need to add the
Thanks to our development HOC (temporarily this component is called
In React Navigation, you can go back to the
We describe these parameters:
If you want to experiment with the idea of developing universal applications presented here, I created two templates.
The first is a clean, universal environment for developing web applications and native applications.
The second is, in effect, the first template, which is extended at the expense of my system to organize navigation through the application.
Here is a papu demo application based on the above considerations. It is full of errors and dead ends, but you can assemble it yourself, run it in a browser and on a mobile device, and in practice get an idea of how it all works.
The community of React-developers, of course, need a universal library for organizing navigation through applications, as this will simplify the development of projects like the one we talked about. It would be very good if the React Navigation library would work in the web (in fact, this feature is already available , but working with it is not without difficulties).
Dear readers! Do you use React capabilities when building generic applications?

The material, which we are publishing today, is a small but fairly detailed guide to developing universal applications using React Native.
Why is this all about?
The abbreviation “PWA” ( Progressive Web Apps , progressive web applications) is widely known today; this three-letter acronym seems like a whale in a sea of technical terms. But this popular technology is still not without flaws . There are many technological difficulties associated with such applications, there are situations in which the developer is forced to simultaneously create native and web applications. Here is a good article comparing PWA and native applications.
')
Maybe business should focus only on native applications? No, not worth it. This is a big mistake. As a result, the development of a single universal application becomes a logical step. This reduces the time spent on development, reduces the cost of creating and supporting projects. It was these characteristics of universal applications that prompted me to one small experiment.
This is a universal example application from the field of e-commerce for ordering food. After the experiment, I created a template for future projects and for further research.
Papu is a food ordering application for Android, iOS and the web.
Basic building blocks of the application
Here we use React, so we need to separate the application logic from the user interface. Here it is best to use some system to manage the state of an application like Redux or Mobx. Such a move immediately makes the logic of the application functioning universal. It, without changes, can be used on different platforms.
The visual part of the application is another conversation. In order to construct an application interface, you need to have a universal set of primitives, basic building blocks. They should work in the web and in the native environment. Unfortunately, the language of the web and the language of native platforms are different things.
For example, a standard web container will contact you like this:
<div> ! - !</div> And native is like this:
<View>! - React Native</View> Some clever people have found a way out of this situation. The output became specialized libraries of elements. One of my favorites is the wonderful React Native Web library. It not only takes care of the basic primitives of the application, allowing you to use React Native components on the web (not all components!), But also gives you access to various React Native APIs. Among them -
Geolocation , Platform , Animated , AsyncStorage and many others. Take a look at the wonderful examples that can be found in the manual for this library.Template
We figured out the primitives. But we still need to link the environment for web development and for native development. In my project, create-react-app (for the web application) and the initialization script React Native (for the native application, without Expo) are used. First, I created one project with the following command:
create-react-app rnw_web . Then I created the second project: react-native init raw_native . Then, following the example of Victor Frankenstein, I took the package.json files from these two projects and merged them. After that I, in the folder of the new project, fed the new yarn file. This is what package file we are talking about: { "name": "rnw_boilerplate", "version": "0.1.0", "private": true, "dependencies": { "react": "^16.5.1", "react-art": "^16.5.1", "react-dom": "^16.5.1", "react-native": "0.56.0", "react-native-web": "^0.9.0", "react-navigation": "^2.17.0", "react-router-dom": "^4.3.1", "react-router-modal": "^1.4.2" }, "devDependencies": { "babel-jest": "^23.4.0", "babel-preset-react-native": "^5", "jest": "^23.4.1", "react-scripts": "1.1.5", "react-test-renderer": "^16.3.1" }, "scripts": { "start": "node node_modules/react-native/local-cli/cli.js start", "test": "jest", "start-ios": "react-native run-ios", "start-web": "react-scripts start", "build": "react-scripts build", "test-web": "react-scripts test --env=jsdom", "eject-web": "react-scripts eject" } } Please note that this version of the file has no navigation options. Next, you need to copy all the source code files from the folders of the web application and the native application to the folder of the new unified project.
Folders that need to be copied to a new project
Now, in the folder
src , which lies in the directory of the new project, create two files: App.js and App.native.js . Thanks to webpack, we can use file name extensions to tell the bundler where to use which files. Sharing App files is vital since we are going to use different approaches to navigate through the applications.Here is the
App.js file for the web. For navigation, use react-router . // App.js - WEB import React, { Component } from "react"; import { View } from "react-native"; import WebRoutesGenerator from "./NativeWebRouteWrapper/index"; import { ModalContainer } from "react-router-modal"; import HomeScreen from "./HomeScreen"; import TopNav from "./TopNav"; import SecondScreen from "./SecondScreen"; import UserScreen from "./UserScreen"; import DasModalScreen from "./DasModalScreen"; const routeMap = { Home: { component: HomeScreen, path: "/", exact: true }, Second: { component: SecondScreen, path: "/second" }, User: { component: UserScreen, path: "/user/:name?", exact: true }, DasModal: { component: DasModalScreen, path: "*/dasmodal", modal: true } }; class App extends Component { render() { return ( <View> <TopNav /> {WebRoutesGenerator({ routeMap })} <ModalContainer /> </View> ); } } export default App; Here is the
App.js for the React Native application. Here, navigation is used react-navigation . // App.js - React Native import React, { Component } from "react"; import { createStackNavigator, createBottomTabNavigator } from "react-navigation"; import HomeScreen from "./HomeScreen"; import DasModalScreen from "./DasModalScreen"; import SecondScreen from "./SecondScreen"; import UserScreen from "./UserScreen"; const HomeStack = createStackNavigator({ Home: { screen: HomeScreen, navigationOptions: { title: "Home" } } }); const SecondStack = createStackNavigator({ Second: { screen: SecondScreen, navigationOptions: { title: "Second" } }, User: { screen: UserScreen, navigationOptions: { title: "User" } } }); const TabNav = createBottomTabNavigator({ Home: HomeStack, SecondStack: SecondStack }); const RootStack = createStackNavigator( { Main: TabNav, DasModal: DasModalScreen }, { mode: "modal", headerMode: "none" } ); class App extends Component { render() { return <RootStack />; } } export default App; This is how I created a simple application template and prepared a platform for further work. You can try this template, looking at this repository.
Now we complicate this template a bit, add a routing / navigation system.
Navigation problems and solutions
The application, unless it consists of one screen, needs some kind of navigation system. Now (we are talking about September 2018) there is only one such universal working system suitable for the web and for native applications. This is React Router . For the web, this solution fits well, but in the case of React Native projects, things are not so straightforward.
In React Router Native there are no transitions between screens, no support for the Back button (for the Android platform), no modal screens, navigation bars and other features. Other navigation tools, like React Navigation , have these capabilities.
I used this particular library, but you can pick up something else. Therefore, in my project, React Router is responsible for navigation in the web application, and React Navigation is responsible for navigation in the native application. This, however, creates a new problem. The fact is that the approaches to navigation and to the transfer of parameters in these systems are very different.
In order to preserve the spirit of React Native Web, using everywhere an approach close to that used in native applications, I approached the solution of this problem by creating web routes and wrapping them in HOC. This gave me the opportunity to create an API resembling React Navigation.
This approach allowed me to move between the screens of the web application, eliminating the need to create separate components for two types of applications.
The first step in implementing this mechanism is to create an object with a description of the routes for the web application:
import WebRoutesGenerator from "./NativeWebRouteWrapper"; // , React Router HOC const routeMap = { Home: { screen: HomeScreen, path: '/', exact: true }, Menu: { screen: MenuScreen, path: '/menu/sectionIndex?' } } // render <View> {WebRoutesGenerator({ routeMap })} </View> In essence, here is a copy of the function for creating the React Navigation navigator with additions of features specific to the React Router.
Next, using my auxiliary function, I create
react-router routes and wrap them in HOC. This allows you to clone the screen component and add navigation to its properties. This approach mimics the behavior of React Navigation and makes available methods like navigate() , goBack() , getParam() .Modal screens
React Navigation, thanks to
createStackNavigator , makes it possible to make sure that a certain application page leaves the bottom in the form of a modal screen. In order to achieve this in a web application, I had to use the React Router Modal library. To work with a modal screen, you first need to add the appropriate option to the routeMap object: const routeMap = { Modal: { screen: ModalScreen, path: '*/modal', modal: true // ModalRoute } } In addition, you need to add the
<ModalContainer /> component from the react-router-modal library to the react-router-modal . The corresponding page will be displayed there.Navigation between screens
Thanks to our development HOC (temporarily this component is called
NativeWebRouteWrapper , and this, by the way, is a terrible name), we can use almost the same set of functions as in React Navigation to organize navigation between pages in the web version of the application: const { product, navigation } = this.props <Button onPress={navigation.navigate('ProductScreen', {id: product.id})} title={`Go to ${product.name}`} /> <Button onPress={navigation.goBack} title="Go Back" /> Return to the previous screen
In React Navigation, you can go back to the
n screens that are in the navigation stack. Similar in React Router is not available, there is no navigation stack. In order to solve this problem, we need to import our own developed pop function into the code. Calling her, we will give her several parameters: import pop from '/NativeWebRouteWrapper/pop' render() { const { navigation } = this.props return ( <Button onPress={pop({screen: 'FirstScreen', n: 2, navigation})} title="Go back two screens" /> ) } We describe these parameters:
screenis the screen name (used by React Router in the web version of the application).nis the number of screens to return using the stack (using React Navigation).navigation- an object that provides navigation.
Work results
If you want to experiment with the idea of developing universal applications presented here, I created two templates.
The first is a clean, universal environment for developing web applications and native applications.
The second is, in effect, the first template, which is extended at the expense of my system to organize navigation through the application.
Here is a papu demo application based on the above considerations. It is full of errors and dead ends, but you can assemble it yourself, run it in a browser and on a mobile device, and in practice get an idea of how it all works.
Results
The community of React-developers, of course, need a universal library for organizing navigation through applications, as this will simplify the development of projects like the one we talked about. It would be very good if the React Navigation library would work in the web (in fact, this feature is already available , but working with it is not without difficulties).
Dear readers! Do you use React capabilities when building generic applications?
Source: https://habr.com/ru/post/428568/
All Articles