How I created a “wizard” for WordPress from my deep laziness
Hello to all. We all love the automation of processes in our lives. I also did not become an exception. After all, laziness is the engine of progress , so I am writing this post.

I’ll start over: Today I’m working as a QA tester for TemplateMonster in the Wordpress department. I have never thought before that the installation of a clean WordPress engine (hereinafter WP) for testing templates can start to feel sick. Especially when the number of installations per day exceeds 20. That’s when one of these days gave birth to the idea to make an automator (Master, WIZARD) installation.
')
Many who worked with this engine know how to perform the default installation.
But I wanted to move away from it all and just click on the button - “do well”. In PHP, this is not really kodil. Is that in the university. And that, for the sake of delivery of laboratory work honed copy-paste skills.
I described the setup in 3 steps in the README.md file, as well as in this video .
Why it is convenient:
And this is how the WP-WIZARD start page looks like.

Only one field. This is what I wanted.
All good and thank you for your attention!
I’ll start over: Today I’m working as a QA tester for TemplateMonster in the Wordpress department. I have never thought before that the installation of a clean WordPress engine (hereinafter WP) for testing templates can start to feel sick. Especially when the number of installations per day exceeds 20. That’s when one of these days gave birth to the idea to make an automator (Master, WIZARD) installation.
')
Many who worked with this engine know how to perform the default installation.
This article will discuss the installation on the Local Server - OpenServer.
Standard installation WP, who did not know
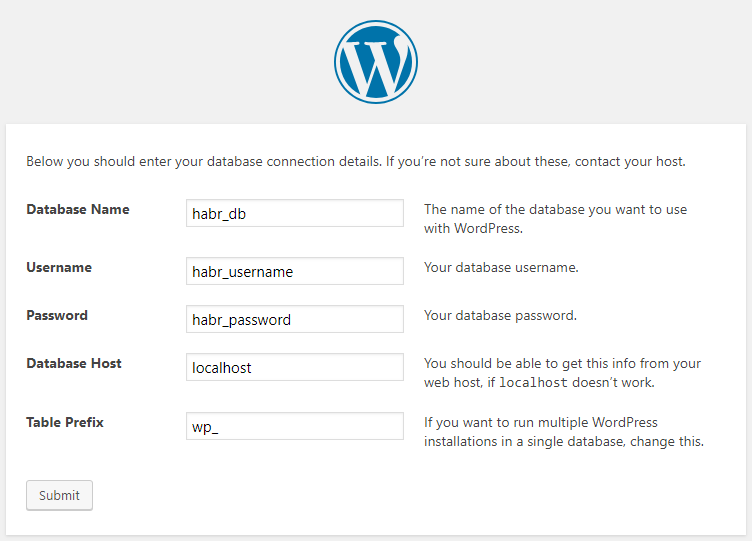
- First we need to create a mysql database with encoding - utf8_general_ci .
- Then put the contents of the archive downloaded from the official WP site or the repository on GitHub to a folder on the local server where your site will be located.
- Register in the address bar the local path to this folder where you will be met by the wizard of the standard WP installation. On the first screen of the wizard, you must select the installation language. Then enter the information to connect to the newly created database. Namely:
- The name of the mysql database.
- Username to the database.
- Password to her.
- Server.
- Prefix if necessary.
- Then, if everything went well in the paragraph above, the second screen of the wizard will meet us. He will ask:
- The name of the future site.
- Username.
- Password in the admin panel.
- And also email.
- After all the operations, we finally get to the admin login screen.
But I wanted to move away from it all and just click on the button - “do well”. In PHP, this is not really kodil. Is that in the university. And that, for the sake of delivery of laboratory work honed copy-paste skills.
At the moment my wizard is freely available on Git . You have the right to download it, edit it, customize it, change the icon and bg. In general, all that pleases.
I described the setup in 3 steps in the README.md file, as well as in this video .
Setup in 3 clicks
The setup is very simple:
- Go to the file wp-wizard / install.php .
- Register the path to the folder with the WP installation in the $ template_testing_folder variable.
- Register the local IP address in the $ site_url variable (this variable will be set in the database path).
Why it is convenient:
- Setup is made only 1 time for all installations.
- You do not create a database.
- You do not need to follow the latest version of WP, it always pulls up from the official repository.
- To make a new WP installation, you need to go through the local path, enter the site name and press Enter. Attention! The base will be called as well. If you need to have a different name for the database and folder with the site - I made a separate variable for this. You just need to make a new input in index.php and duplicate its name in install.php. to the $ db_name variable.
Cons at the moment:
Nobody's Perfect:
- This script has been tested on several web-hosting, but it cannot create a database for itself and import basic WP tables during installation. This is due to the access rights to “create”, “read” and “edit” DB. Therefore, it is intended for use on a local server.
- The main, probably, minus is that the code was written by a novice. I myself think that the code is not particularly difficult to read, but it is worth organizing all this better. To break functions into the files and to write completely on OOP.
What exactly does the script do:
Functions are written in the file wp-wizard / install.php :
- After inputting the name of the installation folder to input, a function is called that downloads the latest version of WP, and unzips the .zip to the folder you specified above in the $ template_testing_folder variable.
- Then it creates a database and imports SQL into it with standard WP tables that are generated by default, as if you were passing a standard wizard.
- After that, the wp-config.php file is created and replaced. The main file which contains the connection to the database. Strings, as you understand, are generated from the variables at the beginning of the wp-wizard / install.php file .
- And after a few seconds of generating all the good, we will see a window to enter the WP admin panel.
Attention! In the wp-wizard / folder there is a main.sql dump file . This, as mentioned above, is the standard dump generated by WP. In which in the wp_users table login: admin and password: 1 are clogged. If you want to use your dump file, then you need to replace the local address with “site_url”.

- Checkbox "NEED KAVA" and the function is_kava (); Call up the KAVA theme directly into the theme folder. This is a theme from ZEMEZ - a vendor that often gets tested, so I made a checkbox when creating a WP. As they say to themselves - “Get the truly easy-to-use design and perfect design!” On the official GitHub repository.
And this is how the WP-WIZARD start page looks like.
Only one field. This is what I wanted.
All good and thank you for your attention!
Source: https://habr.com/ru/post/428558/
All Articles