Drag and Swipe in RecyclerView. Part 2: Drag and Drop Controllers, Grid, and Custom Animations

In the first part, we looked at ItemTouchHelper and the implementation of ItemTouchHelper.Callback , which adds the basic drag & drop and swipe-to-dismiss functions to RecyclerView . In this article, we will continue what was done in the previous one, adding support for the arrangement of elements in the form of a grid, drag and drop controllers, selection of the list item and custom swipe animations.
Drag and Drop Controllers
When you create a list that supports drag & drop , you usually implement the ability to drag and drop items by touch. This contributes to the comprehensibility and usability of the list in the “editing mode”, and also recommended by material guidelines. Adding drag and drop controllers to our example is fabulously easy.

First update the layout item ( item_main.xml ).
<?xml version="1.0" encoding="utf-8"?> <FrameLayout xmlns:android="http://schemas.android.com/apk/res/android" android:id="@+id/item" android:layout_width="match_parent" android:layout_height="?listPreferredItemHeight" android:clickable="true" android:focusable="true" android:foreground="?selectableItemBackground"> <TextView android:id="@+id/text" android:layout_width="wrap_content" android:layout_height="wrap_content" android:layout_gravity="center_vertical" android:layout_marginLeft="16dp" android:textAppearance="?android:attr/textAppearanceMedium" /> <ImageView android:id="@+id/handle" android:layout_width="?listPreferredItemHeight" android:layout_height="match_parent" android:layout_gravity="center_vertical|right" android:scaleType="center" android:src="@drawable/ic_reorder_grey_500_24dp" /> </FrameLayout> The image used for the drag and drop controller can be found in the Material Design icons and added to the project using a convenient plug- in icon generator in Android Studio.
As briefly mentioned in the last article, you can use ItemTouchHelper.startDrag(ViewHolder) to programmatically drag and drop. So, all we need to do is update the ViewHolder by adding a drag controller, and set up a simple touch handler that will call startDrag() .
We will need an interface to send the event through the chain:
public interface OnStartDragListener { /** * Called when a view is requesting a start of a drag. * * @param viewHolder The holder of the view to drag. */ void onStartDrag(RecyclerView.ViewHolder viewHolder); } Then define an ImageView for the drag controller in the ItemViewHolder :
public final ImageView handleView; public ItemViewHolder(View itemView) { super(itemView); // ... handleView = (ImageView) itemView.findViewById(R.id.handle); } and update the RecyclerListAdapter :
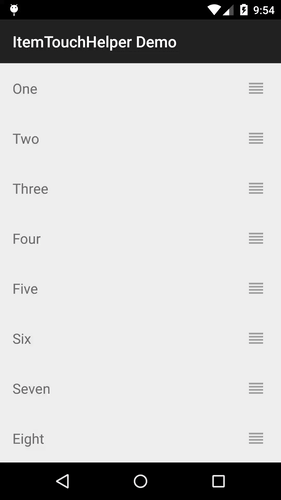
private final OnStartDragListener mDragStartListener; public RecyclerListAdapter(OnStartDragListener dragStartListener) { mDragStartListener = dragStartListener; // ... } @Override public void onBindViewHolder(final ItemViewHolder holder, int position) { // ... holder.handleView.setOnTouchListener(new OnTouchListener() { @Override public boolean onTouch(View v, MotionEvent event) { if (MotionEventCompat.getActionMasked(event) == MotionEvent.ACTION_DOWN) { mDragStartListener.onStartDrag(holder); } return false; } }); } RecyclerListAdapter should now look something like this .
All that is left to do is to add OnStartDragListener to the snippet:
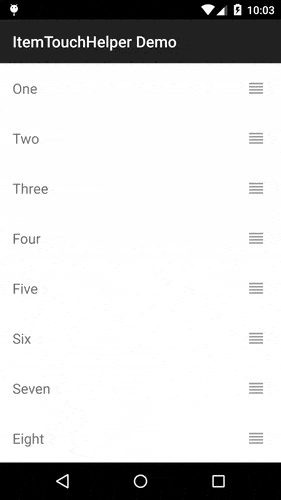
public class RecyclerListFragment extends Fragment implements OnStartDragListener { // ... @Override public void onViewCreated(View view, Bundle icicle) { super.onViewCreated(view, icicle); RecyclerListAdapter a = new RecyclerListAdapter(this); // ... } @Override public void onStartDrag(RecyclerView.ViewHolder viewHolder) { mItemTouchHelper.startDrag(viewHolder); } } RecyclerListFragment should now look like this . Now, when you start the application, you can start dragging by touching the controller.
Select item list
Now in our example, there is no visual indication of an item that is being dragged. Obviously, this should not be so, but it is easy to fix. Using the ItemTouchHelper you can use standard element highlighting effects. On Lollipop and later versions of Android, the backlight “blurs” over the element as it interacts with it; in earlier versions, the element simply changes its color to darkened.
To do this in our example, simply add a background (the background property) to the root FrameLayout element or set it in the constructor RecyclerListAdapter.ItemViewHolder . It will look something like this:
It looks cool, but you might want to control even more. One way to do this is to allow the ViewHolder handle state changes of the item. ItemTouchHelper.Callback provides two more methods for this:
onSelectedChanged(ViewHolder, int)is called whenever the state of the item changes to drag ( ACTION_STATE_DRAG ) or swipe ( ACTION_STATE_SWIPE ). This is the ideal place to change the state of theviewcomponent to active .clearView(RecyclerView, ViewHolder)is called at the end of dragging theviewcomponent, as well as at the end of swipe ( ACTION_STATE_IDLE ). Here the initial state of yourviewcomponent is usually restored.
And now let's just put it all together.
First create the interface that the ViewHolders will implement:
/** * Notifies a View Holder of relevant callbacks from * {@link ItemTouchHelper.Callback}. */ public interface ItemTouchHelperViewHolder { /** * Called when the {@link ItemTouchHelper} first registers an * item as being moved or swiped. * Implementations should update the item view to indicate * it's active state. */ void onItemSelected(); /** * Called when the {@link ItemTouchHelper} has completed the * move or swipe, and the active item state should be cleared. */ void onItemClear(); } Then in SimpleItemTouchHelperCallback implement the appropriate methods:
@Override public void onSelectedChanged(RecyclerView.ViewHolder viewHolder, int actionState) { // We only want the active item if (actionState != ItemTouchHelper.ACTION_STATE_IDLE) { if (viewHolder instanceof ItemTouchHelperViewHolder) { ItemTouchHelperViewHolder itemViewHolder = (ItemTouchHelperViewHolder) viewHolder; itemViewHolder.onItemSelected(); } } super.onSelectedChanged(viewHolder, actionState); } @Override public void clearView(RecyclerView recyclerView, RecyclerView.ViewHolder viewHolder) { super.clearView(recyclerView, viewHolder); if (viewHolder instanceof ItemTouchHelperViewHolder) { ItemTouchHelperViewHolder itemViewHolder = (ItemTouchHelperViewHolder) viewHolder; itemViewHolder.onItemClear(); } } Now it only remains for RecyclerListAdapter.ItemViewHolder implement the ItemTouchHelperViewHolder :
public class ItemViewHolder extends RecyclerView.ViewHolder implements ItemTouchHelperViewHolder { // ... @Override public void onItemSelected() { itemView.setBackgroundColor(Color.LTGRAY); } @Override public void onItemClear() { itemView.setBackgroundColor(0); } } In this example, we simply add a gray background while the item is active, and then delete it. If your ItemTouchHelper and adapter are tightly coupled, you can easily drop this setting and switch the state of the view component directly to the ItemTouchHelper.Callback .
Nets
If you now try to use the GridLayoutManager , you will see that it does not work correctly. The cause and solution of the problem are simple: we must tell our ItemTouchHelper that we want to support dragging items left and right. Earlier in SimpleItemTouchHelperCallback we already indicated:
@Override public int getMovementFlags(RecyclerView recyclerView, RecyclerView.ViewHolder viewHolder) { int dragFlags = ItemTouchHelper.UP | ItemTouchHelper.DOWN; int swipeFlags = ItemTouchHelper.START | ItemTouchHelper.END; return makeMovementFlags(dragFlags, swipeFlags); } The only change needed to support grids is to add the appropriate flags:
int dragFlags = ItemTouchHelper.UP | ItemTouchHelper.DOWN | ItemTouchHelper.LEFT | ItemTouchHelper.RIGHT; However, swipe-to-dismiss is not a very natural behavior for elements in the form of a grid, so swipeFlags wise to zero out swipeFlags :
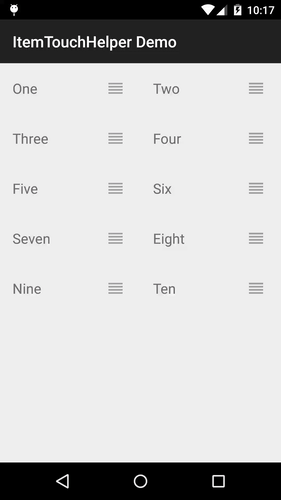
@Override public int getMovementFlags(RecyclerView recyclerView, RecyclerView.ViewHolder viewHolder) { int dragFlags = ItemTouchHelper.UP | ItemTouchHelper.DOWN | ItemTouchHelper.LEFT | ItemTouchHelper.RIGHT; int swipeFlags = 0; return makeMovementFlags(dragFlags, swipeFlags); } To see the working GridLayoutManager example, see RecyclerGridFragment . Here’s what it looks like at startup:
Custom swipe animations
ItemTouchHelper.Callback provides a really convenient way to fully control the animation while dragging or swiping. Since ItemTouchHelper is a RecyclerView.ItemDecoration , we can interfere with the rendering process of the view component in a similar way. In the next part, we will examine this question in more detail, but for now let's look at a simple example of overriding the default swipe animation to show linear disappearance.
@Override public void onChildDraw(Canvas c, RecyclerView recyclerView, ViewHolder viewHolder, float dX, float dY, int actionState, boolean isCurrentlyActive) { if (actionState == ItemTouchHelper.ACTION_STATE_SWIPE) { float width = (float) viewHolder.itemView.getWidth(); float alpha = 1.0f - Math.abs(dX) / width; viewHolder.itemView.setAlpha(alpha); viewHolder.itemView.setTranslationX(dX); } else { super.onChildDraw(c, recyclerView, viewHolder, dX, dY, actionState, isCurrentlyActive); } } The dX and dY are the current shift relative to the selected view component, where:
- -1.0f is a full swipe from right to left (from
ItemTouchHelper.ENDtoItemTouchHelper.START) - 1.0f is a complete swipe from left to right (from
ItemTouchHelper.STARTtoItemTouchHelper.END)
It is important to call super for any actionState that you do not handle in order for the default animation to start.
In the next part, we will look at an example in which we will control the drawing of the element at the moment of dragging.
Conclusion
In fact, setting up an ItemTouchHelper is quite fun. In order not to increase the volume of this article, I have divided it into several.
Source
View all the code for this series of articles in the Android-ItemTouchHelper-Demo GitHub repository. This article covers commits from ef8f149 to d164fba .
')
Source: https://habr.com/ru/post/428419/
All Articles