How to write an extension for GNOME Shell: “Do Not Disturb” mode
It all started with moving to a new version of a single Linux distribution, and there - the notorious GNOME Shell (GH for short), in Javascript. Well, OK, on JS, so on JS, it works - and all right.
At the same time, the pace of my work has long been demanding to find a normal mailer, instead of slowing down and eating tons of megabytes of the outlook.office.com tab in the browser. And I found out, in our time there are several almost excellent candidates, one problem - the mailer began to get me notifications about new letters - both with sound and pop-up inscriptions.
What to do? The decision to write the "Do Not Disturb" extension did not come immediately, I really did not want to write a bicycle and / or get bogged down in the development / code / tons of errors, but I decided, and now I want to share my experience with Habr. one

Technical requirements
I want to have one big button to turn off notifications and sounds for a time of choice: 20 minutes, 40 minutes, 1 hour, 2 hours, 4, 8 and 24 hours. 2 Aha, timing as in Slack.
In the expanses of extensions.gnome.org there was an extension of the "Do Not Disturb Button", which served as a model for writing its extension of Do Not Disturb Time .
End result: Do Not Disturb Time

Install from the site extensions.gnome.org .
Sources on github : we put asterisks, forkaem, we offer improvements.
How to install the extension GH: instructions
- Install the chrome-gnome-shell package, a browser connector, using the example of Ubuntu:
sudo apt install chrome-gnome-shell - Click the link to install the browser extension:
- Click here to install browser extension
- in Ubuntu 18.04, it worked for me in the Chrome / Chromium browser, in Fedora 28/29 - both in Firefox and in Chromium
- We are looking for the desired extension in the list https://extensions.gnome.org : enable, disable, change the extension settings.
- PROFIT!
Start
Create an extension from scratch:
$ gnome-shell-extension-tool --create-extension Name: Do Not Disturb Time Description: Disables notifications and sound for a period Uuid: dnd@catbo.net Created extension in '~/.local/share/gnome-shell/extensions/dnd@catbo.net' # gnome-shell Alt+F2, r, Enter # https://extensions.gnome.org/local/ # Gnome Shell - , gnome-shell systemd, journalctl -f /usr/bin/gnome-shell # , gnome-shell journalctl -f /usr/bin/gnome-shell | grep -E 'dnd|$' The extension.js file in the corresponding directory is the entry point in our application, in the minimal version it looks like this:
function enable() {} // ; function disable() {} // --||-- ; enable() First code
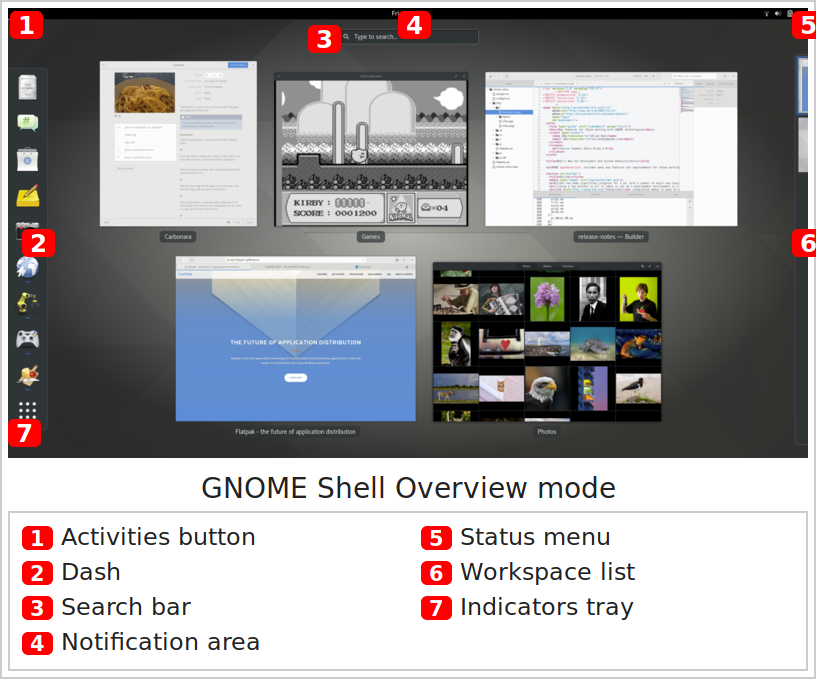
First we want to add a button to the Status Menu top right, as in the screenshot above.
So where to start? Oh, let's start with the documentation. We have official documentation, everything. But no, the official documentation is very small and scattered, but thanks to julio641742 and its unofficial documentation we get what we need:
// 1 - (1 - , 0 - , 0.5 - ) // true, let dndButton = new PanelMenu.Button(1, "DoNotDisturb", false); // `right` - (left/center/right) Main.panel.addToStatusArea("DoNotDisturbRole", dndButton, 0, "right"); let box = new St.BoxLayout(); dndButton.actor.add_child(box); let icon = new St.Icon({ style_class: "system-status-icon" }); icon.set_gicon(Gio.icon_new_for_string("/tmp/bell_normal.svg")); box.add(icon); This code creates the key dndButton object of the dndButton class, a button specifically designed for the Status Menu panel. And we insert it into this panel using the function Main.panel.addToStatusArea (). 3
Insert menu items with handlers bolted to them, example:
let menuItem = new PopupMenu.PopupMenuItem("hello, world!"); menuItem.connect("activate", (menuItem, event) => { log("hello, world!"); }); dndButton.menu.addMenuItem(menuItem); Thank you, julio641742, for the documentation! Link:
https://github.com/julio641742/gnome-shell-extension-reference
The final working code - by reference .
GNOME Shell and Javascript Features
The end of 2018 is in the courtyard, and Node.js / V8 is the main tool for running Javascript code. All modern web development rests on the "node".
But GNOME Shell and the entire infrastructure around it use a different Javascript engine, Mozilla's SpiderMonkey, and hence there are many important differences in the work.
Import modules
Unlike Node.js, there is no require (), and the trendy ES6-import is also not. Instead, there is a special imports object, whose access to the attributes leads to the loading of the module:
//const PanelMenu = require("ui/panelMenu"); const PanelMenu = imports.ui.panelMenu; In this case, we downloaded the js / ui / panelMenu.js module from the GNOME Shell library library, which implements the button functionality with a pop-up menu.
Yes, all the buttons in the panel of the modern Linux desktop using GNOME are based on panelMenu.js. Including: the very right button with battery indicators, Wi-fi, sound volume; input language switch en-ru.
Next, there is a special attribute imports.searchPath - this is a list of paths (strings) where our JS modules will be searched. For example, we selected the timer functionality in a separate module, timeUtils.js, and put it next to the input point of our extension, extension.js. Import timeUtils.js as follows:
// , - ~/.local/share/gnome-shell/extensions/<your-extension>/ const Me = imports.misc.extensionUtils.getCurrentExtension(); // imports.searchPath.unshift(Me.path); // const timeUtils = imports.timeUtils; Logging, debugging Javascript
Well, since we do not have Node.js, then we have our own logging. Instead of console.log (), several logging functions are available in the code, see gjs /../ global.cpp, static_funcs:
- "log" = g_message ("JS LOG:" + message) - logging to stderr, example:
$ cat helloWorld.js log("hello, world"); $ gjs helloWorld.js Gjs-Message: 17:20:21.048: JS LOG: hello, world - "logError" - logs the exception stack:
- The first required argument is an exception, then separated by a comma, whatever you want.
- For example, if you need to print the stack in the right place:
try { throw new Error('bum!'); } catch(e) { logError(e, "what a fuck"); } and it will draw in stderr in the style:
(gjs:28674): Gjs-WARNING **: 13:39:46.951: JS ERROR: what a fuck: Error: bum! ggg@./gtk.js:5:15 ddd@./gtk.js:12:5 @./gtk.js:15:1 - "print" = g_print ("% s \ n", txt); - only text + "\ n" in stdout, without prefixes and coloring, unlike log ()
- "printerr" = g_printerr ("% s \ n", txt) - the difference from print is that in stderr
But there is no debugger for SpiderMonkey out of the box (it’s not for nothing that I painstakingly wrote out all the available logging tools above, use it!). If you prefer, you can try JSRDbg: one , two .
Is there life for JS code outside GNOME Shell?
There is. Full-featured applications, including a graphical user interface (GUI), can be written in Javascript! You need to run them using the gjs binary, the JS-GTK code starter, an example of creating a GUI window:
$ which gjs /usr/bin/gjs $ dpkg --search /usr/bin/gjs gjs: /usr/bin/gjs $ cat gtk.js const Gtk = imports.gi.Gtk; Gtk.init(null); let win = new Gtk.Window(); win.connect("delete-event", () => { Gtk.main_quit(); }); win.show_all(); Gtk.main(); $ gjs gtk.js I mentioned above about breaking the code into modules and loading them from Javascript. The question arises, how to determine in the module itself whether it is running as a "main" module, or loaded from another module?
Python has an authentic construct:
if __name__ == "__main__": main() In Node.js - the same way:
if (require.main === module) { main(); } I did not find an official answer to this question for Gjs / GH, but I came up with a technique that I hasten to share with the reader (and why did someone read the "dosyudov"? Respect!).
So, a tricky trick is based on the analysis of the current call stack, if it consists of 2 or more lines, then we are not in the main () - module:
if ( new Error().stack.split(/\r\n|\r|\n/g).filter(line => line.length > 0) .length == 1 ) { main(); } Cleaning after themselves
Each GNOME Shell extension has access to all objects of the entire GNOME Shell. For example, to display the number of more unread notifications, let's get to the container with them in the Notification Area located in the center above, number 4 in the picture (click on the current time label, it is clickable in real, not here):
let unseenlist = Main.panel.statusArea.dateMenu._messageList._notificationSection._list; You can find out how many of them, unread notifications, subscribe to the events of adding and deleting notifications:
let number = unseenlist.get_n_children(); unseenlist.connect("actor-added", () => { log("added!"); }); unseenlist.connect("actor-removed", () => { log("removed!"); }); This is fine, but the user may decide that he no longer needs the extension X, and will press the button to disable the extension. For expansion, this is equivalent to calling the disable () function, and every effort must be made to ensure that the disabled extension does not break the working GH:
function disable() { dndButton.destroy(); } In this case, in addition to removing the button itself, you need to unsubscribe from the events of "actor-added" / "actor-removed", for example:
var signal = unseenlist.connect("actor-added", () => { log("added!"); }); function disable() { dndButton.destroy(); unseenlist.disconnect(signal); } If this is not done, the handler code will continue to be called on the corresponding event, try to update the state of the menu button that does not already exist and ... GNOME Shell will start to fail. Well, yes, we will foul, users will swear, the stones will fly to the developers of GNOME Shell and GNOME as a whole. The real picture, che.
So, GNOME Shell / Gjs is a symbiosis of two systems, Glib / GTK and Javascript, and they have a different approach to resource management. Glib / GTK requires an explicit release of its resources (buttons, timers, etc.). If the object is created by the Javascript engine, then we act as usual (do not free anything).
As a result, as soon as our extension is ready, and not “flowing”, you can safely publish it at https://extensions.gnome.org .
GnomeSession.PresenceStatus.BUSY and DBus mode.
If you have not forgotten, we are doing the extension "Do Not Disturb", which turns off the display of notifications to the user.
GNOME already has a flag for this state. After the user login, a gnome-session process is created in which this flag is located: this is the GsmPresencePrivate.status attribute, see the gnome-session sources, gnome-session / gsm-presence.c. Access to this flag is obtained through the DBus interface (such interprocess communication).
Not only us, but GH itself also needs information about this flag, so as not to display notifications. This is quite easily searched for in the GH sources:
this._presence = new GnomeSession.Presence((proxy, error) => { this._onStatusChanged(proxy.status); }); ... this._presence.connectSignal('StatusChanged', (proxy, senderName, [status]) => { this._onStatusChanged(status); }); In this case, the _onStatusChanged method is a handler that reacts to a state transition. We copy this code to ourselves, adapt it - we sorted out the notifications 4 , there was a sound.
Mute / unmute sound
Most modern Linux desktops are managed by PulseAudio, notorious division program for the authorship of the notorious Lennart Poettering. So far, I have not gotten my hands on the PulseAudio code, and I was glad to have the opportunity to understand PulseAudio at some level.
As a result, it turned out that for mute / unmute, one pactl utility, or rather three commands based on it, is sufficient:
- "pactl info": find out the
default sink- to which sound output, if there are several, the default sound is delivered - "pactl list sinks": find out mute / unmute status of corresponding device
- "pactl set-sink-mute% (defaultSink) s% (isMute) s": for mute / unmute itself
So, our task is to run commands / processes, read their output from stdout and search for the necessary values by the regular routine. In short, the standard task.
In GNOME, the base library glib is responsible for creating processes, and there is excellent documentation on it. And of course she is C. And we have JS. It is known that the Gjs package made a smart, "intuitive" layer between the C-API and Javascript. But you still understand that you need examples and you can not do without googling.
As a result, thanks to the excellent gist, we get the working code:
let resList = GLib.spawn_command_line_sync(cmd); // res = true/false, / // status = int, // out/err = , stdout/stderr let [res, out, err, status] = resList; if (res != true || status != 0) { print("not ok!"); } else { // do something useful } Saving settings in the registry
No, of course the registry in Linux is not. Here you are not Windows. There are better things called GSettings (this is an API), there are several implementation options behind it, GNOME uses Dconf by default. This is what a GUI wizard looks like for it:
- How is it better to store the settings in plain text files? - will ask old and bearded Linux users. The main feature of GSettings is that you can easily subscribe to configuration changes, for example:
const Gio = imports.gi.Gio; settings = new Gio.Settings({ settings_schema: schemaObj }); settings.connect("changed::mute-audio", function() { log("I see, you changed it!"); }); The only setting so far in our "Do Not Disturb" is the "mute-audio" option, which allows the user to turn off or not the sound during the "quiet hour".
And some classics, GTK GUI
In order to nicely show the user the settings of our extension (and not to use the dirty paws on the registry), GH suggests that we write a GUI code and put it into the buildPrefsWidget () function of the prefs.js file. In this case, in front of our extension in the list of "Installed Extensions" here we will see an additional button "Configure this extension", by pressing which our beauty will appear.
Let's create a separate About tab, because we know that without Ebout, sorry, the program is not complete.
Generally speaking, to build a classic graphical interface, GTK has a whole range of building blocks, , check out the number and the quality of which can be here .
We will use only a few of them:
- Gtk.Notebook are tabs, just like in a browser
- Gtk.VBox is a container for vertically structuring a list of widgets.
- Gtk.Label is a basic element, an inscription, with the possibility of HTML formatting.
function buildPrefsWidget() { // Gtk.Notebook GUI let notebook = new Gtk.Notebook(); ... // About, VBox c 10 , // margin/padding let aboutBox = new Gtk.VBox({ border_width: 10 }); // About notebook.append_page( aboutBox, new Gtk.Label({label: "About"}), ); // , // , (expand) aboutBox.pack_start( new Gtk.Label({ label: "<b>Do Not Disturb Time</b>", use_markup: true, }), true, // expand true, // fill 0, ); ... notebook.show_all(); return notebook; } Final screenshot:

Additionally
The work of the programmer involves 2 modes in my case:
1) in support mode, when you need to quickly respond to events - mail, Slack, Skype, etc.
2) in the mode of operation, when it is vitally necessary to cut down notifications by at least 20 minutes, otherwise the focus is lost and the total labor productivity is negligible. This is what the Do Not Disturb mode is useful for.
It may seem like a complete mute, mute, that's too much. Indeed, after all, ideally, in the Do Not Disturb mode, you want to hear Slack / Skype calls, but the other sounds (real notifications) are not. But for this they need to somehow distinguish. You can, of course, make a sound API specifically for notifications (and this is already there), except that there is always a program / programmer who does not use such functionality. An example is the Mailspring mailer: it just loses sounds through the audio tag, and you can’t distinguish them from, say, a speech in a Slack call.
PanelMenu.Button is actually the button in the panel + pop-up menu, and you can figure it out yourself and create it from scratch, and that, and the other, the boys on raene will appreciate! I had a focus on quick results and therefore I copied the code from informal documentation.
Actually, you need to initiate a mode change using SetStatusRemote ().
')
Source: https://habr.com/ru/post/428187/
All Articles