React.js: an Intuitive Beginner Guide
The author of the article, the translation of which we publish, believes that, unfortunately, most of the existing React guides do not pay due attention to valuable practical development techniques. Such guides do not always give the person who deals with them an understanding of what “the right approach” is to working with React.

This guide, which is designed for novice developers with knowledge of HTML, JavaScript and CSS, will cover the basics of React and the most common mistakes that a programmer using this library may encounter.
Before we get down to business, let's say a few words about why React can be considered the best alternative among the tools for developing web interfaces. There are many UI frameworks. Why choose React? In order to answer this question - let's compare the two most popular tools for developing interfaces - React and Angular. It should be noted that Vue.js framework, which is gaining popularity, could be included in this comparison, but we will limit ourselves to React and Angular.
')
React-development consists in describing what needs to be displayed on the page (and not in drawing up instructions for the browser on how to do this). This, among other things, means a significant reduction in the volume of the template code.
Angular, on the other hand, has command-line tools that generate generic code for components. Doesn't this seem a bit different from what can be expected from modern interface development tools? In fact, we are talking about the fact that Angular has so many sample code that in order to generate it, even a special tool is created.
In React, starting to develop, just start writing code. There is no template code for the components that need to be generated. Of course, some preparation is needed before development, but when it comes to components, they can be described as pure functions.
Angular code uses directives like
The learning curve is an important factor to consider when choosing a UI framework. In this regard, it should be noted that there are fewer abstractions in React than in Angular. If you know JavaScript, then you will probably be able to learn how to write React applications in just a day. Of course, in order to learn how to do it correctly, it will take some time, but you can get to work very, very quickly.
If you analyze Angular, then it turns out that if you decide to master this framework, you will have to learn a new language (Angular uses TypeScript), as well as learn how to use Angular command line tools and get used to working with directives.
Angular has a two-way data binding system. This, for example, is expressed in the fact that changes in the form of an element lead to automatic updating of the state of the application. This complicates debugging and is a big disadvantage of this framework. With this approach, if something goes wrong, the programmer cannot know exactly what caused the change in the state of the application.
In React, on the other hand, one-way data binding is used. This is a big plus of this library, as it is expressed in the fact that the programmer always knows exactly what caused the change in the state of the application. This approach to data binding greatly simplifies debugging applications.
I believe that one of the strengths of React is the fact that this library does not force the developer to use classes. In Angular, all components must be implemented as classes. This leads to excessive code complication, without giving any advantages.
In React, all user interface components can be expressed as sets of pure functions. Using pure functions to form a UI can be compared with a breath of clean air.
Now, when we have considered the reasons for the popularity of React, which, quite possibly, will incline you towards this particular library when choosing tools for developing user interfaces, let's move on to practice.
Node.js is a server platform that supports the execution of JavaScript code, the capabilities of which will be useful to us for React development. If this platform is not yet installed, now is the time to fix it .
Here we will use the
To globally install
Then, to create an application template, run the following command:
At this preliminary training is completed. To start the application run the following commands:
Here we go to the project folder and start the development server, which allows you to open a new React application by going to the browser at http: // localhost: 3000 / .
Let us now understand how the React application is organized. To do this, open the project you just created using your IDE (I recommend Visual Studio Code ).
While in the project folder, open the file that is located at
Index.html file
Here we are especially interested in the string
Now open the file
Index.js file
Here is the line of code that is responsible for outputting what we call the "React-application" to the page:
This line tells React that you need to take the
Let's understand now with the construction
If you plan to use JSX in a certain
Now we are ready to look at the code of our first component. To do this, open the file
App.js file
In order to create a React component, you must first create a class that is a successor of
Notice that the
Repeat what we just found out about the components:
Now let's talk about what, when developing React-applications, should be avoided.
Components in React can be created using two approaches. The first is the use of component classes (Class Component), the second is the use of functional components (Functional Component). As you may have noticed, in the example above, classes are used. Unfortunately, most React beginner’s guides suggest using them.
What is wrong with describing components using the class mechanism? The fact is that such components are hard to test and they tend to grow excessively. These components are subject to the problem of poor-quality sharing of responsibility, mixing logic and visual presentation (and this complicates debugging and testing applications). In general, the use of classes of components leads to the fact that the programmer, figuratively speaking, "shoots himself in the foot." Therefore, especially if we are talking about novice programmers, I would recommend them not to use classes of components at all.
So, we found out that using classes to describe components is not the best idea. What alternatives do we have? The answer to this question are the functional components. If a component created using a class has nothing but a
See what we did here? Namely, we removed the class and replaced the
We turned the class into a function that returns the markup, which should be displayed on the page.
Think about it. There is no template code in the function that returns markup. This is almost a clean markup. Isn't that great?
The code of functional components is much easier to read, working with them, you have much less to be distracted by standard constructions.
Here it should be noted that although we have just said that functional components are preferable to component classes, we will mainly use classes in this material, since the code of component classes is clearer for beginners, it relies on fewer abstractions, it makes it easier to demonstrate key concepts of React. But when you are sufficiently familiar with the development of React-applications, it is strongly recommended to take into account, when developing real projects, what was said above. In order to better understand the functional components - take a look at this material .
Properties (props) is one of the central concepts of React. What are “properties”? In order to understand this, remember the parameters that are passed to the functions. In essence, properties are the parameters that are passed to the components. Consider the following code:
Here we created the
Braces in expressions like
Notice that a single
The code can be simplified by taking advantage of ES6's ability to destruct the objects:
As you can see, the construction
What if to solve the same problem, instead of functional components, we would use class-based components? In this case, the
I do not know what sensations such code causes you, but it seems to me overloaded with auxiliary mechanisms. Here, in particular, to access the properties, it is necessary to use constructions of the form
The Single Responsibility Principle (SRP) is one of the most important programming principles to follow. He tells us that the module should solve only one problem and should do it qualitatively. If you develop a project without following only this principle, the code of such a project can turn into a nightmarish structure that cannot be maintained.
How can one violate the principle of sole responsibility? Most often this happens when mechanisms unrelated to each other are placed in the same files. In this material we will often refer to this principle.
Beginners usually place many components in one file. For example, we have the code for the components
Even very small components (like our
Place the code for the
Then use this component in the
Note that the file name must match the component name. That is, the
A state is another central concept of React. This is where the application data is stored — that is, what may change. Need to save something entered in a form field? Use condition. Need to save points scored by a player in a browser game? For this, you also need to use the state of the application.
Create a simple form with which the user can enter your name. Here I intentionally use a class to describe a component, as this makes it easy to demonstrate the concept in question. You can read about how to convert a component created using a class into a functional component here .
The user can enter something in the form field, and this is good. However, if you carefully read this code, then you may notice that
How to use the value entered in the field? React does not rely on DOM elements to be accessed directly. Event handlers and application state will help us solve this problem.
You can think of a state as a simple JavaScript object that is stored as a property in the
Here we have equipped the
This is where the status of the component is updated. The state of the components is not updated directly. This is done only using the
In this case,
Notice that we did not declare
We implement a simple system for checking data entered into a form using regular expressions. Let's decide that a name must consist of at least three characters and can contain only letters.
Add an
Let's sort this code.
In developing the input validation system, we first added a new property:
Data validation is performed in the
If the check fails, we return an error message from the function. If the name passed the verification, we return an empty string, which indicates that no errors were found during the verification of the name. Here we, for the sake of brevity of the code, use the ternary JavaScript operator.
Here we extract the
Then we call the above data check function, passing it the
Consider the
.
JavaScript.
, , , . , :
React
, , , , , . , .
, , React-. , , —
How to avoid it? , .
, ,
, . .
, :
— ,
«»? — , .
, , , , , . , ,
, , , .
, ,
, . ,
, .
, : ,
:
.
, , , :
, React- . , , , , . , , , React, , , , UI-.
→ , ,
Dear readers! , , React-, .

This guide, which is designed for novice developers with knowledge of HTML, JavaScript and CSS, will cover the basics of React and the most common mistakes that a programmer using this library may encounter.
Why do web developers choose React?
Before we get down to business, let's say a few words about why React can be considered the best alternative among the tools for developing web interfaces. There are many UI frameworks. Why choose React? In order to answer this question - let's compare the two most popular tools for developing interfaces - React and Angular. It should be noted that Vue.js framework, which is gaining popularity, could be included in this comparison, but we will limit ourselves to React and Angular.
')
▍Declarative approach to interface description
React-development consists in describing what needs to be displayed on the page (and not in drawing up instructions for the browser on how to do this). This, among other things, means a significant reduction in the volume of the template code.
Angular, on the other hand, has command-line tools that generate generic code for components. Doesn't this seem a bit different from what can be expected from modern interface development tools? In fact, we are talking about the fact that Angular has so many sample code that in order to generate it, even a special tool is created.
In React, starting to develop, just start writing code. There is no template code for the components that need to be generated. Of course, some preparation is needed before development, but when it comes to components, they can be described as pure functions.
▍Clear syntax
Angular code uses directives like
ng-model , ngIf and ngFor . This code looks rather cumbersome. In React, on the other hand, JSX syntax is used, which is perceived as plain HTML, that is, in order to start React development, you do not need to learn fundamentally new things. Here's what it looks like: const Greetings = ({ firstName }) => ( <div>Hi, {firstName}</div> ); ▍The correct learning curve
The learning curve is an important factor to consider when choosing a UI framework. In this regard, it should be noted that there are fewer abstractions in React than in Angular. If you know JavaScript, then you will probably be able to learn how to write React applications in just a day. Of course, in order to learn how to do it correctly, it will take some time, but you can get to work very, very quickly.
If you analyze Angular, then it turns out that if you decide to master this framework, you will have to learn a new language (Angular uses TypeScript), as well as learn how to use Angular command line tools and get used to working with directives.
▍Features of the data binding mechanism
Angular has a two-way data binding system. This, for example, is expressed in the fact that changes in the form of an element lead to automatic updating of the state of the application. This complicates debugging and is a big disadvantage of this framework. With this approach, if something goes wrong, the programmer cannot know exactly what caused the change in the state of the application.
In React, on the other hand, one-way data binding is used. This is a big plus of this library, as it is expressed in the fact that the programmer always knows exactly what caused the change in the state of the application. This approach to data binding greatly simplifies debugging applications.
▍Functional development approach
I believe that one of the strengths of React is the fact that this library does not force the developer to use classes. In Angular, all components must be implemented as classes. This leads to excessive code complication, without giving any advantages.
In React, all user interface components can be expressed as sets of pure functions. Using pure functions to form a UI can be compared with a breath of clean air.
Now, when we have considered the reasons for the popularity of React, which, quite possibly, will incline you towards this particular library when choosing tools for developing user interfaces, let's move on to practice.
Practice of developing React applications
▍Node.js
Node.js is a server platform that supports the execution of JavaScript code, the capabilities of which will be useful to us for React development. If this platform is not yet installed, now is the time to fix it .
▍Preparation of the project
Here we will use the
create-react-app package from Facebook to create the basis of the React application. This is probably the most popular approach to setting up the working environment, which allows you to start developing. Thanks to create-react-app programmer has at his disposal many of the necessary tools, which saves him from having to select them himself.To globally install
create-react-app , use the following command: npm i -g create-react-app Then, to create an application template, run the following command:
create-react-app react-intro At this preliminary training is completed. To start the application run the following commands:
cd react-intro npm start Here we go to the project folder and start the development server, which allows you to open a new React application by going to the browser at http: // localhost: 3000 / .
Project structure
Let us now understand how the React application is organized. To do this, open the project you just created using your IDE (I recommend Visual Studio Code ).
Index.html file
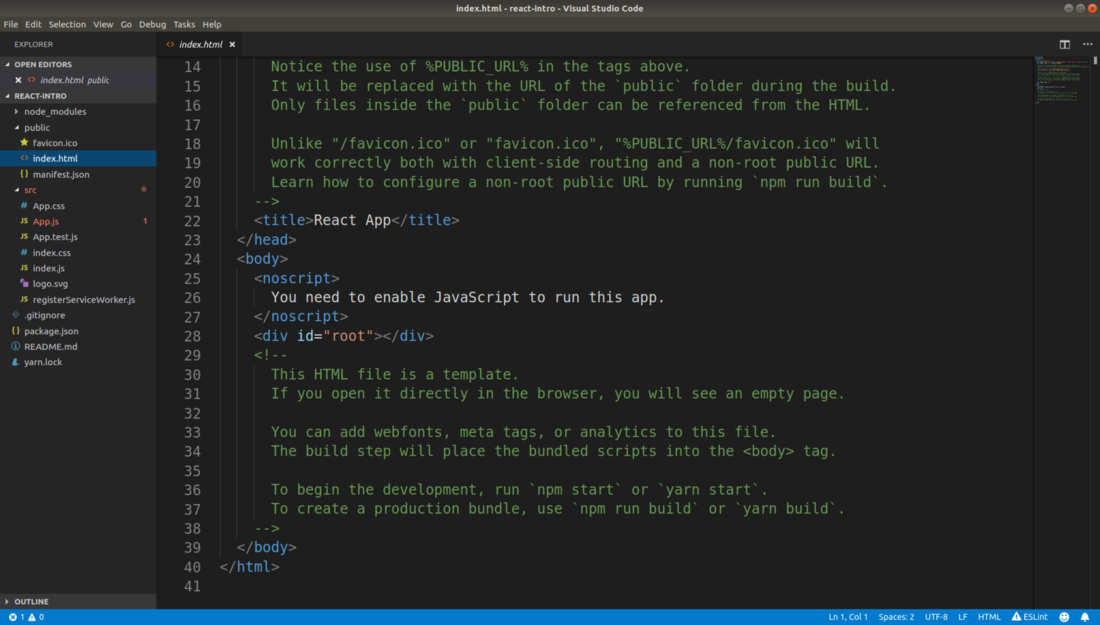
While in the project folder, open the file that is located at
public/index.html . Here is what you see when you do this.Index.html file
Here we are especially interested in the string
<div id="root"> . This is where our React application will be located. All this element will be replaced with the application code, and everything else will remain unchanged.Index.js file
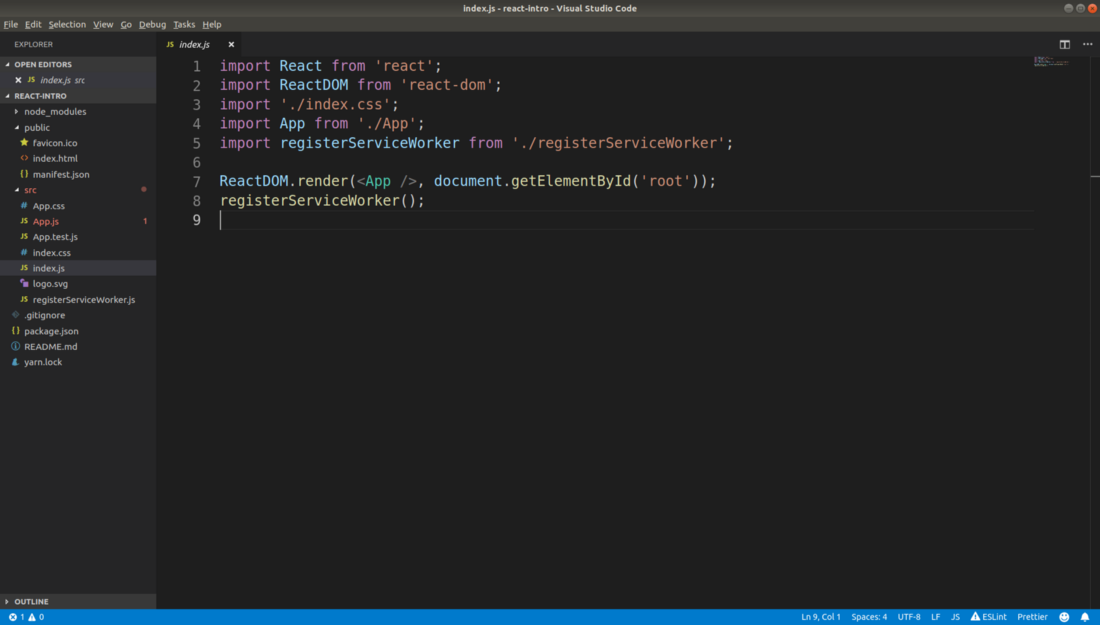
Now open the file
src/index.js . This file performs the deployment of React-application. And, by the way, the source code of the application will be located in the src directory.Index.js file
Here is the line of code that is responsible for outputting what we call the "React-application" to the page:
ReactDOM.render(<App />, document.getElementById('root')); This line tells React that you need to take the
App component (we'll talk about it very soon) and put it in the root div , which was defined in the index.html file we just reviewed.Let's understand now with the construction
<App /> . It is very similar to HTML code, but it is a sample of JSX code that represents the special JavaScript syntax used by React. Please note that this construction starts with a capital A , that this is <App /> , not <app /> . This is because of the entity naming convention used in React. This approach allows the system to distinguish between ordinary HTML tags and React components. If component names do not begin with a capital letter, React will not be able to display them on the page.If you plan to use JSX in a certain
.js file, you need to import React there using the following command: import React from 'react'; App.js file
Now we are ready to look at the code of our first component. To do this, open the file
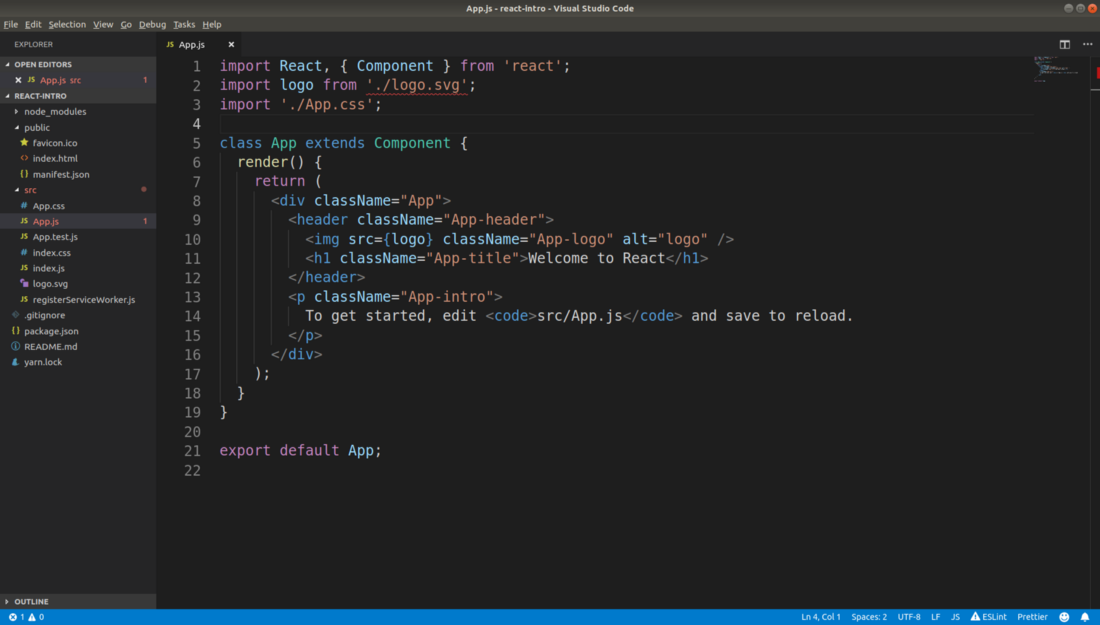
src/App.jsApp.js file
In order to create a React component, you must first create a class that is a successor of
React.Component . This is exactly the task that the class App extends Component solves. All React components should contain an implementation of the render method, in which, as its name suggests, the component is rendered and its visual presentation is formed. This method should return HTML markup to display it on the page.Notice that the
className attribute is the equivalent of the class attribute in HTML. It is used to assign CSS class elements for styling. The class keyword in javascript is reserved; it cannot be used as an attribute name.Repeat what we just found out about the components:
- Their names begin with a capital letter (
Ain theApp). - They extend the
React.Componentclass. - They must implement the
rendermethod that returns the markup.
Now let's talk about what, when developing React-applications, should be avoided.
▍Recommendation # 1: no need to use component classes everywhere
Components in React can be created using two approaches. The first is the use of component classes (Class Component), the second is the use of functional components (Functional Component). As you may have noticed, in the example above, classes are used. Unfortunately, most React beginner’s guides suggest using them.
What is wrong with describing components using the class mechanism? The fact is that such components are hard to test and they tend to grow excessively. These components are subject to the problem of poor-quality sharing of responsibility, mixing logic and visual presentation (and this complicates debugging and testing applications). In general, the use of classes of components leads to the fact that the programmer, figuratively speaking, "shoots himself in the foot." Therefore, especially if we are talking about novice programmers, I would recommend them not to use classes of components at all.
So, we found out that using classes to describe components is not the best idea. What alternatives do we have? The answer to this question are the functional components. If a component created using a class has nothing but a
render method, then it is an excellent contender for processing it into a functional component. Armed with this idea, let's think about how to improve the App component created by the create-react-app tool: function App() { return ( <div className="App"> ... </div> ); } export default App; See what we did here? Namely, we removed the class and replaced the
render method with the view structure function App() {...} . If we use the syntax of ES6 switch functions, then our code will look even better: const App = () => ( <div className="App"> ... </div> ); export default App; We turned the class into a function that returns the markup, which should be displayed on the page.
Think about it. There is no template code in the function that returns markup. This is almost a clean markup. Isn't that great?
The code of functional components is much easier to read, working with them, you have much less to be distracted by standard constructions.
Here it should be noted that although we have just said that functional components are preferable to component classes, we will mainly use classes in this material, since the code of component classes is clearer for beginners, it relies on fewer abstractions, it makes it easier to demonstrate key concepts of React. But when you are sufficiently familiar with the development of React-applications, it is strongly recommended to take into account, when developing real projects, what was said above. In order to better understand the functional components - take a look at this material .
Familiarity with properties
Properties (props) is one of the central concepts of React. What are “properties”? In order to understand this, remember the parameters that are passed to the functions. In essence, properties are the parameters that are passed to the components. Consider the following code:
const Greetings = (props) => <div>Hey you! {props.firstName} {props.lastName}!</div>; const App = () => ( <div> <Greetings firstName="John" lastName="Smith" /> </div> ); Here we created the
Greetings component and used it to greet the person, whose name is John Smith , from the App component. All this code will result in the following HTML markup: <div> <div>Hey you! John Smith!</div> </div> Braces in expressions like
{props.name} are used to extract JavaScript code. Greetings are passed to the firstName and lastName properties as parameters. We work with them by referring to the properties of the props object.Notice that a single
props object is props , rather than two values representing the properties firstName and lastName .The code can be simplified by taking advantage of ES6's ability to destruct the objects:
const Greetings = ({ firstName, lastName }) => <div>Hey you! {firstName} {lastName}!</div>; As you can see, the construction
(props) was replaced by ({ firstName, lastName }) . With this replacement, we inform the system that we are only interested in two properties of the props object. And this, in turn, allows us to directly access the values of firstName and lastName , without explicitly specifying properties of an object like props.firstName .What if to solve the same problem, instead of functional components, we would use class-based components? In this case, the
Greetings component code would look like this: class Greetings extends React.Component { render() { return ( <div>Hey you! {this.props.firstName} {this.props.lastName}!</div> ); } } I do not know what sensations such code causes you, but it seems to me overloaded with auxiliary mechanisms. Here, in particular, to access the properties, it is necessary to use constructions of the form
this.props .Principle of sole responsibility
The Single Responsibility Principle (SRP) is one of the most important programming principles to follow. He tells us that the module should solve only one problem and should do it qualitatively. If you develop a project without following only this principle, the code of such a project can turn into a nightmarish structure that cannot be maintained.
How can one violate the principle of sole responsibility? Most often this happens when mechanisms unrelated to each other are placed in the same files. In this material we will often refer to this principle.
Beginners usually place many components in one file. For example, we have the code for the components
Greetings and the App is in the same file. In practice, this should not be done, as this violates the SRP.Even very small components (like our
Greetings component) need to be placed in separate files.Place the code for the
Greetings component in a separate file: import React from "react"; const Greetings = ({ firstName, lastName }) => ( <div> Hey you! {firstName} {lastName}! </div> ); export default Greetings; Then use this component in the
App component: import Greetings from "./Greetings"; const App = () => ( ... ); Note that the file name must match the component name. That is, the
App component code must be placed in the App.js file, the Greetings component code is in the Greetings.js file, and so on.Familiarity with the state of the application
A state is another central concept of React. This is where the application data is stored — that is, what may change. Need to save something entered in a form field? Use condition. Need to save points scored by a player in a browser game? For this, you also need to use the state of the application.
Create a simple form with which the user can enter your name. Here I intentionally use a class to describe a component, as this makes it easy to demonstrate the concept in question. You can read about how to convert a component created using a class into a functional component here .
import React from "react"; class SimpleForm extends React.Component { render() { return ( <div> <input type="text" name="firstName" /> <Greetings firstName="John" /> </div> ); } } const App = () => ( <div> <SimpleForm /> </div> ); The user can enter something in the form field, and this is good. However, if you carefully read this code, then you may notice that
John is always used as the username in the welcome page. What if so far not all our users call this? If so, then we put ourselves in a not very comfortable position.How to use the value entered in the field? React does not rely on DOM elements to be accessed directly. Event handlers and application state will help us solve this problem.
class SimpleForm extends React.Component { state = { firstName: "", }; onFirstNameChange = event => this.setState({ firstName: event.target.value }); render() { return ( <div> <input type="text" name="firstName" onChange={this.onFirstNameChange} /> <Greetings firstName={this.state.firstName} /> </div> ); } } You can think of a state as a simple JavaScript object that is stored as a property in the
SimpleForm component SimpleForm . In this object we add the property firstName .Here we have equipped the
firstName field with an event handler. It starts every time the user enters at least one character in the field. In the class, the onChange property is responsible for handling the onChange onFirstNameChange , in the function representing which the command is executed of the following form: this.setState(...) This is where the status of the component is updated. The state of the components is not updated directly. This is done only using the
setState method. In order to write a new value to the property firstName , we simply pass to this method an object containing what needs to be written to the state: { firstName: event.target.value } In this case,
event.target.value is what the user entered in the form field, namely his name.Notice that we did not declare
onFirstNameChange as a method. It is very important that such things be declared in the form of class properties containing pointer functions, and not in the form of methods. If you declare a similar function as a method, then this will be bound to the form element that calls this method, and not to the class, as we might expect. This little thing is often confusing for beginners. This is one of the reasons for recommending the use of functional components, rather than component classes.▍Check data entered into the form
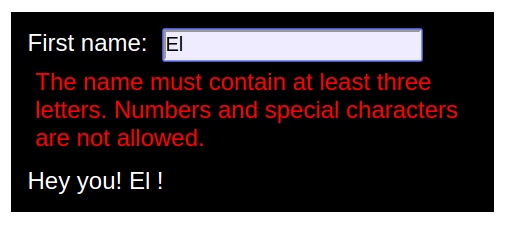
We implement a simple system for checking data entered into a form using regular expressions. Let's decide that a name must consist of at least three characters and can contain only letters.
Add an
onBlur event handler to the component, which is called when the user leaves the input field. Add another property to the application state - firstNameError . If an error occurred while entering the name, we will display a message about it under the field.Let's sort this code.
class SimpleForm extends React.Component { state = { firstName: "", firstNameError: "", }; validateName = name => { const regex = /[A-Za-z]{3,}/; return !regex.test(name) ? "The name must contain at least three letters. Numbers and special characters are not allowed." : ""; }; onFirstNameBlur = () => { const { firstName } = this.state; const firstNameError = this.validateName( firstName ); return this.setState({ firstNameError }); }; onFirstNameChange = event => this.setState({ firstName: event.target.value }); render() { const { firstNameError, firstName } = this.state; return ( <div> <div> <label> First name: <input type="text" name="firstName" onChange={this.onFirstNameChange} onBlur={this.onFirstNameBlur} /> {firstNameError && <div>{firstNameError}</div>} </label> </div> <Greetings firstName={firstName} /> </div> ); } } Application status
In developing the input validation system, we first added a new property:
firstNameError to the state: state = { ... firstNameError: "", }; Data verification function
Data validation is performed in the
validateName arrow function. It checks the entered name with a regular expression: validateName = name => { const regex = /[A-Za-z]{3,}/; return !regex.test(name) ? "The name must contain at least three letters..." : ""; } If the check fails, we return an error message from the function. If the name passed the verification, we return an empty string, which indicates that no errors were found during the verification of the name. Here we, for the sake of brevity of the code, use the ternary JavaScript operator.
OnBlur event handler
onBlur look at the onBlur event onBlur , which is called when the user leaves the input field: onFirstNameBlur = () => { const { firstName } = this.state; const firstNameError = this.validateName( firstName ); return this.setState({ firstNameError }); }; Here we extract the
firstName property from the state, taking advantage of ES6's ability to destruct the objects. The first line of this code is equivalent to: const firstName = this.state.firstName; Then we call the above data check function, passing it the
firstName , and write to the state property firstNameError what this function returns. If the check fails, an error message will be sent to this property. If successful, an empty string will be written there.Render method
Consider the
render() component method: render() { const { firstNameError, firstName} = this.state; ... } .
<input ... onBlur={this.onFirstNameBlur} /> onFirstNameBlur onBlur . {firstNameError && <div>{firstNameError}</div>} JavaScript.
div , , , firstNameError true .▍
, , , . , :
render() { const { firstNameError, firstName } = this.state; return ( <div style={{ margin: 50, padding: 10, width: 300, border: "1px solid black", backgroundColor: "black", color: "white" }} > <div style={{marginBottom: 10}}> <label> First name: <input style={{backgroundColor: '#EFEFFF', marginLeft: 10}} type="text" name="firstName" onChange={this.onFirstNameChange} onBlur={this.onFirstNameBlur} /> {firstNameError && <div style={{color: 'red', margin: 5}}>{firstNameError}</div>} </label> </div> <Greetings firstName={firstName} /> </div> ); } React
style ., , , , , . , .
▍ №2:
, , React-. , , —
render , , . Why is that bad? , . , , .How to avoid it? , .
style , . . , style.js : // style.js: const style = { form: { margin: 50, padding: 10, width: 300, border: "1px solid black", backgroundColor: "black", color: "white" }, inputGroup: { marginBottom: 10 }, input: { backgroundColor: "#EFEFFF", marginLeft: 10 }, error: { color: "red", margin: 5 } }; export default style; , ,
SimpleComponent : import style from './style'; class SimpleForm extends React.Component { ... render() { const { firstNameError, firstName } = this.state; return ( <div style={style.form}> <div style={style.inputGroup}> <label> First name: <input style={style.input} type="text" name="firstName" onChange={this.onFirstNameChange} onBlur={this.onFirstNameBlur} /> {firstNameError && ( <div style={style.error}>{firstNameError}</div> )} </label> </div> <Greetings firstName={firstName} /> </div> ); } } export default SimpleForm; , . .
▍
, :
class SimpleForm extends React.Component { state = { ... lastName: "", lastNameError: "" }; validateName = ...; onFirstNameBlur = ...; onFirstNameChange = ...; onLastNameBlur = () => { const { lastName } = this.state; const lastNameError = this.validateName(lastName); return this.setState({ lastNameError }); }; onLastNameChange = event => this.setState({ lastName: event.target.value }); render() { const { firstNameError, firstName, lastName, lastNameError } = this.state; return ( <div style={style.form}> <div style={style.inputGroup}> <label> First name: <input style={style.input} type="text" name="firstName" onChange={this.onFirstNameChange} onBlur={this.onFirstNameBlur} /> {firstNameError && <div style={style.error}>{firstNameError}</div>} </label> </div> <div style={style.inputGroup}> <label> Last name: <input style={style.input} type="text" name="lastName" onChange={this.onLastNameChange} onBlur={this.onLastNameBlur} /> {lastNameError && <div style={style.error}>{lastNameError}</div>} </label> </div> <Greetings firstName={firstName} lastName={lastName} /> </div> ); } } export default SimpleForm; — ,
firstName .«»? — , .
▍ №3:
, , , , , . , ,
render . ., , , .
TextField , . import React from 'react' import style from "./style"; const TextField = ({name, onChange, onBlur, error, label}) => ( <div style={style.inputGroup}> <label> {label} <input style={style.input} type="text" name={name} onChange={onChange} onBlur={onBlur} /> {error && <div style={style.error}>{error}</div>} </label> </div> ); export default TextField; , ,
render . , , .SimpleForm : ... import TextField from './TextField'; class SimpleForm extends React.Component { ... render() { const { firstNameError, firstName, lastName, lastNameError } = this.state; return ( <div style={style.form}> <TextField name="firstName" label="First name:" onChange={this.onFirstNameChange} onBlur={this.onFirstNameBlur} error={firstNameError} /> <TextField name="lastName" label="Last name:" onChange={this.onLastNameChange} onBlur={this.onLastNameBlur} error={lastNameError} /> <Greetings firstName={firstName} lastName={lastName} /> </div> ); } } , . ,
TextField . FirstNameField : import React from 'react'; import TextField from './TextField'; const FirstNameField = ({...rest}) => ( <TextField name="firstName" label="First name:" {...rest} /> ); export default FirstNameField; , .
({...rest}) ( rest, ). , , , rest . , , TextField , « », spread (, {...rest} , ). rest , , TextField ., : ,
FirstNameField TextField .LastNameField ::
... import FirstNameField from './FirstNameField'; import LastNameField from './LastNameField'; class SimpleForm extends React.Component { ... render() { const { firstNameError, firstName, lastName, lastNameError } = this.state; return ( <div style={style.form}> <FirstNameField onChange={this.onFirstNameChange} onBlur={this.onFirstNameBlur} error={firstNameError} /> <LastNameField onChange={this.onLastNameChange} onBlur={this.onLastNameBlur} error={lastNameError} /> <Greetings firstName={firstName} lastName={lastName} /> </div> ); } } .
▍
, , , :
- , , , .
- . , , , , 1000 ( ).
- , . , , .
- , , , . . , , . , , , .
- , , , , .
this, .
Results
, React- . , , , , . , , , React, , , , UI-.
→ , ,
Dear readers! , , React-, .
Source: https://habr.com/ru/post/428077/
All Articles