Writing a game on LWJGL
Creating a Game on LWJGL # 1
Writing a game is a complex and interesting process that takes a lot of time. In this series of articles I will explain how to create a simple 3D Java game using the LWJGL library.
To create your game you need the following:
- Ability to write Java code (minimum required: understanding of the work of conditions, cycles, strings, arrays, functions, classes)
- Development Environment (I will use Eclipse)
- LWJGL library
- Video card that supports OpengGL version not lower than 3.3
- Free time
- Idea
Who cares, I ask under the cat.
Step one, preparation
How to install Eclipse .
Download LWJGL 2.9.3 , 3D graphics library, add it to your project.
Download slick-util , a library that simplifies texture loading, add it to the project.
')
Step two, check
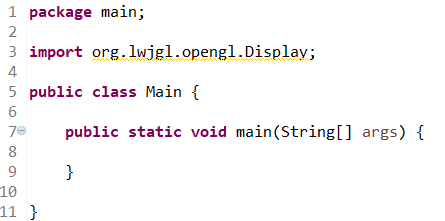
First of all, create the Main class in the main package, put the following code into it:

If the line with input is not highlighted in red, then everything is OK (on the screen it is highlighted in yellow, because this library is not used in the code).
Step Three, Display
Fill the Main class with the following code:
Start code
import org.lwjgl.LWJGLException; import org.lwjgl.opengl.Display; import org.lwjgl.opengl.DisplayMode; public class Main { static int width = 800, height = 600; static DisplayMode mainDisplayMode = new DisplayMode(width, height); static boolean running = true; static void update() { if (Display.wasResized()) { width = Display.getWidth(); height = Display.getHeight(); } Display.update(); Display.sync(60); if (Display.isCloseRequested()) { running = false; } } public static void main(String[] args) { try { Display.setLocation( (Display.getDesktopDisplayMode().getWidth() - mainDisplayMode.getWidth()) / 2, Display.getDesktopDisplayMode().getHeight() - mainDisplayMode.getHeight()) / 2); Display.setResizable(true); Display.setVSyncEnabled(true); Display.setDisplayMode(mainDisplayMode); Display.create(); } catch (LWJGLException ex) { System.err.println(ex.getStackTrace().toString()); Display.destroy(); System.exit(1); } while (running) { update(); } Display.destroy(); System.exit(0); } } So what happens here:
Display.setLocation( (Display.getDesktopDisplayMode().getWidth() - mainDisplayMode.getWidth()) / 2, (Display.getDesktopDisplayMode().getHeight() - mainDisplayMode.getHeight()) / 2); Display.setResizable(true); Display.setVSyncEnabled(true); Display.setDisplayMode(mainDisplayMode); Display.create(); In these lines:
- sets the display position (in the center of the screen)
- it is allowed to change its size
- vertical sync is on
- set DisplayMode in which screen sizes and some other parameters are stored
- in the last line the display is created and displayed on the screen.
static void update() { if (Display.wasResized()) { width = Display.getWidth(); height = Display.getHeight(); } Display.update(); Display.sync(60); if (Display.isCloseRequested()) { running = false; } } In the update function, which is called in an infinite loop:
- Check window resizing
- Display update
- In the Display.sync (60) line, the display synchronizes with 60 hertz (if you have a different screen refresh rate, for example, 59, 76, 120, 144, etc., set your frequency).
- Check closing window
Notice how the program ends when the user clicks on the cross, the window’s close flag, Display.isCloseRequested () becomes true, and the running variable becomes false, and at the next iteration the while (running) cycle does not execute and the display will go to .destroy (), which will destroy the display and System.exit (0), the call of which will end the program.
Step Four, OpenGL
To initialize OpenGL to the main function before the while (running) loop, add the following code:
if (!GLContext.getCapabilities().OpenGL33) { System.err.println(" OpenGL 3.3."); System.exit(0); } This code checks if the video card supports OpenGL 3.3, if the video card does not support this version, try updating the drivers or switching to another video card (if you have more than one).
So, the check is done, if everything is fine, the video card supports OpenGL 3.3, then we move on. After the verification code, before the loop, add the following code:
glShadeModel(GL_SMOOTH); glEnable(GL_TEXTURE_2D); glEnable(GL_DEPTH_TEST); glClearColor(1f, 0f, 0f, 1f); This code will configure OpenGL as follows:
- Turn on soft lighting in shaders
- Turn on textures
- Turn on depth checking (so that near objects overlap distant objects)
- Set the cleaning color
In the loop while (running), before calling the function update (), we add the line
glClear(GL_COLOR_BUFFER_BIT | GL_DEPTH_BUFFER_BIT); Which will clear the color buffer and depth buffer each time the screen is updated.
Summary code
Click to view
import static org.lwjgl.opengl.GL11.GL_COLOR_BUFFER_BIT; import static org.lwjgl.opengl.GL11.GL_DEPTH_BUFFER_BIT; import static org.lwjgl.opengl.GL11.GL_DEPTH_TEST; import static org.lwjgl.opengl.GL11.GL_SMOOTH; import static org.lwjgl.opengl.GL11.GL_TEXTURE_2D; import static org.lwjgl.opengl.GL11.glClear; import static org.lwjgl.opengl.GL11.glClearColor; import static org.lwjgl.opengl.GL11.glEnable; import static org.lwjgl.opengl.GL11.glShadeModel; import org.lwjgl.LWJGLException; import org.lwjgl.opengl.Display; import org.lwjgl.opengl.DisplayMode; import org.lwjgl.opengl.GLContext; public class Main { static int width = 800, height = 600; static DisplayMode mainDisplayMode = new DisplayMode(width, height); static boolean running = true; static void update() { if (Display.wasResized()) { width = Display.getWidth(); height = Display.getHeight(); } Display.update(); Display.sync(60); if (Display.isCloseRequested()) { running = false; } } public static void main(String[] args) { try { Display.setLocation((Display.getDesktopDisplayMode().getWidth() - mainDisplayMode.getWidth()) / 2, (Display.getDesktopDisplayMode().getHeight() - mainDisplayMode.getHeight()) / 2); Display.setResizable(true); Display.setVSyncEnabled(true); Display.setDisplayMode(mainDisplayMode); Display.create(); } catch (LWJGLException ex) { System.err.println(ex.getStackTrace().toString()); Display.destroy(); System.exit(1); } if (!GLContext.getCapabilities().OpenGL33) { System.err.println(" OpenGL 3.3."); System.exit(0); } glShadeModel(GL_SMOOTH); glEnable(GL_TEXTURE_2D); glEnable(GL_DEPTH_TEST); glClearColor(1f, 0f, 0f, 1f); while (running) { glClear(GL_COLOR_BUFFER_BIT | GL_DEPTH_BUFFER_BIT); update(); } Display.destroy(); System.exit(0); } } This concludes the first article on writing a game on LWJGL, if the survey contains more than 50% positive responses, I will continue to write a series of articles.
Source: https://habr.com/ru/post/427979/
All Articles