Codable for API requests and how to clean up the code
Hi, Habr!
Starting with Swift 4, we have access to the new Codable protocol, which makes it easy to encode / decode models. In my projects there is a lot of code for API calls, and over the past year I have done a lot of work on optimizing this huge array of code into something very light, concise and simple by killing repetitive code and using Codable even for multipart queries and url query parameters. So it turned out several classes, excellent in my opinion, for sending requests and parsing responses from the server. As well as a convenient file structure, which is the controller for each group of requests, which I got used to when using Vapor 3 on the backend. A few days ago, I allocated all my work into a separate library and called it CodyFire. I would like to tell about it in this article.
CodyFire is based on Alamofire, but it's a little more than just a wrapper over Alamofire, it's a whole system approach to working with the REST API for iOS. That is why I do not worry that Alamofire is sawing the fifth version, in which Codable support will be, since it will not kill my creation.
Let's start a little from afar, namely from the fact that we often have three servers:
')
dev - for development, what we run from Xcode
stage - for testing before release, usually in TestFlight or InHouse
prod - production, for AppStore
And many iOS developers, of course, know about the existence of Environment Variables and startup schemes in Xcode, but for my (8+ years) practice, 90% of developers manually prescribe the desired server in some constant while testing, or before building, and this is I would like to correct it by showing a good example of how to do it right.
CodyFire automatically defaults to the environment in which the application is currently running; it makes it very simple:
This is of course under the hood, and in the project in AppDelegate you only need to register three URLs
And one could just enjoy it and do nothing else.
But in real life, we often need to test the dev, stage and prod servers in Xcode, and for this I urge the use of launch schemes.
In each scheme, you need to set the environment variable `env` which can take three values: dev, testFlight, appStore.

And in order for these schemes to work with CodyFire, you need to add the following code to AppDelegate.didFinishLaunchingWithOptions after initializing CodyFire
Moreover, often the boss or testers of your project may request to switch the server "on the fly" somewhere on the LoginScreen . With CodyFire, you can easily do this by switching the server in one line by changing the environment:
Now you can talk about my vision of the file structure for all API calls, this can be called the ideology of CodyFire.
Let's see what it looks like in the project.
And now let's look at file listings, let's start with API.swift .
Links to all controllers are listed here so that they can be easily invoked through `API.controller.method`.
API + Login.swift
In this decorator, we declare the function to access our API:
- specify endpoint
- HTTP POST method
- we use wrapper for basic auth
- we declare the desired text for a specific response from the server (this is convenient)
- and specify the model by which the data will be decoded
What is left hidden?
- no need to specify the full URL of the server, because it is already set globally
- I did not have to specify that we expect to receive 200 OK if everything is fine
onError and onSuccess are only a small part of callbacks that APIRequest can return, let 's talk about them later.
In the example with the input, we considered only the option when the returned data is automatically decoded, but you can say that you yourself could realize it, and you will be right. Therefore, let us consider the possibility of sending data by model using the example of a registration form.
API + Signup.swift
Unlike the entrance, during registration we transfer a large amount of data.
In this example, we have a SignupRequest model that conforms to the JSONPayload protocol (thus, CodyFire understands the payload type) so that the body of our request is in the form of JSON. If you need x-www-form-urlencoded, then use FormURLEncodedPayload .
As a result, you get a simple function that takes the payload model.
and which, if successful, will return you a certain response model.
In my opinion already cool, huh?
Let's look at an example when you can create a certain Post .
Post + Create.swift
This code will be able to send a multipart form with an array of image files and a single video.
Let's see how to call the dispatch. Here is the most interesting moment about Attachment .
Attachment is a model in which, in addition to Data, the file name and its MimeType are also transmitted.
If you ever sent a multipart form from Swift using Alamofire or a naked URLRequest, I'm sure you will appreciate the simplicity of CodyFire .
Now more simple, but no less cool examples of GET calls.
Post + Get.swift
The simplest example is
which in onSuccess will return to you Post model.
And here is a more interesting example.
which takes as input a ListQuery model,
which eventually APIRequest converts to the URL-path of the form
and returns to the onSuccess array [Post] .
Of course, you can write the URL-path in the old-fashioned way, but now you know that you can totally codable.
The last sample query will be DELETE
Post + Delete.swift
Here are two interesting points.
- the return type is APIRequest, it indicates the generic type Nothing , which is an empty Codable model.
- we explicitly indicated that we expect to receive 204 NO CONTENT, and only in this case CodyFire will call onSuccess .
You already know how to call this endpoint from your ViewController.
But there are two options, the first with onSuccess , and the second without. And look at him
That is, if it doesn’t matter to you whether the request will work, then you can simply call .execute () and everything, otherwise it will start after the onSuccess declaration of the handler.
To sign each API request with any http-headers, a global handler is used, which you can specify somewhere in AppDelegate . Moreover, the choice can use the classic [String: String] or Codable model.
Example for Authorization Bearer.
1. Codable (recommended)
2. Classic [String: String]
This can be done when creating an APIRequest, for example:
You can process them globally, for example in AppDelegate
or locally in every request
You can set .onRequestStarted and start showing, for example, a loader in it.
This is a convenient place, because it is not called if there is no Internet, and you don’t have to show a loader in vain, for example.
As I said above, by default CodyFire expects to receive 200 OK and if it receives it, it starts parsing data and calls onSuccess .
But the expected code can be set as a convenient enum, for example, for 201 CREATED
or you can even set custom expected code
and you can find out that the request is canceled by declaring .onCancellation handler
otherwise, onError will be called .
the timeout event can also be handled
otherwise, onError will be called .
This is my favorite trick. One customer from the United States once asked me about it, because he did not like the fact that the login form works out too quickly, in his opinion it didn’t look natural, as if it was a fake, not an authorization.
The idea is that he wanted email / password verification to last 2 seconds or more. And if it lasts only 0.5 seconds, then you need to throw another 1.5 and only then call onSuccess . And if it takes exactly 2 or 2.5 seconds, then call onSuccess right away.
CodyFire has its own DateCodingStrategy enum, in which there are three values
- secondsSince1970
- millisecondsSince1970
- formatted (_ customDateFormatter: DateFormatter)
DateCodingStrategy can be set in three options and separately for decoding and encoding
- globally in AppDelegate
- for one request
- or even separately for each model, it is just necessary that the model matches the CustomDateEncodingStrategy and / or CustomDateDecodingStrategy .
The library is available on GitHub under the MIT license.
Installation is currently available only through CocoaPods.
I really hope that CodyFire will be useful to other iOS developers, simplify development for them, and generally make the world a little better, and people kinder.
That's all, thank you for your time.
UPD: ReactiveCocoa and RxSwift support added
APIRequest for ReactiveCoca will have .signalProducer , and for RxSwift .observable
UPD2: the ability to run multiple queries
If it is important for you to get the result of each query, use .and ()
As much as possible in this mode you can run up to 10 requests, they will be executed strictly one after the other.
onRequestStarted, onNetworkUnavailable, onCancellation, onNotAuthorized, onTimeout are also available.
onProgress - while in development
If query results are not important to you, you can use .flatten ()
To skip errors of failed requests, add .avoidCancelOnError ()
To get progress progress add .onProgress
UPD3: the opportunity to set a separate server for each request
You need to create anywhere necessary server addresses, for example
Starting with Swift 4, we have access to the new Codable protocol, which makes it easy to encode / decode models. In my projects there is a lot of code for API calls, and over the past year I have done a lot of work on optimizing this huge array of code into something very light, concise and simple by killing repetitive code and using Codable even for multipart queries and url query parameters. So it turned out several classes, excellent in my opinion, for sending requests and parsing responses from the server. As well as a convenient file structure, which is the controller for each group of requests, which I got used to when using Vapor 3 on the backend. A few days ago, I allocated all my work into a separate library and called it CodyFire. I would like to tell about it in this article.
Disclaimer
CodyFire is based on Alamofire, but it's a little more than just a wrapper over Alamofire, it's a whole system approach to working with the REST API for iOS. That is why I do not worry that Alamofire is sawing the fifth version, in which Codable support will be, since it will not kill my creation.
Initialization
Let's start a little from afar, namely from the fact that we often have three servers:
')
dev - for development, what we run from Xcode
stage - for testing before release, usually in TestFlight or InHouse
prod - production, for AppStore
And many iOS developers, of course, know about the existence of Environment Variables and startup schemes in Xcode, but for my (8+ years) practice, 90% of developers manually prescribe the desired server in some constant while testing, or before building, and this is I would like to correct it by showing a good example of how to do it right.
CodyFire automatically defaults to the environment in which the application is currently running; it makes it very simple:
#if DEBUG //DEV environment #else if Bundle.main.appStoreReceiptURL?.lastPathComponent == "sandboxReceipt" { //TESTFLIGHT environment } else { //APPSTORE environment } #endif This is of course under the hood, and in the project in AppDelegate you only need to register three URLs
import CodyFire @UIApplicationMain class AppDelegate: UIResponder, UIApplicationDelegate { func application(_ application: UIApplication, didFinishLaunchingWithOptions launchOptions: [UIApplication.LaunchOptionsKey : Any]? = nil) -> Bool { let dev = CodyFireEnvironment(baseURL: "http://localhost:8080") let testFlight = CodyFireEnvironment(baseURL: "https://stage.myapi.com") let appStore = CodyFireEnvironment(baseURL: "https://api.myapi.com") CodyFire.shared.configureEnvironments(dev: dev, testFlight: testFlight, appStore: appStore) return true } } And one could just enjoy it and do nothing else.
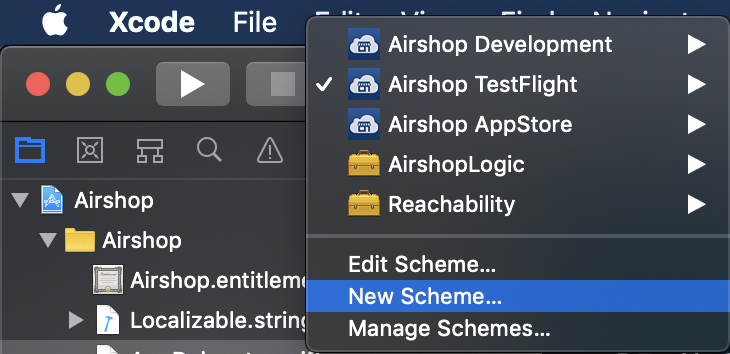
But in real life, we often need to test the dev, stage and prod servers in Xcode, and for this I urge the use of launch schemes.
Tip: in the Manage schemes section do not forget to tick the `shared` scheme for each scheme to be available to all developers in the project.
In each scheme, you need to set the environment variable `env` which can take three values: dev, testFlight, appStore.
And in order for these schemes to work with CodyFire, you need to add the following code to AppDelegate.didFinishLaunchingWithOptions after initializing CodyFire
CodyFire.shared.setupEnvByProjectScheme() Moreover, often the boss or testers of your project may request to switch the server "on the fly" somewhere on the LoginScreen . With CodyFire, you can easily do this by switching the server in one line by changing the environment:
CodyFire.shared.environmentMode = .appStore This will work until the application is restarted, and if you want it to persist after the launch, save the value in UserDefaults , do a check when you start the application in AppDelegate and switch the environment to what you need.I told this important point, I hope that there will be more projects in which environmental switching will be done beautifully. And at the same time we have already initialized the library.
File structure and controllers
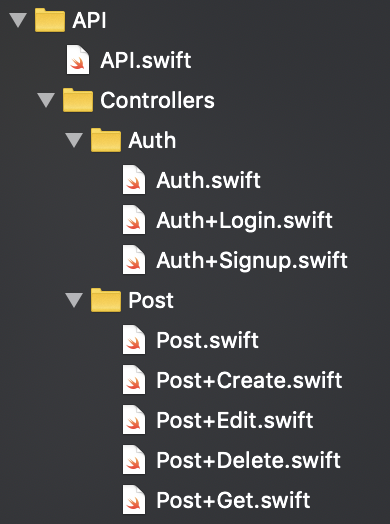
Now you can talk about my vision of the file structure for all API calls, this can be called the ideology of CodyFire.
Let's see what it looks like in the project.
And now let's look at file listings, let's start with API.swift .
class API { typealias auth = AuthController typealias post = PostController } Links to all controllers are listed here so that they can be easily invoked through `API.controller.method`.
class AuthController {} API + Login.swift
extension AuthController { struct LoginResponse: Codable { var token: String } static func login(email: String, password: String) -> APIRequest<LoginResponse> { return APIRequest("login").method(.post) .basicAuth(email: email, password: password) .addCustomError(.notFound, "User not found") } } In this decorator, we declare the function to access our API:
- specify endpoint
- HTTP POST method
- we use wrapper for basic auth
- we declare the desired text for a specific response from the server (this is convenient)
- and specify the model by which the data will be decoded
What is left hidden?
- no need to specify the full URL of the server, because it is already set globally
- I did not have to specify that we expect to receive 200 OK if everything is fine
200 OK is the status code, the default expected CodyFire for all requests, in which case the data is decoding and the callback is called, everything is fine, here is your data.Then somewhere in the code for your LoginScreen, you can just call
API.auth.login(email: "test@mail.com", password: "qwerty").onError { error in switch error.code { case .notFound: print(error.description) //: User not found default: print(error.description) } }.onSuccess { token in //TODO: auth token print("Received auth token: "+ token) } onError and onSuccess are only a small part of callbacks that APIRequest can return, let 's talk about them later.
In the example with the input, we considered only the option when the returned data is automatically decoded, but you can say that you yourself could realize it, and you will be right. Therefore, let us consider the possibility of sending data by model using the example of a registration form.
API + Signup.swift
extension AuthController { struct SignupRequest: JSONPayload { let email, password: String let firstName, lastName, mobileNumber: String init(email: String, password: String, firstName: String, lastName: String, mobileNumber: String) { self.email = email self.password = password self.firstName = firstName self.lastName = lastName self.mobileNumber = mobileNumber } } struct SignupResponse: Codable { let token: String } static func signup(_ request: SignupRequest) -> APIRequest<SignupResponse> { return APIRequest("signup", payload: request).method(.post) .addError(.conflict, "Account already exists") } } Unlike the entrance, during registration we transfer a large amount of data.
In this example, we have a SignupRequest model that conforms to the JSONPayload protocol (thus, CodyFire understands the payload type) so that the body of our request is in the form of JSON. If you need x-www-form-urlencoded, then use FormURLEncodedPayload .
As a result, you get a simple function that takes the payload model.
API.auth.signup(request) and which, if successful, will return you a certain response model.
In my opinion already cool, huh?
And what if multipart?
Let's look at an example when you can create a certain Post .
Post + Create.swift
extension PostController { struct CreateRequest: MultipartPayload { var text: String var tags: [String] var images: [Attachment] var video: Data init (text: String, tags: [String], images: [Attachment], video: Data) { self.text = text self.tags = tags self.images = images self.video = video } } struct Post: Codable { let text: String let tags: [String] let linksToImages: [String] let linkToVideo: String } static func create(_ request: CreateRequest) -> APIRequest<CreateRequest> { return APIRequest("post", payload: request).method(.post) } } This code will be able to send a multipart form with an array of image files and a single video.
Let's see how to call the dispatch. Here is the most interesting moment about Attachment .
let videoData = FileManager.default.contents(atPath: "/path/to/video.mp4")! let imageAttachment = Attachment(data: UIImage(named: "cat")!.jpeg(.high)!, fileName: "cat.jpg", mimeType: .jpg) let payload = PostController.CreateRequest(text: "CodyFire is awesome", tags: ["codyfire", "awesome"], images: [imageAttachment], video: videoData) API.post.create(payload).onProgress { progress in print(" : \(progress)") }.onError { error in print(error.description) }.onSuccess { createdPost in print(" : \(createdPost)") } Attachment is a model in which, in addition to Data, the file name and its MimeType are also transmitted.
If you ever sent a multipart form from Swift using Alamofire or a naked URLRequest, I'm sure you will appreciate the simplicity of CodyFire .
Now more simple, but no less cool examples of GET calls.
Post + Get.swift
extension PostController { struct ListQuery: Codable { let offset, limit: Int init (offset: Int, limit: Int) { self.offset = offset self.limit = limit } } static func get(_ query: ListQuery? = nil) -> APIRequest<[Post]> { return APIRequest("post").query(query) } static func get(id: UUID) -> APIRequest<Post> { return APIRequest("post/" + id.uuidString) } } The simplest example is
API.post.get(id:) which in onSuccess will return to you Post model.
And here is a more interesting example.
API.post.get(PostController.ListQuery(offset: 0, limit: 100)) which takes as input a ListQuery model,
which eventually APIRequest converts to the URL-path of the form
post?limit=0&offset=100 and returns to the onSuccess array [Post] .
Of course, you can write the URL-path in the old-fashioned way, but now you know that you can totally codable.
The last sample query will be DELETE
Post + Delete.swift
extension PostController { static func delete(id: UUID) -> APIRequest<Nothing> { return APIRequest("post/" + id.uuidString) .method(.delete) .desiredStatusCode(.noContent) } } Here are two interesting points.
- the return type is APIRequest, it indicates the generic type Nothing , which is an empty Codable model.
- we explicitly indicated that we expect to receive 204 NO CONTENT, and only in this case CodyFire will call onSuccess .
You already know how to call this endpoint from your ViewController.
But there are two options, the first with onSuccess , and the second without. And look at him
API.post.delete(id:).execute() That is, if it doesn’t matter to you whether the request will work, then you can simply call .execute () and everything, otherwise it will start after the onSuccess declaration of the handler.
Available features
Authorization of each request
To sign each API request with any http-headers, a global handler is used, which you can specify somewhere in AppDelegate . Moreover, the choice can use the classic [String: String] or Codable model.
Example for Authorization Bearer.
1. Codable (recommended)
CodyFire.shared.fillCodableHeaders = { struct Headers: Codable { //NOTE: nil, headers var Authorization: String? var anythingElse: String } return Headers(Authorization: nil, anythingElse: "hello") } 2. Classic [String: String]
CodyFire.shared.fillHeaders = { guard let apiToken = LocalAuthStorage.savedToken else { return [:] } return ["Authorization": "Bearer \(apiToken)"] } Selectively adding some http-headers to the request
This can be done when creating an APIRequest, for example:
APIRequest("some/endpoint").headers(["someKey": "someValue"]) Processing unauthorized requests
You can process them globally, for example in AppDelegate
CodyFire.shared.unauthorizedHandler = { // WelcomeScreen } or locally in every request
API.post.create(request).onNotAuthorized { // } If the network is not available
API.post.create(request). onNetworkUnavailable { // , , } otherwise, onError you get an error ._notConnectedToInternetStarting something before the query starts.
You can set .onRequestStarted and start showing, for example, a loader in it.
This is a convenient place, because it is not called if there is no Internet, and you don’t have to show a loader in vain, for example.
How to disable / enable logging globally
CodyFire.shared.logLevel = .debug CodyFire.shared.logLevel = .error CodyFire.shared.logLevel = .info CodyFire.shared.logLevel = .off How to disable logging for one request
.avoidLogError() Handle logs in their own way
CodyFire.shared.logHandler = { level, text in print(" CodyFire: " + text) } How to set the expected http response code of the server
As I said above, by default CodyFire expects to receive 200 OK and if it receives it, it starts parsing data and calls onSuccess .
But the expected code can be set as a convenient enum, for example, for 201 CREATED
.desiredStatusCode(.created) or you can even set custom expected code
.desiredStatusCode(.custom(777)) Cancel request
.cancel() and you can find out that the request is canceled by declaring .onCancellation handler
.onCancellation { // } otherwise, onError will be called .
Setting timeout for request
.responseTimeout(30) // 30 the timeout event can also be handled
. onTimeout { // } otherwise, onError will be called .
Setting an interactive extra timeout
This is my favorite trick. One customer from the United States once asked me about it, because he did not like the fact that the login form works out too quickly, in his opinion it didn’t look natural, as if it was a fake, not an authorization.
The idea is that he wanted email / password verification to last 2 seconds or more. And if it lasts only 0.5 seconds, then you need to throw another 1.5 and only then call onSuccess . And if it takes exactly 2 or 2.5 seconds, then call onSuccess right away.
.additionalTimeout(2) // 2 Own date encoder / decoder
CodyFire has its own DateCodingStrategy enum, in which there are three values
- secondsSince1970
- millisecondsSince1970
- formatted (_ customDateFormatter: DateFormatter)
DateCodingStrategy can be set in three options and separately for decoding and encoding
- globally in AppDelegate
CodyFire.shared.dateEncodingStrategy = .secondsSince1970 let customDateFormatter = DateFormatter() CodyFire.shared.dateDecodingStrategy = .formatted(customDateFormatter) - for one request
APIRequest("some/endpoint") .dateDecodingStrategy(.millisecondsSince1970) .dateEncodingStrategy(.secondsSince1970) - or even separately for each model, it is just necessary that the model matches the CustomDateEncodingStrategy and / or CustomDateDecodingStrategy .
struct SomePayload: JSONPayload, CustomDateEncodingStrategy, CustomDateDecodingStrategy { var dateEncodingStrategy: DateCodingStrategy var dateDecodingStrategy: DateCodingStrategy } How to add to the project
The library is available on GitHub under the MIT license.
Installation is currently available only through CocoaPods.
pod 'CodyFire' I really hope that CodyFire will be useful to other iOS developers, simplify development for them, and generally make the world a little better, and people kinder.
That's all, thank you for your time.
UPD: ReactiveCocoa and RxSwift support added
pod 'ReactiveCodyFire' # ReactiveCocoa pod 'RxCodyFire' # RxSwift # 'CodyFire', APIRequest for ReactiveCoca will have .signalProducer , and for RxSwift .observable
UPD2: the ability to run multiple queries
If it is important for you to get the result of each query, use .and ()
As much as possible in this mode you can run up to 10 requests, they will be executed strictly one after the other.
API.employee.all() .and(API.office.all()) .and(API.car.all()) .and(API.event.all()) .and(API.post.all()) .onError { error in print(error.description) }.onSuccess { employees, offices, cars, events, posts in // !!! } onRequestStarted, onNetworkUnavailable, onCancellation, onNotAuthorized, onTimeout are also available.
onProgress - while in development
If query results are not important to you, you can use .flatten ()
[API.employee.all(), API.office.all(), API.car.all()].flatten().onError { print(error.description) }.onSuccess { print("flatten finished!") } To run them at the same time just add .concurrent (by: 3) this will allow three requests to be executed simultaneously, you can specify any number.To skip errors of failed requests, add .avoidCancelOnError ()
To get progress progress add .onProgress
UPD3: the opportunity to set a separate server for each request
You need to create anywhere necessary server addresses, for example
let server1 = ServerURL(base: "https://server1.com", path: "v1") let server2 = ServerURL(base: "https://server2.com", path: "v1") let server3 = ServerURL(base: "https://server3.com") And now you can use them directly in the initialization of the request before specifying the endpoint APIRequest(server1, "endpoint", payload: payloadObject) APIRequest(server2, "endpoint", payload: payloadObject) APIRequest(server3, "endpoint", payload: payloadObject) or you can specify the server after initializing the request APIRequest("endpoint", payload: payloadObject).serverURL(server1) Source: https://habr.com/ru/post/427937/
All Articles