How to finally start writing tests and not regret it

Coming to a new project, I regularly come across one of the following situations:
- There are no tests at all.
- There are few tests, they are rarely written and do not run on an ongoing basis.
- Tests are present and included in CI (Continuous Integration), but they do more harm than good.
Unfortunately, it is precisely the latter scenario that is often led by serious attempts to begin to introduce testing in the absence of appropriate skills.
')
What can be done to change the situation? The idea of using tests is not new. At the same time, most of the tutorials resemble the famous picture about how to draw an owl: connect JUnit, write the first test, use the first mock - and go! Such articles do not answer questions about what tests you need to write, what you should pay attention to and how to live with all this. Hence the idea of this article. I tried to briefly summarize my experience in implementing tests in different projects in order to facilitate this path for everyone.

There are more than enough introductory articles on this topic, so we will not repeat and try to enter from the other side. In the first part, we will dispel the myth that testing bears only additional costs. It will show how creating quality tests can in turn speed up the development process. Then, using the example of a small project, the basic principles and rules that should be followed in order to realize this benefit will be considered. Finally, the final section will give specific recommendations for implementation: how to avoid typical problems when tests begin, on the contrary, to significantly slow down the development.
Since my main specialization is Java backend, the examples will use the following technology stack: Java, JUnit, H2, Mockito, Spring, Hibernate. In this case, a significant part of the article is devoted to general issues of testing and tips in it are applicable to a much wider range of tasks.
However, be careful! Tests are very addictive: once you learn how to use them, you can no longer live without them.
Content
Tests vs development speed
The main questions that arise when discussing the introduction of testing: how long will it take to write tests and what advantages will it have? Testing, like any other technology, will require serious efforts for development and implementation, so at first no significant benefit should be expected. As for time, they are highly dependent on a specific team. However, it is not worth counting on less than 20–30% of additional coding costs. Less is simply not enough to achieve at least some result. Waiting for instant returns is often the main reason for curtailing this activity even before the tests benefit.
But what kind of efficiency then? Let's discard the lyrics about the difficulties of implementation and see what specific time-saving opportunities are opened up by testing.
Running code in any place
In the absence of tests in the project, the only way to start is to raise the entire application. It is good if it takes about 15–20 seconds, but cases of large projects in which a full launch can take from several minutes are far from rare. What does this mean for developers? A substantial part of their working time will be composed of these short waiting sessions, during which it is impossible to continue working on the current task, but at the same time there is too little time to switch to something else. Many have come across such projects at least once, where the code written in an hour requires many hours of debugging due to long restarts between corrections. In tests, you can limit the launch of small parts of the application, which will significantly reduce the waiting time and increase the productivity of work on the code.
In addition, the ability to run code in an arbitrary location leads to more thorough debugging. Often, verification of even the main positive usage scenarios through the application interface requires serious efforts and time. The presence of tests allows for detailed verification of specific functionality much easier and faster.
Another plus is the ability to control the size of the unit being tested. Depending on the complexity of the logic being tested, you can limit yourself to one method, a class, a group of classes that implement some functionality, a service, and so on, up to automating the testing of the application as a whole. This flexibility allows you to unload high-level tests from many parts due to the fact that they will be tested at lower levels.
Re-run tests
This plus is often cited as the essence of test automation, but let's look at it from a less common angle. What new opportunities for developers it opens?
First, every new developer who comes to the project will be able to easily run the available tests in order to understand the logic of the application using examples. Unfortunately, the importance of this is greatly underestimated. In modern conditions, the same people rarely work on a project for more than 1-2 years. And since teams consist of several people, the appearance of a new participant every 2-3 months is a typical situation for relatively large projects. Particularly difficult projects are experiencing the change of entire generations of developers! The ability to easily run any part of the application and look at the behavior of the system at times simplifies immersing new programmers into the project. In addition, a more detailed study of the logic of the code reduces the number of errors at the output and the time to debug them in the future.
Secondly, the ability to easily verify that the application is working correctly, opens the way for continuous refactoring (Continuous Refactoring). This term, unfortunately, is much less popular than CI. It means that refactoring can and should be done with every revision of the code. It is the regular adherence to the notorious scout rule “leave the parking space cleaner than it was before your arrival”, allows you to avoid degradation of the code base and guarantees the project a long and happy life.
Debugging
Debugging has already been mentioned in the preceding paragraphs, but this point is so important that it deserves more careful consideration. Unfortunately, there is no reliable way to measure the relationship between the time spent writing code and debugging it, since these processes are almost inseparable. Nevertheless, the availability of high-quality tests in the project significantly reduces debugging time, up to the almost complete absence of the need to run a debugger.
Efficiency
All of the above can provide significant time savings for the initial debugging of the code. With the right approach, this alone will pay for all additional development costs. The remaining testing bonuses - improving the quality of the code base (a poorly designed code is hard to test), reducing the number of defects, being able to make sure that the code is correct at any time, etc. - will get almost free.
From theory to practice
In words, it all looks good, but let's get down to business. As mentioned earlier, there is more than enough information on how to perform the initial setup of the test environment. Therefore, we will immediately proceed to the finished project. Sources here.
Task
As a sample problem, consider a small fragment of the online store backend. Let's write a typical API for working with products: creating, receiving, editing. As well as a couple of methods for working with clients: changing the "favorite product" and calculating bonus points on request.
Domain model
In order not to overload the example, we restrict ourselves to the minimum set of fields and classes.
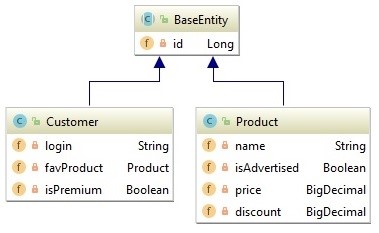
Customer has a login, a link to a favorite product and a flag indicating whether it is a premium customer.
A product (Product) has a name, price, discount, and a flag indicating whether it is currently advertised.
Project structure
The structure of the main project code is as follows.
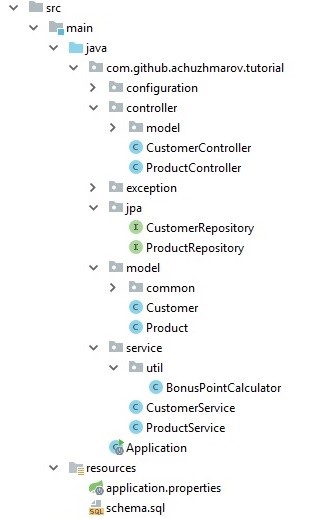
Classes are divided into layers:
- Model - domain model of the project;
- Jpa - repositories for working with databases based on Spring Data;
- Service - application business logic;
- Controller - controllers that implement the API.
Structure of unit tests.
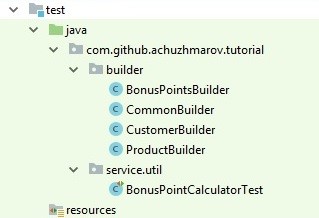
Classes of tests are in the same packages as the original code. Additionally, a package was created with builders for the preparation of test data, but more on that below.
Conveniently separate unit tests and integration tests. They often have different dependencies, and for comfortable development it should be possible to run either one or the other. This can be achieved in different ways: convention naming, modules, packages, sourceSets. The choice of a particular method is only a matter of taste. In this project, integration tests lie in a separate sourceSet - integrationTest.
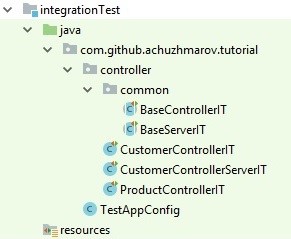
Like unit tests, classes with integration tests are in the same packages as the original code. Additionally, there are base classes that help get rid of duplication of configuration and, if necessary, contain useful universal methods.
Integration tests
There are different approaches to what tests to start with. If the checked logic is not very complicated, you can immediately move on to integration (they are sometimes called acceptance). Unlike unit tests, they make sure that the application as a whole is working correctly.
Architecture
First you need to decide on what level of integration checks will be performed. Spring Boot provides complete freedom of choice: you can raise part of the context, the entire context, and even a full-fledged server accessible from tests. As the size of the application increases, this issue becomes more complex. Often you have to write different tests at different levels.
A good starting point would be controller tests without starting the server. In relatively small applications, it is quite acceptable to raise the entire context as a whole, since by default it is reused between tests and initialized only once. Consider the basic methods of the
ProductController class: @PostMapping("new") public Product createProduct(@RequestBody Product product) { return productService.createProduct(product); } @GetMapping("{productId}") public Product getProduct(@PathVariable("productId") long productId) { return productService.getProduct(productId); } @PostMapping("{productId}/edit") public void updateProduct(@PathVariable("productId") long productId, @RequestBody Product product) { productService.updateProduct(productId, product); } The question of error handling leave aside. Suppose that it is implemented outside based on the analysis of the exceptions thrown out. The code of the methods is very simple, their implementation in the
ProductService service is not much more complicated: @Transactional(readOnly = true) public Product getProduct(Long productId) { return productRepository.findById(productId) .orElseThrow(() -> new DataNotFoundException("Product", productId)); } @Transactional public Product createProduct(Product product) { return productRepository.save(new Product(product)); } @Transactional public Product updateProduct(Long productId, Product product) { Product dbProduct = productRepository.findById(productId) .orElseThrow(() -> new DataNotFoundException("Product", productId)); dbProduct.setPrice(product.getPrice()); dbProduct.setDiscount(product.getDiscount()); dbProduct.setName(product.getName()); dbProduct.setIsAdvertised(product.isAdvertised()); return productRepository.save(dbProduct); } The
ProductRepository repository does not contain its own methods at all: public interface ProductRepository extends JpaRepository<Product, Long> { } Everything hints at the fact that unit tests are not needed by these classes simply because the whole chain can be easily and efficiently checked with several integration tests. Duplication of the same checks in different tests makes debugging more difficult. In the event of an error in the code, not one test will now fall, but 10–15 at once. This in turn will require further analysis. If there is no duplication, then the only dropped test is likely to immediately indicate an error.
Configuration
For convenience, select the base class
BaseControllerIT , which contains the Spring configuration and a pair of fields: @RunWith(SpringRunner.class) @SpringBootTest(webEnvironment = SpringBootTest.WebEnvironment.NONE) @Transactional public abstract class BaseControllerIT { @Autowired protected ProductRepository productRepository; @Autowired protected CustomerRepository customerRepository; } Repositories are moved to the base class in order not to clutter up the test classes. Their role is only auxiliary: preparing data and checking the state of the database after the controller is working. If you increase the size of the application, this may cease to be convenient, but for a start it is quite suitable.
The basic configuration of Spring is defined by the following lines:
@SpringBootTest - used to set the context of the application. WebEnvironment.NONE means that the web context should not be raised.@Transactional - wraps all class tests in a transaction with automatic rollback to save the state of the database.Test structure
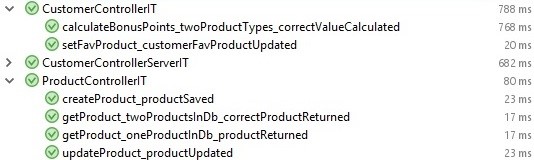
Let's move on to the minimalist test suite for the
ProductController class - ProductControllerIT . @Test public void createProduct_productSaved() { Product product = product("productName").price("1.01").discount("0.1").advertised(true).build(); Product createdProduct = productController.createProduct(product); Product dbProduct = productRepository.getOne(createdProduct.getId()); assertEquals("productName", dbProduct.getName()); assertEquals(number("1.01"), dbProduct.getPrice()); assertEquals(number("0.1"), dbProduct.getDiscount()); assertEquals(true, dbProduct.isAdvertised()); } The test code should be extremely simple and clear at first glance. If this is not the case, then most of the advantages of the tests described in the first section of the article are lost. It is good practice to divide the test body into three parts that are visually separated from each other: data preparation, calling the method under test, validation of results. It is very desirable that the test code be placed on the screen entirely.
Personally, it seems to me more visual when the test values from the data preparation section are used later in the checks. Alternatively, one could explicitly compare objects, like this:
assertEquals(product, dbProduct); In another test for updating product information (
updateProduct ) it is clear that creating data has become a bit more difficult and to preserve the visual integrity of the three parts of the test, they are separated by two line breaks in a row: @Test public void updateProduct_productUpdated() { Product product = product("productName").build(); productRepository.save(product); Product updatedProduct = product("updatedName").price("1.1").discount("0.5").advertised(true).build(); updatedProduct.setId(product.getId()); productController.updateProduct(product.getId(), updatedProduct); Product dbProduct = productRepository.getOne(product.getId()); assertEquals("updatedName", dbProduct.getName()); assertEquals(number("1.1"), dbProduct.getPrice()); assertEquals(number("0.5"), dbProduct.getDiscount()); assertEquals(true, dbProduct.isAdvertised()); } Each of the three parts of the test can be simplified. Test builders are great for preparing data. They contain logic for creating objects that is convenient for use from tests. Too complex method calls can be made into helper methods inside test classes, hiding some of the parameters that are irrelevant for this class. To simplify complex checks, you can also write auxiliary functions or implement your own matchers. The main thing with all these simplifications is not to lose the visibility of the test: everything should be clear at a glance at the main method, without the need to go deeper.
Test builders
Test builders deserve special attention. Encapsulation of object creation logic simplifies test maintenance. In particular, filling in the non-relevant fields of this test model can be hidden inside the builder. To do this, you do not need to create it directly, but use a static method that fills the missing fields with default values. For example, in the case of the emergence of new required fields in the model, they can be easily added to this method. In
ProductBuilder it looks like this: public static ProductBuilder product(String name) { return new ProductBuilder() .name(name) .advertised(false) .price("0.00"); } Test name
It is extremely important to understand what is specifically tested in this test. For clarity, it is best to answer this question in its title. Using the example of tests for the
getProduct method, getProduct consider the naming convention used: @Test public void getProduct_oneProductInDb_productReturned() { Product product = product("productName").build(); productRepository.save(product); Product result = productController.getProduct(product.getId()); assertEquals("productName", result.getName()); } @Test public void getProduct_twoProductsInDb_correctProductReturned() { Product product1 = product("product1").build(); Product product2 = product("product2").build(); productRepository.save(product1); productRepository.save(product2); Product result = productController.getProduct(product1.getId()); assertEquals("product1", result.getName()); } In general, the test method header consists of three parts, separated by an underscore: the name of the test method, the script, the expected result. However, common sense has not been canceled, and it may be justified to drop some parts of the name if they are not needed in this context (for example, the script in a single test for creating a product). The purpose of such naming is to ensure that the essence of each test is understandable without studying the code. This makes the test results window as clear as possible, and it usually starts working with tests.
findings
That's all. For the first time, a minimalist set of four tests is enough to test the methods of the
ProductController class. In the case of bugs, you can always add the missing tests. In this case, the minimum number of tests significantly reduces the time and effort to support them. In turn, this is critical in the process of testing implementation, since the first tests usually are not of the best quality and create many unexpected problems. At the same time, such a test set is quite enough to get the bonuses described in the first part of the article.It is worth noting that such tests do not check the web layer of the application, but often this is not required. If necessary, you can write separate tests for a web layer with a stub instead of a base (
@WebMvcTest , MockMvc , @MockBean ) or use a full-fledged server. The latter may make debugging more difficult and difficult to work with transactions, since the test will not be able to control the server’s transaction. An example of such an integration test can be viewed in the class CustomerControllerServerIT .Unit tests
Unit tests have several advantages over integration tests:
- The run takes milliseconds;
- The small size of the tested unit;
- It is easy to implement a check of a large number of variants, since when you call a method directly, the preparation of data is greatly simplified.
Despite this, unit tests by their nature cannot guarantee the performance of the application as a whole and do not allow to avoid writing integration ones. If the logic of the tested unit is simple, duplication of integration checks with unit tests will not bring any benefits, but will only add more code for support.
The only class in this example that deserves unit testing is
BonusPointCalculator . Its distinctive feature is a large number of branches of business logic. For example, it is assumed that the buyer receives, with bonuses, 10% of the value of the product, multiplied by no more than 2 multipliers from the following list:- The product costs more than 10,000 (× 4);
- The product participates in an advertising campaign (× 3);
- The product is a customer’s favorite product (× 5);
- The client has a premium status (× 2);
- If the client has a premium status and buys a “favorite” product, instead of the two designated multipliers, one is used (× 8).
In real life, of course, it would be worthwhile to design a flexible universal mechanism for calculating these bonuses, but to simplify the example we restrict ourselves to a fixed implementation. The code for calculating multipliers looks like this:
private List<BigDecimal> calculateMultipliers(Customer customer, Product product) { List<BigDecimal> multipliers = new ArrayList<>(); if (customer.getFavProduct() != null && customer.getFavProduct().equals(product)) { if (customer.isPremium()) { multipliers.add(PREMIUM_FAVORITE_MULTIPLIER); } else { multipliers.add(FAVORITE_MULTIPLIER); } } else if (customer.isPremium()) { multipliers.add(PREMIUM_MULTIPLIER); } if (product.isAdvertised()) { multipliers.add(ADVERTISED_MULTIPLIER); } if (product.getPrice().compareTo(EXPENSIVE_THRESHOLD) >= 0) { multipliers.add(EXPENSIVE_MULTIPLIER); } return multipliers; } A large number of options leads to the fact that two or three integration tests are no longer limited here. A minimalist set of unit tests is perfect for debugging such functionality.
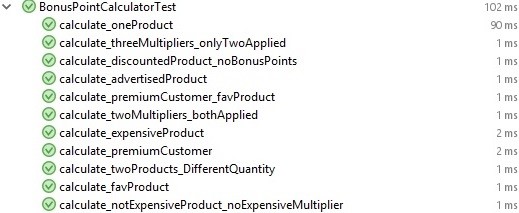
The corresponding test suite can be viewed in the
BonusPointCalculatorTest class. Here are some of them: @Test public void calculate_oneProduct() { Product product = product("product").price("1.00").build(); Customer customer = customer("customer").build(); Map<Product, Long> quantities = mapOf(product, 1L); BigDecimal bonus = bonusPointCalculator.calculate(customer, list(product), quantities::get); BigDecimal expectedBonus = bonusPoints("0.10").build(); assertEquals(expectedBonus, bonus); } @Test public void calculate_favProduct() { Product product = product("product").price("1.00").build(); Customer customer = customer("customer").favProduct(product).build(); Map<Product, Long> quantities = mapOf(product, 1L); BigDecimal bonus = bonusPointCalculator.calculate(customer, list(product), quantities::get); BigDecimal expectedBonus = bonusPoints("0.10").addMultiplier(FAVORITE_MULTIPLIER).build(); assertEquals(expectedBonus, bonus); } It is worth noting that the tests refer to the public API of the class, the
calculate method. Testing a class contract, rather than implementing it, allows you to avoid test failures due to non-functional changes and refactoring.Finally, when we checked the internal logic with unit tests, we don’t have to take all these details into the integration logic. In this case, one more or less representative test is enough, for example:
@Test public void calculateBonusPoints_twoProductTypes_correctValueCalculated() { Product product1 = product("product1").price("1.01").build(); Product product2 = product("product2").price("10.00").build(); productRepository.save(product1); productRepository.save(product2); Customer customer = customer("customer").build(); customerRepository.save(customer); Map<Long, Long> quantities = mapOf(product1.getId(), 1L, product2.getId(), 2L); BigDecimal bonus = customerController.calculateBonusPoints( new CalculateBonusPointsRequest("customer", quantities) ); BigDecimal bonusPointsProduct1 = bonusPoints("0.10").build(); BigDecimal bonusPointsProduct2 = bonusPoints("1.00").quantity(2).build(); BigDecimal expectedBonus = bonusPointsProduct1.add(bonusPointsProduct2); assertEquals(expectedBonus, bonus); } As in the case of integration tests, the set of unit tests used is very small and does not guarantee the complete correctness of the application. Nevertheless, its presence significantly increases confidence in the code, facilitates debugging and gives other bonuses listed in the first part of the article.
Recommendations for implementation
I hope the previous sections were enough to convince at least one developer to try to start using tests in your project. This chapter will briefly list the main recommendations that will help to avoid serious problems and lead to a reduction in the initial costs of implementation.
Try to start the implementation of tests on the new application. To write the first tests in a large legacy project will be much more difficult and will require greater qualification than in the newly created one. Therefore, if possible, it is better to start with a small new application. If new high-grade applications are not expected, you can try to develop some useful utility for internal use. The main thing is that the task be more or less realistic - the invented examples will not give a full-fledged experience.
Set up a regular test run. If tests do not run on a regular basis, then they not only cease to perform their main function - checking the correctness of the code - but also quickly become obsolete. Therefore, it is extremely important to set up at least a minimal CI pipeline with automatic start of tests each time the code is updated in the repository.
Do not chase the cover. As in the case of any other technology, the first time the tests will be not very good quality. Relevant literature (links at the end of the article) or a competent mentor can help here, but this does not negate the need for self-stuffing cones. Tests in this regard are similar to the rest of the code: to understand how they will affect the project, it will only work after being with them for a while. Therefore, in order to minimize damage, at first it is better not to chase after the number and beautiful figures like one hundred percent coverage. Instead, it should be limited to the main positive scenarios for its own functionality of the application.
Do not get carried away with unit tests. In continuation of the topic “quantity vs quality”, it should be noted that at first you should not get carried away with honest unit tests, because this can easily lead to excessive specification of the application. In turn, this will become a serious inhibiting factor in the subsequent refactoring and refinement of the application. Unit tests should be used only if there is a complex logic in a particular class or group of classes, which is inconvenient to check at the level of integration.
Do not get carried away with the stubs of the classes and methods of the application. Stubs (stub, mock) is another tool that requires a balanced approach and balance. On the one hand, the complete isolation of the unit allows you to focus on the logic being tested and not think about the rest of the system. On the other hand, this will require additional development time and, as with the use of unit tests, may lead to excessive specification of behavior.
Untie the integration tests from external systems. A very common mistake in integration tests is the use of a real database, message queues, and other systems external to the application. Of course, the ability to run a test in a real environment is useful for debugging and development. Such tests in small quantities can make sense, especially to run interactively. However, their widespread use leads to a number of problems:
- To run the tests will need to customize the external environment. For example, install a database on each machine where the application will be built. This will make it more difficult for new developers to enter the project and set up CI.
- The state of external systems may differ on different machines before running the tests. For example, the database may already contain tables needed by the application with data that are not expected in the test. This will lead to unpredictable test failures, and their removal will take a considerable amount of time.
- If there is a parallel work on several projects, it is possible that some projects have an unobvious effect on others. For example, the specific database settings made for one of the projects can help the functionality of another project to work correctly, which, however, will break when running on a clean database on another machine.
- Tests are carried out for a long time: a full run can reach tens of minutes. This leads to the fact that developers no longer run tests locally and look at their results only after sending changes to the remote repository. This behavior negates most of the advantages of the tests, which were discussed in the first part of the article.
Clear the context between integration tests. Often, in order to speed up the work of integration tests, it is necessary to reuse the same context between them. This recommendation is given even by the official Spring documentation. At the same time, the influence of tests on each other should be avoided. Since they are launched in a random order, the presence of such links can lead to random, unrepeatable errors. To avoid this, tests should not leave behind any changes in context. For example, when using a database, for isolation it is usually enough to roll back all the transactions performed in the test. If the changes in the context cannot be avoided, you can customize its re-creation using the
@DirtiesContext annotation.Ensure that tests are performed in a reasonable time. Even if tests do not depend on real external systems, the time to complete them can easily get out of control. To prevent this from happening, you need to constantly monitor this indicator and take action if necessary. The least that can be done is to single out the slow tests into a separate group so that they do not interfere with work on tasks not related to them.
Try to make the tests as clear and readable as possible. As already shown in the example, tests should be written in such a way that they do not need to be understood. Time spent learning the test could be spent learning the code.
Do not focus on TDD (Test-Driven Development).TDD is a fairly popular practice, but I do not consider it mandatory, especially in the early stages of implementation. In general, the ability to write good tests is not related to the moment at which they are written. What is really important is to do primary debugging of the code already on tests, since this is one of the main ways to save time.
The first tests are written, what next?
Next, you need to carefully monitor the life of the tests in the project and periodically ask yourself questions like the following:
- What tests interfere with refactoring and rework (require constant fixes)? Such tests need to be rewritten or completely removed from the project and replaced with higher level ones.
- What tests often and unpredictably break upon repeated or parallel launch, when running in different environments (computer colleagues, server CI)? They also require recycling.
- What errors pass by tests? For each such bug, it is advisable to add a new test and in the future keep them in mind when writing tests for the same functionality.
- What tests work too long? We must try to rewrite them. If this is not possible, then separate them from the faster ones in order to preserve the possibility of an on-line local run.
Additionally, you should pay attention to the advantages of the tests, which were described at the beginning of the article. If you don't get them, then something went wrong. Regular retrospective is the cheapest way to a steady increase in the quality and effectiveness of the tests used.
Conclusion
At first it is better not to chase the number of tests, but focus on their quality. A huge number of inappropriate unit tests can easily become an anchor pulling a project to the bottom. In addition, the presence of unit tests does not relieve the need to write integration. Therefore, the most effective strategy for the first time is to start with covering the main positive scenarios with integration tests and, if this is not enough, add local checks with unit tests. Over time, feedback will accumulate to help correct errors and get a clearer picture of the effective use of various automated test methods.
I hope, among those who have read, there will be those whose delicate strings of the soul will be touched by my graphomania, and several more projects with good and effective tests will appear in the world!
Project sources on GitHub
Useful literature
The Object-Oriented Growing Software, the Guided by the Tests , by Steve Freeman, Nat the Pryce
of The Art of Unit Testing , of Roy Osherove
the Test-driven Development: By Example The , Kent Beck
the Refactoring: Improving the Design of the Existing Code , by Martin Fowler
of The Art of Unit Testing , of Roy Osherove
the Test-driven Development: By Example The , Kent Beck
the Refactoring: Improving the Design of the Existing Code , by Martin Fowler
Source: https://habr.com/ru/post/427603/
All Articles