Distributing an iOS application within a company (Enterprise Distribute iOS App in-house)
(Caution, under the cut traffic)
Preparing and distributing an IOS application within a company is not an easy task, especially when the application is written on Windows using Visual studio, and most tutorials on the Internet only describe MacOS using Xcode. However, after hours of battle with the brainchild of Apple, we managed to accomplish the seemingly impossible, namely: tocross a giraffe with a rhinoceros to assemble an IOS application on Xamarin in the Xcode archive, right on MacOS, after receiving the necessary files for distribution, and finally creating a link that application will be distributed.
Yes, at the hearing it seems not very difficult. However, when it comes to developing applications for Apple devices, everything becomes several times more incomprehensible and more complicated. And after a triumphant, but not easy victory, we wanted to leave our mark on history by writing this tutorial.

Prerequisites:
')
1. Must be an Apple Enterprise Account - $ 299 per year.
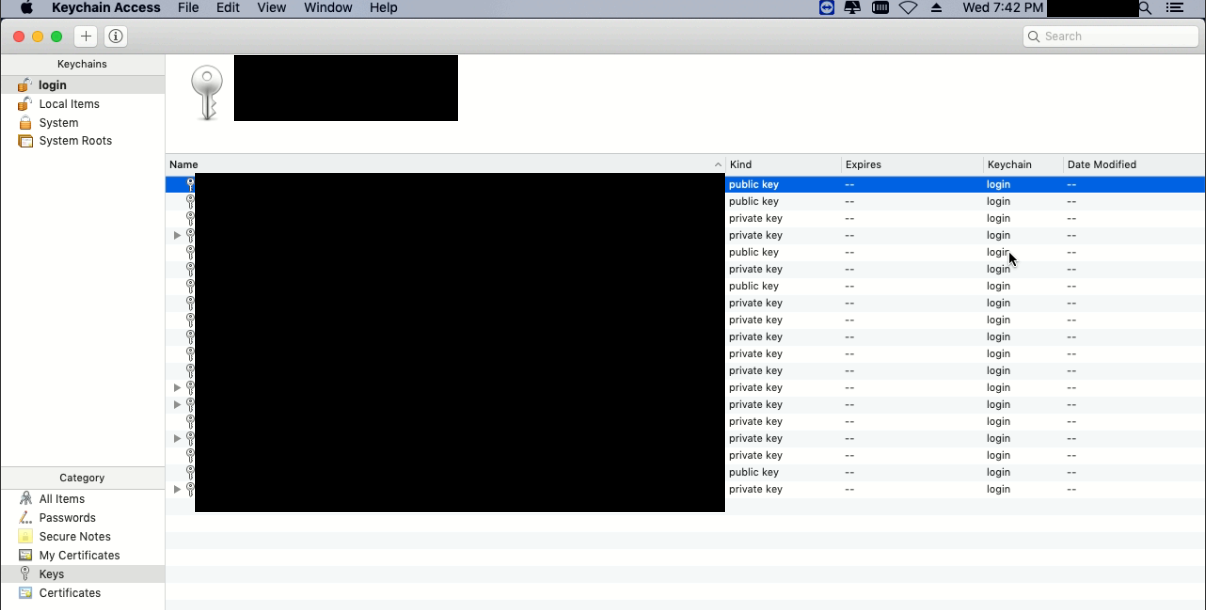
1. First, on a Mac, you need to create a request to create a certificate. To do this, open the keychain access, for example, through a search:

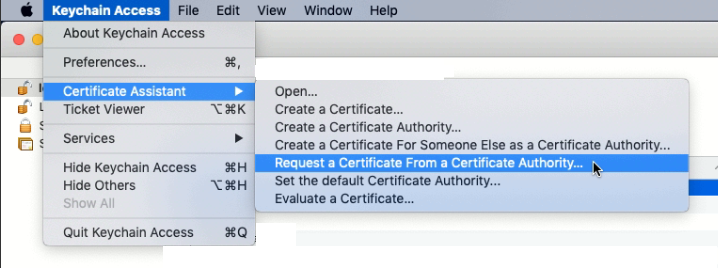
2. Select keychain access in the upper left corner of the screen, select “certificate assistant” -> “request a certificate from a certificate authority” in the pop-up menu, the corresponding window will open:

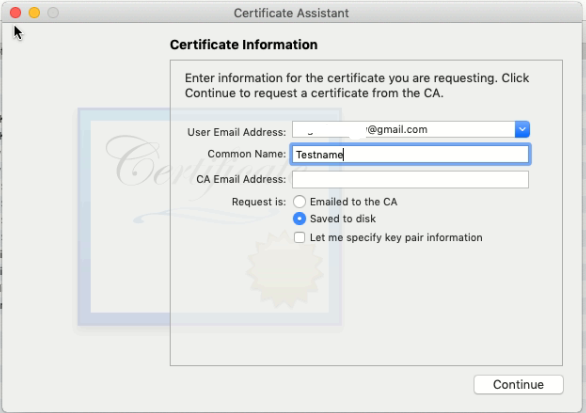
3. In the window that appears, fill in the fields “User Email Address” - your email, and “Common Name” - the name of the key. And also select the item “Saved to disk” to save the request file to the computer. And press the “Continue” button:
4. Next, a window will appear in which you need to specify the name of the request file and select the path to save the file. Make the necessary changes and save:

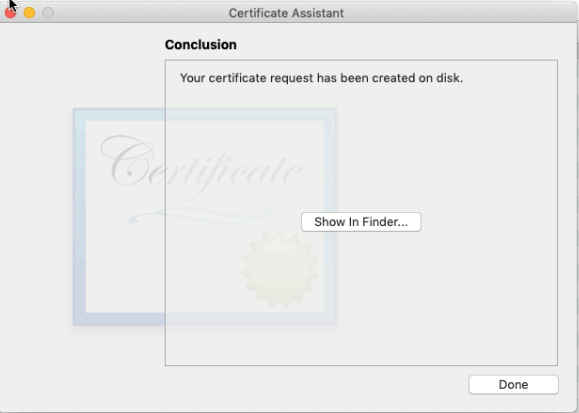
5. After successful saving, the following window will appear. Click “Done”:
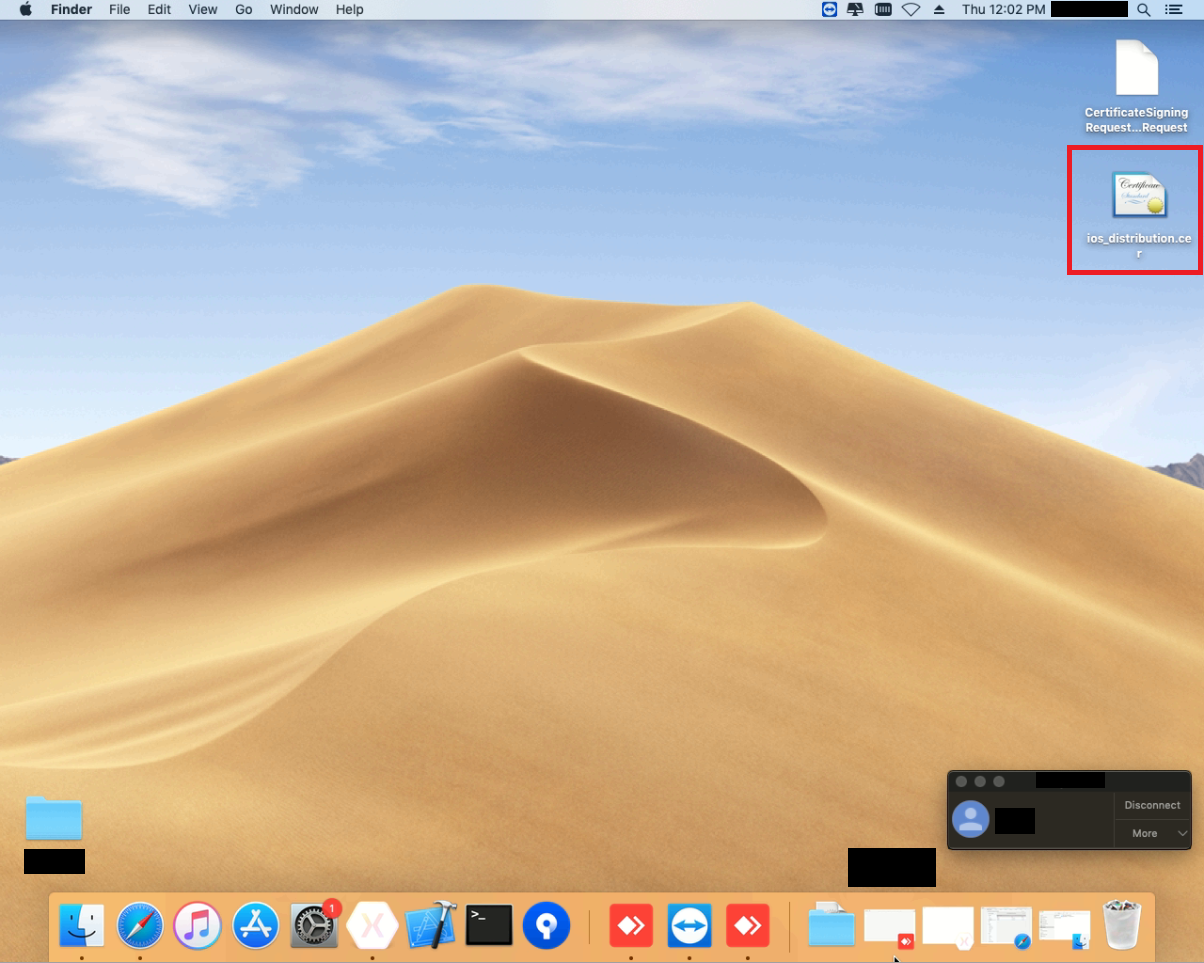
6. After we can see that the request file was created in the save location (in this example on the desktop). Or we can see the generated key in the list of keys in “keychain access”:


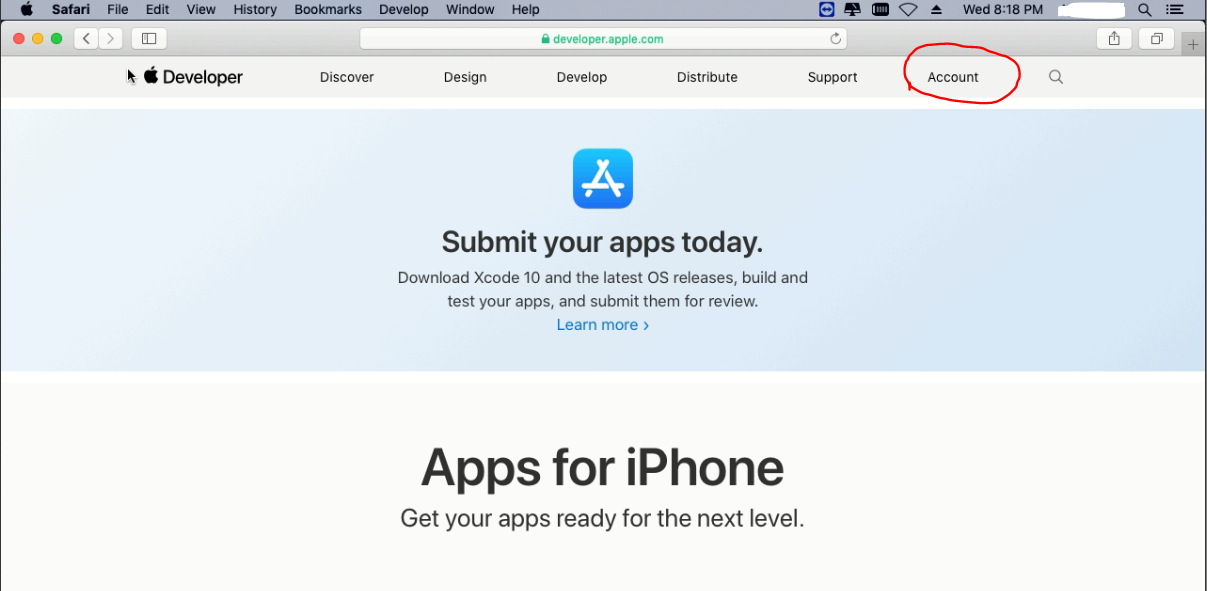
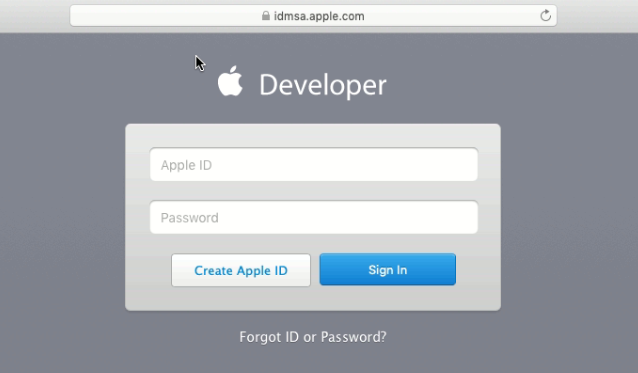
7. Next, we need to create a certificate, we can do this on the Apple website for developers by logging into your account:

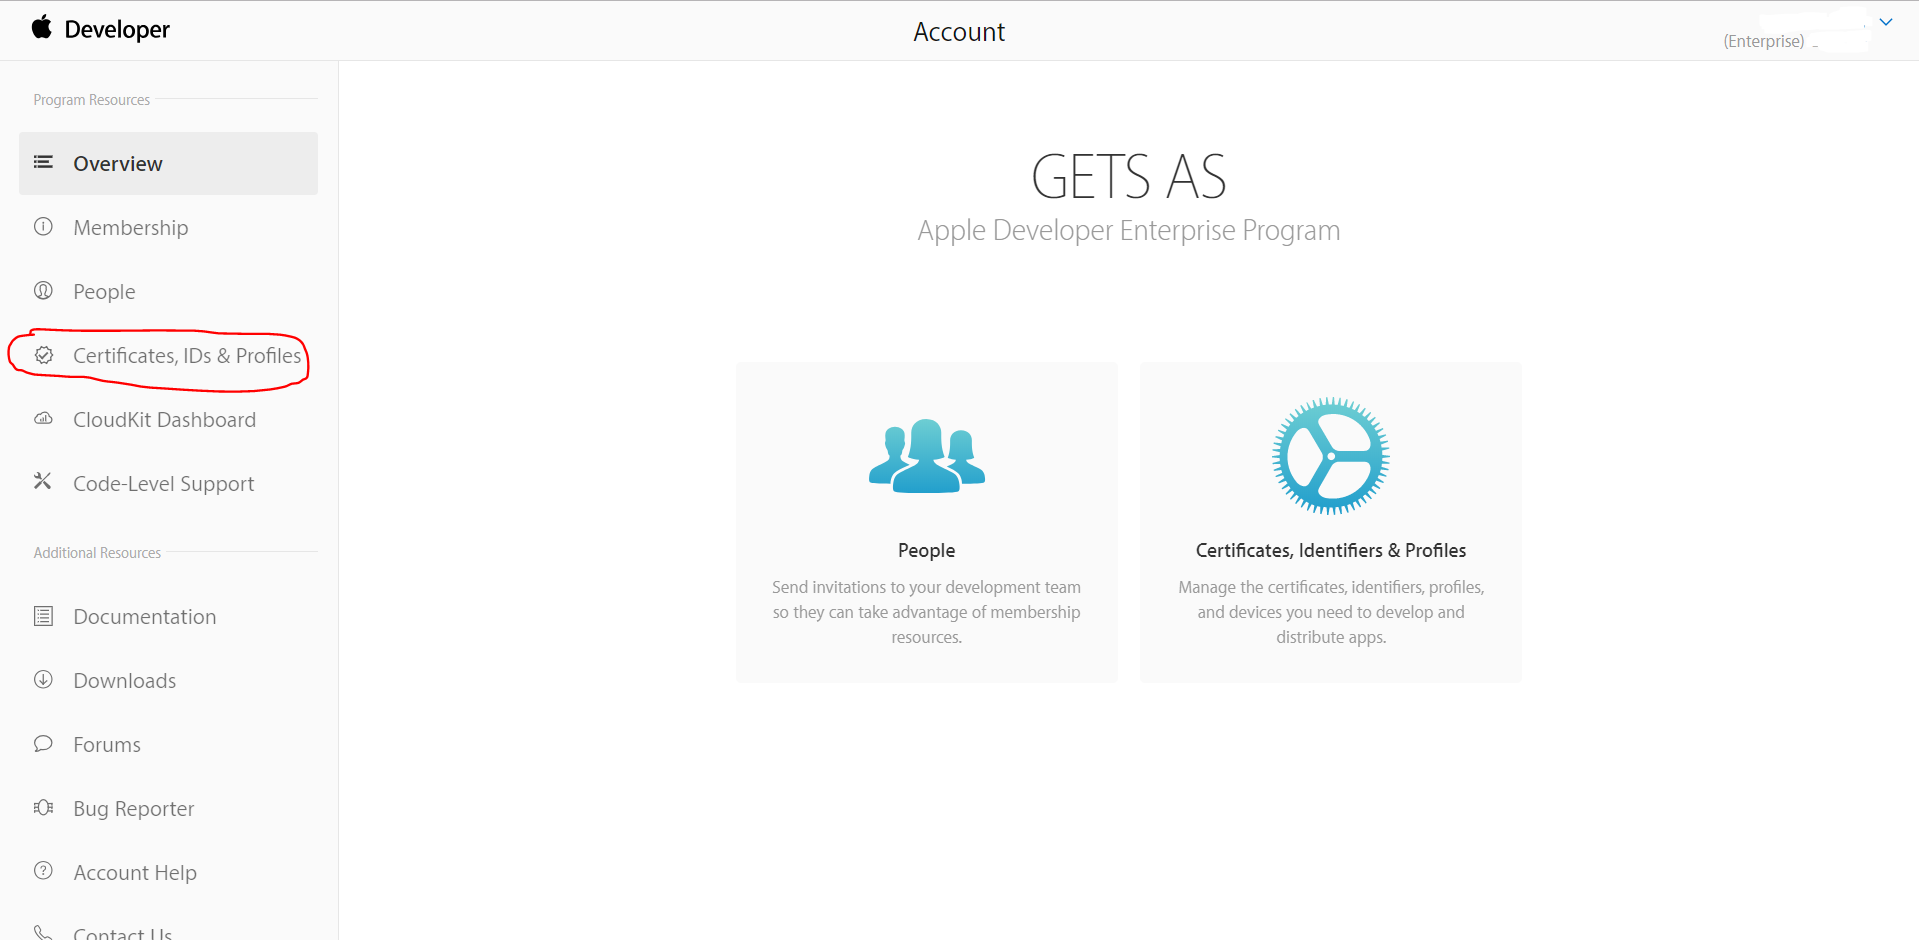
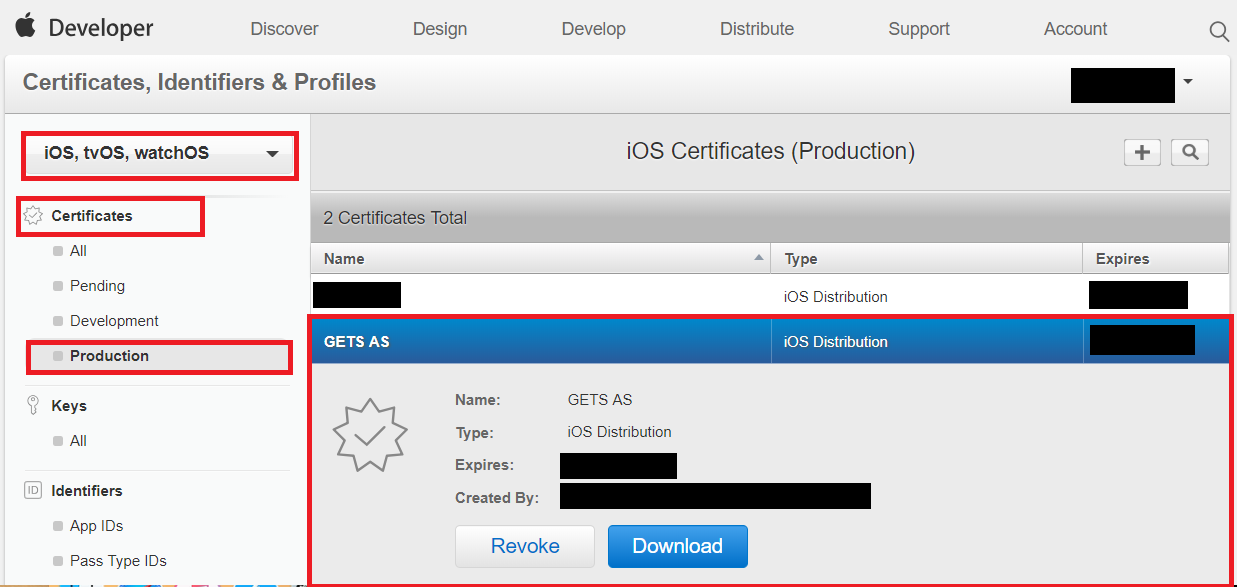
8. After successful login, we go to “Certificates, IDs & Profiles”, also on the certificates page you need to make sure that “IOS, tvOS, watchOS” is selected:
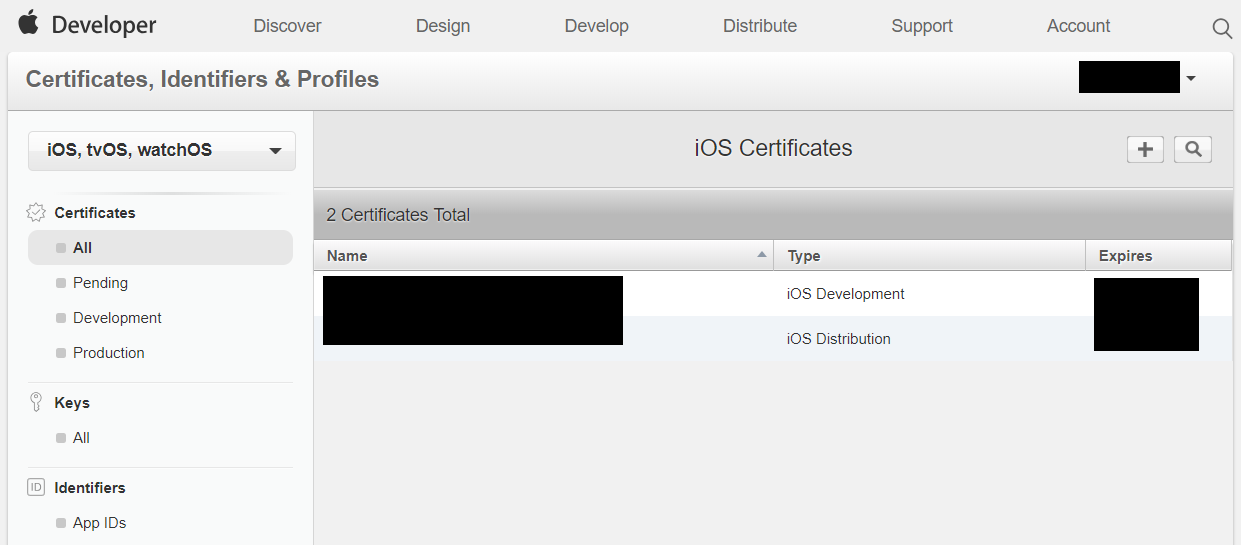
9. Next on the page, in the “Certificates” section, you need to select “Production”:

10. On the page, click on the button with the image “+” to create a certificate. A page will appear on which you need to select the type of certificate to be created:
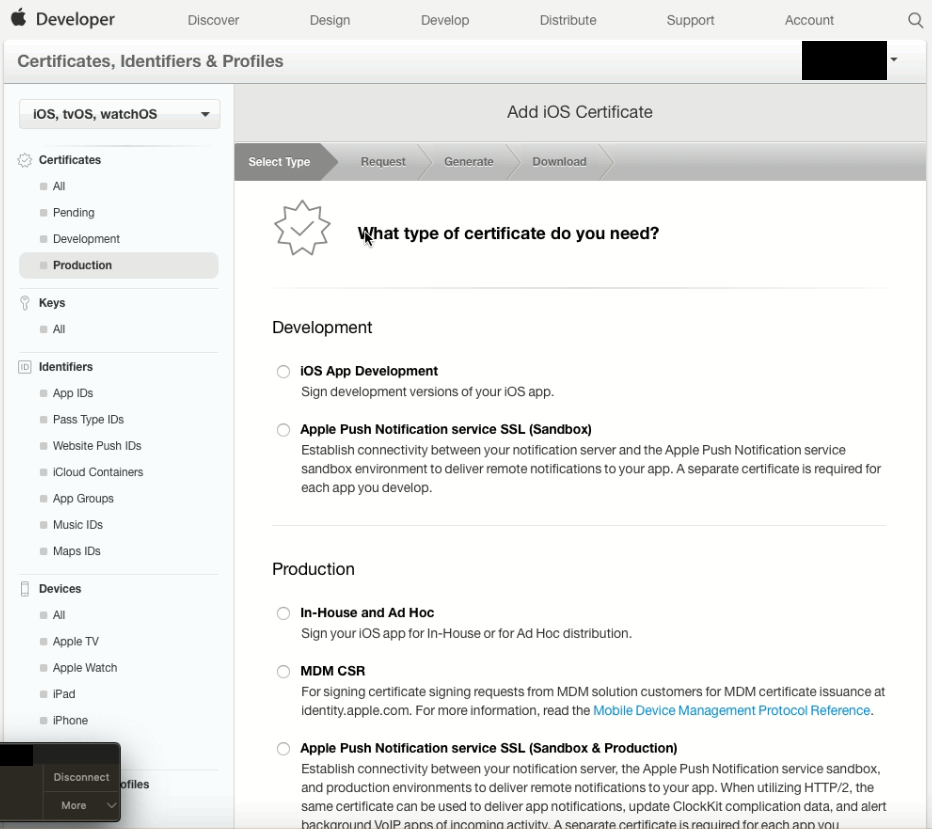
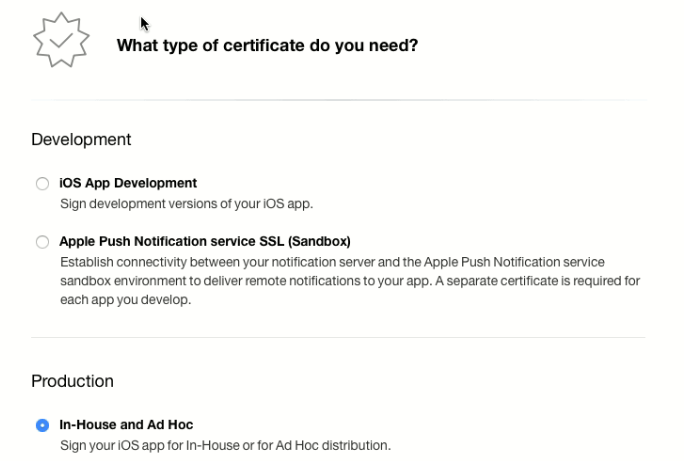
11. In this example, we are interested in the distribution method of In-House, so the type of certificate you need to select “In-House and Ad Hoc”. After clicking the “Continue” button:
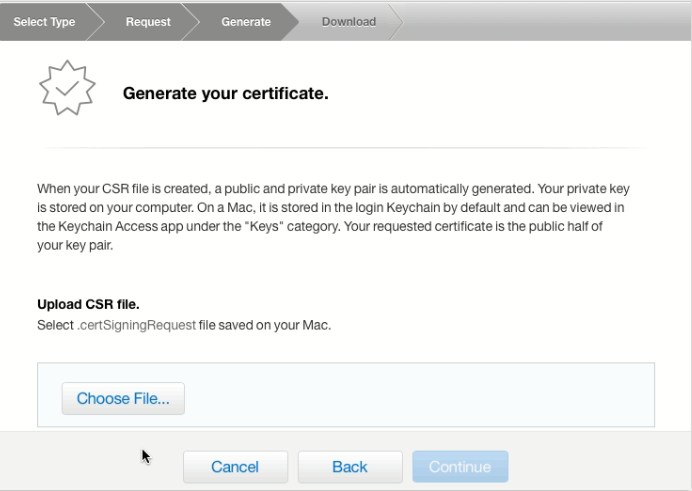
12. After we move on to the next page for creating a certificate that will describe how to create a MacOS request for a certificate. We have already created this query in the previous paragraphs. Click the “Continue” button:

13. In the next step, you will need to download the request file that we created earlier on the desktop. After a successful download, click “Continue”:

14. After the certificate is generated, it can be downloaded to the computer on the next page:
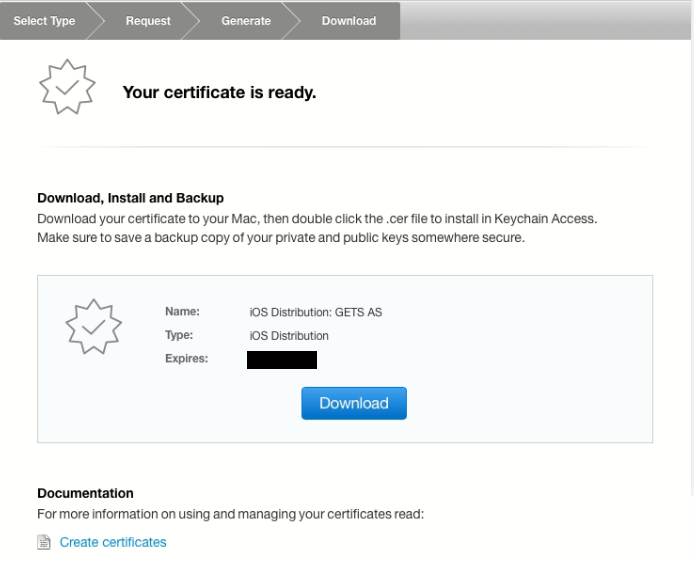
15. Download the certificate, in this example, on the desktop. We can also see the generated certificate on the website:
As we can see, according to the results, we successfully received a certificate. The next step is to create the application ID.
In the previous step, we successfully created a certificate, now we need to create an Apps ID. For this you need:
1. On the Apple site for developers , go to “Certificates, IDs & Profiles” first in your account, as well as on the certificates page you need to make sure that “IOS, tvOS, watchOS” is selected:
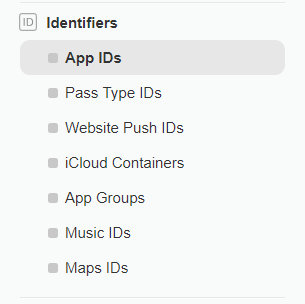
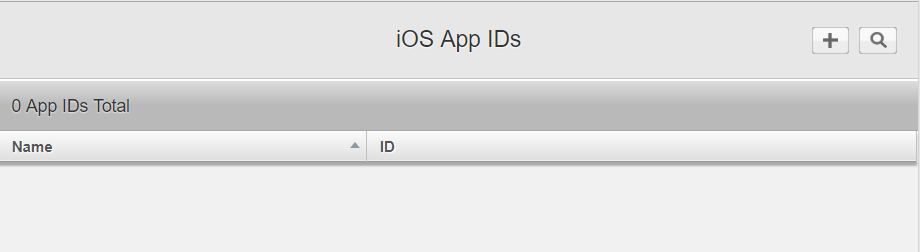
2. Next on the page, in the “Identifiers” section, you need to select “App IDs”:
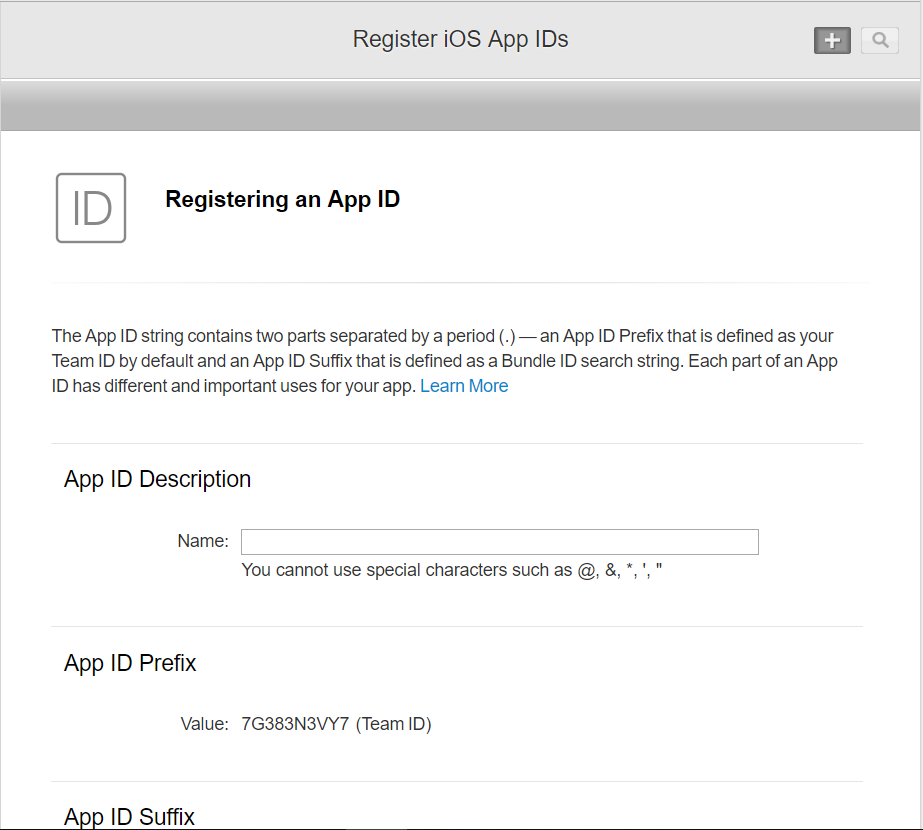
3. On the page, click on the “+” button to create an App ID. A page will appear on which you need to select the settings for the generated ID. ID settings are individual for your application, the only important clarification is to select Explicit App ID in the App ID Suffix column:

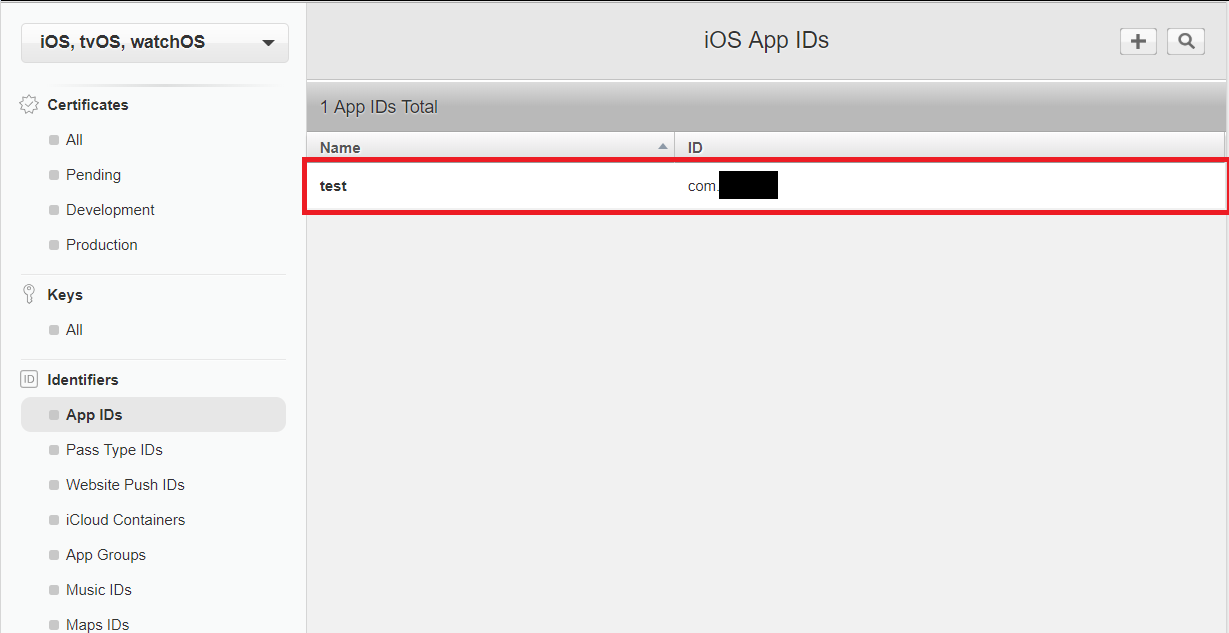
4. After creating the App ID, you can see it on the website:
Following two steps, we successfully received a certificate and created an App ID. Next, we need to create Provisioning Profiles using the generated certificate. And that brings us to the next step “Step 3. Creating Provisioning Profiles ”.
In the previous step, we successfully created a certificate; now we need to create Provisioning Profiles with it. For this you need:
1. On the Apple site for developers , go to “Certificates, IDs & Profiles” first in your account, as well as on the certificates page you need to make sure that “IOS, tvOS, watchOS” is selected:
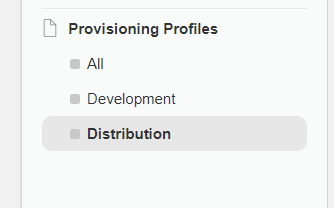
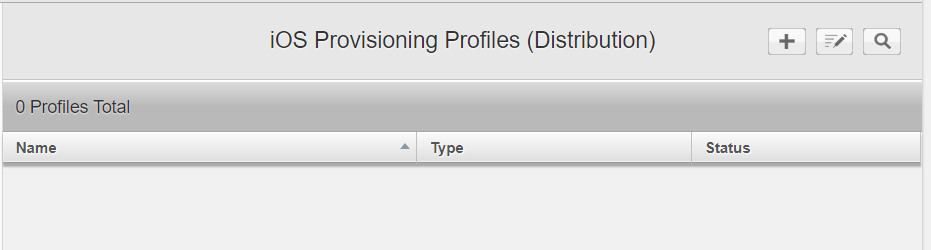
2. Next on the page, in the section “Provisioning Profiles”, you need to select “Distribution”:
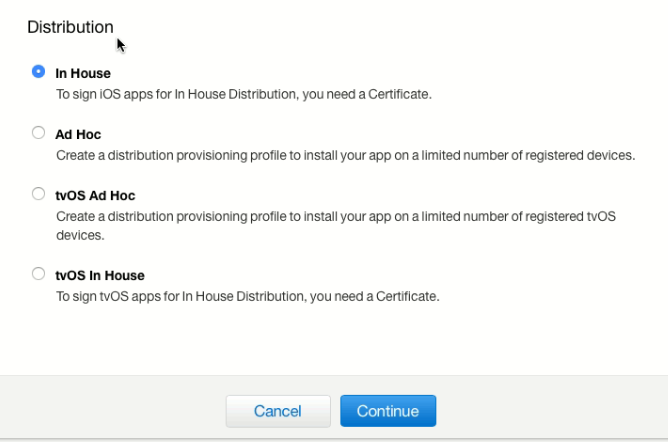
3. On the page, click on the “+” button to create Provisioning Profiles. A page will appear on which you need to select the type of profile to be created:

4. In this example, we are interested in the In-House distribution method, respectively, select the profile type “In House” and click on the “Continue” button:
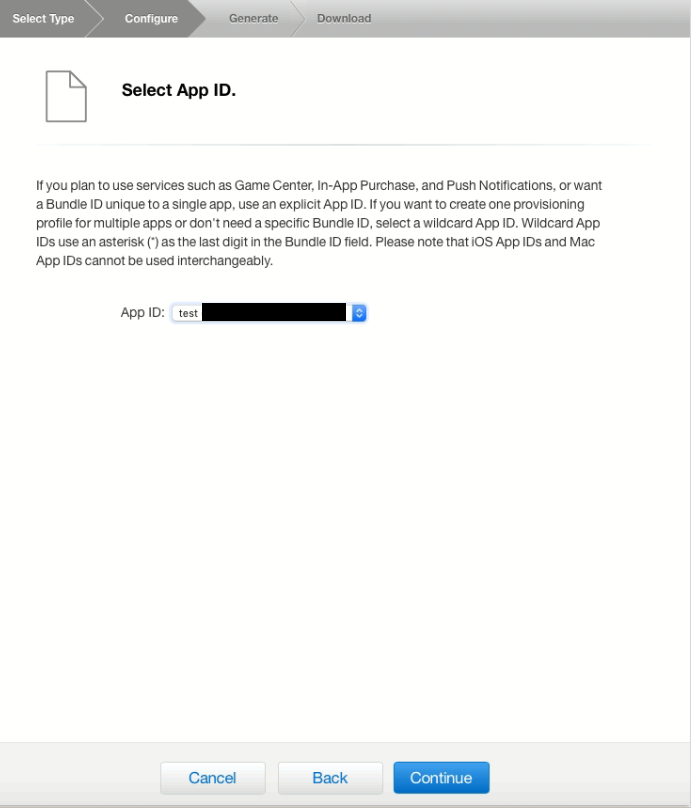
5. On the next page you need to select the previously created App ID in step 2:
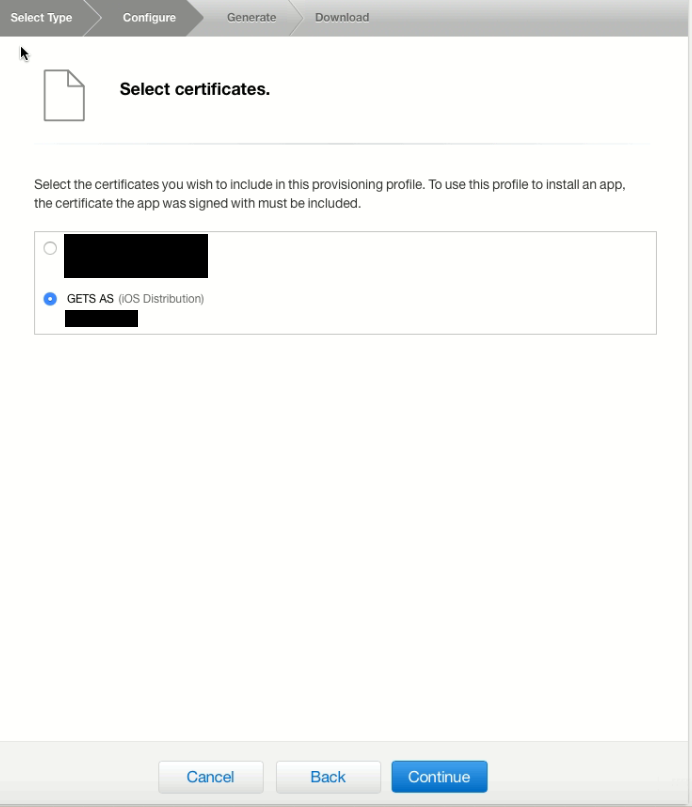
6. After clicking the “Continue” button, we will proceed to the selection of the certificate, we created it in step 1. Next, click on the “Continue” button:
7. On the next page we need to fill in the field with the name of the profile and check the data before generating the profile:

8. After the profile will be generated and can be downloaded:

9. Download Provisioning Profile, in this example, on the desktop. We can also see the created provisioning profile on the site, and see that it is active:

Following the results of 3 steps, we have successfully created the Provisioning Profile.
The previous steps were performed on a computer from Apple (Mac), then I will explain how to create .xcarchive in Visual Studio 2017 for Windows, immediately on a Mac.
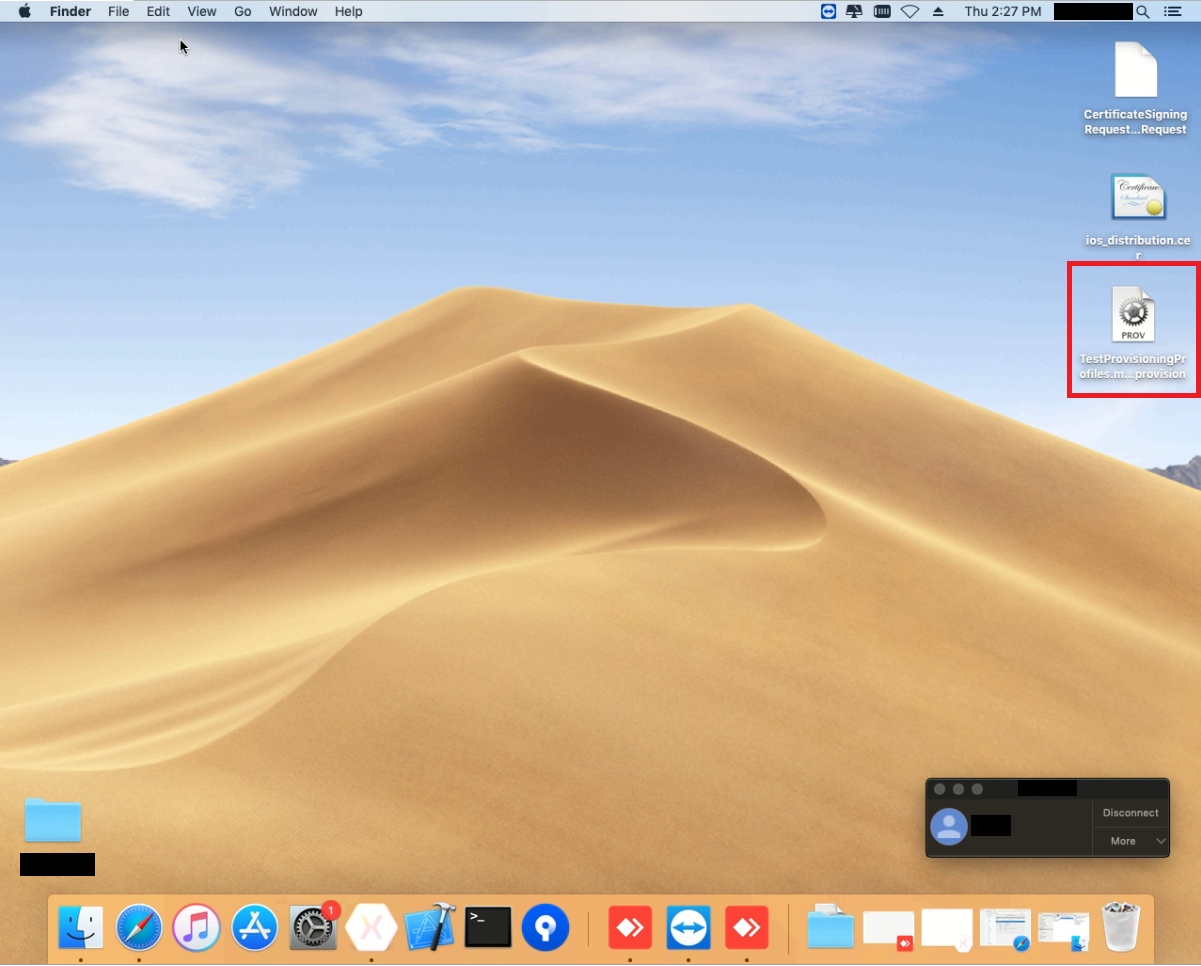
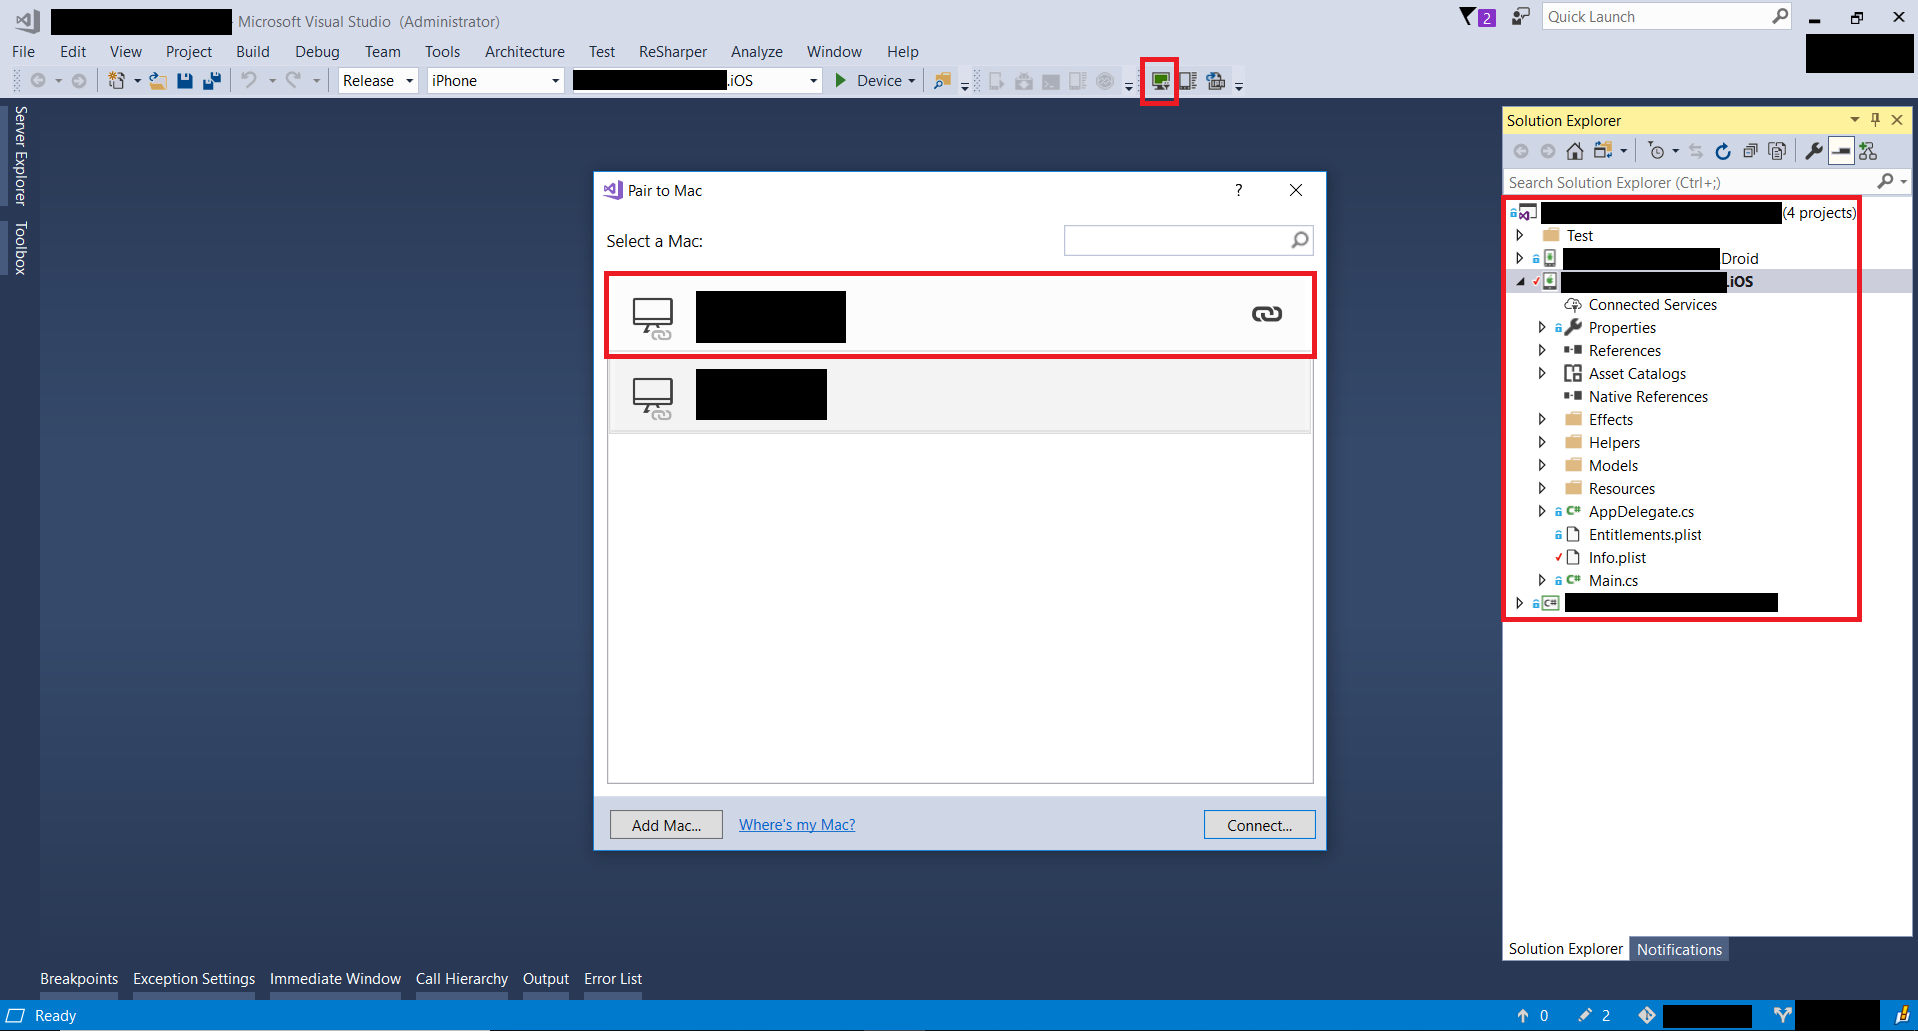
1. To do this, we need the Xamarin application in Visual Studio, which will be connected to the Mac:
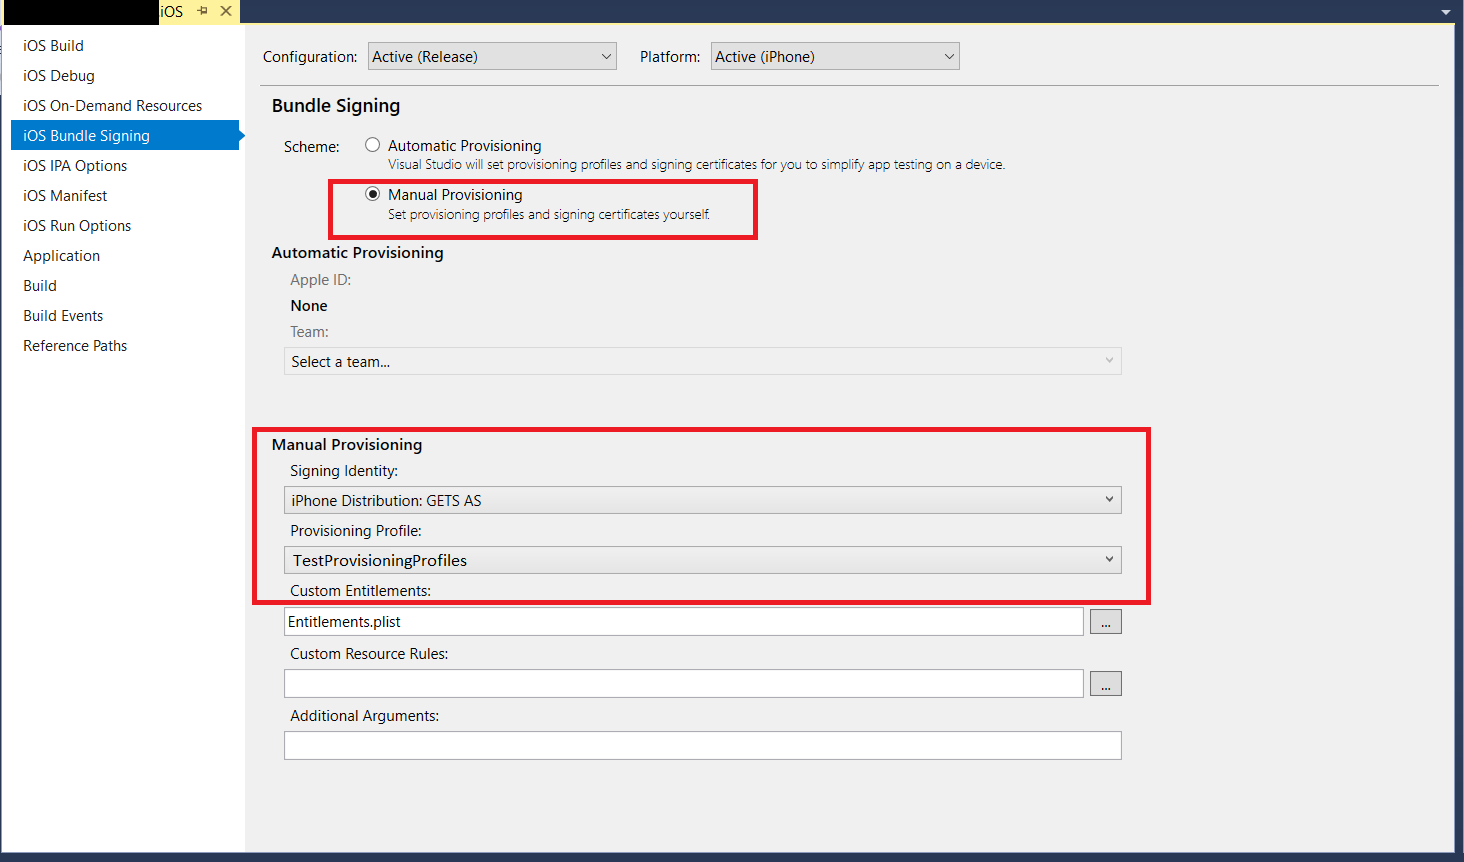
2. In the solution you need to select the IOS project by clicking on it with the right mouse button. In the menu that appears, select “Properties”. In the opened window select the item “ios bundle setting”. Then select in the “bundle setting” - “manual provisioning”, and below in the “manual provisioning” column select your certificate and profile that we created in the previous stages:

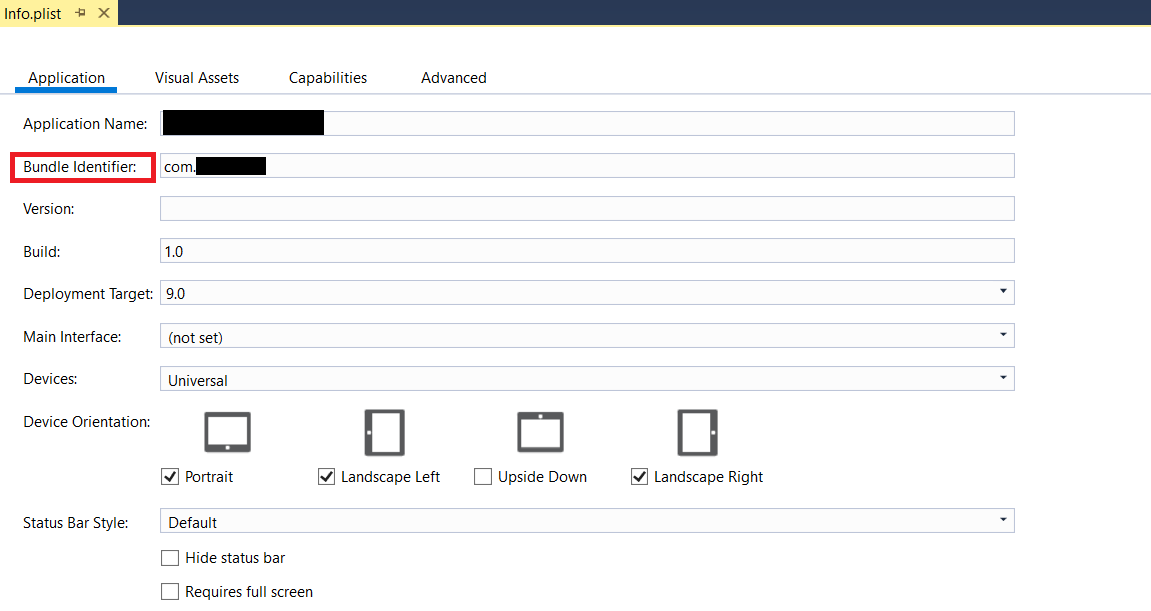
3. In the IOS project, you need to select the Info.plist file and make sure that the “bundle identifier” matches the desired App ID:

4. Then open the developer command line in Visual Studio (as administrator) “Developer Command Prompt for VS 2017” and either go to the directory with the ios project, or specify the full address when creating the command. This command will create an .xcarchive archive on a Mac from Visual Studio. The archive itself does not contain the .ipa and .plist file we need to distribute, so after generating the archive we need to create them. Learn more about how to create an archive here .
Command:
5. After the successful execution of the command on the Mac should create an archive. We need to run Xcode, select “Windows” in it and select “Organazer” in this menu. There in the “Archive” section we will see the created .xcarchive archive:


6. Now we need to create .ipa and .plist files, based on the created archive.
With their help, we will be able to distribute our application bypassing the AppStore, for example, within the company. Next we need to click the “Distribute App” button. In the menu that appears, select “Enterprise” and click the “Next” button:
7. Next, you need to select the devices to which you can distribute and be sure to select “include manifest for over-the-air installation” in order to be able to download the application from the browser:
8. In the next window you need to specify “Name” - the name of the application; “App URL” - the path to the .ipa file; ”Display Image URL” - Path to the icon 57x57; ”Full Size Image URL” - Path to the icon 512x512.
It is important that the server on which the .ipa and .plist files are located be encrypted, that is, https is mandatory. The example uses the dropbox service. When using the dropbox service, it is important to know : the correct path to the file via a public link should not begin with “https://www.dropbox.com/”, as indicated in the generated link, but with “https://dl.dropboxusercontent.com/ ".

9. In the next step, we need to select the generated certificate and Provisioning Profile:

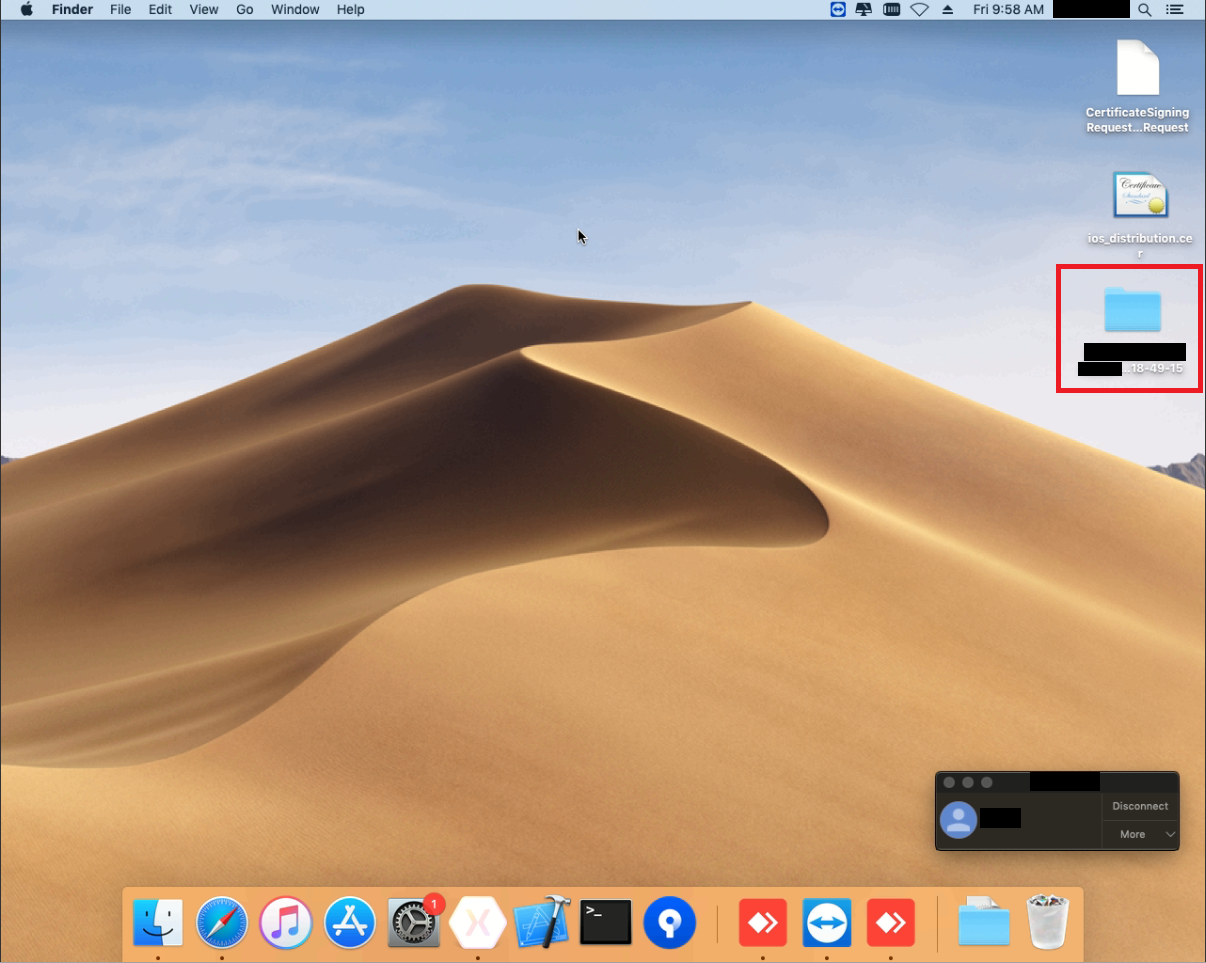
10. After we see the successfully assembled application, and we must choose where to save the folder with the application, which we will then distribute:

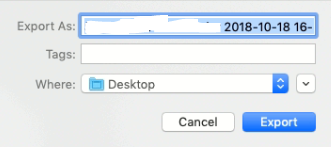
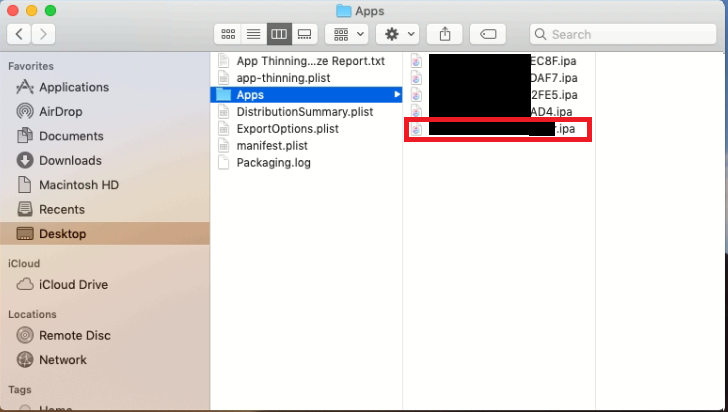
11. After saving, a folder was created on the desktop. You can see the contents of the folder in the screenshots below, when generating, 4 .plist files are created and usually 1 .ipa, but in the test application this is slightly wrong, but in this case we will be interested in the file with the name of our application in the name. As for the 4 files .plist, then we need the file “manifest.plist”. To install the application you need a plist, which describes the pre-installation properties. You can learn more about Enterprise Distribution and see what manifest.plist looks like here :

Thus, in this step, we have successfully created the .ipa and .plist files of the application created in Visual Studio 2017, and which we will use for In-House distribution.
In the previous steps, we prepared our application for distribution. In this step, we will create a simple html file with a link and lay it out on the local IIS, this is done to simplify the example, but the location of the link does not matter. Not within the scope of the example link
can be placed on your own site so that it is available to employees, as well as application files should be placed on your own server. However, in this example, as mentioned earlier, we used the dropbox service.
1. First we need to place the files (icons, .ipa file and manifest.plist) on the dropbox and make them available at the link:

2. After we create an html file, as follows:
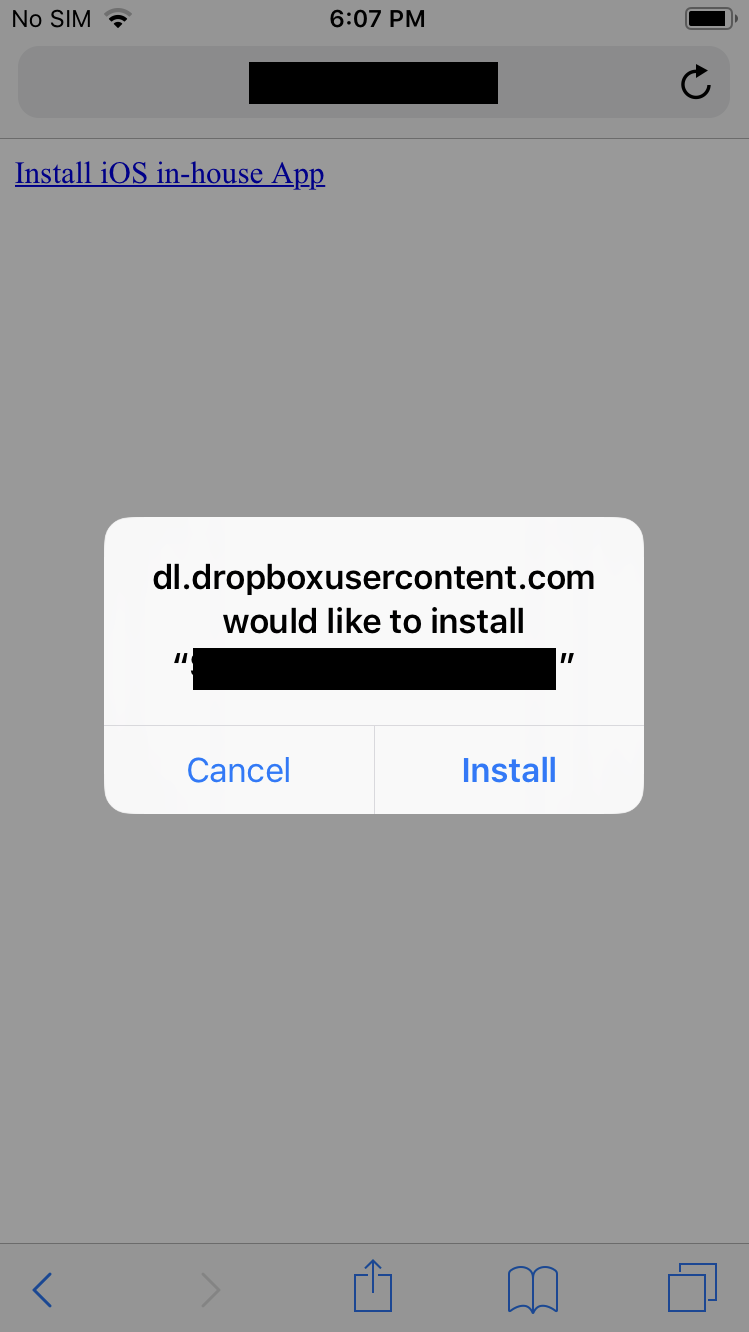
3. Next, lay out this html file on the local IIS (or your website), and after clicking on this link from a mobile device, we will be offered to install the application. After installing the application, the user needs to confirm the trust of the certificate on the device Settings → General → Device Management → "Enterprise Name" then only users will be able to open the application:

Following the results of 5 steps, we created a certificate and Provisioning Profile, collected an Xcode archive from Visual Studio 2017, received .ipa and .plist files for distribution, and also managed to successfully install the application on the device by clicking on the link, thereby bypassing the AppStore.
Preparing and distributing an IOS application within a company is not an easy task, especially when the application is written on Windows using Visual studio, and most tutorials on the Internet only describe MacOS using Xcode. However, after hours of battle with the brainchild of Apple, we managed to accomplish the seemingly impossible, namely: to
Yes, at the hearing it seems not very difficult. However, when it comes to developing applications for Apple devices, everything becomes several times more incomprehensible and more complicated. And after a triumphant, but not easy victory, we wanted to leave our mark on history by writing this tutorial.
Prerequisites:
')
1. Must be an Apple Enterprise Account - $ 299 per year.
1 Step. Creating a certificate.
1. First, on a Mac, you need to create a request to create a certificate. To do this, open the keychain access, for example, through a search:
2. Select keychain access in the upper left corner of the screen, select “certificate assistant” -> “request a certificate from a certificate authority” in the pop-up menu, the corresponding window will open:
3. In the window that appears, fill in the fields “User Email Address” - your email, and “Common Name” - the name of the key. And also select the item “Saved to disk” to save the request file to the computer. And press the “Continue” button:
4. Next, a window will appear in which you need to specify the name of the request file and select the path to save the file. Make the necessary changes and save:
5. After successful saving, the following window will appear. Click “Done”:
6. After we can see that the request file was created in the save location (in this example on the desktop). Or we can see the generated key in the list of keys in “keychain access”:
7. Next, we need to create a certificate, we can do this on the Apple website for developers by logging into your account:
8. After successful login, we go to “Certificates, IDs & Profiles”, also on the certificates page you need to make sure that “IOS, tvOS, watchOS” is selected:
9. Next on the page, in the “Certificates” section, you need to select “Production”:
10. On the page, click on the button with the image “+” to create a certificate. A page will appear on which you need to select the type of certificate to be created:
11. In this example, we are interested in the distribution method of In-House, so the type of certificate you need to select “In-House and Ad Hoc”. After clicking the “Continue” button:
12. After we move on to the next page for creating a certificate that will describe how to create a MacOS request for a certificate. We have already created this query in the previous paragraphs. Click the “Continue” button:
13. In the next step, you will need to download the request file that we created earlier on the desktop. After a successful download, click “Continue”:
14. After the certificate is generated, it can be downloaded to the computer on the next page:
15. Download the certificate, in this example, on the desktop. We can also see the generated certificate on the website:
As we can see, according to the results, we successfully received a certificate. The next step is to create the application ID.
2 Step. Create Apps ID.
In the previous step, we successfully created a certificate, now we need to create an Apps ID. For this you need:
1. On the Apple site for developers , go to “Certificates, IDs & Profiles” first in your account, as well as on the certificates page you need to make sure that “IOS, tvOS, watchOS” is selected:
2. Next on the page, in the “Identifiers” section, you need to select “App IDs”:
3. On the page, click on the “+” button to create an App ID. A page will appear on which you need to select the settings for the generated ID. ID settings are individual for your application, the only important clarification is to select Explicit App ID in the App ID Suffix column:
4. After creating the App ID, you can see it on the website:
Following two steps, we successfully received a certificate and created an App ID. Next, we need to create Provisioning Profiles using the generated certificate. And that brings us to the next step “Step 3. Creating Provisioning Profiles ”.
Step 3 Creating Provisioning Profiles.
In the previous step, we successfully created a certificate; now we need to create Provisioning Profiles with it. For this you need:
1. On the Apple site for developers , go to “Certificates, IDs & Profiles” first in your account, as well as on the certificates page you need to make sure that “IOS, tvOS, watchOS” is selected:
2. Next on the page, in the section “Provisioning Profiles”, you need to select “Distribution”:
3. On the page, click on the “+” button to create Provisioning Profiles. A page will appear on which you need to select the type of profile to be created:
4. In this example, we are interested in the In-House distribution method, respectively, select the profile type “In House” and click on the “Continue” button:
5. On the next page you need to select the previously created App ID in step 2:
6. After clicking the “Continue” button, we will proceed to the selection of the certificate, we created it in step 1. Next, click on the “Continue” button:
7. On the next page we need to fill in the field with the name of the profile and check the data before generating the profile:
8. After the profile will be generated and can be downloaded:
9. Download Provisioning Profile, in this example, on the desktop. We can also see the created provisioning profile on the site, and see that it is active:
Following the results of 3 steps, we have successfully created the Provisioning Profile.
4 Step. Creating Xcode archives (.xcarchive) based on your application in Visual Studio on Windows and then creating .ipa and .plist files
The previous steps were performed on a computer from Apple (Mac), then I will explain how to create .xcarchive in Visual Studio 2017 for Windows, immediately on a Mac.
1. To do this, we need the Xamarin application in Visual Studio, which will be connected to the Mac:
2. In the solution you need to select the IOS project by clicking on it with the right mouse button. In the menu that appears, select “Properties”. In the opened window select the item “ios bundle setting”. Then select in the “bundle setting” - “manual provisioning”, and below in the “manual provisioning” column select your certificate and profile that we created in the previous stages:
3. In the IOS project, you need to select the Info.plist file and make sure that the “bundle identifier” matches the desired App ID:
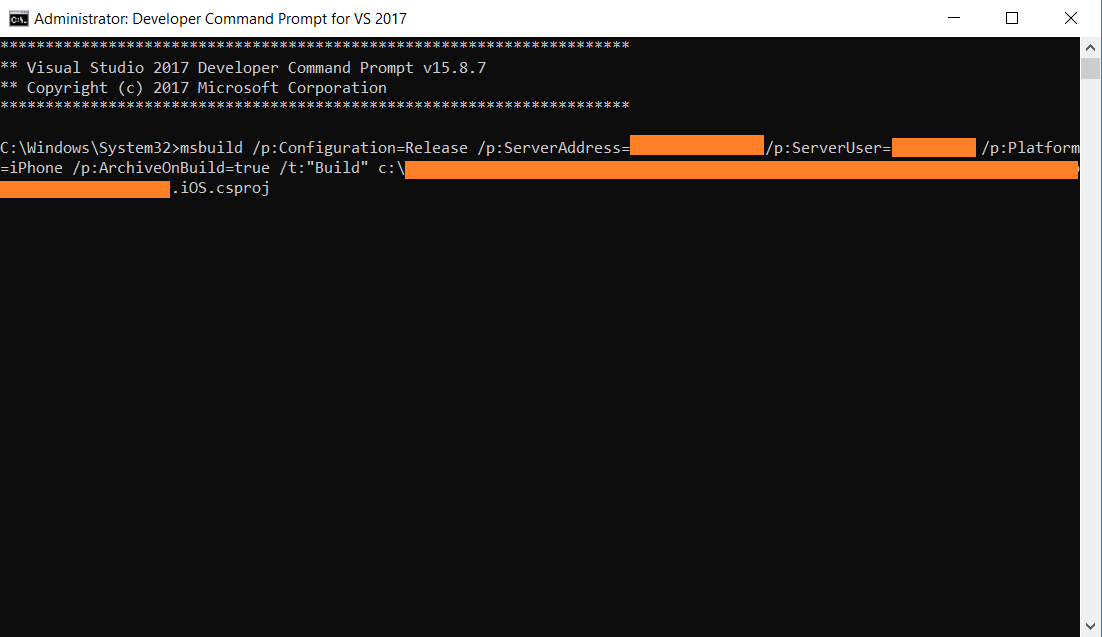
4. Then open the developer command line in Visual Studio (as administrator) “Developer Command Prompt for VS 2017” and either go to the directory with the ios project, or specify the full address when creating the command. This command will create an .xcarchive archive on a Mac from Visual Studio. The archive itself does not contain the .ipa and .plist file we need to distribute, so after generating the archive we need to create them. Learn more about how to create an archive here .
Command:
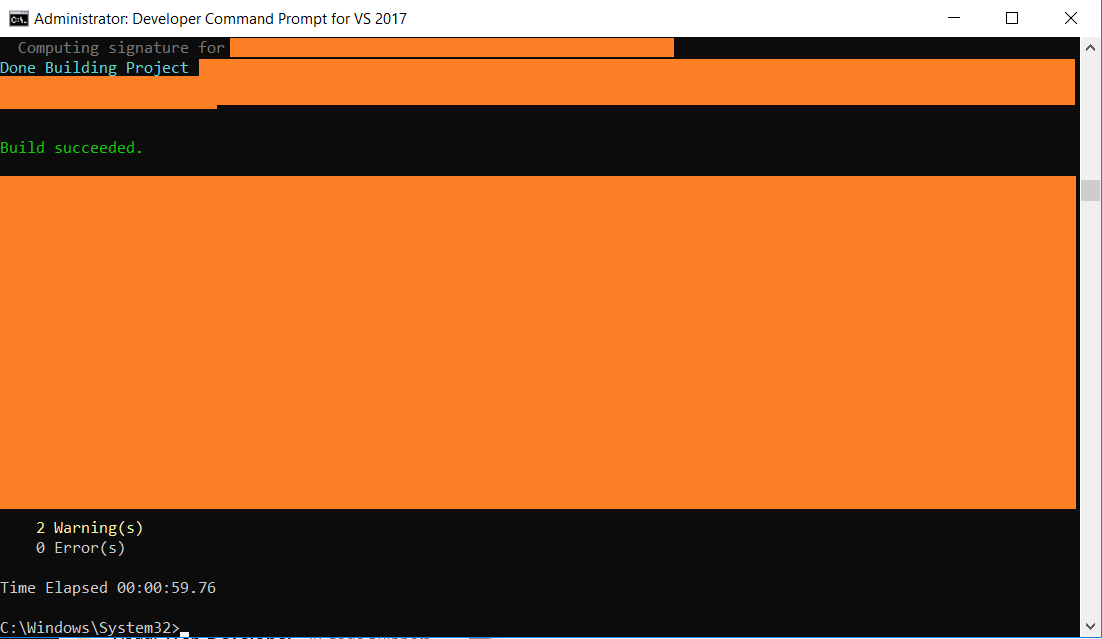
msbuild /p:Configuration=Release /p:ServerAddress=10.211.55.2 /p:ServerUser=xamUser /p:Platform=iPhone /p:ArchiveOnBuild=true /t:"Build" MyProject.csproj5. After the successful execution of the command on the Mac should create an archive. We need to run Xcode, select “Windows” in it and select “Organazer” in this menu. There in the “Archive” section we will see the created .xcarchive archive:
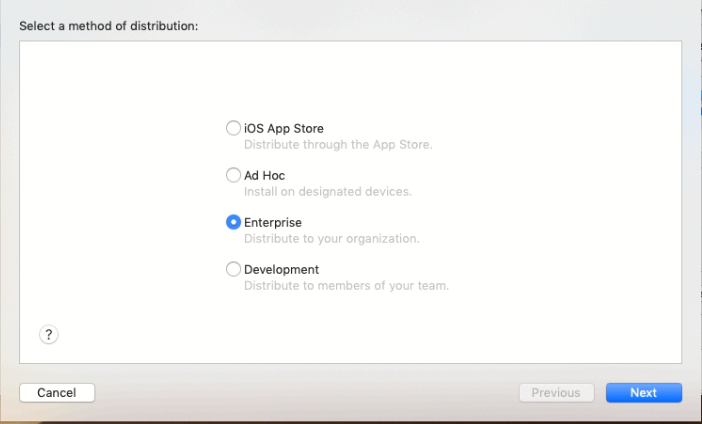
6. Now we need to create .ipa and .plist files, based on the created archive.
With their help, we will be able to distribute our application bypassing the AppStore, for example, within the company. Next we need to click the “Distribute App” button. In the menu that appears, select “Enterprise” and click the “Next” button:
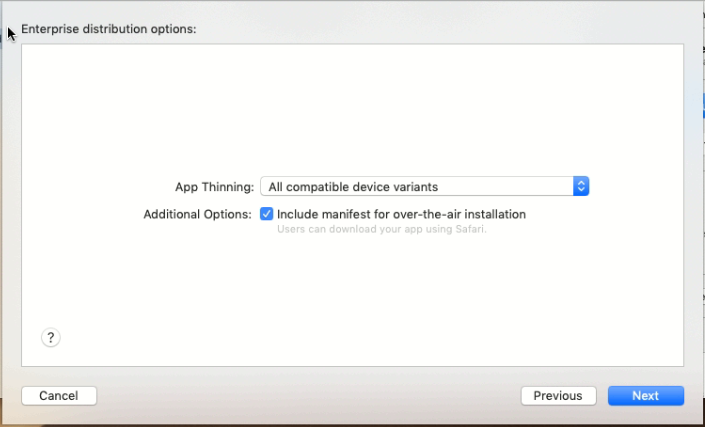
7. Next, you need to select the devices to which you can distribute and be sure to select “include manifest for over-the-air installation” in order to be able to download the application from the browser:
8. In the next window you need to specify “Name” - the name of the application; “App URL” - the path to the .ipa file; ”Display Image URL” - Path to the icon 57x57; ”Full Size Image URL” - Path to the icon 512x512.
It is important that the server on which the .ipa and .plist files are located be encrypted, that is, https is mandatory. The example uses the dropbox service. When using the dropbox service, it is important to know : the correct path to the file via a public link should not begin with “https://www.dropbox.com/”, as indicated in the generated link, but with “https://dl.dropboxusercontent.com/ ".
9. In the next step, we need to select the generated certificate and Provisioning Profile:
10. After we see the successfully assembled application, and we must choose where to save the folder with the application, which we will then distribute:
11. After saving, a folder was created on the desktop. You can see the contents of the folder in the screenshots below, when generating, 4 .plist files are created and usually 1 .ipa, but in the test application this is slightly wrong, but in this case we will be interested in the file with the name of our application in the name. As for the 4 files .plist, then we need the file “manifest.plist”. To install the application you need a plist, which describes the pre-installation properties. You can learn more about Enterprise Distribution and see what manifest.plist looks like here :
Thus, in this step, we have successfully created the .ipa and .plist files of the application created in Visual Studio 2017, and which we will use for In-House distribution.
5 Step. Application distribution
In the previous steps, we prepared our application for distribution. In this step, we will create a simple html file with a link and lay it out on the local IIS, this is done to simplify the example, but the location of the link does not matter. Not within the scope of the example link
can be placed on your own site so that it is available to employees, as well as application files should be placed on your own server. However, in this example, as mentioned earlier, we used the dropbox service.
1. First we need to place the files (icons, .ipa file and manifest.plist) on the dropbox and make them available at the link:
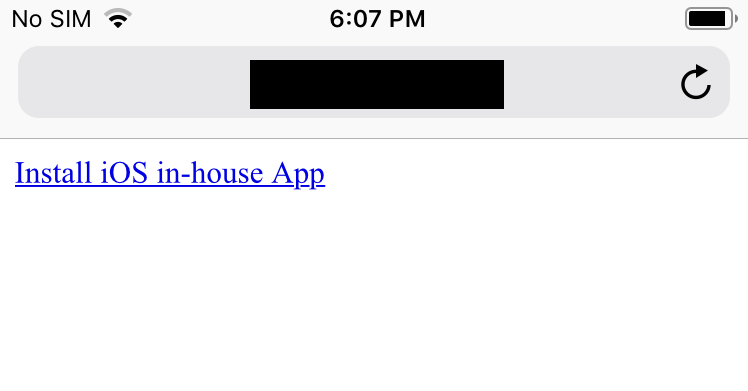
2. After we create an html file, as follows:
<html> <body> <a href="itms-services://?action=download-manifest&url=https://www.yoursite.ru/dirname/manifest.plist"> Install iOS in-house App</a> </body> </html> 3. Next, lay out this html file on the local IIS (or your website), and after clicking on this link from a mobile device, we will be offered to install the application. After installing the application, the user needs to confirm the trust of the certificate on the device Settings → General → Device Management → "Enterprise Name" then only users will be able to open the application:
Total
Following the results of 5 steps, we created a certificate and Provisioning Profile, collected an Xcode archive from Visual Studio 2017, received .ipa and .plist files for distribution, and also managed to successfully install the application on the device by clicking on the link, thereby bypassing the AppStore.
Source: https://habr.com/ru/post/427579/
All Articles