How to understand Tensorflow and not die, but even teach a car something
Hi, Habrazhiteli. Today's post will be about how not to get lost in the wilds of the variety of options for using TensorFlow for machine learning and achieve your goal. The article is designed to ensure that the reader knows the basics of the principles of machine learning, but has not yet tried to do it with his own hands. As a result, we get a working demo on Android, which recognizes something with fairly high accuracy. But first things first.
After looking at the latest materials - it was decided to start using Tensorflow , which is now gaining high momentum, and it seems that there are enough articles in English and Russian not to dig in all of this and be able to figure out what's what.
After spending two weeks studying articles and numerous ekzamply at the office. site, I realized that I did not understand. TOO much information and options on how Tensorflow can be used. My head is already plump on how much they offer different solutions and what to do with them, in relation to my task.

Then I decided to try everything, from the simplest and almost ready-made options (in which I was required to register a dependency in the gradle and add a couple of lines of code) to more complex ones (in which I would have to create and train graph models myself and learn how to use them in mobile application).
In the end, I had to use a complex version, which will be described in more detail below. In the meantime, I have compiled for you a list of simpler options that are no less effective, just everyone is suited to their goal.
1. ML KIT

The easiest solution to use is to use a couple of lines of code:
- Text recognition (text, Latin characters)
- Face detection (faces, emotions)
- Barcode scanning (barcode, qr-code)
- Image labeling (limited number of object types in the image)
- Landmark recognition
With this solution, it is also a little more difficult to use your own TensorFlow Lite model, but converting to this format has caused difficulties, so this item has not been tried.
As the creators of this creation write, it is possible to solve most of the problems using these developments. But if this does not apply to your task - you will have to use custom models.
2. Custom Vision

Very handy tool for creating and training your custom models using images.
From the Pros - there is a free version that allows you to keep one project.
From the Minuses - the free version limits the number of "incoming" images in 3000 pcs. To try and make an average network of accuracy - quite enough. For more accurate tasks, you need more.
All that is required from the user is to add images with a mark (for example, image1 is "racoon", image2 - "sun"), train and export the graph for further use.
Caring Microsoft even offers its own sample , with which you can try out your resulting graph.
For those who are already "in the subject" - the graph is generated already in the Frozen state, i.e. You don’t need to do anything else with it.
This solution is good when you have a large sample and (attention) MANY different classes when learning. Since otherwise, there will be many false definitions in practice. For example, you have trained on raccoons and suns, and if there is a person at the entrance, then he may be equally likely to be defined by such a system as one or the other. Although in fact - Nothing else.
3. Creating a model manually

When you need to fine-tune the model yourself for image recognition, more complex manipulations with the input sample of images come into play.
For example, we do not want to have restrictions on the size of the input sample (as in the preceding paragraph), or we want to train the model more precisely by adjusting the number of epoch and other learning parameters ourselves.
In this approach, there are several examples from Tensorflow, which describe the procedure and the final result.
Here are a few such examples:
- Cool codebot Tensorflow for Poets .
It provides an example of how to create a color type classifier based on an open ImageNet image database — prepare images, and then train the model. Also mentioned a bit is how you can work with a rather interesting tool - TensorBoard. Of its simplest functions, it clearly demonstrates the structure of your finished model, as well as the learning process in many ways.
Kodlab Tensorflow for Poets 2 - continued work with the color classifier. Shows how if there are graph files and its labels (which were obtained in the previous Kodlab), you can run the application on android. One of the Kodlab points is the conversion from the "usual" graph format ".pb" into the Tensorflow lite format (which provides for some file optimizations to reduce the total size of the graph file, because mobile devices are demanding for this).
Recognition of handwritten characters MNIST .
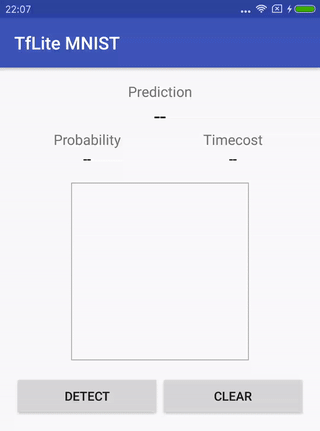
The turnip contains the original model (which is already prepared for this task), instructions on how to train it, convert it, and how to launch the project for Android at the end to check how it all works.
Based on these examples, you can figure out how to work with custom models in Tensorflow and try to either make your own, or take one of the already pre-trained models that are assembled on a githaba:
Tensorflow models
Speaking of "pre-trained" models. Interesting nuances when using these:
- Their structure is already prepared for a specific task.
- They are already trained on large sample sizes.
Therefore, if your sample is not full enough, you can take a pre-trained model that is close in scope to your task. Using such a model, adding your own learning rules, you will get a better result, rather than trying to train a model from scratch.
4. Object Detection API + model creation manually
However, all the previous points did not give the desired result. From the very beginning it was difficult to understand what needs to be done and with the help of which approach. Then a cool article was found on the Object Detection API , which tells how you can find several categories on one image, as well as several instances of one category. In the process of working on this sample, the original articles and video tutorials on recognizing custom objects turned out to be more convenient (links will be at the end).
But the work could not have been completed without an article on the recognition of Pikachu - because a very important nuance was mentioned there, which for some reason is not mentioned anywhere in a single guide or example. And without it, all the work done would be wasted.
So, now at last about what still had to do and what happened at the exit.
- First, the flour installation Tensorflow. Who will not be able to install it, or use the standard creation scripts, model training - just have patience and google. Almost every problem has already been written to issues on a githheb or on stackoverflow.
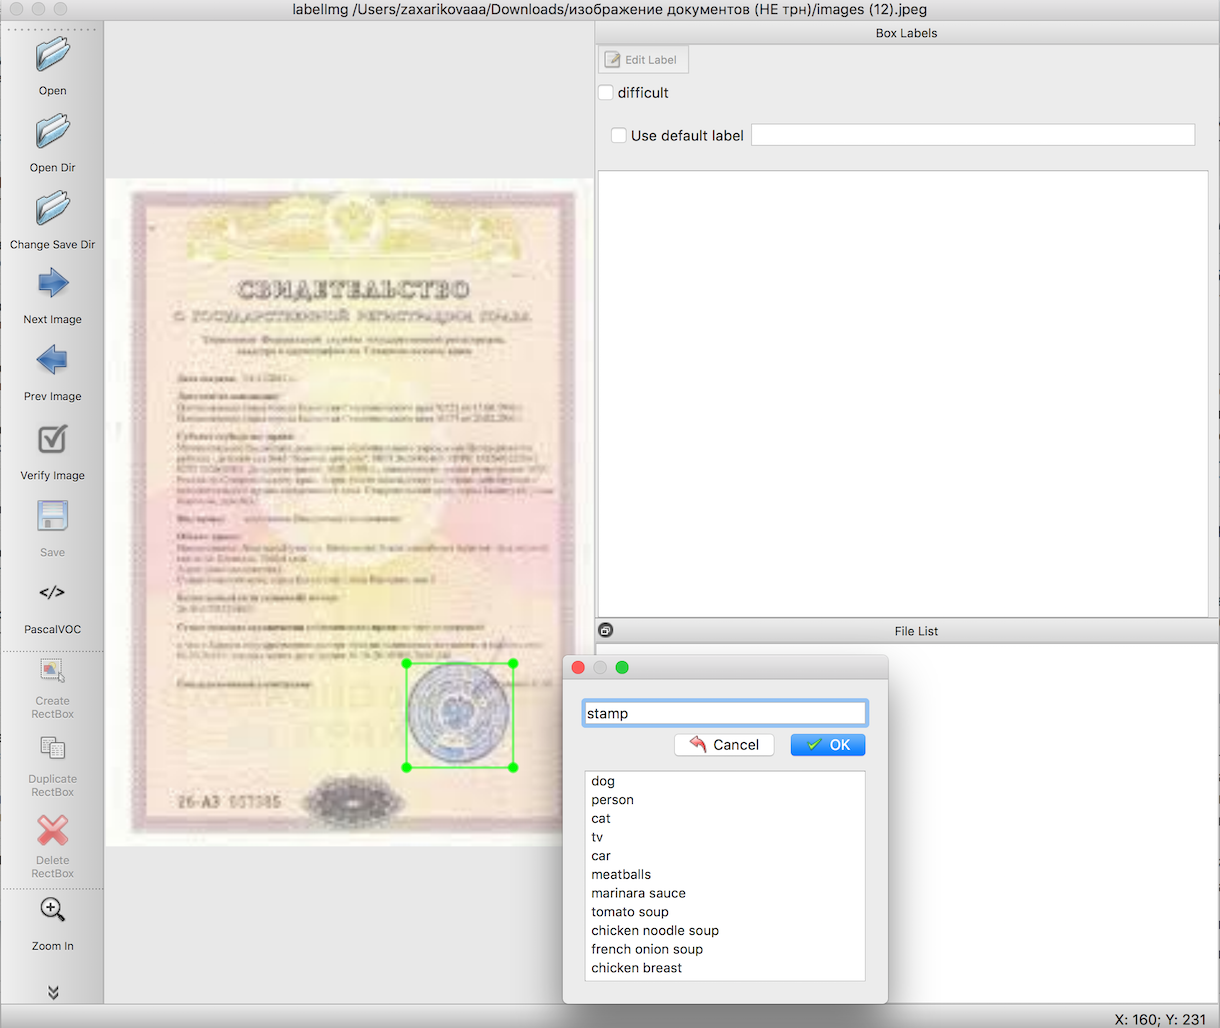
According to the instructions for object recognition, we need to prepare an input sample before learning the model. These articles describe in detail how to do this with the help of a convenient tool - labelImg. The only difficulty here is to do a very long and scrupulous work on identifying the boundaries of the objects we need. In this case, stamp-stamps on the images of documents.
')
With the help of ready-made scripts, the next step is to export the data from step 2 first to csv files, then to TFRecords - the input data format Tensorflow. There should be no difficulties.
Choosing a pre-trained model, based on which we will pre-train the graph, as well as the training itself. Here there can appear the most huge number of unknown errors, the cause of which is unidentified (or crookedly set) packages necessary for work. But you will succeed, do not despair, the result is worth it.

Export the resulting file after learning to the 'pb' format. Simply select the last 'ckpt' file and export it.
Run an example of work on Android.
Downloading the official object recognition sample from the Tensorflow - TF Detect github. We insert there our model and file with labels. But. Nothing will work.

It was here that the biggest plug-in in all the work arose, oddly enough - well, Tensorflow samples didn’t want to work at all. Everything fell. Only the mighty Pikachu with his article managed to help bring everything to work.
In the labels.txt file, the first line must be the inscription "???", because By default, in Object Detection API, object id numbers do not begin with 0 as usual, but from 1. Due to the fact that the null class is reserved - and you need to specify magic questions. Those. Your tag file will look something like this:
??? stamp And then - run the sample and see the recognition of objects and the level of confidience with which it was obtained.
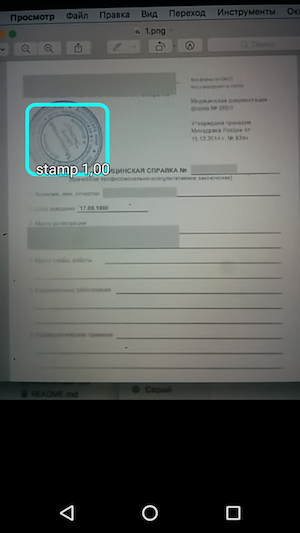
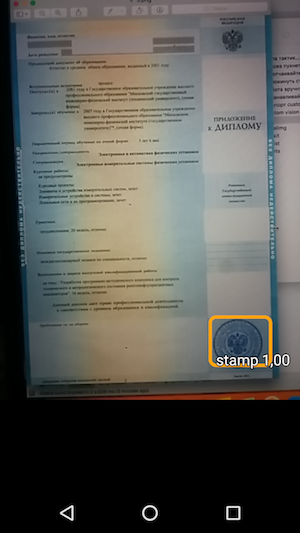

Thus, the result was a simple application that, when you hover the camera, recognizes the borders of the stamp on the document and points them along with the accuracy of recognition.
And if we exclude the time that was spent on searching for the right approach and trying to launch it, in general, the work turned out to be quite fast and not really difficult. You just need to know the nuances before proceeding to work.
Already as an additional section (here you can already close the article, if you are tired of the information), I would like to write a couple of life hacks that helped in working with all this.
quite often tensorflow scripts did not work because they were run from the wrong directories. And on different PCs it was different: someone needed to run from the "
tensroflowmodels/models/research" directory, and someone - to a deeper level - from "tensroflowmodels/models/research/object-detection"Remember that for each open terminal, you need to re-export the path with the command
export PYTHONPATH=/ /tensroflowmodels/models/research/slim:$PYTHONPATHif you are not using your graph and want to find out information about it (for example, "
input_node_name", which is required later in the work), execute two commands from the root folder:bazel build tensorflow/tools/graph_transforms:summarize_graph bazel-bin/tensorflow/tools/graph_transforms/summarize_graph --in_graph="/ /frozen_inference_graph.pb"where "
/ /frozen_inference_graph.pb" is the path to the column about which you want to find out informationTo view information about the graph, you can use Tensorboard
python import_pb_to_tensorboard.py --model_dir=output/frozen_inference_graph.pb --log_dir=trainingwhere you need to specify the path to the graph (
model_dir) and the path to the files that were obtained in the learning process (log_dir). Then just open localhost in the browser and watch what interests you.
And the last part - on working with python scripts in the instructions for the Object Detection API - for you prepared a little cheat sheet below with commands and hints.
Export from labelimg to csv (from the object_detection directory)
python xml_to_csv.py Further, all the steps that are listed below should be performed from the same Tensorflow folder (" tensroflowmodels/models/research/object-detection " or one level higher - depending on how you do it) - that is, all images of the input sample, TFRecords and other files before the start of the work should be copied inside this directory.
Export from csv to tfrecord
python generate_tfrecord.py --csv_input=data/train_labels.csv --output_path=data/train.record python generate_tfrecord.py --csv_input=data/test_labels.csv --output_path=data/test.record * Do not forget to change in the file itself (generate_tfrecord.py) the lines 'train' and 'test' in the paths, as well as
the name of the recognized classes in the class_text_to_int function (which should be duplicated in the pbtxt file that you create before learning the graph).
Training
python legacy/train.py —logtostderr --train_dir=training/ --pipeline_config_path=training/ssd_mobilenet_v1_coco.config ** Before training, do not forget to check the file " training/object-detection.pbtxt " - all recognized classes and the file " training/ssd_mobilenet_v1_coco.config " should be listed there - you need to change the parameter " num_classes " to the number of your classes.
Export model to pb
python export_inference_graph.py \ --input_type=image_tensor \ --pipeline_config_path=training/pipeline.config \ --trained_checkpoint_prefix=training/model.ckpt-110 \ --output_directory=output Thank you for your interest in this topic!
Links
Source: https://habr.com/ru/post/427449/
All Articles