Writing Shaders in Unity. GrabPass, PerRendererData
Hello! I would like to share the experience of writing shaders in Unity. Let's start with the space distortion shader (Displacement / Refraction) in 2D, consider the functionality used to write it (GrabPass, PerRendererData), and also pay attention to the problems that are sure to arise.
Information is useful to those who have a general idea about shaders and tried to create them, but they are not familiar with the possibilities that Unity provides, and does not know which side to approach. Take a look, perhaps my experience will help you figure it out.
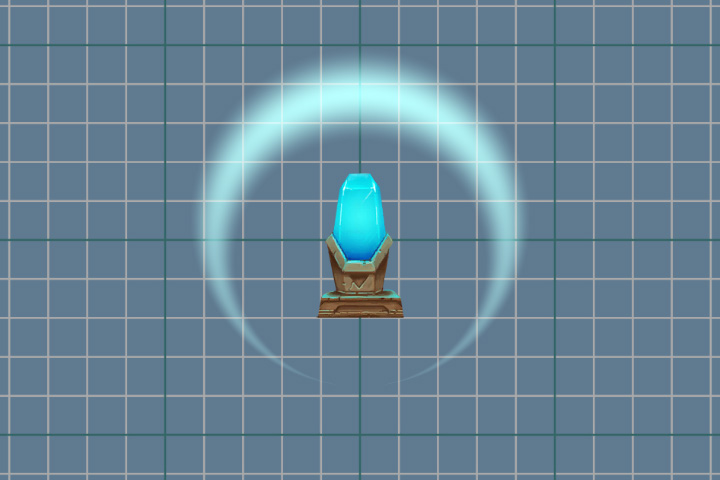
This is the result we want to achieve.
')

First we create a shader that will simply draw the specified sprite. It will be our basis for further manipulations. Something will be added to it, something else will be deleted. From the standard “Sprites-Default” it will differ in the absence of some tags and actions that will not affect the result.
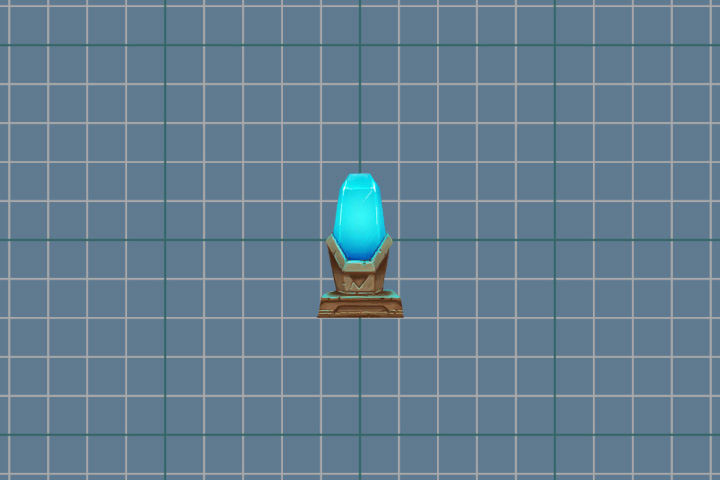
The resulting billet.
Now our task is to make changes to the current image on the screen, and for this we need to get an image. And this will help us pass GrabPass . This pass captures the image on the screen into the _GrabTexture texture. The texture will contain only what was drawn before our object using this shader went to render.
In addition to the texture itself, we need the scan coordinates to get the pixel color from it. To do this, add additional texture coordinates to the fragment shader data. These coordinates are not normalized (values not in the range from 0 to 1) and describe the position of a point in the space of the camera (projection).
And in the vertex shader, fill them.
In order to get color from _GrabTexture , we can use the following method if we use non-normalized coordinates
But we will use another method and normalize the coordinates ourselves, using the perspective division, i.e. dividing all the others into w components.
Perspective division can also be performed in the vertex shader, and already prepared data can be transferred to the fragment shader.
Let's add a fragmentary shader accordingly.
Turn off the specified mixing mode, because Now we implement our blend mode inside the fragment shader.
And look at the result of GrabPass .
It seems that nothing happened, but it is not. For clarity, we will make a small shift, for this we add the value of the variable to the texture coordinates. So that we can change the variable, add a new _DisplacementPower property.
And again make changes to the fragment shader.
Op hop and the result! Picture with a shift.

After a successful shift, you can proceed to a more complex distortion. We use pre-prepared textures that will store the bias force at the specified point. Red is for the x-axis offset value, and green is for the y-axis.
Let's get started Add a new property to store the texture.
And variable.
In the fragment shader, we get the offset values from the texture and add them to the texture coordinates.
Now, by changing the values of the _DisplacementPower parameter, we do not just shift the original image, but distort it.

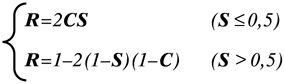
Now on the screen there is only a distortion of space, and the sprite, which we showed at the very beginning, is absent. Bring it back in place. To do this, we use the difficult mixing of colors. Take something else, for example, overlay blending mode. Its formula is as follows:
where S is the original image, C is the corrective, that is, our sprite, R is the result.
Let's transfer this formula to our shader.
The use of conditional statements in a shader is a rather confusing topic. Much depends on the platform and API used for graphics. In some cases, conditional statements will not affect performance. But it is always worth having a fallback. You can replace the conditional operator with the help of mathematics and the available methods. We use the following construction
Rewrite color for overlay .
Be sure to consider the transparency of the sprite. For this we use linear interpolation between two colors.
The complete fragment shader code.
And the result of our work.

It was mentioned above that the GrabPass {} pass captures the contents of the screen into the _GrabTexture texture. In this case, each time this pass is called, the contents of the texture will be updated.
Permanent updates can be avoided by specifying the name of the texture into which the screen will be captured.
Now the contents of the texture will be updated only when you first call the GrabPass pass per frame. This saves resources if there are many objects using GrabPass {} . But if two objects overlap each other, then artifacts will be noticeable, since both objects will use the same image.
Using GrabPass {"_ DisplacementGrabTexture"}.
Using GrabPass {}.
Now it's time to animate our effect. We want to smoothly reduce the distortion force as the blast wave grows, imitating its extinction. For this we need to change the properties of the material.
Result of animation.
Pay attention to the line below.
Here, we do not simply change one of the material properties, but create a copy of the source material (only when the method is first called) and work with it. It is a working option, but if there is more than one object on the stage, for example, one thousand, the creation of so many copies will not lead to anything good. A better option is to use the [PerRendererData] attribute in the shader, and the MaterialPropertyBlock object in the script.
To do this, add an attribute to the _DisplacementPower property in the shader.
After this, the property will no longer be displayed in the inspector, since now it is individual for each object, which will set the values.
Go back to the script and make changes to it.
Now, to change the property, we will update the MaterialPropertyBlock of our object, without creating copies of the material.
You can get MaterialPropertyBlock in almost all components associated with the render. For example, SpriteRenderer , ParticleRenderer , MeshRenderer and other Renderer components. But there is always an exception, it is CanvasRenderer . It is impossible to get and change properties with this method. Therefore, if you are writing a 2D game using UI components, you will encounter this problem when writing shaders.
An unpleasant effect occurs when the image is rotated. On the example of a round wave, this is especially noticeable.
The right wave when turning (90 degrees) gives another distortion.

Red indicates the vector obtained from the same texture point, but with a different rotation of this texture. The offset value remains the same and does not take into account the rotation.
To solve this problem, we will use the unity_ObjectToWorld transformation matrix . It will help to convert our vector from local coordinates to world ones.
But the matrix contains the data and the scale of the object, so when specifying the distortion force, we must take into account the scale of the object itself.
The right wave is also rotated 90 degrees, but the distortions are now calculated correctly.

Our texture has enough transparent pixels (especially if we use the Rect mesh type). The shader processes them, which in this case does not make sense. Therefore, we will try to reduce the number of unnecessary calculations. We can interrupt the processing of transparent pixels using the clip (x) method. If the parameter passed to it is less than zero, then the shader will terminate. But since the alpha value cannot be less than 0, we will subtract a small value from it. It can also be taken out in properties ( Cutout ) and used to cut off the transparent parts of the image. In this case, we do not need a separate parameter, so we will use just the number 0.01 .
The complete fragment shader code.
PS: Shader and script source code - link to git . The project also has a small texture generator for distortion. A crystal with a pedestal was taken from the 2D Game Kit.
Information is useful to those who have a general idea about shaders and tried to create them, but they are not familiar with the possibilities that Unity provides, and does not know which side to approach. Take a look, perhaps my experience will help you figure it out.
This is the result we want to achieve.
')
Training
First we create a shader that will simply draw the specified sprite. It will be our basis for further manipulations. Something will be added to it, something else will be deleted. From the standard “Sprites-Default” it will differ in the absence of some tags and actions that will not affect the result.
Shader code for sprite rendering
Shader "Displacement/Displacement_Wave" { Properties { [PerRendererData] _MainTex ("Main Texture", 2D) = "white" {} _Color ("Color" , Color) = (1,1,1,1) } SubShader { Tags { "RenderType" = "Transparent" "Queue" = "Transparent" } Cull Off Blend SrcAlpha OneMinusSrcAlpha Pass { CGPROGRAM #pragma vertex vert #pragma fragment frag #include "UnityCG.cginc" struct appdata { float4 vertex : POSITION; float2 uv : TEXCOORD0; float4 color : COLOR; }; struct v2f { float4 vertex : SV_POSITION; float2 uv : TEXCOORD0; float4 color : COLOR; }; fixed4 _Color; sampler2D _MainTex; v2f vert (appdata v) { v2f o; o.uv = v.uv; o.color = v.color; o.vertex = UnityObjectToClipPos(v.vertex); return o; } fixed4 frag (v2f i) : SV_Target { fixed4 texColor = tex2D(_MainTex, i.uv)*i.color; return texColor; } ENDCG } } } Sprite to display
The background is actually transparent, blacked out intentionally.

The resulting billet.
Grabpass
Now our task is to make changes to the current image on the screen, and for this we need to get an image. And this will help us pass GrabPass . This pass captures the image on the screen into the _GrabTexture texture. The texture will contain only what was drawn before our object using this shader went to render.
In addition to the texture itself, we need the scan coordinates to get the pixel color from it. To do this, add additional texture coordinates to the fragment shader data. These coordinates are not normalized (values not in the range from 0 to 1) and describe the position of a point in the space of the camera (projection).
struct v2f { float4 vertex : SV_POSITION; float2 uv : float4 color : COLOR; float4 grabPos : TEXCOORD1; }; And in the vertex shader, fill them.
o.grabPos = ComputeGrabScreenPos (o.vertex); In order to get color from _GrabTexture , we can use the following method if we use non-normalized coordinates
tex2Dproj(_GrabTexture, i.grabPos) But we will use another method and normalize the coordinates ourselves, using the perspective division, i.e. dividing all the others into w components.
tex2D(_GrabTexture, i.grabPos.xy/i.grabPos.w) w-component
The division by the w-component is necessary only when using perspective, in orthographic projection it will always be 1. In fact, w stores the value of the distance, the point to the camera. But it is not depth - z , the value of which should be in the range from 0 to 1. Work with depth is worth a separate topic, so we will return to our shader.
Perspective division can also be performed in the vertex shader, and already prepared data can be transferred to the fragment shader.
v2f vert (appdata v) { v2f o; o.uv = v.uv; o.color = v.color; o.vertex = UnityObjectToClipPos(v.vertex); o.grabPos = ComputeScreenPos (o.vertex); o.grabPos /= o.grabPos.w; return o; } Let's add a fragmentary shader accordingly.
fixed4 frag (v2f i) : SV_Target { fixed4 = grabColor = tex2d(_GrabTexture, i.grabPos.xy); fixed4 texColor = tex2D(_MainTex, i.uv)*i.color; return grabColor; } Turn off the specified mixing mode, because Now we implement our blend mode inside the fragment shader.
//Blend SrcAlpha OneMinusSrcAlpha Blend Off And look at the result of GrabPass .
It seems that nothing happened, but it is not. For clarity, we will make a small shift, for this we add the value of the variable to the texture coordinates. So that we can change the variable, add a new _DisplacementPower property.
Properties { [PerRendererData] _MainTex ("Main Texture", 2D) = "white" {} _Color ("Color" , Color) = (1,1,1,1) _DisplacementPower ("Displacement Power" , Float) = 0 } SubShader { Pass { ... float _DisplacementPower; ... } } And again make changes to the fragment shader.
fixed4 grabColor = tex2d(_GrabTexture, i.grabPos.xy + _DisplaccementPower); Op hop and the result! Picture with a shift.
After a successful shift, you can proceed to a more complex distortion. We use pre-prepared textures that will store the bias force at the specified point. Red is for the x-axis offset value, and green is for the y-axis.
Distorted textures

Let's get started Add a new property to store the texture.
_DisplacementTex ("Displacement Texture", 2D) = "white" {} And variable.
sampler2D _DisplacementTex; In the fragment shader, we get the offset values from the texture and add them to the texture coordinates.
fixed4 displPos = tex2D(_DisplacementTex, i.uv); float2 offset = (displPos.xy*2 - 1) * _DisplacementPower * displPos.a; fixed4 grabColor = tex2D (_GrabTexture, i.grabPos.xy + offset); Now, by changing the values of the _DisplacementPower parameter, we do not just shift the original image, but distort it.
Overlay
Now on the screen there is only a distortion of space, and the sprite, which we showed at the very beginning, is absent. Bring it back in place. To do this, we use the difficult mixing of colors. Take something else, for example, overlay blending mode. Its formula is as follows:
where S is the original image, C is the corrective, that is, our sprite, R is the result.
Let's transfer this formula to our shader.
fixed4 color = grabColor < 0.5 ? 2*grabColor*texColor : 1-2*(1-texColor)*(1-grabColor); The use of conditional statements in a shader is a rather confusing topic. Much depends on the platform and API used for graphics. In some cases, conditional statements will not affect performance. But it is always worth having a fallback. You can replace the conditional operator with the help of mathematics and the available methods. We use the following construction
c = step ( y, x); r = c * a + (1 - c) * b; Step function
The step function will return 1 if x is greater than or equal to y . And 0 if x is less than y .
For example, if x = 1 and y = 0.5, then the result c will be equal to 1. And the following expression will have the form
r = 1 * a + 0 * b
Since multiplying by 0 gives 0, then the result is just the value of a .
Otherwise, if c is 0,
r = 0 * a + 1 * b
And the end result will be b .
For example, if x = 1 and y = 0.5, then the result c will be equal to 1. And the following expression will have the form
r = 1 * a + 0 * b
Since multiplying by 0 gives 0, then the result is just the value of a .
Otherwise, if c is 0,
r = 0 * a + 1 * b
And the end result will be b .
Rewrite color for overlay .
fixed s = step(grabColor, 0.5); fixed4 color = s * (2 * grabColor * texColor) + (1 - s) * (1 - 2 * (1 - texColor) * (1 - grabColor)); Be sure to consider the transparency of the sprite. For this we use linear interpolation between two colors.
color = lerp(grabColor, color ,texColor.a); The complete fragment shader code.
fixed4 frag (v2f i) : SV_Target { fixed4 displPos = tex2D(_DisplacementTex, i.uv); float2 offset = (displPos.xy*2 - 1) * _DisplacementPower * displPos.a; fixed4 texColor = tex2D(_MainTex, i.uv + offset)*i.color; fixed4 grabColor = tex2D (_GrabTexture, i.grabPos.xy + offset); fixed s = step(grabColor, 0.5); fixed4 color = s * (2 * grabColor * texColor) + (1 - s) * (1 - 2 * (1 - texColor) * (1 - grabColor)); color = lerp(grabColor, color ,texColor.a); return color; } And the result of our work.
GrabPass feature
It was mentioned above that the GrabPass {} pass captures the contents of the screen into the _GrabTexture texture. In this case, each time this pass is called, the contents of the texture will be updated.
Permanent updates can be avoided by specifying the name of the texture into which the screen will be captured.
GrabPass{"_DisplacementGrabTexture"} Now the contents of the texture will be updated only when you first call the GrabPass pass per frame. This saves resources if there are many objects using GrabPass {} . But if two objects overlap each other, then artifacts will be noticeable, since both objects will use the same image.
Using GrabPass {"_ DisplacementGrabTexture"}.
Using GrabPass {}.
Animation
Now it's time to animate our effect. We want to smoothly reduce the distortion force as the blast wave grows, imitating its extinction. For this we need to change the properties of the material.
Script for animation
public class Wave : MonoBehaviour { private float _elapsedTime; private SpriteRenderer _renderer; public float Duration; [Space] public AnimationCurve ScaleProgress; public Vector3 ScalePower; [Space] public AnimationCurve PropertyProgress; public float PropertyPower; [Space] public AnimationCurve AlphaProgress; private void Start() { _renderer = GetComponent<SpriteRenderer>(); } private void OnEnable() { _elapsedTime = 0f; } void Update() { if (_elapsedTime < Duration) { var progress = _elapsedTime / Duration; var scale = ScaleProgress.Evaluate(progress) * ScalePower; var property = PropertyProgress.Evaluate(progress) * PropertyPower; var alpha = AlphaProgress.Evaluate(progress); transform.localScale = scale; _renderer.material.SetFloat("_DisplacementPower", property); var color = _renderer.color; color.a = alpha; _renderer.color = color; _elapsedTime += Time.deltaTime; } else { _elapsedTime = 0; } } } And its settings
Result of animation.
PerRendererData
Pay attention to the line below.
_renderer.material.SetFloat("_DisplacementPower", property); Here, we do not simply change one of the material properties, but create a copy of the source material (only when the method is first called) and work with it. It is a working option, but if there is more than one object on the stage, for example, one thousand, the creation of so many copies will not lead to anything good. A better option is to use the [PerRendererData] attribute in the shader, and the MaterialPropertyBlock object in the script.
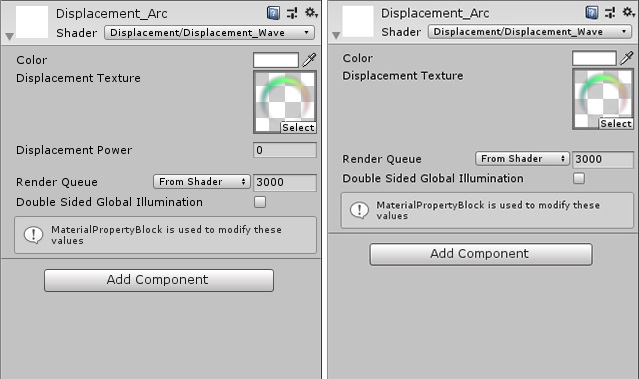
To do this, add an attribute to the _DisplacementPower property in the shader.
[PerRendererData] _DisplacementPower ("Displacement Power" , Range(-.1,.1)) = 0 After this, the property will no longer be displayed in the inspector, since now it is individual for each object, which will set the values.
Go back to the script and make changes to it.
private MaterialPropertyBlock _propertyBlock; private void Start() { _renderer = GetComponent<SpriteRenderer>(); _propertyBlock = new MaterialPropertyBlock(); } void Update() { ... //_renderer.material.SetFloat("_DisplacementPower", property); _renderer.GetPropertyBlock(_propertyBlock); _propertyBlock.SetFloat("_DisplacementPower", property); _renderer.SetPropertyBlock(_propertyBlock); ... } Now, to change the property, we will update the MaterialPropertyBlock of our object, without creating copies of the material.
About SpriteRenderer
Let's look at this line in the shader.
SpriteRenderer similarly works with sprites. It sets the _MainTex property using the MaterialPropertyBlock . Therefore, the _MainTex property is not displayed in the material’s inspector , and in the SpriteRenderer component we specify the texture we need. At the same time, there can be many different sprites on the scene, but only one material will be used to render them (unless you change it yourself).
[PerRendererData] _MainTex ("Main Texture", 2D) = "white" {} SpriteRenderer similarly works with sprites. It sets the _MainTex property using the MaterialPropertyBlock . Therefore, the _MainTex property is not displayed in the material’s inspector , and in the SpriteRenderer component we specify the texture we need. At the same time, there can be many different sprites on the scene, but only one material will be used to render them (unless you change it yourself).
PerRendererData Feature
You can get MaterialPropertyBlock in almost all components associated with the render. For example, SpriteRenderer , ParticleRenderer , MeshRenderer and other Renderer components. But there is always an exception, it is CanvasRenderer . It is impossible to get and change properties with this method. Therefore, if you are writing a 2D game using UI components, you will encounter this problem when writing shaders.
Rotation
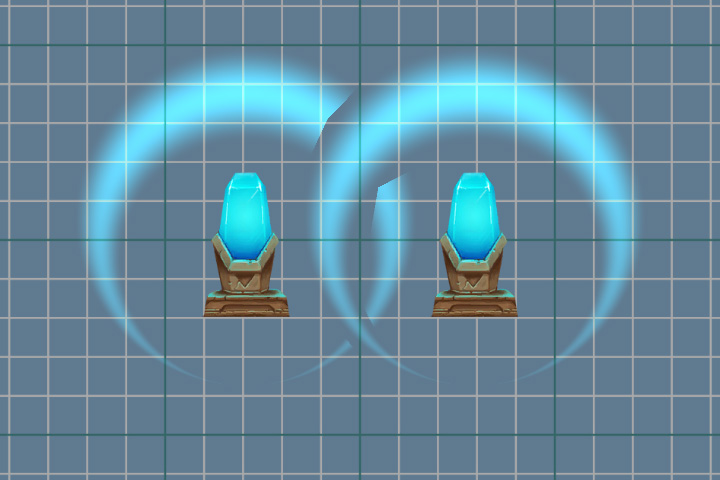
An unpleasant effect occurs when the image is rotated. On the example of a round wave, this is especially noticeable.
The right wave when turning (90 degrees) gives another distortion.
Red indicates the vector obtained from the same texture point, but with a different rotation of this texture. The offset value remains the same and does not take into account the rotation.
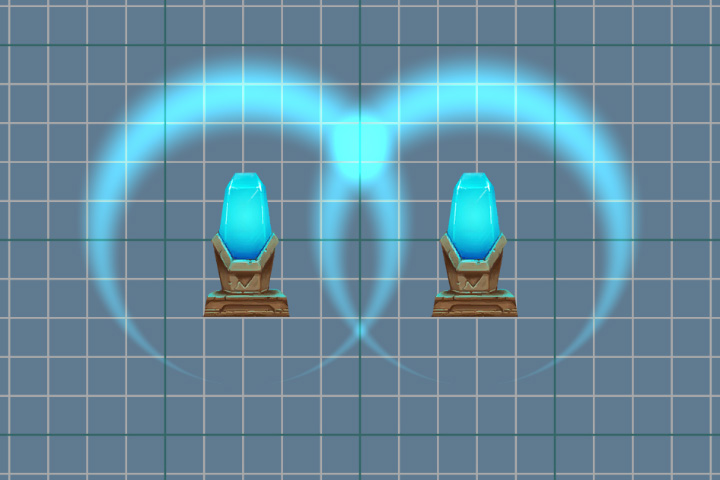
To solve this problem, we will use the unity_ObjectToWorld transformation matrix . It will help to convert our vector from local coordinates to world ones.
float2 offset = (displPos.xy*2 - 1) * _DisplacementPower * displPos.a; offset = mul( unity_ObjectToWorld, offset); But the matrix contains the data and the scale of the object, so when specifying the distortion force, we must take into account the scale of the object itself.
_propertyBlock.SetFloat("_DisplacementPower", property/transform.localScale.x); The right wave is also rotated 90 degrees, but the distortions are now calculated correctly.
Clip
Our texture has enough transparent pixels (especially if we use the Rect mesh type). The shader processes them, which in this case does not make sense. Therefore, we will try to reduce the number of unnecessary calculations. We can interrupt the processing of transparent pixels using the clip (x) method. If the parameter passed to it is less than zero, then the shader will terminate. But since the alpha value cannot be less than 0, we will subtract a small value from it. It can also be taken out in properties ( Cutout ) and used to cut off the transparent parts of the image. In this case, we do not need a separate parameter, so we will use just the number 0.01 .
The complete fragment shader code.
fixed4 frag (v2f i) : SV_Target { fixed4 displPos = tex2D(_DisplacementTex, i.uv); float2 offset = (displPos.xy * 2 - 1) * _DisplacementPower * displPos.a; offset = mul( unity_ObjectToWorld,offset); fixed4 texColor = tex2D(_MainTex, i.uv + offset)*i.color; clip(texColor.a - 0.01); fixed4 grabColor = tex2D (_GrabTexture, i.grabPos.xy + offset); fixed s = step(grabColor, 0.5); fixed4 color = s * 2 * grabColor * texColor + (1 - s) * (1 - 2 * (1 - texColor) * (1 - grabColor)); color = lerp(grabColor, color ,texColor.a); return color; } PS: Shader and script source code - link to git . The project also has a small texture generator for distortion. A crystal with a pedestal was taken from the 2D Game Kit.
Source: https://habr.com/ru/post/427357/
All Articles