History of one development
Although my last publication was noticed by a number of people, nevertheless it received the stamp of “Translation”. That without a doubt makes all my recommendations noted there plagiarized. After all, there is no consensus on code maintenance.
Therefore, this time, I decided to tell you my story about how I carried out an order to develop a page for an online store.
Perhaps you say that this is a rather hackneyed topic. However, not all so simple. If the customers themselves usually put difficulties into the work, then I decided to look for bumps myself. The fact is that I have long since moved away from the development of simple websites, pages and all kinds of CMS in favor of Single Page Application. The proposal to finalize a number of elements on the page, which was part of the already finished site and had a number of taboos in the approach to development, did not inspire me much interest. I note that the task itself is not difficult. The bottom line was to display the goods in the appropriate form and with its internal logic. Also, an important condition was: easy editing of the content by the customer. Since the site itself is not designed as a SPA, I can’t do it by means of my favorite, Angular ... or not? Yes, I could not connect fraemwork to the site myself, but I could make a bundle file with all the conditions necessary for me to complete the task.
I must say at once that of course there are ways that are much simpler and more correct, but in this case, I would not take up this job. I was moved by interest, in theory I knew that it would work. I read about a certain CodeMix, a component that comes with Angular version 6 and higher. Meet Angular Elements. In a nutshell, they convert components to HTML elements (+ JavaScript), allowing us to use our components in other applications, different fraemworks (same, React) or even a simple HTML + JavaScript page!
')
I will not describe the custom version of the work and as an example I will give a simple panel component that will display the title and the content under it. We will also place, within the header, a checkbox to control the display of the message content. Then we will continue to use this panel on a simple HTML page. Thereby solving the problem.
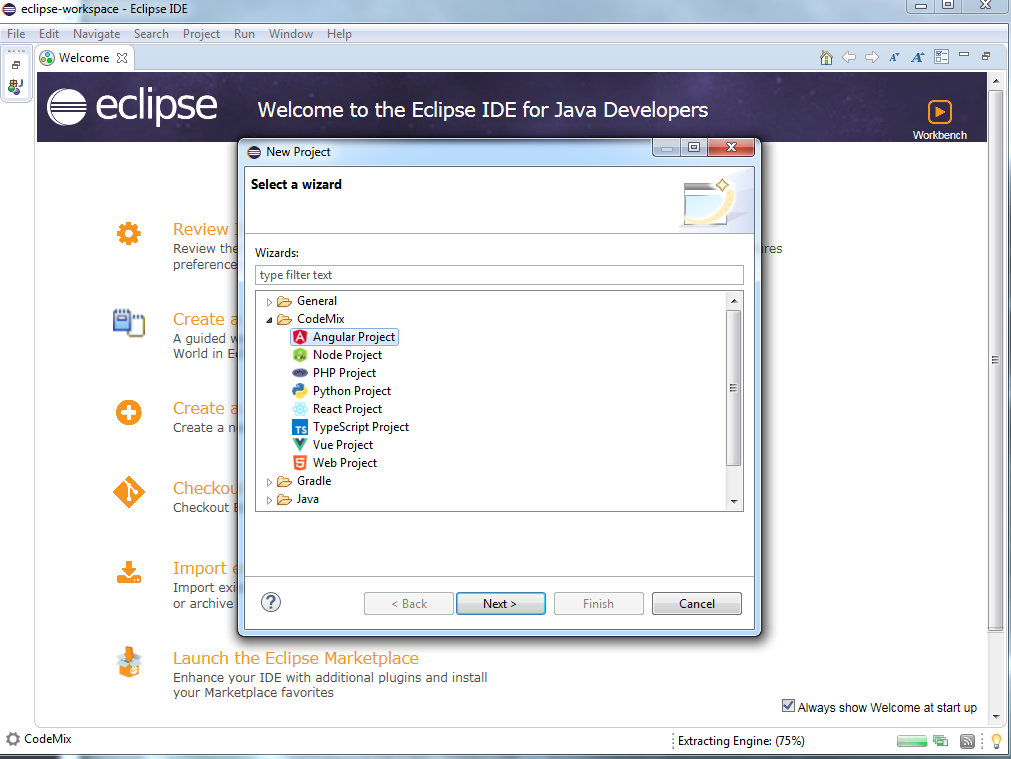
File> Create> Project> CodeMix> Angular Project
Next in the terminal for the project ( Ctrl + Shift + P )

Enter: Terminal: Create New Integrated Terminal
The terminal will automatically open in the project folder. In it we enter npm install , ng serve . After, calmly go to the page: localhost: 4200. Next, we need to use the Angular element and poly-fills modules for browser compatibility, since they are not supported properly in Microsoft browsers.
Using the simple capabilities of the Angular CLI, we write the following:
Our component is ready, it remains to put it in order.
HTML :
TypeScript :
I’ll not go into the details of CSS; for this example, I just set the background color for the main blocks.
We check our component in that it works and continue.
//app.module.ts.
In the above code, we stopped Angular from automatically loading the application. We achieved this by removing the bootstrap property in the decorator parameter object and overwriting the ngDoBootstrap method in the AppModule class. We also add the CodemixExampleComponent component to the entryComponents array to instruct Angular to create the component, even if it is not part of the template. Then, in ngDoBootstrap, the CodemixExampleComponent component is analyzed using the createCustomElement function from the Angular Elements module. Now we can use the element in the HTML file in our project.
For example, the index.html file can be rewritten as follows:
Now that we can use the element in the HTML document in our project, the next step is to create a bundle file for use as a page dependency.
For this we need the concat module:
It remains to create a build script in the root of the project folder.
// build.js:
The final touch, run the command, or add it to package.json to the scripts object:
As a result, we got the coveted bundle.js. A file that can now be used anywhere. Copy this file to another location and create a simple HTML file in the same folder.
If anyone is interested in the output, I got the following:

And here is the simplest index.html
As you can see, we simply used the Angular component in a simple HTML file. Yes, it's great that even in such tasks Angular is able to declare itself. We are able to use our component developed on Angular, in React, Vue, etc., isn’t it cool? But, as I said at the beginning, this is not the only and definitely not the best option in the task that I solved. I did it only because I was interested in doing so. It is important to know that this method is not fully supported by most browsers. It also forces us to work with a file that is rather large to work with just one element. For example, my turned out to be 234KB.
Therefore, this time, I decided to tell you my story about how I carried out an order to develop a page for an online store.
Perhaps you say that this is a rather hackneyed topic. However, not all so simple. If the customers themselves usually put difficulties into the work, then I decided to look for bumps myself. The fact is that I have long since moved away from the development of simple websites, pages and all kinds of CMS in favor of Single Page Application. The proposal to finalize a number of elements on the page, which was part of the already finished site and had a number of taboos in the approach to development, did not inspire me much interest. I note that the task itself is not difficult. The bottom line was to display the goods in the appropriate form and with its internal logic. Also, an important condition was: easy editing of the content by the customer. Since the site itself is not designed as a SPA, I can’t do it by means of my favorite, Angular ... or not? Yes, I could not connect fraemwork to the site myself, but I could make a bundle file with all the conditions necessary for me to complete the task.
I must say at once that of course there are ways that are much simpler and more correct, but in this case, I would not take up this job. I was moved by interest, in theory I knew that it would work. I read about a certain CodeMix, a component that comes with Angular version 6 and higher. Meet Angular Elements. In a nutshell, they convert components to HTML elements (+ JavaScript), allowing us to use our components in other applications, different fraemworks (same, React) or even a simple HTML + JavaScript page!
')
I will not describe the custom version of the work and as an example I will give a simple panel component that will display the title and the content under it. We will also place, within the header, a checkbox to control the display of the message content. Then we will continue to use this panel on a simple HTML page. Thereby solving the problem.
According to the recipe we need:
- Node.js,
- Package Manager Nodes (npm),
- Angular CLI (> 6.0.0),
- CodeMix
In Eclipse, create a new project.
File> Create> Project> CodeMix> Angular Project
Next in the terminal for the project ( Ctrl + Shift + P )
Enter: Terminal: Create New Integrated Terminal
The terminal will automatically open in the project folder. In it we enter npm install , ng serve . After, calmly go to the page: localhost: 4200. Next, we need to use the Angular element and poly-fills modules for browser compatibility, since they are not supported properly in Microsoft browsers.
npm install @angular/elements @webcomponents/custom-elements Create a component
Using the simple capabilities of the Angular CLI, we write the following:
ng gc codemix-example Our component is ready, it remains to put it in order.
HTML :
<div class="CodemixExampleComponentClass"> <div class="head"> <span>{{ title }}</span> <input type="checkbox" [checked]="isShow" (change)="changeShow()" /> </div> <div class="body" *ngIf="isShow">{{ content }}</div> </div> TypeScript :
import { Component, Input, ViewEncapsulation } from '@angular/core'; @Component({ selector: 'codemix-example', templateUrl: './codemix-example.component.html', styleUrls: ['./codemix-example.component.css'], encapsulation: ViewEncapsulation.Native }) export class CodemixExampleComponent { public isShow: boolean; constructor() { } @Input() public content; @Input() public title; public changeShow(): void { this.isShow = !this.isShow; } } I’ll not go into the details of CSS; for this example, I just set the background color for the main blocks.
We check our component in that it works and continue.
//app.module.ts.
import { BrowserModule } from '@angular/platform-browser'; import { NgModule, Injector } from '@angular/core'; import { createCustomElement } from '@angular/elements'; import { CodemixExampleComponent } from './codemix-example/codemix-example.component'; import { AppComponent } from './app.component'; @NgModule({ declarations: [ AppComponent, CodemixExampleComponent ], entryComponents: [CodemixExampleComponent], imports: [ BrowserModule ], providers: [] }) export class AppModule { constructor(private injector: Injector){ } ngDoBootstrap(){ const element = createCustomElement( CodemixExampleComponent, { injector: this.injector } ); customElements.define('codemix-example', element) } } In the above code, we stopped Angular from automatically loading the application. We achieved this by removing the bootstrap property in the decorator parameter object and overwriting the ngDoBootstrap method in the AppModule class. We also add the CodemixExampleComponent component to the entryComponents array to instruct Angular to create the component, even if it is not part of the template. Then, in ngDoBootstrap, the CodemixExampleComponent component is analyzed using the createCustomElement function from the Angular Elements module. Now we can use the element in the HTML file in our project.
For example, the index.html file can be rewritten as follows:
<!doctype html> ... <body> <div style="width: 50vw; margin: auto;"> <codemix-example title="Title text" content="Content text Content text Content text Content text Content text Content text Content text Content text Content text Content text"> </codemix-example> </div> </body> ... Getting bundle file
Now that we can use the element in the HTML document in our project, the next step is to create a bundle file for use as a page dependency.
For this we need the concat module:
npm install concat --save-dev It remains to create a build script in the root of the project folder.
// build.js:
const concat = require('concat'); const files = [ 'node_modules/@webcomponents/custom-elements/src/native-shim.js', './dist/angulartest/runtime.js', './dist/angulartest/polyfills.js', './dist/angulartest/main.js' ]; const outputFile = './dist/bundle.js'; concat(files, outputFile); The final touch, run the command, or add it to package.json to the scripts object:
ng build --prod --output-hashing = none && node build-script.js As a result, we got the coveted bundle.js. A file that can now be used anywhere. Copy this file to another location and create a simple HTML file in the same folder.
If anyone is interested in the output, I got the following:
And here is the simplest index.html
<!doctype html> <html lang="en"> <head> <meta charset="utf-8"> <title>Angulartest</title> </head> <body> <div style="width: 50vw; margin: auto;"> <codemix-example title="Title text" content="Content text Content text Content text Content text Content text Content text Content text Content text Content text Content text"> </codemix-example> </div> <script type="text/javascript" src="bundle.js"></script> </body> </html> Conclusion
As you can see, we simply used the Angular component in a simple HTML file. Yes, it's great that even in such tasks Angular is able to declare itself. We are able to use our component developed on Angular, in React, Vue, etc., isn’t it cool? But, as I said at the beginning, this is not the only and definitely not the best option in the task that I solved. I did it only because I was interested in doing so. It is important to know that this method is not fully supported by most browsers. It also forces us to work with a file that is rather large to work with just one element. For example, my turned out to be 234KB.
Source: https://habr.com/ru/post/427075/
All Articles