Automation with Codeception + Gherkin + PageObject for the smallest

Not finding a single concrete example of the Gherkin implementation with the Page Object design pattern for Codeception on the Internet , I thought that it would not be superfluous to tell the Internet about its own implementation of this pattern.
This article is intended more for those who are already a little familiar with Codeception or similar frameworks, but do not yet know how using Page Object to make tests more readable, simplify their support and reduce the amount of excess code. Nevertheless, I tried to step by step explain all the main points of the assembly of the automation project from scratch.
The Page Object template allows you to encapsulate work with page elements, which in turn allows you to reduce the amount of code and simplify its support. All changes to the UI are easily and quickly implemented - just update the Page Object class that describes this page. Another important advantage of this architectural approach is that it allows you not to clutter up the HTML test script with details, which makes it more understandable and easy to read.
This is what a test looks like without using Page Object.
')
Using Page Object
I will not dwell on the installation of the base environment in detail; I will give my initial data:
- Ubuntu bionic beaver
- PHP 7.1.19-1
- Composer - dependency manager for PHP, installed globally
- PhpStorm - development environment
To run the tests, we also need:
- hromedriver 2.41 (by the link you can not only download, but also see which driver corresponds to your chrome version)
- Chrome 67.0.3396.99
- Selenium-server-standalone-3.14.0 (article about installing selenium on ubuntu)
Expand Codeception
Getting down to installing Codeception:
Open in the terminal the directory we need where we will build the project, or create a directory for the project and go to it:
mkdir ProjectTutorial cd ProjectTutorial Install the Codeception framework and its dependencies:
composer require codeception/codeception --dev 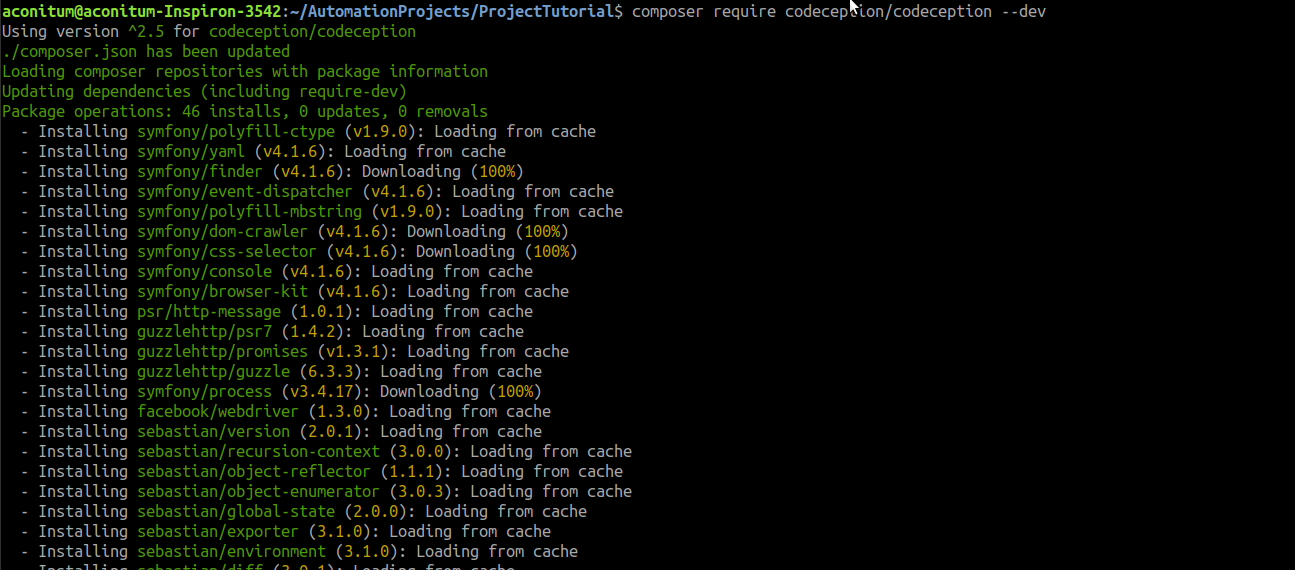
The installation installation file composer.json in the project will look like this:
{ "require": { "php": ">=5.6.0 <8.0", "facebook/webdriver": ">=1.1.3 <2.0", "behat/gherkin": "^4.4.0", "codeception/phpunit-wrapper": "^6.0.9|^7.0.6" }, "require-dev": { "codeception/codeception": "^2.5", "codeception/base": "^2.5" } } We develop the project:
php vendor/bin/codecept bootstrap 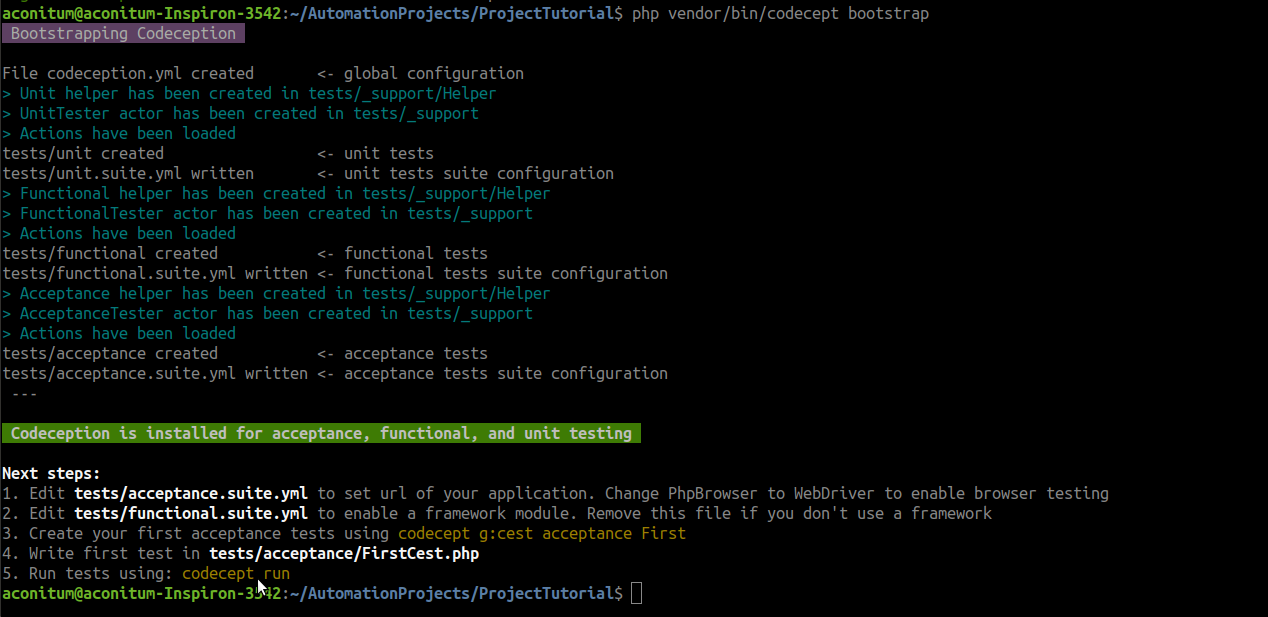
More information about how to install the project can be obtained in the official documentation .
At this stage in our project are three sets of (suite) tests. By default, Codeception separates them into acceptance, functional, and unit. To these sets, Codeception also generates three yml files. In them we specify all the necessary configurations , we connect the modules and properties to run our tests.
This lesson is built on the example of the Acceptance test, so I will bring the settings to Acceptance.suite.yml.
Open our project in PHP Storm (or another favorite development environment) and go to Acceptance.suite.yml (by default it lies in the tests / acceptance.suite.yml folder).
We prescribe the minimum necessary dependencies and be sure to pay attention to formatting. The modules are separated by a "-" sign and must be located on the same level, otherwise errors will sprinkle when the test is started.
It turns out:
actor: AcceptanceTester modules: enabled: - WebDriver: url: 'http://yandex.ru/' // , browser: 'chrome' - \Helper\Acceptance // gherkin: contexts: default: - AcceptanceTester And a little more preparatory work:
Create a separate directory in the project root (I have lib).
In this directory, create an executable file run.sh, which will run Selenium and Chrome Driver.
We put Selenium and Chrome Driver here, and write the run command to run.sh:
java -jar -Dwebdriver.chrome.driver=chromedriver_241 selenium-server-standalone-3.14.0.jar How it looks in the project:

We return to the console and change access rights:
chmod +x ./run.sh (note. The names of the drivers in the directory must exactly match those specified in the startup command).
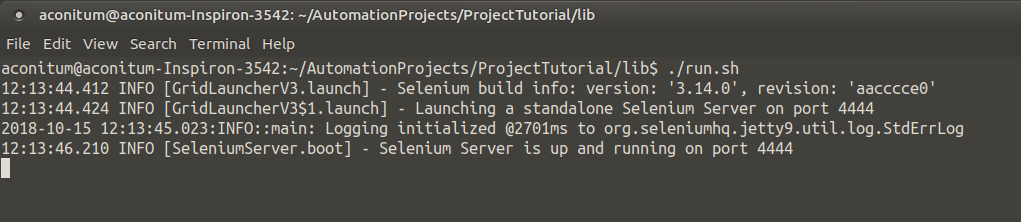
You can start Selenium and Webdriver right now so that you don’t have to return to it. To do this, open a new tab of the terminal, go to the directory where the file run.sh lies and write the start command:
~/AutomationProjects/ProjectTutorial/lib$ ./run.sh Make sure that the server is running:
Leave it in disrepair. This preparatory work is completed.
Writing a test script
Moving on to creating a feature file for our test script. For this, a special command is provided to Codeception, run it in the console:
cept g:feature acceptance check (note “check” - the name of my test)
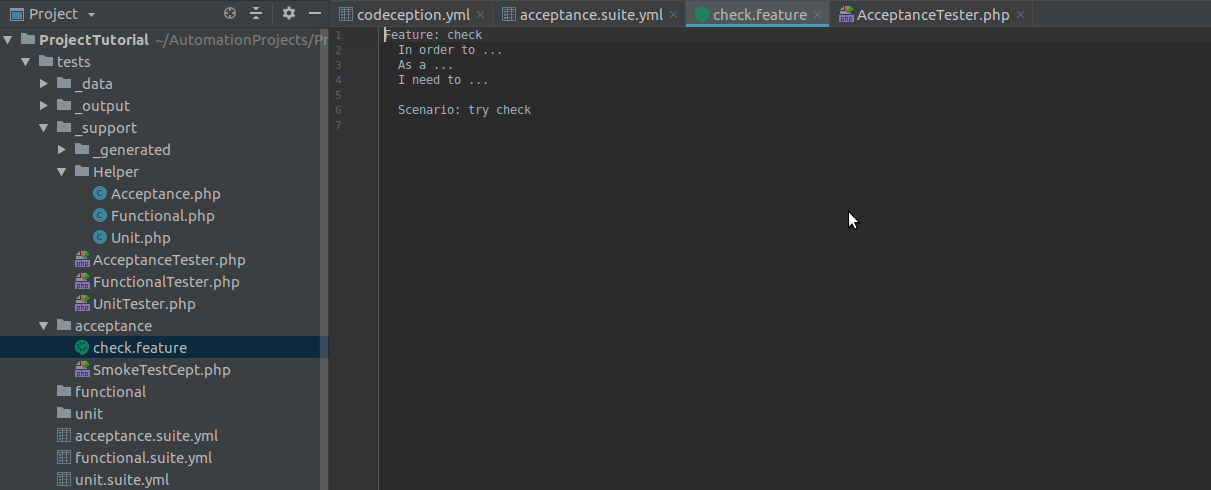
We see in the acceptance folder a new check.feature file.
We do not need the default content, immediately delete and write our test.
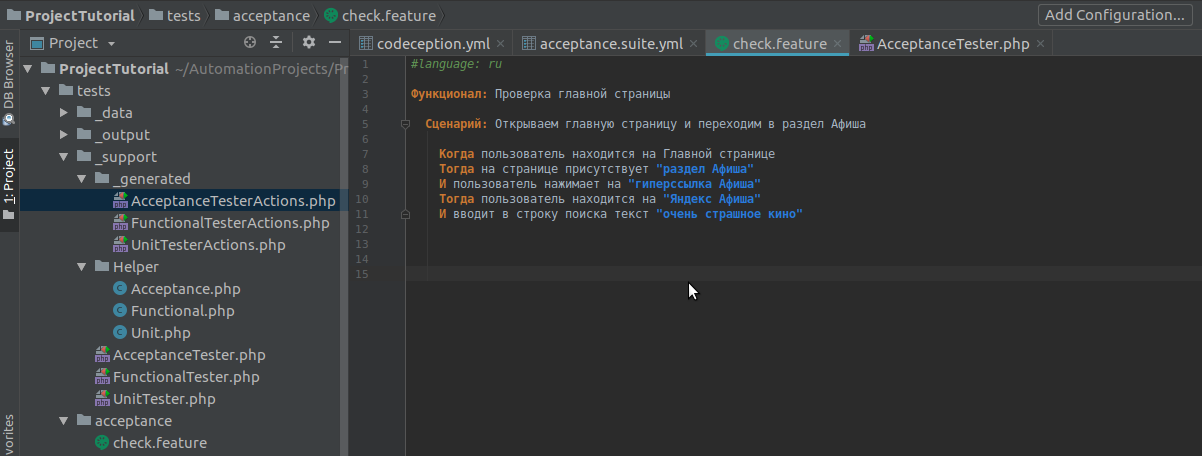
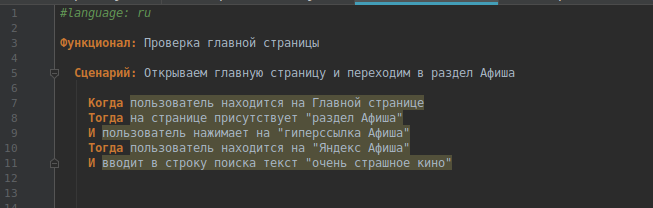
In order for the collector to recognize the Cyrillic alphabet, do not forget to start the script with #language: ru.
We write a short script in Russian. I remind you that each sentence must begin with the key words: “When”, “Then”, “And”, the symbol “*”, etc.
For my example, I took the site Yandex, you can take any.
To see what steps there are in the test, we run our script in the terminal:
cept dry-run acceptance check.feature 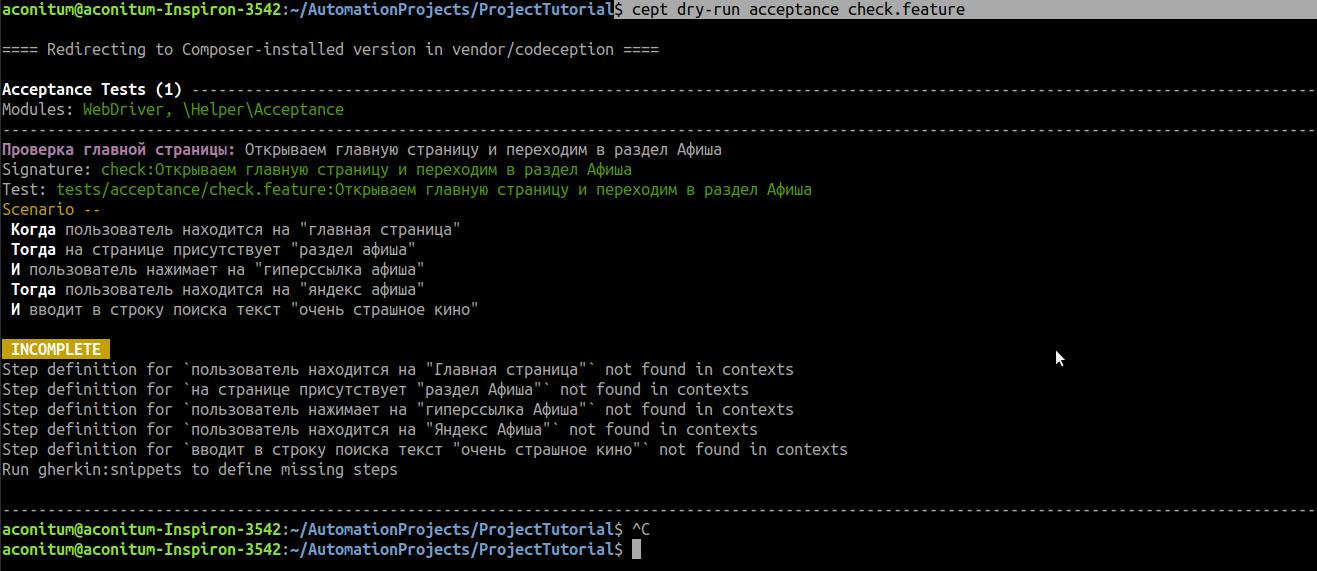
The script steps are output to the console, but they are not yet implemented.
Then we run a command that automatically generates templates for implementing our methods:
cept gherkin:snippets acceptance 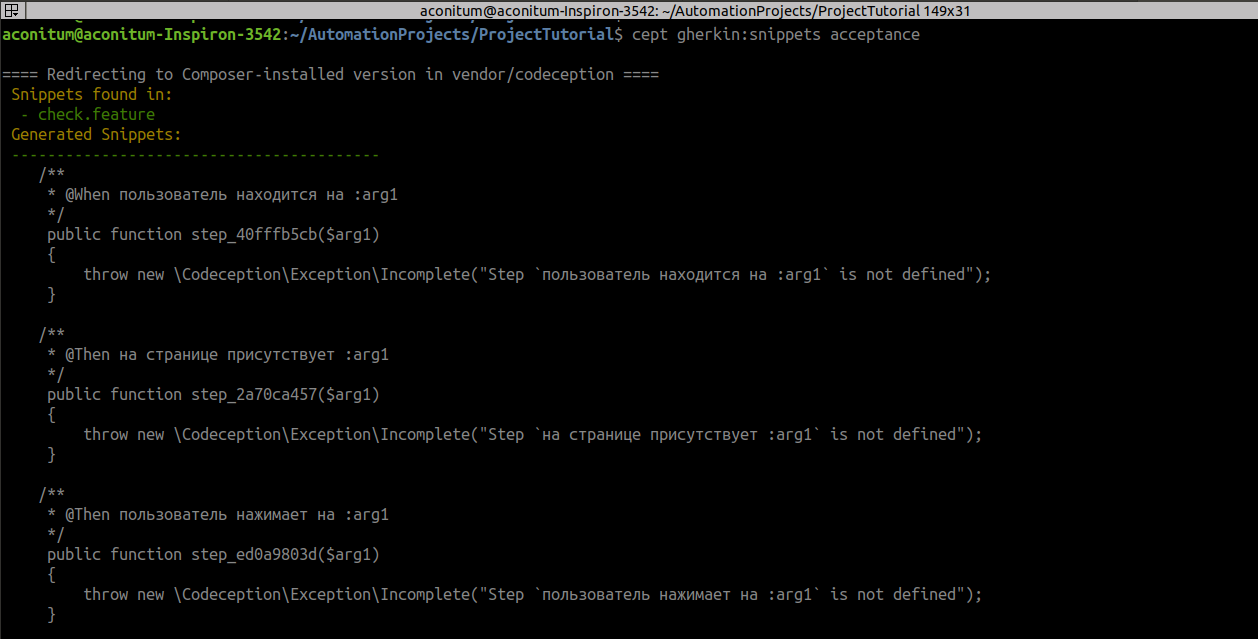
All names from the script that were in quotes are replaced with variables: arg.
We copy them from the terminal and paste into the AcceptanceTester.php file, where the methods of working with page elements will lie.
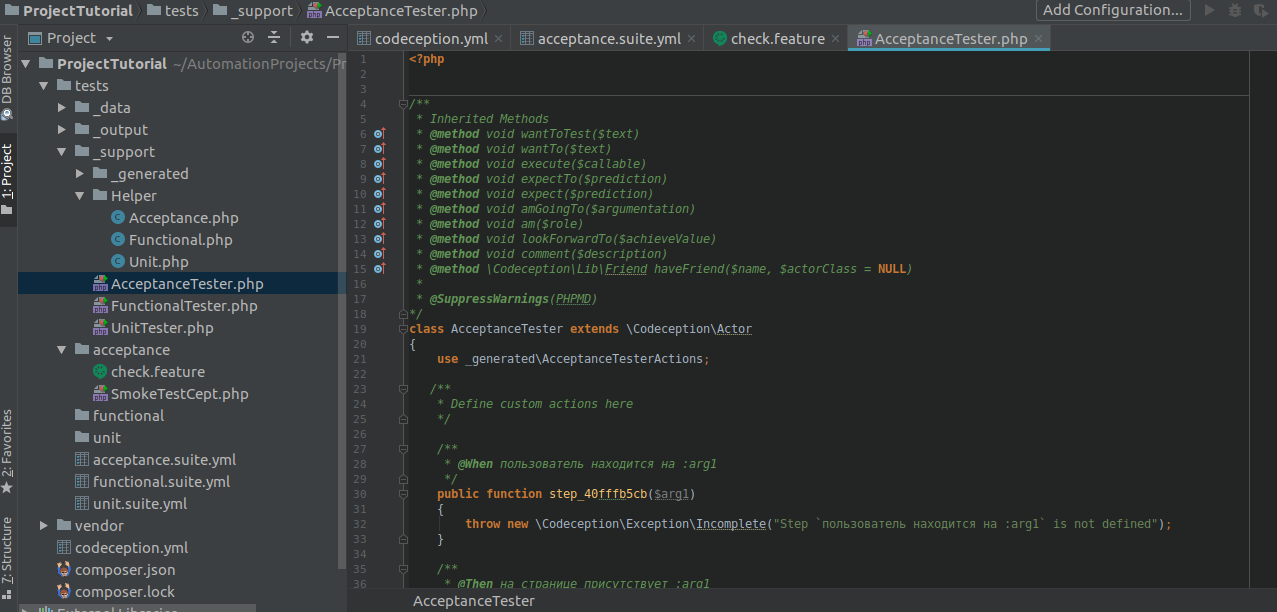
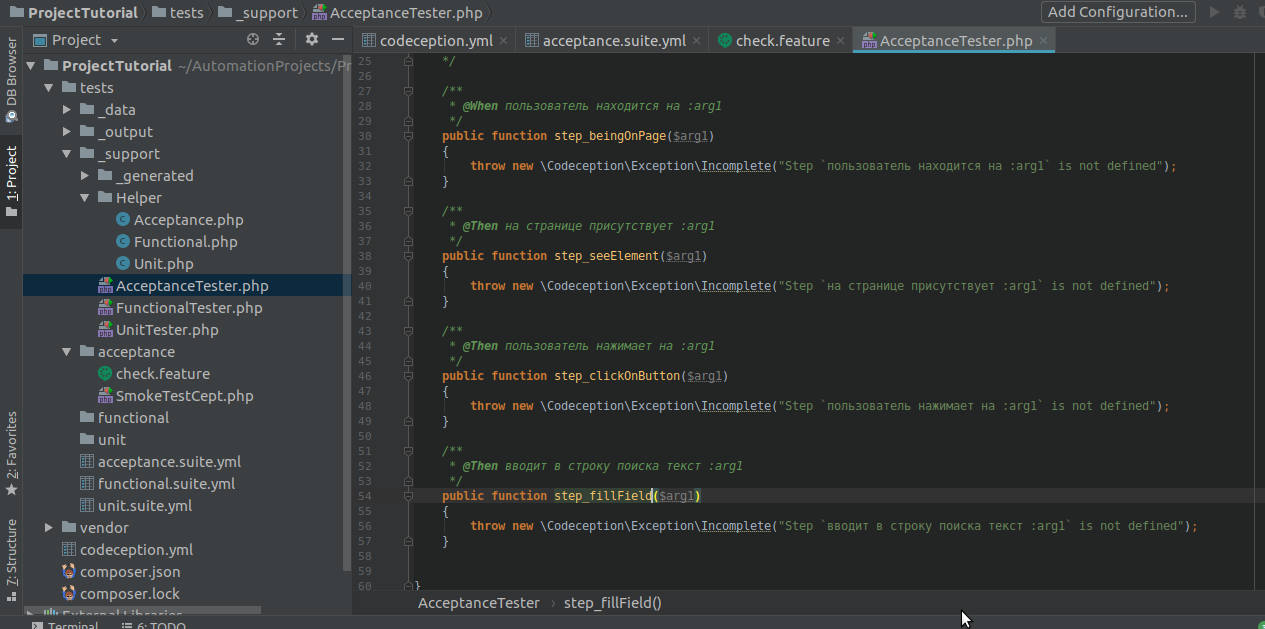
Rename the methods to readable, reflecting their essence (optional), and write their implementation.
Everything is simple, but even easier if you work in a smart development environment, such as Storm, which itself will prompt the necessary commands from the library:
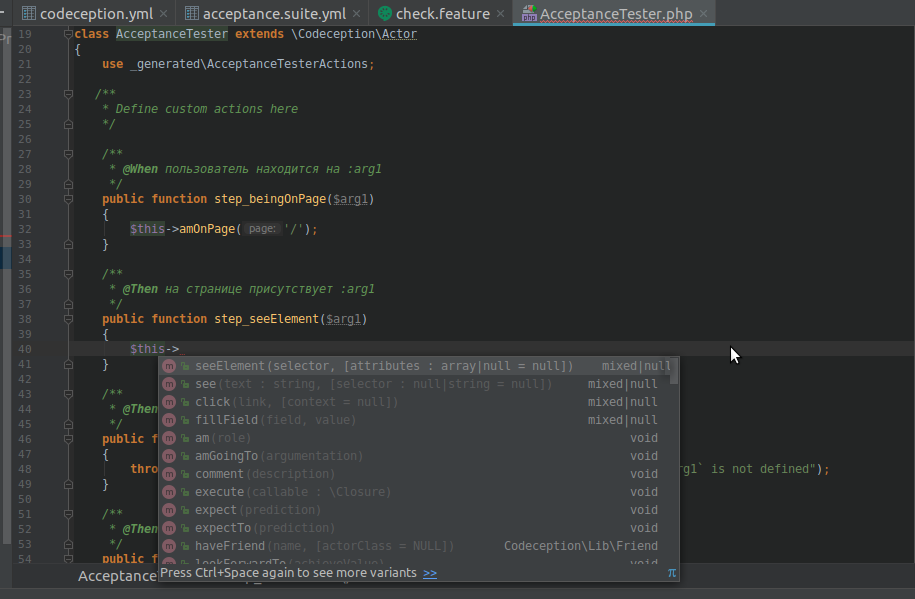
Delete the excess and write the methods:
/** * @When */ public function step_beingOnMainPage($page) { $this->amOnPage('/'); } /** * @Then :element */ public function step_seeElement($element) { this->seeElement($element); } /** * @Then :button */ public function step_clickOnButton($button) { $this->click($button); } /** * @Then :field :text */ public function step_fillField($field, $text) { $this->fillField($field, $text); } Let's see what happened. Run the command that will show us which methods (step) we now have implementation.
cept gherkin:steps acceptance 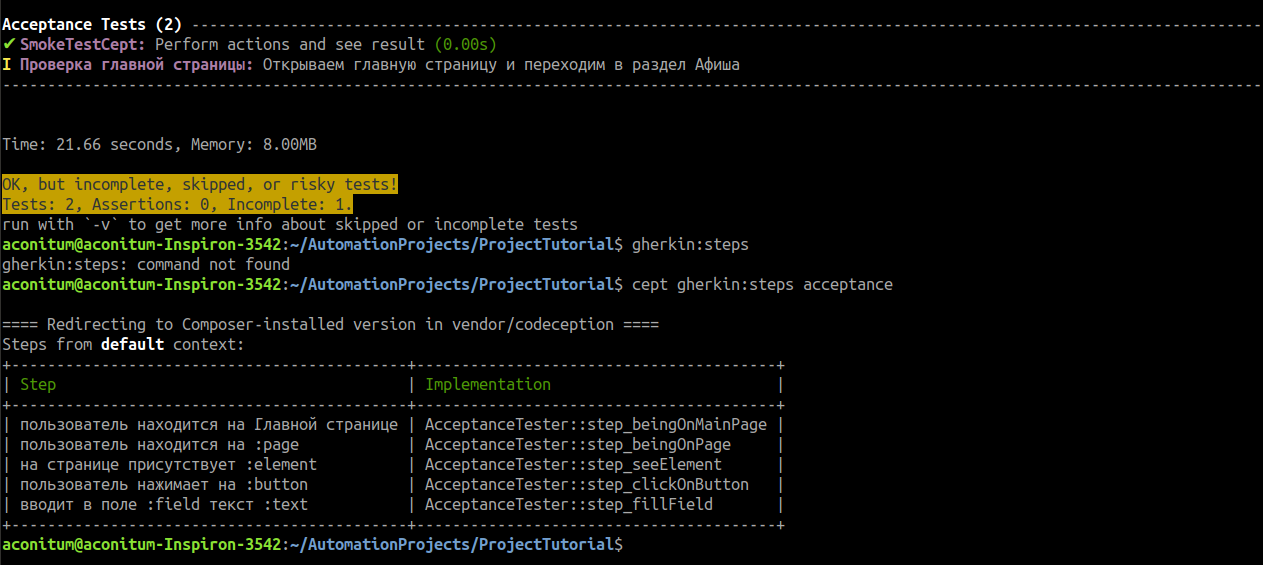
Success!
But the steps in the feature file are still not recognized as methods.
To Storm understand what to do with the steppes, let's check the trick with the implementation of the Context interface from the namespace Gherkin Context.
namespace Behat\Behat\Context { interface Context {} } Wrap our AcceptanceTester class in a namespace and inherit from Context.
implements \Behat\Behat\Context\Context 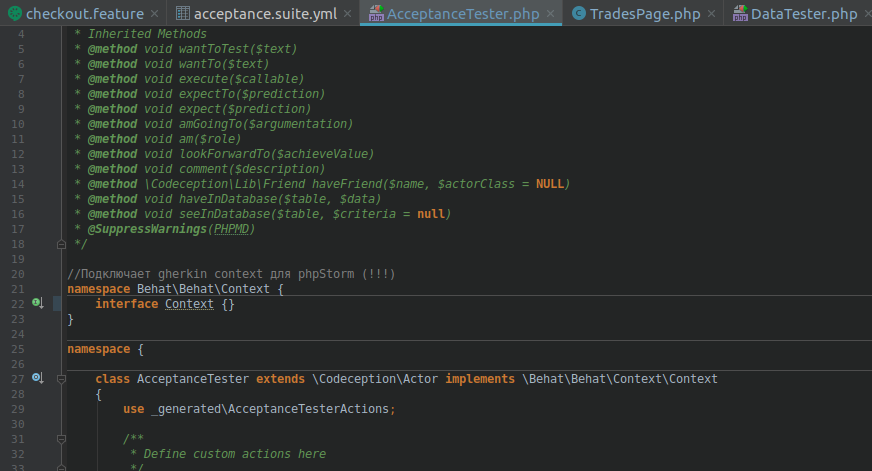
Now all the steps of the feature file are tied to their implementation:
In order for Webdriver to understand what to click and where to look, you need to replace the readable names of the elements and the addresses of the pages with the corresponding locators and URLs, which in the form of arguments will fall into the methods.
Then we get a test of the form:

And you can run:
cept run acceptance 
Passed.
approx. If page elements take a long time to load, you can add a wait to the desired method:
$this->waitForElementVisible($element); We return to our test script. We are upset that all the readability of the test is lost due to the fact that instead of clear names of elements and pages we see HTML elements and url.
If we want to fix this, it's time to move on to implementing the Page Object pattern.
Go to Page Object
In the _support directory we create the Page directory where we will add our class pages:
php vendor/bin/codecept generate:pageobject MainPage The first Page Object is the Yandex main page, let's call it MainPage, let's call the class the same:
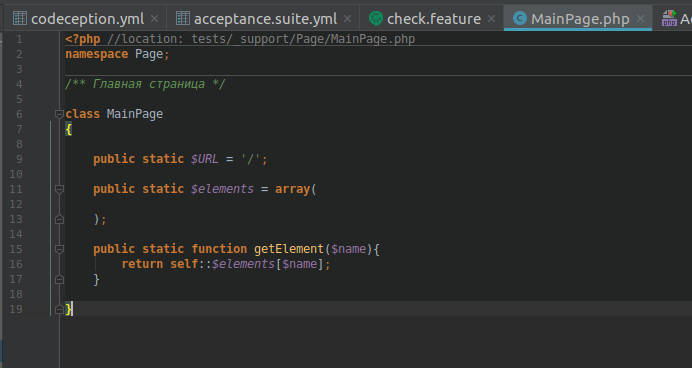
Here we declare static fields and methods so that they can be called without creating an object.
Since in the configurations of Acceptance.suite.yml we have already indicated the starting page url: yandex.ru , then for the main page it will be sufficient to specify
public static $URL = '/'; Next comes the array of page elements. We describe locators for several elements and give them clear and unique names.
Now you need to add the getElement method, which will return the locator by the name of the element from the array.
As a result, we have:
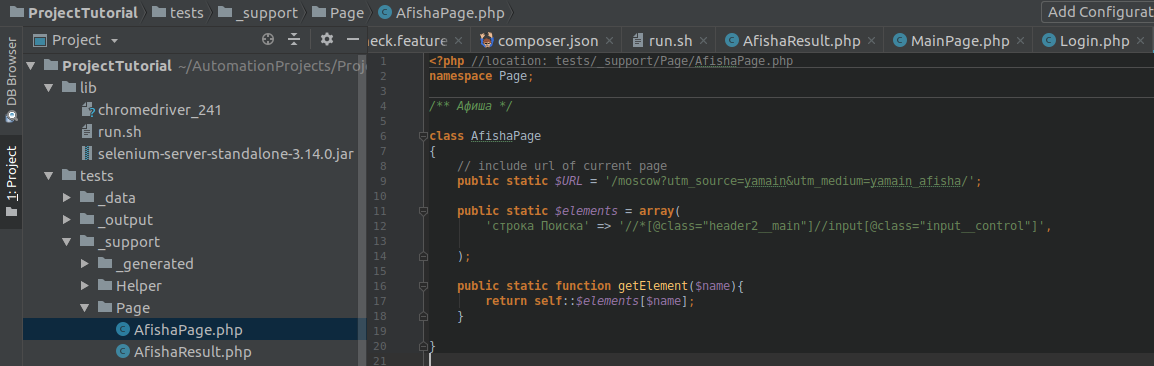
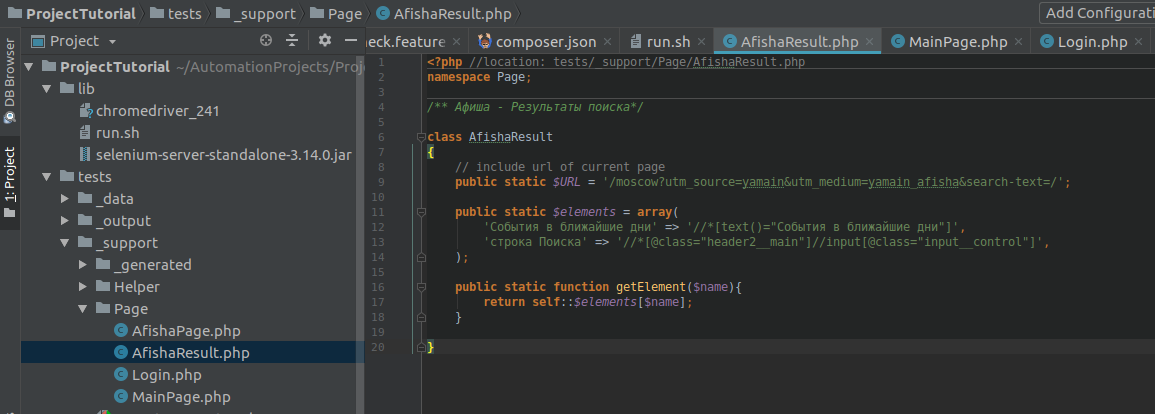
<?php //location: tests/_support/Page/MainPage.php namespace Page; /** */ class MainPage { public static $URL = '/'; public static $elements = array( ' ' => "//*[@id='wd-wrapper-_afisha']", ' ' => "//*[@data-statlog='afisha.title.link']", ' ' => "//*[@class='weather__icon weather__icon_ovc']|//*[@class='weather__icon weather__icon_skc_d']", ); public static function getElement($name){ return self::$elements[$name]; } } Add a couple of classes of pages:
/ ** Poster * /
/ ** Poster - Search results * /
We return to the AcceptanceTester.php class, where we wrote our methods.
Create an array of PageObject classes in it, where we assign names to pages and specify their class names in the namespace:
private $pages = array( " " => "\Page\MainPage", "" => "\Page\AfishaPage", " - " => "\Page\AfishaResult" ); Each new PageObject is similarly added to this array.
Next, we need to create the currentPage field in which the link to the PageObject of the current page will be stored:
private $currentPage; Now we will write a method, by calling which we will be able to get the currentPage and initialize the PageObject class we need.
It is logical to make a step like this “When the user navigates to the page title page.” Then the easiest way to initialize the PageObject class, without checks, will look like this:
/** * @When :page */ public function step_beingOn($page) { // pageObject $this->currentPage = $this->pages[$page]; } Now we write the getPageElement method, which will allow us to get an element, or rather, its locator from the current page:
private function getPageElement($elementName) { // $curPage = $this->currentPage; return $curPage::getElement($elementName); } 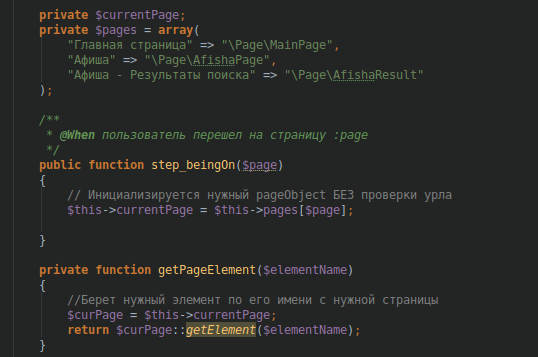
For already implemented methods, it is necessary to replace the arguments, which we initially obtained directly from the text of the feature, with elements from PageObject, that is:
$arg take the form
getPageElement($arg)) Then our methods will take the form:
/** * @When :page */ public function step_beingOnMainPage($page) { // pageObject $this->currentPage = $this->pages[$page]; $curPage = $this->currentPage; $this->amOnPage($curPage::$URL); } /** * @Then :element */ public function step_seeElement($element) { $this->waitForElementVisible($this->getPageElement($element)); $this->seeElement($this->getPageElement($element)); } /** * @Then :button */ public function step_clickOnButton($button) { $this->click($this->getPageElement($button)); } /** * @Then :field :text */ public function step_fillField($field, $text) { $this->fillField($this->getPageElement($field), $text); } /** * @Then :field */ public function step_deleteText($field) { $this->clearField($this->getPageElement($field)); } Added another method to display the search results by pressing the Enter key:
/** * @Then ENTER */ public function step_keyboardButton() { $this->pressKey('//input',WebDriverKeys::ENTER); } The last step is when all the necessary methods and PageObjects are described, you need to refactor the test itself. Add steps that will initialize PageObject when moving to a new page. We have this “* user navigated to page: page”.
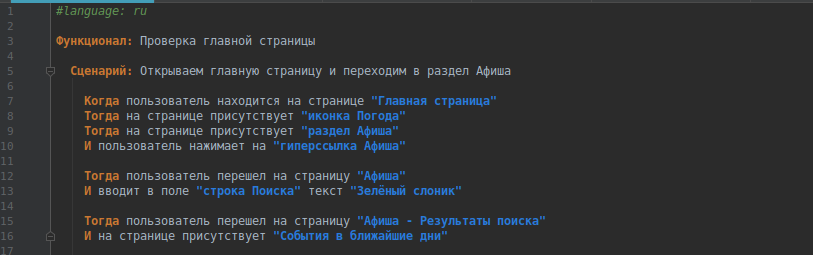
For clarity, I will add a few more steps. The result is the following test:
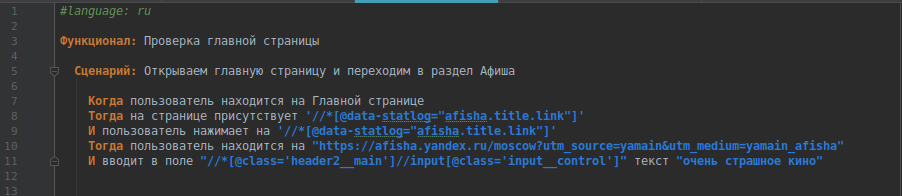
#language: ru : : . . . " " " " " " " " "" " " " " ENTER " - " " " " " " " "" ENTER Such a test script is understandable and readable to any outsider.
Run!
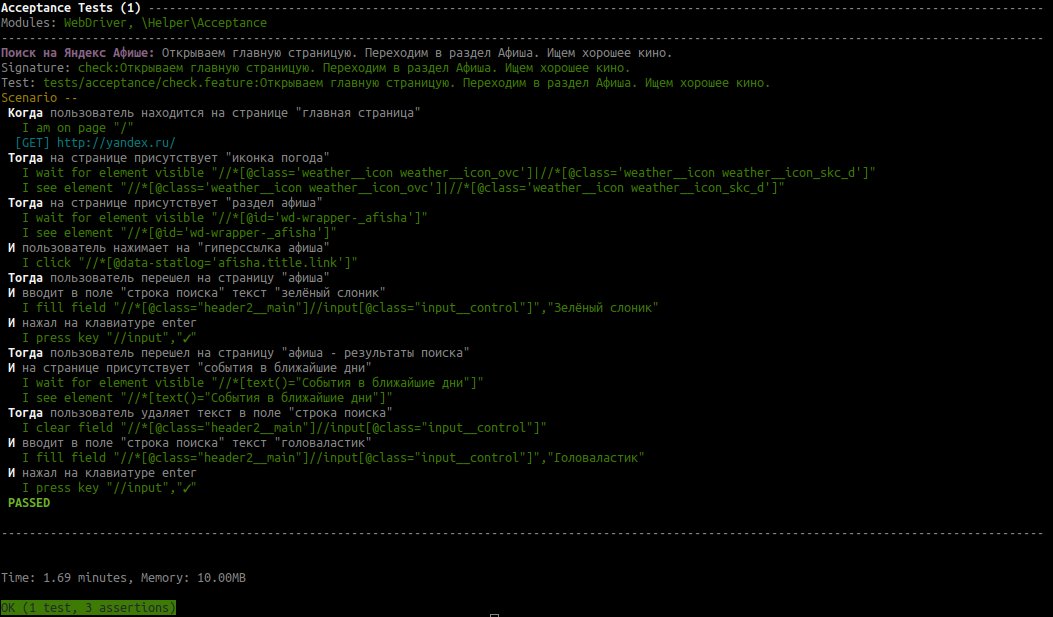
To view a more detailed result of the run, you can use the command
cept run acceptance --debug See the result:
Thus, using the Page Object pattern allows you to separate all page elements from test scripts and store them in a separate directory.
The project itself can be found at https://github.com/Remneva/ProjectTutorial
As a novice automator, I would be grateful if you share your ideas and, perhaps, tell me how logical it is to transform and simplify the structure of the project.
Source: https://habr.com/ru/post/427031/
All Articles