Unity Hexagon Maps: Path Search, Player Squads, Animation
Parts 1-3: mesh, cell colors and heights
Parts 4-7: bumps, rivers and roads
Parts 8-11: water, landforms and walls
')
Parts 12-15: saving and loading, textures, distances
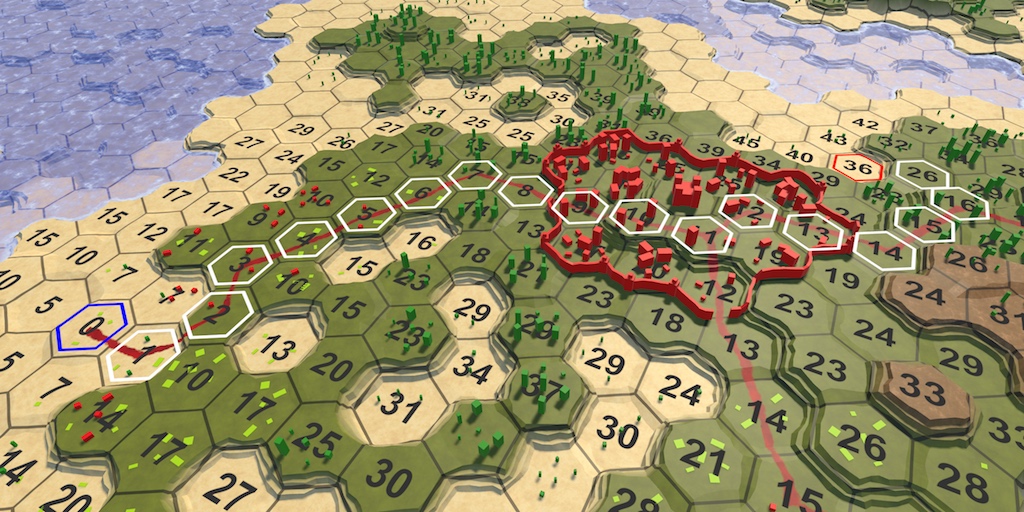
Parts 16-19: Pathfinding, Player Squads, Animations
Parts 20-23: fog of war, map exploration, procedural generation
Parts 24-27: water cycle, erosion, biomes, cylindrical map
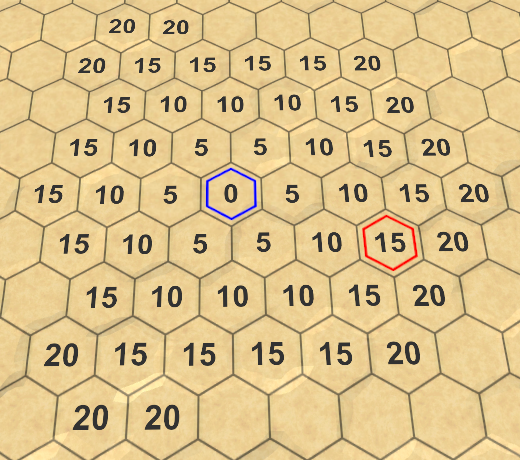
Calculating the distance between the cells, we went to finding the paths between them.
Starting from this part, tutorials on hexagon maps will be created in Unity 5.6.0. It should be noted that in 5.6 there is a bug destroying texture arrays in assemblies for several platforms. You can bypass it by turning on the Is Readable in the texture array inspector.
Planning a trip
To search for a path between two cells, we need to first select these cells. It is no longer just a choice of a single cell and the observation of the search on the map. For example, first we select the starting cell, and then the final one. It would be convenient for them to become illuminated. So let's add this functionality. As long as we do not create a complex or effective method of selection, simply create something that helps us in our development.
One of the easiest ways to select cells is to add an outline to them. The easiest way to do this is with a texture containing a hexagonal outline. Here you can download this texture. It is transparent, except for the white contour of the hexagon. By making it white, we will be able to paint it in the future as we need.
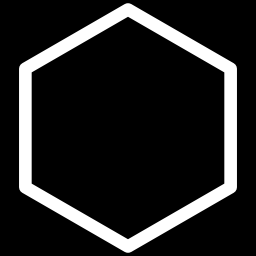
The contour of the cell on a black background
Import the texture and set its Texture Type to the Sprite value. Her Sprite Mode will be Single with the default settings. Since this is an exceptionally white texture, we do not need to convert to sRGB . The alpha channel stands for transparency, so we turn on Alpha is Transparency . I also set the Filter Mode textures to Trilinear , because otherwise the mip transitions for the contours may become too noticeable.
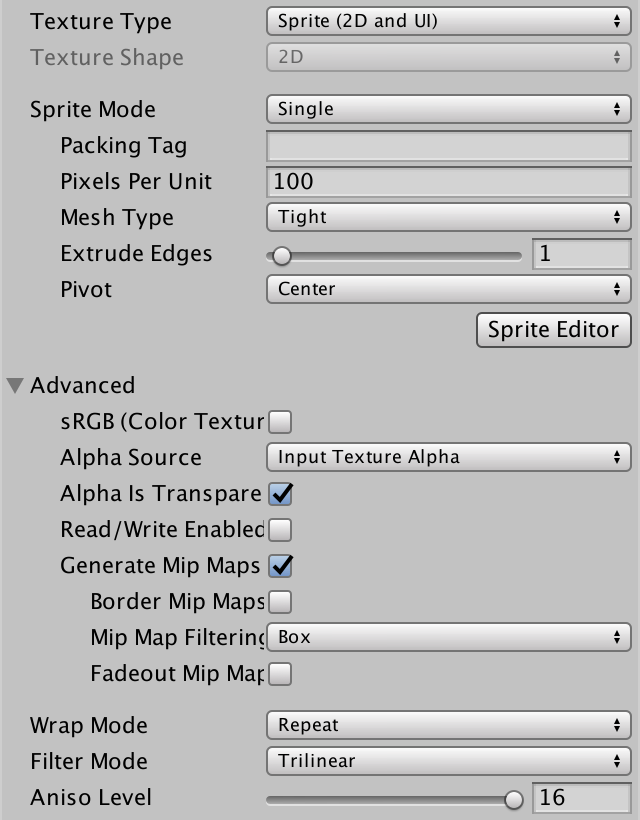
Texture Import Options
The quickest way to add to the cells is a possible contour, adding each one its own sprite. Let's create a new game object, add the Image component ( Component / UI / Image ) to it and assign it our sprite contour. Then we insert an instance of the Hex Cell Label prefab into the scene, make the sprite object its child, apply the changes to the prefab, and then get rid of the prefab.
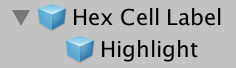
Child element prefab selection
Now each cell has a sprite, but it will be too big. To make the contours correspond to the centers of the cells, change the Width and Height of the transform component of the sprite to 17.
Selection sprites partially hidden by relief
Since the contour overlaps the areas of the edges of the cells, it often falls under the geometry of the relief. Because of this, part of the contour disappears. This can be avoided by slightly raising the sprites vertically, but not in the case of cliffs. Instead, we can do the following: always draw sprites on top of everything else. To do this, create your own sprite shader. It will be enough for us to copy the standard Unity sprite shader and make a couple of changes to it.
The first change is that we ignore the depth buffer, making it so that the Z test always ends in luck.
The second change is that we render after all the rest of the transparent geometry. It will be enough to add 10 to the queue of transparency.
Create a new material that will be used by this shader. We can ignore all its properties, adhering to default values. Then make the sprite prefab use this material.
Use your own sprite material
Now the contours of the selection are always visible. Even if the cell is hidden under a higher terrain, its outline will still be drawn on top of everything else. It may not look beautiful, but the selected cells will always be visible, which is useful for us.
Ignore the depth buffer
We do not want all cells to be highlighted at the same time. In fact, initially they should all be unallocated. We can accomplish this by disabling the Image component of the Highlight prefab object.
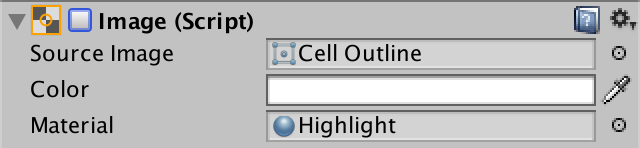
Image component disabled
To enable cell selection, add the
Finally, we can specify the color so that when turned on, it gives the backlight a tint.
unitypackage
Now, when we can select cells, we need to move on and select two cells, and then find a path between them. First we need to select the cells, then limit the search to finding the path between them, and finally show this path.
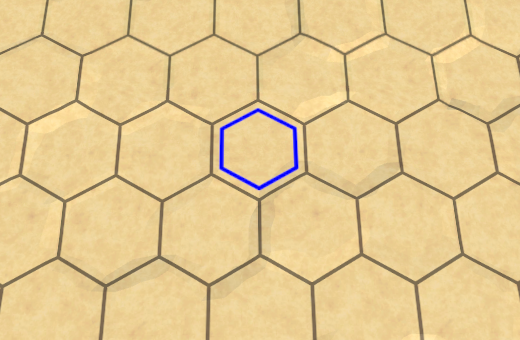
We need to select two different cells, the starting and ending points of the search. Suppose that in order to select the initial search cell, hold down the left Shift key when clicking the mouse. At the same time, the cell will be highlighted in blue. We need to save the link to this cell for further search. In addition, when selecting a new starting cell, the selection of the old one must be disabled. Therefore, add the
Inside
Where to look
Instead of looking for all the distances to the cell, we are now looking for a path between two specific cells. Therefore, rename
Now
Turning to the search, we first need to get rid of all previous selections. Therefore, let the
End points of a potential path
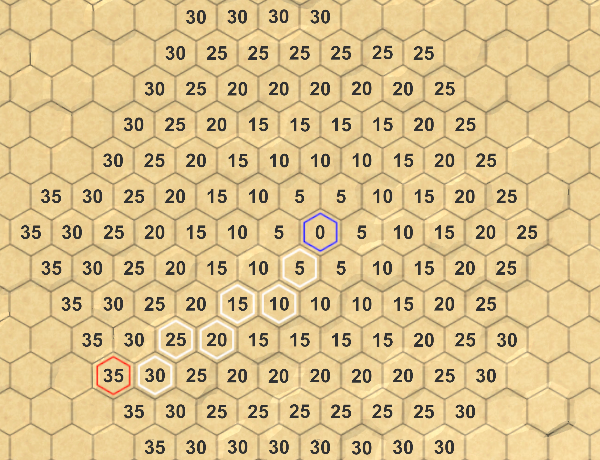
At this stage, our search algorithm still calculates the distances to all the cells that are reachable from the initial cell. But we do not need this anymore. We can stop as soon as we find the final distance to the final cell. That is, when the current cell is finite, we can exit the loop of the algorithm.
Stop at the end point
We can find the distance between the beginning and the end of the path, but do not yet know what the real path will be. To find it, you need to track how each cell is reached. But how to do that?
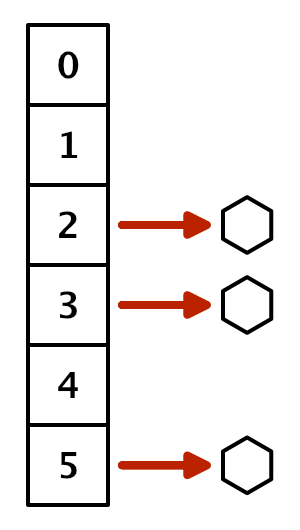
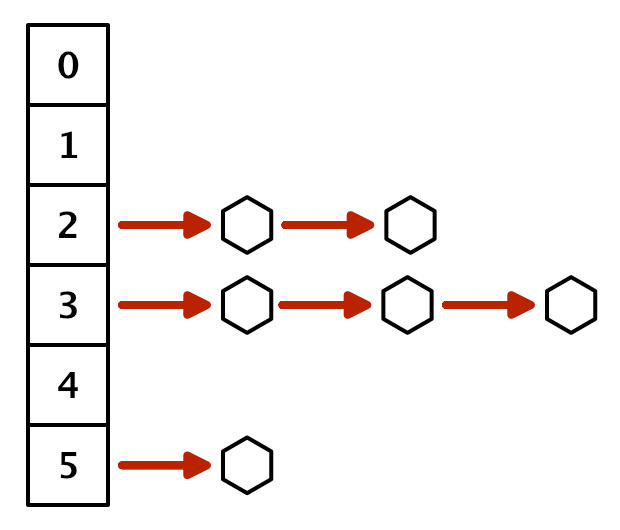
When adding a cell to the border, we do this because it is a neighbor of the current cell. The only exception is the starting cell. All other cells were reached through the current cell. If we keep track of which cell each cell was reached from, we will end up with a network of cells. More specifically, a tree network whose root is the starting point. We can use it to build a path after reaching the end point.

Tree network describing the way to the center
We can save this information by adding a link to another cell in
In
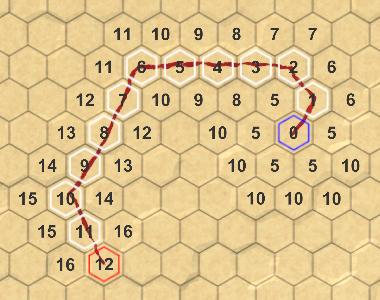
Having reached the end point, we can visualize the path, following these links back to the starting cell, and select them.
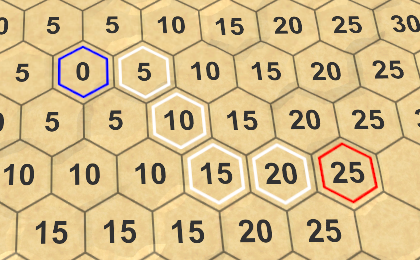
Path found
It is worth considering that there are often several shortest paths. Found depends on the order of processing cells. Some paths may look good, others are bad, but there is never a shorter path. We will come back to this later.
After selecting the starting point, changing the end point will trigger a new search. The same should happen when choosing a new starting cell. To make this possible,
Using this field we can also initiate a new search when selecting a new beginning.
In addition, we need to avoid the equality of the starting and ending points.
unitypackage
Although our algorithm finds the shortest path, it spends a lot of time researching points that obviously will not become part of this path. At least obvious to us. The algorithm can not look at the map "down", he can not see that the search in some directions will be meaningless. He prefers to drive along roads, despite the fact that they are heading in the opposite direction from the end point. Is it possible to make the search smarter?
At the moment, when choosing a cell to be processed next, we consider only the distance from the cell to the beginning. If we want to act smarter, then we must also consider the distance to the end point. Unfortunately, we do not know him yet. But we can create an estimate of the remaining distance. Adding this estimate to the distance to the cell gives us an understanding of the total length of the path that passes through this cell. Then we can use it to prioritize cell search.
When we use estimates or guesses instead of well-known data, this is called using search heuristics. This heuristic represents the best guess of the remaining distance. We have to define this value for each cell by which we perform the search, so we add an
How do we make a guess about the remaining distance? In the most ideal case, we will have a road leading straight to the end point. If so, then the distance is equal to the unchanged distance between the coordinates of this cell and the final cell. Let's use this in our heuristics.
Since heuristics do not depend on a previously traveled path, it is constant in the search process. Therefore, we only need to calculate it once the
From now on, we will determine the search priority based on the distance to the cell plus its heuristics. Let's add for this value in the
To make it work, we
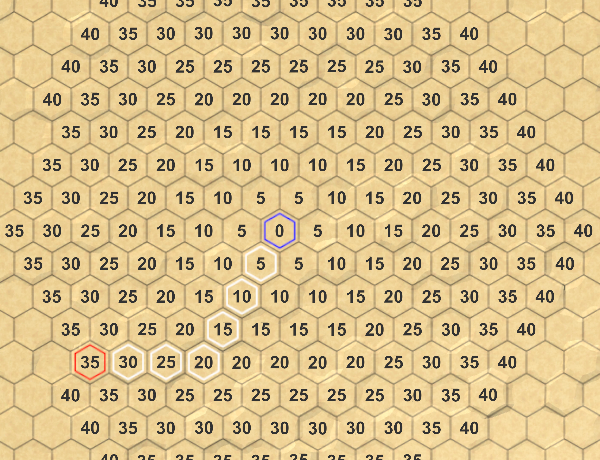

Search without and with heuristics
Thanks to the new search priorities, we will actually visit fewer cells. However, on a flat map, the algorithm still processes cells that are in the wrong direction. This is because, by default, the cost of each move step is 5, and a heuristic adds only 1 to a step. That is, the influence of heuristics is not very strong.
If the costs of moving on all maps are the same, then we can use the same costs when determining heuristics. In our case, this will be the current heuristic multiplied by 5. This will significantly reduce the number of cells being processed.
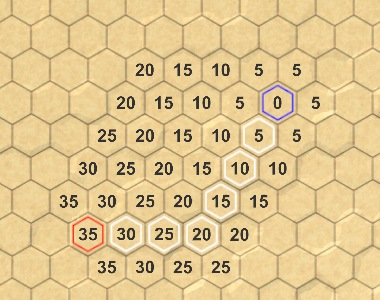
We use heuristics × 5
However, if there are roads on the map, then we can overestimate the remaining distance. As a result, the algorithm may make mistakes and create a path that is actually not the shortest.

Overvalued and allowable heuristics
To ensure that the shortest path is found, we need to ensure that we never overestimate the remaining distance. Such an approach is called admissible heuristics. Since the minimum costs for moving are 1, we have no choice but to use the same costs when defining a heuristic.
Strictly speaking, it is quite normal to use even lower costs, but this will only make heuristics weaker. The minimum possible heuristics is zero, which gives us just the Dijkstra algorithm. When a non-zero heuristic, the algorithm is called A * (pronounced "A star").
unitypackage
Although A * is a good algorithm, our implementation is not so efficient, because to store the border we use a list that needs to be sorted at each iteration. As mentioned in the previous section, we need a priority queue, but its standard implementation does not exist. So let's create it yourself.
Our queue must support staging and de-queuing based on priority. It should also support changing the priority of a cell already in the queue. Ideally, we implement it by minimizing the search sorting and allocated memory. In addition, it should remain simple.
Create a new
We store cell priorities in the cells themselves. That is, before adding a cell to the queue, its priority must be set. But if the priority changes, it will probably be useful to know what the old priority was. So let's add this to
It is also useful to know how many cells are in the queue, so let's add the
When a cell is added to a queue, let's first use its priority as an index, treating the list as a simple array.
However, this only works if the list is long enough, otherwise we will go beyond the boundaries. You can avoid this by adding empty items to the list until it reaches the desired length. These empty elements do not refer to the cell, so you can create them by adding
List with holes
But so we store only one cell per priority, and there will most likely be several of them. To track all the cells with the same priority, we need to use another list. Although we can use this list for each priority, we can also add a property to
To create a chain, we make
List of related lists
To get a cell from the priority queue, we need to access the linked list at the smallest non-empty index. Therefore, bypass the list in the loop until we find it. If not found, the queue is empty and we return
From the found chain, we can return any cell, because they all have the same priority. The easiest way is to return a cell from the beginning of the chain.
To keep the link to the remaining chain, use the next cell with the same priority as the new beginning. If at this priority level there was only one cell, then the element becomes
This approach works, but requires iteration through the list each time a cell is received. We cannot avoid searching for the smallest non-empty index, but we do not have to start from scratch every time. Instead, we can track the minimum priority and start the search with it. Initially, the minimum is essentially equal to infinity.
When adding a cell to the queue, we change the minimum if necessary.
And when withdrawing from the queue, we use for the iterations at least the list, and do not start from scratch.
This significantly reduces the amount of time to crawl in the priority list cycle.
When the priority of a cell changes, it must be removed from the linked list of which it is a part. To do this, we need to follow the chain until we find it.
Let's start with the announcement that the head of the old list of priorities will be the current cell, and we will also track the next cell. We can immediately take the next cell, because we know that there is at least one cell in this index.
If the current cell is a changed cell, then this is the head cell and we can cut it off, as if we were removed from the queue.
If this is not the case, then we need to follow the chain until we are in the cell in front of the changed cell. It contains a link to the cell that has been modified.
At this stage, we can remove the changed cell from the linked list by skipping it.
After deleting a cell, you need to add it again so that it appears in the list of its new priority.
The
Now we can use our priority
Before the cycle begins, the method
Let's change the code so that it adds and changes the neighbor. Before the change we will remember the old priority.
In addition, we no longer need to sort the border.
Search using the priority queue
As mentioned earlier, the shortest path found depends on the cell processing order. Our queue creates an order different from the sorted list order, so we can receive other paths. As we add and remove from the head of the linked list for each priority, they are more like stacks than queues. The cells added last are processed first. A side effect of this approach is that the algorithm is prone to zigzags. Therefore, the likelihood of zigzag paths also increases. Fortunately, such paths usually look better, so this side effect is to our advantage.
Sorted list and unitypackage priority
queue
In this part, we will divide the movement into moves and speed up the search as much as possible.
Journey from several moves
Strategy games that use hexagonal grids are almost always turn-based. The units moving on the map have a limited speed, which limits the distance traveled in one turn.
To support limited motion, add to
Different types of units in the game use different speeds. Cavalry is fast, infantry is slow, and so on. We still do not have units, so for now we will use a constant speed. Let's take the value 24. This is a fairly large value, not divisible by 5 (the cost of moving by default). Add an argument for
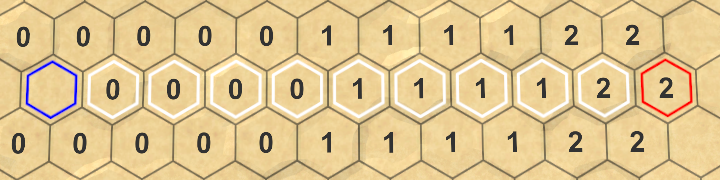
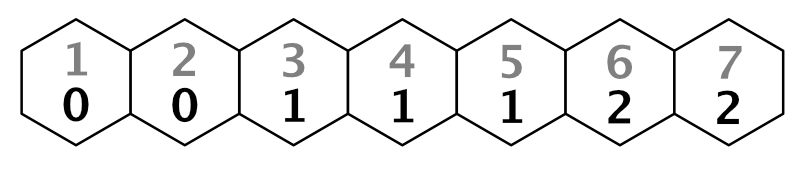
In addition to tracking the total cost of moving along the way, we also need to now know how many moves it will take to move through it. But we do not need to store this information in each cell. It can be obtained by dividing the distance traveled by speed. Since these are integers, we use integer division. That is, the total distance of no more than 24 corresponds to the move 0. This means that the entire path can be passed in the current course. If the end point is at a distance of 30, then it must be turn 1. To get to the end point, the detachment will have to spend all its movement in the current turn and in the part of the next turn.
Let's determine the course of the current cell and all its neighbors inside
If the move of the neighbor is greater than the current move, then we have crossed the turn boundary. If the movement required to reach a neighbor was 1, then everything is fine. But if moving to the next cell is more expensive, then everything becomes more complicated.
Suppose that we move on a uniform map, that is, to get into each cell you need 5 movement units. Our speed is equal to 24. After four steps, we spent 20 units from our stock of movement, and there are 4 left. In the next step, we need 5 units again, that is, one more than the existing ones. What do we need to do at this stage?
There are two approaches to this situation. The first is to allow the squad to enter the fifth cell on the current turn, even if we do not have enough movement. The second is to prohibit movement during the current turn, that is, the remaining movement points cannot be used and they will be lost.
The choice of option depends on the game. In general, the first approach is more appropriate for games in which units can move only a few steps per turn, for example, for the games of the Civilization series. This ensures that units can always move at least one cell per turn. If units can move on many cells per turn, as in Age of Wonders or in Battle for Wesnoth, then the second option is better.
As we use speed 24, let's choose the second approach. In order for it to start working, we need to isolate the costs of entering the neighboring cell before adding it to the current distance.
If, as a result, we cross the turn boundary, we first use all movement points of the current turn. We can do this by simply multiplying the move by the speed. After that we add the cost of moving.
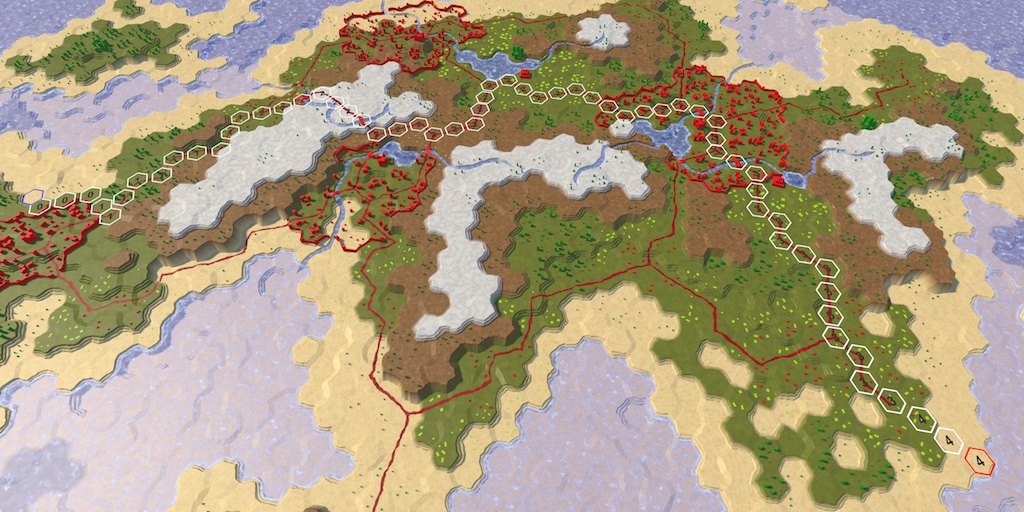
As a result of this, we will finish the first move in the fourth cell with 4 unused movement points. These lost points are added to the costs of the fifth cell, so its distance becomes 29, not 25. As a result, the distances are greater than before. For example, the tenth cell had a distance of 50. But now to get to it, we need to cross the boundaries of two moves, losing 8 movement points, that is, the distance to it now becomes equal to 58.
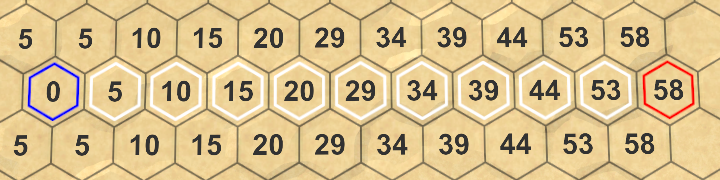
Longer than expected
Since unused movement points are added to the distances to the cells, they are taken into account when determining the shortest path. The most effective way is wasting as little points as possible. Therefore, at different speeds, we can get different ways.
When we play a game, we are not very interested in the distance values used to find the shortest path. We are interested in the number of moves required to reach the end point. Therefore, let us, instead of distances, will display the moves.
First, get rid of
Instead, we add to the
We use this new method to
Then we assign the value of its progress to the neighbor's label. After this, we will be able to see how many extra moves are required to go all the way.
The number of moves required to move along the unitypackage path
In addition, when we play a game, we do not care how the pathfinding algorithm finds the path. We want to immediately see the requested path. At the moment we can be sure that the algorithm is working, so let's get rid of the search visualization.
For the slow passage of the algorithm, we used korutinu. We don’t need to do this anymore, so we’ll get rid of calls
Since we no longer use
Instant results
Now we can get the paths instantly, but how fast are they calculated? Short cuts appear almost immediately, but long paths on large maps may seem a bit slow.
Let's measure how long it takes to search and display the path. We can use a profiler to determine the search time, but this is a bit too much and creates additional costs. Let's use instead
Right before performing the search, create a new stopwatch and launch it. After the search is completed, stopwatch will be stopped and the elapsed time will be output to the console.
Let's choose the worst case for our algorithm - a search from the bottom left to the top right corner of the large map. The worst is the monotonous map, because the algorithm will have to process all 4,800 cells of the map.
Search for the worst case The time
spent on the search may be different, because the Unity editor is not the only process running on your machine. Therefore, test it several times to get an understanding of the average duration. In my case, the search takes about 45 milliseconds. This is not very much and corresponds to 22.22 paths per second; denote this as 22 pps (paths per second). This means that the frame rate of the game will also decrease by a maximum of 22 fps in that frame when this path is calculated. And this is without taking into account all the other work, for example, rendering the frame itself. That is, we get a fairly large reduction in the frame rate, it will drop to 20 fps.
When performing such performance testing, you need to consider that the performance of the Unity editor will not be as high as the performance of the finished application. If I perform the same test with the assembly, then on average it will take only 15 ms. That is 66 pps, which is much better. However, this is still a large part of the resources allocated to a frame, so the frame rate will be below 60 fps.
We can make a simple optimization - perform a search only when it is needed. While we initiate a new search in each frame in which the mouse button is held down. Therefore, the frame rate will constantly be underestimated while dragging. We can avoid this by initiating a new search
Showing progress marks is quite a costly operation, especially because we use a non-optimized approach. Performing this operation for all cells will definitely slow down the execution. So let's skip tagging c
We need to see this information only for the path found. Therefore, after reaching the end point, we will calculate the course and set labels only for those cells that are on the way.

We display labels only for path cells.
Now we include only labels of cells that are between the initial and final. But the end point is the most important, we should also give it a label. You can do this by starting the path loop from the end cell, not the cell in front of it. At the same time, the end point light from the red one will change to white, therefore we will remove its illumination under the cycle.
The progress information is most important for the end point.
After these changes, the worst case time was reduced to 23 milliseconds in the editor and to 6 milliseconds in the finished assembly. These are 43 pps and 166 pps - much better.
unitypackage
In the previous section, we made the search procedure smarter by implementing the A * algorithm . However, in reality, we still do not perform the search in the most optimal way. In each iteration, we calculate the distances from the current cell to all its neighbors. This is true for cells that are not yet or are currently part of the search boundary. But cells that are already removed from the border, no longer need to be considered, because we have already found the shortest path to these cells. The correct implementation of A * skips these cells, so we can do the same.
How do we know that the cell has already left the border? While we can not determine this. Therefore, you need to keep track of what phase of the search is a cell. She has not yet been in the border or is in it now, or is abroad. We can track this by adding to a
For example, 0 means that the cells have not yet reached, 1 - that the cell is in the border now, and 2 - that it has already been removed from the border.
In
Now we need to set the cell search phase when adding them to the border. The process begins with the initial cell, which is added to the border.
And also every time we add a neighbor to the border.
Up to this point, to verify that the cell has not yet been added to the border, we used a distance equal to
This means that we no longer need to reset the distance of the cells before the search, that is, we have to do less work, which is good.
When a cell is removed from the border, we denote this by increasing its search phase. This puts it beyond the current boundary and before the next one.
Now we can skip cells that are removed from the border, avoiding meaningless calculation and comparison of distances.
At this stage, our algorithm still produces the same results, but more efficiently. On my machine, the worst case search takes 20 ms in the editor and 5 ms in the assembly.
We can also calculate how many times the cell has been processed by the algorithm, increasing the counter when calculating the distance to the cell. In the past, in the worst case, our algorithm calculated 28,239 distances. In the finished algorithm A *, we calculate 14,220 distances. The amount decreased by 50%. The degree of influence of these indicators on performance depends on the cost of calculating the cost of moving. In our case there is not so much work here, so the improvement in the assembly is not very large, but it is very noticeable in the editor.
unitypackage
When initiating a new search, we first need to clear the visualization of the previous path. While we are doing this, turning off the selection and removing the labels from each cell of the grid. This is a very heavy approach. Ideally, we only need to reset the cells that were part of the previous path.
Let's start by completely removing the visualization code from
To report that
When the path is found, we need to remember it. Due to this we will be able to clean it in the future. Therefore, we will track the end points and whether there is a path between them.
We can use the search data we recorded to visualize the path again. Create a new method for this
Call this method in
We see the path again, but now it is not removed. To clear it, create a method
With this method we can clear the visualization of the old path, visiting only the necessary cells, the size of the map is no longer important. Call it
In addition, we will clear the path when creating a new map.
And also before loading another card.
The path visualization is cleared again, as before this change. But now we use a more efficient approach, and in the worst case, the search time has decreased to 14 milliseconds. Rather serious improvement only thanks to cleverer clearing. The build time was reduced to 3 ms, which is 333 pps. Thanks to this, the search for paths is perfectly applicable in real time.
Now that we have achieved a quick search for paths, we can remove the temporary debugging code.
unitypackage
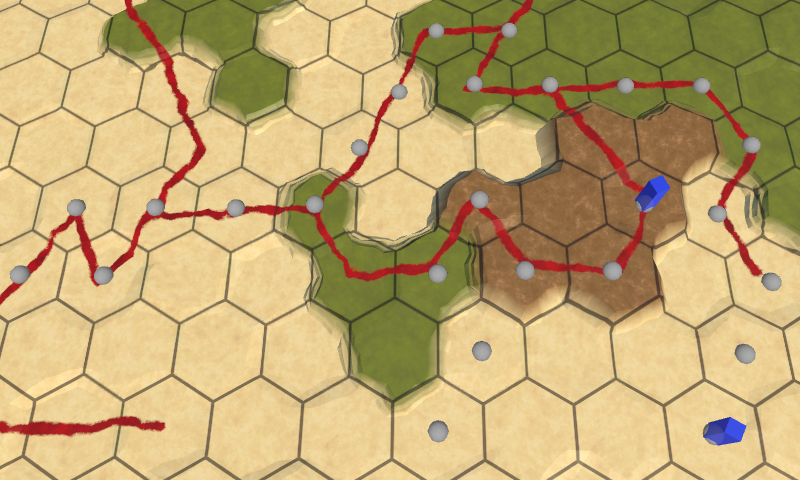
Now that we’ve figured out how to search for a path, let's place troops on the map.
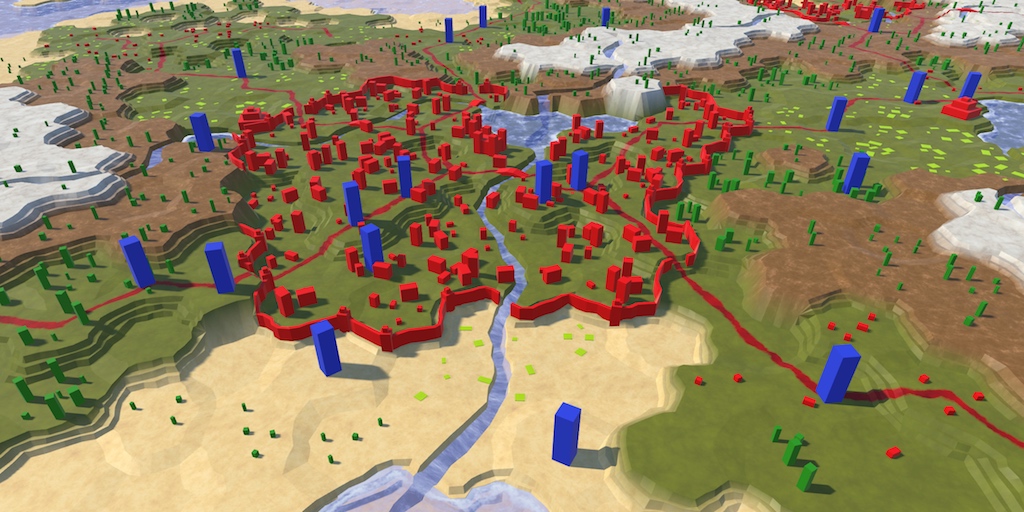
Reinforcements arrived
So far we have dealt only with cells and their fixed objects. Troops differ from them in that they are mobile. A detachment can denote anything of any scale, from one person or vehicle to an entire army. In this tutorial we restrict ourselves to a simple generalized type of detachment. After this, we will move on to supporting combinations of several types of units.
To work with units we will create a new type of component
Create an empty game object with this component, which should become a prefab. This will be the root object of the squad.
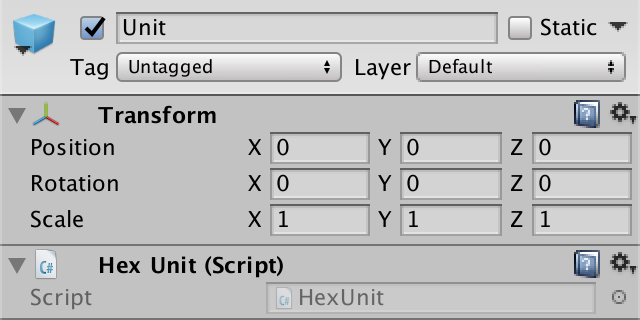
Prefab squad.
Add a 3D model symbolizing the squad as a child. I used a simple scaled cube to which I created the blue material. The root object determines the level of the squad's land, so we will displace the child element accordingly.
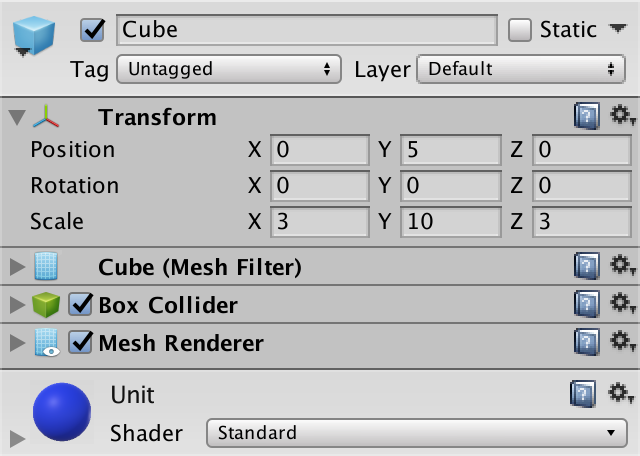
Child element-cube
Add a collider to the squad to make it easier to choose later. The standard cube collider is fine for us, just make sure that the collider fits in one cell.
Since we have no gameplay yet, the creation of units takes place in edit mode. Therefore, this should deal with
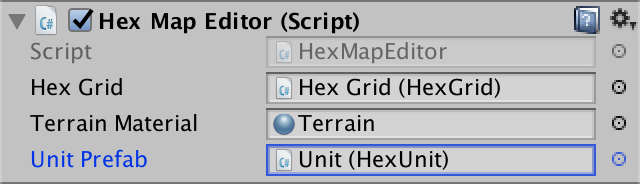
Connecting the prefab
When creating squads, we will place them on the cell under the cursor. In
Now we can use this method in
Next, add a new method
To keep the hierarchy clear, let's use the grid as a parent element for all game objects of units.
The easiest way to add

Created instance of the squad
Now we can create units, but they appear at the origin of the map. We need to put them in the right place. For this it is necessary that the detachments know about their position. Therefore, we add to the
Now

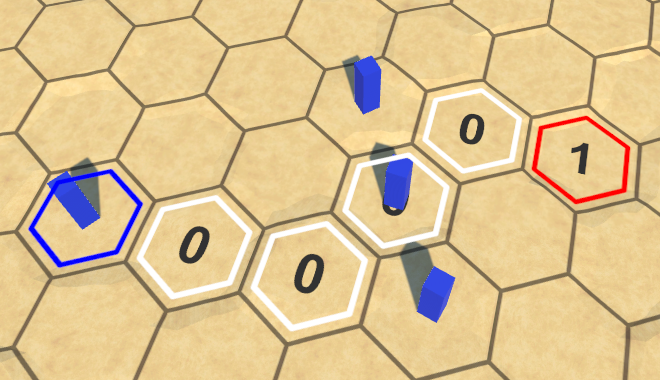
Detachments on the map
So far all units have the same orientation, which looks rather unnatural. To revive them, add to the
In
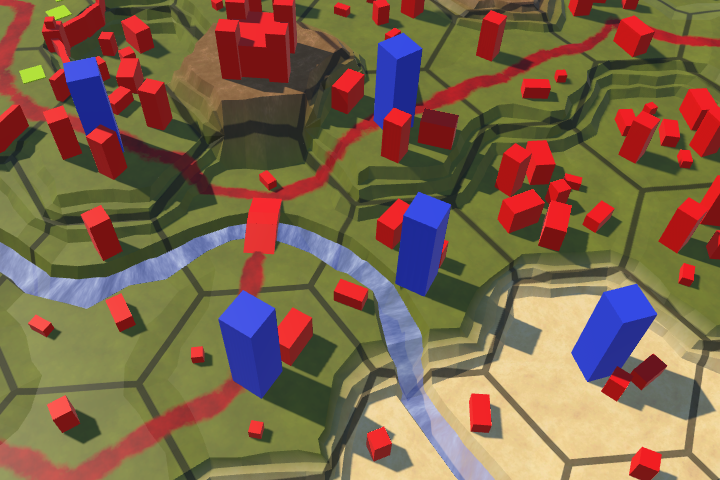
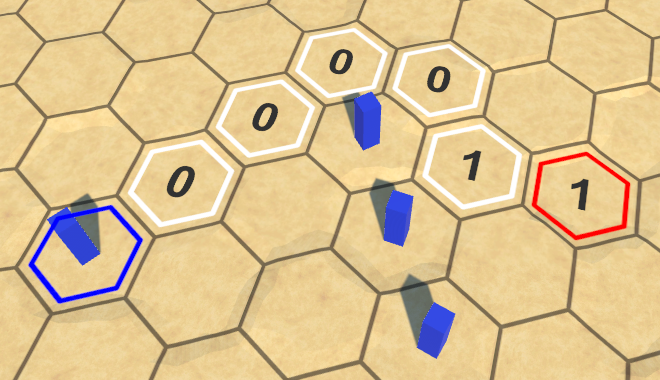
Different orientation of units
Troops look good, if not created in a single cell. In this case, we get a cluster of strange looking cubes.

Superimposed squads
Some games allow several squads to be placed in one place, others are not. Since it is easier to work with one unit per cell, I will choose this option. This means that we must create a new squad only when the current cell is not busy. That it was possible to learn, we will add in
We use this property in
Now it
Initially, units are placed correctly, but this may change if their cells are further edited. If the height of the cell changes, the detachment occupying it will either hang over it or sink into it.
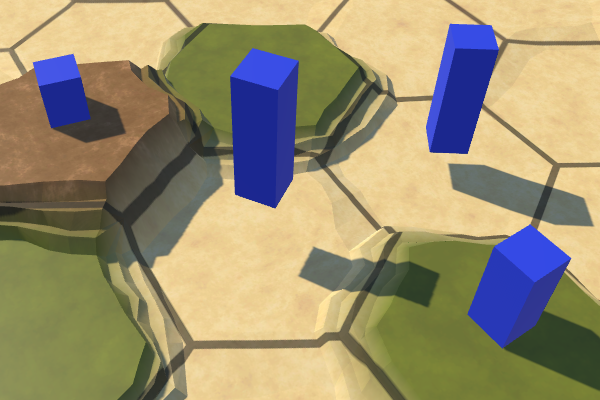
Hanging and drowned troops.
The solution is to check the position of the squad after making changes. To do this, add a method to
We must coordinate the position of the squad when the cell is updated, which happens when methods
In addition to creating units, it would be useful to destroy them. Therefore, we add to the
Consider, to get to the squad, we go through the cell. To interact with the squad it is enough to hover the mouse on its cell. Therefore, for this to work, the detachment does not need to have a collider. However, adding a collider simplifies their selection, because it blocks the rays that would otherwise collide with the cell behind the squad.
Let's
In the case when we create and destroy several units, let's be careful and clear the property when removing a unit. That is, we explicitly clear the cell reference to the squad. Add to the
We will call this method in
unitypackage
Now that we can have troops on the map, we need to include them in the process of saving and loading. We can approach this task in two ways. The first is to record squad data when recording a cell so that the data of the cell and the squad are mixed. The second way is to save the data of cells and units separately. Although it may seem that the first approach is easier to implement, the second gives us more structured data. If we share the data, it will be easier to work with them in the future.
To keep all the troops together, we need to track them. We will do this by adding to
When creating or loading a new map, we need to get rid of all the units that are on the map. To simplify this process, create a method
Call this method in
Now, when creating new units, we need to add them to the list. Let's set a method for this
Now it
Add a method to remove a detachment and in
Call this method in
Since we are going to keep all the units together, we need to remember which cells they occupy. The most reliable way is to save the coordinates of their location. To make this possible, add to the
The method
As it
We have changed the saved data, so we will increase the version number
Since it
Since the number of units is variable, we do not have pre-existing units into which data can be loaded. We can create new squad instances before loading their data, but this will require
The next step is to create an instance of a new squad. However, for this we need a link to the prefab of the detachment. So as not to complicate, let's add to this
To set this link, let's use it again

Passing the unit's prefab.
After connecting the field, we no longer need a direct link to
Now we can create a copy of the new squad in
In the end,
Of course, this will only work for save files with a version of at least 2, in the younger versions there are no download teams.
Now we can correctly load version 2 files, therefore
unitypackage
The troops are mobile, so we should be able to move them around the map. We already have the path search code, but for now we have tested it only for arbitrary locations. Now we need to remove the old test UI and create a new UI to control the units.
Moving units along paths is part of the actual gameplay, it does not apply to the map editor. Therefore, let's get rid
After removing this code, it no longer makes sense to keep the editor active when we are not in edit mode. Therefore, instead of a field for tracking mode, we can simply enable or disable the component
Since by default we are not in map editing mode, in Awake we will disable the editor.
It is necessary to use raycast to search for the current cell under the cursor when editing the map and to control the troops. Perhaps in the future it will be useful to us and for something else. Let's move the raycasting logic out
To control the game mode UI, we will use the new component. While he will be engaged only in the selection and movement of troops. Create a new component type for it
Add this component to the new game object in the UI hierarchy. It does not have to have its own object, but it will be obvious to us that there is a separate UI for the game.
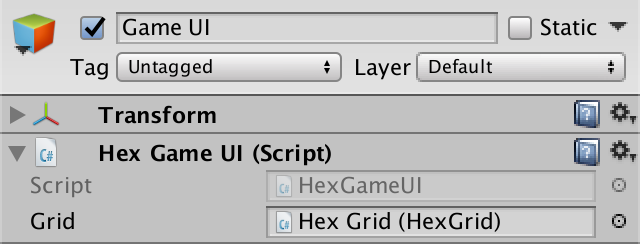

Object Game UI
Add a
Add a game UI method to the event list of the edit mode switch. This will mean that when a player changes the mode, both methods are invoked.
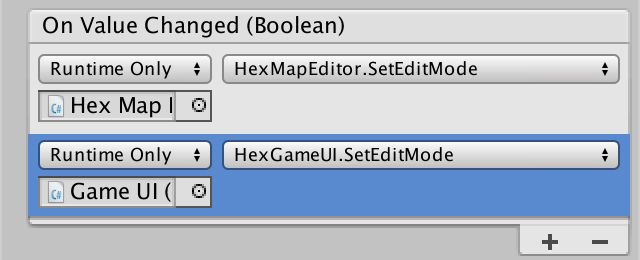
Multiple event methods.
Depending on the situation,
Create a method
When updating the current cell, we may need to know if it has changed. Make it
Before you move a squad, you need to select and track it. Therefore, we add a field
When we try to make a selection, we need to start by updating the current cell. If the current cell is, then the unit occupying this cell becomes the selected unit. If there is no squad in the cell, then no squad is selected. Let's create a method for this
We implement the selection of units with a simple click of the mouse. Therefore, we will add a method
At this stage, we learned to select one squad at a time by clicking the mouse. When you click on an empty cell, the choice of any unit is removed. But while we do not receive any visual confirmation of this.
When a squad is selected, we can use its location as a starting point for finding the way. To activate this, we will not require another mouse click. Instead, we will automatically find and show the path between the squad position and the current cell. We will always do this in
Consider that we should not find a new path with every update, but only when changing the current cell.

Finding the path for the squad
Now we see the path that appears when you move the cursor after selecting a squad. Because of this, it is obvious which unit is selected. However, paths are not always cleared correctly. To begin, let's clear the old path if the cursor is outside the map.
Of course, for this to happen, it needs to
Secondly, we will clear the old way when choosing a detachment.
Finally, let's clear the path when changing the edit mode.
We can not always find a way, because sometimes it is impossible to reach the final cell. This is normal. But sometimes the final cell itself is not valid. For example, we decided that paths could not include underwater cells. But this may depend on the detachment. Let's add to the
In addition, we allowed only one detachment to stand in the cell. Therefore, the final cell will not be valid if it is busy.
Use this method
If we have a valid path, then we can move the squad to the end point.
To move a squad, add to the
Let's use the mouse button 1 to issue a command (right click). We will check this if a squad is selected. If the button is not pressed, then we perform the search path.
Now we can move troops! But sometimes they refuse to find the path to some cells. In particular, to those cells in which there was a detachment before. This happens because it
The search for the path now works correctly, and the troops can teleport along the map. Although they can not move into the cells in which there is already a detachment, as long as the detachments standing in the way are ignored.
Troops on the way are ignored.
Troops of the same faction can usually move through each other, but so far we have no factions. Therefore, let's consider all units unrelated to each other and blocking the way. This can be done by skipping busy cells in
Avoid detachments
unitypackage
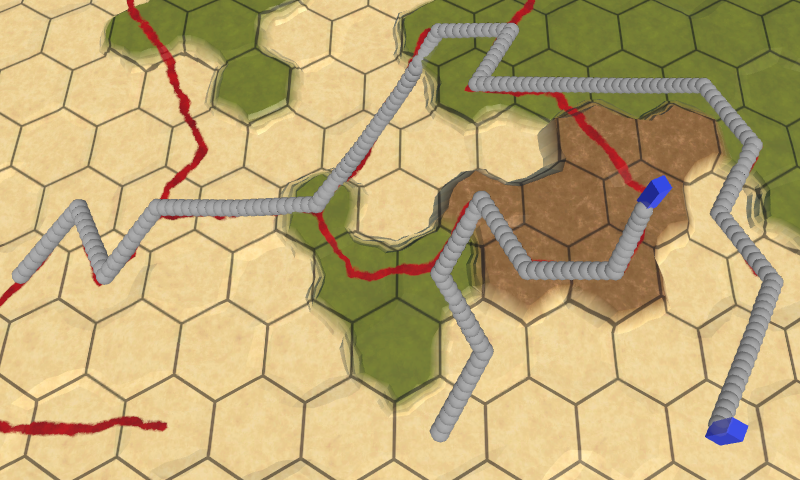
In this part, we will force the units to move along paths instead of teleportation.
Troops on the way
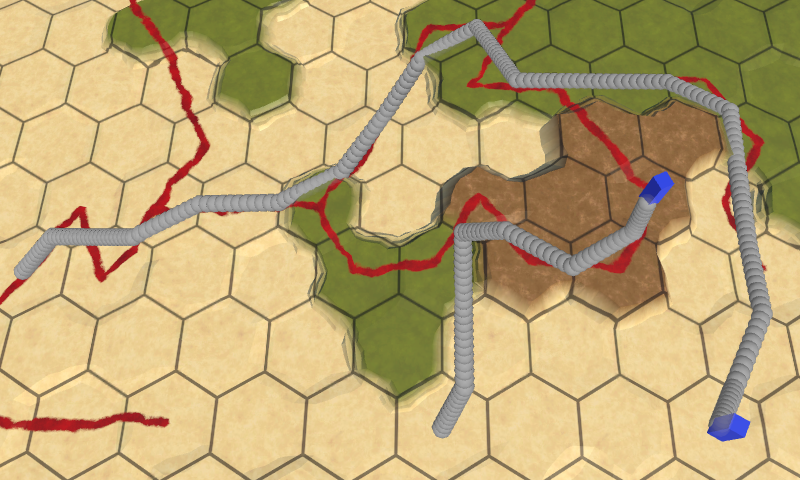
In the previous part, we added troops and the ability to move them. Although we used the search for a path to determine the acceptable endpoints, after the command was sent, the detachments simply teleported to the final cell. In order for them to actually follow the path found, we need to track this path and create an animation process that forces the squad to move from cell to cell. Since looking at the animation is difficult to see how the squad moved, we also visualize the path traveled with the help of gizmos. But before moving on, we need to correct the error.
Due to an oversight, we incorrectly calculate the course on which the cell will be reached. Now we determine the course by dividing the total distance by the detachment speed.and discarding residue. An error occurs when you need to spend exactly any remaining movement points on the course to enter the cell.
For example, when each step is 1, and the speed is 3, then we can move three cells per turn. However, with the existing calculations, we can take only two steps in the first move, because for the third step .
Total costs for moving with incorrectly determined moves, speed 3
In order to calculate moves correctly, we need to move the boundary one step from the initial cell. We can do this by calculating the move by reducing the distance by 1. Then the move for the third step will be
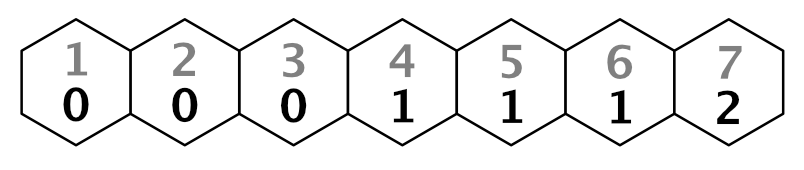
Correct moves.
We can do this by changing the calculation formula to .Make this change to
Change the move labels as well.
Note that with this approach, the stroke of the initial cell is −1. This is normal, because we do not display it, and the search algorithm remains intact.
Moving along the path is the task of the squad. To do this, he needs to know the way. This information is in y
The list is filled by following the path reference from the destination cell to the initial one, as is done when visualizing the path.
In this case, we need the entire path, which includes the starting cell.
Now we have a way in reverse order. We can work with him, but it will not be very intuitive. Let's reverse the list so that it goes from the beginning to the end.
Now we can add to the
To request movement, we change it
Before we begin to animate the squad, let's check that the paths are correct. We will do this by ordering us to
Add a method
The easiest way to show the path is to draw a gizmo sphere for each cell in the path. We have a sphere with a radius of 2 units.
Since we will show the way for the squad, we will be able to see all his last ways at the same time.
Gizmos display the last traversed paths.
To better show the connections of the cells, we draw in a cycle several spheres on a straight line between the previous and the current cells. To do this, we need to start the process from the second cell. Spheres can be positioned using linear interpolation with an increment of 0.1 units, so we will have ten spheres per segment.
More obvious ways
The same method can be used to move units. Let's create a corutin for this. Instead of drawing a gizmo, we will set the squad's position. Instead of incrementing, we use 0.1 delta time, and we will yield for each iteration. In this case, the detachment will move from one cell to the next in one second.
We'll start the corute at the end of the method
Moving one cell in a second is pretty slow. The player in the game does not want to wait that long. You can make the detachment speed the configuration option, but for now let's use a constant. I assigned it a value of 4 cells per second; it's pretty quick, but lets notice what's going on.
Just as we can visualize several paths at the same time, several teams can be made to travel simultaneously. From the point of view of the game state, the movement is still teleportation, the animations are purely visual. Troops instantly occupy the final cell. You can even find ways and start a new move before they have arrived. In this case, they are visually teleported to the beginning of a new path. This can be avoided by blocking troops or even the entire UI while they are moving, but this quick response is quite handy when developing and testing movements.
Moving troops.
One of the disadvantages of Corutin is that they do not “survive” when recompiling in Play mode. Although the game state is always true, this can lead to the fact that the units are stuck somewhere in their last path, if you start recompilation when they are still moving. To mitigate the consequences, let's make sure that after recompilation the detachments are always in the correct position. This can be done by updating their position in
unitypackage
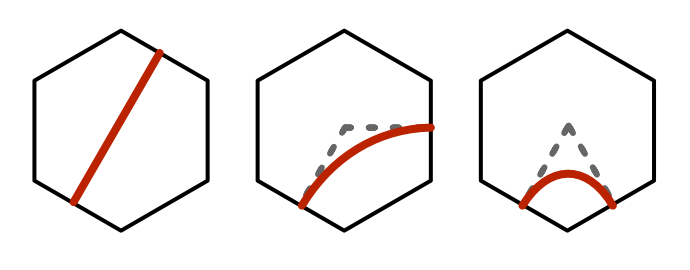
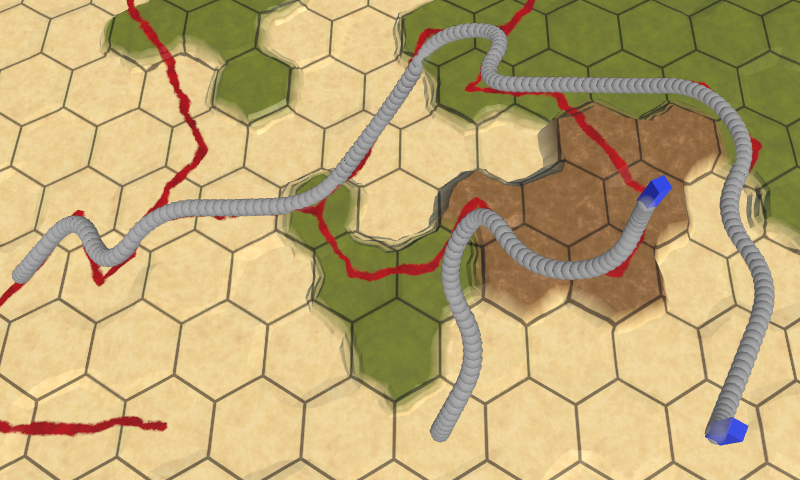
The movement from the center to the center of the cell looks too mechanistic and creates sharp changes of direction. For many games this will be normal, but unacceptable if you need at least a little realistic movement. So let's change the movement to make it look a bit more organic.
The squad begins its journey from the center of the cell. He goes to the middle of the edge of the cell, and then enters the next cell. Instead of moving to the center, he can go straight to the next edge, which he must cross. In fact, the squad will cut the path when it needs to change direction. This is possible for all cells except the end points of the path.

Three ways to move from edge to edge.
Let's adapt
To reach the center of the target cell, we need to use the position of the cell as the last point, not the edge. You can add a check of this case to the loop, but this is such a simple code that it would be clearer to just duplicate the code and modify it a little.
Edge based
paths The resulting paths are less like zigzags, and the maximum angle of rotation decreases from 120 ° to 90 °. This can be considered an improvement, so apply the same changes to corutin
Moving with variable speed
After cutting corners, the length of the path segments became dependent on the change of direction. But we set the speed in cells per second. As a result, the detachment's speed changes randomly.
Instant change of direction and speed when crossing the borders of the cells looks ugly. It is better to use a gradual change in direction. We can add support for this by forcing troops to follow curves, rather than straight lines. To do this, you can use Bezier curves. In particular, one can take quadratic Bezier curves in which the average control points are cell centers. In this case, the tangents of adjacent curves will be mirror reflections of each other, that is, the whole path will turn into a continuous smooth curve.
Curves from edge to edge
Let's create an auxiliary class
To show the curve path in
In the starting and ending cells, instead of the ending and midpoint, we can simply use the center of the cell.
Paths created using Bezier curves The
curve path looks much better. Apply the same changes in
Moving along curves The
animation also became smooth, even when the detachment’s speed is not constant. Since the tangent curves of adjacent segments coincide, the speed is continuous. The change in speed occurs gradually and happens when a detachment passes through a cell, slowing down when changing direction. If it goes straight, then the speed remains constant. In addition, the squad starts and ends its way at zero speed. This mimics the natural movement, so leave it that way.
Up to this point, we started an iteration over each of the segments from 0, continuing until we reach 1. This works fine when we increase by a constant value, but our iteration depends on the time delta. When the iteration over one segment is completed, we are likely to surpass 1 by some amount depending on the time delta. This is not noticeable at a high frame rate, but can lead to jerks at a low frame rate.
To avoid wasting time, we need to transfer the remaining time from one segment to the next. This can be done by tracking
If we are already engaged in this, let's make sure that the time delta is taken into account at the beginning of the journey. This means that we will start moving right away, and we will not stand idle for one frame.
In addition, we end not exactly at the moment of time when the path should end, but moments before. Here the difference may also depend on the frame rate. Therefore, let's make the squad complete the path at the end point.
unitypackage
The troops began to move in a smooth curve, but they do not change orientation in accordance with the direction of movement. As a result, they seem to slide. To make the movement look like a real movement, we need to rotate them.
As in the tutorial Curves and Splines , we can use the derivative of a curve to determine the orientation of a squad. The formula for the derivative of a quadratic Bezier curve: .Add to the
The derivative vector is located on the same straight line with the direction of motion. We can use the method
In contrast to the position of the detachment, the non-ideality of its orientation at the end of the path is not important. however, we need to ensure that its orientation corresponds to the final turn. To do this, after completing we equate its orientation to its rotation in Y.
Now the troops are looking exactly in the direction of movement, both horizontally and vertically. This means that they will be bending forward and backward, descending from the slopes and climbing them. So that they always stand erect, forcibly null the component Y of the direction vector before using it to determine the rotation of the unit.
Looking forward while driving
All along the way, the detachments are looking forward, but before the start of the movement they can look in a different direction. In this case, they instantly change their orientation. It will be better if they turn in the direction of the path before the start of the movement.
Looking in the right direction may be useful in other situations, so let's create a method
In order for the squad to actually turn, we will turn the method into another coruntine, which will rotate it at a constant speed. The speed of rotation can also be adjustable, but we will use the constant again. Turn should be fast, about 180 ° per second.
Fiddling with the acceleration of the turn is optional, because it is unnoticeable. It is enough for us to simply perform the interpolation between the two orientations. Unfortunately, this is not as easy to do as in the case of two numbers, because the angles are circular. For example, a transition from 350 ° to 10 ° should turn clockwise by 20 °, but a simple interpolation will force you to turn 340 ° counterclockwise.
The easiest way to create the correct rotation is by performing an interpolation between two quaternions using spherical interpolation. This will lead to the shortest turn. To do this, we obtain the beginning and the end quaternions, and then we perform the transition between them using
This works, but interpolation always goes from 0 to 1, regardless of the angle of rotation. To ensure a uniform angular velocity, we need to slow down the interpolation as the angle of rotation increases.
Knowing the angle, we can completely skip the turn if it turns out to be zero.
Now we can add a detachment's turn in
If you check the code, the unit teleports to the destination cell, turns there, then teleports back to the beginning of the path and starts moving from there. This happens because we assign a value to the property
Turn before moving
Having received the movement we need, we can get rid of the method
Since we no longer need to memorize the path we took, at the end
unitypackage
Parts 4-7: bumps, rivers and roads
Parts 8-11: water, landforms and walls
')
Parts 12-15: saving and loading, textures, distances
Parts 16-19: Pathfinding, Player Squads, Animations
Parts 20-23: fog of war, map exploration, procedural generation
Parts 24-27: water cycle, erosion, biomes, cylindrical map
Part 16: finding the way
- Highlight cells
- Selecting the target search point
- Find the shortest path
- Create a priority queue
Calculating the distance between the cells, we went to finding the paths between them.
Starting from this part, tutorials on hexagon maps will be created in Unity 5.6.0. It should be noted that in 5.6 there is a bug destroying texture arrays in assemblies for several platforms. You can bypass it by turning on the Is Readable in the texture array inspector.
Planning a trip
Highlighted cells
To search for a path between two cells, we need to first select these cells. It is no longer just a choice of a single cell and the observation of the search on the map. For example, first we select the starting cell, and then the final one. It would be convenient for them to become illuminated. So let's add this functionality. As long as we do not create a complex or effective method of selection, simply create something that helps us in our development.
Texture contour
One of the easiest ways to select cells is to add an outline to them. The easiest way to do this is with a texture containing a hexagonal outline. Here you can download this texture. It is transparent, except for the white contour of the hexagon. By making it white, we will be able to paint it in the future as we need.
The contour of the cell on a black background
Import the texture and set its Texture Type to the Sprite value. Her Sprite Mode will be Single with the default settings. Since this is an exceptionally white texture, we do not need to convert to sRGB . The alpha channel stands for transparency, so we turn on Alpha is Transparency . I also set the Filter Mode textures to Trilinear , because otherwise the mip transitions for the contours may become too noticeable.
Texture Import Options
One sprite per cell
The quickest way to add to the cells is a possible contour, adding each one its own sprite. Let's create a new game object, add the Image component ( Component / UI / Image ) to it and assign it our sprite contour. Then we insert an instance of the Hex Cell Label prefab into the scene, make the sprite object its child, apply the changes to the prefab, and then get rid of the prefab.
Child element prefab selection
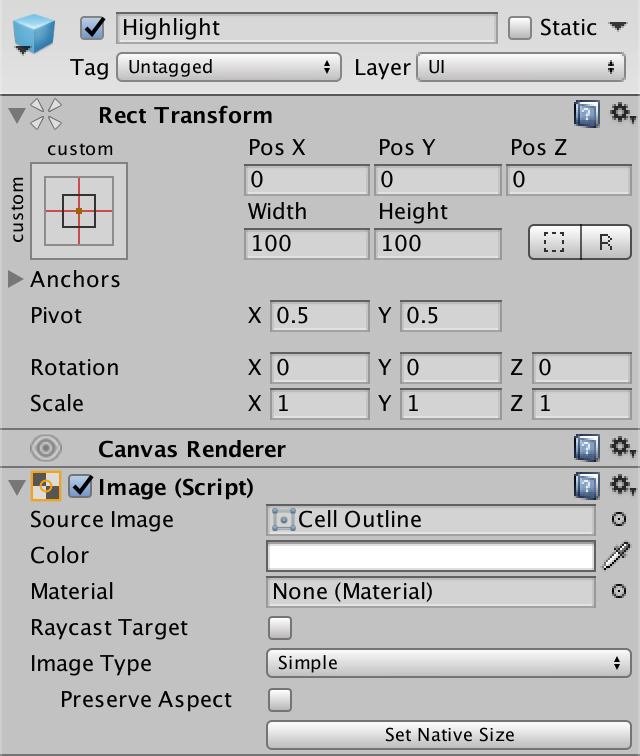
Now each cell has a sprite, but it will be too big. To make the contours correspond to the centers of the cells, change the Width and Height of the transform component of the sprite to 17.
Selection sprites partially hidden by relief
Draw over everything
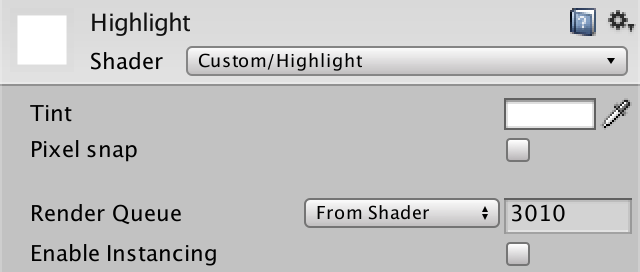
Since the contour overlaps the areas of the edges of the cells, it often falls under the geometry of the relief. Because of this, part of the contour disappears. This can be avoided by slightly raising the sprites vertically, but not in the case of cliffs. Instead, we can do the following: always draw sprites on top of everything else. To do this, create your own sprite shader. It will be enough for us to copy the standard Unity sprite shader and make a couple of changes to it.
Shader "Custom/Highlight" { Properties { [PerRendererData] _MainTex ("Sprite Texture", 2D) = "white" {} _Color ("Tint", Color) = (1,1,1,1) [MaterialToggle] PixelSnap ("Pixel snap", Float) = 0 [HideInInspector] _RendererColor ("RendererColor", Color) = (1,1,1,1) [HideInInspector] _Flip ("Flip", Vector) = (1,1,1,1) [PerRendererData] _AlphaTex ("External Alpha", 2D) = "white" {} [PerRendererData] _EnableExternalAlpha ("Enable External Alpha", Float) = 0 } SubShader { Tags { "Queue"="Transparent" "IgnoreProjector"="True" "RenderType"="Transparent" "PreviewType"="Plane" "CanUseSpriteAtlas"="True" } Cull Off ZWrite Off Blend One OneMinusSrcAlpha Pass { CGPROGRAM #pragma vertex SpriteVert #pragma fragment SpriteFrag #pragma target 2.0 #pragma multi_compile_instancing #pragma multi_compile _ PIXELSNAP_ON #pragma multi_compile _ ETC1_EXTERNAL_ALPHA #include "UnitySprites.cginc" ENDCG } } } The first change is that we ignore the depth buffer, making it so that the Z test always ends in luck.
ZWrite Off ZTest Always The second change is that we render after all the rest of the transparent geometry. It will be enough to add 10 to the queue of transparency.
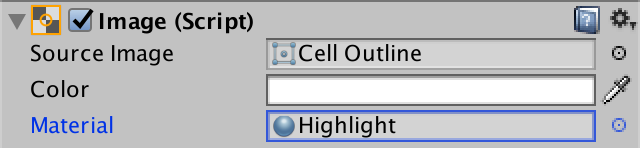
"Queue"="Transparent+10" Create a new material that will be used by this shader. We can ignore all its properties, adhering to default values. Then make the sprite prefab use this material.
Use your own sprite material
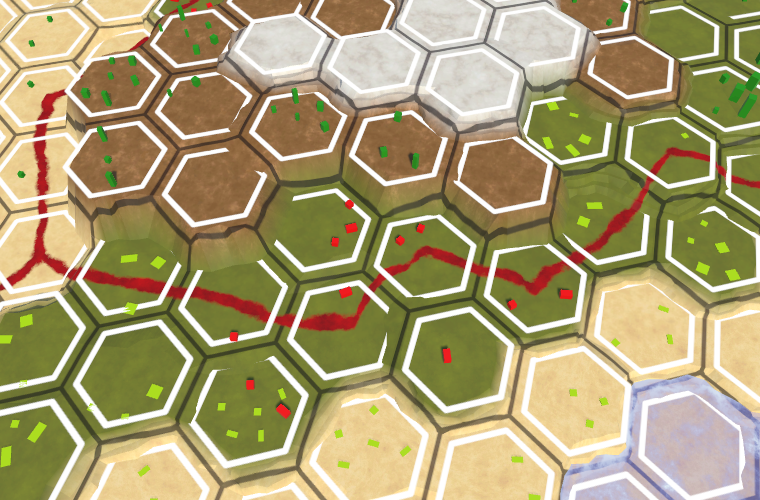
Now the contours of the selection are always visible. Even if the cell is hidden under a higher terrain, its outline will still be drawn on top of everything else. It may not look beautiful, but the selected cells will always be visible, which is useful for us.
Ignore the depth buffer
Allocation control
We do not want all cells to be highlighted at the same time. In fact, initially they should all be unallocated. We can accomplish this by disabling the Image component of the Highlight prefab object.
Image component disabled
To enable cell selection, add the
HexCell method to EnableHighlight . It must take the only child of its uiRect and include its Image component. Let's also create the DisableHighlight method. public void DisableHighlight () { Image highlight = uiRect.GetChild(0).GetComponent<Image>(); highlight.enabled = false; } public void EnableHighlight () { Image highlight = uiRect.GetChild(0).GetComponent<Image>(); highlight.enabled = true; } Finally, we can specify the color so that when turned on, it gives the backlight a tint.
public void EnableHighlight (Color color) { Image highlight = uiRect.GetChild(0).GetComponent<Image>(); highlight.color = color; highlight.enabled = true; } unitypackage
Finding the way
Now, when we can select cells, we need to move on and select two cells, and then find a path between them. First we need to select the cells, then limit the search to finding the path between them, and finally show this path.
Start search
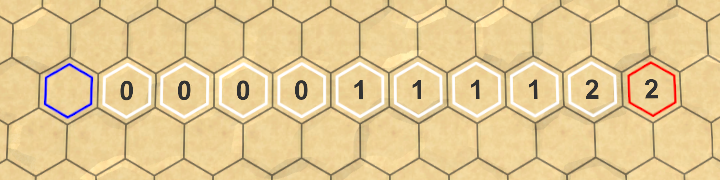
We need to select two different cells, the starting and ending points of the search. Suppose that in order to select the initial search cell, hold down the left Shift key when clicking the mouse. At the same time, the cell will be highlighted in blue. We need to save the link to this cell for further search. In addition, when selecting a new starting cell, the selection of the old one must be disabled. Therefore, add the
HexMapEditor field to the searchFromCell . HexCell previousCell, searchFromCell; Inside
HandleInput we can use Input.GetKey(KeyCode.LeftShift) to test the Shift key Input.GetKey(KeyCode.LeftShift) . if (editMode) { EditCells(currentCell); } else if (Input.GetKey(KeyCode.LeftShift)) { if (searchFromCell) { searchFromCell.DisableHighlight(); } searchFromCell = currentCell; searchFromCell.EnableHighlight(Color.blue); } else { hexGrid.FindDistancesTo(currentCell); } Where to look
End point search
Instead of looking for all the distances to the cell, we are now looking for a path between two specific cells. Therefore, rename
HexGrid.FindDistancesTo to HexGrid.FindPath and give it the second HexCell parameter. Also, change the Search method. public void FindPath (HexCell fromCell, HexCell toCell) { StopAllCoroutines(); StartCoroutine(Search(fromCell, toCell)); } IEnumerator Search (HexCell fromCell, HexCell toCell) { for (int i = 0; i < cells.Length; i++) { cells[i].Distance = int.MaxValue; } WaitForSeconds delay = new WaitForSeconds(1 / 60f); List<HexCell> frontier = new List<HexCell>(); fromCell.Distance = 0; frontier.Add(fromCell); … } Now
HexMapEditor.HandleInput should call the modified method using searchFromCell and currentCell as arguments. In addition, we can search only when we know which cell to search for. And we don’t have to bother searching if the start and end points are the same. if (editMode) { EditCells(currentCell); } else if (Input.GetKey(KeyCode.LeftShift)) { … } else if (searchFromCell && searchFromCell != currentCell) { hexGrid.FindPath(searchFromCell, currentCell); } Turning to the search, we first need to get rid of all previous selections. Therefore, let the
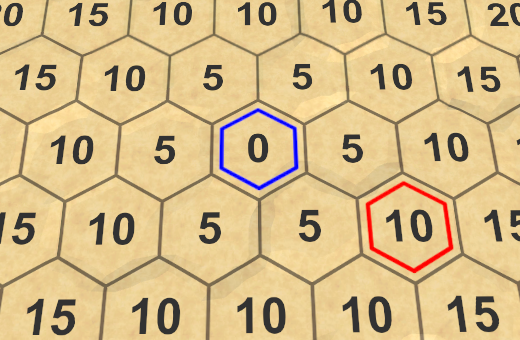
HexGrid.Search disable the selection when the distances are reset. Since this also turns off the backlight of the initial cell, then turn it on again. At this stage, we can also highlight the end point. Let's make it red. IEnumerator Search (HexCell fromCell, HexCell toCell) { for (int i = 0; i < cells.Length; i++) { cells[i].Distance = int.MaxValue; cells[i].DisableHighlight(); } fromCell.EnableHighlight(Color.blue); toCell.EnableHighlight(Color.red); … } End points of a potential path
We limit the search
At this stage, our search algorithm still calculates the distances to all the cells that are reachable from the initial cell. But we do not need this anymore. We can stop as soon as we find the final distance to the final cell. That is, when the current cell is finite, we can exit the loop of the algorithm.
while (frontier.Count > 0) { yield return delay; HexCell current = frontier[0]; frontier.RemoveAt(0); if (current == toCell) { break; } for (HexDirection d = HexDirection.NE; d <= HexDirection.NW; d++) { … } } Stop at the end point
What happens if the end point cannot be reached?
Then the algorithm will continue to work until it finds all reachable cells. Without the possibility of a premature exit, it will work as the old
FindDistancesTo method.Path mapping
We can find the distance between the beginning and the end of the path, but do not yet know what the real path will be. To find it, you need to track how each cell is reached. But how to do that?
When adding a cell to the border, we do this because it is a neighbor of the current cell. The only exception is the starting cell. All other cells were reached through the current cell. If we keep track of which cell each cell was reached from, we will end up with a network of cells. More specifically, a tree network whose root is the starting point. We can use it to build a path after reaching the end point.
Tree network describing the way to the center
We can save this information by adding a link to another cell in
HexCell . We do not need to serialize this data, so we use a standard property for this. public HexCell PathFrom { get; set; } In
HexGrid.Search we set the current cell as the neighbor's PathFrom value when it is added to the border. In addition, we need to change this link when we find a shorter path to the neighbor. if (neighbor.Distance == int.MaxValue) { neighbor.Distance = distance; neighbor.PathFrom = current; frontier.Add(neighbor); } else if (distance < neighbor.Distance) { neighbor.Distance = distance; neighbor.PathFrom = current; } Having reached the end point, we can visualize the path, following these links back to the starting cell, and select them.
if (current == toCell) { current = current.PathFrom; while (current != fromCell) { current.EnableHighlight(Color.white); current = current.PathFrom; } break; } Path found
It is worth considering that there are often several shortest paths. Found depends on the order of processing cells. Some paths may look good, others are bad, but there is never a shorter path. We will come back to this later.
Change the start of the search
After selecting the starting point, changing the end point will trigger a new search. The same should happen when choosing a new starting cell. To make this possible,
HexMapEditor must also remember the end point. HexCell previousCell, searchFromCell, searchToCell; Using this field we can also initiate a new search when selecting a new beginning.
else if (Input.GetKey(KeyCode.LeftShift)) { if (searchFromCell) { searchFromCell.DisableHighlight(); } searchFromCell = currentCell; searchFromCell.EnableHighlight(Color.blue); if (searchToCell) { hexGrid.FindPath(searchFromCell, searchToCell); } } else if (searchFromCell && searchFromCell != currentCell) { searchToCell = currentCell; hexGrid.FindPath(searchFromCell, searchToCell); } In addition, we need to avoid the equality of the starting and ending points.
if (editMode) { EditCells(currentCell); } else if ( Input.GetKey(KeyCode.LeftShift) && searchToCell != currentCell ) { … } unitypackage
Smarter search
Although our algorithm finds the shortest path, it spends a lot of time researching points that obviously will not become part of this path. At least obvious to us. The algorithm can not look at the map "down", he can not see that the search in some directions will be meaningless. He prefers to drive along roads, despite the fact that they are heading in the opposite direction from the end point. Is it possible to make the search smarter?
At the moment, when choosing a cell to be processed next, we consider only the distance from the cell to the beginning. If we want to act smarter, then we must also consider the distance to the end point. Unfortunately, we do not know him yet. But we can create an estimate of the remaining distance. Adding this estimate to the distance to the cell gives us an understanding of the total length of the path that passes through this cell. Then we can use it to prioritize cell search.
Search heuristics
When we use estimates or guesses instead of well-known data, this is called using search heuristics. This heuristic represents the best guess of the remaining distance. We have to define this value for each cell by which we perform the search, so we add an
HexCell integer property for it. We do not need to serialize it, so one more standard property will suffice. public int SearchHeuristic { get; set; } How do we make a guess about the remaining distance? In the most ideal case, we will have a road leading straight to the end point. If so, then the distance is equal to the unchanged distance between the coordinates of this cell and the final cell. Let's use this in our heuristics.
Since heuristics do not depend on a previously traveled path, it is constant in the search process. Therefore, we only need to calculate it once the
HexGrid.Search adds a cell to the border. if (neighbor.Distance == int.MaxValue) { neighbor.Distance = distance; neighbor.PathFrom = current; neighbor.SearchHeuristic = neighbor.coordinates.DistanceTo(toCell.coordinates); frontier.Add(neighbor); } Search priority
From now on, we will determine the search priority based on the distance to the cell plus its heuristics. Let's add for this value in the
HexCell property. public int SearchPriority { get { return distance + SearchHeuristic; } } To make it work, we
HexGrid.Search so that it uses this property to sort the border. frontier.Sort( (x, y) => x.SearchPriority.CompareTo(y.SearchPriority) ); Search without and with heuristics
Acceptable Heuristics
Thanks to the new search priorities, we will actually visit fewer cells. However, on a flat map, the algorithm still processes cells that are in the wrong direction. This is because, by default, the cost of each move step is 5, and a heuristic adds only 1 to a step. That is, the influence of heuristics is not very strong.
If the costs of moving on all maps are the same, then we can use the same costs when determining heuristics. In our case, this will be the current heuristic multiplied by 5. This will significantly reduce the number of cells being processed.
We use heuristics × 5
However, if there are roads on the map, then we can overestimate the remaining distance. As a result, the algorithm may make mistakes and create a path that is actually not the shortest.
Overvalued and allowable heuristics
To ensure that the shortest path is found, we need to ensure that we never overestimate the remaining distance. Such an approach is called admissible heuristics. Since the minimum costs for moving are 1, we have no choice but to use the same costs when defining a heuristic.
Strictly speaking, it is quite normal to use even lower costs, but this will only make heuristics weaker. The minimum possible heuristics is zero, which gives us just the Dijkstra algorithm. When a non-zero heuristic, the algorithm is called A * (pronounced "A star").
Why is it called A *?
The idea of adding heuristics to Dijkstra's algorithm was first proposed by Niels Nilsson. He called his version A1. Later, Bertram Raphael came up with the best version, which he called A2. Then Peter Hart proved that with good heuristics, A2 is optimal, that is, there cannot be a better version. This made him call the algorithm A * to show that it would not be possible to improve, that is, A3 or A4 would not appear. So yes, the A * algorithm is the best we can get, but it is only as good as its heuristics.
unitypackage
Priority queue
Although A * is a good algorithm, our implementation is not so efficient, because to store the border we use a list that needs to be sorted at each iteration. As mentioned in the previous section, we need a priority queue, but its standard implementation does not exist. So let's create it yourself.
Our queue must support staging and de-queuing based on priority. It should also support changing the priority of a cell already in the queue. Ideally, we implement it by minimizing the search sorting and allocated memory. In addition, it should remain simple.
Create your own queue
Create a new
HexCellPriorityQueue class with the required general methods. To track the contents of the queue, we use a simple list. In addition, we will add the Clear method to it to reset the queue so that it can be used repeatedly. using System.Collections.Generic; public class HexCellPriorityQueue { List<HexCell> list = new List<HexCell>(); public void Enqueue (HexCell cell) { } public HexCell Dequeue () { return null; } public void Change (HexCell cell) { } public void Clear () { list.Clear(); } } We store cell priorities in the cells themselves. That is, before adding a cell to the queue, its priority must be set. But if the priority changes, it will probably be useful to know what the old priority was. So let's add this to
Change as a parameter. public void Change (HexCell cell, int oldPriority) { } It is also useful to know how many cells are in the queue, so let's add the
Count property for this. Simply use the field for which we will perform the corresponding increment and decrement. int count = 0; public int Count { get { return count; } } public void Enqueue (HexCell cell) { count += 1; } public HexCell Dequeue () { count -= 1; return null; } … public void Clear () { list.Clear(); count = 0; } Adding to the queue
When a cell is added to a queue, let's first use its priority as an index, treating the list as a simple array.
public void Enqueue (HexCell cell) { count += 1; int priority = cell.SearchPriority; list[priority] = cell; } However, this only works if the list is long enough, otherwise we will go beyond the boundaries. You can avoid this by adding empty items to the list until it reaches the desired length. These empty elements do not refer to the cell, so you can create them by adding
null to the list. int priority = cell.SearchPriority; while (priority >= list.Count) { list.Add(null); } list[priority] = cell; List with holes
But so we store only one cell per priority, and there will most likely be several of them. To track all the cells with the same priority, we need to use another list. Although we can use this list for each priority, we can also add a property to
HexCell to link them together. This allows us to create a chain of cells called a linked list. public HexCell NextWithSamePriority { get; set; } To create a chain, we make
HexCellPriorityQueue.Enqueue force the newly added cell to refer to the current value with the same priority before deleting it. cell.NextWithSamePriority = list[priority]; list[priority] = cell; List of related lists
Remove from queue
To get a cell from the priority queue, we need to access the linked list at the smallest non-empty index. Therefore, bypass the list in the loop until we find it. If not found, the queue is empty and we return
null .From the found chain, we can return any cell, because they all have the same priority. The easiest way is to return a cell from the beginning of the chain.
public HexCell Dequeue () { count -= 1; for (int i = 0; i < list.Count; i++) { HexCell cell = list[i]; if (cell != null) { return cell; } } return null; } To keep the link to the remaining chain, use the next cell with the same priority as the new beginning. If at this priority level there was only one cell, then the element becomes
null and will be skipped in the future. if (cell != null) { list[i] = cell.NextWithSamePriority; return cell; } Minimum tracking
This approach works, but requires iteration through the list each time a cell is received. We cannot avoid searching for the smallest non-empty index, but we do not have to start from scratch every time. Instead, we can track the minimum priority and start the search with it. Initially, the minimum is essentially equal to infinity.
int minimum = int.MaxValue; … public void Clear () { list.Clear(); count = 0; minimum = int.MaxValue; } When adding a cell to the queue, we change the minimum if necessary.
public void Enqueue (HexCell cell) { count += 1; int priority = cell.SearchPriority; if (priority < minimum) { minimum = priority; } … } And when withdrawing from the queue, we use for the iterations at least the list, and do not start from scratch.
public HexCell Dequeue () { count -= 1; for (; minimum < list.Count; minimum++) { HexCell cell = list[minimum]; if (cell != null) { list[minimum] = cell.NextWithSamePriority; return cell; } } return null; } This significantly reduces the amount of time to crawl in the priority list cycle.
Changing priorities
When the priority of a cell changes, it must be removed from the linked list of which it is a part. To do this, we need to follow the chain until we find it.
Let's start with the announcement that the head of the old list of priorities will be the current cell, and we will also track the next cell. We can immediately take the next cell, because we know that there is at least one cell in this index.
public void Change (HexCell cell, int oldPriority) { HexCell current = list[oldPriority]; HexCell next = current.NextWithSamePriority; } If the current cell is a changed cell, then this is the head cell and we can cut it off, as if we were removed from the queue.
HexCell current = list[oldPriority]; HexCell next = current.NextWithSamePriority; if (current == cell) { list[oldPriority] = next; } If this is not the case, then we need to follow the chain until we are in the cell in front of the changed cell. It contains a link to the cell that has been modified.
if (current == cell) { list[oldPriority] = next; } else { while (next != cell) { current = next; next = current.NextWithSamePriority; } } At this stage, we can remove the changed cell from the linked list by skipping it.
while (next != cell) { current = next; next = current.NextWithSamePriority; } current.NextWithSamePriority = cell.NextWithSamePriority; After deleting a cell, you need to add it again so that it appears in the list of its new priority.
public void Change (HexCell cell, int oldPriority) { … Enqueue(cell); } The
Enqueue method increases the counter, but in fact we are not adding a new cell. Therefore, to compensate for this, we will have to execute the decrement of the counter. Enqueue(cell); count -= 1; Use queue
Now we can use our priority
HexGrid . This can be done with a single instance, reusable for all searches. HexCellPriorityQueue searchFrontier; … IEnumerator Search (HexCell fromCell, HexCell toCell) { if (searchFrontier == null) { searchFrontier = new HexCellPriorityQueue(); } else { searchFrontier.Clear(); } … } Before the cycle begins, the method
Searchmust first be added to the queue fromCell, and each iteration begins with the cell being removed from the queue. This will replace the old border code. WaitForSeconds delay = new WaitForSeconds(1 / 60f); // List<HexCell> frontier = new List<HexCell>(); fromCell.Distance = 0; // frontier.Add(fromCell); searchFrontier.Enqueue(fromCell); while (searchFrontier.Count > 0) { yield return delay; HexCell current = searchFrontier.Dequeue(); // frontier.RemoveAt(0); … } Let's change the code so that it adds and changes the neighbor. Before the change we will remember the old priority.
if (neighbor.Distance == int.MaxValue) { neighbor.Distance = distance; neighbor.PathFrom = current; neighbor.SearchHeuristic = neighbor.coordinates.DistanceTo(toCell.coordinates); // frontier.Add(neighbor); searchFrontier.Enqueue(neighbor); } else if (distance < neighbor.Distance) { int oldPriority = neighbor.SearchPriority; neighbor.Distance = distance; neighbor.PathFrom = current; searchFrontier.Change(neighbor, oldPriority); } In addition, we no longer need to sort the border.
// frontier.Sort( // (x, y) => x.SearchPriority.CompareTo(y.SearchPriority) // ); Search using the priority queue
As mentioned earlier, the shortest path found depends on the cell processing order. Our queue creates an order different from the sorted list order, so we can receive other paths. As we add and remove from the head of the linked list for each priority, they are more like stacks than queues. The cells added last are processed first. A side effect of this approach is that the algorithm is prone to zigzags. Therefore, the likelihood of zigzag paths also increases. Fortunately, such paths usually look better, so this side effect is to our advantage.
Sorted list and unitypackage priority
queue
Part 17: limited movement
- We find ways for step-by-step movement.
- Immediately display the path.
- Create a more efficient search.
- We visualize only the way.
In this part, we will divide the movement into moves and speed up the search as much as possible.
Journey from several moves
Step Motion
Strategy games that use hexagonal grids are almost always turn-based. The units moving on the map have a limited speed, which limits the distance traveled in one turn.
Speed
To support limited motion, add to
HexGrid.FindPathand to the HexGrid.Searchinteger parameter speed. It determines the stock of movements for one turn. public void FindPath (HexCell fromCell, HexCell toCell, int speed) { StopAllCoroutines(); StartCoroutine(Search(fromCell, toCell, speed)); } IEnumerator Search (HexCell fromCell, HexCell toCell, int speed) { … } Different types of units in the game use different speeds. Cavalry is fast, infantry is slow, and so on. We still do not have units, so for now we will use a constant speed. Let's take the value 24. This is a fairly large value, not divisible by 5 (the cost of moving by default). Add an argument for
FindPathat HexMapEditor.HandleInputa constant speed. if (editMode) { EditCells(currentCell); } else if ( Input.GetKey(KeyCode.LeftShift) && searchToCell != currentCell ) { if (searchFromCell) { searchFromCell.DisableHighlight(); } searchFromCell = currentCell; searchFromCell.EnableHighlight(Color.blue); if (searchToCell) { hexGrid.FindPath(searchFromCell, searchToCell, 24); } } else if (searchFromCell && searchFromCell != currentCell) { searchToCell = currentCell; hexGrid.FindPath(searchFromCell, searchToCell, 24); } Moves
In addition to tracking the total cost of moving along the way, we also need to now know how many moves it will take to move through it. But we do not need to store this information in each cell. It can be obtained by dividing the distance traveled by speed. Since these are integers, we use integer division. That is, the total distance of no more than 24 corresponds to the move 0. This means that the entire path can be passed in the current course. If the end point is at a distance of 30, then it must be turn 1. To get to the end point, the detachment will have to spend all its movement in the current turn and in the part of the next turn.
Let's determine the course of the current cell and all its neighbors inside
HexGrid.Search. The course of the current cell can be calculated only once, just before going around in the cycle of neighbors. The progress of the neighbor can be determined as soon as we find the distance to it. int currentTurn = current.Distance / speed; for (HexDirection d = HexDirection.NE; d <= HexDirection.NW; d++) { … int distance = current.Distance; if (current.HasRoadThroughEdge(d)) { distance += 1; } else if (current.Walled != neighbor.Walled) { continue; } else { distance += edgeType == HexEdgeType.Flat ? 5 : 10; distance += neighbor.UrbanLevel + neighbor.FarmLevel + neighbor.PlantLevel; } int turn = distance / speed; … } Lost motion
If the move of the neighbor is greater than the current move, then we have crossed the turn boundary. If the movement required to reach a neighbor was 1, then everything is fine. But if moving to the next cell is more expensive, then everything becomes more complicated.
Suppose that we move on a uniform map, that is, to get into each cell you need 5 movement units. Our speed is equal to 24. After four steps, we spent 20 units from our stock of movement, and there are 4 left. In the next step, we need 5 units again, that is, one more than the existing ones. What do we need to do at this stage?
There are two approaches to this situation. The first is to allow the squad to enter the fifth cell on the current turn, even if we do not have enough movement. The second is to prohibit movement during the current turn, that is, the remaining movement points cannot be used and they will be lost.
The choice of option depends on the game. In general, the first approach is more appropriate for games in which units can move only a few steps per turn, for example, for the games of the Civilization series. This ensures that units can always move at least one cell per turn. If units can move on many cells per turn, as in Age of Wonders or in Battle for Wesnoth, then the second option is better.
As we use speed 24, let's choose the second approach. In order for it to start working, we need to isolate the costs of entering the neighboring cell before adding it to the current distance.
// int distance = current.Distance; int moveCost; if (current.HasRoadThroughEdge(d)) { moveCost = 1; } else if (current.Walled != neighbor.Walled) { continue; } else { moveCost = edgeType == HexEdgeType.Flat ? 5 : 10; moveCost += neighbor.UrbanLevel + neighbor.FarmLevel + neighbor.PlantLevel; } int distance = current.Distance + moveCost; int turn = distance / speed; If, as a result, we cross the turn boundary, we first use all movement points of the current turn. We can do this by simply multiplying the move by the speed. After that we add the cost of moving.
int distance = current.Distance + moveCost; int turn = distance / speed; if (turn > currentTurn) { distance = turn * speed + moveCost; } As a result of this, we will finish the first move in the fourth cell with 4 unused movement points. These lost points are added to the costs of the fifth cell, so its distance becomes 29, not 25. As a result, the distances are greater than before. For example, the tenth cell had a distance of 50. But now to get to it, we need to cross the boundaries of two moves, losing 8 movement points, that is, the distance to it now becomes equal to 58.
Longer than expected
Since unused movement points are added to the distances to the cells, they are taken into account when determining the shortest path. The most effective way is wasting as little points as possible. Therefore, at different speeds, we can get different ways.
Displays moves instead of distances
When we play a game, we are not very interested in the distance values used to find the shortest path. We are interested in the number of moves required to reach the end point. Therefore, let us, instead of distances, will display the moves.
First, get rid of
UpdateDistanceLabeland call it in HexCell. public int Distance { get { return distance; } set { distance = value; // UpdateDistanceLabel(); } } … // void UpdateDistanceLabel () { // UnityEngine.UI.Text label = uiRect.GetComponent<Text>(); // label.text = distance == int.MaxValue ? "" : distance.ToString(); // } Instead, we add to the
HexCellgeneric method SetLabelthat gets an arbitrary string. public void SetLabel (string text) { UnityEngine.UI.Text label = uiRect.GetComponent<Text>(); label.text = text; } We use this new method to
HexGrid.Searchclean the cells. To hide the cells, simply assign them null. for (int i = 0; i < cells.Length; i++) { cells[i].Distance = int.MaxValue; cells[i].SetLabel(null); cells[i].DisableHighlight(); } Then we assign the value of its progress to the neighbor's label. After this, we will be able to see how many extra moves are required to go all the way.
if (neighbor.Distance == int.MaxValue) { neighbor.Distance = distance; neighbor.SetLabel(turn.ToString()); neighbor.PathFrom = current; neighbor.SearchHeuristic = neighbor.coordinates.DistanceTo(toCell.coordinates); searchFrontier.Enqueue(neighbor); } else if (distance < neighbor.Distance) { int oldPriority = neighbor.SearchPriority; neighbor.Distance = distance; neighbor.SetLabel(turn.ToString()); neighbor.PathFrom = current; searchFrontier.Change(neighbor, oldPriority); } The number of moves required to move along the unitypackage path
Instant Ways
In addition, when we play a game, we do not care how the pathfinding algorithm finds the path. We want to immediately see the requested path. At the moment we can be sure that the algorithm is working, so let's get rid of the search visualization.
Without korutin
For the slow passage of the algorithm, we used korutinu. We don’t need to do this anymore, so we’ll get rid of calls
StartCoroutineand StopAllCoroutinesin HexGrid. Instead, we just call Searchas usual. public void Load (BinaryReader reader, int header) { // StopAllCoroutines(); … } public void FindPath (HexCell fromCell, HexCell toCell, int speed) { // StopAllCoroutines(); // StartCoroutine(Search(fromCell, toCell, speed)); Search(fromCell, toCell, speed); } Since we no longer use
Searchas a corutin, he does not need a yield, so we’ll get rid of this operator. This means that we will also delete the declaration WaitForSecondsand change the returned type of the method to void. void Search (HexCell fromCell, HexCell toCell, int speed) { … // WaitForSeconds delay = new WaitForSeconds(1 / 60f); fromCell.Distance = 0; searchFrontier.Enqueue(fromCell); while (searchFrontier.Count > 0) { // yield return delay; HexCell current = searchFrontier.Dequeue(); … } } Instant results
Determination of search time
Now we can get the paths instantly, but how fast are they calculated? Short cuts appear almost immediately, but long paths on large maps may seem a bit slow.
Let's measure how long it takes to search and display the path. We can use a profiler to determine the search time, but this is a bit too much and creates additional costs. Let's use instead
Stopwatch, which is in namespace System.Diagnostics. Since we only use it temporarily, I will not add a construct usingto the beginning of the script.Right before performing the search, create a new stopwatch and launch it. After the search is completed, stopwatch will be stopped and the elapsed time will be output to the console.
public void FindPath (HexCell fromCell, HexCell toCell, int speed) { System.Diagnostics.Stopwatch sw = new System.Diagnostics.Stopwatch(); sw.Start(); Search(fromCell, toCell, speed); sw.Stop(); Debug.Log(sw.ElapsedMilliseconds); } Let's choose the worst case for our algorithm - a search from the bottom left to the top right corner of the large map. The worst is the monotonous map, because the algorithm will have to process all 4,800 cells of the map.
Search for the worst case The time
spent on the search may be different, because the Unity editor is not the only process running on your machine. Therefore, test it several times to get an understanding of the average duration. In my case, the search takes about 45 milliseconds. This is not very much and corresponds to 22.22 paths per second; denote this as 22 pps (paths per second). This means that the frame rate of the game will also decrease by a maximum of 22 fps in that frame when this path is calculated. And this is without taking into account all the other work, for example, rendering the frame itself. That is, we get a fairly large reduction in the frame rate, it will drop to 20 fps.
When performing such performance testing, you need to consider that the performance of the Unity editor will not be as high as the performance of the finished application. If I perform the same test with the assembly, then on average it will take only 15 ms. That is 66 pps, which is much better. However, this is still a large part of the resources allocated to a frame, so the frame rate will be below 60 fps.
Where can I see the debug log for the build?
Unity , . . , , Unity Log Files .
Search only when needed
We can make a simple optimization - perform a search only when it is needed. While we initiate a new search in each frame in which the mouse button is held down. Therefore, the frame rate will constantly be underestimated while dragging. We can avoid this by initiating a new search
HexMapEditor.HandleInputonly when we are actually dealing with a new end point. If not, then the current visible path is still valid. if (editMode) { EditCells(currentCell); } else if ( Input.GetKey(KeyCode.LeftShift) && searchToCell != currentCell ) { if (searchFromCell != currentCell) { if (searchFromCell) { searchFromCell.DisableHighlight(); } searchFromCell = currentCell; searchFromCell.EnableHighlight(Color.blue); if (searchToCell) { hexGrid.FindPath(searchFromCell, searchToCell, 24); } } } else if (searchFromCell && searchFromCell != currentCell) { if (searchToCell != currentCell) { searchToCell = currentCell; hexGrid.FindPath(searchFromCell, searchToCell, 24); } } Show tags for path only
Showing progress marks is quite a costly operation, especially because we use a non-optimized approach. Performing this operation for all cells will definitely slow down the execution. So let's skip tagging c
HexGrid.Search. if (neighbor.Distance == int.MaxValue) { neighbor.Distance = distance; // neighbor.SetLabel(turn.ToString()); neighbor.PathFrom = current; neighbor.SearchHeuristic = neighbor.coordinates.DistanceTo(toCell.coordinates); searchFrontier.Enqueue(neighbor); } else if (distance < neighbor.Distance) { int oldPriority = neighbor.SearchPriority; neighbor.Distance = distance; // neighbor.SetLabel(turn.ToString()); neighbor.PathFrom = current; searchFrontier.Change(neighbor, oldPriority); } We need to see this information only for the path found. Therefore, after reaching the end point, we will calculate the course and set labels only for those cells that are on the way.
if (current == toCell) { current = current.PathFrom; while (current != fromCell) { int turn = current.Distance / speed; current.SetLabel(turn.ToString()); current.EnableHighlight(Color.white); current = current.PathFrom; } break; } We display labels only for path cells.
Now we include only labels of cells that are between the initial and final. But the end point is the most important, we should also give it a label. You can do this by starting the path loop from the end cell, not the cell in front of it. At the same time, the end point light from the red one will change to white, therefore we will remove its illumination under the cycle.
fromCell.EnableHighlight(Color.blue); // toCell.EnableHighlight(Color.red); fromCell.Distance = 0; searchFrontier.Enqueue(fromCell); while (searchFrontier.Count > 0) { HexCell current = searchFrontier.Dequeue(); if (current == toCell) { // current = current.PathFrom; while (current != fromCell) { int turn = current.Distance / speed; current.SetLabel(turn.ToString()); current.EnableHighlight(Color.white); current = current.PathFrom; } toCell.EnableHighlight(Color.red); break; } … } The progress information is most important for the end point.
After these changes, the worst case time was reduced to 23 milliseconds in the editor and to 6 milliseconds in the finished assembly. These are 43 pps and 166 pps - much better.
unitypackage
The smartest search
In the previous section, we made the search procedure smarter by implementing the A * algorithm . However, in reality, we still do not perform the search in the most optimal way. In each iteration, we calculate the distances from the current cell to all its neighbors. This is true for cells that are not yet or are currently part of the search boundary. But cells that are already removed from the border, no longer need to be considered, because we have already found the shortest path to these cells. The correct implementation of A * skips these cells, so we can do the same.
Cell Search Phase
How do we know that the cell has already left the border? While we can not determine this. Therefore, you need to keep track of what phase of the search is a cell. She has not yet been in the border or is in it now, or is abroad. We can track this by adding to a
HexCellsimple integer property. public int SearchPhase { get; set; } For example, 0 means that the cells have not yet reached, 1 - that the cell is in the border now, and 2 - that it has already been removed from the border.
Hitting the border
In
HexGrid.Searchwe can reset all cells to 0 and always use 1 for the border. Or we can increase the number of borders with each new search. Due to this, we will not have to deal with the discharge of cells, if we each time increase the number of the border by two. int searchFrontierPhase; … void Search (HexCell fromCell, HexCell toCell, int speed) { searchFrontierPhase += 2; … } Now we need to set the cell search phase when adding them to the border. The process begins with the initial cell, which is added to the border.
fromCell.SearchPhase = searchFrontierPhase; fromCell.Distance = 0; searchFrontier.Enqueue(fromCell); And also every time we add a neighbor to the border.
if (neighbor.Distance == int.MaxValue) { neighbor.SearchPhase = searchFrontierPhase; neighbor.Distance = distance; neighbor.PathFrom = current; neighbor.SearchHeuristic = neighbor.coordinates.DistanceTo(toCell.coordinates); searchFrontier.Enqueue(neighbor); } Border check
Up to this point, to verify that the cell has not yet been added to the border, we used a distance equal to
int.MaxValue. Now we can compare the cell search phase with the current border. // if (neighbor.Distance == int.MaxValue) { if (neighbor.SearchPhase < searchFrontierPhase) { neighbor.SearchPhase = searchFrontierPhase; neighbor.Distance = distance; neighbor.PathFrom = current; neighbor.SearchHeuristic = neighbor.coordinates.DistanceTo(toCell.coordinates); searchFrontier.Enqueue(neighbor); } This means that we no longer need to reset the distance of the cells before the search, that is, we have to do less work, which is good.
for (int i = 0; i < cells.Length; i++) { // cells[i].Distance = int.MaxValue; cells[i].SetLabel(null); cells[i].DisableHighlight(); } Leaving the border
When a cell is removed from the border, we denote this by increasing its search phase. This puts it beyond the current boundary and before the next one.
while (searchFrontier.Count > 0) { HexCell current = searchFrontier.Dequeue(); current.SearchPhase += 1; … } Now we can skip cells that are removed from the border, avoiding meaningless calculation and comparison of distances.
for (HexDirection d = HexDirection.NE; d <= HexDirection.NW; d++) { HexCell neighbor = current.GetNeighbor(d); if ( neighbor == null || neighbor.SearchPhase > searchFrontierPhase ) { continue; } … } At this stage, our algorithm still produces the same results, but more efficiently. On my machine, the worst case search takes 20 ms in the editor and 5 ms in the assembly.
We can also calculate how many times the cell has been processed by the algorithm, increasing the counter when calculating the distance to the cell. In the past, in the worst case, our algorithm calculated 28,239 distances. In the finished algorithm A *, we calculate 14,220 distances. The amount decreased by 50%. The degree of influence of these indicators on performance depends on the cost of calculating the cost of moving. In our case there is not so much work here, so the improvement in the assembly is not very large, but it is very noticeable in the editor.
unitypackage
Clearing the way
When initiating a new search, we first need to clear the visualization of the previous path. While we are doing this, turning off the selection and removing the labels from each cell of the grid. This is a very heavy approach. Ideally, we only need to reset the cells that were part of the previous path.
Search only
Let's start by completely removing the visualization code from
Search. He only needs to search for the path and not necessarily know what we will do with this information. void Search (HexCell fromCell, HexCell toCell, int speed) { searchFrontierPhase += 2; if (searchFrontier == null) { searchFrontier = new HexCellPriorityQueue(); } else { searchFrontier.Clear(); } // for (int i = 0; i < cells.Length; i++) { // cells[i].SetLabel(null); // cells[i].DisableHighlight(); // } // fromCell.EnableHighlight(Color.blue); fromCell.SearchPhase = searchFrontierPhase; fromCell.Distance = 0; searchFrontier.Enqueue(fromCell); while (searchFrontier.Count > 0) { HexCell current = searchFrontier.Dequeue(); current.SearchPhase += 1; if (current == toCell) { // while (current != fromCell) { // int turn = current.Distance / speed; // current.SetLabel(turn.ToString()); // current.EnableHighlight(Color.white); // current = current.PathFrom; // } // toCell.EnableHighlight(Color.red); // break; } … } } To report that
Searchfound the path, we will return boolean. bool Search (HexCell fromCell, HexCell toCell, int speed) { searchFrontierPhase += 2; if (searchFrontier == null) { searchFrontier = new HexCellPriorityQueue(); } else { searchFrontier.Clear(); } fromCell.SearchPhase = searchFrontierPhase; fromCell.Distance = 0; searchFrontier.Enqueue(fromCell); while (searchFrontier.Count > 0) { HexCell current = searchFrontier.Dequeue(); current.SearchPhase += 1; if (current == toCell) { return true; } … } return false; } Remember the way
When the path is found, we need to remember it. Due to this we will be able to clean it in the future. Therefore, we will track the end points and whether there is a path between them.
HexCell currentPathFrom, currentPathTo; bool currentPathExists; … public void FindPath (HexCell fromCell, HexCell toCell, int speed) { System.Diagnostics.Stopwatch sw = new System.Diagnostics.Stopwatch(); sw.Start(); currentPathFrom = fromCell; currentPathTo = toCell; currentPathExists = Search(fromCell, toCell, speed); sw.Stop(); Debug.Log(sw.ElapsedMilliseconds); } Display the path again.
We can use the search data we recorded to visualize the path again. Create a new method for this
ShowPath. It will cycle through the end to the beginning of the path, highlighting the cells and assigning them a turn value. To do this, we need to know the speed, so we will make it a parameter. If we do not have a path, then the method will simply select the end points. void ShowPath (int speed) { if (currentPathExists) { HexCell current = currentPathTo; while (current != currentPathFrom) { int turn = current.Distance / speed; current.SetLabel(turn.ToString()); current.EnableHighlight(Color.white); current = current.PathFrom; } } currentPathFrom.EnableHighlight(Color.blue); currentPathTo.EnableHighlight(Color.red); } Call this method in
FindPathafter the search. currentPathExists = Search(fromCell, toCell, speed); ShowPath(speed); Cleaning up
We see the path again, but now it is not removed. To clear it, create a method
ClearPath. In essence, it is a copy ShowPath, except that it turns off selections and labels, and does not include them. Having done this, he must clear the recorded path data that is no longer valid. void ClearPath () { if (currentPathExists) { HexCell current = currentPathTo; while (current != currentPathFrom) { current.SetLabel(null); current.DisableHighlight(); current = current.PathFrom; } current.DisableHighlight(); currentPathExists = false; } currentPathFrom = currentPathTo = null; } With this method we can clear the visualization of the old path, visiting only the necessary cells, the size of the map is no longer important. Call it
FindPathbefore starting a new search. sw.Start(); ClearPath(); currentPathFrom = fromCell; currentPathTo = toCell; currentPathExists = Search(fromCell, toCell, speed); if (currentPathExists) { ShowPath(speed); } sw.Stop(); In addition, we will clear the path when creating a new map.
public bool CreateMap (int x, int z) { … ClearPath(); if (chunks != null) { for (int i = 0; i < chunks.Length; i++) { Destroy(chunks[i].gameObject); } } … } And also before loading another card.
public void Load (BinaryReader reader, int header) { ClearPath(); … } The path visualization is cleared again, as before this change. But now we use a more efficient approach, and in the worst case, the search time has decreased to 14 milliseconds. Rather serious improvement only thanks to cleverer clearing. The build time was reduced to 3 ms, which is 333 pps. Thanks to this, the search for paths is perfectly applicable in real time.
Now that we have achieved a quick search for paths, we can remove the temporary debugging code.
public void FindPath (HexCell fromCell, HexCell toCell, int speed) { // System.Diagnostics.Stopwatch sw = new System.Diagnostics.Stopwatch(); // sw.Start(); ClearPath(); currentPathFrom = fromCell; currentPathTo = toCell; currentPathExists = Search(fromCell, toCell, speed); ShowPath(speed); // sw.Stop(); // Debug.Log(sw.ElapsedMilliseconds); } unitypackage
Part 18: troops
- We place the detachments on the map.
- Save and load teams.
- We find the way for the troops.
- Move the troops.
Now that we’ve figured out how to search for a path, let's place troops on the map.
Reinforcements arrived
Create squads
So far we have dealt only with cells and their fixed objects. Troops differ from them in that they are mobile. A detachment can denote anything of any scale, from one person or vehicle to an entire army. In this tutorial we restrict ourselves to a simple generalized type of detachment. After this, we will move on to supporting combinations of several types of units.
Prefab squad
To work with units we will create a new type of component
HexUnit. For now, let's start with an empty one MonoBehaviour, and later add functionality to it. using UnityEngine; public class HexUnit : MonoBehaviour { } Create an empty game object with this component, which should become a prefab. This will be the root object of the squad.
Prefab squad.
Add a 3D model symbolizing the squad as a child. I used a simple scaled cube to which I created the blue material. The root object determines the level of the squad's land, so we will displace the child element accordingly.
Child element-cube
Add a collider to the squad to make it easier to choose later. The standard cube collider is fine for us, just make sure that the collider fits in one cell.
Creation of squad instances
Since we have no gameplay yet, the creation of units takes place in edit mode. Therefore, this should deal with
HexMapEditor. For this, he needs a prefab, so we will add a field HexUnit unitPrefaband connect it. public HexUnit unitPrefab; Connecting the prefab
When creating squads, we will place them on the cell under the cursor. In
HandleInputthere is a code for finding this cell when editing relief. Now we need it for the troops, so move the corresponding code to a separate method. HexCell GetCellUnderCursor () { Ray inputRay = Camera.main.ScreenPointToRay(Input.mousePosition); RaycastHit hit; if (Physics.Raycast(inputRay, out hit)) { return hexGrid.GetCell(hit.point); } return null; } Now we can use this method in
HandleInput, simplifying it. void HandleInput () { // Ray inputRay = Camera.main.ScreenPointToRay(Input.mousePosition); // RaycastHit hit; // if (Physics.Raycast(inputRay, out hit)) { // HexCell currentCell = hexGrid.GetCell(hit.point); HexCell currentCell = GetCellUnderCursor(); if (currentCell) { … } else { previousCell = null; } } Next, add a new method
CreateUnitthat also uses GetCellUnderCursor. If there is a cell, we will create a new squad. void CreateUnit () { HexCell cell = GetCellUnderCursor(); if (cell) { Instantiate(unitPrefab); } } To keep the hierarchy clear, let's use the grid as a parent element for all game objects of units.
void CreateUnit () { HexCell cell = GetCellUnderCursor(); if (cell) { HexUnit unit = Instantiate(unitPrefab); unit.transform.SetParent(hexGrid.transform, false); } } The easiest way to add
HexMapEditorsupport for the creation of units through keystrokes. Change the method Updateso that it calls CreateUnitwhen you press the U key. As in the case of c HandleInput, this should occur if the cursor is not over the GUI element. First we’ll check to see if we should edit the map, and if not, then we’ll check whether we should add a squad. If yes, then we call CreateUnit. void Update () { // if ( // Input.GetMouseButton(0) && // !EventSystem.current.IsPointerOverGameObject() // ) { // HandleInput(); // } // else { // previousCell = null; // } if (!EventSystem.current.IsPointerOverGameObject()) { if (Input.GetMouseButton(0)) { HandleInput(); return; } if (Input.GetKeyDown(KeyCode.U)) { CreateUnit(); return; } } previousCell = null; } Created instance of the squad
Detachment placement
Now we can create units, but they appear at the origin of the map. We need to put them in the right place. For this it is necessary that the detachments know about their position. Therefore, we add to the
HexUnitproperty Locationdenoting the cell they occupy. When setting the property, we change the position of the squad so that it corresponds to the position of the cell. public HexCell Location { get { return location; } set { location = value; transform.localPosition = value.Position; } } HexCell location; Now
HexMapEditor.CreateUnitmust assign the position of the squad cell under the cursor. Then the troops will be where they should be. void CreateUnit () { HexCell cell = GetCellUnderCursor(); if (cell) { HexUnit unit = Instantiate(unitPrefab); unit.transform.SetParent(hexGrid.transform, false); unit.Location = cell; } } Detachments on the map
Troop orientation
So far all units have the same orientation, which looks rather unnatural. To revive them, add to the
HexUnitproperty Orientation. This value is a float, denoting the unit's rotation along the Y axis in degrees. When it is assigned, we will appropriately change the rotation of the game object itself. public float Orientation { get { return orientation; } set { orientation = value; transform.localRotation = Quaternion.Euler(0f, value, 0f); } } float orientation; In
HexMapEditor.CreateUnitassign a random rotation from 0 to 360 degrees. void CreateUnit () { HexCell cell = GetCellUnderCursor(); if (cell) { HexUnit unit = Instantiate(unitPrefab); unit.transform.SetParent(hexGrid.transform, false); unit.Location = cell; unit.Orientation = Random.Range(0f, 360f); } } Different orientation of units
One squad per cell
Troops look good, if not created in a single cell. In this case, we get a cluster of strange looking cubes.
Superimposed squads
Some games allow several squads to be placed in one place, others are not. Since it is easier to work with one unit per cell, I will choose this option. This means that we must create a new squad only when the current cell is not busy. That it was possible to learn, we will add in
HexCellstandard property Unit. public HexUnit Unit { get; set; } We use this property in
HexUnit.Locationto let the cell know if a squad is standing on it. public HexCell Location { get { return location; } set { location = value; value.Unit = this; transform.localPosition = value.Position; } } Now it
HexMapEditor.CreateUnitcan check if the current cell is free. void CreateUnit () { HexCell cell = GetCellUnderCursor(); if (cell && !cell.Unit) { HexUnit unit = Instantiate(unitPrefab); unit.Location = cell; unit.Orientation = Random.Range(0f, 360f); } } Editing occupied cells
Initially, units are placed correctly, but this may change if their cells are further edited. If the height of the cell changes, the detachment occupying it will either hang over it or sink into it.
Hanging and drowned troops.
The solution is to check the position of the squad after making changes. To do this, add a method to
HexUnit. While we are only interested in the position of the squad, so just set it again. public void ValidateLocation () { transform.localPosition = location.Position; } We must coordinate the position of the squad when the cell is updated, which happens when methods
Refreshor RefreshSelfOnlyobjects are HexCellcalled. Of course, this is only necessary when there really is a detachment in the cell. void Refresh () { if (chunk) { chunk.Refresh(); … if (Unit) { Unit.ValidateLocation(); } } } void RefreshSelfOnly () { chunk.Refresh(); if (Unit) { Unit.ValidateLocation(); } } Detachment removal
In addition to creating units, it would be useful to destroy them. Therefore, we add to the
HexMapEditormethod DestroyUnit. He must check whether there is a squad in the cell under the cursor, and if so, destroy the squad's game object. void DestroyUnit () { HexCell cell = GetCellUnderCursor(); if (cell && cell.Unit) { Destroy(cell.Unit.gameObject); } } Consider, to get to the squad, we go through the cell. To interact with the squad it is enough to hover the mouse on its cell. Therefore, for this to work, the detachment does not need to have a collider. However, adding a collider simplifies their selection, because it blocks the rays that would otherwise collide with the cell behind the squad.
Let's
Updateuse a combination of left Shift + U to destroy a squadron . if (Input.GetKeyDown(KeyCode.U)) { if (Input.GetKey(KeyCode.LeftShift)) { DestroyUnit(); } else { CreateUnit(); } return; } In the case when we create and destroy several units, let's be careful and clear the property when removing a unit. That is, we explicitly clear the cell reference to the squad. Add to the
HexUnitmethod Diethat will do this, as well as the destruction of its own game object. public void Die () { location.Unit = null; Destroy(gameObject); } We will call this method in
HexMapEditor.DestroyUnit, and not destroy the squad directly. void DestroyUnit () { HexCell cell = GetCellUnderCursor(); if (cell && cell.Unit) { // Destroy(cell.Unit.gameObject); cell.Unit.Die(); } } unitypackage
Saving and loading units
Now that we can have troops on the map, we need to include them in the process of saving and loading. We can approach this task in two ways. The first is to record squad data when recording a cell so that the data of the cell and the squad are mixed. The second way is to save the data of cells and units separately. Although it may seem that the first approach is easier to implement, the second gives us more structured data. If we share the data, it will be easier to work with them in the future.
Unit tracking
To keep all the troops together, we need to track them. We will do this by adding to
HexGridthe squad list. This list should contain all units on the map. List<HexUnit> units = new List<HexUnit>(); When creating or loading a new map, we need to get rid of all the units that are on the map. To simplify this process, create a method
ClearUnitsthat kills everyone in the list and clears it. void ClearUnits () { for (int i = 0; i < units.Count; i++) { units[i].Die(); } units.Clear(); } Call this method in
CreateMapand in Load. Let's do it after clearing the way. public bool CreateMap (int x, int z) { … ClearPath(); ClearUnits(); … } … public void Load (BinaryReader reader, int header) { ClearPath(); ClearUnits(); … } Adding squads to the grid
Now, when creating new units, we need to add them to the list. Let's set a method for this
AddUnit, which will also deal with the location of the detachment and the setting of the parameters of its parent object. public void AddUnit (HexUnit unit, HexCell location, float orientation) { units.Add(unit); unit.transform.SetParent(transform, false); unit.Location = location; unit.Orientation = orientation; } Now it
HexMapEditor.CreatUnitwill be enough to call AddUnitwith a new instance of the detachment, its location and random orientation. void CreateUnit () { HexCell cell = GetCellUnderCursor(); if (cell && !cell.Unit) { // HexUnit unit = Instantiate(unitPrefab); // unit.transform.SetParent(hexGrid.transform, false); // unit.Location = cell; // unit.Orientation = Random.Range(0f, 360f); hexGrid.AddUnit( Instantiate(unitPrefab), cell, Random.Range(0f, 360f) ); } } Removing units from the grid
Add a method to remove a detachment and in
HexGrid. Just remove the squad from the list and order him to die. public void RemoveUnit (HexUnit unit) { units.Remove(unit); unit.Die(); } Call this method in
HexMapEditor.DestroyUnit, instead of destroying a squad directly. void DestroyUnit () { HexCell cell = GetCellUnderCursor(); if (cell && cell.Unit) { // cell.Unit.Die(); hexGrid.RemoveUnit(cell.Unit); } } Saving troops
Since we are going to keep all the units together, we need to remember which cells they occupy. The most reliable way is to save the coordinates of their location. To make this possible, add to the
HexCoordinatesmethod Savethat writes its fields X and Z. using UnityEngine; using System.IO; [System.Serializable] public struct HexCoordinates { … public void Save (BinaryWriter writer) { writer.Write(x); writer.Write(z); } } The method
Savefor HexUnitcan now record the coordinates and orientation of the squad. This is all data detachments that we have at the moment. using UnityEngine; using System.IO; public class HexUnit : MonoBehaviour { … public void Save (BinaryWriter writer) { location.coordinates.Save(writer); writer.Write(orientation); } } As it
HexGridtracks troops, its method Savewill record the data of the troops. First we write down the total number of units, and then we go round them all in a cycle. public void Save (BinaryWriter writer) { writer.Write(cellCountX); writer.Write(cellCountZ); for (int i = 0; i < cells.Length; i++) { cells[i].Save(writer); } writer.Write(units.Count); for (int i = 0; i < units.Count; i++) { units[i].Save(writer); } } We have changed the saved data, so we will increase the version number
SaveLoadMenu.Saveto 2. The old download code will still work, because it simply will not read the detachment data. However, it is necessary to increase the version number in order to report that there are detachment data in the file. void Save (string path) { using ( BinaryWriter writer = new BinaryWriter(File.Open(path, FileMode.Create)) ) { writer.Write(2); hexGrid.Save(writer); } } Loading troops
Since it
HexCoordinatesis a structure, it does not make much sense to add the usual method to it Load. We make it a static method that reads and returns the saved coordinates. public static HexCoordinates Load (BinaryReader reader) { HexCoordinates c; cx = reader.ReadInt32(); cz = reader.ReadInt32(); return c; } Since the number of units is variable, we do not have pre-existing units into which data can be loaded. We can create new squad instances before loading their data, but this will require
HexGridcreating instances of new squads at boot time. So it is better to leave it HexUnit. We also use the static method HexUnit.Load. Let's start with a simple readout of these units. To read the value of the float orientation, we use the method BinaryReader.ReadSingle.Why Single?
float , . , double , . Unity . public static void Load (BinaryReader reader) { HexCoordinates coordinates = HexCoordinates.Load(reader); float orientation = reader.ReadSingle(); } The next step is to create an instance of a new squad. However, for this we need a link to the prefab of the detachment. So as not to complicate, let's add to this
HexUnitstatic method. public static HexUnit unitPrefab; To set this link, let's use it again
HexGrid, as we did with the noise texture. When we need to support many types of units, we will move on to a better solution. public HexUnit unitPrefab; … void Awake () { HexMetrics.noiseSource = noiseSource; HexMetrics.InitializeHashGrid(seed); HexUnit.unitPrefab = unitPrefab; CreateMap(cellCountX, cellCountZ); } … void OnEnable () { if (!HexMetrics.noiseSource) { HexMetrics.noiseSource = noiseSource; HexMetrics.InitializeHashGrid(seed); HexUnit.unitPrefab = unitPrefab; } } Passing the unit's prefab.
After connecting the field, we no longer need a direct link to
HexMapEditor. Instead, he can use HexUnit.unitPrefab. // public HexUnit unitPrefab; … void CreateUnit () { HexCell cell = GetCellUnderCursor(); if (cell && !cell.Unit) { hexGrid.AddUnit( Instantiate(HexUnit.unitPrefab), cell, Random.Range(0f, 360f) ); } } Now we can create a copy of the new squad in
HexUnit.Load. Instead of returning it, we can use the loaded coordinates and orientation to add it to the grid. To make this possible, add a parameter HexGrid. public static void Load (BinaryReader reader, HexGrid grid) { HexCoordinates coordinates = HexCoordinates.Load(reader); float orientation = reader.ReadSingle(); grid.AddUnit( Instantiate(unitPrefab), grid.GetCell(coordinates), orientation ); } In the end,
HexGrid.Loadwe count the number of units and use it to load all the saved units, passing ourselves as an additional argument. public void Load (BinaryReader reader, int header) { … int unitCount = reader.ReadInt32(); for (int i = 0; i < unitCount; i++) { HexUnit.Load(reader, this); } } Of course, this will only work for save files with a version of at least 2, in the younger versions there are no download teams.
if (header >= 2) { int unitCount = reader.ReadInt32(); for (int i = 0; i < unitCount; i++) { HexUnit.Load(reader, this); } } Now we can correctly load version 2 files, therefore
SaveLoadMenu.Loadwe will increase the supported version number to 2. void Load (string path) { if (!File.Exists(path)) { Debug.LogError("File does not exist " + path); return; } using (BinaryReader reader = new BinaryReader(File.OpenRead(path))) { int header = reader.ReadInt32(); if (header <= 2) { hexGrid.Load(reader, header); HexMapCamera.ValidatePosition(); } else { Debug.LogWarning("Unknown map format " + header); } } } unitypackage
Moving units
The troops are mobile, so we should be able to move them around the map. We already have the path search code, but for now we have tested it only for arbitrary locations. Now we need to remove the old test UI and create a new UI to control the units.
Cleaning up the map editor
Moving units along paths is part of the actual gameplay, it does not apply to the map editor. Therefore, let's get rid
HexMapEditorof all the code associated with finding the path. // HexCell previousCell, searchFromCell, searchToCell; HexCell previousCell; … void HandleInput () { HexCell currentCell = GetCellUnderCursor(); if (currentCell) { if (previousCell && previousCell != currentCell) { ValidateDrag(currentCell); } else { isDrag = false; } if (editMode) { EditCells(currentCell); } // else if ( // Input.GetKey(KeyCode.LeftShift) && searchToCell != currentCell // ) { // if (searchFromCell != currentCell) { // if (searchFromCell) { // searchFromCell.DisableHighlight(); // } // searchFromCell = currentCell; // searchFromCell.EnableHighlight(Color.blue); // if (searchToCell) { // hexGrid.FindPath(searchFromCell, searchToCell, 24); // } // } // } // else if (searchFromCell && searchFromCell != currentCell) { // if (searchToCell != currentCell) { // searchToCell = currentCell; // hexGrid.FindPath(searchFromCell, searchToCell, 24); // } // } previousCell = currentCell; } else { previousCell = null; } } After removing this code, it no longer makes sense to keep the editor active when we are not in edit mode. Therefore, instead of a field for tracking mode, we can simply enable or disable the component
HexMapEditor. In addition, now the editor should not deal with UI tags. // bool editMode; … public void SetEditMode (bool toggle) { // editMode = toggle; // hexGrid.ShowUI(!toggle); enabled = toggle; } … void HandleInput () { HexCell currentCell = GetCellUnderCursor(); if (currentCell) { if (previousCell && previousCell != currentCell) { ValidateDrag(currentCell); } else { isDrag = false; } // if (editMode) { EditCells(currentCell); // } previousCell = currentCell; } else { previousCell = null; } } Since by default we are not in map editing mode, in Awake we will disable the editor.
void Awake () { terrainMaterial.DisableKeyword("GRID_ON"); SetEditMode(false); } It is necessary to use raycast to search for the current cell under the cursor when editing the map and to control the troops. Perhaps in the future it will be useful to us and for something else. Let's move the raycasting logic out
HexGridto a new method GetCellwith a parameter-ray. public HexCell GetCell (Ray ray) { RaycastHit hit; if (Physics.Raycast(ray, out hit)) { return GetCell(hit.point); } return null; } HexMapEditor.GetCellUniderCursor may simply call this method with the cursor ray. HexCell GetCellUnderCursor () { return hexGrid.GetCell(Camera.main.ScreenPointToRay(Input.mousePosition)); } Game UI
To control the game mode UI, we will use the new component. While he will be engaged only in the selection and movement of troops. Create a new component type for it
HexGameUI. To do his job he has enough links to the grid. using UnityEngine; using UnityEngine.EventSystems; public class HexGameUI : MonoBehaviour { public HexGrid grid; } Add this component to the new game object in the UI hierarchy. It does not have to have its own object, but it will be obvious to us that there is a separate UI for the game.
Object Game UI
Add a
HexGameUImethod SetEditMode, as in HexMapEditor. The game UI should be enabled when we are not in edit mode. In addition, you need to include tags here, because the game UI works with paths. public void SetEditMode (bool toggle) { enabled = !toggle; grid.ShowUI(!toggle); } Add a game UI method to the event list of the edit mode switch. This will mean that when a player changes the mode, both methods are invoked.
Multiple event methods.
Tracking the current cell
Depending on the situation,
HexGameUIyou need to know which cell is currently under the cursor. Therefore we will add to it a field currentCell. HexCell currentCell; Create a method
UpdateCurrentCellthat uses HexGrid.GetCellwith the cursor ray to update this field. void UpdateCurrentCell () { currentCell = grid.GetCell(Camera.main.ScreenPointToRay(Input.mousePosition)); } When updating the current cell, we may need to know if it has changed. Make it
UpdateCurrentCellreturn this information. bool UpdateCurrentCell () { HexCell cell = grid.GetCell(Camera.main.ScreenPointToRay(Input.mousePosition)); if (cell != currentCell) { currentCell = cell; return true; } return false; } Squad selection
Before you move a squad, you need to select and track it. Therefore, we add a field
selectedUnit. HexUnit selectedUnit; When we try to make a selection, we need to start by updating the current cell. If the current cell is, then the unit occupying this cell becomes the selected unit. If there is no squad in the cell, then no squad is selected. Let's create a method for this
DoSelection. void DoSelection () { UpdateCurrentCell(); if (currentCell) { selectedUnit = currentCell.Unit; } } We implement the selection of units with a simple click of the mouse. Therefore, we will add a method
Updatethat performs the selection when the mouse button 0 is activated. Of course, we need to execute it only when the cursor is not over the GUI element. void Update () { if (!EventSystem.current.IsPointerOverGameObject()) { if (Input.GetMouseButtonDown(0)) { DoSelection(); } } } At this stage, we learned to select one squad at a time by clicking the mouse. When you click on an empty cell, the choice of any unit is removed. But while we do not receive any visual confirmation of this.
Search path squad
When a squad is selected, we can use its location as a starting point for finding the way. To activate this, we will not require another mouse click. Instead, we will automatically find and show the path between the squad position and the current cell. We will always do this in
Update, except when the selection is made. For this, when we have a squad, we call the method DoPathfinding. void Update () { if (!EventSystem.current.IsPointerOverGameObject()) { if (Input.GetMouseButtonDown(0)) { DoSelection(); } else if (selectedUnit) { DoPathfinding(); } } } DoPathfindingsimply updates the current cell and calls HexGrid.FindPathif there is an end point. We again use a constant speed of 24. void DoPathfinding () { UpdateCurrentCell(); grid.FindPath(selectedUnit.Location, currentCell, 24); } Consider that we should not find a new path with every update, but only when changing the current cell.
void DoPathfinding () { if (UpdateCurrentCell()) { grid.FindPath(selectedUnit.Location, currentCell, 24); } } Finding the path for the squad
Now we see the path that appears when you move the cursor after selecting a squad. Because of this, it is obvious which unit is selected. However, paths are not always cleared correctly. To begin, let's clear the old path if the cursor is outside the map.
void DoPathfinding () { if (UpdateCurrentCell()) { if (currentCell) { grid.FindPath(selectedUnit.Location, currentCell, 24); } else { grid.ClearPath(); } } } Of course, for this to happen, it needs to
HexGrid.ClearPathbe general, so we will make such a change. public void ClearPath () { … } Secondly, we will clear the old way when choosing a detachment.
void DoSelection () { grid.ClearPath(); UpdateCurrentCell(); if (currentCell) { selectedUnit = currentCell.Unit; } } Finally, let's clear the path when changing the edit mode.
public void SetEditMode (bool toggle) { enabled = !toggle; grid.ShowUI(!toggle); grid.ClearPath(); } Search only for valid endpoints
We can not always find a way, because sometimes it is impossible to reach the final cell. This is normal. But sometimes the final cell itself is not valid. For example, we decided that paths could not include underwater cells. But this may depend on the detachment. Let's add to the
HexUnitmethod that tells us whether the cell is a valid endpoint. Underwater cells are not. public bool IsValidDestination (HexCell cell) { return !cell.IsUnderwater; } In addition, we allowed only one detachment to stand in the cell. Therefore, the final cell will not be valid if it is busy.
public bool IsValidDestination (HexCell cell) { return !cell.IsUnderwater && !cell.Unit; } Use this method
HexGameUI.DoPathfindingto ignore invalid endpoints. void DoPathfinding () { if (UpdateCurrentCell()) { if (currentCell && selectedUnit.IsValidDestination(currentCell)) { grid.FindPath(selectedUnit.Location, currentCell, 24); } else { grid.ClearPath(); } } } Move to end point
If we have a valid path, then we can move the squad to the end point.
HexGridknows when it can be done. Let's make it so that it passes this information in a read-only new property HasPath. public bool HasPath { get { return currentPathExists; } } To move a squad, add to the
HexGameUImethod DoMove. This method will be called when the command is given and if the unit is selected. Therefore, he must check whether there is a path and, if so, change the position of the squad. While we immediately teleport the detachment to the end point. In one of the following tutorials, we will make the squad actually go all the way. void DoMove () { if (grid.HasPath) { selectedUnit.Location = currentCell; grid.ClearPath(); } } Let's use the mouse button 1 to issue a command (right click). We will check this if a squad is selected. If the button is not pressed, then we perform the search path.
void Update () { if (!EventSystem.current.IsPointerOverGameObject()) { if (Input.GetMouseButtonDown(0)) { DoSelection(); } else if (selectedUnit) { if (Input.GetMouseButtonDown(1)) { DoMove(); } else { DoPathfinding(); } } } } Now we can move troops! But sometimes they refuse to find the path to some cells. In particular, to those cells in which there was a detachment before. This happens because it
HexUnitdoes not update the old location when setting a new one. To fix this, we will clear the link to the squad in its old location. public HexCell Location { get { return location; } set { if (location) { location.Unit = null; } location = value; value.Unit = this; transform.localPosition = value.Position; } } Avoid squads
The search for the path now works correctly, and the troops can teleport along the map. Although they can not move into the cells in which there is already a detachment, as long as the detachments standing in the way are ignored.
Troops on the way are ignored.
Troops of the same faction can usually move through each other, but so far we have no factions. Therefore, let's consider all units unrelated to each other and blocking the way. This can be done by skipping busy cells in
HexGrid.Search. if ( neighbor == null || neighbor.SearchPhase > searchFrontierPhase ) { continue; } if (neighbor.IsUnderwater || neighbor.Unit) { continue; } Avoid detachments
unitypackage
Part 19: Tween Motion
- Move the units between the cells.
- Visualize the path traveled.
- Move the troops on the curves.
- We force troops to look in the direction of movement.
In this part, we will force the units to move along paths instead of teleportation.
Troops on the way
Driving on the way
In the previous part, we added troops and the ability to move them. Although we used the search for a path to determine the acceptable endpoints, after the command was sent, the detachments simply teleported to the final cell. In order for them to actually follow the path found, we need to track this path and create an animation process that forces the squad to move from cell to cell. Since looking at the animation is difficult to see how the squad moved, we also visualize the path traveled with the help of gizmos. But before moving on, we need to correct the error.
Bug with turns
Due to an oversight, we incorrectly calculate the course on which the cell will be reached. Now we determine the course by dividing the total distance by the detachment speed.and discarding residue. An error occurs when you need to spend exactly any remaining movement points on the course to enter the cell.
For example, when each step is 1, and the speed is 3, then we can move three cells per turn. However, with the existing calculations, we can take only two steps in the first move, because for the third step .
Total costs for moving with incorrectly determined moves, speed 3
In order to calculate moves correctly, we need to move the boundary one step from the initial cell. We can do this by calculating the move by reducing the distance by 1. Then the move for the third step will be
Correct moves.
We can do this by changing the calculation formula to .Make this change to
HexGrid.Search. bool Search (HexCell fromCell, HexCell toCell, int speed) { … while (searchFrontier.Count > 0) { … int currentTurn = (current.Distance - 1) / speed; for (HexDirection d = HexDirection.NE; d <= HexDirection.NW; d++) { … int distance = current.Distance + moveCost; int turn = (distance - 1) / speed; if (turn > currentTurn) { distance = turn * speed + moveCost; } … } } return false; } Change the move labels as well.
void ShowPath (int speed) { if (currentPathExists) { HexCell current = currentPathTo; while (current != currentPathFrom) { int turn = (current.Distance - 1) / speed; … } } … } Note that with this approach, the stroke of the initial cell is −1. This is normal, because we do not display it, and the search algorithm remains intact.
Getting a way
Moving along the path is the task of the squad. To do this, he needs to know the way. This information is in y
HexGrid, so add to it a method to get the current path in the form of a list of cells. He can take it from the pool of lists and return if there really is a path. public List<HexCell> GetPath () { if (!currentPathExists) { return null; } List<HexCell> path = ListPool<HexCell>.Get(); return path; } The list is filled by following the path reference from the destination cell to the initial one, as is done when visualizing the path.
List<HexCell> path = ListPool<HexCell>.Get(); for (HexCell c = currentPathTo; c != currentPathFrom; c = c.PathFrom) { path.Add(c); } return path; In this case, we need the entire path, which includes the starting cell.
for (HexCell c = currentPathTo; c != currentPathFrom; c = c.PathFrom) { path.Add(c); } path.Add(currentPathFrom); return path; Now we have a way in reverse order. We can work with him, but it will not be very intuitive. Let's reverse the list so that it goes from the beginning to the end.
path.Add(currentPathFrom); path.Reverse(); return path; Motion request
Now we can add to the
HexUnitmethod that orders it to follow the path. Initially, we simply let him teleport to the destination cell. We will not immediately return the list to the pool, because it will be useful to us for a while. using UnityEngine; using System.Collections.Generic; using System.IO; public class HexUnit : MonoBehaviour { … public void Travel (List<HexCell> path) { Location = path[path.Count - 1]; } … } To request movement, we change it
HexGameUI.DoMoveso that it calls the new method with the current path, and not just specifies the location of the squad. void DoMove () { if (grid.HasPath) { // selectedUnit.Location = currentCell; selectedUnit.Travel(grid.GetPath()); grid.ClearPath(); } } Visualization of the way
Before we begin to animate the squad, let's check that the paths are correct. We will do this by ordering us to
HexUnitremember the path that it must travel in order to be able to visualize it using gizmos. List<HexCell> pathToTravel; … public void Travel (List<HexCell> path) { Location = path[path.Count - 1]; pathToTravel = path; } Add a method
OnDrawGizmosto show the last path to be taken (if it exists). If the squad has not moved yet, the path must be equal null. But due to Unity's serialization during editing after recompilation in Play mode, it can also be an empty list. void OnDrawGizmos () { if (pathToTravel == null || pathToTravel.Count == 0) { return; } } The easiest way to show the path is to draw a gizmo sphere for each cell in the path. We have a sphere with a radius of 2 units.
void OnDrawGizmos () { if (pathToTravel == null || pathToTravel.Count == 0) { return; } for (int i = 0; i < pathToTravel.Count; i++) { Gizmos.DrawSphere(pathToTravel[i].Position, 2f); } } Since we will show the way for the squad, we will be able to see all his last ways at the same time.
Gizmos display the last traversed paths.
To better show the connections of the cells, we draw in a cycle several spheres on a straight line between the previous and the current cells. To do this, we need to start the process from the second cell. Spheres can be positioned using linear interpolation with an increment of 0.1 units, so we will have ten spheres per segment.
for (int i = 1; i < pathToTravel.Count; i++) { Vector3 a = pathToTravel[i - 1].Position; Vector3 b = pathToTravel[i].Position; for (float t = 0f; t < 1f; t += 0.1f) { Gizmos.DrawSphere(Vector3.Lerp(a, b, t), 2f); } } More obvious ways
Sliding along the path
The same method can be used to move units. Let's create a corutin for this. Instead of drawing a gizmo, we will set the squad's position. Instead of incrementing, we use 0.1 delta time, and we will yield for each iteration. In this case, the detachment will move from one cell to the next in one second.
using UnityEngine; using System.Collections; using System.Collections.Generic; using System.IO; public class HexUnit : MonoBehaviour { … IEnumerator TravelPath () { for (int i = 1; i < pathToTravel.Count; i++) { Vector3 a = pathToTravel[i - 1].Position; Vector3 b = pathToTravel[i].Position; for (float t = 0f; t < 1f; t += Time.deltaTime) { transform.localPosition = Vector3.Lerp(a, b, t); yield return null; } } } … } We'll start the corute at the end of the method
Travel. But before we stop all existing korutiny. So we guarantee that two Korutins will not start at the same time, otherwise it would lead to very strange results. public void Travel (List<HexCell> path) { Location = path[path.Count - 1]; pathToTravel = path; StopAllCoroutines(); StartCoroutine(TravelPath()); } Moving one cell in a second is pretty slow. The player in the game does not want to wait that long. You can make the detachment speed the configuration option, but for now let's use a constant. I assigned it a value of 4 cells per second; it's pretty quick, but lets notice what's going on.
const float travelSpeed = 4f; … IEnumerator TravelPath () { for (int i = 1; i < pathToTravel.Count; i++) { Vector3 a = pathToTravel[i - 1].Position; Vector3 b = pathToTravel[i].Position; for (float t = 0f; t < 1f; t += Time.deltaTime * travelSpeed) { transform.localPosition = Vector3.Lerp(a, b, t); yield return null; } } } Just as we can visualize several paths at the same time, several teams can be made to travel simultaneously. From the point of view of the game state, the movement is still teleportation, the animations are purely visual. Troops instantly occupy the final cell. You can even find ways and start a new move before they have arrived. In this case, they are visually teleported to the beginning of a new path. This can be avoided by blocking troops or even the entire UI while they are moving, but this quick response is quite handy when developing and testing movements.
Moving troops.
What about the difference in heights?
, . , . , . , . , Endless Legend, , . , .
Position after compilation
One of the disadvantages of Corutin is that they do not “survive” when recompiling in Play mode. Although the game state is always true, this can lead to the fact that the units are stuck somewhere in their last path, if you start recompilation when they are still moving. To mitigate the consequences, let's make sure that after recompilation the detachments are always in the correct position. This can be done by updating their position in
OnEnable. void OnEnable () { if (location) { transform.localPosition = location.Position; } } unitypackage
Smooth movement
The movement from the center to the center of the cell looks too mechanistic and creates sharp changes of direction. For many games this will be normal, but unacceptable if you need at least a little realistic movement. So let's change the movement to make it look a bit more organic.
Moving from edge to edge
The squad begins its journey from the center of the cell. He goes to the middle of the edge of the cell, and then enters the next cell. Instead of moving to the center, he can go straight to the next edge, which he must cross. In fact, the squad will cut the path when it needs to change direction. This is possible for all cells except the end points of the path.
Three ways to move from edge to edge.
Let's adapt
OnDrawGizmosto the mapping of paths generated in this way. It must interpolate between the edges of the cells, which can be found by averaging the positions of neighboring cells. We only need to calculate one edge per iteration, reusing the value from the previous iteration. Thus, we can make the method work for the initial cell, but instead of the edge, we take its position. void OnDrawGizmos () { if (pathToTravel == null || pathToTravel.Count == 0) { return; } Vector3 a, b = pathToTravel[0].Position; for (int i = 1; i < pathToTravel.Count; i++) { // Vector3 a = pathToTravel[i - 1].Position; // Vector3 b = pathToTravel[i].Position; a = b; b = (pathToTravel[i - 1].Position + pathToTravel[i].Position) * 0.5f; for (float t = 0f; t < 1f; t += 0.1f) { Gizmos.DrawSphere(Vector3.Lerp(a, b, t), 2f); } } } To reach the center of the target cell, we need to use the position of the cell as the last point, not the edge. You can add a check of this case to the loop, but this is such a simple code that it would be clearer to just duplicate the code and modify it a little.
void OnDrawGizmos () { … for (int i = 1; i < pathToTravel.Count; i++) { … } a = b; b = pathToTravel[pathToTravel.Count - 1].Position; for (float t = 0f; t < 1f; t += 0.1f) { Gizmos.DrawSphere(Vector3.Lerp(a, b, t), 2f); } } Edge based
paths The resulting paths are less like zigzags, and the maximum angle of rotation decreases from 120 ° to 90 °. This can be considered an improvement, so apply the same changes to corutin
TravelPathto see what it looks like in the animation. IEnumerator TravelPath () { Vector3 a, b = pathToTravel[0].Position; for (int i = 1; i < pathToTravel.Count; i++) { // Vector3 a = pathToTravel[i - 1].Position; // Vector3 b = pathToTravel[i].Position; a = b; b = (pathToTravel[i - 1].Position + pathToTravel[i].Position) * 0.5f; for (float t = 0f; t < 1f; t += Time.deltaTime * travelSpeed) { transform.localPosition = Vector3.Lerp(a, b, t); yield return null; } } a = b; b = pathToTravel[pathToTravel.Count - 1].Position; for (float t = 0f; t < 1f; t += Time.deltaTime * travelSpeed) { transform.localPosition = Vector3.Lerp(a, b, t); yield return null; } } Moving with variable speed
After cutting corners, the length of the path segments became dependent on the change of direction. But we set the speed in cells per second. As a result, the detachment's speed changes randomly.
Following curves
Instant change of direction and speed when crossing the borders of the cells looks ugly. It is better to use a gradual change in direction. We can add support for this by forcing troops to follow curves, rather than straight lines. To do this, you can use Bezier curves. In particular, one can take quadratic Bezier curves in which the average control points are cell centers. In this case, the tangents of adjacent curves will be mirror reflections of each other, that is, the whole path will turn into a continuous smooth curve.
Curves from edge to edge
Let's create an auxiliary class
Bezierwith a method to get a point on a quadratic Bezier curve. As explained in the Curves and Splines tutorial , the formula is used for this. where , and Are control points and t is an interpolator. using UnityEngine; public static class Bezier { public static Vector3 GetPoint (Vector3 a, Vector3 b, Vector3 c, float t) { float r = 1f - t; return r * r * a + 2f * r * t * b + t * t * c; } } Shouldn't getpoint be limited to a range of 0-1?
0-1, . . ,
GetPointClamped , t . , GetPointUnclamped .To show the curve path in
OnDrawGizmos, we need to track not two, but three points. An additional point is the center of the cell with which we are working on the current iteration, having an index i - 1, because the cycle starts from 1. After receiving all the points, we can replace it Vector3.Lerpwith Bezier.GetPoint.In the starting and ending cells, instead of the ending and midpoint, we can simply use the center of the cell.
void OnDrawGizmos () { if (pathToTravel == null || pathToTravel.Count == 0) { return; } Vector3 a, b, c = pathToTravel[0].Position; for (int i = 1; i < pathToTravel.Count; i++) { a = c; b = pathToTravel[i - 1].Position; c = (b + pathToTravel[i].Position) * 0.5f; for (float t = 0f; t < 1f; t += Time.deltaTime * travelSpeed) { Gizmos.DrawSphere(Bezier.GetPoint(a, b, c, t), 2f); } } a = c; b = pathToTravel[pathToTravel.Count - 1].Position; c = b; for (float t = 0f; t < 1f; t += 0.1f) { Gizmos.DrawSphere(Bezier.GetPoint(a, b, c, t), 2f); } } Paths created using Bezier curves The
curve path looks much better. Apply the same changes in
TravelPathand see how the units are animated with this approach. IEnumerator TravelPath () { Vector3 a, b, c = pathToTravel[0].Position; for (int i = 1; i < pathToTravel.Count; i++) { a = c; b = pathToTravel[i - 1].Position; c = (b + pathToTravel[i].Position) * 0.5f; for (float t = 0f; t < 1f; t += Time.deltaTime * travelSpeed) { transform.localPosition = Bezier.GetPoint(a, b, c, t); yield return null; } } a = c; b = pathToTravel[pathToTravel.Count - 1].Position; c = b; for (float t = 0f; t < 1f; t += Time.deltaTime * travelSpeed) { transform.localPosition = Bezier.GetPoint(a, b, c, t); yield return null; } } Moving along curves The
animation also became smooth, even when the detachment’s speed is not constant. Since the tangent curves of adjacent segments coincide, the speed is continuous. The change in speed occurs gradually and happens when a detachment passes through a cell, slowing down when changing direction. If it goes straight, then the speed remains constant. In addition, the squad starts and ends its way at zero speed. This mimics the natural movement, so leave it that way.
Time tracking
Up to this point, we started an iteration over each of the segments from 0, continuing until we reach 1. This works fine when we increase by a constant value, but our iteration depends on the time delta. When the iteration over one segment is completed, we are likely to surpass 1 by some amount depending on the time delta. This is not noticeable at a high frame rate, but can lead to jerks at a low frame rate.
To avoid wasting time, we need to transfer the remaining time from one segment to the next. This can be done by tracking
tthroughout the journey, and not just in each segment. Then at the end of each segment we will subtract 1 from it. IEnumerator TravelPath () { Vector3 a, b, c = pathToTravel[0].Position; float t = 0f; for (int i = 1; i < pathToTravel.Count; i++) { a = c; b = pathToTravel[i - 1].Position; c = (b + pathToTravel[i].Position) * 0.5f; for (; t < 1f; t += Time.deltaTime * travelSpeed) { transform.localPosition = Bezier.GetPoint(a, b, c, t); yield return null; } t -= 1f; } a = c; b = pathToTravel[pathToTravel.Count - 1].Position; c = b; for (; t < 1f; t += Time.deltaTime * traveSpeed) { transform.localPosition = Bezier.GetPoint(a, b, c, t); yield return null; } } If we are already engaged in this, let's make sure that the time delta is taken into account at the beginning of the journey. This means that we will start moving right away, and we will not stand idle for one frame.
float t = Time.deltaTime * travelSpeed; In addition, we end not exactly at the moment of time when the path should end, but moments before. Here the difference may also depend on the frame rate. Therefore, let's make the squad complete the path at the end point.
IEnumerator TravelPath () { … transform.localPosition = location.Position; } unitypackage
Orientation animation
The troops began to move in a smooth curve, but they do not change orientation in accordance with the direction of movement. As a result, they seem to slide. To make the movement look like a real movement, we need to rotate them.
We look forward
As in the tutorial Curves and Splines , we can use the derivative of a curve to determine the orientation of a squad. The formula for the derivative of a quadratic Bezier curve: .Add to the
Beziermethod to calculate it. public static Vector3 GetDerivative ( Vector3 a, Vector3 b, Vector3 c, float t ) { return 2f * ((1f - t) * (b - a) + t * (c - b)); } The derivative vector is located on the same straight line with the direction of motion. We can use the method
Quaternion.LookRotationto convert it into a detachment's turn. We will do this every step of the way HexUnit.TravelPath. transform.localPosition = Bezier.GetPoint(a, b, c, t); Vector3 d = Bezier.GetDerivative(a, b, c, t); transform.localRotation = Quaternion.LookRotation(d); yield return null; … transform.localPosition = Bezier.GetPoint(a, b, c, t); Vector3 d = Bezier.GetDerivative(a, b, c, t); transform.localRotation = Quaternion.LookRotation(d); yield return null; Is there no error at the beginning of the path?
, . and , . , , ,
, .
Quaternion.LookRotation . , , . . , ., .
In contrast to the position of the detachment, the non-ideality of its orientation at the end of the path is not important. however, we need to ensure that its orientation corresponds to the final turn. To do this, after completing we equate its orientation to its rotation in Y.
transform.localPosition = location.Position; orientation = transform.localRotation.eulerAngles.y; Now the troops are looking exactly in the direction of movement, both horizontally and vertically. This means that they will be bending forward and backward, descending from the slopes and climbing them. So that they always stand erect, forcibly null the component Y of the direction vector before using it to determine the rotation of the unit.
Vector3 d = Bezier.GetDerivative(a, b, c, t); dy = 0f; transform.localRotation = Quaternion.LookRotation(d); … Vector3 d = Bezier.GetDerivative(a, b, c, t); dy = 0f; transform.localRotation = Quaternion.LookRotation(d); Looking forward while driving
We look at the point
All along the way, the detachments are looking forward, but before the start of the movement they can look in a different direction. In this case, they instantly change their orientation. It will be better if they turn in the direction of the path before the start of the movement.
Looking in the right direction may be useful in other situations, so let's create a method
LookAtthat forces a detachment to change its orientation in order to look at a certain point. The required rotation can be set using the method Transform.LookAt, first making it so that the point is in the same vertical position as the squad. After that we can extract the orientation of the squad. void LookAt (Vector3 point) { point.y = transform.localPosition.y; transform.LookAt(point); orientation = transform.localRotation.eulerAngles.y; } In order for the squad to actually turn, we will turn the method into another coruntine, which will rotate it at a constant speed. The speed of rotation can also be adjustable, but we will use the constant again. Turn should be fast, about 180 ° per second.
const float rotationSpeed = 180f; … IEnumerator LookAt (Vector3 point) { … } Fiddling with the acceleration of the turn is optional, because it is unnoticeable. It is enough for us to simply perform the interpolation between the two orientations. Unfortunately, this is not as easy to do as in the case of two numbers, because the angles are circular. For example, a transition from 350 ° to 10 ° should turn clockwise by 20 °, but a simple interpolation will force you to turn 340 ° counterclockwise.
The easiest way to create the correct rotation is by performing an interpolation between two quaternions using spherical interpolation. This will lead to the shortest turn. To do this, we obtain the beginning and the end quaternions, and then we perform the transition between them using
Quaternion.Slerp. IEnumerator LookAt (Vector3 point) { point.y = transform.localPosition.y; Quaternion fromRotation = transform.localRotation; Quaternion toRotation = Quaternion.LookRotation(point - transform.localPosition); for (float t = Time.deltaTime; t < 1f; t += Time.deltaTime) { transform.localRotation = Quaternion.Slerp(fromRotation, toRotation, t); yield return null; } transform.LookAt(point); orientation = transform.localRotation.eulerAngles.y; } This works, but interpolation always goes from 0 to 1, regardless of the angle of rotation. To ensure a uniform angular velocity, we need to slow down the interpolation as the angle of rotation increases.
Quaternion fromRotation = transform.localRotation; Quaternion toRotation = Quaternion.LookRotation(point - transform.localPosition); float angle = Quaternion.Angle(fromRotation, toRotation); float speed = rotationSpeed / angle; for ( float t = Time.deltaTime * speed; t < 1f; t += Time.deltaTime * speed ) { transform.localRotation = Quaternion.Slerp(fromRotation, toRotation, t); yield return null; } Knowing the angle, we can completely skip the turn if it turns out to be zero.
float angle = Quaternion.Angle(fromRotation, toRotation); if (angle > 0f) { float speed = rotationSpeed / angle; for ( … ) { … } } Now we can add a detachment's turn in
TravelPathby simply performing a yield LookAtwith the position of the second cell before moving . Unity will automatically launch a quorutine LookAtand TravelPathwait for it to complete. IEnumerator TravelPath () { Vector3 a, b, c = pathToTravel[0].Position; yield return LookAt(pathToTravel[1].Position); float t = Time.deltaTime * travelSpeed; … } If you check the code, the unit teleports to the destination cell, turns there, then teleports back to the beginning of the path and starts moving from there. This happens because we assign a value to the property
Locationbefore the start of the cortina TravelPath. To get rid of teleportation, we can TravelPathreturn the detachment's position to the initial cell at the beginning. Vector3 a, b, c = pathToTravel[0].Position; transform.localPosition = c; yield return LookAt(pathToTravel[1].Position); Turn before moving
Cleaning up
Having received the movement we need, we can get rid of the method
OnDrawGizmos. Delete it or comment it out in case we need to see ways in the future. // void OnDrawGizmos () { // … // } Since we no longer need to memorize the path we took, at the end
TravelPathyou can free up the list of cells. IEnumerator TravelPath () { … ListPool<HexCell>.Add(pathToTravel); pathToTravel = null; } What about real squad animations?
, . 3D- . . , . Mecanim,
TravelPath .unitypackage
Source: https://habr.com/ru/post/426481/
All Articles