Test server for the development team
Hi, Habr! In this article I want to share the experience of deploying a test server for the development team. In short, the essence of the problem - there is a development team and several projects in php. While we were few and the project was essentially one, then 1 test server was used and to show the task to the customer - the developer “started” the server for a certain time. If there were no “windows” in time, then you had to wait. Over time, the team grew and the complexity of the tasks increased, respectively, the test time and the employment of the test server increased, which negatively affected the deadlines and the bonus. Therefore it was necessary to search for the decision and it under a cat.
What happened:
All servers are in our local network, the test server is not accessible from the outside.
What was required:
')
The easiest option. We use the same test server, only the developer needs to create a host for each branch / project and make it into the nginx / apache2 configuration.
Pros:
Minuses:
Select each server and the developer himself is responsible for their own economy.
Pros:
Minuses:
This technology is increasingly penetrating our lives. At home I have been using docker for my projects for a long time.
Minuses:
When using gitlab, AutoDevOps, kubernetes settings were very often seen. Plus, bearded guys at various meetup tell how cool everything works with kubernetes. Therefore, it was decided to try to deploy the cluster at its facilities, the server was requested (and the test can not be touched, people are testing there) and rushed!
Since I have experience with kubernetes 0, everything has gone down on the manual with an attempt to understand how all these clusters work. After some time, I managed to raise the cluster, but then I went to problems with certificates, keys, and indeed with the difficulty of deployment. I needed a simpler solution to teach my colleagues to work with it (for example, I don’t want to spend the same vacation sitting on Skype and helping with the setting). Therefore, kubernetes was left alone. Docker itself remained and it was necessary to find a solution for container routing. Since they could be raised on different ports, it would be possible to use the same nginx for internal redirection. This is called a reverse proxy server.
In order not to reinvent the wheel, I began to look for ready-made solutions. And it was found - this is traefik .
Træfik is a modern HTTP reverse proxy and load balancer that simplifies the deployment of microservices. Træfik integrates with existing infrastructure components (Docker, Swarm mode, Kubernetes, Marathon, Consul, Etcd, Rancher, Amazon ECS, ...) and is configured automatically and dynamically. To work with docker, it is enough to specify its socket and everything, then Træfik finds all the containers and routing to them (for more details, see “Packing applications in docker”).
Here we inform the proxy that you need to listen to ports 80,443 and 8080 (web proxy), we mount the docker socket, the configuration file and the folder with certificates. For the convenience of naming test sites, we decided to make a local domain zone * .test. When accessing any site on it, the user gets to our test server. Therefore, the certificates in the traefik folder are self-signed, but it supports Let's Encrypt so much.
Certificate Generation
Before starting, you need to create a proxy network in the docker (you can call it your own way).
This will be the network to link traefik with php container sites. Therefore, we specify it in the service’s networks parameter and in the entire file in networks, by specifying the external parameter: true.
It's all quite simple - we specify the http and https traffic entry points, do not forget to set insecureSkipVerify = true if the certificates are local. In the entryPoints.https.tls section, you can omit certificates, then traefik will substitute its certificate.
You can start the service
If you go to the site.test address, you will get an error 404, since this domain is not tied to any container.
Now you need to configure the container with the application, namely:
1. specify the network proxy network
2. add labels with traefik configuration
The following is the configuration of one of the applications.
In the app service, in the network section, you need to specify proxy and default, which means that it will be available in two networks, as you can see from the configuration, I do not forward ports to the outside, everything goes inside the network.
Next, configure the labels
In the general section of networks, you need to specify external: true
The constant TEST_DOMAIN needs to be replaced with a domain, for example, site.test
Run the application
Now if you go to the domains site.test, crm.site.test, bonus.site.test you can see the working site. And on the domain pma.site.test will be phpmyadmin for convenient work with the database.
Create a task handler, for this run
Specify url gitlab, token and through which the task will be executed (executors). Since my test and gitlab are on different servers, I choose ssh executor. You will need to specify the server address and login / password to connect via ssh.
Runner can be attached to one or more projects. Since my work logic is the same everywhere, so a shared runner was created (common for all projects).
And the final touch is to create a CI configuration file.
This configuration describes 2 stages - build and clear. The build phase has 2 execution options - build_develop and build_prod

Gitlab builds a clear process flow diagram. In my example, all processes are started manually (when: manual parameter). This is done so that the developer, after deploying the test site, can pull his edits into the container without rebuilding the entire container. Another reason is the domain name - site $ CI_PIPELINE_ID.test, where CI_PIPELINE_ID is the number of the process that launched the build. That is, we gave the site with the site123.test domain for review and in order to make hot edits, changes to the container by the developer are immediately uploaded.
A small feature of the ssh executor. When you connect to the server, a view folder is created.
Therefore, the line was added
In it, we go up to the folder above and copy the project to the folder with the process number. So you can deploy multiple branches of one project. But in the settings of the handler you need to check Lock to current projects, so the handler will not try to deploy several branches at the same time.
The clear phase stops the containers and deletes the folder, you may need root privileges, so use the echo password | sudo -S rm, where password is your password.
From time to time, it is necessary to remove unused containers in order not to take up space; for this, a script with such content is hanging in the crown
performed once a day.
This solution helped us significantly optimize testing and the release of new features. Ready to answer questions, constructive criticism is accepted.
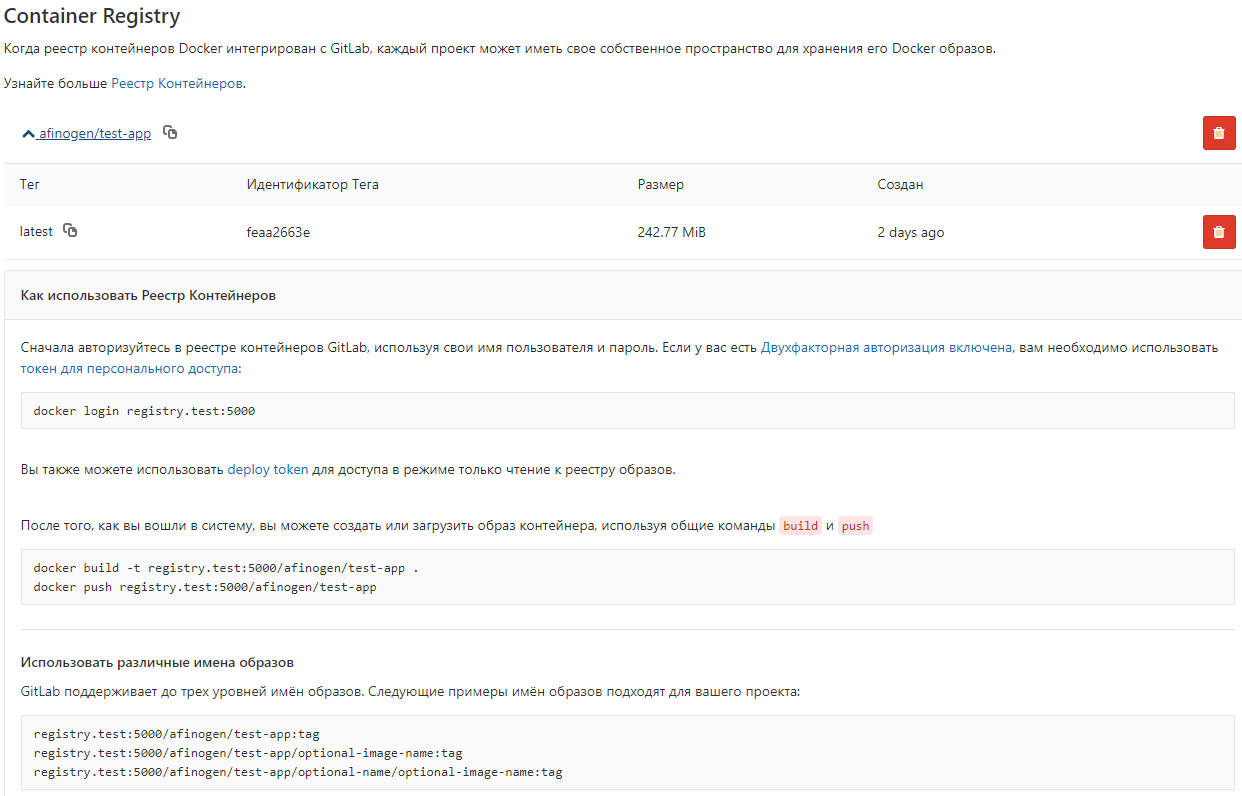
In order not to collect images from the Dockerfile each time, you can store them in the local docker registry.
In this embodiment, authentication is not used, it is not a secure method (!!!), but it is suitable for storing non-critical images.
You can configure gitlab to view
After that, a list of images appears in gitlab.
Introductory
What happened:
- One test server
- Gitlab and redmine on another server
- The desire to understand the problem
All servers are in our local network, the test server is not accessible from the outside.
What was required:
')
- Ability to test multiple projects / branches at the same time
- The developer can go to the server, set it up and not break anything with others.
- Everything should be as convenient as possible and do 1 button preferably from gitlab (CI / CD).
Solutions
1. One server, many hosts
The easiest option. We use the same test server, only the developer needs to create a host for each branch / project and make it into the nginx / apache2 configuration.
Pros:
- Quick and clear to everyone
- Can automate
Minuses:
- Clause 2 of the requirements is not fulfilled - the developer can launch the update database and, under certain circumstances, put everything (Hi Andrey!)
- Pretty complicated automation with a bunch of configuration files.
2. Each developer on the server!
Select each server and the developer himself is responsible for their own economy.
Pros:
- The developer can fully customize the server for your project.
Minuses:
- Clause 2 of the requirements is not fulfilled.
- Expensive and resources can simply stand idle while development is underway, not testing.
- Automation is even more complicated than in claim 1 due to different servers
3. Containerization - docker, kubernetes
This technology is increasingly penetrating our lives. At home I have been using docker for my projects for a long time.
Docker is an automation software for deploying and managing applications in a virtualization environment at the operating system level. Allows you to "pack" the application with all its environments and dependencies in a container that can be transferred to any Linux-system with cgroups support in the kernel, and also provides a container management environment.Pros:
- One server is used
- All requirements are met.
Minuses:
- Images and containers sometimes take up quite a lot of space, you have to crown clean already obsolete to free up space.
Docker implementation
When using gitlab, AutoDevOps, kubernetes settings were very often seen. Plus, bearded guys at various meetup tell how cool everything works with kubernetes. Therefore, it was decided to try to deploy the cluster at its facilities, the server was requested (and the test can not be touched, people are testing there) and rushed!
Since I have experience with kubernetes 0, everything has gone down on the manual with an attempt to understand how all these clusters work. After some time, I managed to raise the cluster, but then I went to problems with certificates, keys, and indeed with the difficulty of deployment. I needed a simpler solution to teach my colleagues to work with it (for example, I don’t want to spend the same vacation sitting on Skype and helping with the setting). Therefore, kubernetes was left alone. Docker itself remained and it was necessary to find a solution for container routing. Since they could be raised on different ports, it would be possible to use the same nginx for internal redirection. This is called a reverse proxy server.
Reverse proxy server - a type of proxy server that relays client requests from the external network to one or more servers that are logically located on the internal network. At the same time, it looks to the client as if the requested resources are located directly on the proxy server.
Reverse Proxy
In order not to reinvent the wheel, I began to look for ready-made solutions. And it was found - this is traefik .
Træfik is a modern HTTP reverse proxy and load balancer that simplifies the deployment of microservices. Træfik integrates with existing infrastructure components (Docker, Swarm mode, Kubernetes, Marathon, Consul, Etcd, Rancher, Amazon ECS, ...) and is configured automatically and dynamically. To work with docker, it is enough to specify its socket and everything, then Træfik finds all the containers and routing to them (for more details, see “Packing applications in docker”).
Træfik Container Configuration
I launch it through docker-compose.yml
version: '3' services: traefik: image: traefik:latest # The official Traefik docker image command: --api --docker # Enables the web UI and tells Træfik to listen to docker ports: - 443:443 - 80:80 # The HTTP port - 8080:8080 # The Web UI (enabled by --api) volumes: - /var/run/docker.sock:/var/run/docker.sock # So that Traefik can listen to the Docker events - /opt/traefik/traefik.toml:/traefik.toml - /opt/traefik/certs/:/certs/ networks: - proxy container_name: traefik restart: always networks: proxy: external: true Here we inform the proxy that you need to listen to ports 80,443 and 8080 (web proxy), we mount the docker socket, the configuration file and the folder with certificates. For the convenience of naming test sites, we decided to make a local domain zone * .test. When accessing any site on it, the user gets to our test server. Therefore, the certificates in the traefik folder are self-signed, but it supports Let's Encrypt so much.
Certificate Generation
openssl req -x509 -nodes -days 365 -newkey rsa:2048 -keyout domain.key -out domain.crt Before starting, you need to create a proxy network in the docker (you can call it your own way).
docker network create proxy This will be the network to link traefik with php container sites. Therefore, we specify it in the service’s networks parameter and in the entire file in networks, by specifying the external parameter: true.
Traefik.toml file
debug = false logLevel = "DEBUG" defaultEntryPoints = ["https","http"] # insecureSkipVerify = true # [entryPoints] [entryPoints.http] address = ":80" [entryPoints.https] address = ":443" [entryPoints.https.tls] [docker] endpoint = "unix:///var/run/docker.sock" domain = "docker.localhost" watch = true exposedbydefault = false It's all quite simple - we specify the http and https traffic entry points, do not forget to set insecureSkipVerify = true if the certificates are local. In the entryPoints.https.tls section, you can omit certificates, then traefik will substitute its certificate.
You can start the service
docker-compose up -d If you go to the site.test address, you will get an error 404, since this domain is not tied to any container.
We pack applications in docker
Now you need to configure the container with the application, namely:
1. specify the network proxy network
2. add labels with traefik configuration
The following is the configuration of one of the applications.
docker-compose.yml applications
version: '3' services: app: build: data/docker/php # restart: always working_dir: /var/www/html/public volumes: - ./:/var/www/html # - /home/develop/site-files/f:/var/www/html/public/f # links: - mailcatcher - memcached - mysql labels: - traefik.enabled=true - traefik.frontend.rule=Host:TEST_DOMAIN,crm.TEST_DOMAIN,bonus.TEST_DOMAIN - traefik.docker.network=proxy - traefik.port=443 - traefik.protocol=https networks: - proxy - default mailcatcher: image: schickling/mailcatcher:latest restart: always memcached: image: memcached restart: always mysql: image: mysql:5.7 restart: always command: --max_allowed_packet=902505856 --sql-mode="" environment: MYSQL_ROOT_PASSWORD: 12345 MYSQL_DATABASE: site volumes: - ./data/cache/mysql-db:/var/lib/mysql # phpmyadmin: image: phpmyadmin/phpmyadmin restart: always links: - mysql environment: MYSQL_USERNAME: root MYSQL_ROOT_PASSWORD: 12345 PMA_ARBITRARY: 1 PMA_HOST: mysql_1 labels: - traefik.enabled=true - traefik.frontend.rule=Host:pma.TEST_DOMAIN - traefik.docker.network=proxy - traefik.port=80 - traefik.default.protocol=http networks: - proxy - default networks: proxy: external: true In the app service, in the network section, you need to specify proxy and default, which means that it will be available in two networks, as you can see from the configuration, I do not forward ports to the outside, everything goes inside the network.
Next, configure the labels
- traefik.enabled=true # traefik - traefik.frontend.rule=Host:TEST_DOMAIN,crm.TEST_DOMAIN,bonus.TEST_DOMAIN # traefik - traefik.docker.network=proxy # - traefik.port=443 #, ssl 80 http - traefik.protocol=https # # phpmyadmin http In the general section of networks, you need to specify external: true
The constant TEST_DOMAIN needs to be replaced with a domain, for example, site.test
Run the application
docker-compose up -d Now if you go to the domains site.test, crm.site.test, bonus.site.test you can see the working site. And on the domain pma.site.test will be phpmyadmin for convenient work with the database.
GitLab Setup
Create a task handler, for this run
gitlab-runner register Specify url gitlab, token and through which the task will be executed (executors). Since my test and gitlab are on different servers, I choose ssh executor. You will need to specify the server address and login / password to connect via ssh.
Runner can be attached to one or more projects. Since my work logic is the same everywhere, so a shared runner was created (common for all projects).
And the final touch is to create a CI configuration file.
.gitlab-ci.yml
stages: - build - clear # develop build_develop: stage: build # build tags: # - ssh-develop environment: # , - name: review/$CI_BUILD_REF_NAME # url: https://site$CI_PIPELINE_ID.test #url on_stop: clear when: manual script: - cd ../ && cp -r $CI_PROJECT_NAME $CI_PIPELINE_ID && cd $CI_PIPELINE_ID # - cp -r /home/develop/site-files/.ssh data/docker/php/.ssh # ssh - sed -i -e "s/TEST_DOMAIN/site$CI_PIPELINE_ID.test/g" docker-compose.yml # - docker-compose down # - docker-compose up -d --build # - script -q -c "docker exec -it ${CI_PIPELINE_ID}_app_1 bash -c \"cd ../ && php composer.phar install --prefer-dist \"" # - script -q -c "docker exec -it ${CI_PIPELINE_ID}_app_1 bash -c \"cd ../ && php composer.phar first-install $CI_PIPELINE_ID\"" # # production build_prod: stage: build tags: - ssh-develop environment: name: review/$CI_BUILD_REF_NAME url: https://site$CI_PIPELINE_ID.test on_stop: clear when: manual script: - cd ../ && cp -r $CI_PROJECT_NAME $CI_PIPELINE_ID && cd $CI_PIPELINE_ID - cp -r /home/develop/site-files/.ssh data/docker/php/.ssh # ssh - docker-compose down - docker-compose up -d --build - script -q -c "docker exec -it ${CI_PIPELINE_ID}_app_1 bash -c \"cd ../ && php composer.phar install --prefer-dist --no-dev\"" - script -q -c "docker exec -it ${CI_PIPELINE_ID}_app_1 bash -c \"cd ../ && php composer.phar first-install $CI_PIPELINE_ID\"" clear: stage: clear tags: - ssh-develop environment: name: review/$CI_BUILD_REF_NAME action: stop script: - cd ../ && cd $CI_PIPELINE_ID && docker-compose down && cd ../ && echo password | sudo -S rm -rf $CI_PIPELINE_ID # when: manual This configuration describes 2 stages - build and clear. The build phase has 2 execution options - build_develop and build_prod
Gitlab builds a clear process flow diagram. In my example, all processes are started manually (when: manual parameter). This is done so that the developer, after deploying the test site, can pull his edits into the container without rebuilding the entire container. Another reason is the domain name - site $ CI_PIPELINE_ID.test, where CI_PIPELINE_ID is the number of the process that launched the build. That is, we gave the site with the site123.test domain for review and in order to make hot edits, changes to the container by the developer are immediately uploaded.
A small feature of the ssh executor. When you connect to the server, a view folder is created.
/home//builds/_runner/0/_/_ Therefore, the line was added
cd ../ && cp -r $CI_PROJECT_NAME $CI_PIPELINE_ID && cd $CI_PIPELINE_ID In it, we go up to the folder above and copy the project to the folder with the process number. So you can deploy multiple branches of one project. But in the settings of the handler you need to check Lock to current projects, so the handler will not try to deploy several branches at the same time.
The clear phase stops the containers and deletes the folder, you may need root privileges, so use the echo password | sudo -S rm, where password is your password.
Garbage collection
From time to time, it is necessary to remove unused containers in order not to take up space; for this, a script with such content is hanging in the crown
#!/bin/bash # : docker ps --filter status=dead --filter status=exited -aq | xargs -r docker rm -v # : yes | docker container prune # : yes | docker image prune # : yes | docker volume prune performed once a day.
Conclusion
This solution helped us significantly optimize testing and the release of new features. Ready to answer questions, constructive criticism is accepted.
Bonus
In order not to collect images from the Dockerfile each time, you can store them in the local docker registry.
Docker-compose.yml file
registry: restart: always image: registry:2 ports: - 5000:5000 volumes: - /opt/docker-registry/data:/var/lib/registry # In this embodiment, authentication is not used, it is not a secure method (!!!), but it is suitable for storing non-critical images.
You can configure gitlab to view
gitlab_rails['registry_enabled'] = true gitlab_rails['registry_host'] = "registry.test" gitlab_rails['registry_port'] = "5000" After that, a list of images appears in gitlab.
Source: https://habr.com/ru/post/426319/
All Articles