A python kivy application for dietary diversity. From the code to the receipt of the .apk file for Android
I study python kivy and for myself decided to write a small application to diversify my diet. Decided to share. The article is designed for beginners in kivy. The application takes about 100 lines of code.
The purpose of creating a bike
- Avoid frequent repetitions in the diet. To not eat the same dish too often.
- I did not forget the dishes that I ate, then I forgot, and for years I did not return to them, because I did not remember the corny. It happens to me.
Intro
You can not read in any intro lyrics.
')
I had to live in one country, in the same hotel, where they were fed daily for breakfast eggs and nothing more, and after a month it began to itch. He applied for medical help, although he had never suffered from anything like this before. Having learned from bitter experience, after this, he decided for himself to allow as few repetitions as possible in the food, so that nothing could accumulate in the body. This is my personal experience, I'm just telling, without imposing. Perhaps there are no rules, without exception, probably oatmeal can be eaten every day for dozens of years.
Screenshots

Suppose my diet consists of 50 dishes. For example, today I ate an omelet. I click on the button, and the omelette is on the 50th line in the queue, and there are 49 dishes in front of it, which I will eat to get to the omelet again. That's the whole logic of the application. (On the screenshots the dishes are naked, all coincidences are random, they have no relation to my real diet).
Source Code and Explanations
main.py
from kivy.app import App from kivy.uix.button import Button from kivy.uix.boxlayout import BoxLayout from kivy.uix.screenmanager import ScreenManager, Screen from kivy.uix.recycleview import RecycleView from kivy.uix.gridlayout import GridLayout from kivy.core.window import Window from kivy.config import ConfigParser from kivy.uix.textinput import TextInput from kivy.uix.label import Label from kivy.metrics import dp from datetime import datetime import os import ast import time class MenuScreen(Screen): def __init__(self, **kw): super(MenuScreen, self).__init__(**kw) box = BoxLayout(orientation='vertical') box.add_widget(Button(text=' ', on_press=lambda x: set_screen('list_food'))) box.add_widget(Button(text=' ', on_press=lambda x: set_screen('add_food'))) self.add_widget(box) class SortedListFood(Screen): def __init__(self, **kw): super(SortedListFood, self).__init__(**kw) def on_enter(self): # self.layout = GridLayout(cols=1, spacing=10, size_hint_y=None) self.layout.bind(minimum_height=self.layout.setter('height')) back_button = Button(text='< ', on_press=lambda x: set_screen('menu'), size_hint_y=None, height=dp(40)) self.layout.add_widget(back_button) root = RecycleView(size_hint=(1, None), size=(Window.width, Window.height)) root.add_widget(self.layout) self.add_widget(root) dic_foods = ast.literal_eval( App.get_running_app().config.get('General', 'user_data')) for f, d in sorted(dic_foods.items(), key=lambda x: x[1]): fd = f.decode('u8') + ' ' + (datetime.fromtimestamp(d).strftime('%Y-%m-%d')) btn = Button(text=fd, size_hint_y=None, height=dp(40)) self.layout.add_widget(btn) def on_leave(self): # self.layout.clear_widgets() # class AddFood(Screen): def buttonClicked(self, btn1): if not self.txt1.text: return self.app = App.get_running_app() self.app.user_data = ast.literal_eval( self.app.config.get('General', 'user_data')) self.app.user_data[self.txt1.text.encode('u8')] = int(time.time()) self.app.config.set('General', 'user_data', self.app.user_data) self.app.config.write() text = " : " + self.txt1.text self.result.text = text self.txt1.text = '' def __init__(self, **kw): super(AddFood, self).__init__(**kw) box = BoxLayout(orientation='vertical') back_button = Button(text='< ', on_press=lambda x: set_screen('menu'), size_hint_y=None, height=dp(40)) box.add_widget(back_button) self.txt1 = TextInput(text='', multiline=False, height=dp(40), size_hint_y=None, hint_text=" ") box.add_widget(self.txt1) btn1 = Button(text=" ", size_hint_y=None, height=dp(40)) btn1.bind(on_press=self.buttonClicked) box.add_widget(btn1) self.result = Label(text='') box.add_widget(self.result) self.add_widget(box) def set_screen(name_screen): sm.current = name_screen sm = ScreenManager() sm.add_widget(MenuScreen(name='menu')) sm.add_widget(SortedListFood(name='list_food')) sm.add_widget(AddFood(name='add_food')) class FoodOptionsApp(App): def __init__(self, **kvargs): super(FoodOptionsApp, self).__init__(**kvargs) self.config = ConfigParser() def build_config(self, config): config.adddefaultsection('General') config.setdefault('General', 'user_data', '{}') def set_value_from_config(self): self.config.read(os.path.join(self.directory, '%(appname)s.ini')) self.user_data = ast.literal_eval(self.config.get( 'General', 'user_data')) def get_application_config(self): return super(FoodOptionsApp, self).get_application_config( '{}/%(appname)s.ini'.format(self.directory)) def build(self): return sm if __name__ == '__main__': FoodOptionsApp().run() I deliberately did not use kv files, as the code is given for educational purposes, for people who are familiar with python. Everything is written on bare python. In the explanations, I will not dwell on the explanation of the python code, but immediately go to the specific features of Kivy.
Go:
class MenuScreen(Screen):
The class is responsible for launching the starting page of the application, it can be called as you like, for example, StartScreen. And inherits the kivy Screen module . The application consists of 3 windows, these windows are created using this module.box = BoxLayout(orientation='vertical')
BoxLayout divides the screen into equal parts, horizontally by default, I wrote orientation = 'vertical' to divide verticallyButton(text=' ', on_press=lambda x: set_screen('list_food'))
Button - creates buttons, in on_press it is set which function will be launched when pressed.
- adds buttons to layers and windows.add_widget()self.layout = GridLayout(cols=1, spacing=10, size_hint_y=None)
Grid Layout is somewhat similar to the table tag in html, indicating cols - the number of columns or rows - the number of rows.
You can specify both parameters or one parameter.
The screen will be divided into the desired number of compartments.root = RecycleView(size_hint=(1, None), size=(Window.width, Window.height))
RecycleView is the module that creates vertical scrolling in my application. A feature of RecycleView is that it builds scrolls with elements of the same width and height. And it works fast. And there is a ScrollView module, it can build scrolls with elements of different sizes, but it works slower than RecycleViewconfig.get('General', 'user_data')
Run on windows & linux & macos
The principle for all operating systems is the same:
- We put python3
- We put kivy
- Create a main.py file and stick the entire code above into it
- Run the command
python3 main.py
The program should earn.
Build an apk file and run on your Android phone
So, we have a program code file written in python. How to create an application now so that it can be launched on an Android phone? Previously, it was quite a tricky process, requiring skills and dancing with a tambourine. Now this is not a problem.
Here is a step by step guide:
- We download the ready virtual machine from the kivy developers in which everything is already configured. https://github.com/Zen-CODE/kivybits/blob/master/KivyCompleteVM/ReadMe.txt . Password: kivy
- Run it in the Virtual Box.
- Open the terminal and enter the following commands:
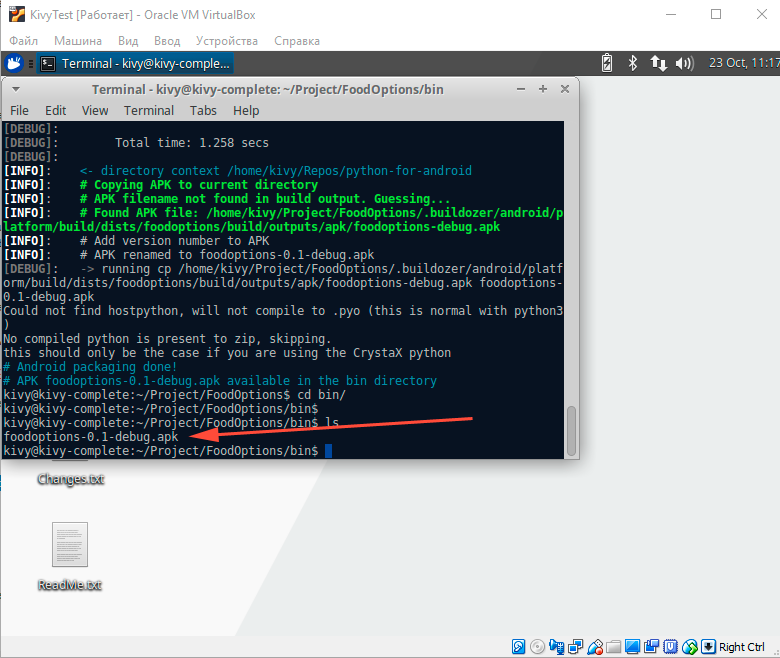
# python-for-android cd /home/kivy/Repos rm -fr python-for-android/ git clone https://github.com/kivy/python-for-android.git cd ~ mkdir Project cd Project git clone https://github.com/Alexmod/FoodOptions.git cd FoodOptions buildozer android debug # 100500 , # . - The last command creates the bin folder in the same directory, in bin you will find the file foodoptions-0.1-debug.apk, which you can upload to your phone, install and enjoy the application.
How to upload apk file to phone?
You can, of course, do it as you please, send yourself by mail, put it somewhere, put it in telegrams, etc., and then download the application to your phone.
But there is a specialized tool for this. We turn on the developer mode on the phone, connect it with a USB cable. The virtual player should see that you have connected the phone. Next install adb:
sudo apt install adb After installation, go to the bin folder and enter the command
adb install -r foodoptions-0.1-debug.apk And after about a minute you can see the application on your phone after
Success in the console.
kivy@kivy-complete:~/Project/FoodOptions/bin$ adb install -r foodoptions-0.1-debug.apk 342 KB/s (10083019 bytes in 28.730s) Success kivy@kivy-complete:~/Project/FoodOptions/bin$ If suddenly the application crashes or does not behave as expected, then there is such a command to view errors
adb logcat| grep python Russian application name
If you want your application to be called in Russian, for example, “Food Diary”, then you need to make changes to the file:
.buildozer/android/platform/build/dists/foodoptions/templates/strings.tmpl.xml The Russian name of the application is written into the appName tag, this folder is created after the first launch of the buildozer android debug. After editing the file, go back to the FoodOptions folder and run the buildozer android debug again. The file will be collected in a new way. After installation on the phone, the program name will be written in Russian.
About buildozer.spec
Here is my github file: buildozer.spec
It is this file that tells buildozer how to build the package.
There are many different variations. To whom it is interesting, then enter the following command inside virtualke
cd /tmp buildozer init A default buildozer.spec file will be created with a bunch of comments and explanations. For example, if you want an icon of your own for an application, you specify in the line:
icon.filename = %(source.dir)s/data/icon.png your file with an icon. And the application will be assembled with your icon.
If you need to load any specific module that is not included in the official python library, then this is done in the requirements = line. In general, the story of the buildozer.spec file can take a whole article, or even two.
Downloading the app on Google Play
It is necessary to register, go through all the procedures, get the keys. And then run:
sudo apt install zipalign buildozer android release jarsigner -verbose -sigalg SHA1withRSA -digestalg SHA1 -keystore /path/keystore bin/apk-unsigned.apk apkname zipalign -v 4 bin/apk-apkname-unsigned.apk bin/apk-apkname-release.apk The resulting file apk-apkname-release.apk upload to Google Play.
Links
- Video lessons on kivy in Russian . I personally liked
- Articles on Habré about kivy from HeaTTheatR (and thanks to him for the help!)
In principle, anyone who can program in python can change the application and easily add the following:
- Add design to make the application beautiful
- Use kv-files to make the code easier. I would give this analogy: those who are familiar with web programming, imagine a code without html templates and with html templates. Putting buttons, layers and other things into kv-files is something like jinja2 for a web programmer. The logic remains in .py files, and baubles - in kv-files.
- Add counting calories, protein, carbohydrates, fat (BJU)
- Add the ability to photograph food
Source: https://habr.com/ru/post/426269/
All Articles