TensorFlow.js and clmtrackr.js: tracking the direction of the user's gaze in the browser
The author of the article, the translation of which we publish, offers to talk about solving tasks from the field of computer vision solely by means of a web browser. Solving this problem is not so difficult thanks to the TensorFlow JavaScript library. Instead of training your own model and offering it to users as part of the finished product, we will give them the opportunity to independently collect data and train the model directly in the browser, on their own computer. With this approach, server data processing is completely unnecessary.

You can try what this material is about to create here . For this you need a modern browser, a webcam and a mouse. Here is the source code of the project. It is not designed to work on mobile devices, the author of the material said that he did not have time for the appropriate improvements. In addition, he notes that the task considered here will become more complicated if you have to process the video stream from a moving camera.
Let's use machine learning technologies to find out exactly where the user is looking when looking at a web page. Do this by watching his eyes with a webcam.
In the browser it is very easy to access the webcam. If we assume that the entire image from the camera will be used as input for the neural network, then we can say that it is too large for this purpose. The system will have to do a great job only to determine the place on the image where the eyes are. Such an approach can show itself well if we are talking about a model that the developer teaches independently and deploys on the server, but if we are talking about learning and using the model in the browser, this is too much.
')
In order to facilitate the task of the network, we can provide it with only a part of the image - the one that contains the user's eyes and a small area around them. This area, which is a rectangle surrounding the eyes, can be identified using a third-party library. Therefore, the first part of our work looks like this:

Webcam input, face recognition, eye detection, cropped image
I used the library called clmtrackr to detect faces in the image. It is not perfect, but is small in size, good performance, and, in general, adequately copes with its task.
If as an input for a simple convolutional neural network, a small but cleverly chosen image is used, the network can learn without any problems. This is what this process looks like:

The input image, the model is a convolutional neural network, the coordinates, the position predicted by the network on the page where the user is looking.
Here will be described a fully working minimal implementation of the idea discussed in this section. A project whose code is in this repository has many additional features.
To get started,
In order to activate the webcam and display the video stream on the page, we will need to obtain the user's permission. Here I do not provide code that solves the problem of compatibility of the project with different browsers. We will proceed from the assumption that our users work on the Internet using the latest version of Google Chrome.
Add the following code to the HTML file. It must be located within the
Now let's work on the
Try this code for yourself. When you open the page, the browser must request permission, and then a picture from the webcam will appear on the screen.
Later we will extend the
Now let's use the clmtrackr.js library to search for faces on the video. To begin, initialize the face tracking system by adding the following code after
Now, in the
That's all we need. Now the system will be able to recognize a face in a video stream.
Do not believe? Let us, in order for you to be convinced of this, draw a “mask” around the face.
In order to do this, we need to display the image on top of the element responsible for displaying the video. You can draw something on HTML pages using the
If you want, you can move the inline style to a separate CSS file.
Here we added a
Now, every time the browser displays the next frame of the video, we are going to draw something on the
Here is the code that implements what we just talked about. You need to add it below the
Now we call the
Refresh the page and look at the webcam. You should see a green “mask” around the face in the video window. Sometimes in order for the system to correctly recognize the face, you need to move your head slightly in the frame.
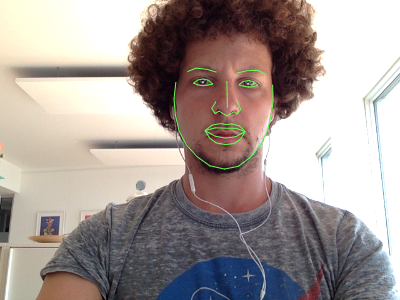
Face recognition results
Now we need to find the rectangular area of the image in which the eyes are located, and place it on a separate
Fortunately, cmltracker gives us not only information about the location of the face, but also 70 control points. If you look at the documentation for cmltracker, you can choose exactly the control points that we need.

Control points
Let us decide that the eyes are a rectangular part of the image, the borders of which touch the points 23, 28, 24 and 26, extended by 5 pixels in each direction. This rectangle should include everything that is important to us, unless the user tilts his head too much.
Now, before we can take advantage of this image fragment, we need another
Add this code to the HTML file, which describes the
The following function will return the
Now, in each frame, we are going to extract a rectangle with eyes from the video stream, circle it with a red line on the
Replace the following code with an
Reloading the page now, you should see the red rectangle around the eyes, and what contains this rectangle - in the corresponding
A <canvas> element that displays a rectangle containing an image of the user's eyes.
There are many ways to collect data. I decided to use the information that can be obtained from the mouse and keyboard. In our project, data collection looks like this.
The user moves the cursor around the page and watches him with his eyes, pressing the
In order to find out exactly where the mouse pointer is located on the web page, we need the event handler
To capture an image displayed by the
Note that the
We could just save all the samples in one large training set, but in machine learning it is important to check the quality of the training model. That is why we need to save some samples in a separate control sample. After that, we can check the model's behavior on new data for it and find out if excessive model learning has occurred. For this purpose, 20% of the total number of samples are included in the control sample.
Here is the code that is used for data collection and sampling:
And finally, we need to bind this function to the
Now each time the
Create a simple convolutional neural network. TensorFlow.js provides an API for this purpose, reminiscent of Keras. The network must have a
Please note that I stopped at the network settings used here after experimenting on my MacBook Air. You may well choose your own configuration of the model.
Here is the model code:
Before we start learning about the network, we set a fixed number of epochs and a variable packet size (since we may be working with very small data sets).
Now add a button to the page to start learning. This code goes to the HTML file:
This code must be added to the JS file:
Now that we can collect data and prepare a model, we can begin to predict the place on the page where the user is looking. Indicate this place with the help of a green circle that moves around the screen.
First, add a circle to the page:
In order to move it around the page, we periodically transfer the current image of the eyes of the neural network and ask it where the user is looking. The model responds with two coordinates along which the circle should be moved:
I set the interval to 100 milliseconds. If your computer is not as powerful as mine, you may decide to increase it.
Now we have everything that is needed to implement the idea set out at the very beginning of this material. Try what we did. Move the mouse cursor, watching him with your eyes, and press the Spacebar. Then click the start training button.
Collect more data, press the button again. After a while, the green circle will start moving around the screen following your gaze. At first, it will not be particularly good to get to the place where you are looking, but, starting with about 50 samples collected, after several stages of training, and if you are lucky, it will quite accurately move to the point on the page you are looking at . The full code of the example analyzed in this material can be found here .
Although what we have done already looks very interesting, there are still many improvements to be made. What if the user moves his head or changes position in front of the camera? Our project would not be hindered by the possibilities regarding the selection of the size, position and angle of a rectangle bounding the image area where the eyes are located. In fact, quite a lot of additional features are implemented in the full version of the example discussed here. Here are some of them:
Dear readers! Do you use TensorFlow?

You can try what this material is about to create here . For this you need a modern browser, a webcam and a mouse. Here is the source code of the project. It is not designed to work on mobile devices, the author of the material said that he did not have time for the appropriate improvements. In addition, he notes that the task considered here will become more complicated if you have to process the video stream from a moving camera.
Idea
Let's use machine learning technologies to find out exactly where the user is looking when looking at a web page. Do this by watching his eyes with a webcam.
In the browser it is very easy to access the webcam. If we assume that the entire image from the camera will be used as input for the neural network, then we can say that it is too large for this purpose. The system will have to do a great job only to determine the place on the image where the eyes are. Such an approach can show itself well if we are talking about a model that the developer teaches independently and deploys on the server, but if we are talking about learning and using the model in the browser, this is too much.
')
In order to facilitate the task of the network, we can provide it with only a part of the image - the one that contains the user's eyes and a small area around them. This area, which is a rectangle surrounding the eyes, can be identified using a third-party library. Therefore, the first part of our work looks like this:
Webcam input, face recognition, eye detection, cropped image
I used the library called clmtrackr to detect faces in the image. It is not perfect, but is small in size, good performance, and, in general, adequately copes with its task.
If as an input for a simple convolutional neural network, a small but cleverly chosen image is used, the network can learn without any problems. This is what this process looks like:
The input image, the model is a convolutional neural network, the coordinates, the position predicted by the network on the page where the user is looking.
Here will be described a fully working minimal implementation of the idea discussed in this section. A project whose code is in this repository has many additional features.
Training
To get started,
clmtrackr.js from the corresponding repository . We'll start the work with an empty HTML file in which jQuery, TensorFlow.js, clmtrackr.js and main.js file are main.js with our code, which we will work on a little later: <!doctype html> <html> <body> <script src="https://code.jquery.com/jquery-3.3.1.min.js"></script> <script src="https://cdn.jsdelivr.net/npm/@tensorflow/tfjs@0.12.0"></script> <script src="clmtrackr.js"></script> <script src="main.js"></script> </body> </html> Getting video stream from a webcam
In order to activate the webcam and display the video stream on the page, we will need to obtain the user's permission. Here I do not provide code that solves the problem of compatibility of the project with different browsers. We will proceed from the assumption that our users work on the Internet using the latest version of Google Chrome.
Add the following code to the HTML file. It must be located within the
<body> , but above the <script> tags: <video id="webcam" width="400" height="300" autoplay></video> Now let's work on the
main.js file: $(document).ready(function() { const video = $('#webcam')[0]; function onStreaming(stream) { video.srcObject = stream; } navigator.mediaDevices.getUserMedia({ video: true }).then(onStreaming); }); Try this code for yourself. When you open the page, the browser must request permission, and then a picture from the webcam will appear on the screen.
Later we will extend the
onStreaming() function code.Face search
Now let's use the clmtrackr.js library to search for faces on the video. To begin, initialize the face tracking system by adding the following code after
const video = ... : const ctrack = new clm.tracker(); ctrack.init(); Now, in the
onStreaming() function, we connect the face search system by adding the following command: ctrack.start(video); That's all we need. Now the system will be able to recognize a face in a video stream.
Do not believe? Let us, in order for you to be convinced of this, draw a “mask” around the face.
In order to do this, we need to display the image on top of the element responsible for displaying the video. You can draw something on HTML pages using the
<canvas> . Therefore, we will create such an element, putting it on the element that displays the video. This will help us with the following code, which must be added to the HTML file under the <video> element already existing there: <canvas id="overlay" width="400" height="300"></canvas> <style> #webcam, #overlay { position: absolute; top: 0; left: 0; } </style> If you want, you can move the inline style to a separate CSS file.
Here we added a
<canvas> element to the page of the same size as the <video> element. The fact that the elements will be located in the same position is provided by the styles used here.Now, every time the browser displays the next frame of the video, we are going to draw something on the
<canvas> . The execution of any code during the output of each frame is performed using the requestAnimationLoop() mechanism. Before we put anything into the <canvas> , we need to remove from it what was on it before, clearing it. We can then suggest that clmtrackr perform graphics output directly on the <canvas> .Here is the code that implements what we just talked about. You need to add it below the
ctrack.init() command: const overlay = $('#overlay')[0]; const overlayCC = overlay.getContext('2d'); function trackingLoop() { // , , // - . requestAnimationFrame(trackingLoop); let currentPosition = ctrack.getCurrentPosition(); overlayCC.clearRect(0, 0, 400, 300); if (currentPosition) { ctrack.draw(overlay); } } Now we call the
trackingLoop() function in the onStreaming() function immediately after ctrack.start() . This function will plan its own restart itself in each frame.Refresh the page and look at the webcam. You should see a green “mask” around the face in the video window. Sometimes in order for the system to correctly recognize the face, you need to move your head slightly in the frame.
Face recognition results
Identify the area of the image containing the eyes
Now we need to find the rectangular area of the image in which the eyes are located, and place it on a separate
<canvas> .Fortunately, cmltracker gives us not only information about the location of the face, but also 70 control points. If you look at the documentation for cmltracker, you can choose exactly the control points that we need.
Control points
Let us decide that the eyes are a rectangular part of the image, the borders of which touch the points 23, 28, 24 and 26, extended by 5 pixels in each direction. This rectangle should include everything that is important to us, unless the user tilts his head too much.
Now, before we can take advantage of this image fragment, we need another
<canvas> for its output. Its size will be 50x25 pixels. A rectangle with eyes will be inscribed in this element. Small deformations of the image are not a problem.Add this code to the HTML file, which describes the
<canvas> , into which that part of the image that has eyes: <canvas id="eyes" width="50" height="25"></canvas> <style> #eyes { position: absolute; top: 0; right: 0; } </style> The following function will return the
x and y coordinates, as well as the width and height of the rectangle surrounding the eye. She, as input, takes an array of positions , obtained from clmtrackr. Note that each coordinate obtained from clmtrackr has components x and y . This function should be added to main.js : function getEyesRectangle(positions) { const minX = positions[23][0] - 5; const maxX = positions[28][0] + 5; const minY = positions[24][1] - 5; const maxY = positions[26][1] + 5; const width = maxX - minX; const height = maxY - minY; return [minX, minY, width, height]; } Now, in each frame, we are going to extract a rectangle with eyes from the video stream, circle it with a red line on the
<canvas> element that is superimposed on the <video> element, and then copy it into a new <canvas> . Please note that in order to correctly identify the area we need, we will calculate the resizeFactorX and resizeFactorY .Replace the following code with an
if block in the trackingLoop() function: if (currentPosition) { // , // <canvas>, <video> ctrack.draw(overlay); // , , // const eyesRect = getEyesRectangle(currentPosition); overlayCC.strokeStyle = 'red'; overlayCC.strokeRect(eyesRect[0], eyesRect[1], eyesRect[2], eyesRect[3]); // , // // const resizeFactorX = video.videoWidth / video.width; const resizeFactorY = video.videoHeight / video.height; // // <canvas> const eyesCanvas = $('#eyes')[0]; const eyesCC = eyesCanvas.getContext('2d'); eyesCC.drawImage( video, eyesRect[0] * resizeFactorX, eyesRect[1] * resizeFactorY, eyesRect[2] * resizeFactorX, eyesRect[3] * resizeFactorY, 0, 0, eyesCanvas.width, eyesCanvas.height ); } Reloading the page now, you should see the red rectangle around the eyes, and what contains this rectangle - in the corresponding
<canvas> . If your eyes are bigger than mine, experiment with the getEyeRectangle function.A <canvas> element that displays a rectangle containing an image of the user's eyes.
Data collection
There are many ways to collect data. I decided to use the information that can be obtained from the mouse and keyboard. In our project, data collection looks like this.
The user moves the cursor around the page and watches him with his eyes, pressing the
▍Tracking mouse movements
In order to find out exactly where the mouse pointer is located on the web page, we need the event handler
document.onmousemove . Our function, in addition, normalizes the coordinates so that they fit into the range [-1, 1]: // : const mouse = { x: 0, y: 0, handleMouseMove: function(event) { // , [-1, 1] mouse.x = (event.clientX / $(window).width()) * 2 - 1; mouse.y = (event.clientY / $(window).height()) * 2 - 1; }, } document.onmousemove = mouse.handleMouseMove; ▍ Image Capture
To capture an image displayed by the
<canvas> and save it as a tensor, TensorFlow.js offers an auxiliary function tf.fromPixels() . Use it to save and then normalize the image from the <canvas> , which displays a rectangle containing the user's eyes: function getImage() { // return tf.tidy(function() { const image = tf.fromPixels($('#eyes')[0]); // <i><font color="#999999"></font></i>: const batchedImage = image.expandDims(0); // : return batchedImage.toFloat().div(tf.scalar(127)).sub(tf.scalar(1)); }); } Note that the
tf.tidy() function is used to restore order after the completion of work.We could just save all the samples in one large training set, but in machine learning it is important to check the quality of the training model. That is why we need to save some samples in a separate control sample. After that, we can check the model's behavior on new data for it and find out if excessive model learning has occurred. For this purpose, 20% of the total number of samples are included in the control sample.
Here is the code that is used for data collection and sampling:
const dataset = { train: { n: 0, x: null, y: null, }, val: { n: 0, x: null, y: null, }, } function captureExample() { // tf.tidy(function() { const image = getImage(); const mousePos = tf.tensor1d([mouse.x, mouse.y]).expandDims(0); // , ( ) const subset = dataset[Math.random() > 0.2 ? 'train' : 'val']; if (subset.x == null) { // subset.x = tf.keep(image); subset.y = tf.keep(mousePos); } else { // const oldX = subset.x; const oldY = subset.y; subset.x = tf.keep(oldX.concat(image, 0)); subset.y = tf.keep(oldY.concat(mousePos, 0)); } // subset.n += 1; }); } And finally, we need to bind this function to the
$('body').keyup(function(event) { // if (event.keyCode == 32) { captureExample(); event.preventDefault(); return false; } }); Now each time the
Model training
Create a simple convolutional neural network. TensorFlow.js provides an API for this purpose, reminiscent of Keras. The network must have a
conv2d layer, a maxPooling2d layer, and, finally, a dense layer with two output values (they represent screen coordinates). Along the way, I added to the network, as a regularizer, a dropout layer, and a flatten layer in order to convert two-dimensional data into one-dimensional. Network training is performed using the Adam optimizer.Please note that I stopped at the network settings used here after experimenting on my MacBook Air. You may well choose your own configuration of the model.
Here is the model code:
let currentModel; function createModel() { const model = tf.sequential(); model.add(tf.layers.conv2d({ kernelSize: 5, filters: 20, strides: 1, activation: 'relu', inputShape: [$('#eyes').height(), $('#eyes').width(), 3], })); model.add(tf.layers.maxPooling2d({ poolSize: [2, 2], strides: [2, 2], })); model.add(tf.layers.flatten()); model.add(tf.layers.dropout(0.2)); // x y model.add(tf.layers.dense({ units: 2, activation: 'tanh', })); // Adam 0.0005 MSE model.compile({ optimizer: tf.train.adam(0.0005), loss: 'meanSquaredError', }); return model; } Before we start learning about the network, we set a fixed number of epochs and a variable packet size (since we may be working with very small data sets).
function fitModel() { let batchSize = Math.floor(dataset.train.n * 0.1); if (batchSize < 4) { batchSize = 4; } else if (batchSize > 64) { batchSize = 64; } if (currentModel == null) { currentModel = createModel(); } currentModel.fit(dataset.train.x, dataset.train.y, { batchSize: batchSize, epochs: 20, shuffle: true, validationData: [dataset.val.x, dataset.val.y], }); } Now add a button to the page to start learning. This code goes to the HTML file:
<button id="train">Train!</button> <style> #train { position: absolute; top: 50%; left: 50%; transform: translate(-50%, -50%); font-size: 24pt; } </style> This code must be added to the JS file:
$('#train').click(function() { fitModel(); }); Where is the user looking?
Now that we can collect data and prepare a model, we can begin to predict the place on the page where the user is looking. Indicate this place with the help of a green circle that moves around the screen.
First, add a circle to the page:
<div id="target"></div> <style> #target { background-color: lightgreen; position: absolute; border-radius: 50%; height: 40px; width: 40px; transition: all 0.1s ease; box-shadow: 0 0 20px 10px white; border: 4px solid rgba(0,0,0,0.5); } </style> In order to move it around the page, we periodically transfer the current image of the eyes of the neural network and ask it where the user is looking. The model responds with two coordinates along which the circle should be moved:
function moveTarget() { if (currentModel == null) { return; } tf.tidy(function() { const image = getImage(); const prediction = currentModel.predict(image); // const targetWidth = $('#target').outerWidth(); const targetHeight = $('#target').outerHeight(); const x = (prediction.get(0, 0) + 1) / 2 * ($(window).width() - targetWidth); const y = (prediction.get(0, 1) + 1) / 2 * ($(window).height() - targetHeight); // : const $target = $('#target'); $target.css('left', x + 'px'); $target.css('top', y + 'px'); }); } setInterval(moveTarget, 100); I set the interval to 100 milliseconds. If your computer is not as powerful as mine, you may decide to increase it.
Results
Now we have everything that is needed to implement the idea set out at the very beginning of this material. Try what we did. Move the mouse cursor, watching him with your eyes, and press the Spacebar. Then click the start training button.
Collect more data, press the button again. After a while, the green circle will start moving around the screen following your gaze. At first, it will not be particularly good to get to the place where you are looking, but, starting with about 50 samples collected, after several stages of training, and if you are lucky, it will quite accurately move to the point on the page you are looking at . The full code of the example analyzed in this material can be found here .
Although what we have done already looks very interesting, there are still many improvements to be made. What if the user moves his head or changes position in front of the camera? Our project would not be hindered by the possibilities regarding the selection of the size, position and angle of a rectangle bounding the image area where the eyes are located. In fact, quite a lot of additional features are implemented in the full version of the example discussed here. Here are some of them:
- The options for setting the rectangle that bounds the eyes described above.
- Convert image to grayscale.
- Using CoordConv .
- Heat map to check where the model performed well and where it did not.
- Ability to save and load datasets.
- Ability to save and load models.
- Saving weights, showed after training the minimum loss when checking.
- Improved user interface with a brief instruction on how to work with the system.
Dear readers! Do you use TensorFlow?
Source: https://habr.com/ru/post/426055/
All Articles