Tips for professional use RecyclerView. Part 1

I decided to write this article, because noticed that many developers make mistakes when using RecyclerView , even though Google has released it for quite some time.
The items described here have been mentioned in various reports and materials on Google Devs.
In this article I will briefly describe the key points from this video , and you don’t have to watch it right now. But I recommend to look at it entirely after reading the article.
1. Attribute setHasFixedSize
Set the attribute recyclerView.setHasFixedSize(true) when recyclerView does not plan to resize its children dynamically.
As a result, recyclerView will not redraw every time the data is updated in the list item, this element will be redrawn independently.
2. Click listener
Install a click handler in onCreateViewHolder(...) .
Whenever a user clicks on a list item, the viewHolder reports the position of the adapter where the click occurred ( vh.getAdapterPosition() ). This is important because elements can be moved inside the adapter, and the view components associated with them will not be recreated.
As a result, by the time the view component is created, the following may occur: the list item will be, say, at position 2, but when the user clicks on it, the element will already be at position 5. Thus, using the vh.getAdapterPosition() method vh.getAdapterPosition() ensures that the list index is valid.
3. Using different types of view components
Return layout directly when using different types of view components (for example, R.layout.view_one ).
If your adapter supports different types of view components, the getItemViewType method and onCreateViewHolder will look something like the one below. You need to write a switch inside the onCreateViewHolder method to implement the necessary logic for the corresponding types of view components.
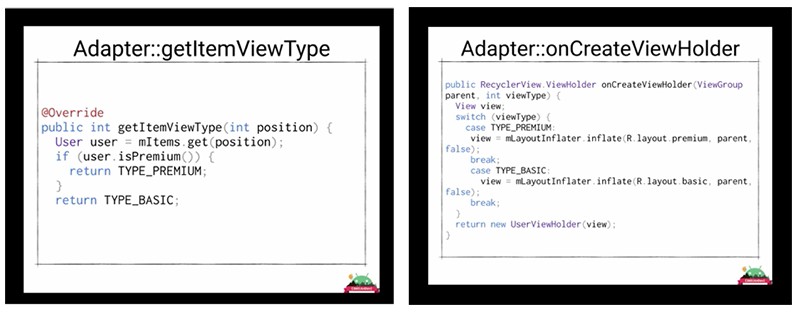
But instead of these types, you can return layout immediately. This will save you from the template code in onCreateViewHolder :
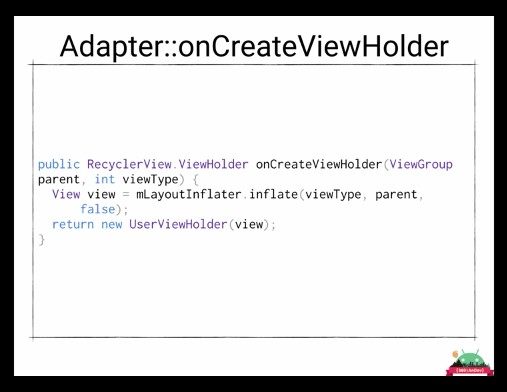
This technique can not be used constantly, because sometimes you may need more complex logic inside each selected layout for different cases. But if this is not your case, then the returned layout is the right way to work with different types of view components.
4. DiffUtil
Use DiffUtil to add new data to RecyclerView .
Whenever data in recyclerView changes, most developers call the notifyDataSetChanged() method to display the updated data on the UI. They simply do not know that this method is resource intensive, and that it is here that DiffUtil copes much more efficiently.
DiffUtil is a utility class that can calculate the difference between two lists as an update list, which then converts the first list to the second. It can be used to calculate updates in the recyclerView adapter. To use DiffUtil , you must implement DiffUtil.Callback , in which there are several required methods for implementing the DiffUtil logic:

The biggest advantage of DiffUtil is that in RecyclerView you can update specific text in a specific item's TextView instead of redrawing the entire list. To do this, you need to implement the onChangePayload method in DiffUtil.Callback . There is a very good article on this topic.
In the second part, we will look at other tips for using RecyclerView quality.
')
Source: https://habr.com/ru/post/425945/
All Articles