Weather Station on Arduino from A to Z. Part 1
Table of contents:
- Part 1. Requirements. The choice of iron. General scheme
- Part 2. Software. Central unit, iron
- Part 3. Central unit, software
- Part 4. Transom Sensor
- Part 5. MySQL, PHP, WWW, Android
“So, let's agree right away: you are not going to make a movie for Hollywood. Even in Wonderland, no more than five percent of all scenarios are approved, and only one percent goes into production ... So, instead of all this, you are going to create your own Hollywood. ”
Ed Gaskel "Making Digital Cinema, or Hollywood at Home"
Foreword
What, another weather station on the Arduino ?! Yes, one more and something tells me, not the last on the Internet of things.
Just as every programmer is obliged to write the program “Hello World!”, So every arduinschik must have the experience of building a simple or not very meteorological station.
Already created meteorological station projects on the Internet are a considerable number, the reader can choose any of them for implementation. I will not hide, I have carefully studied about a dozen of similar projects and a bunch of related ones. Therefore, it cannot be said that I created everything from scratch, of course I "stood on the shoulders of giants."
I must say that my plans did not include the use of third-party services for storing and displaying data. I wanted to personally feel and understand how all this works from the inside from beginning to end, from A to Z.
So for those who want to quickly rivet something out of nothing, this series of articles most likely will not work. It is easier to go and buy a ready-made designer with assembly instructions. Microelectronics professionals have absolutely nothing to do here, maybe to laugh and remember yourself at the beginning of the journey.
But those who really want to understand, I think like it. Perhaps the material is useful as a training tool.
The author will guide you through the maze of modern technologies of the Internet of things. And with the eyes of a beginner, as he himself is.
This project was implemented back in 2016 already, but I hope it is still relevant.
Technology set
We will study and work with simple and complex things:
- temperature and humidity sensors type DHT22, DHT11
- barometric pressure sensor type BMP180
- WiFi module ESP8266
- radio module type nRF24 2.4 GHz
- Arduino Pro Mini family, Arduino Mega
- solar battery and batteries
- programming language C / C ++
- PHP programming language
- MySQL database management system
- Java programming language and Android framework (creating an application for Adnroid to display weather data on a smartphone).
Some of the topics listed and not worth a jigger, and some can be studied for years. Therefore, we will touch upon complicated things only in the part directly related to this project, so that you understand how it all works.
But we will begin from the very beginning correctly. Namely, from the description and design of the future device "on paper" , so that in the end each brick would fall into place.
Prototyping
As Wikipedia correctly tells us, prototyping is a quick draft implementation of a working system. Which, yes, will not work quite inefficiently and with some errors, but will give an idea of whether it is necessary to develop the craft to the industrial design. The process of creating a prototype should not be protracted. The prototyping stage is followed by an analysis of the system and its refinement.
But this is in an industry where workers are full-time workers.
Everyone who rivets his pet-project for the “internet of things” in the evenings should be aware of the fact that he is creating a prototype, a semi-finished product. To the level of a normal industrial product to him very far. Therefore, we should not entrust our amateur handicrafts with any important life-support areas and hope that they will not let us down.
An industrial product is built on an industrial element base and then goes through many more stages, including debugging, testing and maintenance, before it becomes a hit.
So, instead of all this, we will create our own toy, but not a simple one. With elements of technical creativity, the beginnings of programming and cognition (in the process of creation) of many other related things.
Of course, electronics engineers will have a hard time at the programming stage, and programmers will have to sweat over the circuitry, but the author will try to explain everything as clearly as possible and clearly describe why certain solutions were used.
Requirements
Usually this stage is skipped. Deciding to do something such right now, and then it turns out the small details that put the whole project in a dead end or even make it very heavy. All our Wishlist must be recorded, I use a Google disk for this, it is accessible from a PC and from a mobile device.
So, our weather station should:
- measure temperature and humidity outside
- measure the temperature and humidity in the house
- measure atmospheric pressure
- display the indicated values on the display
- transfer data to a server on the Internet, where the data will be stored in a database and displayed on a web page, or used in a mobile application.
Sensors are used the most simple and cheap. For example, looking ahead, I’ll say that the DHT22 measures the temperature quite accurately, but the humidity is a little inaccurate. But, again, I repeat, it does not matter, because we have a prototype, and the variation in 5% humidity will not affect anything important in our life.
The system architecture, hardware and software should provide further system extensibility to add new sensors and new features.
Iron. Component selection
This is the most important part, and not at all the soldering or programming. After determining the system requirements, it is necessary to decide with the help of what exactly they will be implemented.
Here it is one nuance. To select the components you need to know their capabilities well, you need to know the technologies themselves. That is, in other words, one needs to be far from a beginner electronics engineer and programmer. So now a couple of years to spend on studying the whole range of possible devices?
Vicious circle? But the vicious circles for this purpose also exist to break them.
There is an exit. You can just take and repeat someone's project. I studied already existing meteorological station projects and I hope took a step forward.
So. The architecture of the weather station is based on the Arduino. Because the Arduino has a small threshold of entry and I already dealt with it. It is already easier to choose further.
It immediately became clear that the weather station will include a remote, out-of-window sensor and a central module.
The central, main unit will be located indoors. It is important to determine this at the initial stage, from which such important characteristics as the temperature mode of operation and power “dance”.
The remote sensor (or sensors) will be without “brains”, its task is to periodically take measurements and transfer data to the central home unit. The central unit receives data from all sensors, displays them on the screen and sends them to the Internet to the database. Well, and there it is already much easier, as soon as the data is in the database with them you can do whatever you want, even to draw graphs.
For communication with the outside world, the Internet was clearly chosen by the WiFi module ESP8266 with virtually no alternative (perhaps now such alternatives have appeared). Ethernet expansion cards are available for the Arduino, but did not want to be tied to the cable.

An interesting question was how to ensure communication between the windowed sensor (or sensors, remember the requirement of expandability of the system?) And the center. Radio beacons on 433 MHz are definitely not suitable (they are not suitable for anything at all).
Take advantage again of ESP8266?
Cons of such a decision:
need sustainable wifi outside home
communication range will not be large
reliability will suffer; if the Internet is lost, we will not see our remote sensors
more power consumption.
ESP8266 power consumption:
when transmitting 120-170 mA
when receiving 50-56 mA
in Deep Sleep mode 10 µA (µA)
when off, 5 µA (µA).
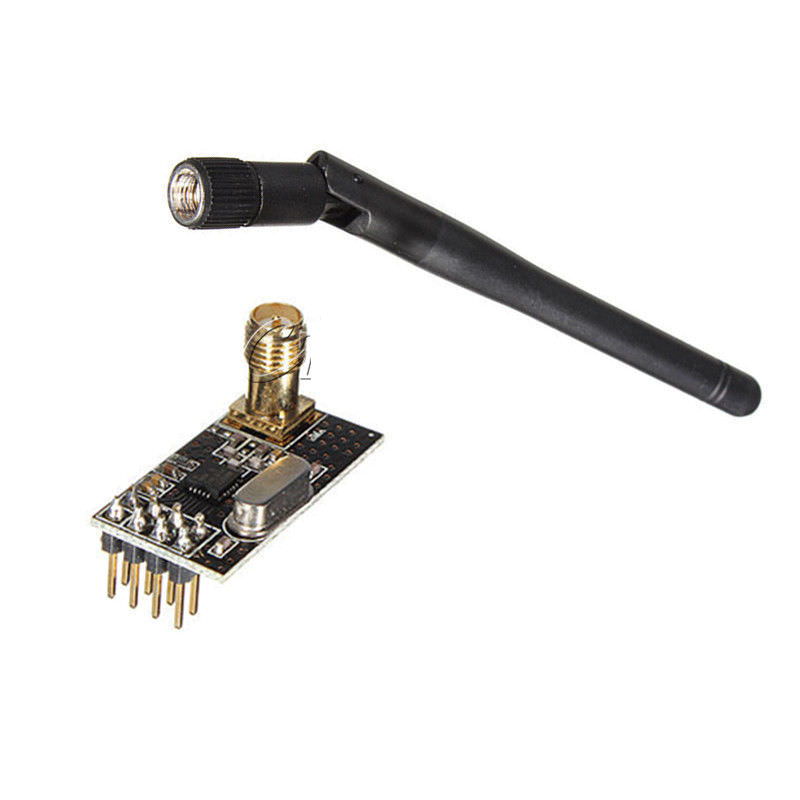
In the end, the nRF24L01 + chip with a 2.4 GHz transmitter and receiver in one bottle, with an additional external antenna, was chosen to connect the remote sensors with the main home unit, in order to “break through” the walls.
Power consumption nRF24L01 + 2.4 GHz:
- when receiving 11 mA
- when transmitting at 2Mbps speed - 13 mA
- in standby-I mode - 26 μA (µA)
- when off, 900 nA (nA).
What the ESP8266, what nRF24L01 + operating temperature range is suitable: from -40 to + 80.
You can buy nRF24L01 + for about $ 1, or immediately with an external antenna for $ 3. Buy ESP8266-01 can be about $ 4. Read the product description carefully! Otherwise buy one antenna.
The core of the system loomed. Go to the sensors themselves.
On the street, as you know, the temperature can reach negative values, so the DHT11 sensor is not suitable, but the DHT22 is just right.
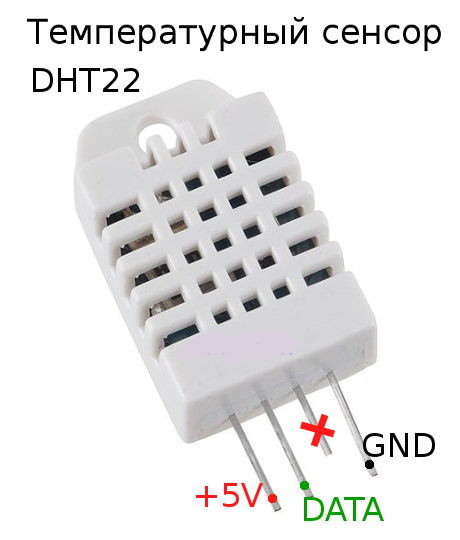
DHT22 / AM2302 Specifications:
- Power supply from 3.3 V to 5 V, 5 V recommended
- 2.5mA maximum consumption, at the time of measurement and data transmission
- humidity measurement range 0-100% with an accuracy of 2-5%
- temperature measurement range from -40 to + 125 ° C with an accuracy of ± 0.5 ° C
- a request to measure no more than 0.5 Hz - once every 2 seconds.
I hope there will be no negative temperatures inside the house, so you can use DHT11, especially since I already had one.
DHT11 Features:
- Power supply from 3.3 V to 5 V
- consumption 2.5 mA maximum at the time of measurement and transmission
- humidity measurement range of 20-80% with an accuracy of 5%
- temperature measurement range from 0 to + 50 ° C with an accuracy of ± 2 ° C
- a measurement request of no more than 1 Hz - once per second.
You can buy DHT22 for about $ 3. DHT11 is cheaper - $ 1, but it is less accurate.
Now we return again to Arduino. What fee to choose?
I tested parts of the system on Arduino UNO. Those. I connected the ESP module to Uno and studied it, disconnected it, then connected the nRF24, etc. For the final implementation of the behind-the-window sensor, I chose the Arduino Pro Mini as the closest to the Uno miniature.
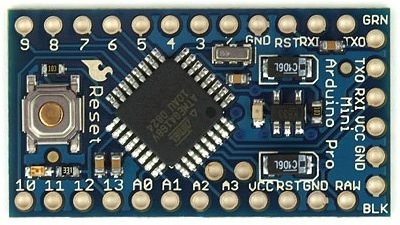
On power consumption, the Arduino Pro Mini also looks good:
- There is no USB-TTL converter, which in itself "eats" a lot,
- LED is connected through a 10k resistor.
For advanced energy conservation planned:
- remove the LED - power indicator on the Arduino Pro Mini (I regretted, did not spoil the board)
- or use the "bare" assembly on the Atmel ATmega328 microprocessor (did not use)
- use the library Low Power Library or JeeLib .
From libraries I chose Low Power Library , it is simple and contains only what you need.
For the central unit, since it was planned to connect numerous peripherals to it, the Arduino Mega board was chosen. In addition, it is fully compatible with UNO and has more memory. Looking ahead to say that this choice was fully justified.
Buy Arduino Mega can be about $ 8.
Power and power consumption
Now about the power and power consumption.
Arduino Pro Mini come in two forms:
- on supply voltage 5V and frequency 16MHz
- at a voltage of 3.3V and a frequency of 8 MHz.
Since the nRF24L01 + radio module requires 3.3 V for power, and the speed is not important here, then buy the Arduino Pro Mini at 8MHz and 3.3V.
At the same time, the Arduino Pro Mini’s supply voltage range is:
- 3.35-12 V for the 3.3 V model
- 5-12 V for model 5 V.
I already had an Arduino Pro Mini on 5V, which is why I used it. Buy Arduino Pro Mini can be about $ 4.
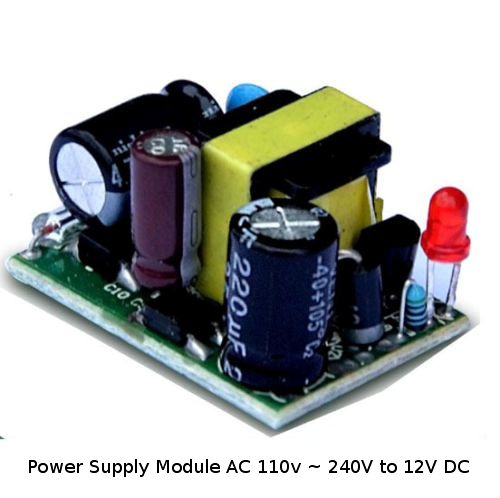
The power supply of the central unit will be from the 220 V network through a small power supply unit, giving 12V, 450mA, 5W output. Like this for $ 5. There still is a separate pin on 5V.
And if this is not enough, then you can and more effectively put. In other words, saving power for the central unit does not make much sense. But for a remote wireless sensor, energy saving is the most important part. But I would not like to lose functionality either.
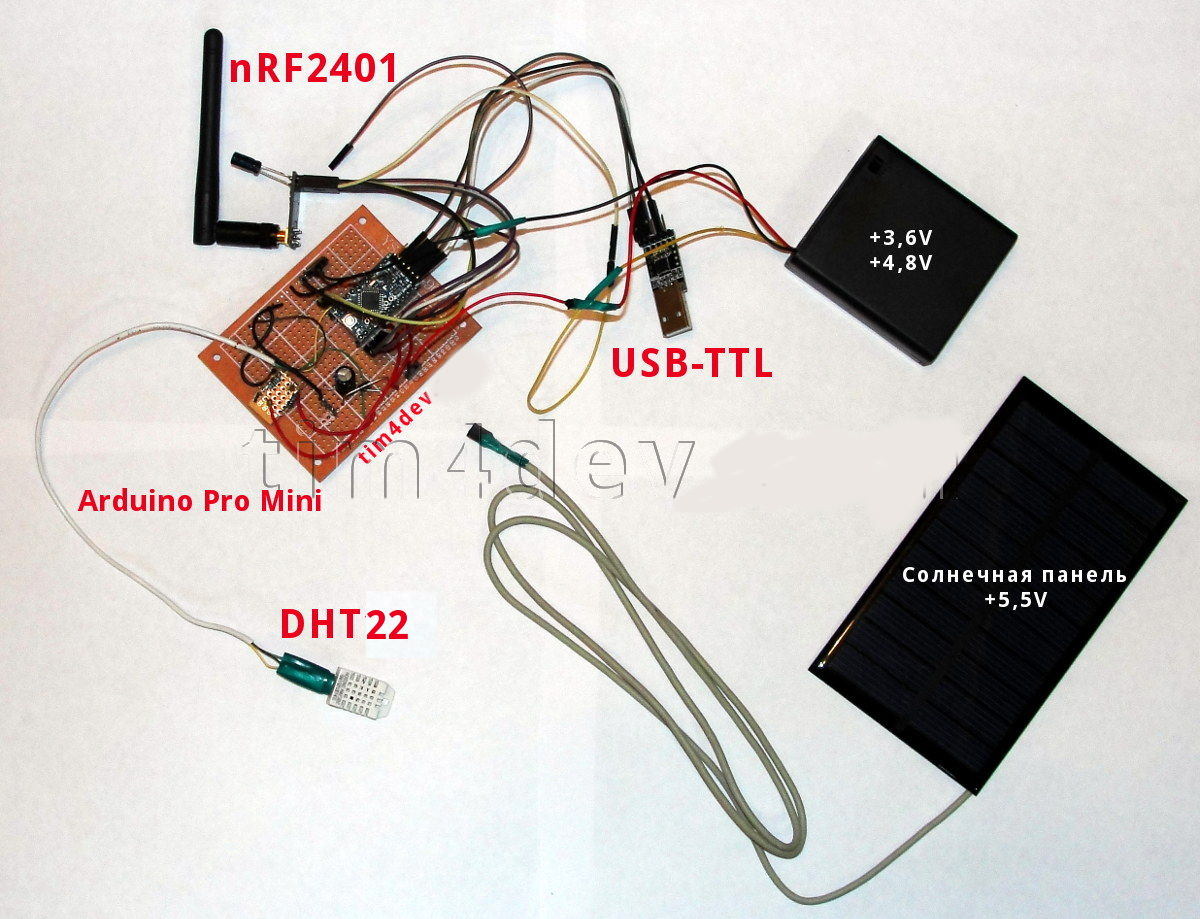
Therefore, the Arduino Pro Mini and the nRF24 radio module will be powered by a bundle of 4 Ni-Mh batteries.
And remember, the maximum capacity of a modern battery is about 2500-2700mAh, all that is more is either marketing tricks (Ansmann 2850) or deception (UltraFire 3500).
I do not use Li-Ion batteries for several reasons:
- very expensive
- when the ambient temperature drops below 0 ° C, the power of the lithium-ion battery decreases to 40-50%
- those that are cheap are made without protection and are unsafe (they can explode and burn when short-circuited or discharged, see a bunch of clips on YouTube)
- they age, even if they are not used (however, this can be said about all chemical elements), after 2 years the Li-Ion battery loses about 20% of its capacity.
For the prototype, it is quite possible to do with high-quality Ni-MH AA or AAA batteries. Moreover, we do not need large currents. The only minus of Ni-MH batteries is their long charging.
General scheme of the weather station
Let's sum up. Here is a general scheme of how everything works.
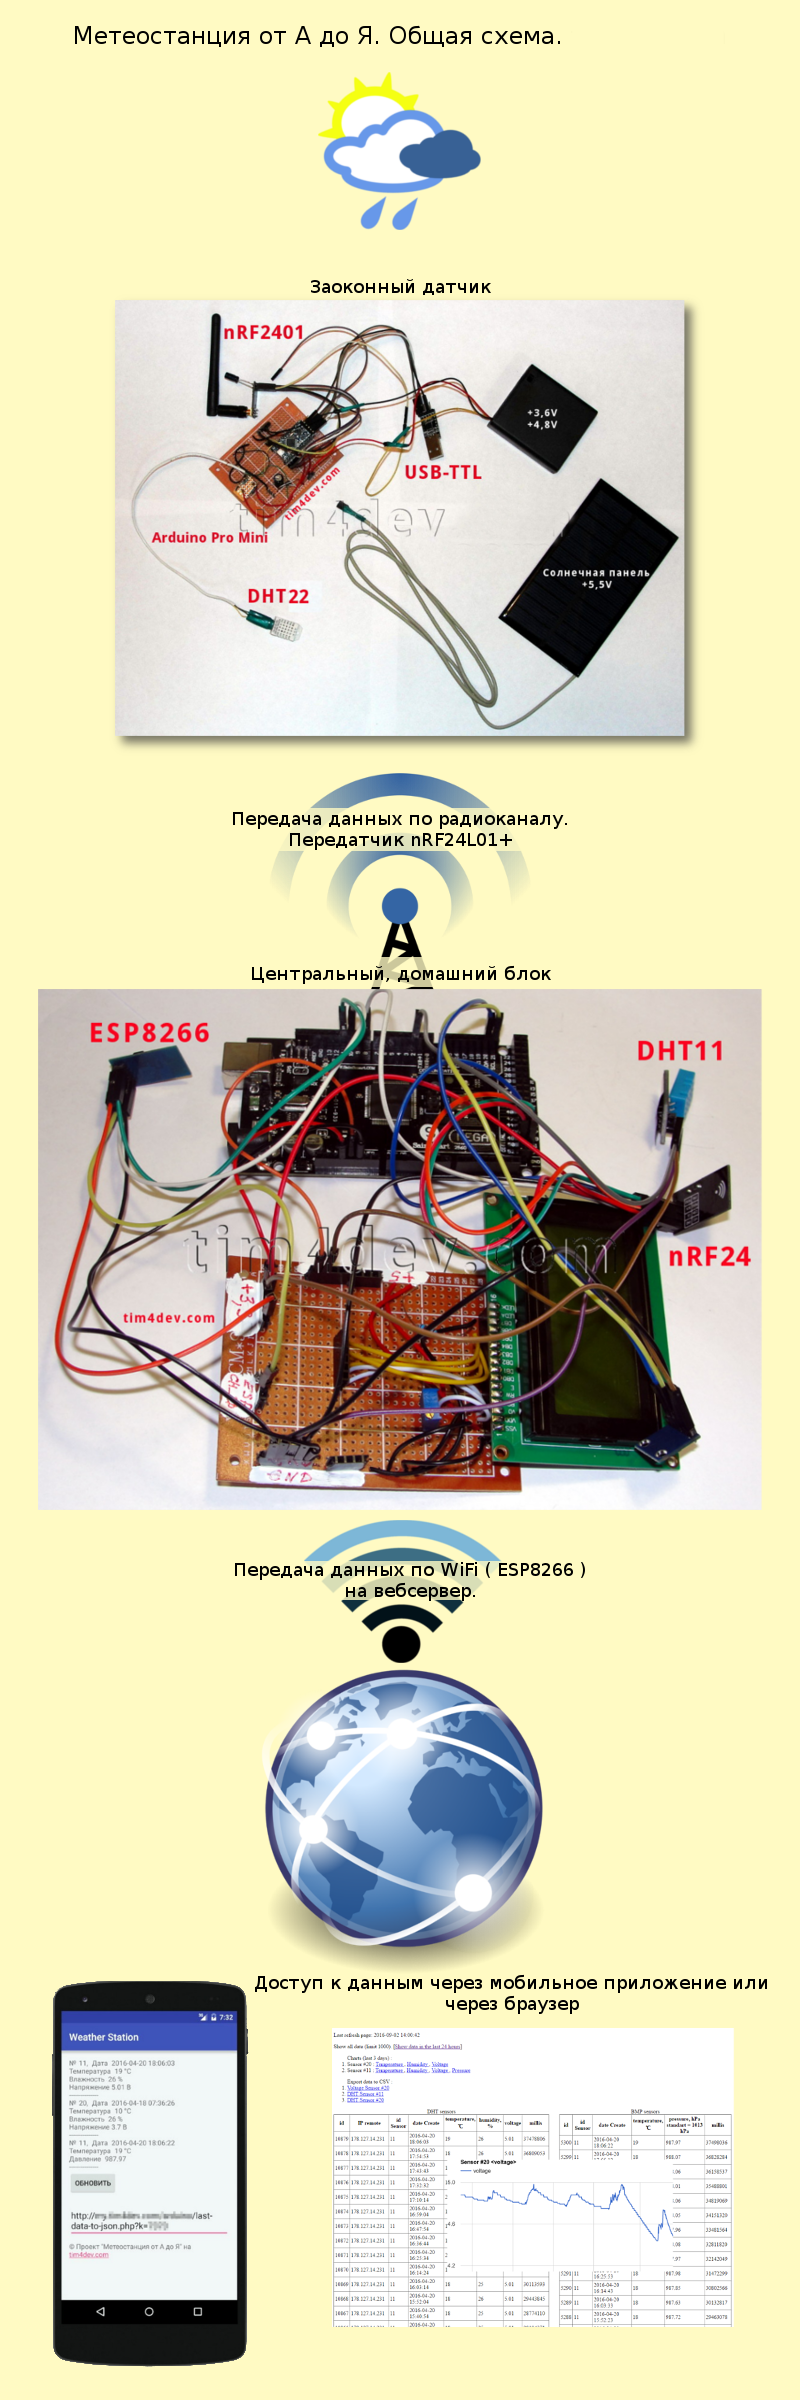
To be continued.
')
Source: https://habr.com/ru/post/425901/
All Articles