Git: fixing bugs and ordering commits
Error in commit ... How to fix it? Confusion in the history of commits ... How to bring everything into a decent look? The author of the article, the translation of which we publish today, says that it was written specifically for those who asked such questions. According to him, after studying the techniques of working with Git, presented here, you can significantly advance the path of mastering Git.
It is assumed that the reader of this article is already familiar with the basics of Git. If this is not the case, it is first recommended to master the base, for example, using this material.
Here we consider several scenarios for the appearance of errors in commits and their correction.
Suppose you commit a lot of files and understand that the commit message was not particularly clear. After that you decided to change this message. To do this, use the
')
Suppose you wanted to commit six files, but, by mistake, commit only five. It seems that you can correct this error simply by creating a new commit and adding the missing sixth file there.
Such an approach is completely entitled to life. But in order to keep the history of commits in good condition, it would probably be much better to be able to add a randomly missed file to the same commit. This can be done, again, with the
The flag
To the commits that make in Git, the name of the author and his email address are attached. Usually this data is indicated by performing the initial Git setup. As a result, the one who uses Git may, by performing each commit, not worry about the details of its author.
In this case, it is quite possible that, when working with some projects, you will need to use information about the author, for example, an email address that is different from the main ones. For such a project, you must specify the email address using the following command:
Suppose you forgot to perform this setup and have already made the first commit. The
Use the
Suppose you are working on a piece of code from a project. You know that it will take about ten days. During these ten days, other developers commit to the source repository.
It is recommended to maintain synchronization between the local and remote repositories. This avoids many of the merge conflicts that occur when synchronization of repositories is too rare. Following this practice, you decide to download changes from a remote repository every two days.
Each time you download code from a remote to a local repository, a new merge commit is created in the local repository. This means that in your local commit history there will be many such commits that can confuse the person who will view your code.
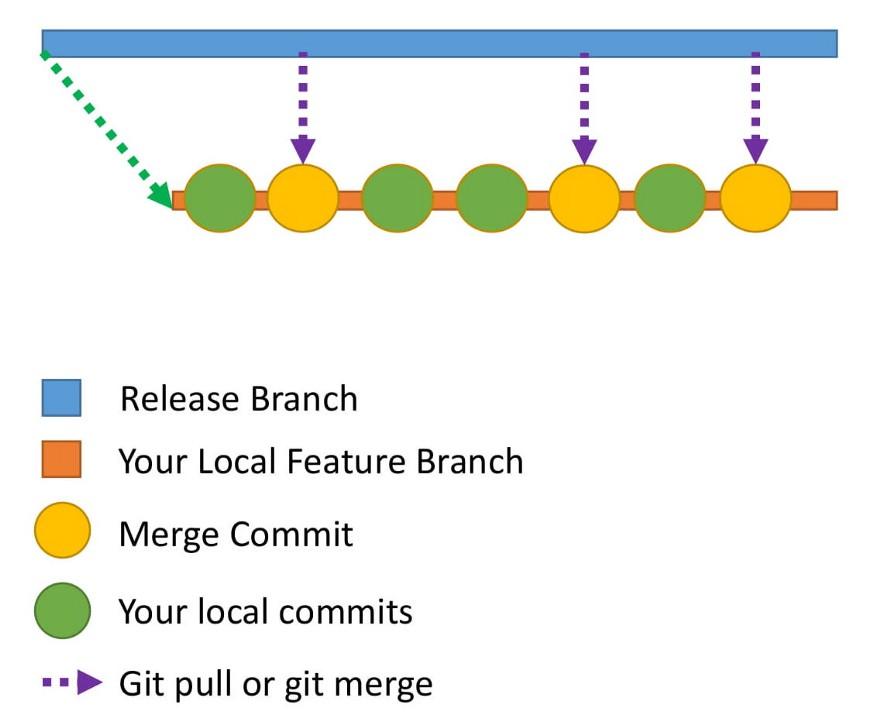
The history of commits in the local repository
How to put a commit history in order? To solve this problem, you can use the
Consider the
Commits in the release branch and in the feature branch
In the
We will use the names
As a result, using the
The
When using this command, the system tries to add each commit to the
Feature branch and three steps of the rebase command
At the moment of calling the command, the
Now Git is trying to add the
After the commit
After the completion of the
When working with Git, both the
If you use the
It is recommended to use these commands in various situations. So,
After examining the concepts presented in this material, you have improved your Git skills and come closer to the level of a Git expert. We hope that what you have learned here will be useful to you. But the world of Git is huge, therefore, having mastered something new, do not stop there and move on.
Dear readers! Did you encounter confusion in git commits?

It is assumed that the reader of this article is already familiar with the basics of Git. If this is not the case, it is first recommended to master the base, for example, using this material.
Correction of errors in commits
Here we consider several scenarios for the appearance of errors in commits and their correction.
▍Scenario number 1
Suppose you commit a lot of files and understand that the commit message was not particularly clear. After that you decided to change this message. To do this, use the
git commit --amend . Here is an example of its use:')
git commit --amend -m "New commit message" ▍Scenario number 2
Suppose you wanted to commit six files, but, by mistake, commit only five. It seems that you can correct this error simply by creating a new commit and adding the missing sixth file there.
Such an approach is completely entitled to life. But in order to keep the history of commits in good condition, it would probably be much better to be able to add a randomly missed file to the same commit. This can be done, again, with the
git commit --amend . Its use looks like this: git add file6 git commit --amend --no-edit The flag
--no-edit means that the commit message does not change.▍Scenario number 3
To the commits that make in Git, the name of the author and his email address are attached. Usually this data is indicated by performing the initial Git setup. As a result, the one who uses Git may, by performing each commit, not worry about the details of its author.
In this case, it is quite possible that, when working with some projects, you will need to use information about the author, for example, an email address that is different from the main ones. For such a project, you must specify the email address using the following command:
git config user.email "your email id" Suppose you forgot to perform this setup and have already made the first commit. The
amend command already familiar to us can amend . With its help you can change the information about the author of the previous commit: git commit --amend --author "Author Name <Author Email>" ▍Note
Use the
amend command only in your local repository. Using it in remote repositories can be a huge mess.Bringing order to commit history
Suppose you are working on a piece of code from a project. You know that it will take about ten days. During these ten days, other developers commit to the source repository.
It is recommended to maintain synchronization between the local and remote repositories. This avoids many of the merge conflicts that occur when synchronization of repositories is too rare. Following this practice, you decide to download changes from a remote repository every two days.
Each time you download code from a remote to a local repository, a new merge commit is created in the local repository. This means that in your local commit history there will be many such commits that can confuse the person who will view your code.
The history of commits in the local repository
How to put a commit history in order? To solve this problem, you can use the
git rebase .▍ git rebase command
Consider the
git rebase with an example.Commits in the release branch and in the feature branch
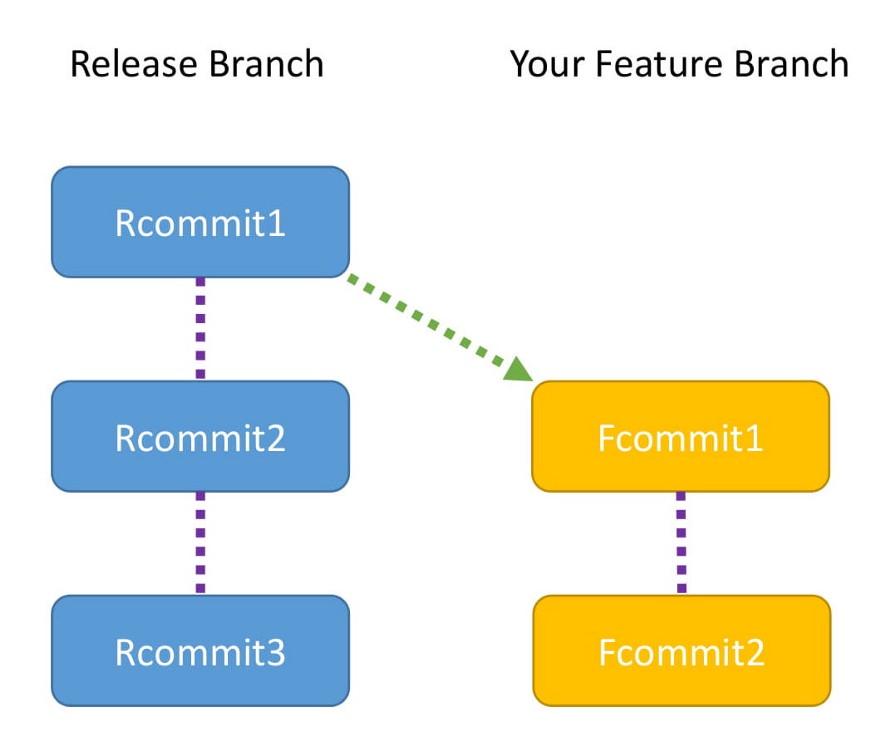
In the
Release branch there are three commits: Rcommit1 , Rcommit2 , and Rcommit3 . You created your Feature branch from the Release branch when there was only one commit in it - Rcommit1 . After that you added two commits to the Feature branch. These are Fcommit1 and Fcommit2 . Your goal is to download commits from the Release branch to your Feature branch. In order to do this, you are going to use the rebase command.We will use the names
release and feature for the two branches in question.As a result, using the
rebase will look like this: git checkout feature git rebase release ▍Rebase command features
The
rebase command rebase used to ensure that the Feature branch Feature fresh code from the Release branch.When using this command, the system tries to add each commit to the
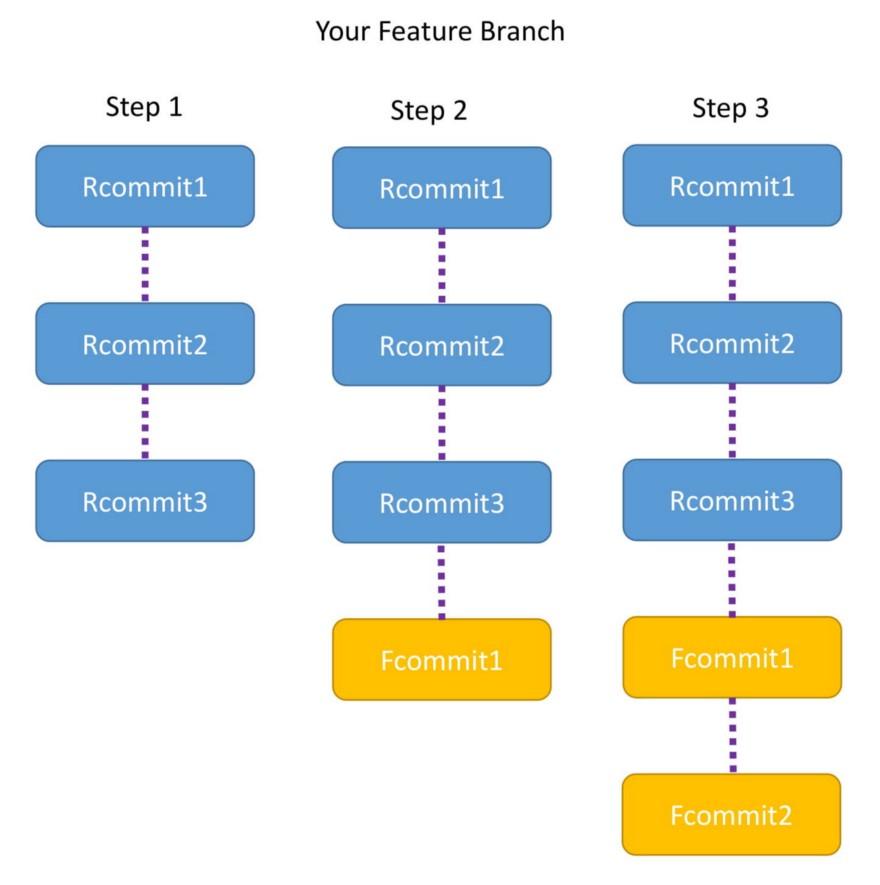
Feature branch, one at a time, and check for conflicts. If it sounds difficult - let's consider the following figure. This shows the internal mechanisms for the rebase .Feature branch and three steps of the rebase command
Step 1
At the moment of calling the command, the
Feature branch points to the head of the Release branch. After that, there are three commits in the Feature branch: Rcommit1 , Rcommit2 , and Rcommit3 . Perhaps, here you will have a question about what happened to the commits Fcommit1 and Fcommit2 . These commits have not gone away; they will be used in the next steps.Step 2
Now Git is trying to add the
Fcommit1 commit to the Feature branch. If there is no conflict, Fcommit1 added after Rcommit3 . If a conflict is detected, Git will report this and you will have to resolve this conflict manually.Step 3
After the commit
Fcommit1 added to the Feature branch, Git tries to add Fcommit2 to the same Fcommit2 . Here, again, if there are no conflicts, then Fcommit2 added after Fcommit1 and the operation is successfully completed. If a conflict is detected, then Git, as before, will report this and offer to deal with it.After the completion of the
rebase command rebase you will see that there are commits Rcommit1 , Rcommit2 , Rcommit3 , Fcommit1 , and Fcommit2 in the Feature branch.▍Note
When working with Git, both the
merge command and the rebase command are rebase . It cannot be said that one of them is preferable to the other.If you use the
merge command, you will get a commit-merge. If you use rebase , you will not have any additional rebase .It is recommended to use these commands in various situations. So,
rebase is suitable for updating the local repository code based on fresh code from a remote repository. Use the merge command when executing pool queries to merge the Feature branch with the Release or Master branch.Results
After examining the concepts presented in this material, you have improved your Git skills and come closer to the level of a Git expert. We hope that what you have learned here will be useful to you. But the world of Git is huge, therefore, having mastered something new, do not stop there and move on.
Dear readers! Did you encounter confusion in git commits?
Source: https://habr.com/ru/post/425665/
All Articles