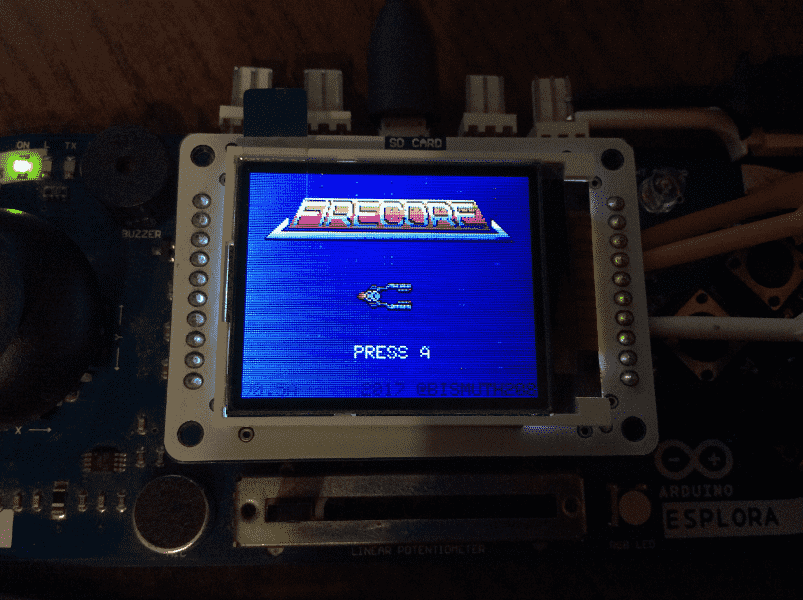
Firecore - a fun AVR game
I want to share another evening protracted, which shows that you can make games even on weak iron.
That it was necessary to do that as it was decided and how to make something bigger, than the next clone of Pong - welcome under kat.
')
Caution: great article, traffic and multiple code inserts!
Briefly about the game
Shoot`em up! Now on AVR.
In fact, this is another shmap, so once again, the main character
The whole game is written in C and C ++ without using the Wire library from Arduino.
The game has 4 ships to choose from (the latter is available after passing), each with its own characteristics:
- maneuverability;
- strength;
- power of guns.
Also implemented:
- color 2D graphics;
- power up for weapons;
- bosses at the end of levels;
- levels with asteroids (and their rotation animation);
- changing the background color at the levels (and not just black space);
- the movement of stars in the background with different speeds (for the effect of depth);
- scoring and saving in the EEPROM;
- identical sounds (shots, explosions, etc.);
- a sea of identical opponents.
Platform
The return of the ghost.
I will clarify in advance that this platform should be perceived as an old gaming console of thefirstthird generation (80th year, shiru8bit ).
Also, hardware modifications over the original hardware are prohibited, which guarantees the launch on any other identical motherboard immediately out of the box.
This game was written under the Arduino Esplora fee, but I think the transfer to GBA or any other platform will not be difficult.
Nevertheless, even on this resource, this board was covered only a couple of times, and the other boards were not at all honored to be mentioned, despite the rather large community of each:
- GameBuino META:
- Pokitto;
- makerbuino;
- Arduboy;
- UzeBox / FuzeBox;
- and many others.
To begin with, what is not on Esplora:
- a lot of memory (ROM 28kb, RAM 2,5kb);
- power (8 bits of CPU at 16 MHz);
- DMA;
- character generator;
- allocated memory areas or special registers. appointments (palette, tiles, background, etc.);
- control the brightness of the screen (oh, so many effects in the trash);
- address space expanders (mappers);
- debugger (
who needs it when there is a whole screen!).
I will continue with the fact that there is:
- hardware SPI (can work at F_CPU / 2 speed);
- screen based on ST7735 160x128 1,44 “;
- pinch timers (only 4 pcs.);
- pinch GPIO;
- a handful of buttons (5pcs. + two-axis joystick);
- some sensors (lighting, accelerometer, thermometer);
emitterpiezo buzzer.
As you can see there is almost nothing. No wonder no one wanted to do anything with her except Pong clone and a pair of three games for all this time!
Perhaps the fact is that writing under the ATmega32u4 controller (and similar ones) is similar to programming under Intel 8051 (which at the time of publication is almost 40 years old), where you have to comply with a huge number of conditions and resort to various tricks and tricks.
Peripheral processing
One for all!
Looking at the circuit, it was clearly visible that all peripherals are connected via a GPIO expander (multiplexer 74HC4067D, MUX) and switched using GPIO PF4, PF5, PF6, PF7 or PORTF nibble, and the output of the MUX output occurs on GPIO - PF1.
It is very convenient to switch the input, simply assigning the values to the PORTF port by mask and in no case forgetting the younger nibble:
uint16_t getAnalogMux(uint8_t chMux) { MUX_PORTX = ((MUX_PORTX & 0x0F) | ((chMux<<4)&0xF0)); return readADC(); } Poll button press:
#define SW_BTN_MIN_LVL 800 bool readSwitchButton(uint8_t btn) { bool state = true; if(getAnalogMux(btn) > SW_BTN_MIN_LVL) { // low state == pressed state = false; } return state; } Further values for port F:
#define SW_BTN_1_MUX 0 #define SW_BTN_2_MUX 8 #define SW_BTN_3_MUX 4 #define SW_BTN_4_MUX 12 Adding a little more:
#define BUTTON_A SW_BTN_4_MUX #define BUTTON_B SW_BTN_1_MUX #define BUTTON_X SW_BTN_2_MUX #define BUTTON_Y SW_BTN_3_MUX #define buttonIsPressed(a) readSwitchButton(a) You can safely ask the right crossbar:
void updateBtnStates(void) { if(buttonIsPressed(BUTTON_A)) btnStates.aBtn = true; if(buttonIsPressed(BUTTON_B)) btnStates.bBtn = true; if(buttonIsPressed(BUTTON_X)) btnStates.xBtn = true; if(buttonIsPressed(BUTTON_Y)) btnStates.yBtn = true; } Please note that the previous state is not reset, otherwise you can miss the fact of pressing the key (it also works as an additional protection against bounce).
SFX
Buzz bit.
What if there is no DAC, no Yamaha chip, but only a 1-bit PWM rectangle for sound?
At first, it seems not so much, but, despite this, it uses sly PWM to recreate the technology "PDM audio" and with its help you can do this.
Something similar is provided by the Gamebuino library and all that is needed is to transfer the pop-up generator to another GPIO and timer to Esplora (timer4 and OCR4D output). Also for correct operation, timer1 is also used to form interrupts and reset the OCR4D register with new data.
The Gamebuino engine uses sound patterns (as in tracker music), which saves space pretty well, but you need to make all the samples yourself, there are no libraries with ready ones.
It is worth mentioning that this engine is tied to the update period of about 1/50 s or 20 frames / s.
To create sound patterns, after reading the Wiki on audio format, sketched a simple GUI on Qt. It does not output the sound exactly the same, but gives a rough idea of how the pattern will sound and allows you to load, save and edit it.
Graphics
Immortal Pixelart.
The display encodes colors in two bytes (RGB565), but since the images in this format will take a lot, all of them are made indexed on the palette to save space, which I have already described more than once in my earlier articles.
Unlike Famicom / NES, there are no restrictions on colors on the image and there are no more available colors in the palette.
Each image in the game is an array of bytes in which the following data is stored:
- width height;
- data start marker;
- dictionary (if there is, but more on that later);
- payload;
- data end marker
For example, this picture (increased 10 times):

in the code it will look like this:
pic_t weaponLaserPic1[] PROGMEM = { 0x0f,0x07, 0x02, 0x8f,0x32,0xa2,0x05,0x8f,0x06,0x22,0x41,0xad,0x03,0x41,0x22,0x8f,0x06,0xa2,0x05, 0x8f,0x23,0xff, }; Where do without choosing a ship in this genre? After hundreds of test sketches with a pixel difference, only these ships for the player remained:

It is noteworthy that the ships do not have a flame in the tiles (here it is for clarity), it is superimposed separately to create animation of the exhaust from the engine.
Do not forget about the pilots of each of the ships:

The variation of the enemy ships is not too big, but I remind you that there is not too much space, so here are three ships:

Without canonical bonuses in the form of improving weapons and restoring health, a player will not last long:

It goes without saying that with the increase in the power of the guns, the form of the emitted shells changes

As it was written at the beginning, there is a level with asteroids in the game, it comes after every second boss. It is interesting because there are many moving and rotating objects of different sizes. In addition, when a player hits them, they are partially destroyed, becoming smaller in size.
Hint: Large asteroids bring more points.


To create this simple animation, 12 small images are enough:
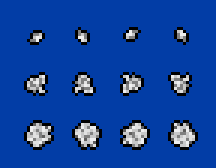
They are divided into three for each size (large, medium and small) and for each angle of rotation you need 4 more rotated 0, 90, 180 and 270 degrees. In the game, it is enough to replace the pointer to the array with the image at an equal interval, thereby creating the illusion of rotation.
void rotateAsteroid(asteroid_t &asteroid) { if(RN & 1) { asteroid.sprite.pPic = getAsteroidPic(asteroid); ++asteroid.angle; } } void moveAsteroids(void) { for(auto &asteroid : asteroids) { if(asteroid.onUse) { updateSprite(&asteroid.sprite); rotateAsteroid(asteroid); ... This is done so only because of the lack of hardware capabilities, and software implementation like the Affine transformation will take more than the images themselves and will be very slow.
A piece of atlas for those who are interested.
You can see some of the prototypes and what appears only in the credits after passing the game.
You can see some of the prototypes and what appears only in the credits after passing the game.
In addition to simple graphics, to save space and add a retro effect, small glyphs and all glyphs were thrown out of the font, which is up to 30 and after 127 bytes of ASCII.
Important!
Do not forget that const and constexpr on AVR does not mean at all that the data will be in the program memory, here for this you need to additionally use PROGMEM.
This is due to the fact that the AVR core is based on the Harvard architecture, so for accessing the data you need special opcodes for the CPU.
Squeezing the galaxy
The easiest way to pack is RLE.
After examining the packed data, you can see that the most significant bit in the byte of the payload in the range from 0x00 to 0x50 is not used. This allows you to add the data and the start-repeat bit marker (0x80), and the next byte to indicate the number of repetitions, which allows you to pack a series of 257 (+2 from the fact that the RLE of two bytes is stupid) identical bytes just two.
Unpacker implementation and screen output:
void drawPico_RLE_P(uint8_t x, uint8_t y, pic_t *pPic) { uint16_t repeatColor; uint8_t tmpInd, repeatTimes; alphaReplaceColorId = getAlphaReplaceColorId(); auto tmpData = getPicSize(pPic, 0); tftSetAddrWindow(x, y, x+tmpData.u8Data1, y+tmpData.u8Data2); ++pPic; // make offset to picture data while((tmpInd = getPicByte(++pPic)) != PIC_DATA_END) { // get color index or repeat times if(tmpInd & RLE_MARK) { // is it color index? tmpInd &= DATA_MARK; // get color index to repeat repeatTimes = getPicByte(++pPic)+1; // zero RLE does not exist! } ++repeatTimes; // get color from colorTable by color index repeatColor = palette_RAM[(tmpInd == ALPHA_COLOR_ID) ? alphaReplaceColorId : tmpInd]; do { pushColorFast(repeatColor); } while(--repeatTimes); } } The main thing is not to display the image abroad of the screen, otherwise there will be garbage, since there are no border checks here.
The test image is unpacked for ~ 39ms. at the same time, occupying 3040 bytes, while without compression it would take 11,200 bytes or 22,400 bytes without indexing.
Test image (2 times magnified):

In the image above, interlace can be seen, but on the screen it is smoothed by hardware, creating an effect similar to CRT and at the same time significantly increasing the compression ratio.
RLE is not a panacea
We are treated for deja vu.
As is well known, RLE is perfectly combined with LZ-like packers. WiKi came to the rescue with a list of compression methods. The video from GameHut about the analysis of the impossible intro in Sonic 3D Blast became a push .
After examining many packers (LZ77, LZW, LZSS, LZO, RNC, etc.) I came to the conclusion that their unpackers:
- require a lot of RAM for unpacked data (at least 64kb. and more);
- cumbersome and slow (some need to build Huffman trees on each subblock);
- have a low compression ratio with a small window (very strict RAM requirements);
- have ambiguities with licensing.
After months of vain adaptations, it was decided to modify the existing packer.
By analogy with LZ-like packers, vocabulary access was used to achieve maximum compression, but at the byte level, the most frequently repeated pairs of bytes are replaced with one byte pointer in the dictionary.
But there is a catch here, how to distinguish a byte “how many repetitions” from a “dictionary marker”?
After a long sitting with a piece of paper and a magical game with bats, this appeared:
- “Dictionary marker” is a marker RLE (0x80) + data byte (0x50) + position number in the dictionary;
- limit the byte “how many repetitions” to the size “dictionary marker” - 1 (0xCF);
- the dictionary cannot use the value 0xff (it is for the end of image marker).
Applying all this, we get a fixed size of the dictionary: no more than 46 pairs of bytes and an abbreviation of RLE to 209 bytes. Obviously, not all images can be packaged this way, but they will not come again.
In both algorithms, the structure of the packed image will be as follows:
- 1 byte for width and height;
- 1 byte for the size of the dictionary, it is also a marker of the beginning of the packed data;
- from 0 to 92 bytes of the dictionary;
- 1 to N bytes of packed data.
The received packer utility for D (pickoPacker) is enough to put in the folder with the indexed * .png files and run from the terminal (or cmd). If you need help, run with the key "-h" or "--help".
After the utility is working, the output is * .h files, the contents of which are conveniently moved to the right place in the project (therefore, there is no protection included).
Before unpacking, the screen, the dictionary and the reading of the initial data are prepared:
void drawPico_DIC_P(uint8_t x, uint8_t y, pic_t *pPic) { auto tmpData = getPicSize(pPic, 0); tftSetAddrWindow(x, y, x+tmpData.u8Data1, y+tmpData.u8Data2); uint8_t tmpByte, unfoldPos, dictMarker; alphaReplaceColorId = getAlphaReplaceColorId(); auto pDict = &pPic[3]; // save dictionary pointer pPic += getPicByte(&pPic[2]); // make offset to picture data do { unfoldPos = dictMarker = 0; do { if((tmpByte = getPicByte(++pPic)) != PIC_DATA_END) { if(tmpByte < DICT_MARK) { buf_packed[unfoldPos] = tmpByte; } else { dictMarker = 1; setPicWData(&buf_packed[unfoldPos]) = getPicWData(pDict, tmpByte); ++unfoldPos; } ++unfoldPos; } else { break; } } while((unfoldPos < MAX_UNFOLD_SIZE) //&& (unfoldPos) && ((tmpByte > DATA_MARK) || (tmpByte > MAX_DATA_LENGTH))); if(unfoldPos) { buf_packed[unfoldPos] = PIC_DATA_END; // mark end of chunk printBuf_RLE( dictMarker ? unpackBuf_DIC(pDict) : &buf_packed[0] ); // V2V3 decoder } } while(unfoldPos); } The read piece of data can be packed with a dictionary, so check and unpack:
inline uint8_t findPackedMark(uint8_t *ptr) { do { if(*ptr >= DICT_MARK) { return 1; } } while(*(++ptr) != PIC_DATA_END); return 0; } inline uint8_t *unpackBuf_DIC(const uint8_t *pDict) { bool swap = false; bool dictMarker = true; auto getBufferPtr = [&](uint8_t a[], uint8_t b[]) { return swap ? &a[0] : &b[0]; }; auto ptrP = getBufferPtr(buf_unpacked, buf_packed); auto ptrU = getBufferPtr(buf_packed, buf_unpacked); while(dictMarker) { if(*ptrP >= DICT_MARK) { setPicWData(ptrU) = getPicWData(pDict, *ptrP); ++ptrU; } else { *ptrU = *ptrP; } ++ptrU; ++ptrP; if(*ptrP == PIC_DATA_END) { *ptrU = *ptrP; // mark end of chunk swap = !swap; ptrP = getBufferPtr(buf_unpacked, buf_packed); ptrU = getBufferPtr(buf_packed, buf_unpacked); dictMarker = findPackedMark(ptrP); } } return getBufferPtr(buf_unpacked, buf_packed); } Now from the received buffer we unpack the RLE in a familiar way and display it on the screen:
inline void printBuf_RLE(uint8_t *pData) { uint16_t repeatColor; uint8_t repeatTimes, tmpByte; while((tmpByte = *pData) != PIC_DATA_END) { // get color index or repeat times if(tmpByte & RLE_MARK) { // is it RLE byte? tmpByte &= DATA_MARK; // get color index to repeat repeatTimes = *(++pData)+1; // zero RLE does not exist! } ++repeatTimes; ++pData; // get color from colorTable by color index repeatColor = palette_RAM[(tmpByte == ALPHA_COLOR_ID) ? alphaReplaceColorId : tmpByte]; do { pushColorFast(repeatColor); } while(--repeatTimes); } } The replacement of the algorithm surprisingly did not significantly affect the unpacking time and is ~ 47ms. This is almost 8ms. longer, but the test image takes only 1650 bytes!
Until the last measure
Almost everything can be done faster!
Despite the presence of a hardware SPI, the AVR core delivers a lot of headaches when using it.
It has been known for a long time that SPI on AVR, besides the fact that it operates at F_CPU / 2 speed, also has a data register of only 1 byte (there is no possibility to load 2 bytes at once).
Moreover, almost all the SPI code on AVR that I met works according to this scheme:
- upload SPDR data;
- loop through the SPIF bits in SPSR.
As you can see, the continuous submission of data, as is done on the STM32, does not smell here. But even here you can speed up the output of both unpackers to ~ 3ms!
Having opened the datasheet and looking at the “Instruction set clocks” section, you can calculate the CPU costs for transmitting a byte via SPI:
- 1 clock for register loading with new data;
- 2 clocks per bit (or 16 clocks per byte);
- 1 tact per clock line magic (a bit later on “NOP”);
- 1 clock to check the status bit in SPSR (or 2 clock on the branch);
Total for transfer of one pixel (two bytes) it is necessary to spend 38 clock periods or ~ 425600 clock cycles for a test image (11200 bytes).
Knowing that F_CPU == 16 MHz, we get
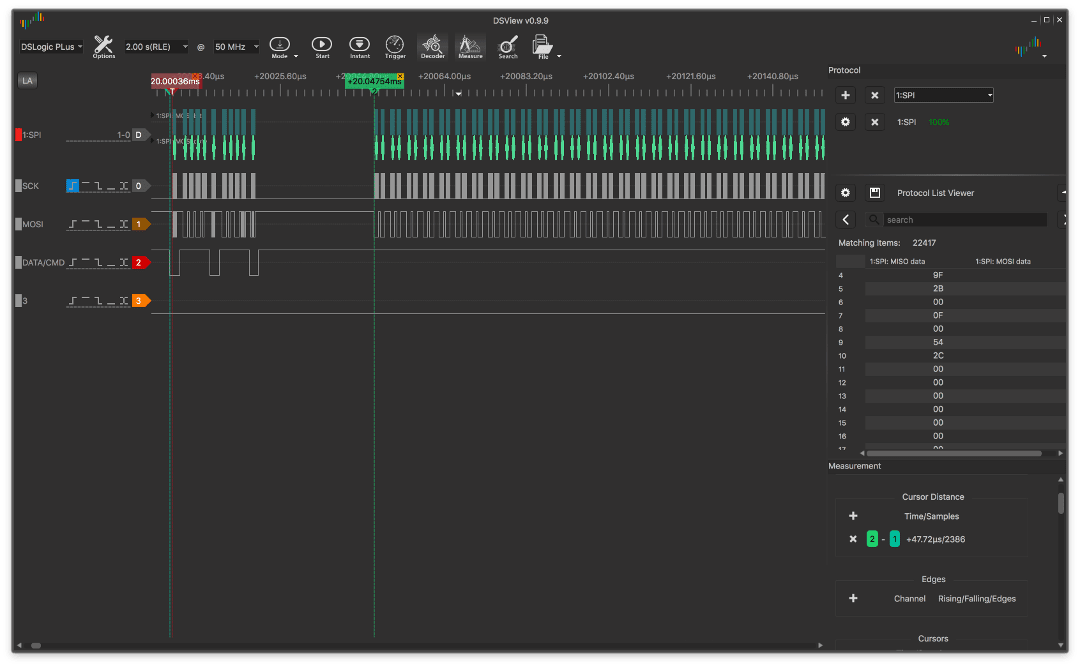
Here is an example of output with interrupts:
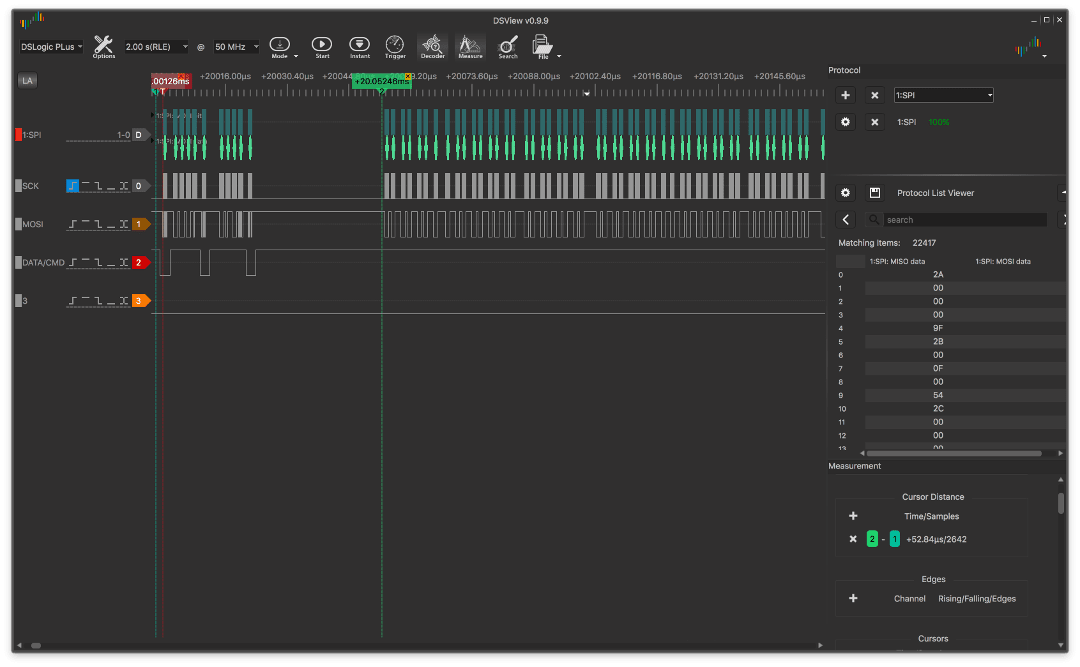
and without interruption:

The graphs show that the time between the setting of the address window in the VRAM screen and the start of data transfer in the non-interrupt version is less and there are almost no gaps between the bytes during transmission (the schedule is uniform).
Unfortunately, it is impossible to disable interrupts at each output of images, otherwise the sound and the core of the whole game will break down (more on that later).
Above it was written about a certain "magic NOP" for the clock line. The fact is that in order to stabilize the CLK and set the SPIF flag, exactly 1 clock cycle is needed and by the time this flag is read, it is already set, which allows avoiding a 2-clock branch on the “BREQ” instruction.
Here is an example without a NOP:
and with him:

The difference seems insignificant, only a few microseconds, but if you take a different scale:
Without NOP large:
and with him too big:

then the difference becomes much more noticeable, reaching ~ 4.3 ms.
Now do the following dirty trick:
Swap the order of loading and reading registers and you can not wait on every second byte of the SPIF flag, but check it only before loading the first byte of the next pixel.
Apply knowledge and expand the function "pushColorFast (repeatColor);":
#define SPDR_TX_WAIT(a) asm volatile(a); while((SPSR & (1<<SPIF)) == 0); typedef union { uint16_t val; struct { uint8_t lsb; uint8_t msb; }; } SPDR_t; ... do { #ifdef ESPLORA_OPTIMIZE SPDR_t in = {.val = repeatColor}; SPDR_TX_WAIT(""); SPDR = in.msb; SPDR_TX_WAIT("nop"); SPDR = in.lsb; #else pushColorFast(repeatColor); #endif } while(--repeatTimes); } #ifdef ESPLORA_OPTIMIZE SPDR_TX_WAIT(""); // dummy wait to stable SPI #endif } Despite the interruption from the timer, using the above trick gives a gain of almost 6ms:

This is how simple knowledge of iron allows you to squeeze a little more out of it and display something like this:

Coliseum of collisions
Battle of the boxes.
To begin with, the whole set of objects (ships, projectiles, asteroids, bonuses) are structures (sprites) with parameters:
- current coordinates X, Y;
- new coordinates X, Y;
- pointer to the image.
Since the image stores the width and height, there is no need to duplicate these parameters, moreover, such an organization simplifies the logic in many aspects.
The calculation itself is done to a banal simple - based on the intersection of the rectangles. Although it is not accurate enough and does not calculate collisions in the future, but this is more than enough.
The check occurs alternately along the X and Y axes. Due to this, the absence of an intersection along the X axis reduces the calculation of the collision.
First, the right side of the first rectangle with the left side of the second rectangle is checked for the common part of the X axis. If successful, a similar check is made for the left side of the first and right side of the second rectangle.
After successful detection of intersections along the X axis, the same procedure is checked for the upper and lower sides of the rectangles along the Y axis.
Writing the above looks much easier than it seems:
bool checkSpriteCollision(sprite_t *pSprOne, sprite_t *pSprTwo) { auto tmpDataOne = getPicSize(pSprOne->pPic, 0); auto tmpDataTwo = getPicSize(pSprTwo->pPic, 0); /* ----------- Check X position ----------- */ uint8_t objOnePosEndX = (pSprOne->pos.Old.x + tmpDataOne.u8Data1); if(objOnePosEndX >= pSprTwo->pos.Old.x) { uint8_t objTwoPosEndX = (pSprTwo->pos.Old.x + tmpDataTwo.u8Data1); if(pSprOne->pos.Old.x >= objTwoPosEndX) { return false; // nope, different X positions } // ok, objects on same X lines; Go next... } else { return false; // nope, absolutelly different X positions } /* ---------------------------------------- */ /* ----------- Check Y position ----------- */ uint8_t objOnePosEndY = (pSprOne->pos.Old.y + tmpDataOne.u8Data2); if(objOnePosEndY >= pSprTwo->pos.Old.y) { uint8_t objTwoPosEndY = (pSprTwo->pos.Old.y + tmpDataTwo.u8Data2); if(pSprOne->pos.Old.y <= objTwoPosEndY) { // ok, objects on same Y lines; Go next... // yep, if we are here // then, part of one object collide wthith another object return true; } else { return false; // nope, different Y positions } } else { return false; // nope, absolutelly different Y positions } } It remains to add this to the game:
void checkInVadersCollision(void) { decltype(aliens[0].weapon.ray) gopher; for(auto &alien : aliens) { if(alien.alive) { if(checkSpriteCollision(&ship.sprite, &alien.sprite)) { gopher.sprite.pos.Old = alien.sprite.pos.Old; rocketEpxlosion(&gopher); // now make gopher to explode \(^_^)/ removeSprite(&alien.sprite); alien.alive = false; score -= SCORE_PENALTY; if(score < 0) score = 0; } } } } Bezier curve
Space rails.
As in any other game with this genre, enemy ships are required to move along curves.
It was decided to implement the quadratic curves as the simplest for the controller and this task. For them, three points are enough: the initial (P0), final (P2) and imaginary (P1) points. The first two set the beginning and end of the line, the last point describes the type of curvature.
Excellent article on the curves.
Since this is a parametric Bezier curve, it also needs another parameter — the number of intermediate points between the start and end points.
Total we get the following structure:
typedef struct { // 7 bytes position_t P0; position_t P1; position_t P2; uint8_t totalSteps; } bezier_t; In it, position_t is a structure of two bytes of X and Y coordinates.Finding a point for each coordinate is calculated by the following formula (thx Wiki):
B = ((1.0 - t) ^ 2) P0 + 2t (1.0 - t) P1 + (t ^ 2) P2,
t [> = 0 && <= 1]
For a long time, its implementation was resolved head-on without fixed point math:
... float t = ((float)pItemLine->step)/((float)pLine->totalSteps); pPos->x = (1.0 - t)*(1.0 - t)*pLine->P0.x + 2*t*(1.0 - t)*pLine->P1.x + t*t*pLine->P2.x; pPos->y = (1.0 - t)*(1.0 - t)*pLine->P0.y + 2*t*(1.0 - t)*pLine->P1.y + t*t*pLine->P2.y; ... Of course it can not be left. After all, getting rid of float could not only give an improvement in speed, but also release the ROM, so the following implementations were found:
- avrfix;
- stdfix;
- libfixmath;
- fixedptc.
The first one remains a dark horse, since it is a compiled library and I didn’t want to mess around with the disassembler.
The second candidate from the GCC kit also didn’t work out, as the avr-gcc used is not patched and the type “short _Accum” remains unavailable.
The third option, despite the fact that it has a large number of mat. functions, has hard-bit bit operations on specific bits under the Q16.16 format, which makes it impossible to control the values of Q and I.
The latter can be considered a simplified version of “fixedmath”, but the main advantage is the ability to control not only the size of the variable, which by default is 32bit with Q24.8 format, but also the values of Q and I.
Test results for different settings:
| Type of | Iq | Additional flags | ROM byte | Tms. * |
|---|---|---|---|---|
| float | - | - | 4236 | 35 |
| fixedmath | 16.16 | - | 4796 | 119 |
| fixedmath | 16.16 | FIXMATH_NO_OVERFLOW | 4664 | 89 |
| fixedmath | 16.16 | FIXMATH_OPTIMIZE_8BIT | 5036 | 92 |
| fixedmath | 16.16 | _NO_OVERFLOW + _8BIT | 4916 | 89 |
| fixedptc | 24.8 | FIXEDPT_BITS 32 | 4420 | 64 |
| fixedptc | 9.7 | FIXEDPT_BITS 16 | 3490 | 31 |
The table shows that both libraries took up more ROM and showed themselves worse than the compiled code from GCC when using float.
It is also clear that a slight refinement for the Q9.7 format and reducing the variable to 16bit resulted in an acceleration of 4 ms. and freeing ROM at ~ 50 bytes.
The expected effect was a decrease in accuracy and an increase in the number of errors:

which in this case is uncritical.
Allocating resources
Work on Tuesday and Thursday just an hour.
In most cases, all calculations are performed every frame, which is not always justified, since the frame may not have enough time to calculate something and will have to be tricky with alternating, counting frames or skipping them. Therefore, I went further - completely abandoned the personnel binding.
Having broken everything into small tasks, be it: collision counting, sound processing, buttons and graphics output, it’s enough to perform them at a certain interval, and the inertia of the eye and the ability to update only part of the screen will do its job.
We never manage all of this, but the state machine I created a couple of years ago, or, to put it simply, the tinySM task manager, not displacing the task manager.
I will repeat the reasons for using it instead of any of the RTOS:
- lower ROM requirements (~ 250 bytes core);
- lower requirements for RAM (~ 9 bytes per task);
- simple and clear working principle;
- determinism of behavior;
- spends less CPU time;
- leaves access to the gland;
- platform independent;
- written in C and easy to wrap in C ++;
needed my own bike.
As I have already described once, tasks for it are organized into an array of pointers to structures, where the pointer to the function and its call interval are stored. This grouping simplifies the description of the game in separate stages, which also allows you to reduce the number of branches and dynamically switch a set of tasks.
For example, during the start-up screen 7 tasks are performed, and during the game there are already 20 of them (all tasks are described in the gameTasks.c file).
First you need to define some macros for convenience:
#define T(a) a##Task #define TASK_N(a) const taskParams_t T(a) #define TASK(a,b) TASK_N(a) PROGMEM = {.pFunc=a, .timeOut=b} #define TASK_P(a) (taskParams_t*)&T(a) #define TASK_ARR_N(a) const tasksArr_t a##TasksArr[] #define TASK_ARR(a) TASK_ARR_N(a) PROGMEM #define TASK_END NULL The declaration of the task is actually the creation of the structure, the initialization of its fields and the placement in the ROM:
TASK(updateBtnStates, 25); Each such structure occupies 4 bytes of ROM (two per pointer and two per interval).
A nice bonus of macros is that it will not work to create more than one unique structure for each function.
Having declared the necessary tasks, we add them to the array and also put them in the ROM:
TASK_ARR( game ) = { TASK_P(updateBtnStates), TASK_P(playMusic), TASK_P(drawStars), TASK_P(moveShip), TASK_P(drawShip), TASK_P(checkFireButton), TASK_P(pauseMenu), TASK_P(drawPlayerWeapon), TASK_P(checkShipHealth), TASK_P(drawSomeGUI), TASK_P(checkInVaders), TASK_P(drawInVaders), TASK_P(moveInVaders), TASK_P(checkInVadersRespawn), TASK_P(checkInVadersRay), TASK_P(checkInVadersCollision), TASK_P(dropWeaponGift), TASK_END }; When setting the USE_DYNAMIC_MEM flag to 0 for static memory, the main thing is to remember to initialize the pointers to the task repository in RAM and set the maximum number to be executed:
... tasksContainer_t tasksContainer; taskFunc_t tasksArr[MAX_GAME_TASKS]; ... initTasksArr(&tasksContainer, &tasksArr[0], MAX_GAME_TASKS); … Setting tasks to perform:
... addTasksArray_P(gameTasksArr); … Protection against storage overflow is controlled by the USE_MEM_PANIC flag, if you are sure of the number of tasks, you can disable it to save ROM.
It remains only to start the handler:
... runTasks(); ... Inside is an infinite loop that contains the main logic. Falling into it, the stack is also restored thanks to "__attribute__ ((noreturn))".
In the loop, the elements of the array are alternately searched for the need to call the task after the interval expires.
The intervals are calculated on the basis of timer0 as a system one with a 1ms quantum ...
Despite the successful distribution of tasks over time, sometimes they were superimposed (jitter), which caused short-term fades of everything and everyone in the game.
Definitely it needed to be addressed, but how? About how everything was profiled the next time, but for now try to find easter eggs in the source code.
the end
This is how using many tricks (and many more that I have not described) and it turned out to fit everything into 24kb ROM and 1500 bytes of RAM. If you have questions, I will be glad to answer them.
For those who did not find or did not look for Easter eggs:
dig to the side:
Nothing remarkable, right?
void invadersMagicRespawn(void) { for(auto &alien : aliens) { if(!alien.alive) { alien.respawnTime = 1; } } } Nothing remarkable, right?
Raaaaazvnata macro invadersMagicRespawn:
«(void)» , «action()» 10 , «disablePause();». «Matrix Falling code» . 130 ROM.
void action() { tftSetTextSize(1); for(;;) { tftSetCP437(RN & 1); tftSetTextColorBG((((RN % 192 + 64) & 0xFC) << 3), COLOR_BLACK); tftDrawCharInt(((RN % 26) * 6), ((RN & 15) * 8), (RN % 255)); tftPrintAt_P(32, 58, (const char *)creditP0); } } a(void) { for(auto &alien : aliens) { if(!alien.alive) { alien.respawnTime = 1; } } } «(void)» , «action()» 10 , «disablePause();». «Matrix Falling code» . 130 ROM.
To build and run, just put the folder (or make a link) “esploraAPI” in “/ arduino / libraries /”.
References:
PS See and hear how it all looks can be a little later when I make an acceptable video.
Source: https://habr.com/ru/post/425407/
All Articles